
BLSTTDT-N00 - Blender OSTER - Free user manual and instructions
Find the device manual for free BLSTTDT-N00 OSTER in PDF.


| Product Type | Blender |
| Brand | Oster |
| Model | BLSTTDT-N00 |
| Jar Capacity | 2 L (8 cups) |
| Jar Material | BPA-free Tritan™ (break-resistant, odor-free) or Boroclass® glass |
| Blade Type | 6-point stainless steel, reversible |
| Motor Power | Approx. 700W |
| Control Panel | Digital with power, food mode, texture, manual speed (3 levels), pulse, start/pause buttons |
| ActiveSense™ Technology | Automatically senses ingredients and adjusts speed, direction, and time |
| Food Modes | 5 presets: Smoothie, Salsa, Frozen Drink, Milkshake, Juice |
| Texture Control | Thin/Thick for beverages; Chunky/Smooth for foods |
| Add Liquid Alert | Automatic stop and notification when more liquid needed |
| Accessories Included (select models) | Blend-N-Go® cup (600ml BPA-free Tritan), food processor attachment (S-blade, slicing/shredding disk, bowl, lid, food pusher) |
| Dishwasher Safe Parts | Jar, lid, filler cap, blade assembly, sealing ring, cup and lid, food processor bowl, cover, pusher, S-blade, disks |
| Safety Features | Blade guard, auto shut-off (after idle minutes), cover interlock on food processor, hot liquid warning |
| Voltage | 120V (standard US household outlet) |
| Maximum Pulse Time | 4 minutes continuous |
Frequently Asked Questions - BLSTTDT-N00 OSTER
User questions about BLSTTDT-N00 OSTER
0 question about this device. Answer the ones you know or ask your own.
Ask a new question about this device
Download the instructions for your Blender in PDF format for free! Find your manual BLSTTDT-N00 - OSTER and take your electronic device back in hand. On this page are published all the documents necessary for the use of your device. BLSTTDT-N00 by OSTER.
USER MANUAL BLSTTDT-N00 OSTER
natural_image
Illustration of two Oster blender machines side by side, showing front and back views with control panel and buttons (no text or symbols on the devices themselves)MODELOS MODELS
BLSTTDT-N00, BLSTTDG-NBG, BLSTTDG-RBG, BLSTTDT-NBG, BLSTTDT-RBG, BLSTTDT-NBGF
READ ALL INSTRUCTIONS BEFORE USING THIS APPLIANCE
MANUAL DE INSTRUÇÕES
LIQUIDIFICADOR XPERT SERIES™ COM TECNOLOGIA ACTIVESENSE™
LEIA TODAS AS INSTRUÇÕES ANTES DE USAR ESTE APARELHO
PRECAUCIONES IMPORTANTES
PANEL DE CONTROL
CÓMO ENSAMBLAR LA CUCHILLA Y EL VASO
ESPAÑOL-II
ENSAMBLANDO Y UTILIZANDO SU ACCESORIO PROCESADOR DE ALIMENTOS (CON MODELOS SELECTOS)
flowchart
graph TD
    A["Raw Material"] --> B["Addener"]
    B --> C["Adder with Paper"]
    C --> D["Adder with Cover"]
    D --> E["Adder with Stover"]
    E --> F["Adder with Round Top"]
    F --> G["Adder with Cover"]
flowchart
graph TD
    A["Raw Material"] --> B["Addener"]
    B --> C["Close-up of Plate with Cover"]
    C --> D["Adder into Dish with Cover"]
    D --> E["Ordering to Cover"]
    E --> F["Final Product"]
ESPAÑOL-13
CÓMO DESARMAR LA UNIDAD
natural_image
Illustration of a blender being placed on top of a stand (no text or symbols)
natural_image
Line drawing of hands using a spatula to handle a bowl (no text or symbols)natural_image
Line drawing of a hand holding a cylindrical component above a square base (no text or symbols)Cantidades de Ingredientes
When using electrical appliances, basic safety precautions should always be followed, including the following:
- READ AND KEEP ALL INSTRUCTIONS.
- Close supervision is necessary when any appliance is used by or near children, or incapacitated persons.
- Unplug from outlet when not in use, before putting on or taking off parts, and before cleaning.
- Avoid contact with moving parts.
- DO NOT operate any appliance with a damaged cord or plug or after the appliance malfunctions, or is dropped or damaged in any manner. Take the appliance to the nearest Authorized Oster® Appliance Service Center for examination, repair or electrical or mechanical adjustment.
- The use of attachments, including canning and/or ordinary jars and processing assembly parts not recommended by the manufacturer, may cause a risk of injury to persons.
- Keep hands and utensils out of jar while blending to prevent the possibility of severe injury to persons and/or damage to the blender. If scraping, folding, etc., is necessary, turn off and unplug the blender, and only use a rubber spatula.
- Blades are sharp. Handle carefully.
- To reduce risk of injury to persons, never place cutting blades on base without blender jar properly attached.
- Screw on jar bottom firmly. Injury can result if moving blades become exposed.
• Always operate blender with cover in place.
- Make sure that the voltage in your outlet is the same as the voltage indicated on the appliance.
- If the jar should turn when the motor is switched on, switch off immediately and tighten blender jar in threaded cup bottom. DO NOT leave blender unattended while it is operating.
- Be careful if hot liquid is poured into blender as it can be ejected out of the appliance due to a sudden steaming. When blending hot liquids, remove the filler cap from the lid. DO NOT fill blender jar beyond the 4-cup level. Always begin processing at the lowest speed setting. Keep hands and other exposed skin away from the cover opening to prevent possible burns.
- To protect against risk of electrical shock, do not put blender base in water or other liquid. DO NOT let the cord hang over edge of table or countertop. DO NOT let cord rest against hot surfaces.
- This appliance is not intended for use by persons (including children) with reduced physical, sensory or mental capabilities, or lack of experience and knowledge, unless they have been given supervision or instruction concerning use of the appliance by a person responsible for their safety. Children should be supervised to ensure that they DO NOT play with the appliance.
ENGLISH-1
- This appliance is intended to be used in household and similar applications such as: staff kitchen areas in shops, offices and other working environments; farm houses by clients in hotels, motels and other residential type environments; bed and breakfast type environments.
- This appliance is not intended to be operated by means of an external timer or separate remote-control system. DO NOT use outdoors.
- The maximum continuous operating time for the pulse function is 4 minutes.
FOR MODELS WITH BLEND-N-GO ACCESSORY ONLY
CAUTION!
• Do not process ingredients for more than 1 min in the Blend-N-Go cup.
Excessive blending may cause heat and pressure to build up in an enclosed vessel. If the cup is warm, allow the cup and contents to cool before opening.
- Do not put hot foods or liquids into the Blend-N-Go cup. Hot ingredients will result in pressure buildup in the cup which could cause hot ingredients to spurt out when removing the cup bottom, resulting in burns. Only process ingredients that are room temperature or cooler in the Blend-N-Go cup.
- Do not blend carbonated beverages as this could result in critical pressure buildup in the cup.
- Do not fill beyond the MAX fill line.
FOR MODELS WITH FOOD PROCESSOR OR FOOD CHOPPER ATTACHMENTS:
- Keep hands and utensils away from moving blades or discs while processing or chopping food to reduce the risk of severe injury to persons or damage to the food processor or chopper. A scraper may be used but must be used only when the food processor or chopper is not running.
- To reduce the risk of injury, never place cutting blade or discs on base without first putting container properly in place.
- Be certain cover is securely locked in place before operating appliance.
• For food processors: Never feed food by hand. Always use food pusher. - Do not attempt to defeat the cover interlock mechanism
THIS UNIT IS FOR HOUSEHOLD USE ONLY.
The maximum rating as marked on the unit is based on the attachment that draws the greatest load. Other recommended attachments may draw significantly less power.
SAVE THESE INSTRUCTIONS
ENGLISH-2
POWER CORD SPECIAL INSTRUCTIONS
- Try to position the blender near the power source to reduce the hazards associated with power cords (such as becoming entangled or tripping over a long power cord).
- Do not pull, twist or otherwise abuse the power cord.
- Do not wrap the power cord around the main body of the blender during or after use.
- Do not use an extension cord with this product.

This symbol is used in certain parts of this manual and is intended to help you easily identify those instructions that require special attention.
DESCRIPTION OF THE APPLIANCE
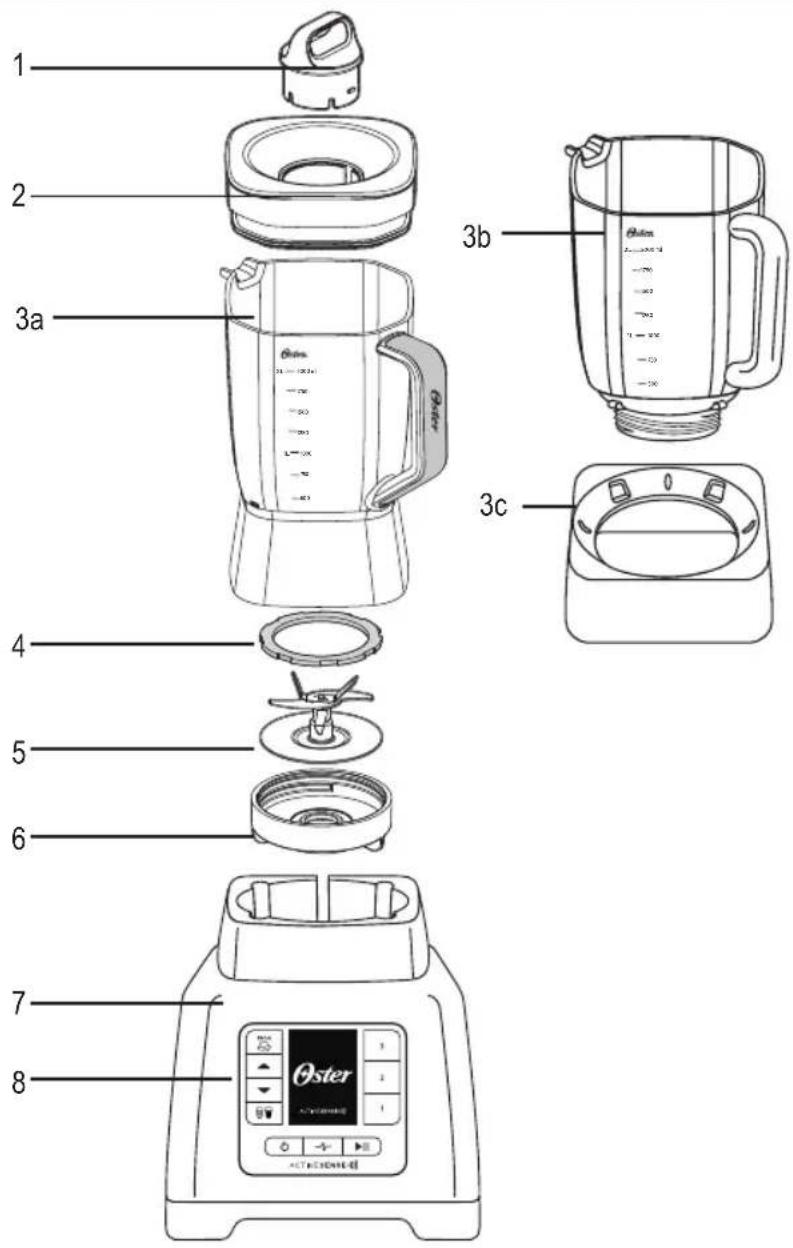
- FillerCap
- Jar lid
3a. 2 L (8-Cup) BPA-free, resistant, odor-free and non-toxic Tritan™ jar (models with Tritan™ jar)
3b. 2 L (8-Cup) heat resistant, Boroclass® glass jar (models with Boroclass® glass jar)
3c. Glass Jar Collar (models with Boroclass® glass jar)
4. Locking Sealing Ring
5.6-PointBlade
6. Threaded Cup Bottom
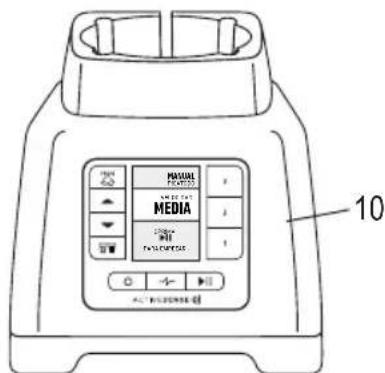
7. Motor Base
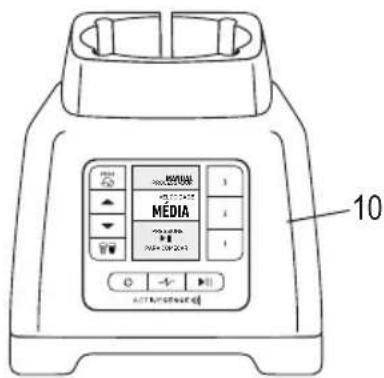
8. Control Panel
ENGLISH-4
CONTROL PANEL
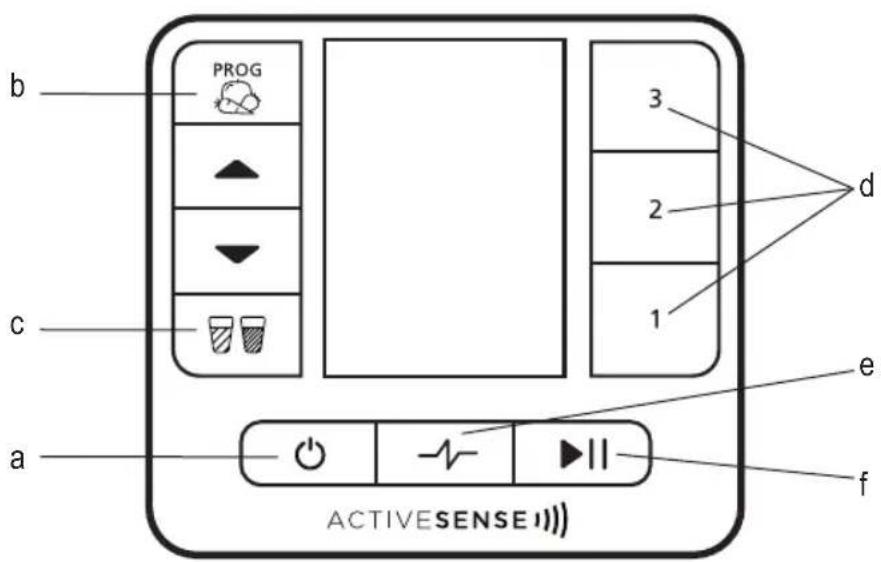
CONTROL PANEL
a. Power Button ( )
b. Food Mode ( ) selection:
Smoothie ( Ⓤ )
Salsa (
Frozen Drink ( )
Milkshake ( )
Juice ( )
c. Texture Control ( 📋) For Beverages: Thick or Thin For Foods: Chunky or Smooth
d. Manual Controls 3 - High Speed 2 - Medium Speed 1 - Low Speed
e. Pulse Button ( )
f. Start/Pause Button ( )
USING YOUR BLENDER
Your product includes the following technology and features:
ActiveSense ^™ Technology – Actively senses ingredients and adjusts blade speed, direction and blend timing for perfectly blended results.

TECHNOLOGY
Takes the guesswork out of blending! It allows your blender to sense what is in its jar and adjust the blending process to make the meal you want with the consistency you want.
- Texture Control – Select the desired thickness.
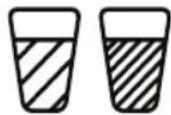
From Thin to Thick or Smooth to Chunky, choose your desired texture for your recipes!
- Add Liquid Alert – Notifies when more liquid is needed for the blending cycle.
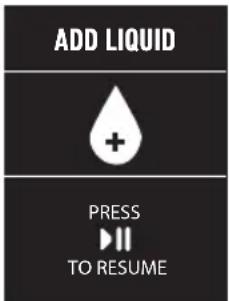
With the ability to know when there is not enough liquid in the jar to properly blend, ActiveSense™ technology will stop the blending process and notify you to add more liquid when this happens.
- 5 Food Mode Settings – Food mode settings ensure precise speed and operating time to deliver perfect results.
Smoothie ( )
Salsa ( )
Frozen Drink
Milkshake
Juice (7)

- Blade – 3-in-1 multi-blade system precisely pulverizes, chops and mixes evenly.
- Exclusive Reversible Technology – The exclusive reversible technology turns blades back-and-forth to completely process all ingredients.
- Manual Controls – Give you the flexibility to operate the blender to customize your recipes.
- Filler Cap – Lets you add ingredients without removing the jar lid.
- Models with 2-liter Boroclass® Glass Jar – Thermal shock-resistant glass jar was created to withstand extreme temperature changes up to 90^ .
- Models with 2-liter Tritan™ Jar – The Tritan™ technology delivers all the benefits of a glass jar in a break-resistant, non-toxic and odor-free material.
Before you use product for first time, separate filler cap, 2 L jar, jar lid, blade, sealing ring and threaded cup bottom. Wash in warm, soapy water, or top rack in the dishwasher. Rinse and dry well.
ENGLISH-6
NOTE: The control panel language settings can be set to either English, Spanish or Portuguese. To select a language, press the power button ( 🔊 ) to turn the unit on. Hold the texture button ( ☑ ) for five (5) seconds. Select the desired language with the up or down arrow keys and then press the start/pause button ( ▶ ) to save your selection.
NOTE: To select a language, the blender should be on the main screen.
ASSEMBLING THE 2 L JAR USING THE OSTER® BLENDER WITH ACTIVESENSE™ TECHNOLOGY
Before you use the product for the first time, separate all parts and clean them. Refer to page 16 for cleaning instructions.

WARNING: Blade is sharp. Handle with care.
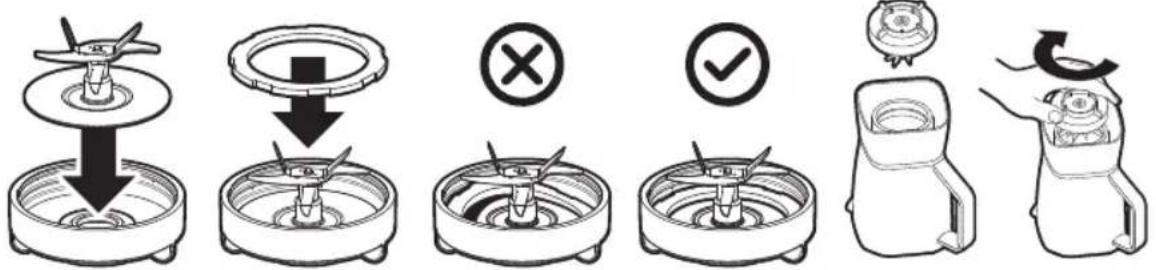
BLADE & JAR ASSEMBLY
-
Place the blade into the threaded cup bottom.
-
Place the sealing ring over the blade assembly. Carefully press and tuck the sealing ring into the last groove of the threaded cup bottom.
-
Ensure the sealing ring is fully and evenly tucked in place and holding the blade assembly to the threaded cup bottom.
-
Install the integrated blade assembly onto the jar. Turn clockwise to tighten. Be sure the integrated blade assembly is tightened to the jar before use.
-
Choose a recipe from the recipe book provided.
-
Put the ingredients into the jar.
-
Secure the lid and filler cap.
-
Place the jar onto the motor base.
-
Plug the power cord into a standard household outlet of the same voltage as the one indicated in the rating plate of your blender. You are now ready to start.
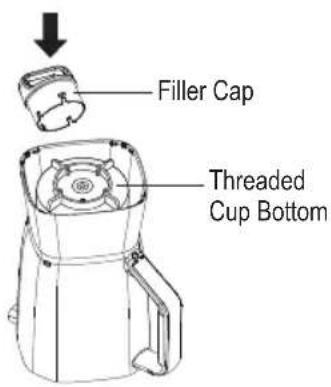
Note: The filler cap can be used as a tool to tighten or remove the threaded cup bottom.
FOOD MODE
- Press the power button ( ⏻ ) to turn the product on. The start/pause button ( ▶II ) will blink, indicating the product is active and ready to use. The light will stay on when the motor is running.
ENGLISH-7
- Press the food mode button (PBOO) and select the desired automatic program using the up or down arrow keys (5 food modes):
- Smoothie ( Ⓤ )
- Salsa ( )
- Frozen Drink ( )
- Milkshake ( )
- Juice ( )

- (Optional) Press the texture button ( ☑ to select a thickness option for the meal:
For Beverages: Thick or Thin
For Foods: Chunky or Smooth
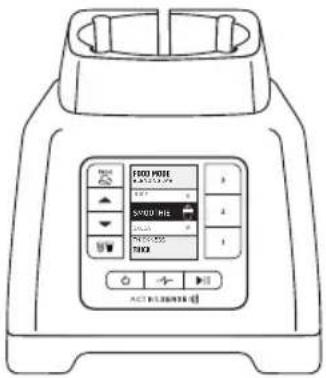
- When ready to begin, press the start/pause button (▶)The blender will notify about the progress of the blending process and will stop automatically when blending is complete. Press the start/pause button (▶)to cancel the program at any time.
- Press the power button ( ) to turn the blender off. This appliance is pre-programmed to turn off automatically if not used for a period of several minutes. All lights will turn off when the unit automatically powers down.
ADD LIQUID FUNCTION
The Oster® ActiveSense™ blender has the ability to sense when there is not enough liquid in the jar, causing the contents to not be properly blended. If the blender senses that more liquid needs to be added to the jar, it will automatically stop the blending process and notify "Add Liquid". After adding liquid to the jar, press the start/pause button (▶)to resume blending.
MANUAL CONTROLS
Manual Controls include:
3 - High Speed
2 - Medium Speed
1 - Low Speed
Pulse
▶↓Start/Pause
Use these controls for personal recipes or to continue blending after a food mode setting is finished.
- Press the power button ( ☐to turn the product on. The start/pause button ( ) ▶II will blink, meaning the product is active and ready to use. The light will stay on when the motor is running.
- Put the ingredients into the jar.
- Secure the lid and the filler cap.
Using the High Speed
- Press the "3" button to run the product at a high speed.
- Press the start/pause button (▶) to cancel the operation at any time.
- Press the power button ( ) to turn the product off.
Using the Medium Speed
- Press the "2" button to run the product at a medium speed.
- Press the start/pause button (▶to cancel the program at any time.
- Press the power button ( ) to turn the product off.
Using the Low Speed
- Press the "1" button to run the product at a low speed.
- Press the start/pause button (▶to cancel the program at any time.
- Press the power button ( ) to turn the product off.
Using the Pulse
- Verify that the blue light is blinking. This indicates that the blender is turned on.
- Press the pulse button ( ).
- Release the pulse button ( ) to stop.
- Press the power button ( ) to turn the product off.
- Use pulse button ( ) to crush ice or chop food.
| MANUALBLENDING JAR |
| SPEEDHIGH |
| PRESS▶IITO START |
| MANUALBLENDING JAR |
| SPEEDMEDIUM |
| PRESS▶IITO START |
| MANUALBLENDING JAR |
| SPEEDLOW |
| PRESS▶IITO START |


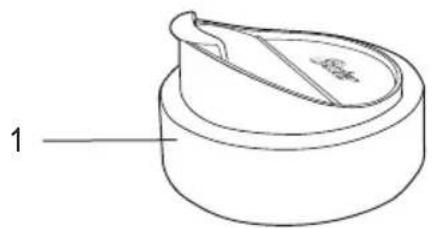
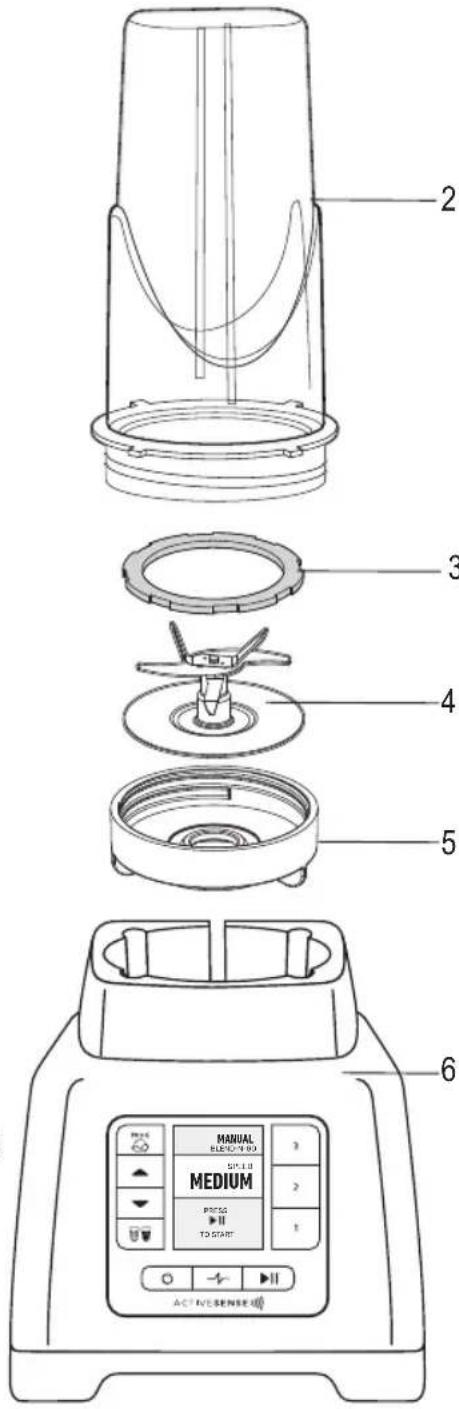
BLEND-N-GO® CUP ACCESSORY (WITH SELECT MODELS)
- Cup Lid
- Break Resistant, BPA-Free Tritan™ Plastic Cup
- Locking Sealing Ring
- 6-Point Blade
WARNING: The blade is very sharp, handle carefully.
-
Threaded Cup Bottom
-
Motor Base
natural_image
Line drawing of a cylindrical container with a lid and a side clip, labeled with number 1 (no text or symbols on the diagram itself)USING YOUR BLEND-N-GO® CUP ACCESSORY WITH YOUR BLENDER WITH ACTIVESENSE™ TECHNOLOGY
Before you use the product for the first time, separate all parts and clean them. Refer to Page 16 for cleaning instructions - the cup, lid and blade assembly are all top rack dishwasher safe.
⚠️ Never blend hot liquids in the Blend-N-Go® cup accessory.
- Place the blade in the threaded cup bottom.
- Place the sealing ring over the blade assembly. Carefully press and tuck the sealing ring into the last groove of the threaded cup bottom. Refer to page 7 for detailed instructions on blade assembly.
-
Place all ingredients into the cup, then screw the integrated blade assembly clockwise onto the cup. Be sure the integrated blade assembly is tightened to the cup before using.
-
To put the cup assembly on the motor base, push down and turn counter-clockwise. The cup assembly should be fully seated into the 4 grooves of the motor base.
-
Refer to page 7-8 on how to use the food mode settings and manual controls. Press the start/pause button (▶) to begin blending.
NOTE: The food mode "Salsa" (☐) is not available with the Blend-N-Go ^® cup accessory.
- Press the start/pause button (▶to stop blending and the power button (◀to turn the blender off. Remove the cup assembly from the motor base by pushing down and turning clockwise. This appliance is pre-programmed to turn off
ENGLISH-10
automatically if not used for a period of several minutes. All lights will turn off when the unit automatically powers down.
To store, screw the blade assembly onto the cup to avoid leaving the blade exposed. Keep in a dry place.
FOOD PROCESSOR ACCESSORY (WITH SELECT MODELS)
- Food Pusher
- Cover
- Slicing/Shredding Disk
WARNING: The blade is very sharp, handle carefully. - Blade Shaft
- Plastic Center Hub
- S Blade
WARNING: The blade is very sharp, handle carefully. - Processor Bowl
- Flexible Seal
- Adaptor
- Motor Base
Before you use the product for the first time, separate all parts and clean them. Refer to page 13 for cleaning instructions.
CAUTION: DO NOT IMMERSE ADAPTOR IN ANY LIQUID.
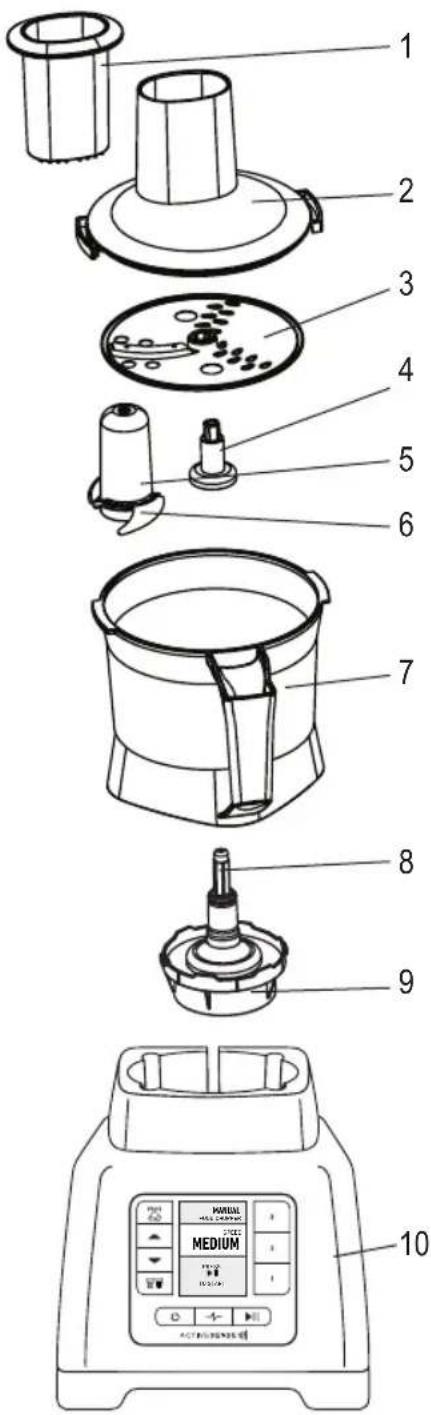
ASSEMBLING AND USING YOUR FOOD PROCESSOR ACCESSORY (WITH SELECT MODELS)
- Place the adaptor in the processor bowl and turn counterclockwise to lock.
- Place the processor bowl with the adaptor onto the the motor base.
TO CHOP OR MINCE
- Hold the S blade by the plastic center hub and place it over the post of the processor bowl. Rotate the S blade to make certain is it seated on the post as far as it will go.
ENGLISH-II
Always place the S blade in the processor bowl before adding ingredients.
WARNING: The blade is very sharp, handle carefully.
- Place food in the processor bowl. Food to be processed should always be cut into 1-inch (2.5 cm) pieces.
-
Using alignment marks on the lid, place the cover on the processor bowl and press down firmly while turning counterclockwise to lock. DO NOT OPERATE UNIT UNLESS COMPLETELY ASSEMBLED
-
Press the power button ( ) to turn the blender on. The start/pause button ( ▶) will blink, indicating the product is active and ready to use. The light will stay on when the motor is running.
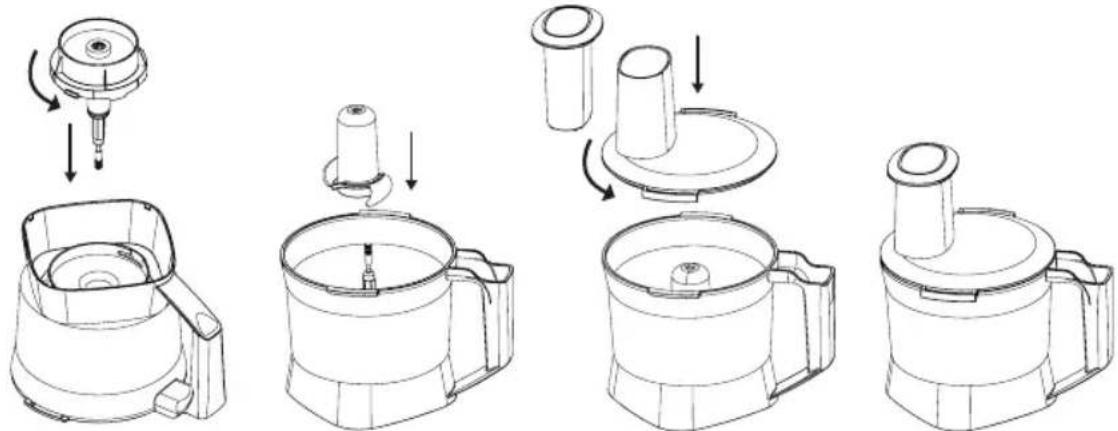
- The only food mode available when the food processor accessory is on the motor base is chop. To select chop, press the food mode button. If opting to use a manual control instead, low speed is recommended. ALWAYS HOLD THE FOOD PROCESSOR FIRMLY WITH ONE HAND WHEN STARTING THE UNIT AND WHEN PROCESSING.
Food can also be chopped or minced by using the technique of fast pulsing. Press and release the pulse button (→very quickly to control the size of the food being processed in the food processor accessory. Refer to the processing chart on page 15 for proper techniques, quantities and end results.
-
Press the start/pause button (▶to begin chopping/mincing and press the start/pause button (▶) to stop when finished. If using chop, the blender will notify about the progress of the blending process and will stop automatically when blending is complete. Press the power button (◀) to cancel the program at any time.
-
Press the power button ( ) to turn the blender off. This appliance is pre-programmed to turn off automatically if not used for a period of several minutes. All lights will turn off when the unit automatically powers down.
TO SLICE OR SHRED
- Place the blade shaft over the post in the processor bowl. Place the slicing/shredding disk over the blade shaft with the blade of your choice facing up.
WARNING: The blade is very sharp, handle carefully.
-
Using alignment marks on the lid, place the cover on the processor bowl and press down firmly while turning counterclockwise to lock.
-
Load the feed tube of the cover with ingredients and rest the food pusher in the feed tube.
ENGLISH-12
- Press the power button ( Ⓤ) to turn the blender on. The start/pause button ( ▶) will blink, indicating the product is active and ready to use. The light will stay on when the motor is running.
- Press a manual control button - medium or high is recommended for slicing/shredding.
- When ready to begin, press the start/pause button (▶)! While holding the food pusher with one hand and the feed tube with the other, push gently down on the food pusher while the manual control is running. Always use the food pusher to yield more evenly sliced or shredded foods. NEVER USE YOUR FINGERS.
- Press the start/pause button (▶) to stop slicing/shredding and press the power button (○) to turn the blender off. This appliance is pre-programmed to turn off automatically if not used for a period of several minutes. All lights will turn off when the unit automatically powers down.
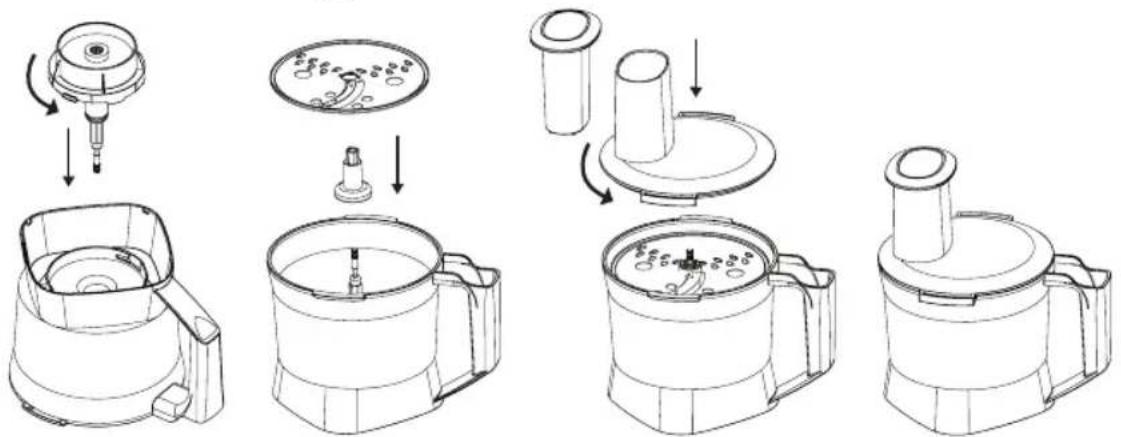
flowchart
graph TD
    A["Feeding Device"] --> B["Add Feed into Dish"]
    B --> C["Add Cover with Paper"]
    C --> D["Add Cover with Cover"]
    D --> E["Add Cover with Cover"]
    E --> F["Final Packaging with Cover"]
HOW TO DISASSEMBLE
- Turn the blender off and unplug the appliance from the outlet.
- After the S blade or slicing/shredding disk has stopped spinning, remove the food processor accessory from the motor base.
- Turn the cover clockwise to remove it from the processor bowl and remove the S blade or slicing/shredding disk carefully. Be careful not to let the S blade or slicing/shredding disk fall out of the container. Scrape any remaining food from the blade and processor bowl.
WARNING: The blade is very sharp, handle carefully.
- Unlock the processor bowl from the adaptor by turning the processor bowl clockwise.
CLEANING
All parts of the food processor accessory are top rack dish-washer safe except for the adaptor. Make sure to remove the adaptor from the processor bowl before cleaning.
All parts (except for the adaptor) can also be hand washed with warm, soapy water. Rinse well and dry. It is recommended to hand wash the S blade and slicing/shredding disk for longer usage.
⚠ WARNING: The blade is very sharp, handle carefully.
Remove stains caused by processing large amounts of carrots or similar vegetables with baking soda. Rinse stained parts in water and sprinkle with baking soda. Rub with a soft, damp cloth. Rinse well and dry. Do not use abrasive cleaners on any parts.
Check the parts as you put them back together.

WARNING: Do Not Immerse Adaptor in Water. Always remove adaptor from processor bowl before cleaning.
STORING
Keep the S blade and slicing/shredding disk out of the reach of children. Store the S blade and slicing/shredding disk in the processor bowl or in a convenient, safe location when not in use. The S blade and slicing/shredding disk should be treated with the same caution as a sharp knife.

WARNING: The blade is very sharp, handle carefully.
PROCESSING TIPS
- Cut all fruits and vegetables, cooked meats, fish, seafoods and cheeses into pieces 1 in. (2.5 cm) or smaller.
- Do not exceed the quantities indicated in the food processing chart.
- Always hold hand firmly on the cover when starting and running blender.
- Do not process hot liquids or frozen foods.
- Do not process whole spices (except peppercorns) such as nutmeg or cinnamon. They may cause damage to the surface of the processor bowl.
- Process the hardest foods first, using only a few fast pulses to begin chopping. Add more delicate foods and continue to process using the fast pulse technique. The harder foods will continue to be chopped along with the softer foods.
- Processing of parmesan cheese, dried dates or other extremely hard foods is not recommended. If a knife cannot easily pierce the food, it should NOT be processed in the food processor accessory.
- The food processor accessory is not designed to whip cream, whip egg whites or process dough. Use a standard mixer for those tasks.
- If liquid leaks from the cover, there is too much liquid in the recipe. Adjust the liquid level to prevent leakage.
- The temperature of cheese will affect how it processes. Cheese for spreads should be at room temperature for a smooth, creamy texture. "Grated" cheese should be refrigerator cold.
- Large, harder pieces of food can be processed with several fast pulses to coarsely chop. Then process continuously for a fine texture.
TO CONVERT A RECIPE
- Total the amount of dry and liquid ingredients. If the total exceeds 5 cups (40 oz), decide if the recipe can be made easily in batches. Do not attempt to process large recipes.
ENGLISH-14
- If total is under 1 cup (250 ml), process dry ingredients or the most finely chopped foods first.
- Then add remaining ingredients and combine with several fast pulses to mix together.
FOOD PROCESSING CHART
| Food Cutting Blade Processing Method | ||
| Vegetables (chopped) - Celery, Potatoes, Onions, Carrots, Cucumbers, Zucchini, Squash, etc. | S-Blade Pulse to desired size | |
| Fruits (chopped) - Apples, Mangos, Pineapple, Papayas, Tomatoes, Chiles, Cranberries, Olives (pitted) etc. | S-Blade Pulse to desired size | |
| Peppers (chopped) - green, red or orange, jalepenos | S-Blade Pulse to desired size | |
| Roots (chopped) - Garlic, Ginger Root, Turnips, etc. | S-Blade Pulse to desired size | |
| Nuts (chopped) - Almonds, Peanuts, Pecans, Walnuts, etc. | S-Blade Pulse to desired size | |
| Herbs, stems removed (chopped) - Parsley, Cilantro, Basil, Oregano, Rosemary, Marjoram, etc. | S-Blade Pulse to desired size | |
| Vegetables (sliced) - Celery, Potatoes, Carrots, Cucumbers, Zucchini, Squash, etc. | Slicing Disk Medium Speed | |
| Vegetables (shredded) - Carrots, Potatoes, Zucchini, Squash, etc. | Shredding Disk Medium Speed | |
| Cheese (chopped) - Mozzarella, Cheddar, Swiss, etc. | S-Blade Pulse to desired size | |
| Cheese (shredded) - Mozzarella, Cheddar, Swiss, etc. | Shredding Disk Medium Speed | |
| Crumbs - Cracker, Graham Cracker, Bread (dried) | S-Blade Medium Speed | |
| Eggs, hard-boiled (chopped) S-Blade | Medium Speed | |
| Meats, raw or cooked (chopped) S-Blade | Medium Speed | |
CARE AND MAINTENANCE
After Use:
- Lift the jar straight up from the base, remove the lid and empty the jar.
- If necessary, use a rubber spatula to scrape foods away from the sides of the jar.
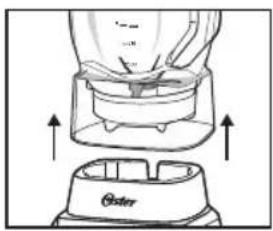
natural_image
Illustration of a blender being placed on top of a stand (no text or symbols)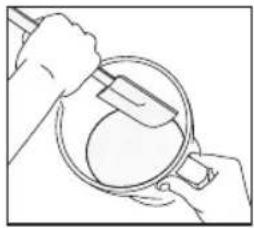
natural_image
Line drawing of hands using a spatula to examine a pan (no text or symbols)Cleaning the 2 L jar and its accessories

WARNING: Blade is sharp. Handle with care.
Release the multi-functional blade from the bottom of the jar by turning the threaded cup bottom counterclockwise.
The filler cap, 2 L jar, jar lid, blade, sealing ring and threaded cup bottom are dishwasher safe. Use the top rack of the dishwasher to wash these parts.
You can also wash the parts in warm, soapy water. Rinse well and dry. Check the parts as you put them back together.
Cleaning the Blend-N-Go cup (models with Blend-N-Go accessory only)
Wash all components except blender base with soapy water with a soft sponge and a bottlebrush. Do not use abrasive cleansers or sponges for cleaning. Rinse well and dry. Parts are also dishwasher safe.
Cleaning the blender
Wipe the base with a soft, damp cloth to clean. Never submerge the base in a liquid.
STORING
Reassemble the blender for storage. Place lid on jar leaving a gap so no odors are retained.

WARNING: Never put the jar, or any other parts, in a microwave oven. Never store foods or drinks in the jar.
ENGLISH-16
BLENDING TIPS
Liquids
Put liquids into the jar first, unless the recipe says otherwise.
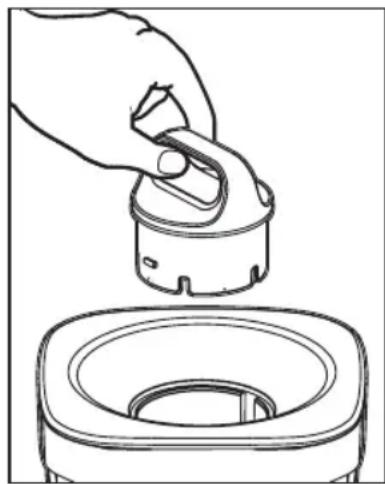
Using the jar lid filler cap
Do not remove the lid while in use. Food may splatter if you do. Instead, open the jar lid filler cap to add smaller ingredients.
Working with Hot Foods or Liquids

WARNING: When you work with HOT FOODS, remove the jar lid filler cap to vent steam. Tilt the lid away from you partially covering the ring. Keep hands and other exposed skin away the lid opening to prevent possible burns.
When you work with HOT LIQUIDS, remove the jar lid filler cap and start at a low speed, and then gradually increase to a faster speed. Do not add liquid over the 4-cup level. Always keep hands away from steam.
natural_image
Line drawing of a hand holding a cylindrical component above a circular base (no text or symbols)Ingredients Quantities
Use only the amount of food suggested in the recipes. If you want greater amounts, prepare in batches. Using larger amounts may overload and strain the motor. You might also get different results from those described.
Multi-Blend Error
Repeated use of the blender in a short amount of time may result in a Multi-Blend error. Open the jar and check the contents. Wait 30 seconds or unplug then plug in the unit, then blend.
FREQUENTLY ASKED QUESTIONS
Why doesn't the blender turn on?
- Make sure the base is plugged in an active power receptacle.
- Verify blinking blue light is active after pushing power ( ⏻ button.
How can I prevent liquids from leaking out?
Check to see that the sealing ring is correctly assembled in between the jar blade and the 2 L jar.
ENGLISH-17
PRECAUÇÕES IMPORTANTES
PAINEL DE CONTROLE
MONTAGEM DO JARRA E DA LÂMINA
- Molhos ( )
- Bebidas com Gelo ( )
- Milkshake ( )
- Sucos ( )


MONTANDO E USANDO SEU ACESSÓRIO PROCESSADOR DE ALIMENTOS (INCLUIDO EM ALGUNS MODELOS)
natural_image
Illustration of a blender being placed on top of a stand (no text or symbols)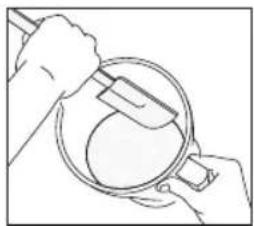
natural_image
Line drawing of hands using a spatula to handle a bowl (no text or symbols)natural_image
Line drawing of a hand holding a small mechanical component above a circular base (no text or symbols)Quantidades de ingredientes
© 2018 Sunbeam Products, Inc. All rights reserved. One year limited warranty – please see insert for details.
BLSTTDT Series_BLSTTDG Series_18SEPM1
GCDS-OST433289-JC
- PRECAUCIONES IMPORTANTES
- PANEL DE CONTROL
- CÓMO ENSAMBLAR LA CUCHILLA Y EL VASO
- ENSAMBLANDO Y UTILIZANDO SU ACCESORIO PROCESADOR DE ALIMENTOS (CON MODELOS SELECTOS)
- CÓMO DESARMAR LA UNIDAD
- Cantidades de Ingredientes
- FOR MODELS WITH BLEND-N-GO ACCESSORY ONLY
- CAUTION!
- FOR MODELS WITH FOOD PROCESSOR OR FOOD CHOPPER ATTACHMENTS:
- THIS UNIT IS FOR HOUSEHOLD USE ONLY.
- SAVE THESE INSTRUCTIONS
- POWER CORD SPECIAL INSTRUCTIONS
- DESCRIPTION OF THE APPLIANCE
- CONTROL PANEL
- USING YOUR BLENDER
- Your product includes the following technology and features:
- ASSEMBLING THE 2 L JAR USING THE OSTER® BLENDER WITH ACTIVESENSE™ TECHNOLOGY
- BLADE & JAR ASSEMBLY
- FOOD MODE
- ADD LIQUID FUNCTION
- MANUAL CONTROLS
- Manual Controls include:
- Using the High Speed
- Using the Medium Speed
- Using the Low Speed
- Using the Pulse
- BLEND-N-GO® CUP ACCESSORY (WITH SELECT MODELS)
- USING YOUR BLEND-N-GO® CUP ACCESSORY WITH YOUR BLENDER WITH ACTIVESENSE™ TECHNOLOGY
- FOOD PROCESSOR ACCESSORY (WITH SELECT MODELS)
- ASSEMBLING AND USING YOUR FOOD PROCESSOR ACCESSORY (WITH SELECT MODELS)
- TO CHOP OR MINCE
- TO SLICE OR SHRED
- HOW TO DISASSEMBLE
- CLEANING
- STORING
- PROCESSING TIPS
- TO CONVERT A RECIPE
- CARE AND MAINTENANCE
- After Use:
- Cleaning the 2 L jar and its accessories
- Cleaning the Blend-N-Go cup (models with Blend-N-Go accessory only)
- Cleaning the blender
- BLENDING TIPS
- Liquids
- Using the jar lid filler cap
- Working with Hot Foods or Liquids
- Ingredients Quantities
- Multi-Blend Error
- FREQUENTLY ASKED QUESTIONS
- Why doesn't the blender turn on?
- How can I prevent liquids from leaking out?
- PRECAUÇÕES IMPORTANTES
- PAINEL DE CONTROLE
- MONTAGEM DO JARRA E DA LÂMINA
- MONTANDO E USANDO SEU ACESSÓRIO PROCESSADOR DE ALIMENTOS (INCLUIDO EM ALGUNS MODELOS)
- Quantidades de ingredientes
Brand : OSTER
Model : BLSTTDT-N00
Category : Blender