
PLUS 2-in-1 - Baby product Baby Trend - Free user manual and instructions
Find the device manual for free PLUS 2-in-1 Baby Trend in PDF.


| Brand | Baby Trend |
| Model | PLUS 2-in-1 |
| Product Type | Baby Walker with Deluxe Toys |
| Age Range | From approximately 6 months until child can walk unassisted |
| Weight Limit | 30 lbs (13.6 kg) |
| Height Limit | 32 inches (81.3 cm) |
| Height Adjustments | 3 levels (lowest, middle, highest) |
| Wheels | 2 front wheels, 2 rear wheels |
| Stoppers | 6 stoppers for stair safety (replaceable) |
| Seat Pad Cleaning | Hand wash only with mild soap and warm water; do not machine wash |
| Frame Cleaning | Lukewarm water and mild soap for metal and plastic parts |
| Assembly Required | Yes (adult assembly) |
| Included Accessories | Seat, tray, push handle, toy bar, 2 toy sockets with toys |
| Safety Warnings | Stair hazard; never leave child unattended; use only on flat surfaces |
| Warranty | 1 year against workmanship defects |
| Customer Service | 1-800-328-7363 (Mon-Fri 8:00 AM - 4:30 PM PST) |
| Manufacturer | Baby Trend, Inc., Fontana, CA, USA |
Frequently Asked Questions - PLUS 2-in-1 Baby Trend
User questions about PLUS 2-in-1 Baby Trend
0 question about this device. Answer the ones you know or ask your own.
Ask a new question about this device
Download the instructions for your Baby product in PDF format for free! Find your manual PLUS 2-in-1 - Baby Trend and take your electronic device back in hand. On this page are published all the documents necessary for the use of your device. PLUS 2-in-1 by Baby Trend.
USER MANUAL PLUS 2-in-1 Baby Trend
Baby Trend, Inc. 13048 Valley Blvd. Fontana CA 92335
1-800-328-7363 (8:00 a.m. \~ 4:30 p.m. PST) www.babytrend.com
WKOTX09E 2L 0823221
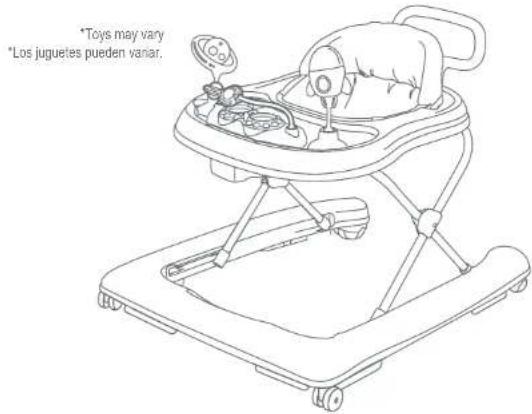
Trend PLUS 2-in-1 Walker with Deluxe Toys

WARRANTY
DO NOT RETURN YOUR PRODUCT TO THE STORE. PLEASE CONTACT BABY TREND® FOR REPLACEMENT PARTS, SERVICE AND REPAIR,
The Baby Trend® warranty covers workmanship defects within 1 year of purchase. Any product which has been subjected to misuse, abuse, abnormal use, excessive wear and tear, improper assembly, negligence, environmental exposure, alteration or accident, or has had its serial number altered or removed invalidates all claims against the manufacturer. Any damage to property during installation is the sole responsibility of the end user.
Customer Service Department can be contacted at 1 (800) 328-7363 Monday through Friday between 8:00 a.m. and 4:30 p.m. (PST). Return Authorizations are required prior to returning product(s) to Baby Trend®. Please visit http://babytrend.com/pages/limited-warranty for complete warranty details.
GARANTIA
NO DEVUELVA SU PRODUCTO A LA TIENDA. POR FAVOR CONTACTE A BABY TREND® PARA PIEZAS DE REPUESTO, SERVICIO Y REPARACION.
Baby Trend, Inc. 13048 Valley Blvd. Fontana CA 92335
1-800-328-7363 • (8:00am \~ 4:30pm PST)
www.babytrend.com
WARNING
WARNING
WARNING: Please read all instructions before assembly and use of the walker. Keep instructions for future use.
WARNING: Never leave child unattended. Always Keep child in view while in walker.
WARNING: Use only on flat surfaces free of objects that could cause the walker to tip over.
WARNING: To reduce chance of child slipping out of the seat, check that both feet of the child touch the floor. Never carry walker with the child in it, as the child may get hurt or slip out.
WARNING: To avoid burns, keep the child away from hot liquids, ranges, radiators, space heaters, fireplaces, etc.
WARNING-STAIR HAZARD: Avoid serious injury or death, block stairs/steps securely before using walker.
- This walker is to be used only by infants, who are old enough to sit upright on their own and are ready to learn to walk (about 6 months old). DO NOT USE UNTIL BABY CAN SIT UP BY ITSELF.
- Discontinue using the walker when the child can walk unassisted, reaches 30 lbs. in weight, or reaches 32 inches in height.
• DO NOT ADJUST TRAY HEIGHT WITH THE BABY IN THE WALKER. -
Periodically inspect seat pad plastic tabs to be sure they are secured in the body. DO NOT USE THE WALKER IF IT IS DAMAGED OR BROKEN. Discontinue using should any part become damaged. Please contact our customer service at 1-800-328-7363 to order replacement parts or arrange for repairs.
-
Clean the stoppers on walker base regularly to maintain stopping performance.
- Clean the wheels on walker regularly to maintain rotating performance.
- Baby walkers are not designed to be used on carpets and rugs.
To clean the seat pad, use only mild household soap and warm water with a sponge or cloth. DO NOT MACHINE WASH. For metal and plastic parts, use only lukewarm water and mild soap.
If you experience any difficulty with assembly, missing parts or use, please DO NOT return this item to the store. Retail stores are unable to properly assist you. Contact our Customer Service Department directly for assistance. Call toll-free 1-800-328-7363, Monday - Friday, between the hours of 8:00 a.m. and 4:30 p.m. (PST).
PARTS
ASSEMBLY
ATTENTION: Carefully remove parts from box. Check that you have all the parts for this model before assembling the baby walker.

Base

Seat

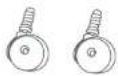
Front Wheels (2x)

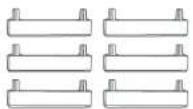
Stoppers (6x)

Rear Wheels (2x)

*Toys & Sockets (2x) *Toy Bar with Base Push Handle
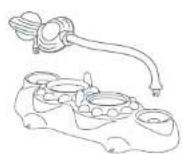
*Toys may vary
IMPORTANT! To ensure safe operation of your product, please follow these instructions carefully. Please keep these instructions for future reference.
IMPORTANT! Before assembly and each use, inspect this product for damaged hardware, loose joints, missing parts or sharp edges. NEVER use if any parts are missing or broken.
IMPORTANT! Adult assembly is required. Keep child away during unpacking and assembly.
IMPORTANT! Always check that the baby walker is locked in the open position before using.
IMPORTANT! Carefully remove parts from box. Check that you have all the parts for this model before assembling the baby walker.
ASSEMBLYASSEMBLY
1 To Assemble Walker
Open the baby walker to raise the tray (Fig. 1a), and locate the lever underneath the tray.
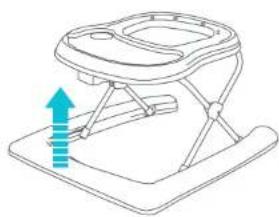
Fig. 1a
Ensure the lever is locked into place after adjusting the height (Fig. 1c).
NOTE: The baby walker can be used for 3 different heights.
"underside"
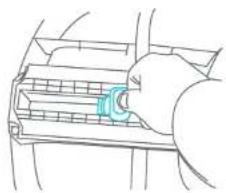
Fig. 1c
To adjust the height
Twist the lever, slide it vertically while simultaneously pushing the lever up to adjust (Fig. 1b).
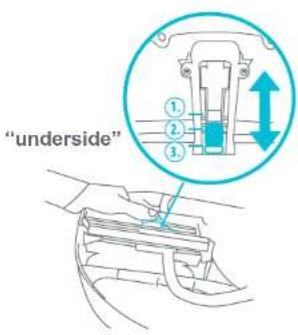
Fig. 1b
2 Inserting the Seat
Insert the seat by aligning the buttonholes to the walker (Fig. 2a).
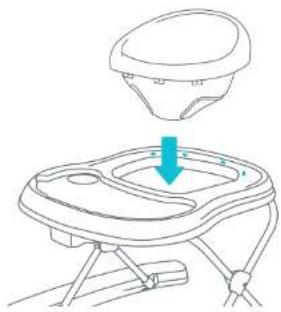
Fig. 2a
ASSEMBLYASSEMBLY
Attaching the seat fabric
Connect the seat fabric by inserting the plastic button pins into the upper, larger openings. Then push them firmly downwards until they SNAP into position (Fig. 2b).
NOTE: Push the pins from the top of the opening all the way down to the bottom.

Fig. 2b
Insert the pins on the back of the seat, into the holes by pushing downwards until it clicks (Fig. 2c).

Fig. 2c
3 Wheels
Place walker on a solid flat surface with bottom of base facing upward. Insert the 2 front wheels, 6 stoppers, and 2 rear wheels as shown (Fig. 3).
NOTE: Ensure to apply enough pressure when inserting the stoppers so that they push in lower than the level of all the wheels. Please check that wheels are locked into place before proceeding.

Fig. 3
4 Push Handle
Insert the Push Handle into the frame. Push in firmly until it clicks into position.
NOTE: Do Not lift the walker from the Push Handle (Fig. 4).

Fig. 4
ACCESSORIES ACCESSORIES
5 Toy Attachments
Insert the individual toys into the notch socket as shown (Fig. 5a).
![graph TD A["Medical Tool"] --> B["Anatomical Procedure"] B --> C["Delivery to Robot with Stamps"] C --> D["End of Robot"]](/content/2026/05/958524/images/32389f7652d9249692a40f9c9318bc0bddf51d7cc5f74bef672de8ef8601c041.jpg)
Fig. 5a
Toys must be aligned with their single tab housings and double tab housings on the tray (Fig. 5b).
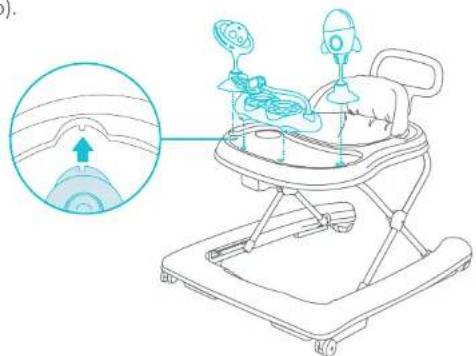
Fig. 5b
Set each toy into the fitting and underneath the tray (1) push the lock up and (2) turn it to lock (Fig. 5c).
Removal: Rotate the tab to release the toy(s).
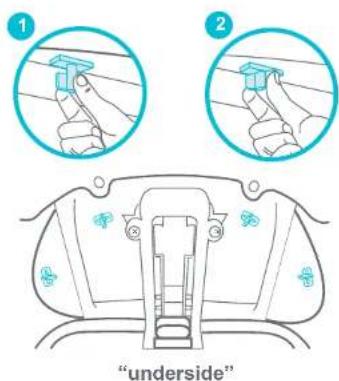
Fig. 5c
Always put the small tab lock back into the tabletop when not in use (Fig. 5d).

Fig. 5d
FOLD
MAINTENANCE
6 To Fold Walker
To fold the walker, turn the lever vertically and pull it towards you to release (Fig. 6a).
Then push the tray downward to the lowest position (Fig. 6b).
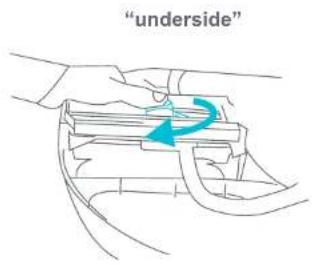
Fig. 6a
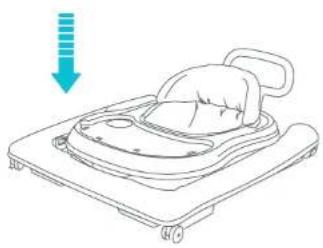
Fig. 6b
7 To Remove the Seat
Lift the front plastic pins of the seat upwards and pull the pins out of the holes (Fig. 7a).

Fig. 7a
Locate the (4) tabs behind the seat of the walker:
For each tab, squeeze both ends of the tab and push up to release from their corresponding slots (Fig. 7b).

Fig. 7b
MAINTENANCE
INFORMATION
8 Stopper Replacement
For replacement, if lost or damaged ONLY.
The Stoppers are there for Stair Safety reasons, do NOT remove the stoppers unless for replacement purposes.
REMOVAL: To remove, pull out the stopper (Fig. 8a).
REATTACH: Push the stopper into the housing completely (Fig. 8b). Ensure to apply enough pressure when inserting the stoppers.

Fig. 8a

Fig. 8b
9 Wheel Replacement
For replacement, if lost or damaged ONLY.
REMOVAL: Pull the front and rear wheels out from the base (Fig. 9).
Refer to Step 3 to reattach.
Front Wheels
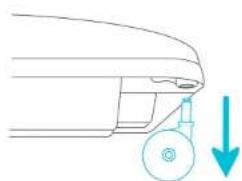
Rear Wheels
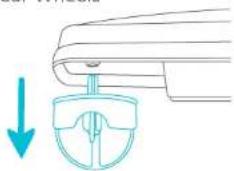
Fig. 9
PLACING CHILD IN THE WALKER
WARNING: To reduce chance of child slipping out of the seat, check that both feet of the child touch the floor. Never carry walker with the child in it, as the child may get hurt or slip out.
• Always check the walker prior to each use to ensure that the seat is snapped in place and that the walker has no loose or broken parts. Do Not use the walker if it is damaged or broken or missing parts.
- Before placing your child in the walker, please determine that your child is developmentally ready for this type of product. Generally, your child must be able to sit upright unassisted and have adequate neck strength to exhibit very good control of his or her head. Typically, a child should be at least 6 months of age to use this product. Infants develop at different rates and you should discuss the use of a walker with your pediatrician to ensure that your infant is ready.
- Adjust the seat height of the walker to the lowest setting. Place your child in the walker and check that both feet touch the floor. The child should have only part of their weight on their feet when their legs are straight. Adjust the walker height as needed as your child grows. Do not adjust height with child in the walker. Discontinue using the walker if your child attempts to climb out, reaches 30 pounds in weight or 32 inches in height, or when your child is able to walk unassisted.
- The baby walker can be used for 3 different heights. To adjust height, remove baby from walker. Adjustment instructions can be referenced in step 1. Adjust to desired height.
- When the position has been selected, check that the safety button turned through 90 degrees to prevent the accidental release of the mechanism. Always follow this procedure. Never use the baby walker if the button is not in the sideways position. Important: Never change the height when the baby is in the walker.
Base

Asiento
Rueda Delantera (2x)
Tapones de goma (6 pcs)

Ruedas Traseras (2x)
Fig. 1a
Fig. 1c
Para ajustar la altura
Fig. 2a
MONTAJEMONTAJE
Fig. 2b
Fig. 3
4 Manija del Empuje
Fig. 5a
Fig. 6b
Fig. 7a
Fig. 8a
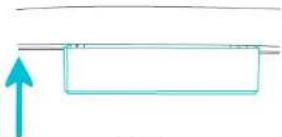
Fig. 8b
9 REEMPLAZO DE RUEDAS
Ruedas Traseras

Fig. 9
The Customer Service Department can be contacted at 1 (800) 328-7363 Monday through Friday between 8:00 a.m. and 4:30 p.m. (PST). Return Authorizations are required prior to returning product(s) to Baby Trend*.
BABY TREND® SERVICIO AL CLIENTE


- WARRANTY
- GARANTIA
- WARNING
- PARTS
- ASSEMBLY
- ASSEMBLYASSEMBLY
- 1 TO ASSEMBLE WALKER
- TO ADJUST THE HEIGHT
- 2 INSERTING THE SEAT
- ATTACHING THE SEAT FABRIC
- 3 WHEELS
- 4 PUSH HANDLE
- ACCESSORIES ACCESSORIES
- 5 TOY ATTACHMENTS
- FOLD
- MAINTENANCE
- 6 TO FOLD WALKER
- 7 TO REMOVE THE SEAT
- INFORMATION
- 8 STOPPER REPLACEMENT
- 9 WHEEL REPLACEMENT
- PLACING CHILD IN THE WALKER
- PARA AJUSTAR LA ALTURA
- MONTAJEMONTAJE
- 4 MANIJA DEL EMPUJE
- 9 REEMPLAZO DE RUEDAS
- BABY TREND® SERVICIO AL CLIENTE
Brand : Baby Trend
Model : PLUS 2-in-1
Category : Baby product