
PDV 798 DVBT - DVB-T Receiver MPMAN - Free user manual and instructions
Find the device manual for free PDV 798 DVBT MPMAN in PDF.


User questions about PDV 798 DVBT MPMAN
0 question about this device. Answer the ones you know or ask your own.
Ask a new question about this device
Download the instructions for your DVB-T Receiver in PDF format for free! Find your manual PDV 798 DVBT - MPMAN and take your electronic device back in hand. On this page are published all the documents necessary for the use of your device. PDV 798 DVBT by MPMAN.
USER MANUAL PDV 798 DVBT MPMAN
Safety Precautions 1
Panel Illustration. 2
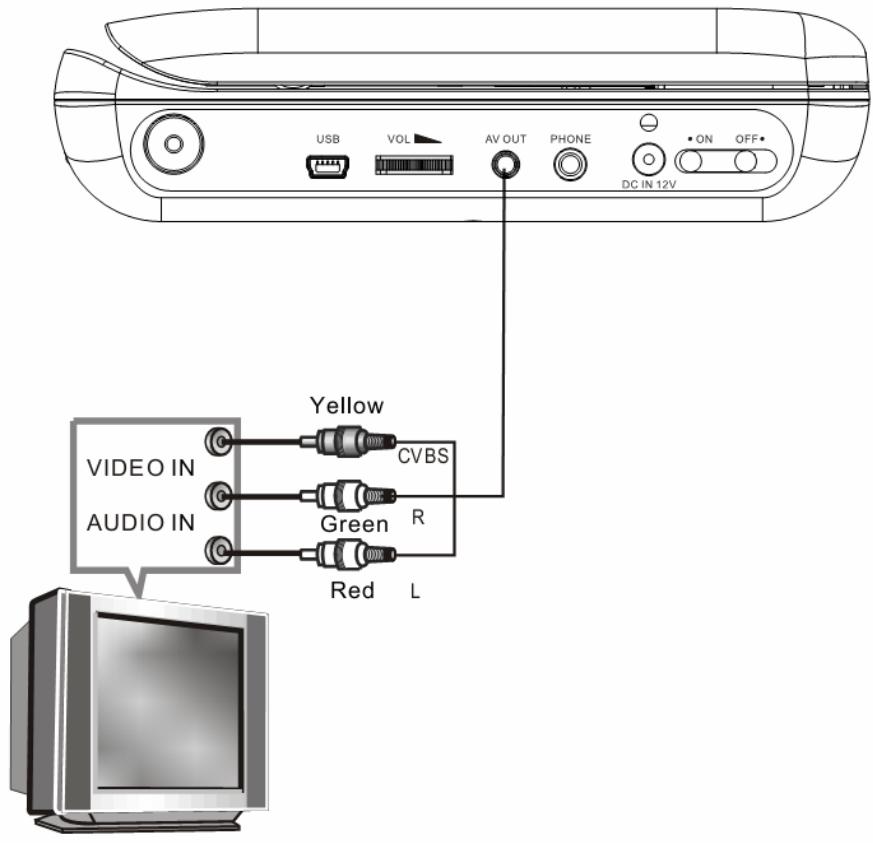
- Connecting to a TV set. 3
Remote Control. 4
Remote Control Operation. 4
DVD PART
The Setup Menu System 5
MPEG4/MP3 PLAYBACK. 7
KODAK Picture CD playback. 8
DVB PART
The Setup Menu System. 9
SCREEN SET PART
The Setup Menu System. 11
OTHERS
Troubleshooting 12
Specifications 13
- The apparatus shall not be exposed to dripping or Splashing and that no objects filled with liquids, such as Vases, shall be placed the apparatus.
- The mains plug is used as the disconnect device, the disconnect device shall remain readily operable.
- Tobe completely disconnect the powerinput, the mains plug of apparatus shall be disconnected from the mains.
- The mains plug of apparatus should not be obstructed or should be easily accessed during intended use.
Warning:
Do not use the mode DVB-T in a moving vehicle etc.. The DVB-T function only works when the vehicle is stationary.
Prolonged exposure to high volume from audio players can cause temporary or permanent hearing loss
When you listen to traffic information or a personal audio player, be aware of potential hazards, such as approaching cars.
The USB drive must be connected directly to the unit.
To prevent data loss by interference and transfer, do not use USB extension cords.
In DVBT, EXIT Button on unit and RC perform the channel swap function.
Safety is Important

To ensure your safety and the safety of others, please ensure you read the Safety Instructions before you operate this product.
Keep this information in a safe place for future reference. Please read all the safety information before using the product.Safety Considerations.
- Position the cables so that they cannot be walked on or pinched by items placed on or against them.
- Do not use the portable DVD Player in humid or damp conditions.
- Do not allow the portable DVD Player to get wet.
- Do not expose the portable DVD Player to dripping or splashing.
- Do not place water filled objects such as vases on top of the portable DVD Player.
- Do not place naked flame sources, such as candles, on the top of the portable DVD Player.
Caution: Danger of explosion if battery is incorrectly replaced. Replace only with the same or equivalent type.
Warning: The battery (battery or batteries or battery pack) shall not be exposed to excessive heat such as sunshine, fire or the like.
Warning: To reduce the risk of fire or electric shock, do not expose this apparatus to rain or moisture. The apparatus shall not be exposed to dripping or splashing and that no objects filled with liquids, such as vases, shall not be placed on apparatus.
Warning: Only use attachments/accessories specified provided by the manufacturer, the Portable DVD Player is supplied by AC adapter, the AC adapter is used as disconnect device, the disconnect device shall remain readily operable.
Cleaning
ALWAYS unplug the portableDVD Player before you clean it.
- Do not use liquidor aerosol cleaners. Clean
the portable DVDPlayer with a soft, damp (not wet) cloth.
Servicing
-
There are no user serviceable parts in this
portable DVD Player. -
When servicing, refer to qualified service personnel.
Consult your dealer if you are ever in doubt about the installation, operation or safety of this unit.
Ventilation
The slots and openings on the portable DVD Player are for ventilation.
Do not cover or block them as it may cause overheating.
NEVER let children push anything into the holes or slots on the case.
Battery Disposal
Please ensure batteries are disposed of safely.
- Never dispose of batteries in a fire or with other household waste.
Check with your local authority for disposal regulations.

This symbol indicates that this product incorporates double insulation between hazardous mains voltage and user accessible parts. When servicing use only identical replacement parts. WARNING: To reduce the risk of fire or electric shock, do not expose this apparatus to rain or cords.

Correct Disposal of this product. This making indicates that this product should not be disposed with other household wastes throughout the EU. To prevent possible harm to the environment or human health from uncontrolled waste disposal, recycle it responsibly to promote the sustainable reuse of material resources. To return your used device, please use the return and collection systems or contact the retailer where the product was purchased. They can take this product for environmental safe recycling.

Special notice
A few highlights or dark spots may occur on the LCD screen. It is a very common phenomenon of the activematrix display technology, and does not mean any defects or faults. Never try to repair this machine by yourself. In case of any faults. Please turn off the unit at once, and notify our Company or the corresponding dealer. The display is made up of many precision electronic components. Any disassembly or modification may lead to further damage.

When the apparatus was in electrostatic circumstance, it may be malfunction and need to reset by user.
Warning: The USB memory stick should be plug in the unit directly. USB extension cables should not be used to avoid failing of datatransferring and interference caused.
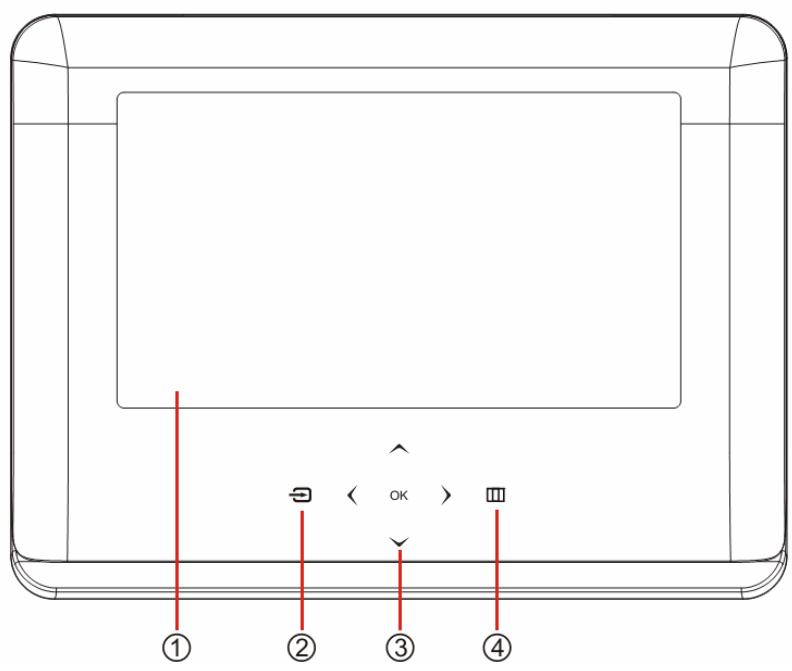
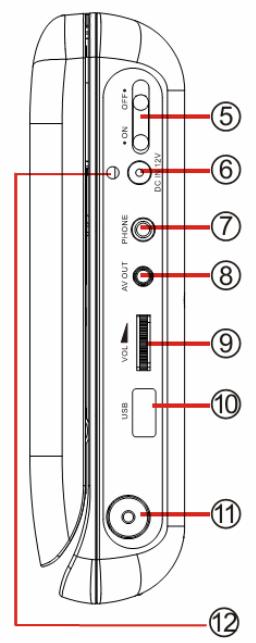
- LCD DISPLAY
- SOURCE
- MOVE(▲,▼,▲,▶)
- MENU
- POWER (ON/OFF)
- DC 12V INPUT JACK(power supply)
- PHONE JACK (Maximum output voltage ≤slant 150mV )
- AV OUT
- VOLUME
- USB
- ANT IN 75 ohm
- CHANGE INDICATOR: Red:charging / Green: full
Note:
- The control keys on the front panel are touch switch, the icons for the keys will disappear when the power switch is set to OFF.
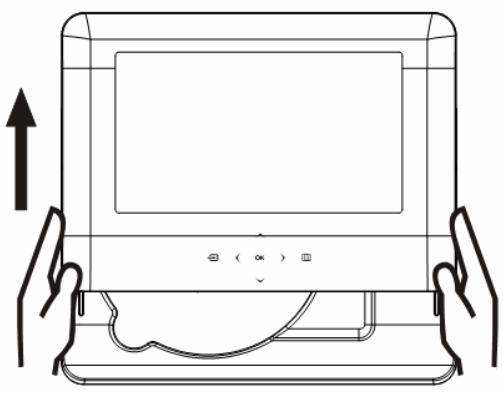
- Don't turn over the front panel, please gently push/pull the front panel as shown to open/close the disc compartment while loading disc.
Remote Control
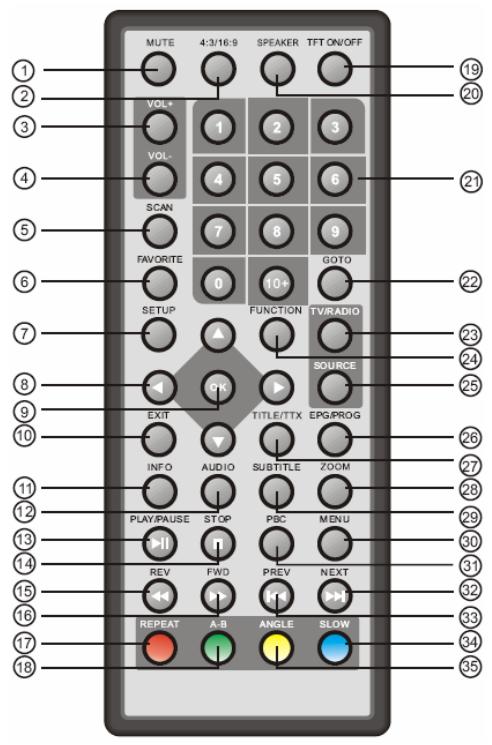
| ① | MUTE | ⑲ | TFT on/off |
| ② | 4:3/16:9 | ⑳ | SPEAKER |
| ③ | VOL + | ⑴ | NUMBER |
| ④ | VOL - | KEY SELECT | |
| ⑤ | SCAN | ⑵ | GOTO |
| ⑥ | FAVORITE | ⑶ | TV/RADIO |
| ⑦ | SETUP | ⑷ | FUNCTION |
| ⑧ | MOVE | ⑸ | SOURCE |
| (▲▼▲▼) | EPG/PROG | ||
| ⑨ | OK | ⑹ | TITLE/TTX |
| ⑩ | EXIT | ⑺ | ZOOM |
| ⑪ | INFO | ⑻ | SUBTITLE |
| ⑫ | AUDIO | ⑽ | MENU |
| ⑬ | PLAY/PAUSE | ⑾ | PBC |
| ⑭ | STOP | ⑿ | NEXT |
| ⑮ | REV | ⑼ | PREV |
| ⑯ | FWD | ⑽ | SLOW |
| ⑰ | REPEAT | ⑾ | ANGLE |
| ⑱ | A-B |
Note:
- In this manual, 空 空 空 空 空 空 空 空 空 空 空 空 空 空 空 空 空 空 空 空 空 ^ will be used to represent different NAVIGATIONARROWS on the remote respectively.
- In order to operate any of theremote functions, you must first press the Powerbutton on the DVD player.
- Some of the keys is multiple key. They can be used in DVD mode or in DVB mode.
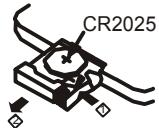
HOW TO REPLACE THE BATTERY
Be sure to place the batteries in the correct direction.
It is dangerous to charge/heat/open or short-circuit the batteries.
Do not leave dead or expired batteries or mix old/new batteries.
When not using the remote control for a long duration of time, remove the batteries. When operating range becomes reduced, replace all batteries with new, fresh ones.
If leakage from the battery occurs, wipe the battery liquid from the battery compartment, then replace.
About Built-in Rechargeable Battery
Precautions related to battery recharge
- Once the battery is fully discharged, immediately recharge it (regardless of whether you plan to use the battery or not) in order to maximize the battery life. When the power is low, the battery icon will be shown on the upper left corner of the TFT for warning.
- To charge the battery, please connect this player to AC mains via the AC adapter and the charge indicator will turn on in red, and the indicator will turn into green when the battery is fully charged. This will take about 2-2.5 hours if the player is in off mode or 4.5-6 hours if the player is in working mode.
Using and maintaining your rechargeable batteries
- Please make sure you always use only the AC adapter included with the player to recharge your batteries.
- Recharge efficiency will degrade when the environmental temperature drops below 50F (10^) or exceed 95F (35^) .
- The lasting time of the fully charged battery when a headphone is connected to the player is approximately 1.5 hours
The setup menu system---DVD PART
Advanced Features
General Steps of setup menu
In the DVD mode, Press the
1. DVD MENU
A. DVD Setup-Language Setup
Press the Up and Down button move on the DVD setup and to enter. The DVD Setup-lanuage Setup option appear the screen.
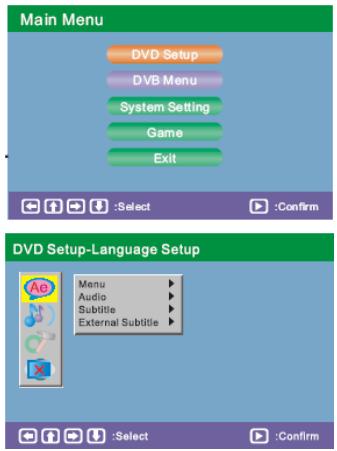
1) MENU
Highlight the MENU option, and press the Arrow buttonsto choose the menu language you prefer. Press
Notes:
If your preferred language is not availabel, the disc sdefault language will be played.
2) AUDIO
Highlight the AUDIO option, and press the Arrow buttons to choose the audiolanguage you prefer. Press
3) SUBTITLE
Highlight the SUBTITLE option, and press the Arrow buttons to choose the subtitle language you prefer. Press
4) EXTERNAL SUBTITLE
Highlight the EXTERNAL SUBTITLE option, and press the Arrow buttons to choose the supported subtitle language when playing MPEG4 format discs.
B. DVD Setup-Audio Setup
Press

1)DOWNMIX
There are two modes, one is Lo/Ro, one is Lt/Rt.
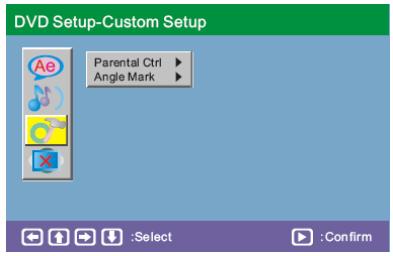
C. DVD Setup-Custom Setup
Press the
1) PARENTAL CTRL
Parental Ctrl:1,2;G,3;G,4;PG13,5,6;R,7;NC17,8 the eight levels. The first level discs are open to people of ever age and eight level only suitable for the adult. If you want to change the parental ctrl setting, enter the user's age control item and then enter four digital password. The default password is 6666 (if you are using this player for the first time, just input this code). If the input code has been confirmed, the level setting up menu will appear. Move the cursor to choose the expected level and press
2) ANGLEMARK
There are On and Off the two choices for this item. If in the ON mode, when play a disc which the content is multi-angleshot, you may press the
D. DVD Setup-Exit
Press the
2.System Setting
Press the
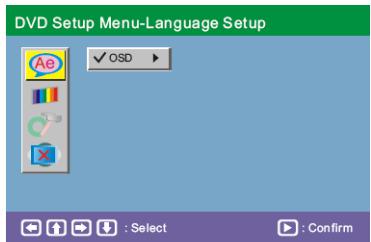
A. System Setting Menu-language Setup
Press the
language Setup, you can setup the OSD option.
1) OSD LANGUAGE
Highlight the OSD LANGUAGE option, and press the Arrow buttons
to choose the OSD language you prefer. Press
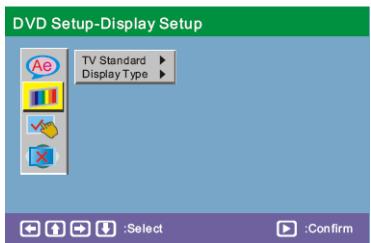
B. System setting Menu-Display Setup
Press the
1) TV Standard
According to the Color System of the TV, you can choose the TV Standard.
2) Display TYPE
According to the Display type, you can choose 4:3PS, 4:3LB or16:9.
C. System setting Menu-Preference
Press the Down arrow button to highlight the Preference option
on the screen.
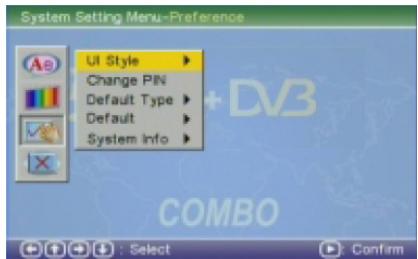
1) UI Style
According to UI Style, you can choose Style1, Style2, Style3, Style4.
2). Change PIN
The default password is 6666.
3). Default Type
In the Default Type options, you can choose the DVD MODE, DVBMODE, USB MODE, Last operation Type MODE.
NOTE: In the Default Type, If you choose the DVB MODE. That next power on the PLAYER will direct enter DVB MODE, no again display the SOURCE list.
4) Default The Default setup options are RESTORE factory setup, Let your PLAYER work on the default state.
5) System Info The system info includes model, HW, SW and Date.
3. Game options
Press the
Press the
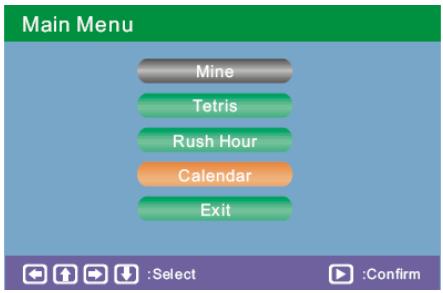
In the Main Menu-Game Setup, you can setup the Mine, Tetris, Rush Hour, Calendar four kinds of games. For example: If you want to play the Mine Game, you can press the
When a Mp3 disc is loaded, the screen will display as follows:
Press to select the file when the cursor appears in the file window. Press select to play the current file select by the cursor. Press to switch between the directory window and the file window.
Note:
The player will not function correctly under the following condition:
- The disc is badly scratched, damaged or dirty.
- The disc is not finalized.
- The recording format is not supported by the player.
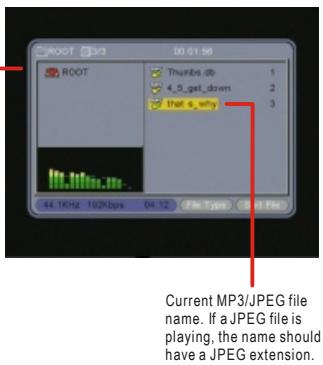
Current directory name
Kodak picture CD Playback
The Introduction of KODAK Picture CD
A Kodak picture CD has the size and shape of a regular CD. You can order a KODAK Picture CD simply by checking the box on the photo finishing envelope when you drop off a roll of film(35mm or Advanced Photo System(APS) color print film) at the time of processing in Kodak Express store displaying " Kodak Picture Cd sign. When your order is returned, you receive your prints, negatives, and your full roll of pictures safely stored on your KODAK Picture CD. Each KODAK Picture CD brings you the tools to enhance, share and manage your pictures on your computer. You also can record the JPEG picture into CD-R or CD-RW with the CD-Rewriter yourself.
Note:
- The Max. Size of JPEG Picture can be supported: 3840X3840 pels
- JPEG stands for Joint Picture Experts Group. It is the first
International Standard on Still Picture Compressing: ISO 10918-1, constituted by the Committee on Still Picture compressing Standard of ISO. The pictures on KODAK Picture CD are stored in this format(JPEG). This player can decode the JPEG picture in KODAK Picture CD and playback the pictures in different modes. Now, you can playback KODAK Picture CD on this player and view your wonderful pictures on your TV in the comfort of your living room. When a Kodak Picture CD is inserted on a player an automatic slide show is launched. Each picture in the Kodak Picture CD will be displayed consecutively in a slide- show fashion and will be scaled to fit in the whole TVscreen.
1. First Time Installation
After all the connections have been madeproperly, switch on your TV. Make sure the receiver is connected to the home antenna and press
A. At the First time installation menu, select YES and press
B. Enter your regional settings, include your Country, Language, Time Zone. Then select
C. Select Yes to start the automatic channel search.
D. Wait to complete the scanning. In case you want to stop the scanning, press the
E. When finished, all active channels found will be stored automatically. The last found channel will be played.
2.DVBModeofMainMenu
Press the
A.DVB MENU-Program list
Press the
1) TV Program
Press the
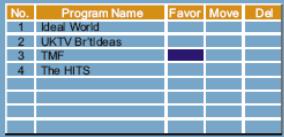
Creating Favorite Channel Groups
This feature allows you to group your favorite channels. To create your favorite groups:
a. Select the channel which you would like to add to the group and go to the Favor column.
b. When the Favor column of the desired channel ishighlighted, one red heart symbol will appear after press the
c. Once your favorite group is created, you can press the
eart symbol will appearun-select the channel
keys to quickly access
The Favor column.
eart symbol will appearun-select the channel
Moving a Channel
a. Select the channel which you like to move and go to the Move column.
b. Press
c. Use the <UP / DOWN> key to move the channel to a desired position.
d. Press
a. Select the channel which you like to move and go to the Move column.
b. Press
c. Use the <UP / DOWN> key to move the channel to a desired position.
d. Press
First Time Installation
Do you want to start first time
Installation Wizard?
Yes
12 =
0
First Time Installation(1)
Count
England
Language
Germany Spain
Time Zone
France
Back
N
lo
First Time Installation (2)
Do you want to start Auto Search?
Previous channel list will be replaced.
Back
Yes
6
No
DVB Menu-Program Search-Automatic
Progress
TVList
Music List
Channel No
Frequency
Exit Save & Exit
DVB Menu-Program List
TV Program
Music Program Sort
0
:Select
Confirm
DVB Menu-Program List-Program Edit Table
:Select
onfirr
Exit: Sa
Deleting a Channel
a. Select the channel which you like to delete and go to the Del column.
b. Press
c. Press
d. Press
2) Music Program
Press the
NOTE: This Music program options operation samethe TV Program.
3) Sort
Press the
style. As: By Name,By Service ID,By Channel number,By LCN.
B. DVB Menu-Program Search
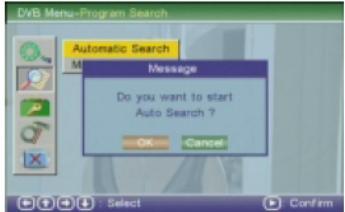
Press the Up and Down button moveon the DVB Menu-Program Search option appear the screen. In the DVB Menu-Program Search, you can setup the Automatic Search, Manual Search options.
1) Automatic Search.
Choose the Automatic Search options, This operation same the First Time
Installation. Refer to First time Installation.
2) Manual Search.
If any channel is missing after auto search, or you want to add newly launched channels, you can use Manual Search to scan the desired channels. To manually search the target channel, you must know its parameters, e.g., the channel number. After the channel is found, it is appended to the current channel list
a. Enter the Manual Search menu via Main Menu > Program
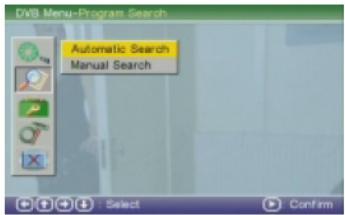
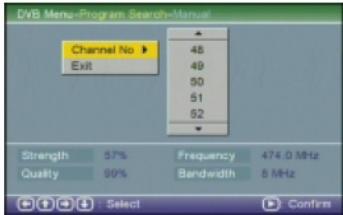
Search > Manual Search.
b. Specify the appropriate channel number in the Channel No field by press <DOWN> and <UP> button. Enter your selection, the frequency and bandwidth values are changed accordingly.
c. Select
d. If no signal is found, a message indicating no signal will appear. Otherwise scanned channel will be saved and appended to the current channel list.
C. DVB Menu -Parental Control
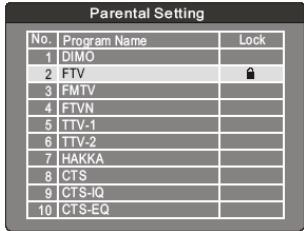
This feature allows you to prevent children or unauthorized people from watching channels.
1) Enter Main Menu > Parental Control. First, you will need to enter PIN as prompted to use the parental control menu. (The default PIN is 6666.)
2) After correct PIN input, the following options are provided: Channel Lock: Allows you to activate or de-activate the overall parental control. Whenset to YES,
all the channels with locking settings will be locked.
Parental Setting: In the channel list, select the channel you want to lock and then press
D. DVB Menu-System Setting
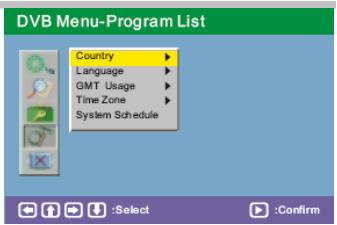
1) Country
In the Country options, you can choose a kinds of the Countries. As: England Germany, Italy, France, Spain etc.
2) Language
Press the
1 st /2nd Audio : This option allows you to select your first and second choice for the audio language. If neither of your selected language is available on the program transmitted, the main language of the program will be used.
Subtitle : Allows you to select the subtitle language. If your selected language is not available on the program transmitted, the main language of the program will be used. Exit: you canchoose the Exitoptions to return the System setting.
3) GMT usage:
Allows you to enable/disable Greenwich Mean Time(GMT) usage. If you know the GMT time zone of your location, set GMT usage to ON and select an appropriate time zone. If you prefer to setthe time manually, select OFF in GMT usage item and then manually select the date and time.
4) Time Zone
Select an appropriate time zone to display the local time correctly. Both EPG and system schedule need a correct time zone setting.
5) System Schedule
Press the
A. In the Schedule pane, use the
b. Press
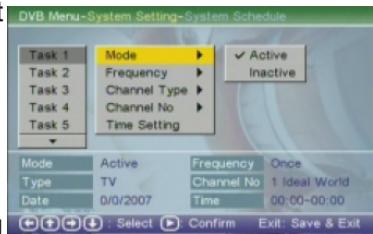
The frequency as Once, Daily or Weekly. Or you can select Stop to disable the task. Start and End Time: Enter the start and end time that automatically turns on and off the receiver. Channel Type: Select TV or radio channel as required. Channel No: Select the channel to be played at scheduled time.
d. When the setting is done, press
SCREEN SET PART
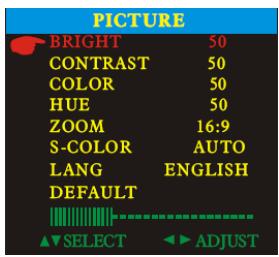
Press the FUNCTION button to display PICTURE setting as below:
Press DOWN button to highlight the desired item. Press LEFT and RIGHT to adjust the screen brightness, contrast, color, HUE(forNTSC only), aspect ratio, color system, OSD language, or setto default values.
If you have any questions, please consult the troubleshooting guide below.
NO PICTURE OR SOUND
Ensure the power button is on.
- Ensure the power outlet is operational.
Ensure the power cord is not damaged.
Ensure the power plug is connected firmly to the outlet.
PICTURE BUT NO SOUND
Ensure the audio jacks are securely connected.
Ensure the audio connector is not damaged.
Ensure the volume is turned up in VOL/CH setup.
Ensure you have set the player's AUDIO settings correctly.
- Ensure you have ENTERed the correct AV input for your TV.
Ensure the audio is not set to mute.
SOUND BUT NO PICTURE
- Ensure the video jacks are securely connected.
Ensure you have ENTE Red the correct AV input for your TV. - Ensure the video connector is not damaged.
- Ensure you have set the player's VIDEO settings correctly.
UNIT NOT WORKING
Turn off the power, and then turn it on again.
"BAD DISC" DISPLAYED
Ensure the disc is not warped, damaged or deformed.
Ensure the disc is not badly stained or damaged.
Ensure the disc format is compatible with the player.
- Please check whether you have tried to play a software CD. If so, please restart the player.
REMOTE NOT WORKING
Ensure the remote batteries are working.
Point the remote control directly at the player's IR sensor.
Remove any obstacles between the remote and the IR sensor.
"NO DISC" DISPLAYED
Ensure you have put the disc on the tray.
- Ensure the disc is not upside down.
Ensure the disc is not distorted, stained or scratched.
POOR PICTURE OR SOUND
Ensure you have set the player's AUDIO settings correctly.
- Ensure the disc is not scratched or stained.
Ensure the AV connector or the output terminal is not damaged.
Before you request for repair
Phenomena below does not necessarily mean failure with TV set. Please check following before you request for repair.
| Phenomena | Possible causes |
| No picture, no sound | Improper connection with AC adapter or Car adapter. Use of unauthorized power supply. Power Switch is on OFF position. |
| No image | Whether antenna adjusted correctly; Whether the correct Channel or Countryselected. May need to reset or search. |
| No sound | Whether the sound is turned to the end. Whether earphone plugged in. Whether press speaker button? Whether press mute button? |
| Diamonds in picture | Whether antenna adjusted correctly; Maybe too weak signal at the receiving place. |
| No signal | Whether the correct Country selected; Maybe signal too weak. |
| Dark picture | Adjust Brightness, Contrast correctly |
| Diamonds in picture orinferior sound during driving. | The signal too weak at that place |
| Play mode | NTSC / PAL |
| Disc mode | DVD,VCD, CD, MP3, CD-R, CD-RW, JPEG, DVD+ -R/W, MPEG4, |
| Video characteristic | |
| Video S/N ratio | ≥65dB. |
| Resolution | ≥500 lines. |
| Audio characteristic | |
| Frequency response | fs 96KHz: 20Hz-20KHz:+/-1dBI |
| Audio S/N ratio | ≥90dB |
| Dynamic range | ≥80dB |
| Distortion | < 0.01% |
| D/A Converter | 96KHz/24bit |
| Output characteristic | |
| Display Device | Color TFT-LCD |
| Receiving Channel | DTV: VHF 177.5MHz~226.5MHz UHF 474 MHz~858 Mhz |
| Screen Size | 7 inches |
| Video output | 1Vp-p(75) |
| Audio output | 2CH |
| Power Voltage | DC IN 12V |
| Power consumption | ≤15W |
| Size | 206x160x40mm |
| Weight | 1.0kg |
Specifications are subject to change without notice.
If at any time in the future you should need to dispose of this product please note that: Waste electrical products should not be disposed of with household waste. Please recycle where facilities exist. Check with your Local Authority or retailer for recycling advice. (Waste Electrical and Electronic Equipment Directive)

For more information please visit our website: www.mpmaneurope.com