MLAF50V - Deep fryer MISTRAL - Free user manual and instructions
Find the device manual for free MLAF50V MISTRAL in PDF.


| Product Type | 8 Litre Pizza Oven Air Fryer |
| Capacity | 8 litres |
| Power Supply | 220-240V ~ 50Hz |
| Power Consumption | 1500W |
| Temperature Range | 80–200°C (Dehydrate: 30–80°C) |
| Timer Range | 1–60 minutes (Dehydrate: 1h–24h) |
| Preset Functions | 8 dedicated functions: Fries, Poultry, Pizza, Steak, Baking, Seafood, Dehydrate, Preheat |
| Accessories | Draw Basket, Air Fry Basket, Air Flow Rack, Grill Rack, 10" Pizza Stone |
| Control Panel | LED display, touch buttons for power, temperature, timer, and presets |
| Cleaning Instructions | Draw basket, air flow rack, air fry basket, and grill rack are dishwasher-proof. Pizza stone: hand wash only, no soap, do not soak. Wipe exterior with damp cloth. |
| Safety Features | Automatic switch-off when timer ends, cool-down fan runs ~20 seconds after cooking, overheat protection, auto shut-off if no button pressed for 5 minutes |
| Warranty | 12 months from date of purchase against defects in workmanship and materials |
Frequently Asked Questions - MLAF50V MISTRAL
User questions about MLAF50V MISTRAL
0 question about this device. Answer the ones you know or ask your own.
Ask a new question about this device
Download the instructions for your Deep fryer in PDF format for free! Find your manual MLAF50V - MISTRAL and take your electronic device back in hand. On this page are published all the documents necessary for the use of your device. MLAF50V by MISTRAL.
USER MANUAL MLAF50V MISTRAL
natural_image
Exterior view of a mistral air fryer with digital display and control handle (no text or symbols on device body)Instruction Manual
Model: MLAF50V
Important Safeguards
When using this electrical appliance, the following basic safety precautions should always be followed:
For Your Safety
- Please read these instructions before operating and retain these for future reference.
- Before connecting the appliance to the power supply, check that the voltage indicated on the appliance corresponds with the voltage in your home. If this is not the case, contact your local qualified technician and DO NOT use the appliance.
- If the supply cord or any part is damaged, cease use of this appliance immediately to avoid a hazard.
- Do not hang the power cord over the edge of table and do not let cord contact hot surfaces, including stovetop.
- Place the appliance on the flat surface. Do not place on the heated surface or near a hot gas or electric burner or oven.
- This appliance is not intended for use by persons (including children) with reduced physical, sensory or mental capabilities, or lack of experience and knowledge, unless they have been given supervision or instruction concerning use of the appliance by a person responsible for their safety.
- Children should be supervised to ensure that they do not play with appliance.
- Never immerse the housing, which contains electrical components and the heating elements, in water nor rinse it under the tap.
- Avoid any liquid entering the appliance to prevent from electric shock or short-circuit.
- Keep all ingredients within the draw basket and do not overfill beyond the draw basket to prevent any direct contact with heating element.
- Do not cover the air inlet or the air outlet when the appliance is working.
- Filling the draw basket with oil may cause a fire hazard.
-
Do not touch the inside of the appliance while it is operating.
-
Keep the appliance and its mains cord out of the reach of children.
- Do not connect appliance to an external timer switch.
- Do not place the appliance on or near combustible materials such as a tablecloth or curtain.
- Do not place the appliance against a wall or against other appliances.
Hot air up to 160 Degrees expels through the rear vent of the appliance.
Leave at least 10cm clearance around the entire appliance, including directly above it.
Additional care should be taking when placing appliances on bench top surfaces or near splash backs where such materials
(Acrylics, timber etc.) do not have the high heat resistant properties, so advise to place them on top of a heat resistant material between bench and appliance and further away from wall surfaces / splash backs.
- Do not place anything on top of the appliance.
- Do not use the appliance for any other purpose than described in this manual.
- Do not let the appliance operate unattended.
- During hot air frying, hot steam is released through the air outlet openings. Keep your hands and face at a safe distance from the steam and form the air outlet openings.
- Also be careful of hot steam and air when you remove the draw basket from the appliance.
- Do not position the pizza stone in a way which differs from that indicated in this booklet.
- Do not cut pizza or other foods directly on the pizza stone as it may be damaged.
- Do not use the pizza stone for any other uses, in other ovens, or directly on an open flame.
- Caution: After cooking process is completed, do not turn the draw basket with ingredients upside down (Excess oil may have collected in the draw basket that could drip out). Place draw basket on a level and flat heat resistant surface, then remove the ingredients of the draw basket onto plate or into a dish with a spatula or tongs.
-
Surfaces may become hot during use.
-
Do not operate the appliance if there is a malfunction or if it is damaged in any manner. Immediately unplug the appliance if you see dark smoke coming out of the appliance.
- Wait for the smoke emission to stop before you remove the draw basket from the appliance.
- Appliances are not intended to be operated by means of an external timer or separate remote-control system.
- This appliance is intended to be used in households and similar applications such as:
- Staff kitchen areas in shops, offices and other working environments;
- Farm houses;
- By clients in hotels, motels and other residential type environments;
- Bed and breakfast type environments.
Caution:
- This appliance is intended for household use only and not for commercial, industrial or outdoor use.
- This appliance must be earthed. Only connect it to a suitable earthed AC 240V\~50Hz mains socket. Always make sure that the plug is inserted into the socket properly.
- Ensure the appliance is placed on a horizontal, even and stable surface.
- The appliance and accessories will become very hot during use. Do not come into contact with heated parts while or after using the appliance! Only touch the handles and control button while the appliance is in operation or immediately after it has been switched off. The appliance needs approximately 30 minutes to cool down. Wait until the appliance has cooled down and make sure all components are clean and dry fully before it is transported, cleaned or stored away. Use oven gloves if necessary when handling the hot accessories.
- Remove the draw basket! Also be careful of hot air when you remove the draw basket from the appliance.
- If the supply cord is damaged, it must be replaced by the manufacturer or similarly qualified persons in order to avoid a hazard.
• Always unplug the appliance when not in use.
- The appliance needs approximately 30 minutes to cool down.
- In the interest of safety, regular periodic close checks should be carried out on the supply cord to ensure no damage is evident. Do not attempt to dismantle or repair this unit yourself. Repairs should only be performed by qualified personnel in order to avoid a hazard.
Warning
If the supply cord is damaged, the cord must be replaced by the manufacturer, its service agent or similarly qualified persons in order to avoid a hazard.
This product has not been designed for any uses other than those specified in this booklet.
Save These Instructions
THIS APPLIANCE IS DESIGNED FOR HOUSEHOLD USE ONLY
Automatic Switch-off
The appliance has a build in timer, it will automatically shut down the appliance when count down is completed. You can manually switch off the appliance by pressing the Power-off button, the heating-up will stop running immediately, and the fan will automatically shut down after approximately 20 seconds. at the same time, you will hear 5 beep sounds.
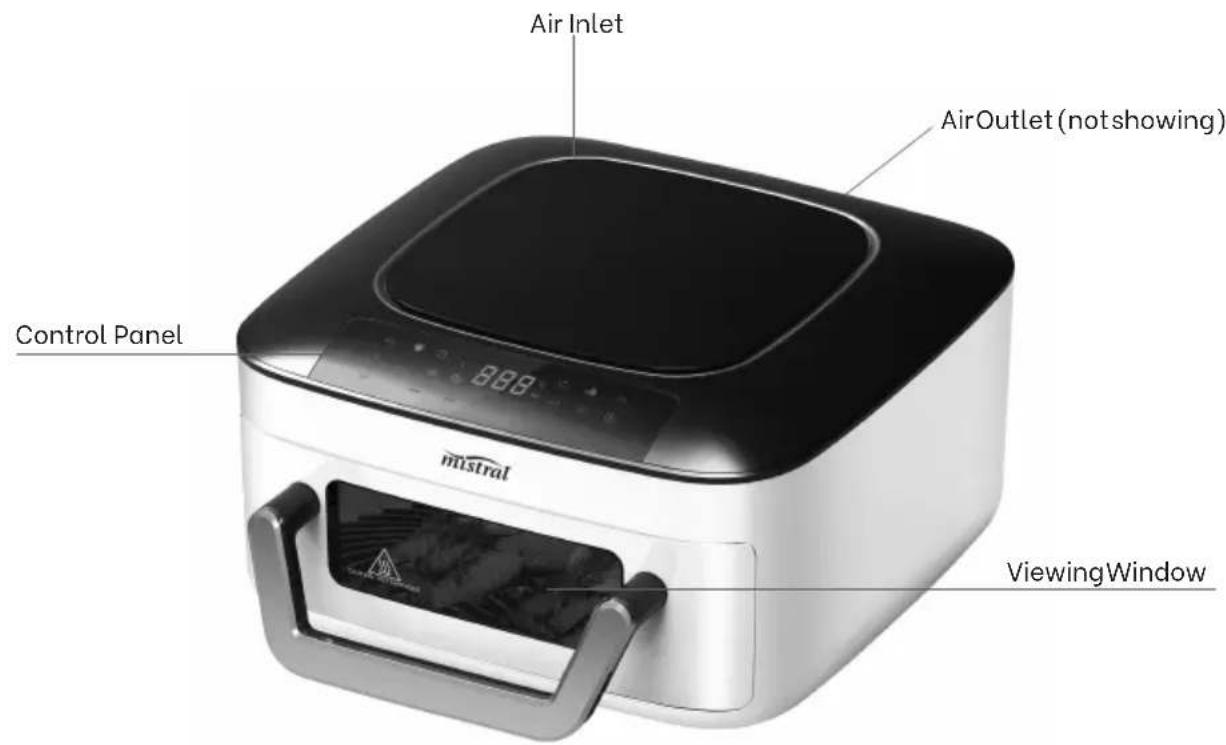
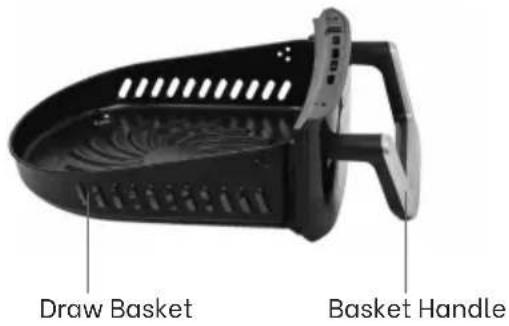
Features of Your 8 Litre Pizza Oven Air Fryer
natural_image
Black plastic air fryer basket with perforated side panel (no text or symbols on the basket itself)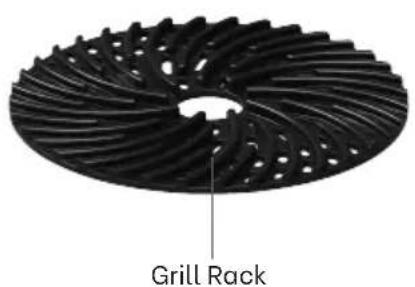
natural_image
Circular mechanical component with radial grooves and central hole, labeled 'Grill Rack' (no other text or symbols)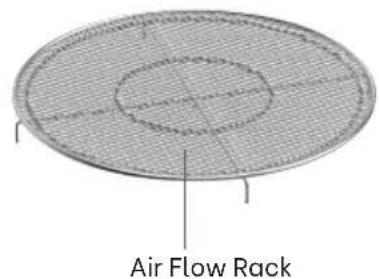
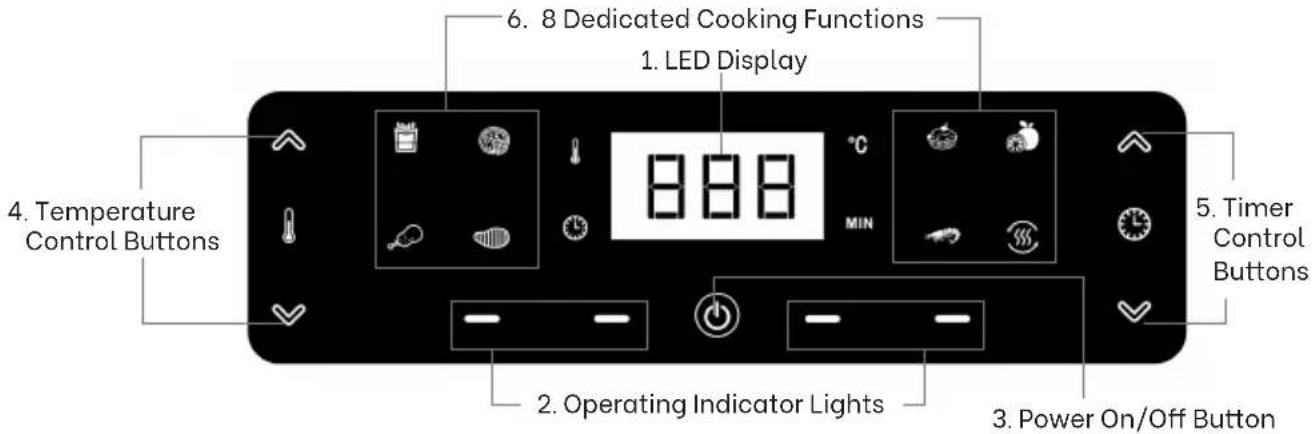
Using the Control Panel
-
LED Display: Once the appliance is plugged in, both the time and temperature will alternately light up in LED display for you to set the time and temperature or show the dedicated function temperature and time. During operation, the LED Display will show the set time counting down and when reaching 0.00 it will auto shut Off.
-
Operating Indicator Lights: lighting up successively when in operation; flashing when operation has been interrupted.
NOTE: The operating lights on the Control Panel will illuminate when the cooking cycle begins and will stay illuminated for up to approximate 20 seconds after the cooking cycle is complete. When the cooking time has completed, cooking will stop and the fan will continue running for approximate 20 seconds to cool down the appliance.
-
Power On/Off Button: Once the appliance is plugged in, the buzzer will sound, and the control panel will light up and then go off. The Power On/Off Button will remain illuminated. Press the Power On/Off Button to turn the screen on. Pressing the Power On/Off Button again will activate the cooking process at the default temperature of 180^ and time of 15 minutes. Pressing the Power On/Off Button at any time during the cooking process will shut down the Unit. The heating-up will stop immediately, and fan will automatically shut down after approximately 20 seconds to cool down the appliance. The screen will go off immediately with the Power On/Off Button remaining illuminated.
-
Temperature Control Buttons: The and symbols enable you to increase or decrease cooking temperature. Keeping a button held down will rapidly change the temperature. Temperature control range: 80–200°C (Dehydrate: 30–80°C).
-
Timer Control Buttons: The and symbols enable you to increase or decrease cooking time 1 minute at a time. Keeping the Button held down will rapidly change the time. Time control range: 1-60 minutes (Dehydrate: 1h-24h).
-
8 Dedicated Cooking Functions: Press the desired Function icon to select one of the 8 cooking presets. The selected icon will flash, with the preset temperature and time showing in the LED Display. See the Preset Chart for the cooking times and temperatures associated with each preset in Page 9.
Before Initial Use
-
Remove all packaging materials including any within the draw basket.
-
Check the items supplied for completeness (See page 4) and possible transport damage. If you find any damage, do not use the appliance, but rather contact the customer service department.
-
Remove any possible films, stickers or transport protection from the appliance. Never remove the rating plate and any possible warnings!
-
The appliance should be used for the first time without any food in it as it may produce some smoke or odours due to coating residues. Allow the appliance to heat up on the highest temperature setting for approximate 15 minutes without any food in it.
-
Wipe inside and outside of the appliance with a clean cloth and thoroughly rinse all accessories. Follow the instructions in the "Maintenance and Cleaning" chapter to do this.
NOTE:
- Do not use washing up liquid to clean the pizza stone. Soap can soak into the stone and taint food when cooking.
- Do not wash the pizza stone in the dishwasher.
- Do not soak the pizza stone.
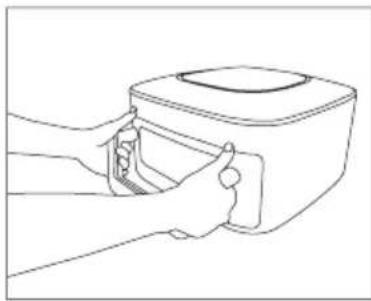
To remove the draw basket from the appliance:
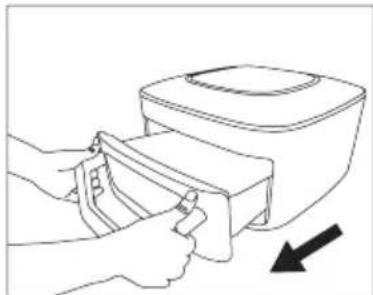
Position your hands on both sides of basket handle for proper weight balance when withdrawing draw basket, place the thumbs of both hands against the body above it (Fig.1). Then pull out slowly (Fig.2).
NOTE: Not to pull by positioning your hands in the middle of basket handle, to avoid injury by rubbing your hands on the countertop.
natural_image
Line drawing of a hand holding a small appliance (no text or symbols)Fig.1
natural_image
Line drawing of a hand using a tool to lift a device into a container, with an arrow indicating downward motion (no text or symbols)Fig.2
Preparing for Use
- Place the appliance on a stable, horizontal and even surface.
Do not place the appliance on non heat resistant surface.
-
Slide the draw basket back into the appliance.
-
Connect the mains plug into an earthed wall
socket. Touch button, one beeping sound indicates that appliance is ready for use. The default setting time is 15 minutes &180 °C.
- Preheat the appliance for 5-10 minutes when
it is cold. Touch button and then touch
button, the appliance will warm up gradually. After the warming-up, carefully pull the draw basket out of the appliance.
CAUTION: After cooking process is completed, do not turn the draw basket with ingredients upside down (Excess oil may have collected in the draw basket that could drip out). Place draw basket on a level and flat heat resistant surface, then remove the ingredients of the draw basket onto plate or into a dish with a spatula or tongs.
Using the Accessories
CAUTION: HOT! Cooked food and the hot accessories can be very hot when used in the appliance, handle with care. Always use oven gloves when handling the accessories or use tongs when removing the food. Do not leave the appliance unattended.
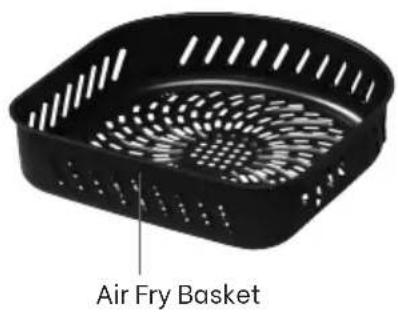
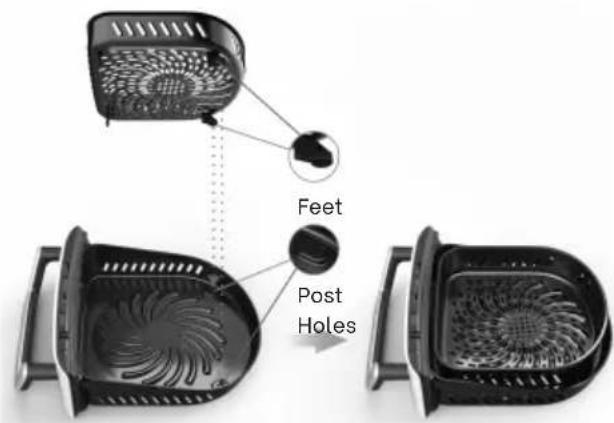
Air Fry Basket
Use the Air Fry Basket when cooking to let oil and grease drain away from your food while cooking.
To use, insert 2 feet of the Air Fry Basket into the two post holes in the Draw Basket until secured, as shown images.
Air Flow Rack
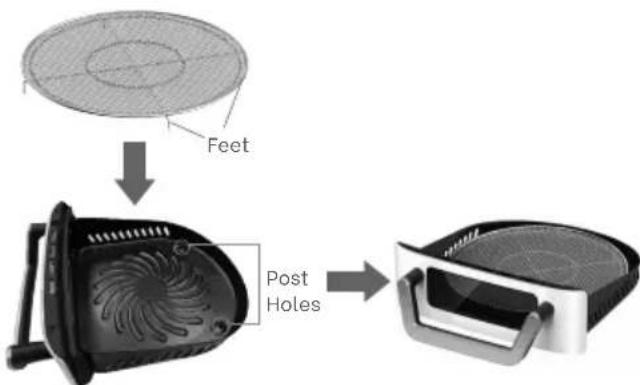
Use the Air Flow Rack as a base for the Grill Rack or Pizza Stone.
To use, insert 2 feet of the Air Flow Rack into the two post holes in the draw basket until secured, then place another accessory on top of the Air Flow Rack.
The Air Flow Rack can also be used without another accessory on top of it for air-frying or dehydrating, to optimise your cooking results.
Grill Rack
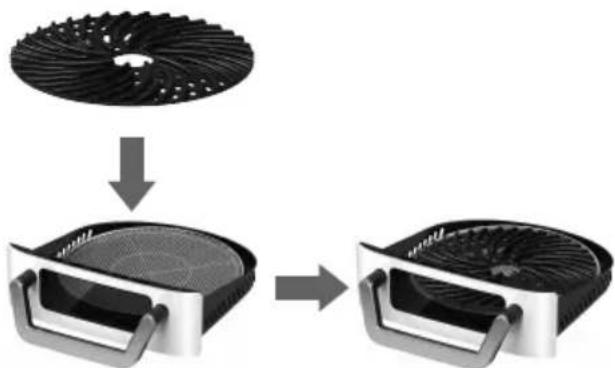
Use the grill rack when cooking grilled foods, like steak, chicken, and other.
To use, attach the Air Flow Rack to the Draw Basket and place the Grill Rack on the Air Flow Rack.
flowchart
graph TD
    A["Top Turbine Blade"] --> B["Bottom Fan Cooling Unit"]
    B --> C["Final Fan Cooling Unit"]
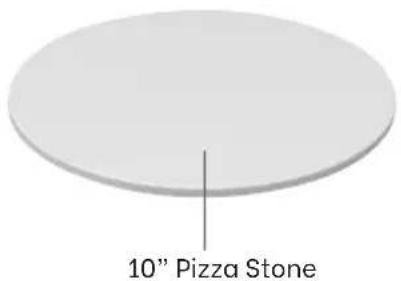
Pizza Stone
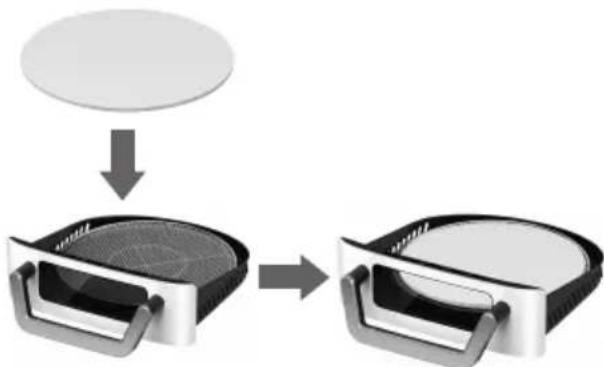
Use the Pizza Stone for baking frozen or fresh pizza up to 10", for crispy perfection. The pizza stone is also great for making cookies, pastry bread, biscuits etc.
To use, attach the Air Flow Rack to the Draw Basket and place the Pizza Stone on the Air Flow Rack.
flowchart
graph TD
    A["Circle Component"] --> B["Shelter Chamber"]
    B --> C["Device with Mesh"]
    C --> D["Final Product"]
WARNING:
- Even if the appliance appears to have cooled down, the pizza stone may still be very hot; be careful and use heat-resistant mitts, to avoid exposure to burning hazard.
- Do not remove the pizza stone to remove the pizza during operation or when it is hot. the pizza stone can be removed only if the oven is switched off and completely cooled.
- Use heat-resistant wooden utensils (not supplied) to avoid damaging the pizza stone.
NOTE:
- Do not place pizzas that are bigger than 10 inches on the Pizza Stone.
- Some pizzas are packed on a sheet of paper or polystyrene which may become stuck to the base of the pizza. Ensure that you remove all packaging materials before cooking.
Using the Appliance
CAUTION:
- Danger of burns! The external surface of the appliance and all inserts will become extremely hot during use. Only hold the draw basket by its handle to remove from the appliance. Always use oven gloves when handling the hot accessories or use tongs when removing the cooked food. Do not leave the appliance unattended.
- Do not place food that is still packed in plastic wrap or plastic bags in the appliance.
- Only ever place down the hot accessories on a heat-resistant surface.
-
Select a suitable accessory for the food that is to be prepared.
-
Process the food and place it on / in the accessory. Attach this accessory in the appliance.
NOTE: The Draw Basket of the appliance must be into the appliance for settings to be made and buttons to be pressed.
-
Completely unwind the power cord and plug the plug into a standard domestic power outlet and switch on. The appliance beeps to indicate there is power supply to the appliance.
-
Press button, the displays on the control panel switch on.
-
Either set the temperature and cooking time manually or select one of the 8 cooking presets.
Manual setting:
- Touch the corresponding or symbol to increase or decrease the temperature from 80-200°C at 5 degree interval (Dehydrate: 30-80°C) or the cooking time from 1-60 minutes at 1 minute interval (Dehydrate: 1h-24h).
Keeping a button held down will rapidly change the temperature/cooking time.
Choose a cooking preset:
- Touch the required programme symbol. When it flashes, the programme is activated. When the symbol is touched again, the selection is cancelled. The symbols represent the following presettings:
| Symbol | Programme | Temperature | Cooking time |
 | Fries 200°C 20 min | ||
 | Poultry 200°C 25 min | ||
 | Pizza 180°C 20 min | ||
 | Steak 180°C 15 min | ||
 | Baking 160°C 30 min | ||
 | Seafoods 160°C 20 min | ||
 | Dehydrate 50°C 2 h | ||
| To dry food is the best and effective way to store food.The dehydrate function ensures that it reduces the loss of food nutrients to maintain healthy foods. Dehydrate fruit and vegetables that are in season and store to enjoy throughout the year. | |||
 | Preheat 180°C 10 min | ||
- The temperatures and cooking times which are set for the programmes are merely averages and should be adjusted if necessary. As the ingredients differ due to their origin, size, shape, quality and brand, the actual cooking temperatures and times may vary.
-
To change the temperature or cooking time of a selected programme, touch the corresponding ▲ or ∨ symbol to increase or decrease the temperature/cooking time as you would for manual setting.
-
Touch button again to begin the cooking cycle immediately once the desired cooking time and temperature have been selected. Constantly illuminating operating lights indicate that the appliance is operating. If operation is interrupted, they flash.
NOTE:
- If you do not touch button after you have selected a cooking preset or manually selected the cooking temperature and time, the LED Display will turn off and appliance shuts down after approximately 5 minutes. The Button will remain illuminated.
- Until you are properly familiar with the appliance, the condition of the food should be checked throughout by removing the draw basket to ensure that it does not burn. The appliance will stop working when the draw basket is pulled out. When draw basket is repositioned into the appliance, it will resume cooking and the display will show the time remaining.
- During cooking process, the cooking temperature /time can be adjusted by touching the corresponding or symbol.
-
You can manually switch Off the appliance at any time during the cooking process, press Button, "OFF" will display on the control panel. The heating-up will stop immediately, and fan will automatically shut down after approximately 20 seconds.
-
Once the cooking time has elapsed, the appliance switches off automatically and a beep is heard.
-
You can now remove the draw basket by its handle from the appliance.
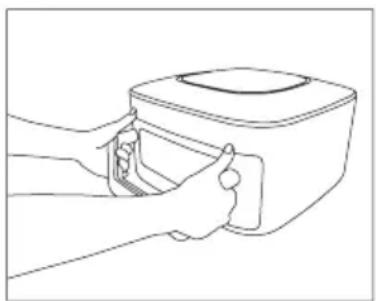
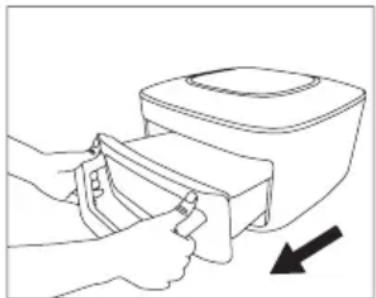
To remove the draw basket, position your hands on both sides of basket handle for proper weight balance when withdrawing draw basket, place the thumbs of both hands against the body above it (Fig.1). Then pull out slowly (Fig.2).
NOTE: Not to pull by positioning your hands in the middle of basket handle, to avoid injury by rubbing your hands on the countertop.
Place the draw basket on heat resistant flat surface and remove the hot accessories and cooked food by using spatula or tongs.
natural_image
Line drawing of a hand holding a device with a lid (no text or symbols)Fig.1
natural_image
Line drawing of a hand using a tool to lift a rectangular device (no text or symbols)Fig.2
- Remove the mains plug from the plug socket after use.
- Allow the used accessories and appliance to cool down and then clean them.
Cooking Table
| Min-max Amount (g) | Time (min) | Temperature (°C) | shake Extra information | ||
| Thin frozen fries 300-600 | 15-25200 | Slightly | shake | ||
| Thick frozen fries 300-600 | 15-25200 | Slightly | shake | ||
| Home-made fries 300-600 | 15-25200 | Slightly | shake | Add 1/2 tbsp of oil | |
| Home-made potato wedges | 300-600 15 | 30200 | Slightly | shake | Add 1/2 tbsp of oil |
| Home-made potato cubes | 300-600 | 15-30200 | Slightly | shake | Add 1/2 tbsp of oil |
| Steak 200-500 | 10-20180 | Slightly | shake | ||
| Pork chops | 200-600 | 15-25200 | Slightly | shake | |
| Chicken breast | 200-600 | 20-30200 | Slightly | shake | |
| Chicken wing | 200-700 | 20-30200 | Slightly | shake | |
| Drumsticks | 200-700 | 20-30200 | Slightly | shake | |
| Fish | 200-600 | 10-20160 | |||
| Onion ring | 200-600 | 15-20 | 180 | Use oven-ready type | |
| Frozen fish | 200-600 | 15-25 | 180 | Use oven-ready type | |
| Frozen cheese snacks | 200-400 | 10-20 | 160 | Use oven-ready type | |
| Frozen vegetable | 200-400 | 10-25 | 130 | Slightly shake | Use oven-ready type |
| Frozen chicken nuggets | 200-600 | 20-35200 | Slightly | shake | Use oven-ready type |
| Cake | 300-500 | 25-35160 | Using silicone cake cups | ||
| Quiche | 200-500 | 25-35 | 160 | Using silicone cake cups | |
| Muffins | 350-500 | 10-15 | 180 | Using silicone cake cups | |
| Tarts / souffle | 350-500 | 20-30 | 160 | Using silicone cake cups | |
Maintenance and Cleaning
- Remove the mains plug from the wall socket and allow the appliance to cool down completely before cleaning. Clean it after every use.
NOTE: Remove the draw basket to let the air fryer cool down faster.
CAUTION: Do not immerse the housing in water or any liquid when you clean the unit.
Care must be taken not to touch any hot surfaces.
- Do not use harsh abrasives, caustic cleaners or oven cleaners when cleaning this appliance.
- Wipe the outside of the appliance with a moist cloth.
- Clean the draw basket, air flow rack, air fry basket and grill rack with hot water, washing-up liquid and a non-abrasive sponge.
NOTE: The Air Fry Basket, Air Flow Rack and Grill Rack are dishwasher-proof.
Clean the Pizza Stone
- Wait until the appliance is completely cool to clean it.
- Do not wash the pizza stone in the dishwasher.
- Do not wash the pizza stone with rough sponges or materials.
- Do not soak the pizza stone.
- Scrape off any excess food from the surface of the pizza stone. Rinse and dry thoroughly.
- The pizza stone may be subject to scratches or wear of the non-stick material; this is normal.
NOTE: Do not use washing up liquid to clean the pizza stone. Soap can soak into the stone and taint food when cooking.
Tips:
If dirt is stuck to the draw basket or the bottom, fill the draw basket with hot water and some washing-up liquid. Allow the part soak for about 10 minutes.
- Clean the inside of the appliance with a slightly dampened cloth and polish it with a soft dry cloth.
- If required lightly brush the heating element to remove any attached food residue.
- Make sure all parts are clean and dry, before storing or using it again.
- Store the appliance in a cool, dry place. Do not place heavy objects on top of the Air Fryer during storage as this may damage the appliance.
WARNING: Beware of escaping steam when removing the draw basket. There is a danger of scalding.
After cooking process is completed, do not turn the draw basket with ingredients upside down (Excess oil may have collected in the draw basket that could drip out).
Place draw basket on a level and flat heat resistant surface, then remove the ingredients of the draw basket onto plate or into a dish with a spatula or tongs.
Recipe
Making Home-made Fries
To make home-made fries, follow the steps below:
- Make the potatoes peel and slice.
- Wash the potato sticks thoroughly and dry them with kitchen paper.
- Pour 1/2 tablespoon of olive oil in a bowl, put the sticks on top and mix until the sticks are coated with oil.
- Remove the sticks from the bowl with your fingers or a kitchen utensil so that excess oil stays behind in the bowl. Put the sticks in the Air Fry Basket.
Fry the potato sticks according to the instructions in this chapter.
Home-made Pizza Base
2 cups plain floor
2 tspn fresh yeast
1 tspn sugar
2 tspn olive oil
1 tspn salt
150ml water
- Sift flour and salt into a glass mixing bowl. Add sugar and yeast. Mix dry ingredients through.
- Make a well in the centre of the flour mixture and add oil. Mix slowly by hand adding water gradually to form a dough.
- Remove dough from bowl and knead on a flat floured surface for a minimum of 10 minutes, until well formed.
- Place back in bowl, and cover bowl top surface area with a clean wet tea towel. Leave stand for 20 minutes until dough doubles in size.
- Remove from bowl and knead well until dough is of elastic consistency.
- Roll out onto pizza base and top with favourite toppings.
- Remove the draw basket from the appliance and attach the air flow rack to the draw basket and place the pizza stone on the air flow rack. Place the pizza on the pizza stone and slide back into appliance to commence baking process.
- Set the timer to 15 minutes at 180^ C. If you prefer extra browning, we recommend you cook for an extra 5-10 minutes.
Troubleshooting
| Problem Possible | cause Solution | |
| The appliance does not work | The appliance is not plugged in. | Put the mains plug in an earthed wall socket. |
| The ingredients fried within fryer are not done | The amount of ingredient Use in the basket are too many. | smaller batches of ingredients. Smaller batches are fried more evenly. |
| The set temperature is too low. | Set the temperature control to the required temperature setting (refer to page 5 of this booklet). | |
| The preparation time is too short. | Set the cooking time to the required preparation time. | |
| The ingredients are fried unevenly in the fryer | Certain types of ingredients need to be tossed halfway through the preparation time. | Ingredients that lie on top of or across each other (e.g. fries) need to be tossed halfway through the preparation time. |
| Fried snacks are not crispy when they come out of the fryer | You used a type of snacks meant to be prepared in a traditional deep fryer. | Use oven snacks or lightly brush some oil onto the snacks for a crisper result. |
| I can not slide the draw basket into the appliance properly | There are too much ingredients in the draw basket. | Do not fill beyond the air fry basket. |
| White smoke comes out from the Appliance. | You are preparing greasy ingredients. | When you fry greasy ingredients in the appliance, a large amount of oil will leak into the draw basket. The oil produces while smoke and the draw basket may heat up more than usual. This does not affect the appliance or the end result. |
| The draw basket still contains grease residues from previous use. | White smoke is caused by grease heating up in the draw basket. Make sure you clean the draw basket properly after each use. |
Troubleshooting
| Problem Possible | cause Solution | |
| Fresh fries are fried unevenlyin the fryer | You did not use the rightpotato type. | Use fresh potatoes and make sure that they stayfirm during frying. |
| You did not rinse thepotato fries properlybefore you fried them. | Rinse the potato fries properly to remove starchfrom the outside of the fries. | |
| Fresh fries arenot crispy whenthey come outof the fryer | The crispiness of the friesdepends on the amount ofoil and water in the fries. | Make sure you dry the potato fries properly beforeyou add the oil. |
| Cut the potato fries smaller for a crispier result. | ||
| Add slightly more oil for a crisper result. | ||
| E1 appears onLED display | The sensor open circuit. Repair and do not use.Repairs should only be performed by qualifiedpersonnel in order to avoid a hazard. | |
| E2 appears onLED display | The sensor short circuit. Do not use and repairRepairs should only be performed by qualifiedpersonnel in order to avoid a hazard. | |
Specifications
| Power Supply 220-240V ~ 50Hz | |
| Power Consumption 1500W |
NOTE: As a result of continual improvements, the design and specifications of the product within may differ slightly from the unit illustrated on the packaging.
Notes
Notes
Notes
Warranty
This product is guaranteed to be free from defects in workmanship and materials, including parts and unless otherwise specified, for a period of 12 months from the date of purchase.
Defects that occur within the warranty period, under normal use and care, will be repaired, replaced or refunded at our discretion.
The benefits conferred by this warranty are in addition to all rights and remedies in respect of the product that the consumer has under the Competition and Consumer Act 2010 and similar state and territory laws.
Our goods come with guarantees that cannot be excluded under the Australian Consumer Law. You are entitled to are replacement or refund for a major failure and for compensation for any other reasonably foreseeable loss or damage. You are also entitled to have the goods repaired or replaced if the goods fail to be of acceptable quality and the failure does not amount to a major failure.
Proof of Purchase
This warranty is valid for the original purchase and is not transferable. Please keep your purchase docket, tax invoice or receipt as the best proof of purchase, and as proof of date on which the purchase was made.
Extent of Warranty
This warranty is limited to defects in workmanship and materials, including parts. All defective products or parts will be repaired, replaced or refunded. This warranty does not cover batteries or any other consumable items.
Normal wear and tear
This warranty does not cover normal wear to the products or parts.
Exclusions
This warranty does not cover:
- Any defects caused by an accident, misuse, abuse, improper installation or operation,
lack of reasonable care, unauthorised modification, loss of parts, tampering or attempted repair by a person not authorised by the distributor. - Any product that has not been installed, operated or maintained in accordance with the manufacturer's operating instructions provided with the product.
- Any product that has been used for purposes other than domestic use.
- Any damage caused by improper power input or improper cable connection.
To make a claim
This warranty against defects is given by: GSM Retail Australia Pty Ltd
Address: Level 2, 142-144 Fullarton Road, Rose Park, Rose Park, South Australia 5067
Email: gsmretailgroup.com
Telephone: 08 8122 2390
If a defect in the product appears within the nominated warranty period (The identified period on the packaging/Instructions), cease using the product, and return the product to the place of purchase. If we agree that a defect covered by this warranty has occurred, you are entitled for replacement or refund of the product.
When making a return, please ensure the product is properly packaged to ensure that no damage occurs to the product during transit.
Where a claim for warranty extends beyond place of purchase replacement /refund (Installed products requiring service repair) please contact:
Telephone: 1300 373 199 (For warranty repairs and technical support)
Supplier Name: GSM Retail Australia Pty Ltd
Supplier Address: 142-144 Fullarton Road, Rose Park, SA 5067
Email: admin@gsmretailgroup.com

Gerard Sourcing & Manufacturing
GSM Retail Group
Consumer Service Centre :
Aus: 1300 941 901
NZ: 0800 764 912
GSM Retail Group has a policy of continual improvement throughout the product range. As such the unit contained within may differ slightly from the unit illustrated on the pack.
MADE IN CHINA for GSM Retail Group
Mistral is a registered trademark of GSM Retail Group
Cat. No. MLAF50V
August 2021
- Instruction Manual
- Important Safeguards
- When using this electrical appliance, the following basic safety precautions should always be followed:
- For Your Safety
- Caution:
- Warning
- Save These Instructions
- Automatic Switch-off
- Using the Control Panel
- Before Initial Use
- NOTE:
- To remove the draw basket from the appliance:
- Preparing for Use
- Using the Accessories
- Air Fry Basket
- Air Flow Rack
- Grill Rack
- Pizza Stone
- WARNING:
- Using the Appliance
- NOTE: The Draw Basket of the appliance must be into the appliance for settings to be made and buttons to be pressed.
- Manual setting:
- Choose a cooking preset:
- Maintenance and Cleaning
- Clean the Pizza Stone
- Tips:
- Recipe
- Making Home-made Fries
- Home-made Pizza Base
- Notes
- Warranty
- Proof of Purchase
- Extent of Warranty
- Normal wear and tear
- Exclusions
- To make a claim
- Telephone: 1300 373 199 (For warranty repairs and technical support)
- GSM Retail Group
Brand : MISTRAL
Model : MLAF50V
Category : Deep fryer