
MDF880 - Deep fryer MISTRAL - Free user manual and instructions
Find the device manual for free MDF880 MISTRAL in PDF.

| Product Type | Digital Air Fryer |
| Power Consumption | 1800W |
| Power Supply | 220-240V ~ 50Hz |
| Capacity | Max 1200g, Optimum 800g |
| Temperature Range | 80°C - 200°C |
| Timer Range | 1 - 60 minutes |
| Cooking Functions | 7 Presets (Seafood, Pork, Fries, Baking, Poultry, Steak, Fish) + Manual Mode |
| Control Type | Touch Control with Digital Display |
| Basket Material | Non-stick Coated, Dishwasher-Proof |
| Safety Features | Auto Shut-Off, Cool-Down Fan, Overheat Protection |
| Memory Function | Remembers Last Settings for Up to 2 Hours After Power Off |
| Cleaning | Basket Dishwasher Safe; Wipe Exterior with Damp Cloth |
| Accessories | Baking Rack/Basket Included |
Frequently Asked Questions - MDF880 MISTRAL
User questions about MDF880 MISTRAL
0 question about this device. Answer the ones you know or ask your own.
Ask a new question about this device
Download the instructions for your Deep fryer in PDF format for free! Find your manual MDF880 - MISTRAL and take your electronic device back in hand. On this page are published all the documents necessary for the use of your device. MDF880 by MISTRAL.
USER MANUAL MDF880 MISTRAL
natural_image
Black and white photo of an instant air fryer with a cut open, containing fried food (no visible text or symbols)Instruction Manual
Model: MDF880
Important Safeguards
When using this electrical appliance, the following basic safety precautions should always be followed:
For Your Safety
- Please read these instructions before operating and retain these for future reference.
- Before connecting the appliance to the power supply, check that the voltage indicated on the appliance corresponds with the voltage in your home. If this is not the case, contact your local qualified technician and DO NOT use the appliance.
- If the supply cord or any part is damaged, cease use of this appliance immediately to avoid a hazard.
- Do not hang the power cord over the edge of table and do not let cord contact hot surfaces, including stovetop.
- Place the appliance on the flat surface. Do not place on the heated surface or near a hot gas or electric burner or oven.
- This appliance is not intended for use by persons (including children) with reduced physical, sensory or mental capabilities, or lack of experience and knowledge, unless they have been given supervision or instruction concerning use of the appliance by a person responsible for their safety.
• Children should be supervised to ensure that they do not play with appliance. - Never immerse the housing, which contains electrical components and the heating elements, in water nor rinse it under the tap.
- Avoid any liquid entering the appliance to prevent from electric shock or short-circuit.
- Keep all ingredients within the basket and do not overfill beyond the basket to prevent any direct contact with heating element.
- Do not cover the air inlet or the air outlet when the appliance is working.
- Filling the basket with oil may cause a fire hazard.
-
Do not touch the inside of the appliance while it is operating.
-
Keep the appliance and its mains cord out of the reach of children.
- Do not connect appliance to an external timer switch.
- Do not place the appliance on or near combustible materials such as a tablecloth or curtain.
- Do not place the appliance against a wall or against other appliances. Hot air up to 160 Degrees expels through the rear vent of the appliance. Leave at least 10cm clearance around the entire appliance, including directly above it. Additional care should be taking when placing appliances on bench top surfaces or near splash backs where such materials (Acrylics, timber etc.) do not have the high heat resistant properties, so advise to place them on top of a heat resistant material between bench and appliance and further away from wall surfaces / splash backs.
- Do not place anything on top of the appliance.
- Do not use the appliance for any other purpose than described in this manual.
- Do not let the appliance operate unattended.
- During hot air frying, hot steam is released through the air outlet openings. Keep your hands and face at a safe distance from the steam and form the air outlet openings.
- Also be careful of hot steam and air when you remove the basket from the appliance.
- Surfaces may become hot during use.
- Do not operate the appliance if there is a malfunction or if it is damaged in any manner. Immediately unplug the appliance if you see dark smoke coming out of the appliance.
- Wait for the smoke emission to stop before you remove the basket from the appliance.
- This appliance is intended to be used in households and similar applications such as:
- Staff kitchen areas in shops, offices and other working environments;
- Farm houses;
- By clients in hotels, motels and other residential type environments;
- Bed and breakfast type environments.
Caution:
- This appliance is intended for household use only and not for commercial, industrial or outdoor use.
- This appliance must be earthed. Only connect it to a suitable earthed AC 240V\~50Hz mains socket. Always make sure that the plug is inserted into the socket properly.
- Ensure the appliance is placed on a horizontal, even and stable surface.
- The baking basket becomes hot all over when it is used in the air fryer. Always use oven gloves when handing the baking basket.
- If the supply cord is damaged, it must be replaced by the manufacturer or similarly qualified persons in order to avoid a hazard.
• Always unplug the appliance when not in use. - The appliance needs approximately 30 minutes to cool down.
- In the interest of safety, regular periodic close checks should be carried out on the supply cord to ensure no damage is evident. Do not attempt to dismantle or repair this unit yourself. Repairs should only be performed by qualified personnel in order to avoid a hazard.
Automatic switch-off
The appliance has a build in timer, it will automatically shut down the appliance when count down is completed. You can manually switch off the appliance by pressing the Power-off key, the heating-up will stop running immediately, and blower will automatically shut down after approximately 20 seconds, at the same time, you will hear 5 beep sounds.
Warning
If the supply cord is damaged, the cord must be replaced by the manufacturer, its service agent or similarly qualified persons in order to avoid a hazard.
This product has not been designed for any uses other than those specified in this booklet.
Save These Instructions
THIS APPLIANCE IS DESIGNED FOR HOUSEHOLD USE ONLY
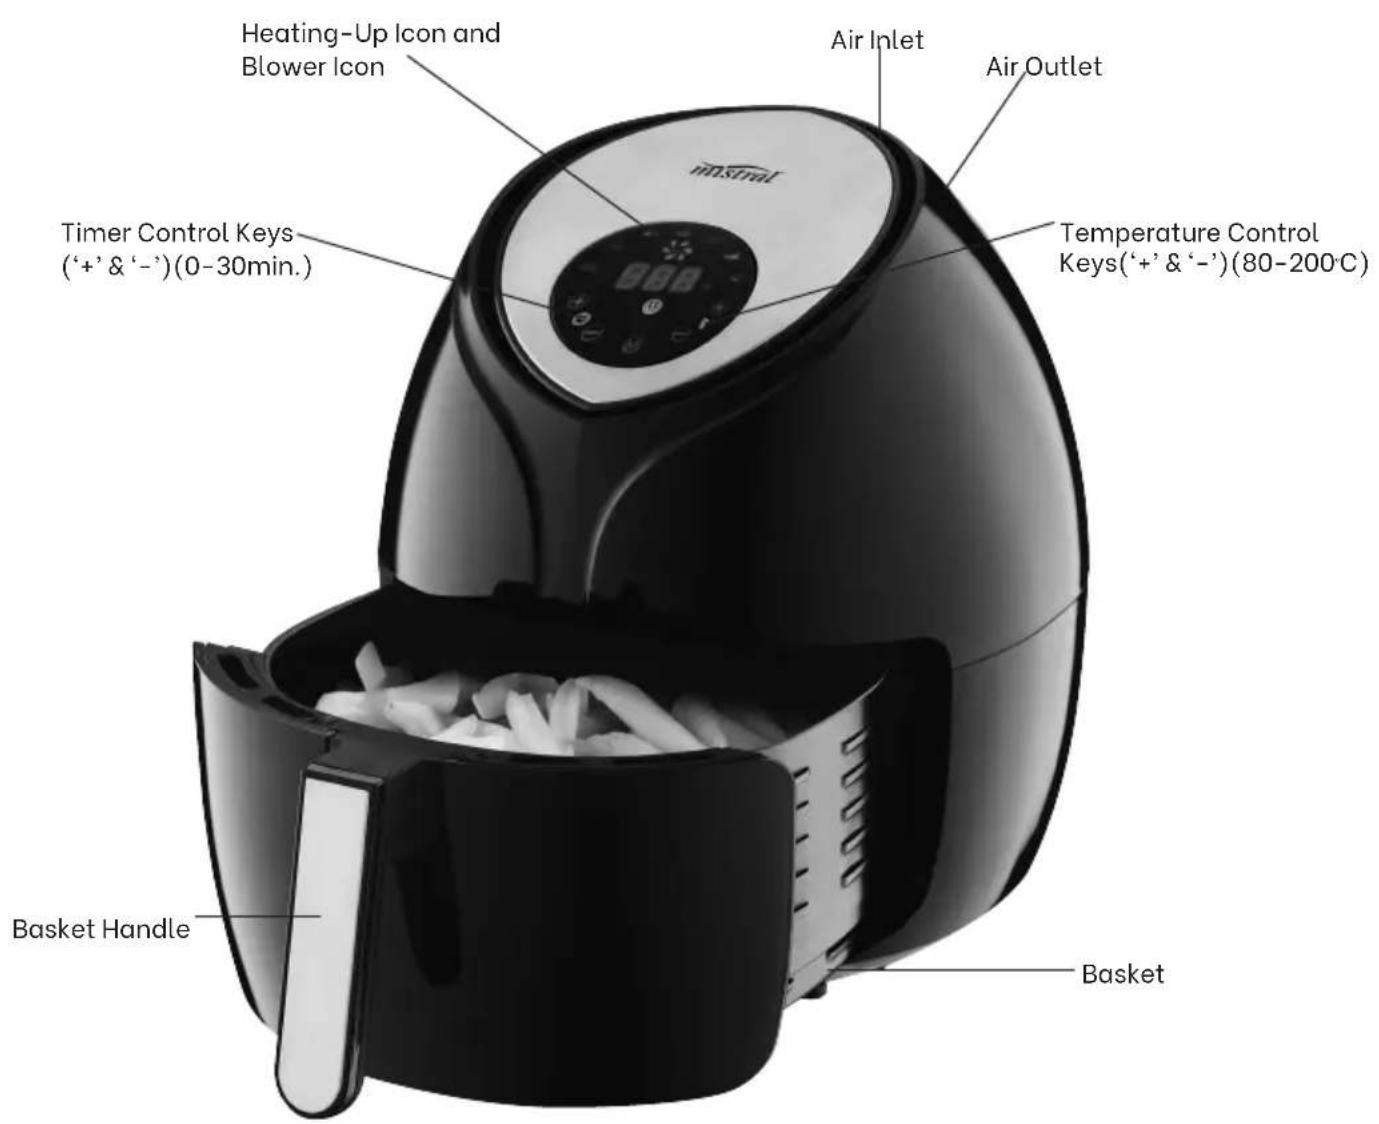
Features of Your Digital Air Fryer

Introduction
The Air fryer provides an easy and healthier way of cooking your favorite foods, by applying rapid air circulation from all directions additional to a top grill and is able to cook a variety of dishes without adding any oil or adding just a little oil for nominated ingredients tabled further in this booklet.
Know Your Appliance
The appliance has manual cooking and 7 dedicated cooking functions. You can select the desired cooking function for ingredients to be cooked (refer to the table on page 9 and 10 of this manual for guidance). In Standby mode, you can touch Timer control keys and Temperature control keys to set the desired cooking time/temperature in Manual cooking function directly.

"Menu" Key
In Standby mode, you can also touch the Menu ("M") key repeatedly to select the desired dedicated preset cooking functions. There are 7 dedicated cooking functions to choose from Seafood, Pork, Fries, Baking, Poultry, Steak and Fish and each have their own preset cooking Temperatures/Times. The corresponding indicator will be displayed once it is selected and touch key to Power ON/OFF key to start cooking process.

"Fries" Function
Default temperature and cooking time is 200^ C for 25 minutes.

"Pork" Function
Default temperature and cooking time is 200^ C for 15 minutes.

"Seafood " Function
Default temperature and cooking time is 160^ C for 20 minutes.

"Baking" Function
Default temperature and cooking time is 160^ C for 30 minutes.

"Poultry" Function
Default temperature and cooking time is 200^ C for 25 minutes.

"Steak" Function
Default temperature and cooking time is 200^ C for 15 minutes.

"Fish" Function
Default temperature and cooking time is 160^ C for 25 minutes.

"Power On/Off" Key
Press key to switch appliance On and press again to activate selected cooking function. Manually switch Off the appliance at any time during the cooking process, You can manually switch off the appliance by pressing the Power-off key, the heating-up will stop running immediately, and fan will automatically shut down after approximately 20 seconds, at the same time, you will hear 5 beep sounds.


"Time Control" key
Use and icons to adjust the timer settings by -/+1 minute increments (minimum of 1 minute to a maximum of 60 minutes). For faster timer adjustment press and hold the or timer icon.


"Temperature Control" key
Press and icons to adjust the temperature setting by - / + 5^ increments (minimum of 80^ to a maximum of 200^ ). For faster temperature adjustment press and hold the or - temperature icon.
NOTE: Cooking times will vary depending on the food you wish to cook and the individual's personal preference. Cooking times stated in this Instruction Manual should only be used as a guide.
Before first use
- Remove all packaging materials including any within the basket.
- Slide out the basket, place on a flat surface and take out the rack within the basket. Clean both basket and rack with non-abrasive sponge and warm water, rinse thoroughly and dry completely.
- Wipe clean the inside and outside of the appliance with a slightly dampened cloth.
Preparing for use
- Place the appliance on a stable, horizontal and even surface. Do not place the appliance on non heat resistant surface.
- Slide the basket back into the appliance.
- Connect the mains plug into an earthed wall socket. Touch the power On/Off key, One beeping sound indicates that appliance is ready for use. The default setting time is 15 minutes &180 °C.
- Preheat the appliance for 5 minutes when it is cold. The setting time is 5 minutes 80°C. you can increase or decrease both Cooking Time at 1 Minute intervals and Temperature at 5°C interval by continues touching the +/- keys at either side of the respective Time and Temperature icons or fast scroll by holding keys down to set your desired cooking Time/Temperatures.

Using the Appliance
This appliance is able to cook a variety of dishes, refer to page 9 & 10 of this booklet for selection and respective cooking times.
-
Connect the mains plug into an earthed wall socket.
-
Place the rack into the basket and put it to the bottom and then put ingredients into the basket and slide the basket into the appliance.
Note: Do not fill beyond the basket (see section ‘settings’ in this chapter), as it may effect the quality of the fried food.
Caution: Do not touch the external surface of the basket during use or when removed from appliance directly after cooking, as it gets very hot. Only hold the basket by the handle protruding from the front of the appliance.
- Touch the Power on/Off key to switch on the unit. The appliance is now in Standby mode.
- The appliance has manual cooking and 7 dedicated cooking functions. You can select the desired cooking function for ingredients to be cooked (refer to the table on page 9 & 10 of this manual for guidance).
In Standby mode, you can touch Timer control keys and Temperature control keys to set the desired cooking time/temperature in Manual cooking function directly.
Note: The preset setting is 15 minutes and 180 degree Celsius. The adjustment time range is 1-60 minutes and the adjustment temperature is 80-200 degree Celsius.
In Standby mode, you can also touch the Menu (“M”) key repeatedly to select the desired dedicated preset cooking functions. There are 7 dedicated cooking functions to choose from CHIPS, MEAT, SEAFOOD, CAKE, CHICKEN, STEAK and FISH and each have their own preset cooking Temperatures/Times. The corresponding indicator will be displayed once it is selected.
Note: As the Temperature/Time are only approximates and dependent on the volumes of ingredients placed in the basket, you can increase or decrease both Cooking Time at 1 Minute intervals and Temperature at 5 degree interval by continues touching the +/- keys at either side of the respective Time and Temperature icons or fast scroll by holding keys down to set your desired cooking Time/Temperatures.
Tip: Before cooking the food, it is better to preheat the appliance without food in the basket in Manual cooking function for 5 minutes at approximate 80 degree Celsius when the basket are cold.
- After the cooking function is selected and the time/temperature are set, touch the Power on key again to start the cooking process. The rotating fan indicator light (Blue) and heating element indicator star light at the centre (Red) will illuminate at the same time.
Note: During the cooking process the Heating Element star indicator light will go On and OFF in unison with the thermostat to maintain set temperature whilst the fan indicator light keeps turning.
-
During the cooking process, oil will drip and be collected on the bottom of the basket, this can be cleaned at the end of the cooking process and when basket has cooled down, ready for future use of the appliance
-
For cooking of some ingredients, it requires you to toss contents of the basket halfway during the cooking process to ensure even cooking and avoid charring of ingredients positioned in top of basket. Where indicated to do so, you can remove basket without affecting the timing and after tossing place back into the appliance to resume cooking.
Caution: The appliance will stop working when the basket is pulled out, when basket is placed back into the appliance, it will resume cooking and the remaining time showing on the display after the basket was repositioned into the appliance.
Tip: You can set the timer for half of the cooking time, when time has elapsed and beeping sound activates, remove the basket from the appliance to toss ingredients, place basket back in appliance, then reset timer for the balance of the cooking time, cooking cycle is completed when time has elapsed and beeping sound activates.
- When you hear the beeping sound, the set cooking time has elapsed (for approximately 20 seconds the fan continues to operate after which the appliance turns automatically OFF). At this point, check if ingredients are cooked to your satisfaction, if not, set timer for a few more minutes until contents are cooked to your satisfaction.
Remove the basket from the appliance, only holding by the handle as other surfaces are hot, tip contents of the basket in a dish
directly or alternatively place basket on flat, firm and heat resistant surface, remove basket and then tip contents into dish.
NOTE: Do not turn over the basket because the oil or fat that dripped into the basket bottom will pour in the cooked food and container.
Note: You can manually switch Off the appliance at anytime during the cooking process, if unable to supervise, by pressing the Power ON/OFF icon button (The fan will continue to operate for approximately 20 seconds, after which the appliance automatically turns OFF).
NOTE: The basket and basket contents are hot during cooking process and cooking is just completed, Steam may escape from the basket, it is depending on the type of ingredients was cooked in the basket.
Tip: To remove large individual or delicate ingredients from the basket, don't tip out, but pick up with pair of tongs.
-
On completion of the cooking process, the air fryer is immediately ready for cooking the next batch of ingredients.
-
After cooking process is completed, allow the fan to cool down appliance and when fan stops the appliance can be switched at wall socket and unplugged.
Settings
To assist with selection of cooking times and maximum basket volumes for specific ingredients, refer to the table on page 9 & 10 of this booklet.
The time setting range is 0-60 Minutes. in the range, you can set any time as your desire and ensure food is cooked.
And the temperature can be set 80^ C to 200^ C. in the range, you can set any temperature as your desire and ensure food is cooked.
Note: Please keep in mind that settings referred to in the table are indicative only and that variation in size, shapes and brands may require minor time adjustment up or down to achieve your desired / preferred cooking outcome.
This type of heating technology reheats the air inside the appliance instantly, so pulling the basket briefly out of the appliance to toss ingredients during the cooking process barely disturbs the process.
Tips:
- Smaller ingredients usually require a slightly shorter cooking time than larger ingredients.
- A larger amount of ingredients only requires a slightly longer cooking time. A smaller amount of ingredients only requires a slightly shorter cooking time.
- Tossing smaller ingredients halfway during the preparation time optimizes the end result and can help prevent unevenly fried ingredients.
- Do not prepare extremely greasy ingredients such as sausages in the fryer.
- Snacks that can be prepared in an oven can also be prepared in the fryer.
- Although Max. 1200g can be placed in the basket, the optimum amount is 800g to facilitate tossing of the basket contents during the cooking process to obtain evenly cooked contents for ingredients requiring tossing.
- Place a baking tin or oven dish in the air fryer basket if you want to bake a cake or quiche or if you want to fry fragile ingredients or filled ingredients.
- You can also use the air fryer to reheat ingredients. To reheat ingredients, set the temperature to 160°C for up to 10-20 minutes.
- For best results with home-made fries soak the cut fries in water for 30 minutes to remove excess starch, dry on kitchen paper and toss in 12 tablespoon of Olive oil (or lightly spray with Olive Oil Spray) until the fries are coated.
- For a crispy home-made coating mix fine breadcrumbs with a tablespoon of Olive oil.
- Pre-packaged snacks like breadcrumb fish or chicken drumsticks only need to be coated lightly with Olive oil.
Memory Function
This appliance has a built-in memory function that will remember the last set temperature and time for a period of two hours after power was switched Off before the completion of previous cooking process. When appliance is turned On within in this 2 hour period, a beep will sound, the indicator light and display will light up and start cooking automatically.
Maintenance and Cleaning
- Remove the mains plug from the wall socket and allow the appliance to cool down completely before cleaning. Clean it after every use.
Note: Remove the basket to let the air fryer cool down faster.
Caution: Do not immerse the housing in water or any liquid when you clean the unit.
Care must be taken not to touch any hot surfaces.
Do not use harsh abrasives, caustic cleaners or oven cleaners when cleaning this appliance.
-
Wipe the outside of the appliance with a moist cloth.
-
Clean the basket with hot water, washing-up liquid and a non-abrasive sponge.
Note: The basket are dishwasher-proof.
Tip: If dirt is stuck to the basket or the bottom, fill the basket with hot water and some washing-up liquid. Place the rack in the basket and allow the rack and the basket soak for about 10 minutes.
-
Clean the inside of the appliance with a slightly dampened cloth and polish it with a soft dry cloth.
-
If required lightly brush the heating element to remove any attached food residue.
-
Make sure all parts are clean and dry, before storing or using it again.
-
Store the Air Fryer in a cool, dry place. Do not place heavy objects on top of the Air Fryer during storage as this may damage the appliance.
Warning: Beware of escaping steam when removing the basket. There is a danger of scalding.
Cooking Guide
NOTE: Cooking times will vary depending on the food you wish to cook and the individual's personal preference. Cooking times stated in this Instruction Manual should only be used as a guide.
| Min-max Amount (g) | Time (min) | Temperature (°C) | Toss | Extra information | |
| Fries & Potatoes | |||||
| Frozen French Fries 800 | -1200 20-30 20 | Toss | |||
| Frozen chunky fries or potato wedges | 800-1200 20 | -30 200 Toss | |||
| Home-made French Fries | 800-1200 20 | -25 200 Toss Add 1/2 tbsp of oil | |||
| Home-made potato wedges | 800-1500 20 | -30 180 Toss Add 1/2 tbsp of oil | |||
| Home-potato bites (Cubes) or scalloped potatoes | 800-1200 20 | -30 180 Toss Add 1/2 tbsp of oil | |||
| Hash brown 500-800 15 | -25 200 Toss | ||||
| Fresh Meat & Poultry | |||||
| Steak / Beef cubes 500 | -1000 10-20 200 | ||||
| Lamb or Pork Chops 500 | -1000 10-20 200 | ||||
| Mince Patties / Meat Balls | 500-1000 10 | -30 200 | |||
| Chicken Wings/ Drumsticks /thigh/ Breast | 800-1200 15 | -30 200 | |||
| Chicken Thigh 800-1200 | 15-30 200 | ||||
| Fish |
Cooking Guide
| Fish (Fresh) | 500-1000 15 | -25 160 P | our 1 cup (300ml) of | water in the basket and brush oil all around fish portions for steamed style fish. | |
| Min-max Amount (g) | Time (min) | Temperature (°C) | Toss Extra information | ||
| Snacks | |||||
| Spring rolls 500-1000 15 | -25 180 Toss U | se oven-ready | |||
| Frozen chicken nuggets | 800-1000 20 | -30 200 T | oss Use oven-ready | ||
| Frozen fish fingers 500-1000 15-25 160 | Use oven-ready | ||||
| Frozen bread crumbed cheese snacks | 500-1000 10 | -20 160 U | se oven-ready | ||
| Croquettes | 800-1000 15 | -30 200 | |||
| Sausage roll 800-1000 15-30 200 | |||||
| Baking | |||||
| Cake 500 25-30 160 | Use baking tin | ||||
| Quiche | 600 | 25-30 | 160 | Use baking tin/oven dish | |
| Muffins | 500 | 20-30 | 160 | Use baking tin / ramekin | |
| Tarts /souffle | 600 | 15-25 | 160 | Use baking tin / ramekin | |
Specifications
| Power Supply 220-240V ~ 50Hz |
| Power Consumption 1800W |
Note: As a result of continual improvements, the design and specifications of the product within may differ slightly to the unit illustrated from the packaging.
Troubleshooting
| Problem Possible cause Solution | ||
| The fryer does not work | The appliance is not plugged in. | Put the mains plug in an earthed wall socket |
| The ingredients fried within fryer are not done | The amount of ingredients in the basket are too many. | Place smaller batches of ingredients in the basket. Smaller batches are fried more evenly. |
| The set temperature is too low. | Set the temperature control to the required, temperature setting (refer to page 10 of this booklet). | |
| The preparation time is too short. | Set the timer to the required preparation time. | |
| The ingredients are fried unevenly in the fryer | Certain types of ingredients need to be tossed halfway through the preparation time. | Ingredients that lie on top of or across each other (e.g. fries) need to be tossed halfway through the preparation time. (refer to page 10 of this booklet). |
| Friedsnacksare notcrispywhen they come out of the fryer | You used a type of snacks meant to be prepared in a traditional deep fryer. | Use oven snacks or lightly brush some oil onto the snacks for a crisper result. |
| I cannot slide the basket into the appliance properly | There are too much ingredients in the basket. | Do not fill beyond the basket. |
| White smoke comes out from theAppliance. | You are preparing greasy ingredients. | When you fry greasy ingredients in the fryer, a large amount of oil will leak into the basket. The oil produces while smoke and the basket may heat up more than usual. This does not affect the appliance or the end result. |
| The basket still contains grease residues from previous use. | White smoke is caused by grease heating up in the basket. Make sure you clean the basket properly after each use. | |
| Fresh fries are fried unevenly in the fryer | You did not use the right potato type. | Use fresh potatoes and make sure that they stay firm during frying. |
| You did not rinse the potato fries properly before you fried them. | Rinse the potato fries properly to remove starch from the outside of the fries. | |
| Fresh fries are not crispy when they come out of the fryer | The crispiness of the fries depends on the amount of oil and water in the fries. | Make sure you dry the potato fries properly before you add the oil. |
| Cut the potato fries smaller for a crispier result. | ||
| Add slightly more oil for a crisper result. |

Gerard Sourcing & Manufacturing
GSM Retail Group
Consumer Service Centre :
Aus: 1300 941 901
NZ: 0800 764 912
GSM Retail Group has a policy of continual improvement throughout the product range. As such the unit contained within may differ slightly from the unit illustrated on the pack.
MADE IN CHINA for GSM Retail Group
Mistral is a registered trademark of GSM Retail Group
Cat. No. MDF880
July 2021


- Instruction Manual
- Important Safeguards
- When using this electrical appliance, the following basic safety precautions should always be followed:
- For Your Safety
- Caution:
- Automatic switch-off
- Warning
- Save These Instructions
- Features of Your Digital Air Fryer
- Introduction
- Know Your Appliance
- "Fries" Function
- "Pork" Function
- "Seafood " Function
- "Baking" Function
- "Poultry" Function
- "Steak" Function
- "Fish" Function
- "Power On/Off" Key
- "Time Control" key
- "Temperature Control" key
- Before first use
- Preparing for use
- Using the Appliance
- Settings
- Tips:
- Memory Function
- Maintenance and Cleaning
- Caution: Do not immerse the housing in water or any liquid when you clean the unit.
- Cooking Guide
- GSM Retail Group
Brand : MISTRAL
Model : MDF880
Category : Deep fryer