MAO250D - Deep fryer MISTRAL - Free user manual and instructions
Find the device manual for free MAO250D MISTRAL in PDF.


| Product Type | Digital Air Fryer Oven |
| Brand | Mistral |
| Model | MAO250D |
| Capacity | 25 Litres |
| Power Supply | 220-240V~50Hz |
| Power Consumption | 1700W |
| Temperature Range | 30°C – 200°C (adjustable) |
| Timer Range | 1 – 90 minutes (up to 24 hours for dehydrate) |
| Cooking Functions | 21 presets including Air Fry, Oven, Rotisserie, Dehydrate, Defrost, Reheat, Bake, Broil, Pizza, Proof, Toast, etc. |
| Control Type | Digital with LED display, selector dial, AIR FRY and OVEN buttons |
| Safety Features | Auto shut-off, overheating protection, cool-touch door handle (glass door) |
| Interior Light | Yes, controllable via Interior Light Button |
| Rotisserie Function | Yes, with rotisserie fork and removal tool |
| Rack Positions | 4 rack positions for different cooking methods |
| Included Accessories | Air Fryer Basket, Baking Pan, Wire Rack, 10'' Pizza Pan, Crumb Tray, Tray Handle, Rotisserie Fork, Rotisserie Removal Tool |
| Cleaning | Hand wash accessories; wipe interior with damp cloth; never immerse unit or use dishwasher |
| Certification | AS/NZS 60335.1 and AS/NZS 60335.2.9 |
Frequently Asked Questions - MAO250D MISTRAL
User questions about MAO250D MISTRAL
0 question about this device. Answer the ones you know or ask your own.
Ask a new question about this device
Download the instructions for your Deep fryer in PDF format for free! Find your manual MAO250D - MISTRAL and take your electronic device back in hand. On this page are published all the documents necessary for the use of your device. MAO250D by MISTRAL.
USER MANUAL MAO250D MISTRAL
natural_image
Exterior view of a mistral 200-degree kitchen oven with digital display and control panel (no text or symbols on main body)Instruction Manual
Model: MAO250D
Important Safeguards
When using electrical appliances, in order to reduce the risk of fire, electric shock and/or injury, these basic safety precautions should always be followed:
For Your Safety
Read all instructions carefully, even if you are familiar with the appliance.
- To protect against the risk of electric shock, DO NOT IMMERSE the main unit, power plug or cord in water or any other liquid.
- Please read these instructions before operating and retain these for future reference.
- Before connecting the appliance to the power supply, check that the voltage indicated on the appliance corresponds with the voltage in your home. If this is not the case, contact your local qualified technician and DO NOT use the appliance.
- If the supply cord or any part is damaged, cease use of this appliance immediately to avoid a hazard.
- Do not hang the power cord over the edge of the table and do not let cord contact hot surfaces, including stovetop.
- Place the appliance on the flat surface. Do not place on heated surfaces or near a hot gas or electric burner or oven.
- This appliance is not intended for use by persons (including children) with reduced physical, sensory or mental capabilities, or lack of experience and knowledge, unless they have been given supervision or instruction concerning use of the appliance by a person responsible for their safety.
- Children should be supervised to ensure that they do not play with appliance.
- Do not cover the air inlet or the air outlet when the appliance is working.
- Do not touch the inside of the appliance while it is operating.
- Keep the appliance and its mains cord out of the reach of children.
• DO NOT PLACE the Unit on stovetop surfaces. -
The appliances are not intended to be operated by means of an external timer or separate remote-control system.
-
NEVER USE this appliance with an extension cord, power board or double adapters.
- While cooking, the internal temperature of the unit is very high, TO AVOID PERSONAL INJURY, never place hands inside the Unit unless it is thoroughly cooled down.
- Do not place the appliance on or near combustible materials such as a tablecloth or curtain.
- Do not operate under or near flammable materials, Such as curtains, Drapes and any other combustible materials.
- Switch off the power outlet and remove the plug before cleaning or when not in use. To unplug, grasp the plug and pull from the power outlet. Never pull the power cord. Never carry the appliance by the power cord.
- Do not place the appliance against the wall, hot air vents from the rear of the appliance.
Leave adequate clearance around and above the appliance of a minimum of 10 cm, where surrounding surfaces are heat resistant.
Position appliance further away if kitchen bench splash backs are acrylic or similar lower heat resistant surfaces.
- Do not place anything on top of the appliance.
- Do not use the appliance for any other purpose than described in this manual.
- Do not let the appliance operate unattended.
- During hot air frying, hot steam is released through the air outlet openings. Keep your hands and face at a safe distance from the steam and from the air outlet openings.
- Also be careful of hot steam and air when you remove the pan from the appliance.
• Surfaces may become hot during use. - Do not operate the appliance if there is a malfunction or if it is damaged in any manner. Immediately unplug the appliance if you see dark smoke coming out of the appliance.
- Wait for the smoke emission to stop before removing oven contents.
- To prevent food contact with the interior heating elements, the roast meat or chicken CAN NOT be too large and are able to rotate freely inside the Air Fryer Oven.
Caution:
- This appliance is intended for household use only and not for commercial, industrial or outdoor use.
- This appliance must be earthed. Only connect it to a suitable earthed standard domestic power outlet. Always make sure that the plug is inserted into the socket properly.
- Ensure the appliance is placed on a horizontal, even and stable surface.
- The baking pan becomes hot all over when it is used in the Air Fryer Oven. Always use oven gloves when handling the baking pan.
- Always unplug the appliance when not in use.
- The appliance needs approximately 30 minutes to cool down.
- In the interest of safety, regular periodic close checks should be carried out on the supply cord to ensure no damage is evident. Do not attempt to dismantle or repair this unit yourself. Repairs should only be performed by qualified personnel in order to avoid a hazard.
Automatic switch-off
The appliance has a build in timer, it will automatically shut down the appliance when count down is completed. You can manually switch off the appliance by touching the START/STOP Button, the heating-up will stop immediately, and fan will automatically shut down after cool down the appliance.
Overheating Protection
Should the inner temperature control system fail, the overheating protection system will be activated and the Unit will not function. Should this happen, unplug the power cord. Allow time for the Unit to cool completely before restarting or storing.
Warning
If the supply power cord is damaged, the power cord must be replaced by the manufacturer, its service agent or similarly qualified persons in order to avoid a hazard.
This product has not been designed for any uses other than those specified in this booklet.
Save These Instructions
THIS APPLIANCE IS DESIGNED FOR HOUSEHOLD USE ONLY
Symbol Meanings
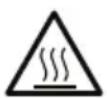
CAUTION: HOT SURFACES. The surfaces are liable to get hot during use, do not touch.
The Regulatory Compliance Mark (RCM) shows that a product is safe to supply to the Australia market.
Features of Your 25 Litre Digital Air Fryer Oven
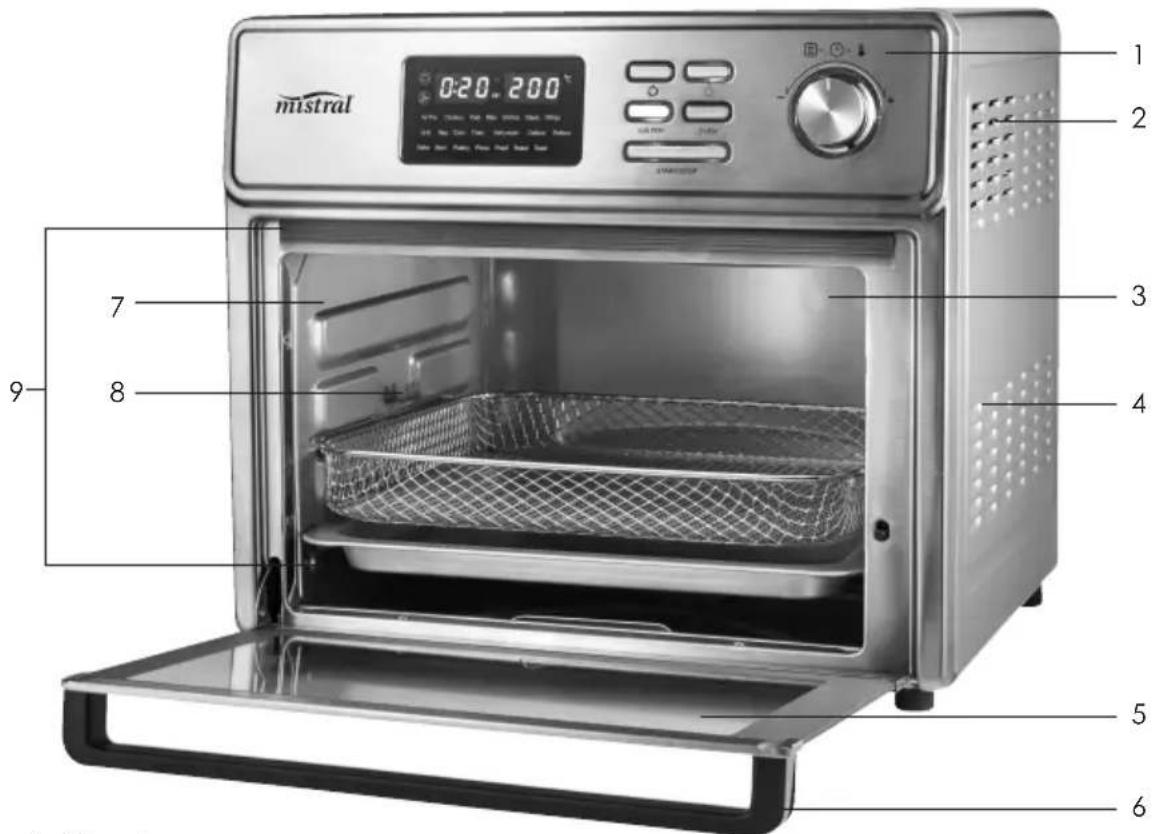
- Control Panel
- Ventilation Slots
- Cooking Space
- Holder for the Shaft of Rotisserie Fork (right) (not shown)
- Glass Door
- Door Handle
- Rails
- Support for the Shaft of Rotisserie Fork (left)
- Top and Bottom Heating Elements (not shown)
Accessories:
natural_image
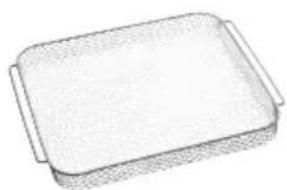
Simple line drawing of a rectangular plate with two side handles (no text or symbols)Air Fryer Basket
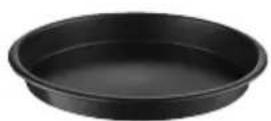
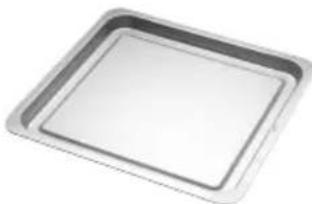
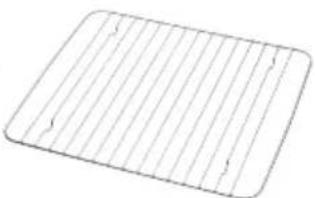
10'' Pizza Pan Baking Pan Wire Rack
natural_image
Simple illustration of a square baking tray with no text or symbols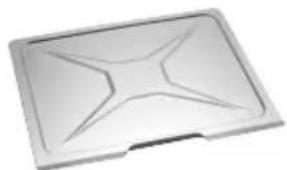
natural_image
Exterior view of a rectangular electronic device with a star-shaped cutout on the lid (no text or symbols visible)Crumb Tray
natural_image
Simple line drawing of a rectangular grid with vertical lines, no text or symbols present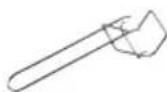
Tray Handle
Rotisserie Fork
natural_image
Simple line drawing of a bent tool or tool (no text or symbols)Rotisserie Removal Tool
Control Panel
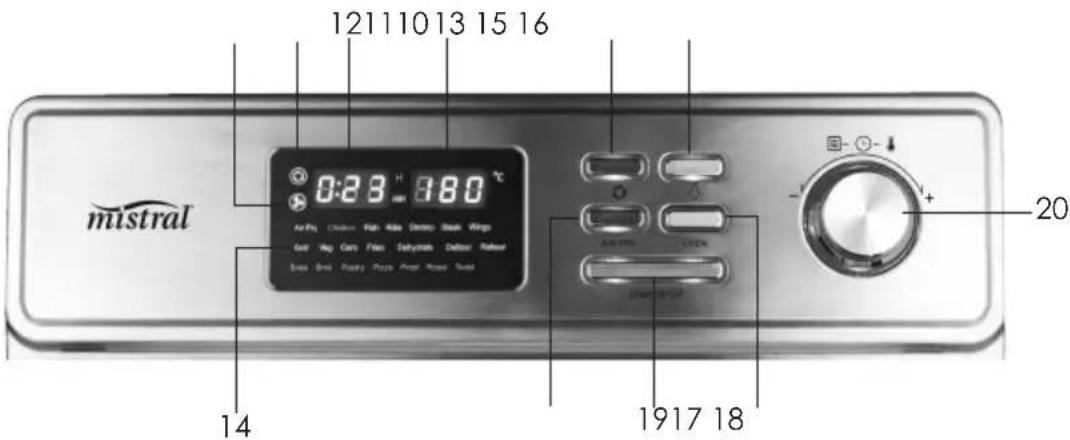
LED Display
10 Display of Air Fry Fan
11 Display of Rotating Function
12 Display of Cooking Time
13 Display of Temperature
14 Display of 21 Cooking Functions
15 Rotating Button
Switch rotating function On/Off for Rotisserie Fork.
16 Interior Light Button
Switch the light in the Air Fryer Oven On/Off.
17 AIR FRY Button
Press the button to select the desired AIR FRY cooking function. The corresponding cooking functions will light up in the LED screen.
18 OVEN Button
Press the button to select the desired OVEN cooking function. The corresponding cooking functions will light up in the LED screen.
19 START/STOP Button
Press the button to start or stop the cooking process.
20 Selector Dial
After pressing the AIR FRY or OVEN button, rotate the dial to select the desired cooking function. The corresponding cooking function will flash in the LED screen. Press the center of the dial to confirm the selection.
Selectable cooking functions for AIR FRY:
Air Fry, Chicken, Fish, Ribs, Shrimp, Steak, Wings, Grill, Veg, Corn, Fries, Dehydrate, Defrost and Reheat
Selectable cooking functions for OVEN:
Bake, Broil, Pastry, Pizza, Proof, Roast & Toast
After the cooking function is selected, rotate the Selector Dial to set the temperature and/or the cooking time. Press the center of dial to confirm the desired temperature and/or cooking time.
Intended Use
- This Air Fryer Oven works with hot air and is not a conventional Cooker that is filled with oil or deep-frying fat. It is suitable for frying, baking, grilling, dehydrating, keeping warm or defrosting food. It generally works like a convection fan oven.
- The Air Fryer Oven is for personal domestic use only and is not intended for commercial applications.
- The Air Fryer Oven should only be used as described in these instructions. Any other use is deemed to be improper. Incorrect operation and incorrect handling may cause faults with the Air Fryer Oven and cause injury to the user.
- The following are excluded from the warranty: all defects caused by improper handling, damage or unauthorised attempts at repair. The same applies to normal wear and tear.
Before Initial Use
- Check the items supplied for completeness and possible transport damage. If you find any damage, do not use the Air Fryer Oven(!), but rather contact the customer service department.
- Remove any possible films, stickers or transport protection from the Air Fryer Oven. Never remove the rating plate and any possible warnings!
- The Air Fryer Oven should be used for the first time without any food in it as it may produce some smoke or odours due to coating residues. Allow the Air Fryer Oven to heat up on the highest temperature setting for approx. 15 minutes without any food in it.
- Thoroughly rinse all accessories. Follow the instructions in the "Care and Cleaning" to do this.
Using the Accessories
Crumb Tray
The crumb tray should always be inserted so that any crumbs or other food residues can be collected in it. Slide the crumb tray right into the bottom of the cooking space.
It slides out easily from the bottom front of the appliance for cleaning.
Baking Pan
Use for baking or roasting, slide into the rails in the cooking space.
It is also used as a drip tray to collect any dripping fat or other food residues. Use with the air fryer basket (placed in the rails above the baking pan) when air-frying, or with the wire rack (placed in the rails above the baking pan) when grilling.
The baking pan becomes hot all over when it is used in the Air Fryer Oven. Always use the tray handle or oven gloves when handling the baking pan.
Wire Rack
Use for grilling or toasting.
It is also designed to hold the pizza pan or a baking dish.
The wire rack becomes hot all over when it is used in the Air Fryer Oven. Always use the tray handle or oven gloves when handling the wire rack.
10" Pizza pan
Use for baking pizza, placed on the wire rack.
Tray Handle
Attach this tray handle to an accessory for safe removal of the accessory from the hot oven.
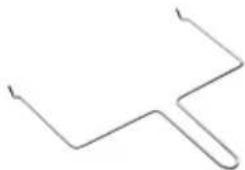
Rotisserie Removal Tool
The rotisserie fork is taken out of the cooking space using the removal tool.
- Place the ends of the rotisserie removal tool under the shaft.
- First lift up the left-hand side of the shaft and move it forwards a little until the right end of the shaft is released from the holder.
- Carefully lift the rotisserie fork out of the cooking space and place down on a heat-resistant surface.
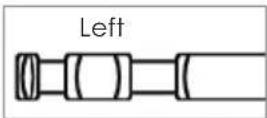
Left end of the shaft with two notches
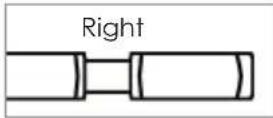
Right end of the shaft
with one notch
Air Fryer Basket
When air-frying or dehydrating, use this basket (placed in the rails above the Baking pan) to optimise your cooking results.
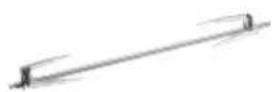
Rotisserie Fork
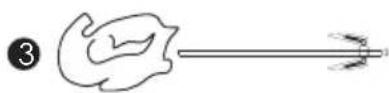
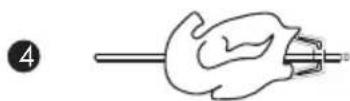
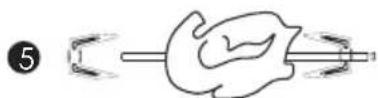
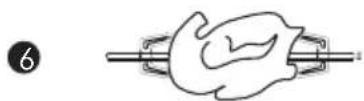
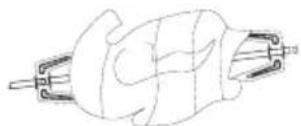
Use for roasts or a whole chicken. Force the shaft length ways through the meat and centre.
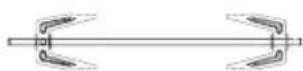
- Slide the forks onto the shaft from either end into the meat. Then lock into place with the screws. Ensure the other screw is fitted tightly to the shaft.
- You can adjust the screws closer to the middle if needed, but never outwards towards the ends.
- Ensure that the roast meat or chicken are not too large and are able to rotate freely inside the Air Fryer Oven.
- Tie up the chicken or other roast meat with cooking string to hold it tightly around the rotisserie stick.
NOTE: Be careful when handling the fork in order to prevent any injuries! The fork will be hot and oven gloves must be used when handling.
- Place right-hand end of the shaft with one notch as far as it will go into the round holder on the right-hand side of the cooking space, then hang the other end of the shaft into the support on the left-hand side of the cooking space.
- Check that it fits securely. The rotating rotisserie fork must not be able to rotate about its own axis while the Air Fryer Oven is switched off. If this is not the case, place the right-hand end of the shaft deeper into the holder. After use, remove the hot rotating rotisserie fork from the cooking space using the rotisserie removal tool. Always use oven gloves to remove the rotating forks and take off the grilled items.


Preset Cooking Temperatures and Times
| Cooking program | Default temperature | Default time | Adjustable temperature range | Adjustable time range |
| Air Fry 200°C 20 mins | 60°C – 200°C 1-90 mins | |||
| Chicken 180°C 23m | ins 60°C – 200°C 1-90 mins | |||
| Fish 190°C 12 mins | 60°C – 200°C 1-90 mins | |||
| Ribs 200°C 25 mins | 60°C – 200°C 1-90 mins | |||
| Shrimp 190°C 10 mins | 60°C – 200°C 1-90 mins | |||
| Steak 200°C 9 mins | 60°C – 200°C 1-90 mins | |||
| Wings 200°C 20 mins | 60°C – 200°C 1-90 mins | |||
| Grill 200°C 15 mins | 60°C – 200°C 1-90 mins | |||
| Veg 200°C 12 mins | 60°C – 200°C 1-90 mins | |||
| Corn 200°C 12 mins | 60°C – 200°C 1-90 mins | |||
| Fries 200°C 15 mins | 60°C – 200°C 1-90 mins | |||
| Dehydrate 30°C 2 hours | 30°C – 80°C | 1-24 hours | ||
| Defrost | 35°C | 40 mins | 30°C – 80°C | 1-90 mins |
| Reheat 200°C 5 mins | 60°C – 200°C 1-90 mins | |||
| Bake 200°C | 30 mins 60°C – | 200°C 1-90 mins | ||
| Broil | 200°C | 25 mins | 60°C – 200°C | 1-90 mins |
| Pastry 195°C | 20 mins | 60°C – 200°C | 1-90 mins | |
| Pizza 200°C | 25 mins | 60°C – 200°C | 1-90 mins | |
| Proof | 35°C 15 mins 30°C – | 80°C | 1-90 mins | |
| Roast 200°C | 30 mins | 60°C – 200°C | 1-90 mins | |
| Toast | 200°C 7 mins 60°C – | 200°C 1-90 mins |
- For cooking programs with an adjustable time range of 1-90 mins, the adjustable interval is 1 minute.
- For cooking programs with an adjustable time range of 1-24 hours, the adjustable interval is 1 hour.
- The adjustable interval for setting the temperature will always be 5^ increments.
Rack Positions
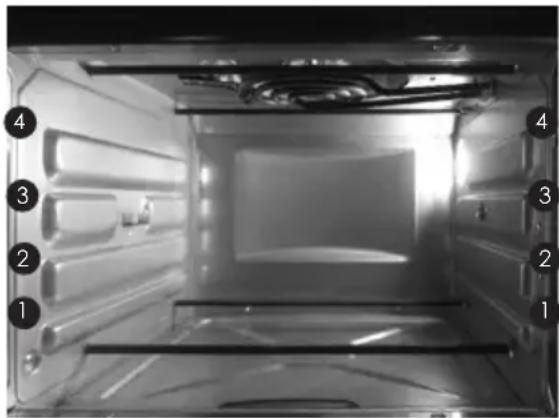
The air fryer oven has four rails at the sides of the oven cavity for four rack positions, as pictured below.
natural_image
Interior view of a refrigerated or stainless steel oven with numbered compartments (1-4), no visible text or symbols on the interior itself.Position (1): warming
- Place the wire rack in position (1) for keeping food warm, or for baking larger roasts or cakes.
Position (2): baking, roasting or toasting
- Place the wire rack, with a baking dish or the pizza pan on top, in position (2) when baking cake, pastries or fresh pizza.
- Place the baking pan in position (2) when cooking a roast.
- Place the wire rack in position (2) for toasting bread. Make sure that the crumb tray is properly in its place on the bottom of the oven cavity.
Position (2) and (3): air-frying or dehydrate
- Place the baking pan in position (1) and the air fryer basket in position (2) or (3) when air-frying or dehydrating.
Position (3): grilling
- Place the baking pan in position (3) when grilling meat or vegetables with convection.
- Place the baking pan, with a shallow dish of food, in position (3) for top-browning.
Position (4): grilling and toasting for small size food
- Place the baking pan in position (4) when grilling meat or vegetables with convection.
- Place the baking pan, with a shallow dish of food, in position (4) for top-browning, make sure the food not touch the top heating elements.
Using the Air Fryer Oven
CAUTION:
- Danger of burns! All inserts will become extremely hot in the Air Fryer Oven. It is essential to use oven gloves to remove them. Use the rotisserie removal tool for the Rotisserie Fork.
- Do not place food that is still packed in plastic wrap or plastic bags in the Air Fryer Oven.
- Only even place down the hot accessories on a heat-resistant surface.
-
Make sure that the food that you would like to prepare does not come into contact with the heating element of the Air Fryer Oven.
-
The door of the Air Fryer Oven must be closed for settings to be made and buttons to be pressed.
- Completely unwind the power cord and plug the plug into a standard domestic power outlet and switch on. The indicator for Start/Stop button is on.
- Press the Start/Stop button, the display is power on.
- Press either the AIR FRY or OVEN button, Use the Selector dial to scroll through the pre-set options for each type of function.
- When your chosen option is flashing on the screen, press the Selector dial to confirm, then press the START/STOP button to start the cooking process.
- When the countdown timer reaches 0:00, an audible alarm will sound and OFF shows on the display. The fan will continue running for cooling down purposes. The display will become blank when the cooling fan stop running.
Manually setting a time and temperature:
- Press either the AIR FRY or OVEN button, Use the Selector dial to scroll through the pre-set options for each type of function, press the Selector dial to confirm.
-
When the time is flashing on the screen, turn the selector dial to adjust the cooking time. Once the desired cooking time is achieved, press the selector dial to confirm.
-
When the temperature is flashing on the screen, turn the selector dial to adjust the cooking temperature. Once the desired cooking temperature is achieved, press the selector dial to confirm. This will set both the cooking time and temperature.
- Press Start/Stop button to start the operation.
- The cooking time or temperature can be adjusted during operation.
To adjust the time, Press the Selector dial, the timer will flash, turn the dial to adjust it, press the dial to confirm. Then the temperature will start flashing, turn the dial to adjust it, press the dial to confirm.
- After cooking time has elapsed, the appliance will stop operation, "OFF" appears on the display. The fan will continue to run to cool the heating element and internal compartment.
- After the fan stop running, Unplug the Power Cord and allow unit to cool fully before cleaning.
NOTE: You can manually switch Off the appliance at any time during the cooking process, by pressing the Start/Stop button.
Cooking Guide
Please refer to the below cooking guide on recommended use for a range of foods which yield great results using the Air Fryer Oven programs.
| Food Item Time Temperature Comments | |||
| Thin frozen fries 15 – 16 mins 200°C | |||
| Thick frozen fries 15 – 20 mins 200°C | |||
| Homemade fries 10 – 16 mins 200°C Add 12 tbsp. oil | |||
| Homemade potato wedges | 18 – 22 mins 180° Add 12 tbsp. oil | ||
| Homemade potato cubes | 12 – 18 mins 180°C Add 12 tbsp. oil | ||
| Hash browns 15 – 18 mins 180°C | |||
| Potato Gratin 15 – 18 mins 200°C | |||
| Steak 8 – 12 mins 180°C | |||
| Hamburger 7 – 14 mins 180°C | |||
| Sausage roll 13 – 15 mins 200°C | |||
| Chicken drumsticks 18 – 22 mins 180°C | |||
| Chicken breast 10 – 15 mins 180°C | |||
| Spring rolls | 15 – 20 mins 200°C Use oven ready | ||
| Frozen chicken nuggets | 10 – 15 mins 200°C Use oven ready | ||
| Fish fingers | 6 – 10 mins 200°C Use oven ready | ||
| Mozzarella sticks 8 – 10 mins 180°C Use oven ready | |||
| Stuffed vegetables | 10 mins | 160°C | |
| Cake 20 – 25 mins 160°C Use baking tin | |||
| Quiche | 20 – 22 mins 180°C Use baking tin/oven dish | ||
| Muffins | 15 – 18 mins 200°C Use baking tin | ||
| Sweet snacks | 20 mins | 160°C Use baking tin/oven dish | |
| Frozen onion rings | 15 mins | 200°C | |
Making Homemade Fries
For the best results, we advise to use pre-baked fries. If you want to make home-made fries, follow the steps below:
- Peel the potatoes and cut them into sticks.
- Soak the potato sticks in a bowl of water for at least 30 minutes. Take them out and dry them with paper towels.
- Pour 1/2 tablespoon of olive oil in a bowl, put the sticks on top and mix until the sticks are coated with oil.
- Remove the sticks from the bowl with your fingers or with a kitchen utensil so that excess oil stays behind in the bowl. Put the sticks in the air fryer basket.
- Slide the air fryer basket inside the Air Fryer Oven.
- Cook the fries for 10 - 16 mins at 200^ .
Rotisserie:
- When the rotisserie fork is fitted inside the slots in the middle of the Air Fryer Oven, pressing the Rotating button will rotate the rotisserie fork.
- The rotisserie fork is a great way to cook a roast chicken inside the Air Fryer Oven as it allows even circulation and thorough cooking.
- Press the Rotating button to stop the rotation.
Proof:
• Proofing is a method used in baking bread. During this time, dough undergoes fermentation and it takes on its final rise before being baked.
- Using the PROOF pre-set option, the warm temperature can increase the activity of the yeast, resulting in faster dough rise.
- The low temperature of 35^ C is ideal to achieve this. The time can be adjusted between 1 minute – 90 minutes.
• After proofing, the bread can be baked.
Tips:
- Foods that are smaller in size usually require a slightly shorter cooking time than larger ones.
• Large quantities of food only require a slightly longer cooking time than smaller quantities. - Flipping or turning smaller sized foods halfway through the cooking process ensures that all the pieces are evenly cooked.
- Misting a bit of vegetable oil on fresh potatoes is suggested for a crispier result. When adding a little oil, do so just before cooking.
- Snacks normally cooked in an oven can also be cooked in the Air Fryer Oven.
- Use premade dough to prepare filled snacks quickly and easily. Premade dough also requires a shorter cooking time than homemade dough.
- Place an oven safe baking tin or dish (not included) inside the Air Fryer Oven when baking a cake or a quiche. A tin or dish is also suggested when cooking fragile or filled foods.
Troubleshooting Guide
| Problem Cause Solution | ||
| The Air Fryer Oven does not work. | The appliance is not plugged into the mains power | Put the mains plug in an earthed wall socket. |
| The oven door is not closed. Ensure the door is closed. | ||
| The ingredients fried with the Air Fryer Oven are not done | There are too many ingredients inside the air fryer basket. | Use smaller batches for more even cooking. |
| The temperature is set too low. | Increase the cooking temperature. | |
| The preparation time is too short. | Increase the cooking time. | |
| The ingredients are fried unevenly in the Air Fryer Oven. | Certain types of ingredients need to be turned during the cooking process. | Turn the ingredients during cooking. |
| Fried snacks are not crispy when they come out. | You used a type of fried be prepared in a traditional deep fryer. | Use oven snacks or lightly brush some oil onto the snacks for a crispier result. |
| Chips / fries are not cooked evenly | You did not soak the potato sticks properly before cooking. | Soak the potato sticks in a bowl of water for at least 30 minutes, then take them out and dry them with paper towels. |
| You did not use the right potato type. | Use fresh potatoes and make sure they stay firm during frying. | |
| White smoke comes out of the appliance. | You are preparing greasy ingredients. | Pay attention that the temperature is well-controlled to be under 180°C, when you fry greasy ingredients in the Air Fryer Oven. |
| There is excess oil inside the Air Fryer Oven. | Wipe down the inside of the Air Fryer Oven to remove excessive oil. | |
Care and Cleaning
WARNING!
Before cleaning or storing the appliance, always unplug the oven from the electrical outlet and allow it to cool completely.
Never immerse the appliance, cord or plug in water or any other liquid.
Never wash any part of the appliance or accessories in a dishwasher.
Never use solvents, cleaning powders, wire brushes, steel wool pads or any other harsh abrasive cleaners, as such materials will damage the finish.
Interior surfaces
To keep your air fryer oven in good working order, make sure to remove all food residues and grease splatters from interior surfaces on a regular basis.
Use a damp cloth and a mild liquid or spray detergent solution on a sponge to clean the interior walls of the air fryer oven.
Never use harsh abrasives or corrosive products as these could damage the oven surface. Never use steel wool pads or other abrasive cleaning products.
If scrubbing is necessary, use a nonabrasive nylon or polyester mesh pad.
To remove crumbs and drippings from the bottom of the oven, slide out the crumb tray and discard any crumbs. Wipe the crumb tray clean and replace. To remove baked-on grease, soak the tray in hot, sudsy water or use nonabrasive cleaners. Never operate the oven without the crumb tray in place!
Exterior surfaces
Wipe the appliance housing clean with a damp cloth and a mild detergent. Apply the cleansing agent to the cloth, not directly onto the oven. Dry thoroughly.
Accessories
All accessories should be hand-washed in hot, sudsy water. The accessories are NOT dishwasher safe.
If scrubbing is necessary, use a nylon scouring pad or nylon brush. Rinse and dry the accessories thoroughly after washing.
Storage
When the appliance is not in use, disconnect it from the power supply.
Storing the appliance and accessories safely in the original packaging will protect it from dust.
Store the appliance in a dry location, out of reach of children.
Do not store any materials other than the supplied ovenproof accessories in the appliance. Never place paper, cardboard, plastic or similar products in the oven.
Do not place any heavy items on top of appliance during storage as this may result in damage of appliance.
Specifications of Product
Power Supply: 220-240V\~50Hz
Power Consumption: 1700w
NOTE: As a result of continual improvements, the design and specifications of the product within may differ slightly to the unit illustrated on the packaging.
Compliance
This product has been fully tested and meets all requirements as set out by standards AS/NZS 60335.1 and AS/NZS 60335.2.9.
Responsible disposal
At the end of its working life, do not throw this appliance out with your household rubbish. Electrical and electronic products contain substances that can have a detrimental effect on the environment and human health if disposed of inappropriately. Observe any local regulations regarding the disposal of electrical consumer goods and dispose of it appropriately for recycling. Contact your local authorities for advice on recycling facilities in your area.
Notes

Gerard Sourcing & Manufacturing
GSM International Ltd.
GSM International Ltd has a policy of continual improvement throughout the product range. As such the unit contained within may differ slightly from the unit illustrated on the pack.
MADE IN CHINA for GSM International Ltd. Mistral is a registered trademark of GSM International Ltd.
- Instruction Manual
- Important Safeguards
- For Your Safety
- Caution:
- Automatic switch-off
- Overheating Protection
- Warning
- Save These Instructions
- THIS APPLIANCE IS DESIGNED FOR HOUSEHOLD USE ONLY
- Symbol Meanings
- Features of Your 25 Litre Digital Air Fryer Oven
- Accessories:
- Control Panel
- LED Display
- Selectable cooking functions for AIR FRY:
- Selectable cooking functions for OVEN:
- Intended Use
- Before Initial Use
- Using the Accessories
- Crumb Tray
- Baking Pan
- Wire Rack
- 10" Pizza pan
- Tray Handle
- Rotisserie Removal Tool
- Air Fryer Basket
- Rotisserie Fork
- Preset Cooking Temperatures and Times
- Rack Positions
- Position (1): warming
- Position (2): baking, roasting or toasting
- Position (2) and (3): air-frying or dehydrate
- Position (3): grilling
- Position (4): grilling and toasting for small size food
- Using the Air Fryer Oven
- Manually setting a time and temperature:
- Cooking Guide
- Making Homemade Fries
- Rotisserie:
- Proof:
- Tips:
- Care and Cleaning
- WARNING!
- Interior surfaces
- Exterior surfaces
- Accessories
- Storage
- Specifications of Product
- Compliance
- Responsible disposal
- GSM International Ltd.
Brand : MISTRAL
Model : MAO250D
Category : Deep fryer