
Connect T1N1 - Headphones MEE audio - Free user manual and instructions
Find the device manual for free Connect T1N1 MEE audio in PDF.


| Product Type | Bluetooth Audio Transmitter |
| Model | Connect T1N1 (AF-T1) |
| Brand | MEE audio |
| Audio Inputs | 3.5mm analog, TOSLINK digital optical (S/PDIF), RCA (via included adapter) |
| Bluetooth Version | Bluetooth with A2DP profile |
| Supported Codecs | SBC, aptX, aptX Low Latency |
| Simultaneous Headphone Pairing | Up to 2 headphones |
| Pairing Buttons | Button A and Button B for independent pairing slots |
| Battery Type | Internal rechargeable battery |
| Charging Port | Micro-USB |
| Charging Time | Approximately 90 minutes |
| Power Indicator | Green LED: solid when on/full, pulsing when charging, blinking rapidly when low battery |
| Connection Indicators | Two blue LEDs: blinking during pairing, solid for connected headphones |
| Range | Typically up to 10 meters (33 feet) but pairing recommended within 1 meter |
| Volume Control | Adjustable on each paired headphone; TV volume may also affect overall level |
| Factory Reset | Hold pairing button A for 5 seconds until blue LED blinks |
| Operating Temperature | Store between -10°C and 45°C (14°F to 113°F) |
| Cleaning Instructions | Wipe with a soft, slightly damp cloth; do not use chemical cleaners |
| Safety Warning | Prolonged use at high volume may cause permanent hearing damage |
| Warranty | 1-year manufacturer's warranty (for purchases from authorized retailers) |
| Accessories and Replacement Parts | Available online at www.MEEaudio.com |
Frequently Asked Questions - Connect T1N1 MEE audio
User questions about Connect T1N1 MEE audio
0 question about this device. Answer the ones you know or ask your own.
Ask a new question about this device
Download the instructions for your Headphones in PDF format for free! Find your manual Connect T1N1 - MEE audio and take your electronic device back in hand. On this page are published all the documents necessary for the use of your device. Connect T1N1 by MEE audio.
USER MANUAL Connect T1N1 MEE audio
Universal Dual Headphone Bluetooth® Wireless Audio Transmitter
Model: AF-T1
PACKAGE CONTENTS
connect
Universal Dual Headphone Bluetooth® Wireless Audio Transmitter
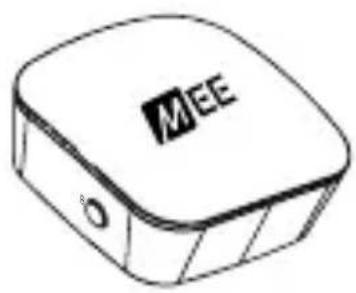
natural_image
Illustration of a MEE-branded electronic device with a lid and mounting base (no text or symbols beyond the brand logo)connect
Bluetooth Transmitter


Micro-USB charging cable

natural_image
Two identical cylindrical electronic components with leads, shown side by side (no text or symbols visible)3.5mm audio cable

natural_image
Two identical electrical connectors with leads, shown in gray and white (no text or symbols)3.5mm to RCA adapter

natural_image
Two identical cylindrical electronic components with leads, no visible text or symbolsTOSLINK digital optical S/PDIF audio cable
Universal Dual Headphone Bluetooth® Wireless Audio Transmitter

1 Pairing button "B"
2 Indicator light "B"
3 Indicator light "A"
4 Pairing button "A"
5 On/Off switch
6 Analog audio input (3.5mm)
7 Digital audio input (TOSLINK optical S/PDIF)
8 Power/charging indicator light
9 Micro-USB power/charging port
COMPATIBILITY
The Connect is compatible with any device that has one of the following audio outputs:

- 3.5mm (1/8") headphone jack

- RCA audio jacks (red and white connectors)

- TOSLINK digital optical (S/PDIF) connector

natural_image
Line drawing of a MEE-branded electronic device with a button and lid (no text or symbols beyond branding)The Connect can stream music to any Bluetooth audio receiver that supports the A2DP Bluetooth profile, such as a Bluetooth headphone, Bluetooth speaker, or dedicated A2DP receiver.

The Connect also supports aptX® and aptX Low Latency, more efficient Bluetooth audio codecs capable of transmitting CD-quality audio that also provide lower and much lower latency (smaller delay), respectively, compared to regular Bluetooth audio (SBC). Using the Connect with a headphone that supports aptX or aptX Low Latency will provide the best possible audio quality and minimize audio lag/latency.
The Connect will always default to the best codec that is also supported by the headphones connected to it. If two headphones are connected, the best codec supported by both will be used.
CHARGING
To charge the Connect, plug the included Micro-USB charging cable into any powered USB port** and the charging port on the rear of the unit.
Charge time is approximately 90 minutes. The green charging indicator light will pulse slowly while the Connect is charging.
Note: If you use the Connect while plugged in to USB power, it is not necessary to charge the unit before using it, or to turn it off after each use.
When used while plugged in, the Connect will use USB power and the internal battery will be charged. When unplugged from USB power, the Connect will use the internal battery. When battery is low, the green power LED will blink once every second and a short alert tone will sound at 10 minute intervals.

flowchart
graph LR
    A["INPUT<br>USB PORT"] --> B["USB"]
    B --> C["USB"]
    C --> D["PORT<br>USB"]
**The USB outputs of some TVs do not provide a stable current. It is recommended to use a computer or USB wall charger to charge the Connect.
To turn on, slide the on/off switch on the right side of the Connect unit to the "On" position.

To turn off, slide the switch to the "off" position.
SETUP: CONNECTING TO TV OR OTHER AUDIO DEVICE
The Connect includes three connection options. Consult the user manual for your television or other device to find the appropriate connector to use for audio output (Audio Out).
Option 1: Digital optical audio out (TOSLINK)
Newer TVs are usually outfitted with a TOSLINK digital optical (SPDIF) connector.
A. Remove the protective caps from the included fiber optic TOSLINK cable

B. Plug the cable firmly into the optical audio output on the TV and the optical input of the Connect.
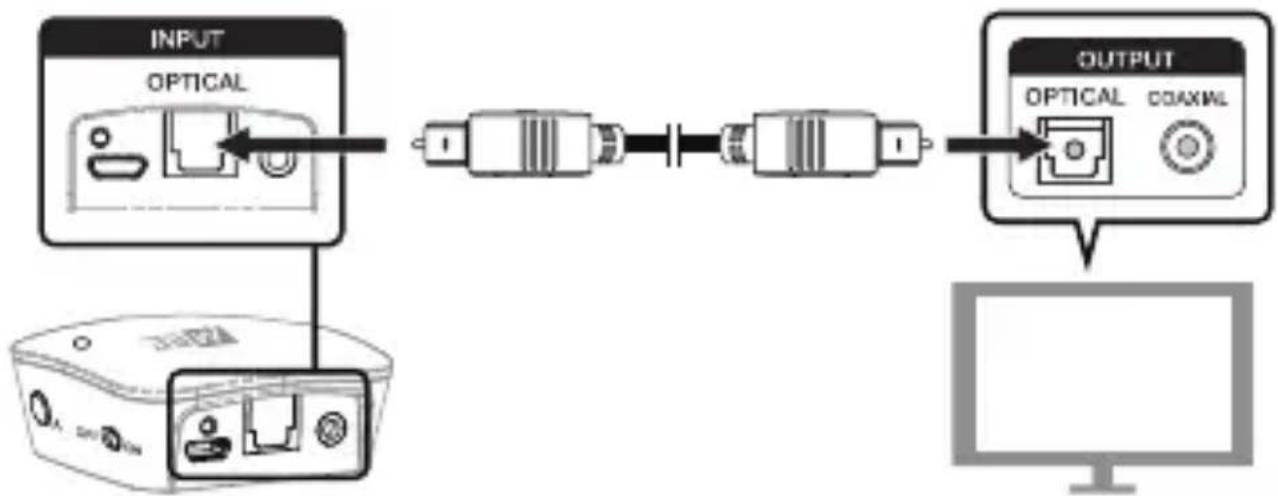
flowchart
graph LR
    A["INPUT\nOPTICAL"] --> B["Switch"]
    B --> C["Switch"]
    C --> D["OUTPUT\nOPTICAL COAXWL"]
    E["Computer monitor"] --> D
    style A fill:#f9f,stroke:#333
    style E fill:#f9f,stroke:#333
The volume of optical output is typically fixed and TV speakers can be controlled independently as necessary.
continue to next page
SETUP (Continued): CONNECTING TO TV OR OTHER AUDIO DEVICE
Note: If something is plugged into both the optical and 3.5mm input jacks of the Connect, the analog (3.5mm) input will have priority and the optical input will be muted. To use the optical input, unplug the 3.5mm connector from the transmitter.
Note: If you have successfully connected the TOSLINK cable and you are still not receiving any sound, please make sure that your audio output settings on your TV, DVR, or other relevant device are set to PCM.
Option 2: RCA audio out (red and white connectors)
Older TVs usually have analog audio output with RCA (red and white) connectors. To use the RCA output, attach the included RCA adapter to the 3.5mm stereo audio cable. Plug the connectors of the RCA adapter into the matching-color RCA jacks on the TVs and plug the attached 3.5mm cable into the 3.5mm input on the rear of the Connect.

flowchart
graph LR
    A["INPUT 3.5mm"] --> B["USB Cable"]
    B --> C["USB Cable"]
    C --> D["OUTPUT AUDIO L R"]
    E["Computer"] --> D
The volume of RCA audio output is typically fixed and TV speakers can be controlled independently of the Connect.
continue to next page
SETUP (Continued): CONNECTING TO TV OR OTHER AUDIO DEVICE
Option 3: 3.5mm (1/8") headphone jack
Some TVs and most standalone receivers have a headphone jack on the front or side. To use the Connect with the headphone jack, plug the included 3.5mm stereo audio cable into the headphone jack on the TV and the 3.5mm input on the rear of the transmitter. A 14 " adapter (not included) may be used with receivers that have a 14 " jack.
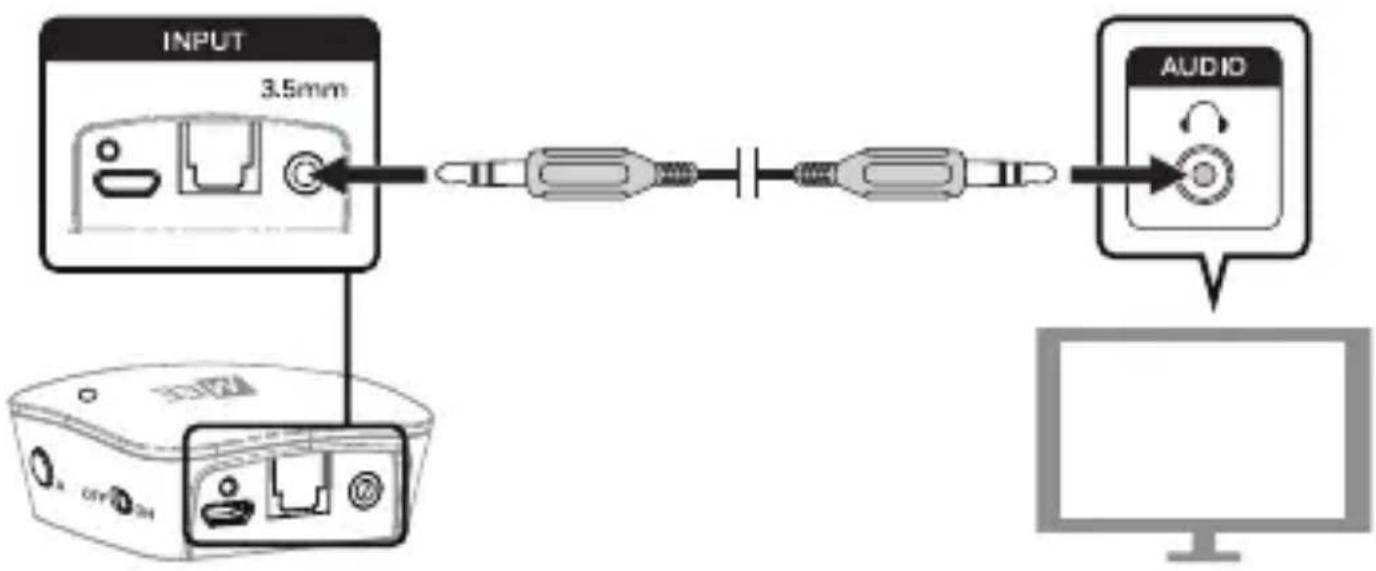
flowchart
graph LR
    A["INPUT 3.5mm"] --> B["USB Cable"]
    B --> C["USB Cable"]
    C --> D["AUDIO"]
    D --> E["Computer"]
TV speakers will typically be muted automatically when the headphone jack is use. The volume of the headphone jack can be controlled using the TV or receiver and will affect the volume of the Connect.
SETUP: PAIRING WITH BLUETOOTH HEADPHONES
Before use, the Connect must be paired with at least one Bluetooth headphone or other Bluetooth audio receiver.
Make sure your Bluetooth headphone or other device is turned off and within 1 meter (3 feet) of Connect and put it in pairing mode. With most headphones this is done by pressing and holding the Power/Multifunction button until the status indicator lights (typically red and blue) flash in an alternating pattern. If you are unsure of how to activate pairing mode, consult the user manual of your headphone/device.
Once the headphone is in pairing mode, press pairing button “A” located on the right side of the Connect. A blue light will blink rapidly on the top of the unit to indicate that the Connect is ready to pair. It will pair automatically with any headphone or other Bluetooth receiver that is also in pairing mode and located within 1 meter (3 feet). The Connect and headphone have to be in pairing mode simultaneously in order to pair.
The Connect will remain in pairing mode for 30 seconds or until successfully paired. Once paired, the blue light will blink several times and turn solid Blue.

flowchart
graph TD
    A["Headband"] --> B["PAIRING"]
    B --> C["PAIRED"]
    C --> D["300Ω"]
Note: The above procedure creates a pairing in slot A. To pair a single headphone in slot B, simply use pairing button "B" instead. To pair two headphones simultaneously, follow the instructions in the next section.
continue to next page
SETUP (Continued): PAIRING WITH BLUETOOTH HEADPHONES
Optional: Pairing a 2nd Headphone
The Connect can stream audio to two Bluetooth headphones simultaneously. A second headphone can be paired after one headphone is already connected (as indicated by a solid blue light on top of the unit). To pair the second headphone, put it in pairing mode and then press pairing button "B" on the Connect. A blue light will flash to indicate that the Connect is in pairing mode and the second headphone will be paired.

Note: During the pairing process the sound may have a brief intermittent period.
Note: When streaming to two headphones, the Connect will always default to the best available codec that is supported by both of the connected headphones. For example, if one of the headphones supports aptX and the other does not, regular Bluetooth audio streaming will be used with both headphones.
continue to next page
SETUP (Continued): PAIRING WITH BLUETOOTH HEADPHONES
Optional: Replace Paired Headphone
Once the maximum of two connected headphones has been reached (as indicated by two solid blue lights on top of the Connect), additional headphones or other Bluetooth receivers can be paired in place of either of the connected headphones.
Follow the instructions found in the “Pairing a 2nd Headphone” section to replace one of the currently-paired headphones with a new device. Use pairing button “A” to replace the headphone paired in slot A and pairing button “B” to replace the headphone paired in slot B.
SUBSEQUENT USE – RECONNECTING HEADPHONES
The Connect will stay connected until either the unit or headphones are turned off or taken out of range. It is not necessary to turn off the Connect or headphones after each use except to conserve battery (note: when the Connect is plugged into USB power, it does not use the battery).
Previously paired Bluetooth headphones will reconnect to Connect automatically once turned back on. The Connect will not initiate reconnection. If the Connect itself is turned off, it is recommended to turn it back on first before turning on the paired headphones so that it can accept the incoming Bluetooth connection from the headphones. If the headphones are already on, turn them off and then on again.
Note: It may take up to 60 seconds for audio transmission to start after headphones re-connect.
ADJUSTING THE VOLUME
Volume can be individually adjusted on each set of headphones paired with the Connect using the built-in volume controls on the headphone.
With some TVs and connection options, TV volume may be further raised or lowered to change the volume of all headphones paired with the Connect. In this case, volume should be maximized on the TV and then adjusted via headphones for best audio quality.
STEP 1. MAXIMIZE TV VOLUME

flowchart
graph TD
    A["Volume"] --> B["max +"]
    B --> C["VOL +"]
    C --> D["VOL -"]
    D --> E["Device with 'max' label"]
    E --> F["Device with '5' label"]
STEP 2. ADJUST HEADPHONE VOLUME
FACTORY RESET / CLEAR MEMORY
The Connect can be reset by holding pairing button "A" on the right side of the unit for approximately 5 seconds until the blue indicator light begins to blink. The unit will enter pairing mode and previously paired devices will be cleared from memory.
LED INDICATOR LIGHTS
The Connect has a green power/charging indicator light on the rear of the unit and two blue indicator lights on the top. They indicate the status of the headphones as follows:
| Indicator Light(s) | Connect Status |
| Green power indicator light on (USB Power plugged in) | Battery full |
| Green power indicator light pulsing slowly | Charging |
| Green power indicator light on (USB Power not plugged in) | On |
| Green power indicator light blinking rapidly | Low battery |
| Blue light blinking Pairing mode active | |
| One solid blue light One headphone is connected | |
| Two solid blue lights Two headphones are connected | |
TROUBLESHOOTING
| Issue: Connect will not turn on; Green power light doesn't turn on or turns on and then off |
| Make sure the Connect transmitter is plugged into a powered USB port or the internal battery has been charged. The green power indicator light on the rear of the unit will light up when the unit is turned on. |
| Issue: Not charging |
| If using a wall charger, make sure it is plugged in to a powered outlet. If using a computer, make sure the computer is on and the USB port has power. |
| Issue: Unable to pair Bluetooth headphones |
| Make sure both the Connect and the Bluetooth headphone are in pairing mode at the same time as indicated by the appropriate tones and/or light pattern and are with 1 meter (3 feet) of each other. Make sure the headphones or other Bluetooth device you are attempting to pair with the Connect support the A2DP Bluetooth profile and can act as a receiver. The Connect is a transmitter and cannot be paired with another Bluetooth transmitter such as a phone or tablet. |
| Issue: Headphones are connected (blue light solid) but audio is not heard |
| Ensure that either the analog (3.5mm) or digital (TOSLINK) audio cable is plugged in to both the Connect and your TV or other audio device. Ensure that audio is playing on the TV/device, the output you have selected is active, and volume is set to “high” on the TV/device. Ensure that volume is sufficiently high on your Bluetooth headphones.If you are using an optical connection, make sure nothing is connected to the 3.5mm input of the Connect. |
| Issue: There is a delay (latency) in audio |
| Bluetooth is a digital wireless signal and there is some latency expected due to the coding/decoding and compression/decompression steps that must occur. The aptX and aptX Low Latency audio codecs supported by the Connect are notable for having lower and much lower latency (smaller delay), respectively, compared to regular Bluetooth audio. Using the Connect with a headphone that supports aptX or aptX Low Latency will minimize audio lag.Some modern TVs and receivers also have an audio delay option. Please make sure that audio delay is set to 0 to minimize lag. |
continue to next page
TROUBLESHOOTING (Continued)
| Issue: I cannot connect to my phone, tablet, or other device via Bluetooth |
| The Connect is a Bluetooth transmitter. It cannot be connected with another transmitter such as a phone or tablet. It can only be connected with a Bluetooth receiver such as a Bluetooth headphone, speaker, sound bar, etc. |
| Issue: Previously paired headphones will not connect |
| Make sure that the Connect has not been reset since the headphones were last paired. Make sure the headphones are turned on and within range and that the Connect is not already connected with two other headphones/devices (at most 1 blue light should be on). Make sure the headphones are not connected to another device.If the headphones are still unable to connect, power them off and then turn them back on. If problems persist, create a new pairing between the Connect and your headphones. |
| Issue: Low volume |
| Adjust the volume both on your Bluetooth headphones and on the TV or other connected device as both may control the volume. |
| Issue: Crackling noise, static, interference |
| For the most noise-free audio, maximize the volume on your TV or other device and adjust via the headphones.Make sure you are within range of your Bluetooth-enabled device. Bluetooth devices are susceptible to interference from other Bluetooth devices, microwave ovens, power stations and transmission lines, Direct Satellite Service (DSS), and wireless devices operating on the 2.4 GHz band. Eliminate as many potential sources of interference as possible while using your Bluetooth headphones. |
SAFETY AND CARE
Taking care of your device in accordance with the following recommendations will ensure optimal performance and a long lifespan.
a) Battery performance will be severely decreased when stored in extreme temperatures: below -10^/14^ or above 45^/113^ including direct sunlight.
b) Clean with a soft, slightly damp cloth. Do not use chemical cleaners.
c) There are no user replaceable/reparable parts in the transmitter. Disassembling it will void your warranty.
d) Do not expose to liquids. If the device comes in contact with liquids, quickly wipe away. If submersed in water, do not turn the device on until completely dried. Note: liquid submersion voids the warranty.
e) Do not use around flammable gasses as fire or explosion may occur.
f) Replacement parts and accessories are available online at www.MEEaudio.com
WARNING
Using headphones at high to moderate volumes for extended periods of time will result in permanent hearing damage. It is advised to adjust the volume to a comfortable listening level before putting on your headphones.
SPECIFICATIONS
See the Connect product page at www.MEEaudio.com for product specifications.
WARRANTY
MEE audio products purchased from authorized retailers are covered by a 1-year manufacturer's warranty. Visit the warranty information page at www.MEEaudio.com for warranty information.
connect

MEE audio and its logo are registered trademarks of S2E, Inc. All rights reserved.
The Bluetooth® word mark and logos are registered trademarks owned by Bluetooth SIG, Inc. and any use of such marks by MEE audio is under license. Other trademarks and trade names are those of their respective owners.
aptX® software is copyright CSR plc or its group companies. All rights reserved. The aptX® mark and the aptX logo are trademarks of CSR plc or one of its group companies and may be registered in one or more jurisdictions.

- Universal Dual Headphone Bluetooth® Wireless Audio Transmitter
- PACKAGE CONTENTS
- connect
- COMPATIBILITY
- CHARGING
- SETUP: CONNECTING TO TV OR OTHER AUDIO DEVICE
- Option 1: Digital optical audio out (TOSLINK)
- SETUP (Continued): CONNECTING TO TV OR OTHER AUDIO DEVICE
- Option 2: RCA audio out (red and white connectors)
- SETUP: PAIRING WITH BLUETOOTH HEADPHONES
- SETUP (Continued): PAIRING WITH BLUETOOTH HEADPHONES
- SUBSEQUENT USE – RECONNECTING HEADPHONES
- ADJUSTING THE VOLUME
- FACTORY RESET / CLEAR MEMORY
- LED INDICATOR LIGHTS
- TROUBLESHOOTING
- TROUBLESHOOTING (Continued)
- SAFETY AND CARE
- WARNING
- SPECIFICATIONS
- WARRANTY
Brand : MEE audio
Model : Connect T1N1
Category : Headphones