3000 - Air purifier Greentec - Free user manual and instructions
Find the device manual for free 3000 Greentec in PDF.


| Product Type | Whole Home Air Purifier |
| Model Number | PUREAIR3000-BK-US |
| Dimensions (H x W x D) | 12.25 x 9.00 x 11.00 inches |
| Weight | 9.04 lbs |
| Power Input | 100-240 VAC, 50/60Hz, 2.5A |
| Power Consumption | 22 Watts (Normal) / 38 Watts (High/Away) |
| Coverage Area | Up to 3,000 sq ft |
| Filtration Technologies | Photocatalytic Oxidation (PCO), Ionization, Activated Oxygen, Filtration |
| Modes | Normal (PCO), High, Away, Sleep |
| Fan Speeds | Adjustable via control panel or remote |
| Activated Oxygen Output | 25-360 mg Ozone per hour (adjustable) |
| Display | Digital with mode indicators, square footage setting, maintenance reminders |
| Remote Control | Included with batteries |
| Maintenance Reminder | "Perform Cleaning" after 30 days of use; "Replace Cell" when needed |
| Replaceable Parts | PCO Cell (annual replacement), Purification Plate (as needed) |
| Cleaning Frequency | Monthly; filter assembly, ionization needle, purification plate, interior |
| Safety Warnings | Do not operate without all parts; avoid direct UV exposure; do not exceed square footage in High mode; no occupancy in Away mode |
| Placement | Near HVAC return, 12-24 inches from ceiling, 3 inches rear clearance, not on floor |
| Power Adapter | DC power adapter with green indicator light |
| Warranty | 1 year limited warranty (registration required) |
Frequently Asked Questions - 3000 Greentec
User questions about 3000 Greentec
0 question about this device. Answer the ones you know or ask your own.
Ask a new question about this device
Download the instructions for your Air purifier in PDF format for free! Find your manual 3000 - Greentec and take your electronic device back in hand. On this page are published all the documents necessary for the use of your device. 3000 by Greentec.
USER MANUAL 3000 Greentec
natural_image
Black square air conditioner unit with digital display showing 750°F, no visible text or symbols on the device itself.Owner's Manual
TABLE OF CONTENTS
PRODUCT CONTENTS 2
RECORDS 2
ABOUT....3
SPECIFICATIONS 3
WARNINGS 4
DIAGRAMS 5-8
SETTING UP 9
DISPLAY NOTIFICATIONS 9
INITIAL SETTINGS 10
CONTROLS 11
DISASSEMBLY....12 - 13
ASSEMBLY 14 - 15
CLEANING....16
TROUBLESHOOTING 17 - 18
WARRANTY 19
ACCESSORY PRODUCTS....20
PRODUCT CONTENTS
This package contains:
1 pureAir 3000 Whole Home Air Purifier
1 POWER CORD
1 Quick Start Card
1 Owner's Manual
1 DC POWER ADAPTER
1 REMOTE with Batteries
RECORDS
Please record the name and phone number of your Dealer.
Name:
Phone #:
Please record the serial number of your pureAir 3000.
Serial #:
ABOUT
pureAir 3000 by GreenTech Environmental is a Whole Home Air Purifier with four different technologies that each contribute as part of a complete air and surface purification solution for your home. Using Photocatalytic Oxidation, Ionization, easily controlled Activated Oxygen, and Filtration you can enjoy noticeably cleaner and fresher air.
pureAir 3000 is very easy to set up and use following the instructions included in this manual. After 30 days of continuous use, it will remind you that it needs cleaned by displaying "Perform Cleaning" on the DISPLAY. Follow the instructions in this manual.
pureAir 3000 contains two parts that must be replaced each year depending on the level and type of pollutants in the environment it is used to purify. The first is the PCO CELL and the second is the Activated Oxygen Plate that generates ozone according to the settings used on the system. Your dealer can provide both of these, or you can also contact us at www.GreenTechEnv.com/Support
GreenTech Environmental wants you to have the best experience with our product. Contact us anytime by visiting www.GreenTechEnv.com/Support.
Don't forget to register your warranty, while you're thinking about it, at www.GreenTechEnv.com/Warranty. We're here for you.
SPECIFICATIONS
Model Number . . . . . . . . . . . . . . . . . . . . . . . . . . . . . . . . . . . . . . . . . . . . . . . . . . . . . . . . . . . . . . . . . . . . . . . . . . . . . . . . . . . . . . . . . . . . . . . . . . . . PUREAIR3000-BK-US
Power Input 100-240 VAC 50/60Hz 2.5A
Power Usage .....22 Watts (Normal) / 38 Watts (High/Away)
Product Dimensions 12.25" H x 9.00" W x 11.00" D
Product Weight 9.04 lbs
Activated Oxygen Plate Output....25-360mg Ozone Per Hour
WARNINGS
Review this list before using or maintaining your purifier!
- Never operate purifier near heat source, open flame or flammable/combustible fluids.
- Do not operate purifier unless all parts (including PCO CELL, ACTIVATED OXYGEN PLATE, REAR FILTER ASSEMBLY and REAR COVER) are properly installed.
- Directly viewing the ultraviolet lamp inside the PCO CELL in this purifier when it is powered on may result in eye damage. Lamp is not directly visible when mounted in completely assembled purifier.
- Never adjust the square footage setting in HIGH MODE to exceed the actual square footage of the space being treated.
- Do not use AWAY MODE in occupied spaces. Short term exposure to ozone levels exceeding 0.5 ppm can cause temporary adverse reactions.
- Purifier should be powered off and POWER CORD should be disconnected when cleaning or servicing your purifier.
DIAGRAMS - PURIFIER EXTERIOR
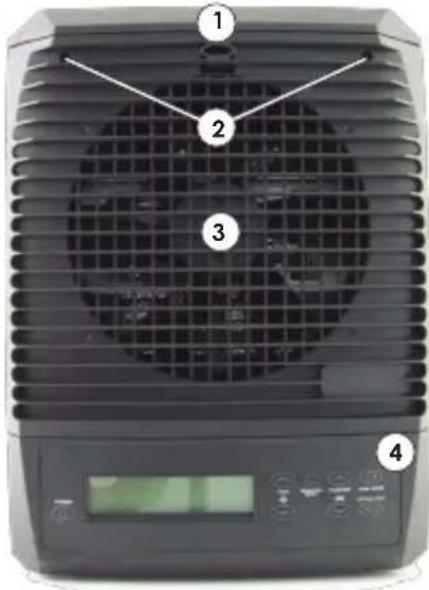
Front of Purifier
- IONIZATION NEEDLE
- FRONT GRILLE SCREWS
- FRONT GRILLE
- CONTROL PANEL
natural_image
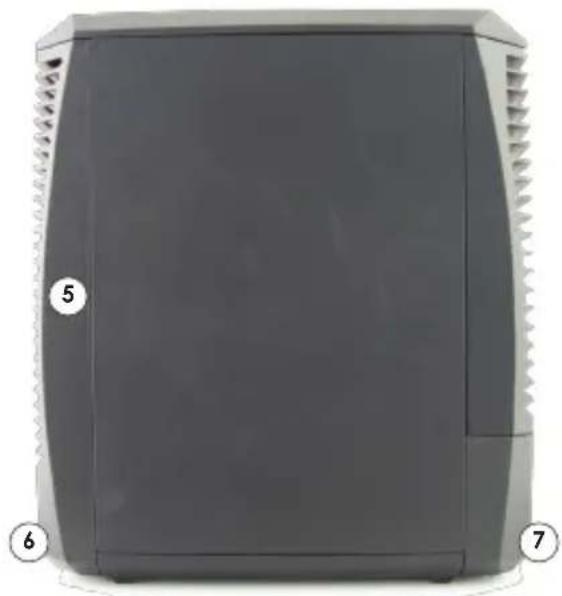
Front view of a gray industrial device with labeled parts (5, 6, 7) and no visible text or symbols on the body.Side of Purifier
- REAR COVER
- PURIFIER REAR
- PURIFIER FRONT
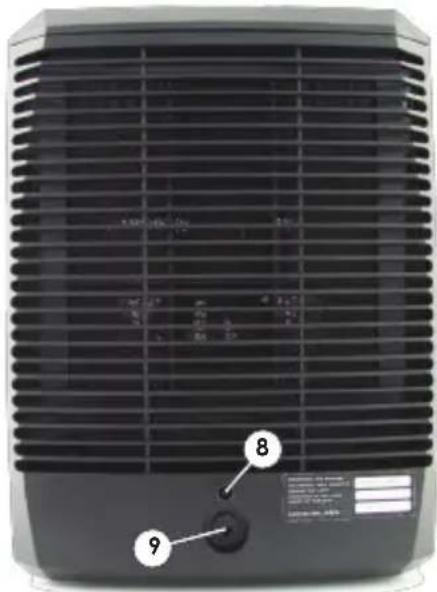
Rear of Purifier
- REAR COVER SCREW
- DC POWER ADAPTER INLET
DIAGRAMS - PURIFIER INTERIOR/POWER ADAPTER
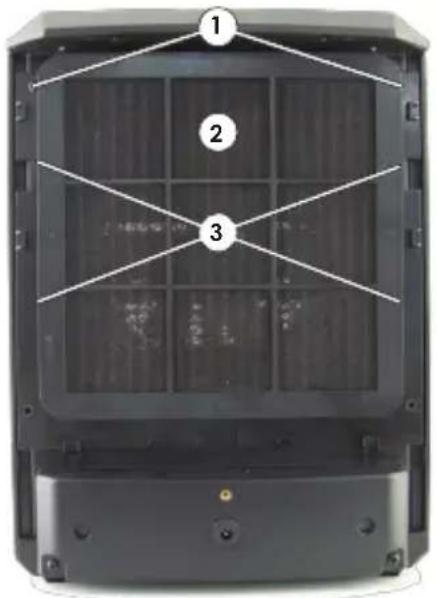
Rear with REAR COVER Removed
- BRASS THUMBSCREWS
- FILTER ASSEMBLY
- FILTER ASSEMBLY TABS
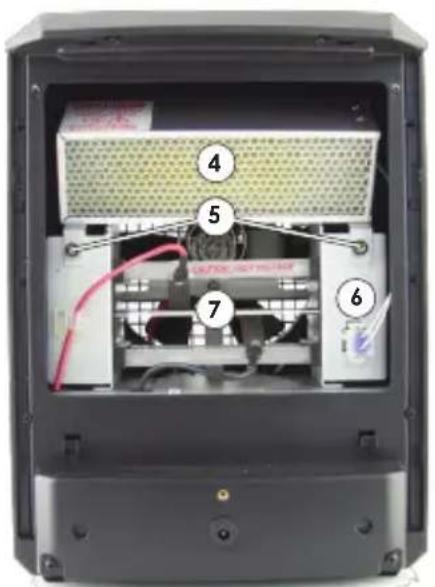
Rear with FILTER ASSEMBLY Removed
- PCO CELL
- PCO CELL RETAINING NUTS
- PCO CELL CONNECTOR
- PURIFICATION PLATE
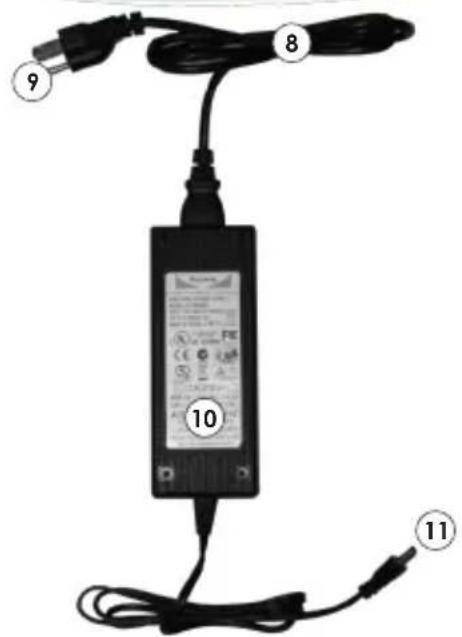
DC POWER ADAPTER & POWER CORD
- POWER CORD
- POWER CORD PLUG
- DC POWER ADAPTER
- DC POWER ADAPTER PLUG
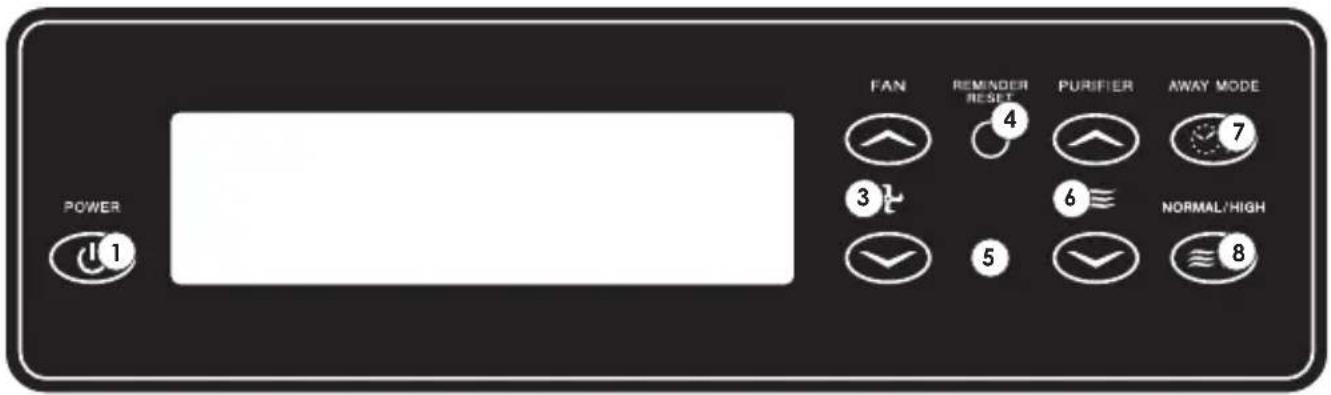
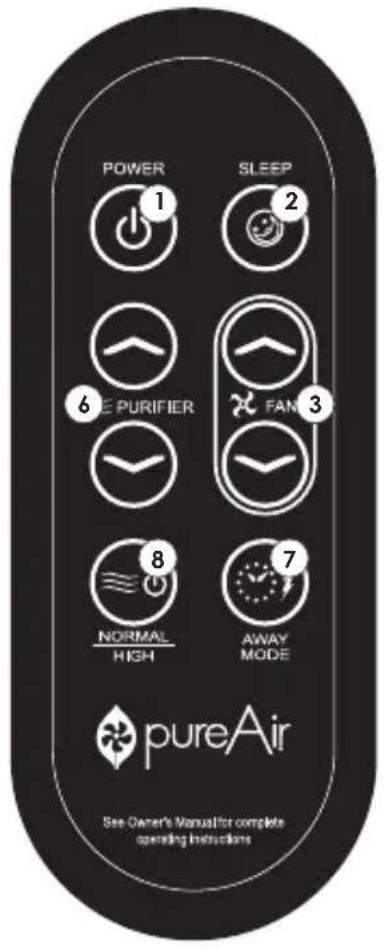
CONTROL PANEL & REMOTE
- POWER BUTTON
- SLEEP MODE CONTROL
- FAN SPEED CONTROL
- REMINDER RESET BUTTON
- INFRARED RECEIVER
- PURIFIER LEVEL CONTROL
- AWAY MODE TOGGLE
- NORMAL/HIGH MODE TOGGLE
DIAGRAMS - DISPLAY
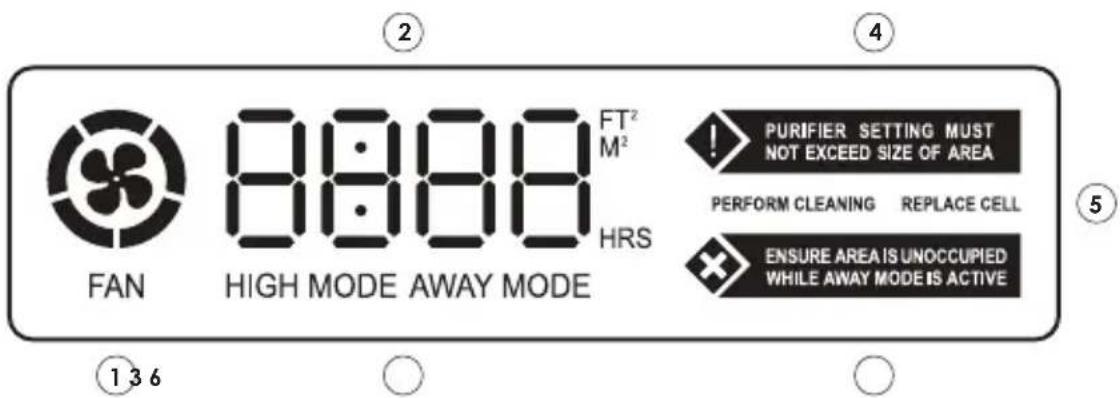
DISPLAY
- FAN SPEED INDICATOR
- MODE SPECIFIC DISPLAY
- MODE INDICATOR
- PURIFICATION LEVEL WARNING
- MAINTENANCE REMINDERS
- AWAY MODE WARNING
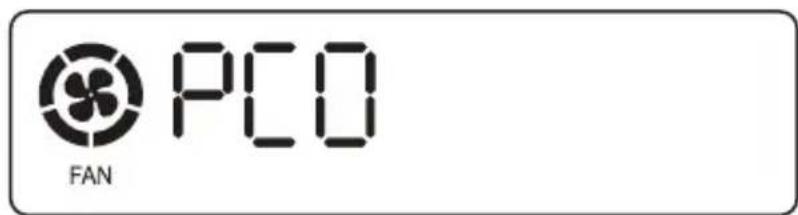
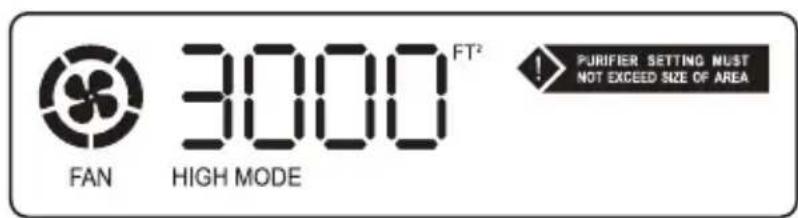
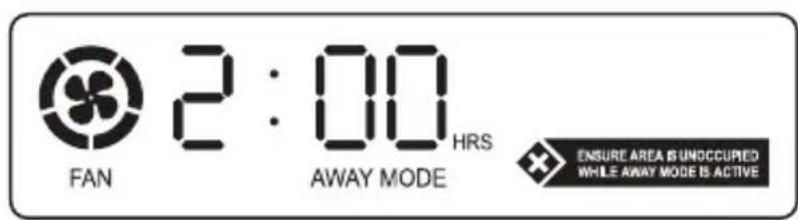
PCO (Normal)High ModeAway Mode
ere's how the DISPLAY appears when in each of the modes.
SETTING UP
This is going to be easy.
1. Unpack Your pureAir 3000
Remove everything from the box. Check and make sure you have everything listed in "PRODUCT CONTENTS" on page 2. Keep your packaging in case you need to return or exchange your purifier. When you are satisfied with your purifier, please recycle the box and properly dispose of all other packaging materials.
2. Select a Location for Your pureAir 3000
There are several things to consider when selecting a location. First, find a common room that contains an HVAC return or adjoining a hallway that has an HVAC return. Ideally, locate the purifier within twelve to twenty four inches (12"-24") of the ceiling, on a bookcase, shelf, or mounting bracket. Make sure that there is nothing within three inches (3") of the rear of the purifier for proper air flow. Point the purifier towards the center of the room. Never place an operating purifier on the floor.
3. Place Your pureAir 3000 and Plug it In
Check to make sure your purifier is secure. Falling purifiers can cause serious headaches! Unravel the cord attached to your DC POWER ADAPTER and your POWER CORD. Plug the DC POWER ADAPTER PLUG into the rear of the purifier, then plug the POWER CORD into the wall. Make sure the POWER CORD is securely seated in the DC POWER ADAPTER and that the green indicator light on the DC POWER ADAPTER is lit, showing that it properly connected.
When “REPLACE CELL” appears, the PCO CELL has stopped functioning (burned out) and must be replaced. Contact your dealer or www.GreenTechEnv.com/Support to order a replacement. Once a replacement has been obtained, follow the instructions in “DISASSEMBLY” and “ASSEMBLY” (pages 12-15) to replace your old PCO CELL.
Note that the PCO CELL relies upon ultraviolet (UV) energy to power the catalytic reaction. Over time, the UV energy output degrades. For this reason, the PCO CELL should be replaced after one (1) year of continuous operation (9000 hours) regardless of the presence of the “REPLACE CELL” maintenance reminder.
"PERFORM CLEANING"
"PERFORM CLEANING" will display once the purifier has been run for 30 days total running time and the purifier requires a complete cleaning. Follow the instructions in "CLEANING" on page 16.
INITIAL SETTINGS
Before using your pureAir 3000 you will need to find the area (or square footage) of the environment. To do this accurately, take into account all connected rooms with open doorways (the purification does not flow through closed doors). The pureAir 3000 can purify up to 3,000 square feet of space.
For example: Suppose you have a 2500 square foot house. The living room is attached to the kitchen, three bedrooms, the den and a laundry room. The kitchen and three bedrooms' doors remain open the majority of the time but the laundry room and den usually remain closed off from the rest of the house. Together, the laundry room and den have a combined area of 500 square feet. The area of the environment you would want to set your pureAir 3000 to purify would be 2000 square feet.
Once you have determined an ideal location for your purifier and calculated the area of the environment:
- Connect the POWER CORD to the DC POWER ADAPTER and the DC POWER ADAPTER PLUG into the purifier. (Check to be sure your power supply is properly assembled. The POWER CORD should be inserted far enough into the DC POWER ADAPTER so that a space of only about 1/8 in. is left between the widest part of the POWER CORD and the edge of the DC POWER ADAPTER.)
- Insert the Power Plug into the wall outlet.
- Turn the purifier on and set it to NORMAL MODE (PCO) (see CONTROLS)
- Leave the purifier on NORMAL MODE (PCO) for at least 24 hours to begin with.
- After 24 hours, set the purifier to HIGH MODE and set the square footage to 250 square feet.
- Gradually increase the square footage setting every 12 - 24 hours until you reach the accurate square footage of your area which you calculated in the beginning steps). Note: Using the purifier at a setting less than the square footage of the area being treated is acceptable and may be desirable in an environment relatively free of pollutants.
- Use your nose to confirm the proper square footage setting. If the setting is too low, you may notice musty, cooking, animal, or other types of odors. If the setting is too high, you may notice an oxidation smell which some liken to the smell of chlorine. In either case, adjust the square footage on the DISPLAY using the PURIFIER LEVEL CONTROL up or down by 250 ft ^2 until the only smell you notice is a clean, fresh living space.
CONTROLS
Turning the Purifier On/Off
Press the POWER BUTTON on the CONTROL PANEL or REMOTE to turn the purifier on. The purifier will initially be set to NORMAL MODE (PCO). Press the POWER BUTTON once more to turn the power off.
Using NORMAL MODE (PCO)
Press NORMAL/HIGH MODE TOGGLE until "PCO" is shown in the MODE SPECIFIC DISPLAY.
- Square Footage not available in "NORMAL MODE (PCO)"
- To control the fan speed: Use Fan Up/Down buttons.
Using HIGH MODE
Press the NORMAL/HIGH MODE TOGGLE and verify that "HIGH MODE" is shown in the MODE INDICATOR.
- To set the square footage on the DISPLAY: Use PURIFIER LEVEL CONTROL (See "INITIAL SETTINGS" page 10).
- To control the fan speed: Use FAN SPEED CONTROL.
Never adjust setting to exceed square footage of ventilated space being treated.
Using AWAY MODE
Press the AWAY MODE TOGGLE and verify that "AWAY MODE" is shown in the MODE INDICATOR.
- To set the AWAY MODE TIMER: press the AWAY MODE TOGGLE. Each press of the AWAY MODE TOGGLE adds two hours to the AWAY MODE TIMER.
- Select 2:00, 4:00, 6:00 or 8:00 hours.
- Press AWAY MODE once when the AWAY MODE TIMER shows 8:00 will revert the purifier back to the mode it was in before you pressed the AWAY MODE TOGGLE.
Using SLEEP MODE
If the light produced by the DISPLAY and CONTROL PANEL causes a distraction, such as when sleeping or viewing your television, simply press the SLEEP MODE CONTROL on the REMOTE and the lighting will cycle through: low brightness, off, high brightness.
DISASSEMBLY
Tools Required
You will need a #2 Phillips screwdriver.
Workspace Recommendations
A counter top or flat surface is ideal for disassembling/assembling your purifier. You will need 2ft x 3ft of clean, accessible workspace. It is recommended to use a small bowl or cup to hold any screws so they are not lost during the /assembly process.
Disassembly Instructions
- Turn the purifier off.
- Remove the POWER CORD PLUG from the wall and the DC POWER ADAPTER PLUG from the rear of the purifier.
- Clean exterior of purifier if necessary (see "CLEANING" page 16).
Removing the REAR COVER:
- Using your screw driver, remove the REAR COVER SCREW from the REAR COVER (above the DC POWER ADAPTER INLET). Place the REAR COVER SCREW where you will find it easily during reassembly.
- Squeeze the sides of the REAR COVER until they release and tilt the REAR COVER slightly upwards and pull directly away from the unit. Clean with compressed air or a damp cloth. Set the REAR COVER aside.
Removing the FILTER ASSEMBLY:
- Remove BRASS THUMBSCREWS from the top corners of the FILTER ASSEMBLY.
- Place BRASS THUMBSCREWS where you will find them easily during reassembly.
- Grasp the top of the FILTER ASSEMBLY and tilt away from the purifier. Clean if necessary (see "CLEANING" page 16) and set the FILTER ASSEMBLY aside. Lift FILTER ASSEMBLY TABS on either side of FILTER ASSEMBLY to remove the rim and access the separate honeycomb, foam and mesh layers.
DISASSEMBLY
Removing the PURIFICATION PLATE:
Grasp the PURIFICATION PLATE on the ceramic and gently pull it out of the grooves on the sides. Clean (see "CLEANING" page 16) and set the PURIFICATION PLATE aside.
Removing the PCO CELL:
- Locate the PCO CELL CONNECTOR on the right of the rear of the purifier almost halfway up the purifier (beside the PURIFICATION PLATE slot). Squeeze the tabs on the top and bottom of the PCO CELL CONNECTOR and pull gently until free from the PCO CELL CONNECTOR Outlet.
- Remove the PCO CELL RETAINING NUTS from the Screw Posts on the right and left below the PCO CELL. Place the PCO CELL RETAINING NUTS where you will find them easily during reassembly.
- Gently slide the PCO CELL out of the purifier. Clean (see "CLEANING" page 16) and set the PCO CELL aside.
Clean the interior of the purifier (see "CLEANING" page 16).
Removing the FRONT GRILLE:
- Locate the four FRONT GRILLE SCREWS in the two upper corners of the FRONT GRILLE. Using your screw driver, carefully remove the two FRONT GRILLE SCREWS. Place the FRONT GRILLE SCREWS where you will find them easily during reassembly.
-
Remove the FRONT GRILLE by tilting the top away from the unit until the FRONT GRILLE can be lifted free. Ensure that the IONIZATION NEEDLE (in the top center of the front of the purifier) is not damaged. Clean the FRONT GRILLE if necessary (using compressed air, vacuum cleaner, damp cloth or warm soapy water) and set the FRONT GRILLE aside.
-
Clean the IONIZATION NEEDLE if necessary (see "CLEANING" page 16).
ASSEMBLY
Refer to "TOOLS & WORKSPACE" from "DISASSEMBLY" on Page 12
Installing the FRONT GRILLE:
-
Gently set the bottom of the FRONT GRILLE in place on the lower front of the purifier and swing the top of the FRONT GRILLE into place, being careful not to damage the IONIZATION NEEDLE at the top center of the front of the purifier.
-
Insert the two FRONT GRILLE SCREWS one at a time until they are in place, but not tight. After both FRONT GRILLE SCREWS are in place, tighten them carefully.
Installing the PCO CELL:
-
Position the PCO CELL inside the purifier so that the two tabs are on the bottom of the PCO CELL. Ensure the holes in the two tabs fit over the two screw posts. Screw the PCO CELL RETAINING NUTS onto the screw posts until they are snug.
-
Align the PCO CELL CONNECTOR to the PCO CELL CONNECTOR outlet and insert gently until the tabs at the top and bottom of the PCO CELL CONNECTOR snap into place, holding it in the PCO CELL CONNECTOR outlet.
Installing the PURIFICATION PLATE:
- Holding the PURIFICATION PLATE by the ceramic, slowly insert it into the PURIFICATION PLATE slot, ensuring that the PURIFICATION PLATE is sliding into the grooves on either side.
NOTE: About halfway in, the PURIFICATION PLATE connectors are parted. Continue sliding the PURIFICATION PLATE into the PURIFICATION PLATE slot until there is approximately one inch of the PURIFICATION PLATE remaining outside of the PURIFICATION PLATE slot and significant resistance is met. Be careful not to force the PURIFICATION PLATE further into the PURIFICATION PLATE slot as this could seriously damage your purifier.
ASSEMBLY
Installing the FILTER ASSEMBLY:
- Hold the FILTER ASSEMBLY with the larger flat side (where the honeycomb layer of the filter is visible) facing the interior of the purifier.
- Insert the bottom of the FILTER ASSEMBLY into the tabs on the rear of the purifier and then seat the FILTER ASSEMBLY on the rear of the purifier. (NOTE: If the user fails to insert the FILTER ASSEMBLY into the tabs appropriately, disassembling the purifier in the future could be extremely difficult.)
- Screw the two BRASS THUMBSCREWS into their holes at the top corners of the FILTER ASSEMBLY.
Installing the REAR COVER:
- Place the tabs at the top of the REAR COVER into the holes above the top of the FILTER ASSEMBLY then swing the REAR COVER flat against the rear of the purifier and press until the tabs on the inner sides of the REAR COVER click into place in the purifier.
- Carefully insert the REAR COVER SCREW into its hole on the REAR COVER (above the POWER CORD Port) and tighten.
Installing the POWER CORD:
- Insert the DC POWER ADAPTER PLUG into the rear of the purifier.
- Ensure the POWER CORD is properly connected to the DC POWER ADAPTER.
- Insert the POWER CORD PLUG into a wall outlet.
Turning the purifier on:
- Press the POWER BUTTON.
- The purifier will be set to NORMAL MODE (PCO) once again. Ensure that the purifier's settings are adjusted to suit your preferences (see "CONTROLS" on page 11).
CLEANING
Your purifier should be cleaned at least monthly to keep it running at peak performance, but more often if its operating environment is heavily contaminated.
Cleaning the Purifier (Exterior):
Wipe down the exterior with a damp cloth or use compressed air or a vacuum cleaner to remove dust.
Cleaning the FILTER ASSEMBLY
You may use clean water or compressed air to clean your FILTER ASSEMBLY once it has been disassembled (see “DISASSEMBLY” on page 12). After disassembling your purifier, the three filters (mesh, foam and honeycomb) should be removed and cleaned separately. If using water, you must allow the filters to dry separately before reassembly. When reassembling, the Honeycomb Filter goes in first, then the Foam Filter, and finally the thin Mesh Filter. Lastly, reattach the rim to the FILTER ASSEMBLY.
Cleaning the IONIZATION NEEDLE
Using a cotton applicator (Q-tip), apply a small amount of clear alcohol-based cleaner (or rubbing alcohol) to the IONIZATION NEEDLE. You may also use compressed air to blow off any dust that may accumulate near the IONIZATION NEEDLE.
Cleaning the PCO CELL
Using a compressed air or a vacuum cleaner, blow and/or vacuum the dust out of the PCO CELL. Do not use any liquid to clean the PCO CELL. Do not disassemble the PCO CELL.
Cleaning the PURIFICATION PLATE
Using white vinegar or a solution of equal parts warm water and clear ammonia, soak the PURIFICATION PLATE for 8-10 hours but do not exceed 12 hours. Using a soft-bristle brush, scrub the wire mesh to remove debris. Rinse thoroughly. Alternatively, use an Ozone Plate Cleaning Kit. Allow the PURIFICATION PLATE to dry completely before reinstalling. Use a soft cloth and rubbing alcohol to clean the contacts on the interior of the purifier that touch the PURIFICATION PLATE.
Cleaning the Purifier (Interior)
Using a damp cloth, a clear alcohol-based cleaner, compressed air or a vacuum cleaner, carefully clean the walls and components inside of the purifier only after completing the disassembly procedures found in DISASSEMBLY on pages 12 - 13.
Resetting the "PERFORM CLEANING" Maintenance Reminder
To reset the "PERFORM CLEANING" maintenance reminder, press and hold the REMINDER RESET BUTTON until the reminder goes away. It will return after 30 days of use.
TROUBLESHOOTING
The Purifier Fails to Turn On
- Verify that the POWER PLUG is plugged into an operational wall outlet.
- Ensure that the POWER CORD is fully inserted (leaving less than an 1/8") into the DC POWER ADAPTER and the green light on the DC POWER ADAPTER is illuminated.
- Ensure that the DC POWER ADAPTER PLUG is fully seated in the DC POWER ADAPTER INLET.
- Verify the POWER BUTTON has been activated on the CONTROL PANEL.
- If the POWER BUTTON on the CONTROL PANEL fails, use the POWER BUTTON on the REMOTE CONTROL. If the CONTROL PANEL fails, contact your dealer or go to www.GreenTechEnv.com/Support.
No Noticeable Activated Oxygen (Ozone) is Being Produced in HIGH MODE or AWAY MODE
- Ensure that the PURIFICATION PLATE is clean. (See "CLEANING" on page 16)
- The PURIFICATION PLATE may not be working because it needs to be replaced. Try installing a new PURIFICATION PLATE.
- Check the electrical contact arms which touch the plate to ensure that they are making proper contact with the metal mesh on the PURIFICATION PLATE.
- Ensure the electrical contact arms which touch the plate are clean. Clean them with a soft cloth and rubbing alcohol.
- Turn the lights off in the room and look through the FRONT GRILLE at the PURIFICATION PLATE. When it is operating properly, the PURIFICATION PLATE will produce a dim purple glow.
The PURIFICATION PLATE Generates an Electrical Arc, an Arcing Noise or a Burning Odor
This means the PURIFICATION PLATE is damaged and must be replaced. To order a replacement, contact your dealer or go to www.GreenTechEnv.com/Support.
The PCO CELL is Not Lighting Up:
- Ensure the PCO CELL CONNECTOR is properly seated in the PCO CELL CONNECTOR outlet (see "DISASSEMBLY" on pages 12 - 13).
- If the PCO CELL still fails to operate, it needs to be replaced. Contact your dealer or go to www.GreenTechEnv.com/Support.
TROUBLESHOOTING
The IONIZATION NEEDLE Creates an Electrical Arc:
The IONIZATION NEEDLE needs to be cleaned. Using a cotton swab soaked with rubbing alcohol, gently clean around the IONIZATION NEEDLE.
The Fan Does Not Operate Properly:
- Try adjusting the fan speed using the CONTROL PANEL or REMOTE CONTROL.
- Remove the FRONT GRILLE (see "DISASSEMBLY" on page 13) to ensure there are no obstructions to the movement of the fan.
- If the Fan continues to operate improperly or not at all, contact your dealer or go to www.GreenTechEnv.com/Support.
The Purifier Makes a Rattling Noise When Taken Out of Packaging:
Remove the REAR COVER of the purifier. Check to ensure the two BRASS THUMBSCREWS holding the FILTER ASSEMBLY are in their proper place. If they are properly installed, remove the THUMB SCREWS and FILTER ASSEMBLY and check the PCO CELL to ensure the two PCO CELL RETAINING NUTS securing the PCO CELL are installed properly. Both the BRASS THUMBSCREWS and PCO CELL RETAINING NUTS can work themselves loose during shipment and storage of the purifier.
LIMITED WARRANTY INFORMATION
Your pureAir 3000 Whole Home Air Purifier (Product) is warranted to be free from all defects in material and workmanship in normal household use for a period of 1 Year from date of purchase. The warranty is granted only to the original purchaser. The warranty is subject to the following provisions:
Any damages or malfunctions caused by negligence, abuse, or use not in accordance with the Product Owner's Manual are not covered by this warranty. Likewise, any defects or damages caused by unauthorized service or the use of other than Genuine GreenTech Environmental Parts are not covered.
GreenTech Environmental will, at its option, repair or replace a defective Product or part(s) for the Product that is/are covered by this warranty. As a matter of warranty policy, GreenTech Environmental will not refund the customer's purchase price.
OBTAINING WARRANTY SERVICE
To obtain warranty service you must return the defective product along with proof of purchase to a GreenTech Environmental Authorized Service Center. All shipping costs submitted under this Warranty shall be borne by purchaser. Unless this Warranty is expressly renewed or extended by GreenTech Environmental, any repaired or replaced part of product shall be warranted to the original purchaser only for the length of the unexpired portion of the original warranty. For the location of the nearest GreenTech Environmental Authorized Service Center or for other service information, please visit us online at:
www.GreenTechEnv.com
Before any product is sent for service, the customer should contact the GreenTech Environmental Service Center to obtain a Return Merchandise Authorization (RMA) Number. This RMA Number should be clearly written on the box before shipping. All components/parts including the remote (if applicable), power adapter, and original packaging should be included in the return if available.
FURTHER LIMITATIONS AND EXCLUSIONS ARE AS FOLLOWS
Any warranty that may be implied in connection with your purchase or use of the Product, including any warranty of merchantability or any warranty for Fitness For A Particular Purpose is limited to the duration of this warranty. Some states do not allow limitations on how long an implied warranty lasts, so the above limitations may not apply to you.
Your relief for the breach of this warranty is limited to the relief expressly provided above. In no event shall GreenTech Environmental be liable for any consequential or incidental damages you may incur in connection with your purchase or use of the Product. Some states do not allow the exclusion or limitation of incidental or consequential damages, so the above limitation or exclusion may not apply to you.
This Warranty gives you specific legal rights, and you may also have other rights which vary from state to state.
REGISTRATION
Please register your Product within 10 days of purchase by visiting:
www.GreenTechEnv.com/Warranty
Registering your new pureAir 3000 Whole Home Air Purifier entitles you to the most up-to-date GreenTech Environmental warranty and information.

GREENTECH
ENVIRONMENTAL

- Owner's Manual
- TABLE OF CONTENTS
- PRODUCT CONTENTS
- This package contains:
- RECORDS
- ABOUT
- SPECIFICATIONS
- WARNINGS
- Review this list before using or maintaining your purifier!
- DIAGRAMS - PURIFIER EXTERIOR
- Front of Purifier
- Side of Purifier
- Rear of Purifier
- DIAGRAMS - PURIFIER INTERIOR/POWER ADAPTER
- Rear with REAR COVER Removed
- Rear with FILTER ASSEMBLY Removed
- DC POWER ADAPTER & POWER CORD
- CONTROL PANEL & REMOTE
- DISPLAY
- SETTING UP
- Unpack Your pureAir 3000
- Select a Location for Your pureAir 3000
- Place Your pureAir 3000 and Plug it In
- "PERFORM CLEANING"
- INITIAL SETTINGS
- CONTROLS
- Turning the Purifier On/Off
- Using NORMAL MODE (PCO)
- Using HIGH MODE
- Using AWAY MODE
- Using SLEEP MODE
- DISASSEMBLY
- Tools Required
- Workspace Recommendations
- Disassembly Instructions
- Removing the REAR COVER:
- Removing the FILTER ASSEMBLY:
- Removing the PCO CELL:
- Removing the FRONT GRILLE:
- ASSEMBLY
- Installing the FRONT GRILLE:
- Installing the PCO CELL:
- Installing the PURIFICATION PLATE:
- Installing the FILTER ASSEMBLY:
- Installing the REAR COVER:
- Installing the POWER CORD:
- Turning the purifier on:
- CLEANING
- Cleaning the Purifier (Exterior):
- Cleaning the FILTER ASSEMBLY
- Cleaning the IONIZATION NEEDLE
- Cleaning the PCO CELL
- Cleaning the PURIFICATION PLATE
- Cleaning the Purifier (Interior)
- Resetting the "PERFORM CLEANING" Maintenance Reminder
- TROUBLESHOOTING
- The Purifier Fails to Turn On
- No Noticeable Activated Oxygen (Ozone) is Being Produced in HIGH MODE or AWAY MODE
- The PURIFICATION PLATE Generates an Electrical Arc, an Arcing Noise or a Burning Odor
- The PCO CELL is Not Lighting Up:
- The Fan Does Not Operate Properly:
- The Purifier Makes a Rattling Noise When Taken Out of Packaging:
- LIMITED WARRANTY INFORMATION
- OBTAINING WARRANTY SERVICE
- FURTHER LIMITATIONS AND EXCLUSIONS ARE AS FOLLOWS
- REGISTRATION
- GREENTECH
- ENVIRONMENTAL
Brand : Greentec
Model : 3000
Category : Air purifier