
PLDNANDVR695 - Media player Pyle - Free user manual and instructions
Find the device manual for free PLDNANDVR695 Pyle in PDF.


| Product Type | Media Player |
| Brand | Pyle |
| Model | PLDNANDVR695 |
| Dimensions (approx.) | 7.5 x 4.0 x 1.2 inches |
| Weight (approx.) | 0.45 lbs |
| Power Supply | USB DC 5V / 1A or AC adapter (not included) |
| Video Output | HDMI 1.4, Composite AV (RCA) |
| Audio Output | HDMI, Stereo RCA, 3.5mm headphone jack |
| Supported Media | USB flash drive, SD/MMC card |
| Supported Video Formats | AVI, MP4, MKV, MOV, MPEG, RMVB, FLV |
| Supported Audio Formats | MP3, WMA, WAV, AAC, FLAC |
| Supported Photo Formats | JPEG, BMP, PNG |
| Max USB/SD Capacity | Up to 32 GB (FAT32) |
| Additional Features | FM radio tuner, remote control, on-screen menu |
| Cleaning Instructions | Wipe with a dry soft cloth. Do not use liquid cleaners. |
| Safety Warnings | Avoid moisture, extreme temperatures, and direct sunlight. Unplug during storms. |
| Repairability / Spare Parts | Remote control and power adapter available separately. No user-serviceable parts inside. |
Frequently Asked Questions - PLDNANDVR695 Pyle
User questions about PLDNANDVR695 Pyle
0 question about this device. Answer the ones you know or ask your own.
Ask a new question about this device
Download the instructions for your Media player in PDF format for free! Find your manual PLDNANDVR695 - Pyle and take your electronic device back in hand. On this page are published all the documents necessary for the use of your device. PLDNANDVR695 by Pyle.
USER MANUAL PLDNANDVR695 Pyle
natural_image
Black remote control device with black keypad and a red button (no text or symbols visible)
natural_image
Close-up of a black and white electronic device with a circular lens and handle (no visible text or symbols)
natural_image
Black plastic cable with attached colored wires (yellow, red, orange) against white background, no text or symbols visible.Model:
PLDNANDVR695
7" Touchscreen Double DIN Stereo Receiver Headunit
Note: This unit is based on Anroid 4.4.4 platform. Besides the standard Apps we provided with the unit, you can also download thousands of Apps and install it on our platform. Please kindly note NOT all Apps are compatible with this platform. If you have any compatibility problem with a 3rd party App, please contact your App provider. For the operation instruction of a certain 3rd party App, please also contact your App provider. We are not responsible for any problem with your 3rd party Apps.
Thank you for choosing Pyle Audio!
To enjoy of the unit's features, along with proper and safe operation, please be sure to read through this manual before use. It is especially important to thoroughly understand and follow all system warnings and precautions. Keep the manual in a safe location for future reference when necessary. Contact your dealer or the nearest authorized repair center for any service, repair or technical support assistance.
| Contents | |
| Precautions | 2 |
| Installation Guide | 3 |
| Installing Steering Wheel Control | 3 |
| Remote Control | 4 |
| Front Panel and Buttons | 5 |
| Turning Power On | 5 |
| Graphics User Interface | 6 |
| Settings | 7 |
| Set Time | 7 |
| Sound | 7 |
| Aux | 7 |
| Calendar | 8 |
| Calculator | 8 |
| EQ | 8 |
| Radio | 9 |
| SD | 9 |
| USB | 9 |
| Video | 9 |
| Wallpaper | 9 |
| Wheel | 10 |
| Third Party Apps | 10 |
| Trouble Shooting | 10 |
| Wiring | 12 |
| DVD Playback | 14 |
| Bluetooth | 15 |
| How to access internet | 16 |
Note: Pyle Audio is constantly aiming to improve the customer experience and your receiver's features and specifications are continually changing for the better, with improvements to the user interface experience, software updates, bug fixes, etc. System descriptions and features reflected as herein stated by this user manual serves to express the Pyle Audio Headunit Receiver features at the current production period. We reserve the right to change terms and conditions of system specifications, features and descriptions at any time, as we continue to improve and provide our customers with upgrades in safety, performance and system operation in general. For questions, comments and concerns, visit PyleAudio.com for more information.
visit www.PyleAudio.com for the latest products & up-to-date model specific information
Compatibility
This unit is a standard “Double Din” sized radio. Check to see that your vehicle accepts a double din sized radio. This unit conforms to the standard size and dimensions of a double din radio. Your vehicle may require a vehicle specific or 3_rd party double din installation kit.
Precautions & Warnings
Please take a moment to read through this information booklet and heed all precautions to ensure a positive user experience.
For your safety, you must not operate the head unit's controls while driving. Make sure you have the volume set to a level where external sounds are still audible.
Do not watch the monitor, or attempt to operate any of the multimedia features while driving. If the parking brake is not engaged video playback will be disabled for your safety.
Cleaning
Clean the LCD with a slightly damp cloth. Keep the screen clean and free of any debris.
Do not use solvents such as alcohol, benzene, thinner, commercially available cleaners or antistatic spray.
When wiping the screen be sure not to scratch the surface.
Temperature
In cold weather, check for condensation on the disc. If found, wipe the moisture from the disc and do not operate your player for an hour until condensation disappears from the unit's optical reader.
System Handling
Screen may not be clear if the temperature of the vehicle is too cold or too hot. The picture will return as the car's temperature returns to normal. Never touch the screen, or operate the touch screen, with anything besides your finger(s). When the display is subject to direct sunlight and glare, the unit may become hot resulting in possible damage to the LCD display. Avoid exposing the display to excessive sunlight as much as possible.
Note:
Driving on rough terrain may cause the disc to skip during playback.
In the event of a malfunction, never open the unit's casing or lubricate any parts. Contact Sound Around USA for repair information. If liquid or any other foreign substances enter the unit, turn the power of immediately and consult your dealer or the nearest authorized repair center. If you notice smoke, irregular noises or smells coming from the unit, power off immediately and consult your dealer or the ne authorized repair center. Do not attempt to disassemble or modify the unit as there are sensitive and high voltage electronic components which can cause damage to the unit, or to one's self, if handled improperly. Be sure to consult your dealer or the nearest authorized repair center for any technical assistance
This equipment has been tested and found to comply with the limits of a Class B digital device, pursuant to Part 15 of the FCC rules and regulations. These limits are designed to provide reasonable protection against any harmful interference in a residential installation. This equipment generates, uses, and can radiate radio frequency energy. If not installed and used in accordance with the instructions, the unit may cause harmful interference to radio communications. If the unit is found to cause harmful interference the user encouraged to consult an experienced radio technician.
System Installation:
Before starting: To prevent short circuits, be sure to disconnect the battery terminal before starting.
Installation Guide - Double Din Fitting:
Caution:
1) This screen opens up. Install the unit within 30 degrees of the horizontal plane. Check that the screen has enough room to fully open. Restricting screen movement will cause damage to the mechanism.
2) Consult your vehicle dealership before making any modifications to your car's body (ex. Drilling holes)
3) Use included screws in installation. Improper hardware may result in damage.
Do not install unit in any area where:
-It may obstruct the steering wheel and gearshift lever operations
-It may obstruct the operation of safety devices such as air bags
-It may obstruct visibility
Installation kits:
This unit conforms to the standard size and dimensions of a double din radio.
Your vehicle may require a vehicle specific or 3^rd party double din installation kit.
Consult your dealer or the nearest authorized repair center for any technical assistance.
*Mounting Sleeve Bracket not included

Outer Trim Cover
*Ensure that the opening or closing of the in-dash unit, when mounted, so as it will not interfere with any of your vehicle's interior panels, consoles, gear shifts, etc. Ensure not to use elongated screws when installing / securing your unit to the in dashconsole to avoid damage.


Installing Steering Wheel Control
Note on compatibility: This unit is a dual wire code learning Steering wheel interface, adaptable to any vehicle with existing steering wheel controls. This unit has the ability to wire directly to your vehicle's steering wheel column and does not, but may, require a 3^rd party steering wheel control interface. Pyle Audio Technical support can assist you in interfacing into vehicles with existing steering wheel controls. For additional help, contact Pyle Technical Support and be sure to supply Year Make Model and options of vehicle so that proper instructions can be supplied.
Key 1 and Key 2 wires are used for setting up steering wheel controls. The location of the attachment wires in the steering wheel column varies between different vehicle makes and models.
Remote Control
Factory batteries are sometimes depleted from extended storage time. Replace the batteries if the unit does not respond to the remote. Also note that Pyle Receiver Remotes are universal and used between multiple radio models, which may or may not, have some buttons / functions that do not work or provide other functionality with your receiver headunit. If some functions respond your remote is not defective. Contact parts at www.PyleAudio.com. Goto “contact us” - “parts” if you believe your remote is defective.
Button Layout

| Power ON/OFF | |
| EJECT | Opens the Motorized Unit /Ejects CD |
| SRC | Input Source Selection / AUX-in |
| HOME | Home Screen / Menu interface |
| DN | Downward / Motorized Screen Tilt Adjustment |
| Next / Hold for Fast Forward (CD/DVD) | |
| UP | Upward / Motorized Screen Tilt Adjustment |
| MENU | Main Menu (CD/DVD) |
| VOL- | Volume - |
| Play / Pause | |
| VOL+ | Volume + |
| MUTE | Mute |
| BAND | Stop (CD/DVD) / Switches AM/FM |
| Previous / Hold for Rewind (CD/DVD) | |
| Up (...to Navigate Selections) |
| SEL | Select (CD/DVD) |
| AMS | AMS-Automatic Search (Radio Stations) |
| Left (...to Navigate Selections) | |
| Enter / Confirm (...to Navigate Selections) | |
| Right (...to Navigate Selections) | |
| ROOT | End Call / Hang Up (...in Bluetooth Interface) |
| Down (...to Navigate Selections) | |
| ZOOM | Call / Dial Number (...in Bluetooth Interface) |
| OSD | File Information (CD/DVD-if compatible) |
| PBC | Playlist Key List (CD/DVD-if compatible) |
| SETUP | Options / Settings |
| SEARCH | CD/DVD Menu Control |
| REPEAT | Repeat Modes (CD/DVD-Media Playback) |
| AUDIO | Left / Right / Stereo Audio Selection |
| ANGLE# | CD/DVD Angle Adjustment (if compatible) |
Front Panel and Buttons
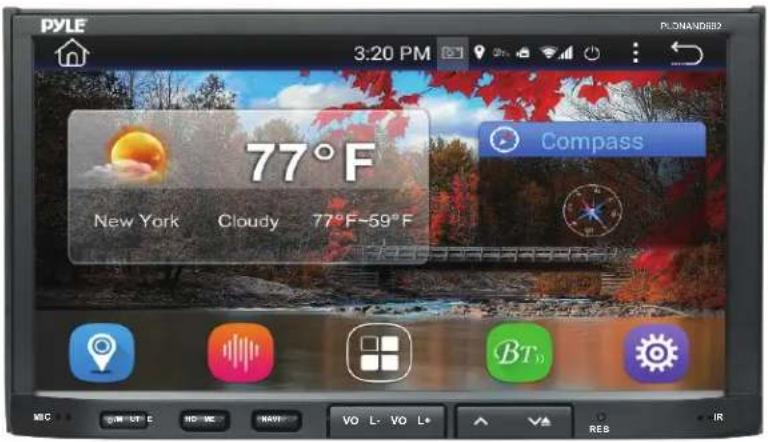
| Button & Feature Layout | |
| Mic | Microphone port |
| Power/Mute | Hold to power up / shut down unit. Short press while unit is on to mute the volume output |
| Home | Switch between apps/radio interface, Press while in GPS interface to return to radio apps |
| Navi | Press to load GPS software from SD map card |
| VOL- | Volume down |
| VOL+ | Volume up |
| ^ | Position screen tilt upward |
| ∨/Eject | Position screen tilt upwardHold to open screen and eject disk. |
| RES | Use a pin to insert into reset port to trigger unit reset. (Hold for 20 secs . to reset) |
| IR | IR remote receiver port |
Tips: Navi----You might have several maps in this device, by pressing Navi button, you will enter into the map which you set as default in the Navi path, if you want to change the navi path to another map, please go to setting to change it Setting → Car setting → Navi setting.
Turning Power On
1) Turn on the engine key to the "ACC" or "ON" position
2) Press and hold the power button for 3 seconds
-When the engine key is turned to the off position the unit is turned off
Status Bar (Along top of radio screen and app screen) you can swipe down for more.
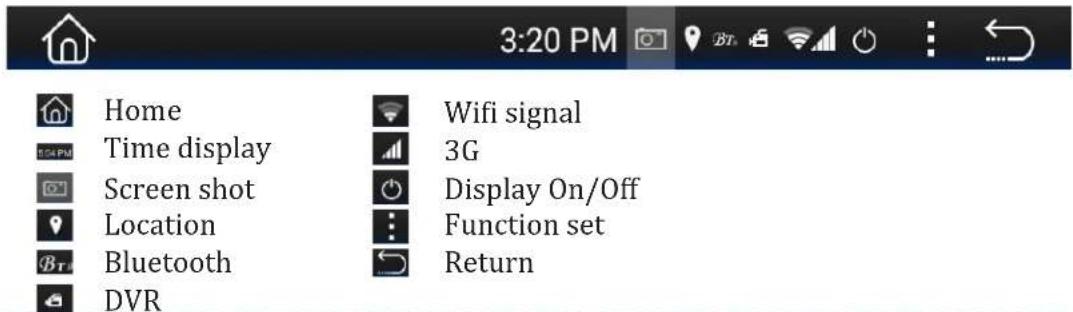
Visit www.PyleAudio.com for additional and detailed model-specific information.


Swipe left/right to access more apps
| Navigation | |
| Radio | |
| All Apps list | |
| BT | |
| Settings |
| Navi | Loads Navigation software (if you have several maps in this device, you can set the default map. Setting →Car setting → Navi setting.) |
| Radio | AM/FM Tuner |
| Bluetooth | Bluetooth |
| AUX | Auxiliary Audio Video Input |
| DVD | DVD / Multi-media Disc Player |
| DVR | DVR |
| Clock | Shortcut to Time Setting |
| Calculator | Opens Calendar app |
| Clear cache | Clear Cache |
| Easy connected | Phone Link |
*Please Note: GPS - Navigation and CD/DVD options and applications may only be found in select headunit receiver stereo systems, which include these, and other, additional/special features -- not all Pyle stereo models come equipped with GPS Navigation and/or CD/DVD players.
Visit for more detailed information and more product specific information.www.PyleAudio.com
Settings
1) Scrolling
Use the red bar to scroll through the list of all available options.
2) Turn on/ off
Many settings can be toggled on or off in this screen
*Note: Factory setup is not adjustable by user. Do not attempt to enter this setup menu.
Set Time
1) Time Options
You can select using GPS to provide positioning time or using net work-provided time.
Visit www.PyleAudio.com to learn more about model specific information.
2) Date and Time
Use the up and down arrows to set the date and time accordingly.
Sound
1) Fade/ Balance
Hold and drag left, right up or down to control the fade and balance of your audio output.
Aux
Auxiliary input (rear RCA jacks) allow audio and video from external devices to be displayed or played through the unit. Auxiliary output (rear RCA jacks) allow audio and video to be sent out to external devices.
1) Customization – Use the settings to adjust and optimize the display quality.
Note: auxiliary app will display “No Signal” if no video signal is connected. Screen controls will not become active until external video signal is detected.

*The Parking brake will need to be wired to a grounding trigger to allow video pass through or a warning message will appear saying warning video disabled while driving.
Calendar
Displays the day, month and year.
Use forward and back arrows the view past or future months.
Selected dates are highlighted in blue
Note: Calendar does not allow entry of appointments. Date must be set within system settings
Calculator
A handy little app for simple calculations
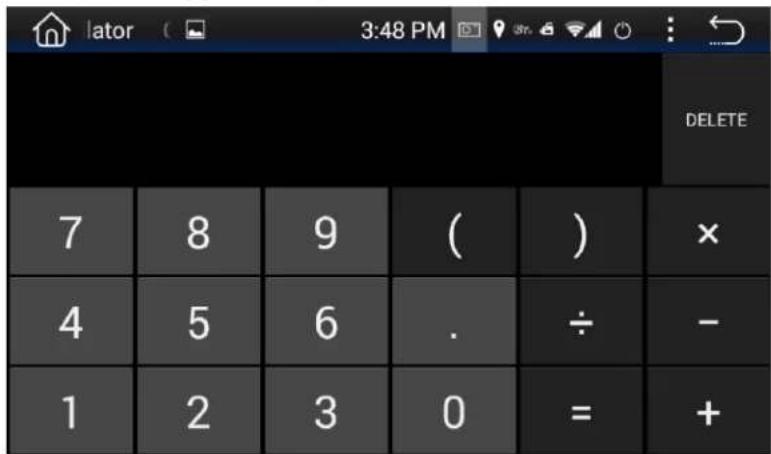
EQ - Equalizer
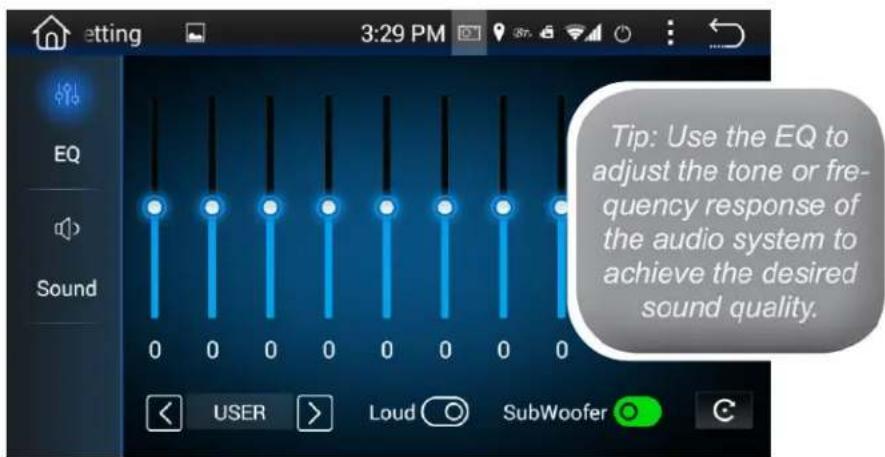
Presets
Select one to automatically adjust the equalizer
Adjustments
Hold and drag up or down to manually adjust the EQ by each frequency band
Radio
1) Scanning: Press, hold, and drag the slider to quickly tune the radio.
2) Current Station: The currently selected station will be displayed in the center.
Press the forward and back arrows to change the current station.
3) Favorite Stations: Press and hold one of the six preset slots to set and save a selection for later.

SD - Flash Memory File Browsing
Warning: Do not attempt to browse files while operating the vehicle
1) Browsing Files
File location is displayed.
Use "Back Arrow" to return to the previous folder
2) Selecting Files
The files and folders of your storage media are displayed.
Once the desired folder is located, select it and press "check icon" to open
USB - Flash Memory File Browsing
Plug in flash drives to access music video and photos.
Video
1) Brightness, Contrast, Hue
Press, hold and drag to adjust the brightness, contrast and hue of the display.
2) Presets
Select to automatically adjust the display settings.
Wall Paper
Note: Wallpapers can be imported from a flash drive or SD card. Check format sheet online for specs on formats.
1) Browse - Use left and right arrows to select the desired wallpaper
2) Select - Press OK to select the wallpaper
Wheel
1) Steering Wheel Controls
Select the command in the application, then press the corresponding button on the wheel to teach the unit how to behave when steering wheel controls are used. To enter the steering wheel menu it will prompt you for a 4 digit pass code you will need to enter '0000'. Then you can manually program each desired option following the on screen instructions. (Note: This feature is not compatible with all vehicle types).
Third Party Apps
For the detailed operation instruction for a certain 3rd party App, such as Google map, Youtube etc., please contact your 3rd party App provider for further service. Thank you.
Trouble Shooting
Q: Unit doesn't power up
A: Use a multi-meter to check for 12v+ to red and yellow wires. Check for proper Ground on the Black wire.
Q: My video does not play
A: Attach "PARK" wire to parking break. When this wire is grounded the video will play (Grounding trigger of the parking brake)
Q: Reverse camera does not come up on the screen
A: Attach "BACK UP CAMERA" wire to reverse tail light 12v+ (Make sure camera is and sending video signal)
Q: Can I set up steering wheel control?
A: Key 1 and Key 2 wires need to be wired to your vehicle's steering wheel column
Q: The time I set is not saved after device reboot
A: Are other setting saved? If not: Check that yellow memory wire is attached to 12v+ constant
A: turn off GPS auto update
-Go to radio settings > Set Time > switch off auto update
Q: My GPS gets no reception.
A: Check antenna is connected properly
A: Mount Antenna directly to your vehicle (GPS antenna is to be magnetically mounted, it will boost GPS reception when attached)
A: Check alternate antenna placement to test for interference
Q: How do I turn up GPS instruction volume (I Can't hear it over music)
A: Change GPS sound settings
Go to Navi > Settings > Sounds > Set GPS voice level to max > Set radio volume to min (Adjust accordingly)
Q: How do I update my map card.
A: The radio will notify you when a map update becomes available. We will need to send out a new map card from our parts department. Log onto www.pyleaudio.com and open a parts ticket under "contact us" requesting the map update.
Q: Where can I download firmware updates?
A: This unit's hardware does not allow it to be updated with new OS or firmware.
Q: How to I set the time?
A: System setting, set time
Trouble Shooting
Q: How do I use / set-up RDS?
A: (*Traffic and weather feature only available in Europe)
Q: My Bluetooth microphone is not working as expected
A: -Check that nothing is covering microphone port.
-Check to see if closer proximity to the mic affects its pickup
-Check that phone connection is good
-Make sure the call recipient has speaker volume set to an appropriate level
-Check that the mic is not picking up too much background noise
Note: The built-in mic cannot be changed, replaced or upgraded.
Q: I am having trouble setting up Bluetooth
A: Check that your device is Bluetooth compatible 4.0+
- Check if you are able to pair with alternate devices via Bluetooth
- Clear out your device history in your Bluetooth setting menu and attempt to pair / connect again
Q: My Map card no longer loads (COCKPIT ERROR DISPLAYED)
A: This is caused by bug in map software. Please contact Tech Support: Pyle, www.pyleaudio.com go to the "contact us" page.
A: You may be able to fix the software on your own
- Insert GPS card into computer
- Open text file under Primo\save\profiles\01\system.ini
- Edit the file to return the cockpit type to "1"
* Deleting the profile folder will default the unit's settings back to cockpit number 1
Q: How do I play video files? My unit cannot read my digital video files.
A: Make sure SD card is compatible
A: Check file format of your file (You may need to convert your video file to an alternate file format)
Q: My unit shows 5 circles and will not load
A: Your unit requires touchscreen calibration.
You have entered the 'Touch Screen Calibration Menu'. For optimum touchscreen performance, this feature enables you to enjoy the best functionality of your device's touch screen. To complete the touchscreen calibration, an "X" will appear in the circles on the screen in numbered order, continue to press the center of the "X" as it passes through each numbered circle.
(In circle number one, you will see an "X", touch the center of the "X", then the "X" will move to circle number two. Continue to touch the center of the "X" as it will move to the other circles in numbered order. If calibration senses an error, the process may restart; Repeat if necessary.)
PYLE®
PyleAudio.com
Wiring - Back Panel:


Wiring
| Radio Antenna | Radio antenna receptacle | ||
| Subwoofer Output | Pre amp subwoofer output (5V) | ||
| Audio / Video Input | Auxiliary input for external hardware | ||
| Audio / Video Output 1 | Connect to headrest display (Optional) | ||
| Audio / Video Output 2 | Connect to headrest display (Optional) | ||
| Green/White | SW KEY | Steering wheel control Key 1 interface wire | |
| Blue/White | AMP REMOTE TURN ON | DC 12 + Volt Remote turn on trigger for external amplifier | |
| Orange | ILLUMINATION | 12 volt + trigger dash board illumination | |
| Brown | BACK UP CAMERA | 12 volt + trigger from reverse lights | |
| Pink | PARKING | Connect to parking brake ground. Disables video play unless grounded | |
| Blue | AUTO ANTENNA | 12 volt + trigger output | |
| Gray/White | SW-GROUND | Steering wheel control Key 2 interface wire | |
| Black (RCA) | CAM VIDEO IN | Camera RCA video input for use with rearview camera | |
| Red | ACC | Ignition Accessory 12V+ | |
| Yellow | FUSE/ POWER B+ | Connect to (+) side of car battery | |
| Black | GROUND | Connect to (-) side of car battery | |
| Orange | CANBUS INTERFACE | TXD - Vehicle Diagnostic CANBUS Interface | |
| Brown | CANBUS INTERFACE | RXD/R - Vehicle Diagnostic CANBUS Interface | |
| Purple | Speaker Rear R | Rear right speaker | Purple (+) Purple/Black (-) |
| Green | Speaker Rear L | Rear left speaker | Green (+) Green/Black (-) |
| Gray | Speaker Front R | Front right speaker | Gray (+) Gray/Black (-) |
| White | Speaker Front L | Front left speaker | White (+) White/Black (-) |
*Brown wire tells the monitor when to activate and display rearview camera on the display (optional)
DVD
DVD app will only open if a compatible DVD disc is detected.
1) Scrubbing
Press and drag along the time line to quickly skip through DVD times line.
(Note: DVD formatting does not allow scrubbing through previews and warnings)
2) Menu options & controls:

Subtitle switch

Fast Backward

Play previous channel

Play / Pause

Stop the DVD

Play next channel

Fast Forward

Submenu

Root menu

Random Play

Repeat all

Play list

Number

Angle

Turn subtitles on/off

Audio

Bluetooth
Bluetooth app allows Bluetooth pairing with compatible devices for making calls and music playback. To pair your phone, ensure Bluetooth is enabled in your phone's system settings and that you are disconnected from all other devices.
In the Bluetooth app of your radio, press the “Gear” icon in the left column to access Bluetooth settings. Next, press the “Magnifying glass” icon to set the radio into pair mode. The radio will then display “searching” and show all nearby compatible Bluetooth devices:
- Select your phone from the list, and tap a second time to initiate pairing.
- Your phone should now display a pin pad where you will enter "0000"
- Check that device named "CAR_KITT" shows as connected on your phone.
Note: Once your phone is paired, you can use the other functions within the radio's Bluetooth app.
Left hand column:
- Select the "Keypad" icon to dial out using the radio's number pad
- Select the "phone" icon to see a log of incoming and outgoing calls
- Select the "gear" icon for phone pairing and selection options
- Select the "headphones" icon for music playback controls
- Select the “address book” icon to display your phone’s contact list. You will need to import your contact list using the “download” icon located in the right column of the Bluetooth app.
Right hand column:
- "Trash" delete currently selected entry
- "Download" Use to download contact data to address book
- "Speaker selection" Switch between car speaker/mic and phone speaker/mic
- "■"Press this function icon for search/disconnect/connect/delete

How to access internet
How to access internet?
You can have three ways to access internet.
- Use a 3G dongle
Insert USB type 3G dongle to one of the rear USB port, wait for few seconds, then 3G signal icon will be shown on status bar, and you can access internet now.
- Use your smartphone as hotspot
Please turn on your smartphone hotspot, then go to this car Android unit and turn on wifi, find out your smartphone hotspot and connect it, now you can access internet.
- Use car wifi router or any other portable wifi router
You can also use car wifi router or any other portable wifi router as a hotspot for internet access.
Vehicle Blackbox DVR
User Manual
Video Recording
- Press ● to start recording ● shows it is under recording.
- When recording, the upper left corner of the screen shows video recorded time.
Setting
- Press to enter DVR setting interface.
- Setting interface is unavailable while recording.

Routine Setup
Recording mode: Record video only.
Auto record at power on: If checked, it will automatically start recording after power on.
Video Setup
Resolution: Video resolution, effective pixels on the horizontal and vertical.
Rate: Video bit rate. Bit rate refers to the data flow per second. The higher the bit rate, the finer the description of the picture, the less loss of picture quality, the closer of the resulting picture to the original one.
Output Setup
Auto segmentation: The video file recorded should not be too large, otherwise it will increase memory consumption when opening a file, which may cause playback failure. When choose high-resolution, the video file recorded will be larger, so it may be appropriate to shorten the split time.
Auto delete old video: When there is not enough free space in the storage, it will automatically delete the oldest recorded video to clear space for newly recorded video.
Storage location: The location to store video files. Path: External memory/DCIM/Dvr. When no external memory inserted, 'Not available' prompt will appear.

Restore Default
- After change a different type of camera, the original parameters may not apply to new camera, which may cause recording failure. In this case, please restore the default parameters.
- If recording fails due to parameter setting changes or other reasons, try to restore the default state through this function.
Video List
- Press or slide the screen left and right to enter DVR video list interface.
- On the left of each list there is a video preview thumbnail. File name is showed in the first line on the right side, and time period in the second line.
- Short press a video from the list to play it, long press to delete the video.


natural_image
Black plastic mechanical lever handle with two slots and a central knob (no text or symbols visible)PLCM18BC
Rear View Backup Camera
System Installation and Wiring
Note: Camera System installation on diesel vehicles may require a slightly different wiring install.
Installation Transcript:
- Locate the reverse taillight wiring behind your vehicle's reverse light. You may need to remove an interior panel, or other cover, in order to locate the wiring. Connect the included power 12V DC power cable to the reverse light.
a. Connect the power cable's Red wire to your vehicle's reverse light positive wire.
b. Connect the power cable's Black wire to your vehicle's reverse light negative wire.
-
Connect the camera to this 'reverse light' connection installation, then mount the camera in the desired location.
-
Run the RCA video cable from the camera to your compatible video display monitor.
*Please remember to run cables in the least obtrusive route possible. Vehicle vibrations and bumpy driving conditions can result, so extra care should be taken to securely mount the camera and fasten all cables and wiring to secure locations.
*Ensure the wires are safely and securely connected, with proper isolation applied to all connections.
Additional Notes:
- Determine the best location for the camera (The camera is preferably mounted just above the license plate).
- Be sure when running the connection cables to leave a small amount of slack so you can still move the camera around the license plate, if you decide to slightly adjust the camera's positioning at a later time.
- After installation, Test the camera before use. Placing your vehicle in reverse should provide a picture in the monitor within the rearview mirror assembly.
Pyle 'PLCM'
Backup Camera Systems
Angle Adjustable Camera Lens
Located on the camera housing are 2 screws which lock the camera lens angle in position.
The screws may be loosened to allow camera lens angle adjustment
Loosen the screws, adjust the camera lens into the desired angle. then tighten the screws securely. Be sure as to not overtighten the screws.

natural_image
Black plastic mechanical component with a red rotation arrow indicating clockwise motion (no text or symbols)
Model:
PLCM18BC

Phone Link Software
User Manual
This phone link software is developed by a 3rd party Apps developer, which we provided to our valued customers free of charge. As mobile phones manufacturers are keeping on upgrading their system, this device may not be compatible with their upgraded operating system, we will not be responsible for these incompatibility. your kind understanding is highly appreciated.
- ABOUT EASY CONNECTED 2
- CONNECTION BETWEEN CAR-MOUNTED TERMINAL AND MOBILE PHONE 3
2.1. Connect to Android mobile phone via USB.... 3
2.2. Connect to iPhone.... 3
- START TO USE 5
3.1. Use Android phone on car-mounted terminal 5
3.2. Use iPhone on car-mounted terminal....6
EXPERIENCE OF DOUBLE-SCREEN INTERACTION 6
4.1. Pop-up function menu 6
4.2. Intelligent adjustment of screen orientation 7
4.3. Exit double-screen interaction.... 7
- PLAY MOBILE VIDEO* 8
- SETTINGS* 9
- EASYDRIVE* 10
7.1. About Easydrive.... 10
7.2. Open and use Easydrive 10
- FAQ.... 12
8.1. How to open USB debugging switch on Android mobile.... 12
8.2. Notes for use.... 13
8.3. Lookup table of connection problems.... 13
1.About Easy Connected
Welcome to use Easy Connected products. Easy Connected is a software inter-connecting the mobile phone and car-mounted terminal screen, which is developed by third party Apps developer Carbit Information Technology Co., Ltd. (hereinafter referred to as Carbit). This car-mounted terminal supports Android, WinCE and QNX platforms, while the mobile phone terminal supports Android and iOS systems. The double-screen interconnection between the mobile phone and car-mounted terminal can be achieved via standard USB interface or wireless connection, i.e. the mobile phone screen can be projected on the car-mounted terminal and bidirectional operation is available (the mobile phone of iOS system currently only supports screen projection, while bidirectional operation is not available yet).
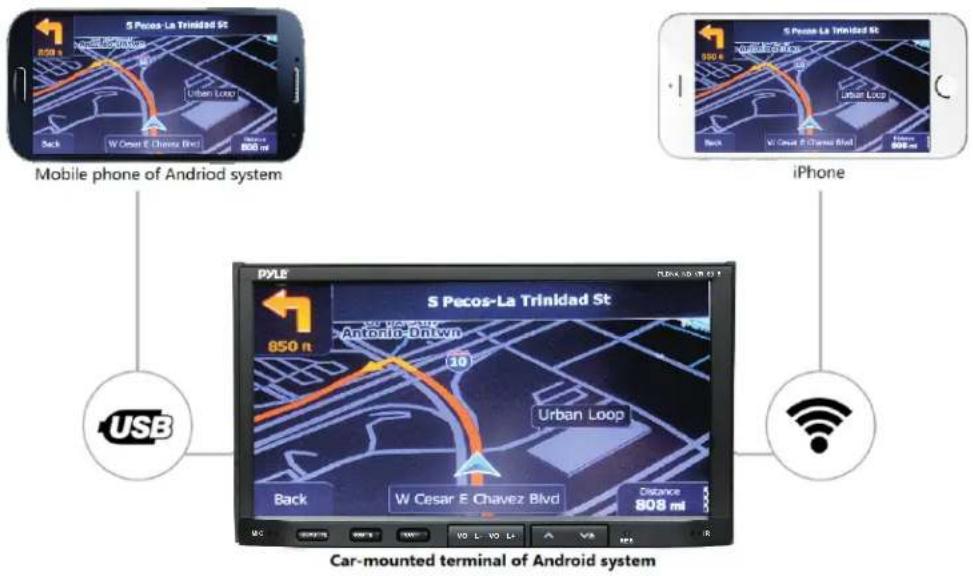
Connection diagram of Easy Connected
Easy Connected is pre-installed on Android car-mounted terminal, supports the connection between the car-mounted terminal and Android mobile phones & iPhone, where the method of connecting Android mobile phone with the car-mounted terminal is the standard USB interface or wireless hotspot, while the connecting method between iPhone and the car-mounted terminal is only the wireless hotspot.
※ Notes during use of Easy Connected software:
This version applies to the car-mounted terminals of specified OEM brands. Carbit will not bear any responsibility for any problems caused by using this software on the terminals of other systems.
Do not operate this software during driving. This software can only be used when transportation safety is ensured to avoid any dangers. Otherwise, the user shall be responsible for any problems caused by the road accident or other accident due to above reasons, and Carbit will not bear any responsibility.
2. Connection between Car-mounted Terminal and Mobile Phone
2.1. Connect to Android mobile phone via USB
Ensure following operation has been done before connecting to your mobile phone for the first time:

flowchart
graph LR
    A["1. Turn on the phone (usb de bug switch)"] --> B["2. Turn on the bluetooth and ensure the match with the vehicle terminal"]
    B --> C["3. Connect the usb cable correct"]
    C --> D["4. Connection completed"]
① The [USB debugging switch] on the mobile phone shall be enabled before connection. After finish setting, please unplug the USB connector on mobile phone end and then plug it again. See relevant information in Section 8.1 about how to enable [USB debugging switch] on Android mobile phones.
② After establish Bluetooth connection between the mobile phone and the car-mounted terminal, the user will be able to answer and make calls conveniently during using this software. Meanwhile, the user can also transmit the audio on mobile phones to the car-mounted terminal via A2DP protocol, which can be played by the car audio speaker. The Bluetooth connection shall be established between the mobile phone and the car-mounted terminal, and see Instruction Manual of Car-mounted Terminal for detailed steps.
③ Please connect the phone with the USB interface of car-mounted terminal again after finishing above setting.
Congratulations! You have finished first time of connection via Easy Connected. You only need to connect the mobile phone with the car-mounted terminal via USB cable every time you driving as long as the setting of mobile phone and car-mounted terminal is not changed.
2.2. Connect to iPhone
Ensure following operation has been done before connecting to your mobile phone for the first time:
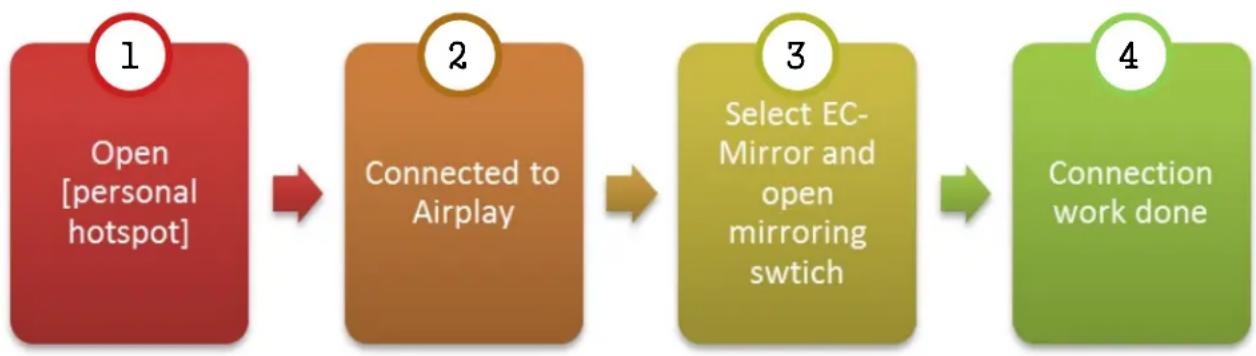
flowchart
graph LR
    A["1 Open [personal hotspot"]] --> B["2 Connected to Airplay"]
    B --> C["3 Select EC-Mirror and open mirroring switch"]
    C --> D["4 Connection work done"]
① Open phone Settings > Personal Hotspot to open iPhone hotspot, and record the name and password of the hotspot.

② Click the button [Connect Now] on the car-mounted terminal to connect the mobile phone hotspot:
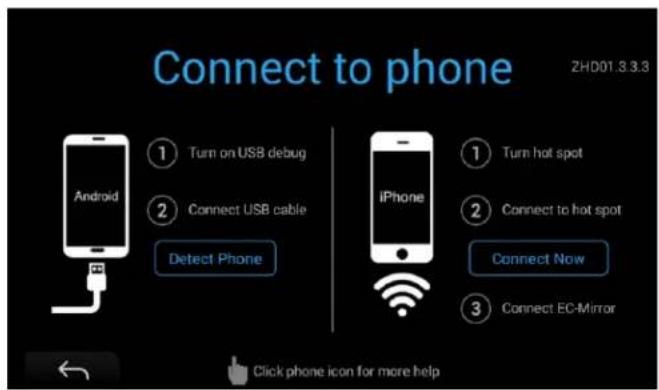
After connected to the hotspot of mobile phone, open the quick control bar of phone and select Airplay:
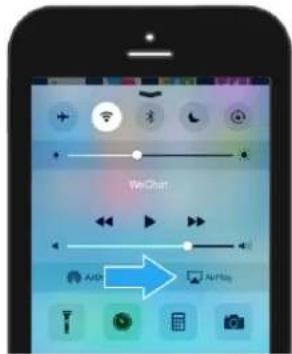
③ Select EC-Mirror and open mirroring switch, then the connection is done successfully:

※ Note: Support iPhones of iPhone4S & iOS7.0 and above versions;
3. Start to use
Click the 📄 icon on the car-mounted terminal to start this software, and pay attention to that the mobile is not at lock-screen state during connection.
3.1. Use Android phone on car-mounted terminal
After successful connection, following interface will appear on onboard screen, and the model of the phone connected will be displayed at the top of screen, as shown in following figure.

Click the button of [Double-screen interaction] on onboard screen to project the screen of mobile phone into the screen of car-mounted terminal screen, and achieve the bidirectional operation of both screens. Following prompt will appear during the connection of phones of some models:
![Check phone Check [Always allow from this computer] and click [OK] Retry Exit Allow USB debugging? computer's RSA key report as $1.40E7C4 66/ES GA CO 3B $158 B0 A5 Always allow from this computer Cancel OK](/content/2026/05/955069/images/d7569c926653e8c5a42e7967e3dd400415b524ea2e395b913a9800a8c0487083.jpg)
At this time, the user shall check the screen of mobile phone, tick "Always allow debugging from this computer", and then click "OK".
If the user fails to connect the Bluetooth correctly, this software will give prompt and assist the user to connect the phone with onboard system via the Bluetooth. The user can refer to the screen on the car-mounted terminal to search Bluetooth device on the phone and connect the device.

The user can also click "Cancel" not to connect phone Bluetooth with the onboard system, and close this prompt in the option of settings.
3.2. Use iPhone on car-mounted terminal
After connected with the car-mounted terminal successfully, the iPhone screen will be projected to the screen of the car-mounted terminal during operation on iPhone.
※ Note:
The double-screen interaction function after connecting iPhone with the screen of car-mounted terminal screen is not available, which means the user can only operate on the phone screen, not the screen of the car-mounted terminal;
4. Experience of Double-screen Interaction
Note:
Double-screen interaction function is not supported when the car-mounted terminal is connected with iPhone.
4.1. Pop-up function menu

The function menu will pop up by clicking the arrow button (▶) on left bottom of the screen, and the definition of function keys is as follows:
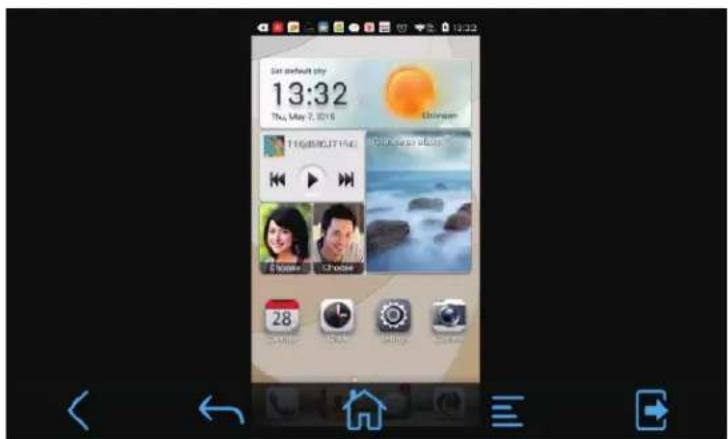
| Interface icon | Name Function | ||
 | Retract key | Retract the pop-up function menu | |
 | Return key | Back to the previous level, same as the Return key on Android mobile phones | |
 | Home key | Return to the home screen, same as the Home key on Android mobile phones | |
 | Option key | Pop up the menu of available options of this software, same as the Option key on Android mobile phones | |
 | Off key | Close this software and disconnect the double-screen interaction with the mobile phone | |
4.2. Intelligent adjustment of screen orientation
When the screen of phone switching from vertical to horizontal, the display screen of the car-mounted terminal will also adjust the orientation to keep consistency with the phone screen, as shown in following figure:

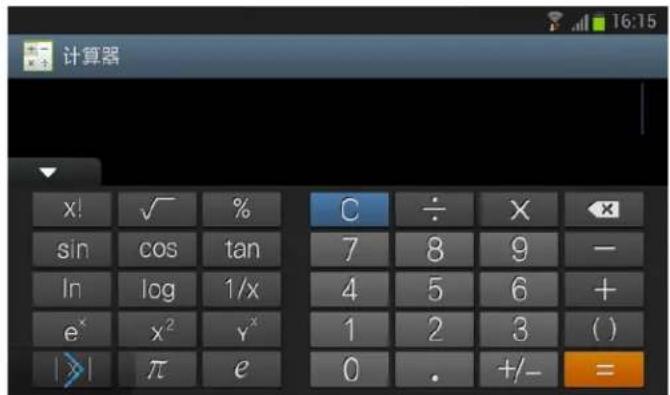
To ensure best service status, it is recommended to enable the function of Auto Screen Rotation.
4.3. Exit double-screen interaction
Extend the function menu by clicking the arrow button (▶) on left bottom of the screen, and then click the Exit key (▶) to exit the function of double-screen interaction.
5. Play mobile video\*
The user can click the function of "mobile video" on the main interface to enter the interface of mobile video function, which will enable the video stored in the mobile phone to be played on the car-mounted terminal directly.
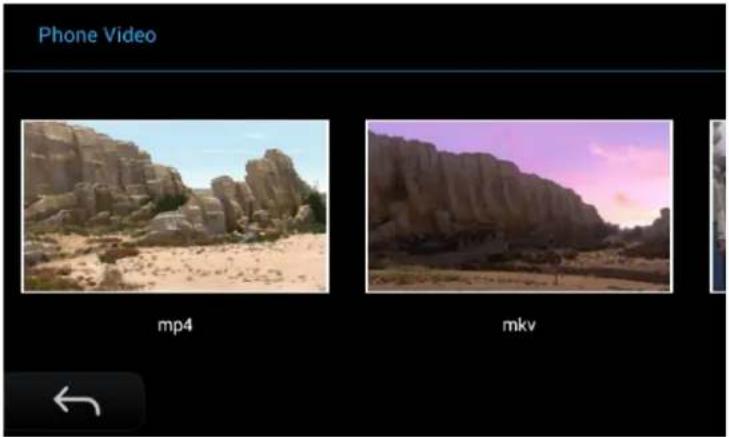
The user can slide the screen left and right to check the video thumbnail and file name, and click the thumbnail to play the video.

6. Settings\*
Click the "Setting" button on the main interface to enter the interface of function setting;
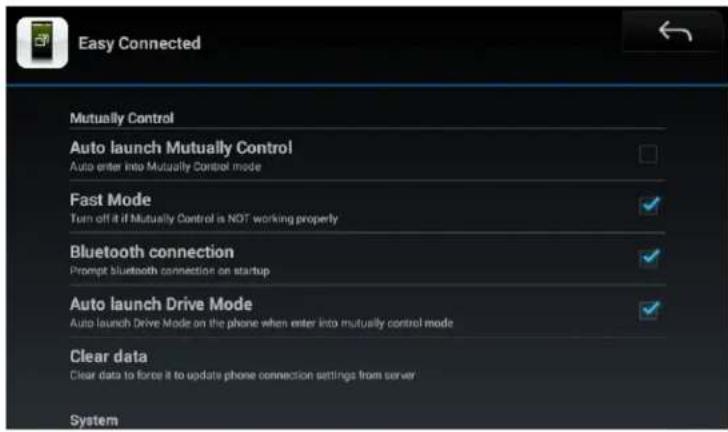
- Enter into double-screen interaction automatically: entering into double-screen interaction state after starting this software.
- Whether enable Bluetooth connection during starting: during the start of this software, whether it will give prompt and guide the user to connect when detect that the car-mounted terminal is not connected with Phone Bluetooth correctly.
- Start Easydrive automatically: start the interface of Easydrive automatically after connecting Easy Connected.
- Clear data: when there is no response from operation of touch screen in double-screen interaction, please select this option to clear the data and re-connect the phone.
● About: the version, copyright and legal provisions about this software.
※ Note: Do not use this function during driving. This software is only for assistance in browsing the phone video in the car. As the supporting format of "Media Gallery" of phone and the "Video" of car-mounted terminal differs, not all video files copies into the phone can be identified and played. As the function of device differs, not the video files of all formats can be played on the car-mounted terminal smoothly.
7. Easydrive\*
7.1. About Easydrive
Easydrive is an APP automatically pushed by Easy Connected and installed on Android mobile phone, through which users can add and open APPs in the phone conveniently. Those APPs in the phone can be switched into onboard mode via the horizontal screen technology to obtain sound human-machine interaction experience.
7.2. Open and use Easydrive
After entering into double-screen interaction by connecting the phone with the Central Multimedia, open Easydrive on the phone (☐), and open the main interface of Easydrive:

Voice service: click [DRIVE MODE] button to start Voice Assistant. Voice service need internet support. Commands supported by voice currently:
1.Open applications, standard voice commands: "Open XXX" or "Start XXX", XXX indicating the name of application;
2.Make calls, standard voice commands: "Make a call to XXX" or "Call XXX", XXX indicating the name in Contacts;
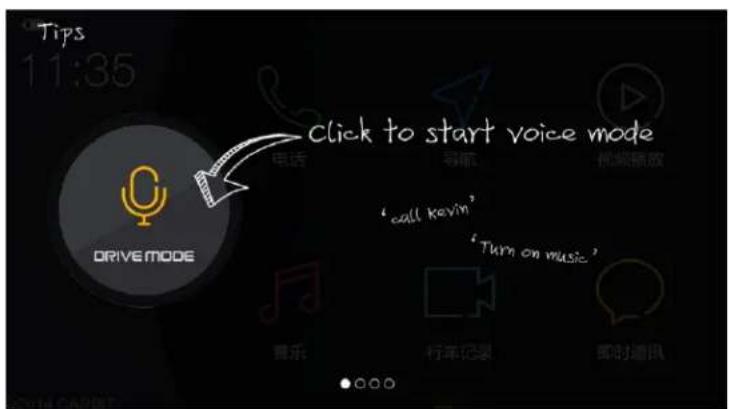
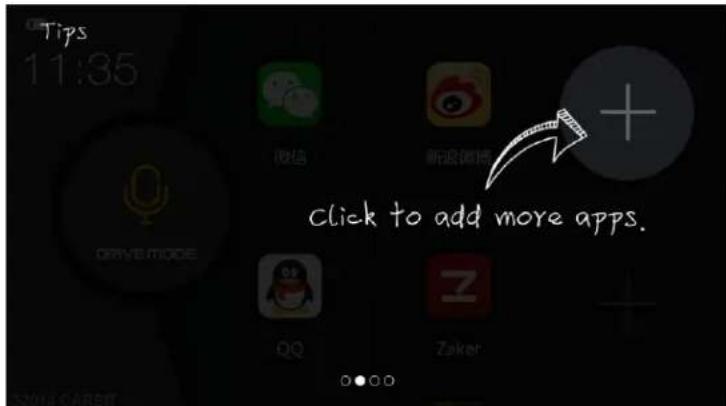
Application addition: click [+] button to add the application in the phone into the main interface of Easydrive, as shown in following figure:
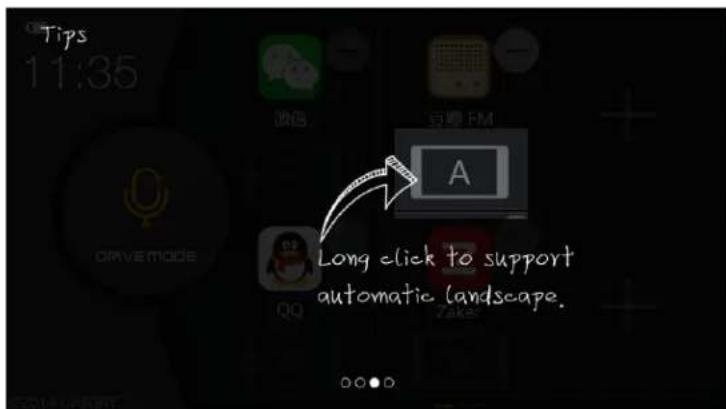
Horizontal screen mode: touch and hold the icon of application and light on [A], and the application will operate in horizontal screen mode automatically, as shown in following figure:
※ Notes during use of Easydrive:
This application does not support iPhone currently.
This application can only be used when transportation safety is ensured to avoid any dangers. Otherwise, the user shall be responsible for any problems caused by the road accident or other accident due to above reasons, and Carbit will not bear any responsibility.
8.FAQ
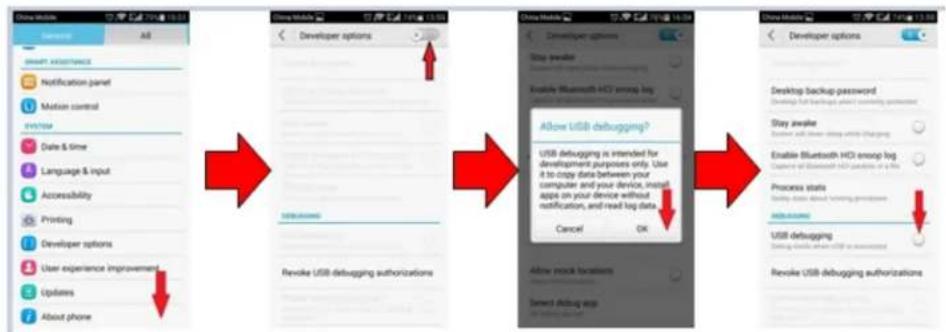
8.1.How to open USB debugging switch on Android mobile
The method of opening USB debugging switch on the phone differs due to different versions of Android system. Please select proper connection wizard according to your phone system version, and operate on the phone in order.

flowchart
graph TD
    A["Initial Setup"] --> B["About phone"]
    B --> C{Phone storage}
    C --> D["Resolution"]
    D --> E["Android version"]
    E --> F["EMCI version"]
    F --> G["Baseband version"]
    G --> H["Kernel version"]
    H --> I["Build number"]
    I --> J["Status"]
    J --> K["Phone status, input, log, data"]
    K --> L["Legal information"]

    M["Developer options"] --> N{Developer settings}
    N --> O{Allow developer settings}
    O --> P{Allow USB debugging}

    style A fill:#f9f,stroke:#333
    style M fill:#f9f,stroke:#333

    subgraph Legend
        A1["Start: Alert/Review"]
        A2["Update: Update"]
        A3["Action: About phone"]
        A4["End: Cancel"]
    end

    subgraph Legend
        B1["Start: Alert/Review"]
        B2["Update: Update"]
        B3["Action: About phone"]
        B4["End: Cancel"]
    end

    subgraph Legend
        C1["Start: Alert/Review"]
        C2["Update: Update"]
        C3["Action: About phone"]
        C4["End: Cancel"]
    end

    subgraph Legend
        D1["Start: Alert/Review"]
        D2["Update: Update"]
        D3["Action: About phone"]
        D4["End: Cancel"]
    end

    subgraph Legend
        E1["Start: Alert/Review"]
        E2["Update: Update"]
        E3["Action: About phone"]
        E4["End: Cancel"]
    end

    subgraph Legend
        F1["Start: Alert/Review"]
        F2["Update: Update"]
        F3["Action: About phone"]
        F4["End: Cancel"]
    end

    subgraph Legend
        G1["Start: Alert/Review"]
        G2["Update: Update"]
        G3["Action: About phone"]
        G4["End: Cancel"]
    end

    subgraph Legend
        H1["Start: Alert/Review"]
        H2["Update: Update"]
        H3["Action: About phone"]
        H4["End: Cancel"]
    end

    subgraph Legend
        I1["Start: Alert/Review"]
        I2["Update: Update"]
        I3["Action: About phone"]
        I4["End: Cancel"]
    end

    subgraph Legend
        J1["Start: Alert/Review"]
        J2["Update: Update"]
        J3["Action: About phone"]
        J4["End: Cancel"]
    end

    subgraph Legend
        K1["Start: Alert/Review"]
        K2["Update: Update"]
        K3["Action: About phone"]
        K4["End: Cancel"]
    end

    subgraph Legend
        L1["Start: Alert/Review"]
        L2["Update: Update"]
        L3["Action: About phone"]
        L4["End: Cancel"]
    end

    subgraph Legend
        M1["Start: Alert/Review"]
        M2["Update: Update"]
        M3["Action: About phone"]
        M4["End: Cancel"]
    end

    subgraph Legend
        N1["Start: Alert/Review"]
        N2["Update: Update"]
        N3["Action: About phone"]
        N4["End: Cancel"]
    end

    subgraph Legend
        O1["Start: Alert/Review"]
        O2["Update: Update"]
        O3["Action: About phone"]
        O4["End: Cancel"]
    end

    subgraph Legend
        P1["Start: Alert/Review"]
        P2["Update: Update"]
        P3["Action: About phone"]
        P4["End: Cancel"]
    end

    subgraph Legend
        Q1["Start: Alert/Review"]
        Q2["Update: Update"]
        Q3["Action: About phone"]
        Q4["End: Cancel"]
    end

    subgraph Legend
        R1["Start: Alert/Review"]
        R2["Update: Update"]
        R3["Action: About phone"]
        R4["End: Cancel"]
    end

    subgraph Legend
        S1["Start: Alert/Review"]
        S2["Update: Update"]
        S3["Action: About phone"]
        S4["End: Cancel"]
    end

    subgraph Legend
        T1["Start: Alert/Review"]
        T2["Update: Update"]
        T3["Action: About phone"]
        T4["End: Cancel"]
    end

    subgraph Legend
        U1["Start: Alert/Review"]
        U2["Update: Update"]
        U3["Action: About phone"]
        U4["End: Cancel"]
    end

    subgraph Legend
        V1["Start: Alert/Review"]
        V2["Update: Update"]
        V3["Action: About phone"]
        V4["End: Cancel"]
    end

    subgraph Legend
        W1["Start: Alert/Review"]
        W2["Update: Update"]
        W3["Action: About phone"]
        W4["End: Cancel"]
    end

    subgraph Legend
        X1["Start: Alert/Review"]
        X2["Update: Update"]
        X3["Action: About phone"]
        X4["End: Cancel"]
    end

    subgraph Legend
        Y1["Start: Alert/Review"]
        Y2["Update: Update"]
        Y3["Action: About phone"]
        Y4["End: Cancel"]
    end

    subgraph Legend
        Z1["Start: Alert/Review"]
        Z2["Update: Update"]
        Z3["Action: About phone"]
        Z4["End: Cancel"]
    end

    subgraph Legend
        AA1["Start: Alert/Review"]
        AA2["Update: Update"]
        AA3["Action: About phone"]
        AA4["End: Cancel"]
    end

    subgraph Legend
        AB1["Start: Alert/Review"]
        AB2["Update: Update"]
        AB3["Action: About phone"]
        AB4["End: Cancel"]
    end

    subgraph Legend
        AC1["Start: Alert/Review"]
        AC2["Update: Update"]
        AC3["Action: About phone"]
        AC4["End: Cancel"]
    end

    subgraph Legend
        AD1["Start: Alert/Review"]
        AD2["Update: Update"]
        AD3["Action: About phone"]
        AD4["End: Cancel"]
    end

    subgraph Legend
        AE1["Start: Alert/Review"]
        AE2["Update: Update"]
        AE3["Action: About phone"]
        AE4["End: Cancel"]
    end

    subgraph Legend
        AF1["Start: Alert/Review"]
        AF2["Update: Update"]
        AF3["Action: About phone"]
        AF4["OK"] --> AG1
        AF5["SIGNATURE"] --> AG2
    end
↑Android 4.2-4.4 system
flowchart
graph TD
    A["Initial Setup"] --> B["Notification Panel"]
    B --> C["Data Transfer"]
    C --> D["User Experience Improvement"]
    D --> E["Updates"]
    E --> F["About phone"]

    G["Initial Setup"] --> H["Developer Options"]
    H --> I["Revoke USB debugging authorizations"]

    J["Initial Setup"] --> K["Stop awake"]
    K --> L["Enable Bluetooth HCI subgroup log"]
    L --> M{Allow USB debugging?}
    M -->|Yes| N["USB debugging is intended for development purposes only. Use it to copy data between your computer and your device, install apps on your device without notification, and read log data"]
    M -->|No| O["Cancel OK"]

    P["Initial Setup"] --> Q["Desktop Backup Password"]
    Q --> R["Stay awake"]
    R --> S["Enable Bluetooth HCI subgroup log"]
    S --> T{Allow USB debugging?}
    T -->|Yes| U["USB debugging"]
    T -->|No| V["Revoke USB debugging authorizations"]
↑Android 4.0-4.1 system
8.2. Notes for use
- For phones of Android system, as “version split” is the inherent problem of Android system and the phone manufacturer of each brand will provide some personalize modification to Android system, it is not ensured that this product can be connected with all Android phones normally. See List of Easy Connected Verified Phones for details about the support phone models.
- As the systems of Android2.3.X and lower lack for relevant support, some functions will not be available when connecting this product with phones of such system, for example: the function of playing the video in the phone via double-screen interaction will not be used normally.
- As the performance of mobile phone data cable differs significantly, it is strongly recommended that use original USB cable for connection; otherwise, please use the USB cable with screening function for connection as possible to ensure stable connection.
- As the performance of the phone differs, the connection performance also varies when different phones are used for connection.
8.3. Lookup table of connection problems
| Phone type | Problem phenomenon | Cause analysis | Solution | |
| Android mobile | No connection process occurs after inserting into the phone and entering Easy Connected | Something wrong with the adaption of environment files | Perform environment detection, and see instruction of Easy Connected Adaption and Installation, or contact the manufacturer of relevant brand | |
| The icon of USB debugging does not appear on the phone screen | USB physical connection fails. | 1. Check that whether the [USB debugging mode] is enabled on the phone2. Check and replace USB cable3. Check USB port on car-mounted terminal4. Plug and unplug the phone again | ||
| The icon of USB debugging appears on the phone screen, but the phone cannot be connected. | 1. The phone is not compatible2. Easy Connected service is blocked | Allow installation and starting of Easy Connected service in the software such as Phone Assistant. | ||
| iPhone | Airplay button does not appear on the phone | Wifi of the phone and car-mounted terminal is not connected | Check whether the Wifi of car-mounted terminal is connected with the phone hotspot | |
| Click mirroring button, and blank screen occurs to the car-mounted terminal | Wifi signal is not stable | Turn off and start again. | ||
| No | Reference code | Meaning | Solutions | |
| 1 | 0x11 | Easy Connected cannot find the phone | Click the reference code for 7 times, run environmental detection application, and exclude the problem of environment configuration. If there is no problem of environment configuration, following reasons maybe possible1. USB device is not stable2. or due to USB cable3. The Central Multimedia does not have /data/.android/directory, or the permission of adb (adb-Easy Connected) is not root (see adaption instructions) | Check whether the USB debugging of phone is open; check whether the debugging icon appears on the notification bar; if not, it is often due to power supply from USB interface is not stable or the capacity of resisting disturbance of USB cable is poor. The user can try replacing USB cable (the USB cable of CE-Link is recommended), or strengthen power supply by adding a USB powered hub between the car-mounted terminal and the phone. |
| 2 | 0x12 | Plug and unplug the phone again and keep the phone screen not locked, and tick “Always allow” when the debugging dialog pops up | ||
| 3 0x13 | ||||
| 4 | 0x14 | |||
| 5 | 0x15 | Easy Connected cannot find the phone | ||
| 6 0x03 | Easy Connected cannot obtain the version number of the phone | Phone initialization is not finished, or it is blocked by Phone Guardian | ||
| 7 | 0x04 / 0x05 / 0x08 / 0x63 / 0x64 / 0x200 / 0x204 | Failing to push the service to the phone | Phone memory is not enough, or it is blocked by Phone Guardian | |
| 8 0x20 | Failing to push the service to the phone | Enter into the interface of phone settings, find “Verify apps via USB” on the interface of safety setting (or the interface of USB debugging setting), and eliminate the ticked state if this option is available and ticked. | ||
1600 63rd. Street Brooklyn N.Y. 11204
PYLE®
PyleAudio.com
natural_image
Side view of a silver sedan car with visible wheel and side mirror (no text or symbols)


- Model:
- PLDNANDVR695
- Thank you for choosing Pyle Audio!
- Compatibility
- Precautions & Warnings
- Cleaning
- Temperature
- System Handling
- Note:
- System Installation:
- Installation Guide - Double Din Fitting:
- Caution:
- Installation kits:
- Installing Steering Wheel Control
- Remote Control
- Button Layout
- Front Panel and Buttons
- Turning Power On
- Settings
- Set Time
- Sound
- Aux
- Calendar
- Calculator
- EQ - Equalizer
- Presets
- Adjustments
- Radio
- SD - Flash Memory File Browsing
- USB - Flash Memory File Browsing
- Video
- Wall Paper
- Wheel
- 1) Steering Wheel Controls
- Third Party Apps
- Trouble Shooting
- DVD
- 1) Scrubbing
- 2) Menu options & controls:
- Bluetooth
- Left hand column:
- Right hand column:
- How to access internet
- Vehicle Blackbox DVR
- User Manual
- Video Recording
- Setting
- Routine Setup
- Video Setup
- Output Setup
- Restore Default
- Video List
- System Installation and Wiring
- Installation Transcript:
- Additional Notes:
- Pyle 'PLCM'
- Backup Camera Systems
- Angle Adjustable Camera Lens
- Phone Link Software
- 1.About Easy Connected
- ※ Notes during use of Easy Connected software:
- Connection between Car-mounted Terminal and Mobile Phone
- Connect to Android mobile phone via USB
- Connect to iPhone
- Start to use
- Use Android phone on car-mounted terminal
- Use iPhone on car-mounted terminal
- Experience of Double-screen Interaction
- Pop-up function menu
- Intelligent adjustment of screen orientation
- Exit double-screen interaction
- Play mobile video\*
- Settings\*
- Easydrive\*
- About Easydrive
- Open and use Easydrive
- ※ Notes during use of Easydrive:
- 8.FAQ
- 8.1.How to open USB debugging switch on Android mobile
- Notes for use
Brand : Pyle
Model : PLDNANDVR695
Category : Media player