SkySeeker JC-1000 - Telescope Carson - Free user manual and instructions
Find the device manual for free SkySeeker JC-1000 Carson in PDF.


| Product Type | Telescope |
| Brand | Carson |
| Model | SkySeeker JC-1000 |
| Optical Design | Refractor |
| Aperture (Objective Lens Diameter) | 60 mm |
| Focal Length | 800 mm |
| Eyepieces Included | H8mm (100x) and H20mm (40x) |
| Magnification Range | 40x to 100x |
| Finderscope | 5x24mm cross-hair |
| Mount Type | Altazimuth with micro-adjustable altitude control |
| Focus Mechanism | Rack and pinion focusing wheel |
| Angle Prism | Included for comfortable viewing |
| Tripod | Adjustable height with accessory tray |
| Eyepiece Size | 1.25 inch |
| Sunshade | Included |
| Intended Use | Astronomical observation of celestial bodies |
| Safety Warning | Never observe the sun directly; risk of eye injury |
| Care Instructions | Avoid rapid temperature changes to prevent lens fogging; if condensation occurs, allow to evaporate away from heat source |
Frequently Asked Questions - SkySeeker JC-1000 Carson
User questions about SkySeeker JC-1000 Carson
0 question about this device. Answer the ones you know or ask your own.
Ask a new question about this device
Download the instructions for your Telescope in PDF format for free! Find your manual SkySeeker JC-1000 - Carson and take your electronic device back in hand. On this page are published all the documents necessary for the use of your device. SkySeeker JC-1000 by Carson.
USER MANUAL SkySeeker JC-1000 Carson
CARSON®
JC-1000 Instruction Manual
JC-1000 Instruction Manual
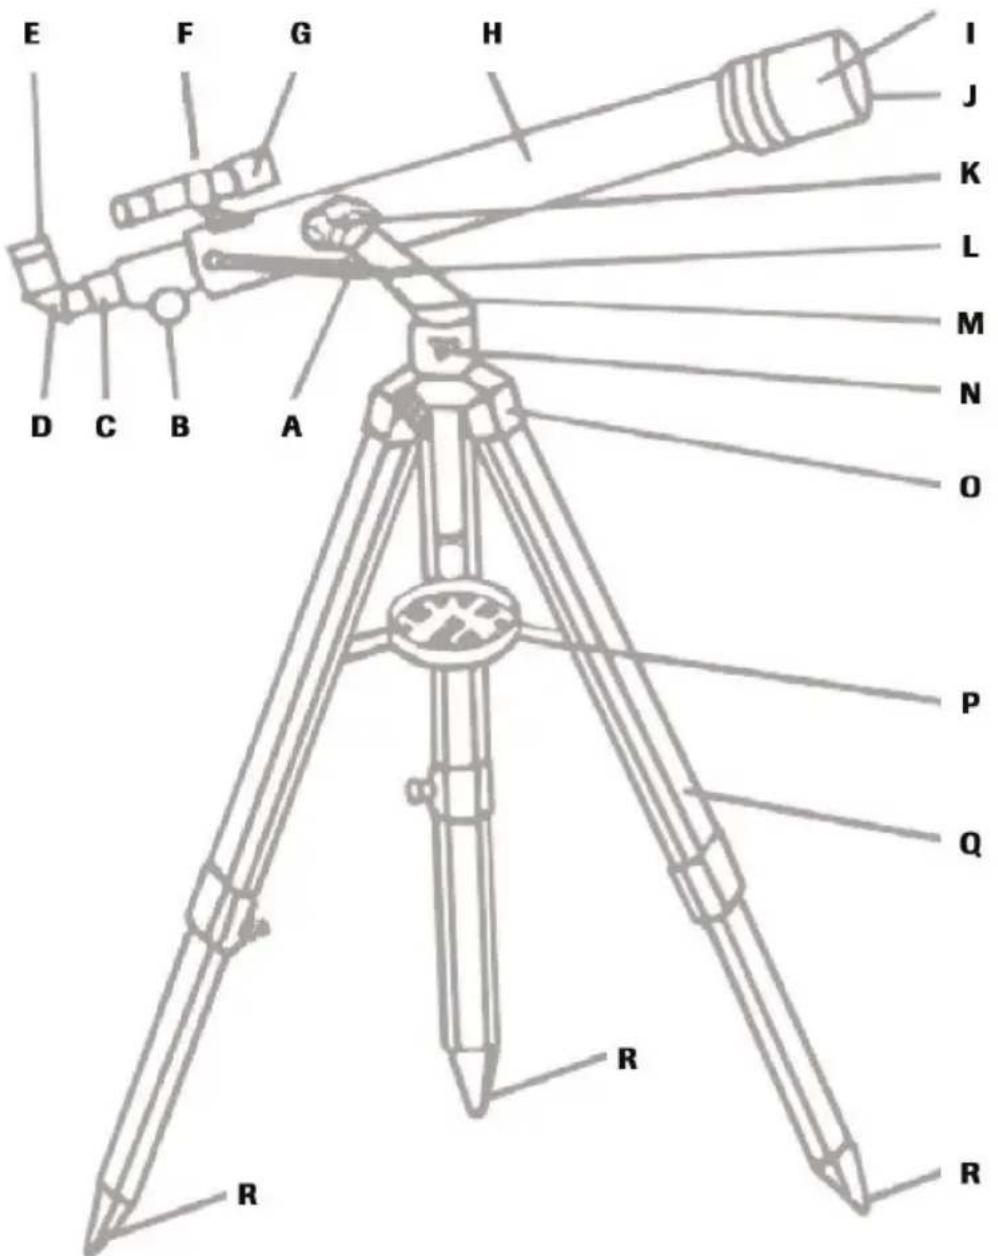
A. Micro adjustable Altitude control
B. Focusing wheel
C. Focusing tube
D. Angle prism
E. Eyepiece
F. Finderscope bracket
G. Finderscope
H. Main telescope body
I. Sunshade
J. Lens
K. Yoke locking screw
L. Adjustment locking nut
M. Yoke bracket
N. Azimuth lock
O. Tripod head
P. Accessory tray
Q. Tripod leg
R. Plastic tipped feet
SPECIFICATIONS
Focal length: 800 mm
Diameter of Objective Lens: 60 mm
1.25 inch eyepieces: H8mm & H20mm
Finder scope: 5x24mm
Magnification: 40X when using the H20mm eyepiece
100X when using the H8mm eyepiece
JC-1000 Instruction Manual
VISUAL GUIDE
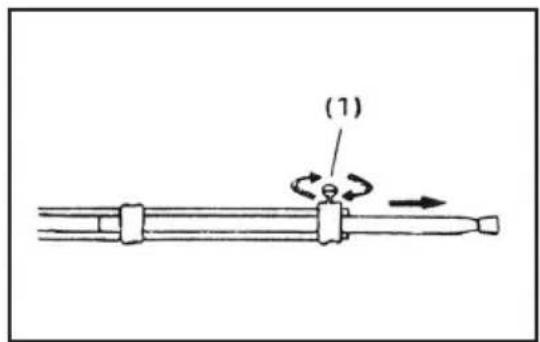
Fig.1 Fig.2
natural_image
Pure mechanical diagram showing a central circular component connected to vertical rods (no text or symbols)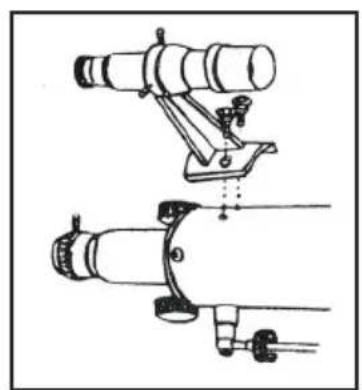
natural_image
Technical line drawing of a mechanical device with two views (top and side), no text or symbols present.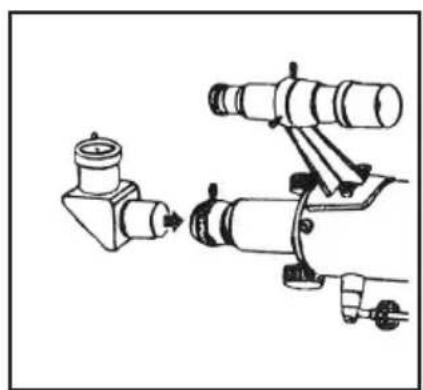
natural_image
Technical line drawing of a mechanical device with no visible text or symbolsFig.3 Fig.4 Fig.5
natural_image
Technical line drawing of a mechanical device with no visible text or symbolsFig.6
JC-1000 Instruction Manual
INSTRUCTIONS FOR USE
1) Extend the legs (Q) as shown in Fig. 1, and lock them at the desired height using the wing nut (1) supplied.
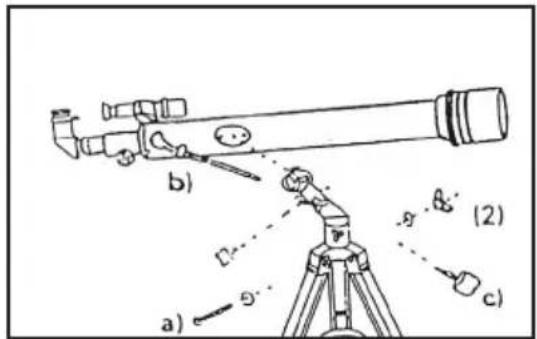
2) Connect the three legs to the tripod head (O) using the wing nut and the bolt (2), proceeding as shown in Fig. 2a.
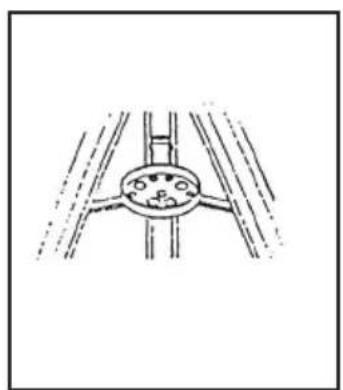
3) Then attach the accessory tray (P) to the flanges of the tripod legs using the adjustment nuts and bolts supplied (see Fig. 3).
4) Once all of the bolts have been tightened down fully, the telescope's main body can be attached to the tripod head yoke (M). Proceed as shown in Fig. 2b: mount the telescope's main body (H) in the yoke (M) and adjust it using the large locking screw (K). Then tighten down the yoke screw (see Fig. 2b and 2c).
5) Remove the finderscope (G) with the attached bracket (F) from its box. Then remove the two knurled thumbscrews from the telescope's main body (H). Locate the finderscope bracket on the telescope's main body so that the holes drilled in the bracket base line up with those exposed in the telescope's main body. Refit the two knurled thumbscrews and tighten them down securely (see Fig. 4).
6) Insert the angle prism (D) into the focusing tube (C). Hold it in place by tightening down the corresponding mounting bolts (see Fig. 5).
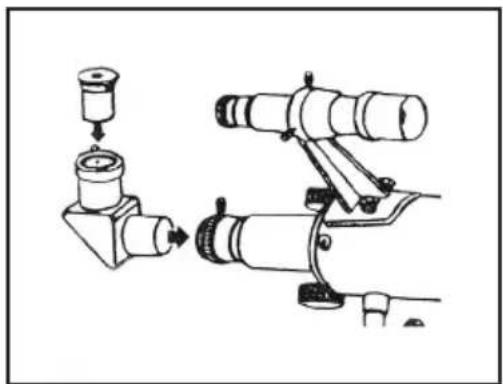
7) Fit the eyepiece (E) into the angle prism (D). The eyepiece also requires adjusting using the small tightening screw (see Fig. 6).
JC-1000 Instruction Manual
FINDERSCOPE ADJUSTMENT
As the telescope only offers a limited field of view, it may be fairly hard to locate a given star or planet for observation. This is why the telescope is fitted with a cross-hair finderscope for orientation purposes. We recommend performing the following adjustments in daylight.
1) Insert the eyepiece with the lowest magnification factor into the angle prism connector. Observe an easily recognizable fixed object that is no more than 300 meters away. Swivel the telescope through its horizontal axis and adjust it along the vertical axis until the object is located right in the center of your field of view, then immobilize the telescope by tightening it down securely.
2) Now look through the finderscope. If the object seen through the telescope cannot be seen, slacken the adjusting nut and move the finderscope until you can see the object. Then tighten down the adjusting nut making sure that the object remains visible in the center of the finderscope. To simplify this procedure, use the adjusting nut to position the object in the center. The finderscope will move in the direction in which the nut is turned. As soon as the eyepiece adjustment coincides with that of the finderscope, all of the nuts can be finally tightened down.
ALTITUDE-AZIMUTH MOUNT
The telescope is fitted with an Altitude-Azimuth mount. "
Altitude " refers to the telescope's up and down or vertical movement, while "Azimuth" refers to its sideways or horizontal movement.
The Altitude Azimuth mount used in conjunction with the microadjustable Altitude control and Azimuth Lock (N) lets you see the entire night sky or any celestial body without having to move the tripod.
Which magnification should be chosen?
SELECTING A SUITABLE EYEPIECE
The magnification defines the telescope's ability to enlarge an image or to bring it closer in order to see it better.
800 mm focal length
Example: = 40x magnification
eyepiece focal length 20 mm
The required degree of magnification depends on the object to be observed.
To this end, we recommend conforming to the following general guidelines:
Ideal viewing conditions are obtained when the magnification factor corresponds to no more than 15 to 20 times the lens diameter, i.e. the optimal magnification of 100x to 125x obtained with a 60 mm diameter lens makes it possible to observe most celestial bodies.
We recommend using a lower magnification factor for observing the stars as the field of view will be wider so that the object being observed will be easier to locate. The highest magnification factor should only be used for especially finely detailed observations of the moon. This is because the moon is relatively close and exceptionally bright, so that good detail resolution is obtained even with a high magnification ratio.
JC-1000 Instruction Manual
GENERAL CONSIDERATIONS
Avoid sudden temperature fluctuations likely to cause any dampness in the air to condense on the telescope's lens. If this phenomenon occurs, place the lens at a moderate distance away from a heat source and let the dampness evaporate away progressively.
Warning: To avoid any eye injury never look directly into another optical instrument through the telescope and never observe the sun with unprotected eyes!
Brand : Carson
Model : SkySeeker JC-1000
Category : Telescope