RedPlanet RP-300 - Telescope Carson - Free user manual and instructions
Find the device manual for free RedPlanet RP-300 Carson in PDF.


| Product Type | Telescope |
| Brand | Carson |
| Model | RedPlanet RP-300 |
| Optical Design | Refractor |
| Aperture | 60 mm (2.4 in) |
| Focal Length | 700 mm |
| Focal Ratio | f/11.7 |
| Mount Type | Altazimuth |
| Tripod Material | Aluminum |
| Eyepieces Included | 20 mm and 10 mm |
| Finderscope | 5x24 finderscope |
| Barlow Lens | 2x Barlow lens (included) |
| Max Magnification | 120x |
| Dimensions (Assembled) | 76 x 23 x 15 cm (30 x 9 x 6 in) |
| Weight | 4.5 kg (10 lbs) |
| Power Source | None (manual operation) |
| Main Features | Pre-assembled tripod, adjustable height, quick-release mount |
| Maintenance | Wipe lenses with microfiber cloth; store in dry place |
| Safety | Never point at sun; use solar filter only |
| Spare Parts | Available via Carson website or authorized dealers |
| Warranty | Limited lifetime warranty |
Frequently Asked Questions - RedPlanet RP-300 Carson
User questions about RedPlanet RP-300 Carson
0 question about this device. Answer the ones you know or ask your own.
Ask a new question about this device
Download the instructions for your Telescope in PDF format for free! Find your manual RedPlanet RP-300 - Carson and take your electronic device back in hand. On this page are published all the documents necessary for the use of your device. RedPlanet RP-300 by Carson.
USER MANUAL RedPlanet RP-300 Carson
natural_image
Red telescope on a tripod stand, no visible text or symbolsCARSON
2070 5th Avenue
Ronkonkoma, NY 11779
Phone: 631-963-5000
Fax: 631-427-6749
For information, call toll-free: 1-800-967-8427
info@carson.com / sales@carson.com / www.carson.com
RP-300 / ©2017-R1
Table of Contents:
Introduction
3 Box Contents
4-9 Figures 1-9/Figure Key
10-11 Telescope Assembly
- Setting up Your Tripod
- Attaching the Equatorial Mount
- Attaching the Counterweight
- Attaching the Slow Motion Cables
- Attaching the Telescope Tube to the Mount
- Attaching the Finder Scope
- Attaching the Eyepieces
12-13 Balancing the Telescope
• Balancing the Mount in R.A.
• Balancing the Mount in Dec.
• Aligning the Finder Scope
13 Calculating Power
14 Understanding Celestial Movement
14-15 A Brief Overview of Celestial Coordinates
15 Polar Alignment
16-17 Using the Telescope
• Image Orientation
• Using Setting Circles
18-22 Care and Maintenance of Your Telescope
- Cleaning
• Collimation of Optics
- Adjusting the Diagonal Holder
- Adjusting the Primary Mirror
• Night Time Star Collimation Testing
21 Specifications
21 Warnings
22 Customer Service
22-23 Warranty Information
Congratulations on your purchase of a Carson RP-300 Red Planet ^™ Series telescope. This telescope features an easy-to-use design and high performance optics that are perfect for amateur astronomers looking to explore the wonders of outer space. Please read this manual carefully to ensure that you assemble and use your telescope correctly. When used properly, your Red Planet ^™ telescope should provide years of exciting observations of the universe. Please note that this Newtonian Reflector telescope was designed for astronomical viewing and is not recommended for terrestrial use.
IMPORTANT: DO NOT USE YOUR RED PLANET™ TELESCOPE TO LOOK AT OR NEAR THE SUN! DOING SO WILL CAUSE INSTANT AND PERMANENT EYE DAMAGE.
Each box contains the following:
- Complete Optical Tube Assembly.
• Equatorial Mount
• Heavy-Duty Aluminum Tripod.
• 9mm Kellner Eyepiece (1.25"O.D.).
• 20mm Kellner Eyepiece (1.25"O.D.).
• Cradle Rings with Lock Knobs.
- 6x30mm Finder Scope.
• Counterweight Bar with Counterweight.
- Flexible Cable Controls for Both Axes.
Please unpack your telescope carefully and make sure that all accessories are included in the box.
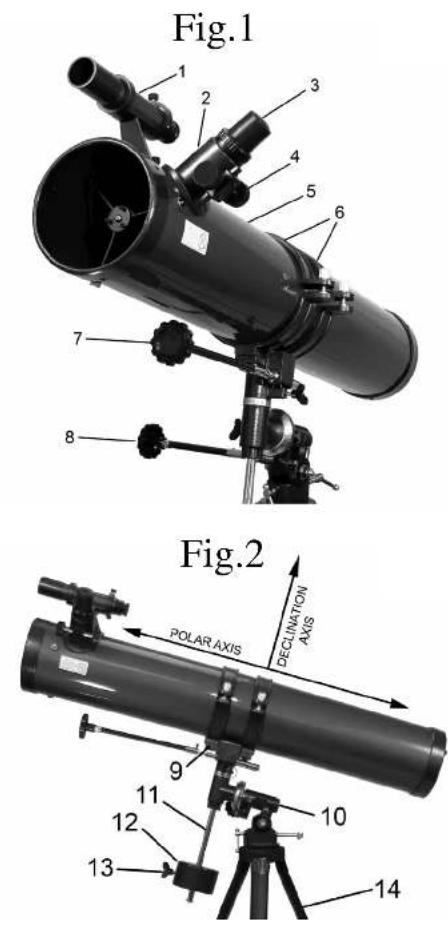
Fig.3
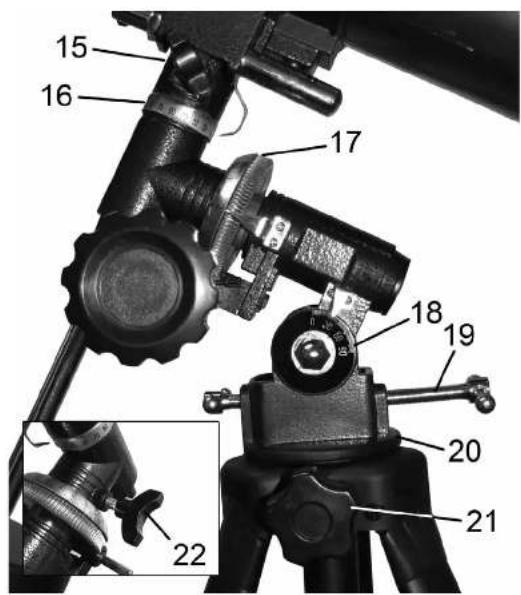
Fig.4 Fig.6
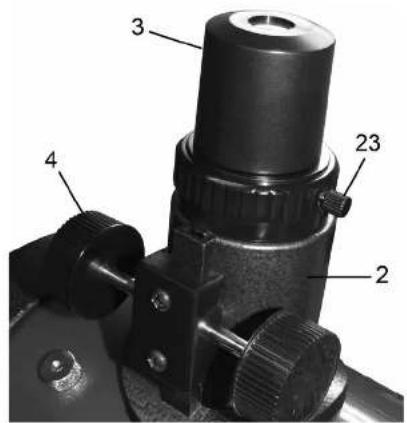
Fig.5
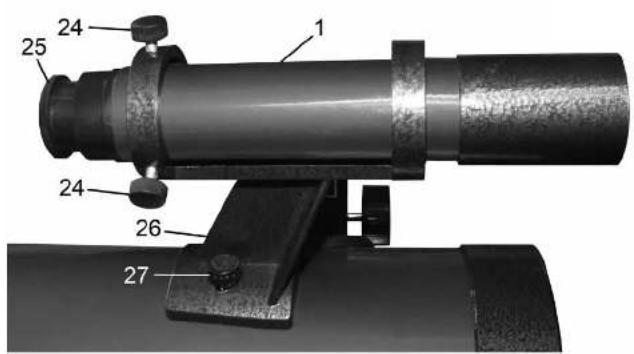
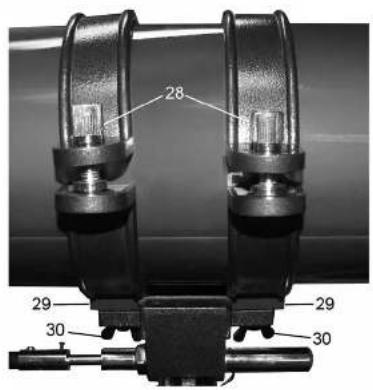
Fig.7
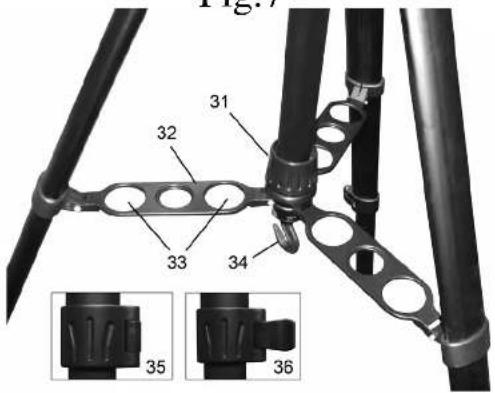
Fig.8
natural_image
Close-up of a mechanical component with numbered parts (37 and 38), no visible text or symbols beyond labelsFig.9
Key to Figures 1-9:
-
6x30mm Finder Scope
-
Focuser
-
Eyepiece
-
Focus Knobs
-
Optical Tube Assembly
-
Cradle Rings
-
Dec. Flexible Cable
-
R.A. Flexible Cable
-
Optical Tube Saddle Plate
-
Equatorial Mount
-
Counter Weight Bar
-
Counter Weight
-
Counter Weight Locking Screw
-
Tripod Legs
-
Declination Lock
-
Dec. Setting Circle
-
R.A. Setting Circle
-
Latitude Dial
-
Latitude Turn Screws
-
Equatorial Mount Base
-
Equatorial Mount Locking Screw
-
R.A. Lock
-
Focuser Thumbscrew
-
Finder Scope Bracket Thumbscrew
-
Finder Scope Focus Knob
-
Finder Scope Bracket
-
Finder Scope Bracket Mounting Bolts
-
Cradle Ring Lock Knobs
-
Cradle Ring Attachment
-
Cradle Ring Attachment Wing Nuts
-
Tripod Tightening Ring
-
Tripod Brace
-
Eyepiece Holder Slots
-
Tripod Hook
-
Tripod Leg Lock Closed
-
Tripod Leg Lock Open
-
Diagonal Mirror Tilt Screws
-
Diagonal Mirror Holder
-
Primary Mirror Locking Screws
-
Primary Mirror Tilt Screws
Assembly of your Red Planet Telescope:
Setting Up Your Tripod:
The aluminum tripod comes preassembled and ready-to-use. Remove the tripod from the box and pull apart the legs. Gently push down the tripod braces (Fig. 7-35) until they are in the lowest position. Turn the tightening ring (Fig. 7-31) (located at the center of the Tripod Brace) clockwise to lock the tripod in the open position. You can then extend the legs to the desired height by pulling open the tab on each leg lock (Fig. 7-36), sliding the leg down the desired amount and then pushing the leg lock back against the leg into the locked position (Fig. 7-35). Repeat the process with each leg trying to keep the tripod as level as possible with the ground. You will notice there are holes in the tripod leg braces (Fig. 7-33). These are designed to hold cycle pieces when not in use. For added stability you can hang a weight from the tripod hook (Fig. 7-34) located at the bottom middle portion of the tripod.
Attaching the Equatorial Mount:
Remove the equatorial mount (Fig. 2-10) from the box and twist into the position shown in Fig. 3. Place the bottom of the mount (Fig. 3-20) into the hole in the top of the tripod head and secure with the mount locking screw (Fig. 3-21). Please be careful to make sure that the mount is securely attached to the tripod.
Attaching the Counterweight:
Attach the threaded end of the counterweight bar (Fig. 2-11) into the threaded hole in the equatorial mount (Fig. 2-10). Remove the safety screw from the end of the counterweight bar and set aside for a moment. Slide the counterweight (Fig. 2-12) onto the bar and tighten down using the screw on the side of the counterweight (Fig. 2-13). Be careful not to drop the counterweight. It is quite heavy and could harm you or damage your floor if dropped. Do not worry about the position of the counterweight just yet. We will position it properly later. Replace the safety screw at the end of the counterweight bar.
Attaching the Slow Motion Cables:
Locate the two slow motion cables (Fig. 1-7,8). Loosen the screw at the end of each cable so that it does not protrude through the hole. Slide the short cable onto either side of the R.A. shaft (Fig. 1-8) (located at the bottom of the mount) and tighten down with the locking screw. You can place the cable on either side depending on which side is most comfortable for you to use. Slide the longer cable onto the Dec. shaft (Fig. 1-7) (located at the top of the mount) and tighten down with the locking screw. These slow motion cables will allow you to make fine pointing adjustments to the telescope in both R.A. and declination. This will be discussed in more detail later.
Attaching the Telescope Tube to the Mount:
Remove the two cradle rings (Fig. 1-6) from the box. There are two holes in the top of the equatorial mount (called the optical tube saddle plate (Fig. 2-9)). Place the threaded screw at the bottom of each cradle ring (Fig. 6-29) through one of these holes and secure it using the included washer and wing nut (Fig. 6-30). Attach and secure the other cradle ring in the same way. Make sure that the cradle ring lock knobs (Fig. 6-28) are both on the same side.
Unscrew the locks (Fig. 6-28) on each cradle ring and open them both. Carefully remove the optical tube assembly (Fig. 1-5) from the box. Gently rest the optical tube into the cradle rings with the focuser (Fig. 1-2) towards the front. The cradle rings should be roughly in the center of the tube. We will balance this later. Close the cradle rings around the telescope and secure by tightening the cradle ring lock knobs (Fig. 6-28).
Attaching the Finder Scope:
There are two finder scope bracket mounting bolts (Fig. 5-27) located at the front end of the optical tube. Remove the nuts and set aside. Place the finder scope bracket (Fig. 5-26) onto the mounting bolts and tighten down securely to the optical tube. Make sure the bracket is facing forward as shown in Fig. 5. Slide the finder scope (Fig. 1-1) into the bracket facing forward. Tighten down the finder scope bracket thumbscrews (Fig. 5-24) to secure the finder scope in place.
Attaching the Eyepieces:
Insert the Kellner 20mm eycpiece (Fig. 1-3) into the focuser (Fig. 1-2) and tighten down using the focuser locking screw (Fig. 4-23).
You have now completed the assembly of your Red Planet ^™ telescope. We will now need to make the necessary adjustments in order to use your telescope properly.
Balancing the Telescope:
Balancing the Mount in R.A.:
To reduce stress on the mount, the telescope should be balanced on the polar axis (See Fig. 2). Instructions on how to do so are as follows:
- Loosen the R.A. lock knob (Fig. 3-22) and position the telescope off to one side of the mount (you may need to remove the R.A. slow motion cable (Fig. 1-8) temporarily). The counterweight bar (Fig. 2-11) should be parallel to the ground.
- Release the telescope gradually and see which side it falls towards. To avoid accidental damage, do not let go of the telescope completely.
- Loosen the counterweight (Fig. 2-12) and position the weight so that the telescope and counterweight remain stationary (parallel to the floor) on their own.
- Tighten the counterweight into place.
Balancing the Mount in Dec.:
To prevent sudden movement when the Dec. lock (Fig. 3-15) is loosened, the telescope must be balanced on the declination axis (See Fig. 2). Instructions on how to do so are as follows:
- Loosen the R.A. lock knob (Fig. 3-22) and position the telescope off to one side of the mount (you may need to remove the R.A. slow motion cable (Fig. 1-8) temporarily). The counterweight bar should be parallel to the ground.
- Tighten the R.A. lock knob (Fig. 3-22) to hold the telescope in place.
- Loosen the Dec. lock knob (Fig. 3-15) and rotate the telescope until the tube is parallel with the ground.
- Release the telescope gradually and see which way it will rotate. To avoid accidental damage, do not let go of the telescope completely.
- Loosen the cradle rings (Fig. 1-6) and slide the optical tube forward or backward as needed until it remains stationary and parallel to the ground on its own.
- Tighten the cradle rings securely around the optical tube.
- Loosen the R.A. lock knob, return the telescope to its upright position and retighten.
Aligning the Finder Scope:
The low power and wide field of view provided by the 6x30mm finder scope (Fig. 5-1) provides a quick and easy way to sight an object prior to looking through the high-power telescope. The finder scope must first be properly aligned with the telescope in order to work properly. This alignment is best performed during the daylight. Follow the steps below to align your finder scope properly:
- Place the Kellner 20mm eyepiece (Fig. 4-3) into the focuser (Fig. 4-2) of the telescope.
- Loosen both the R.A. lock (Fig. 3-22) and the Dec. lock (Fig. 3-15) so that the telescope swings freely along both axes.
- Point the main telescope at a specific land object 200 yards or more away. Lock down the R.A. and Dec. axes. Turn the slow motion cables (Fig. 1–7,8) until the object is centered in the telescope field.
- Now look through the finder scope and loosen or tighten the finder scope bracket screws (Fig. 5-24) until the crosshairs are centered on the same object. Focus by turning the finder scope focus knob (Fig. 5-25) until the image in the finder scope is sharp and clear.
- Check the alignment at nighttime by repeating this process with a bright star or the moon. Make any necessary adjustments.
Now that your finder scope is properly aligned, any object centered in your finder scope should also be centered in your telescope.
Calculating Power:
The magnification of a telescope depends on both the focal length of your telescope as well as the eyepiece you use. There is a simple formula you can use to determine the magnification you are using at any given time. Simply divide the focal length of the telescope by the focal length of the eyepiece. For example, if you are using the 20mm eyepiece with your RP-300 telescope the power would be:
$$ \mathrm{Power} = 9 0 0 \mathrm{mm} / 2 0 \mathrm{mm} = 4 5 \mathrm{x} $$
Using an eyepiece with a smaller focal length will increase the magnification of your telescope. It is always best to start at the lowest magnification configuration. The wider field of view makes it easier to spot far away objects. Once an object is centered in your field of view you can switch to the higher power configurations.
Understanding Celestial Movement:
In order to get the most enjoyment out of your telescope it is necessary to know the basics of how celestial objects move across the sky. Due to the rotation of the earth, celestial objects appear to move from East to West across the sky, much like the Sun. You will notice this movement as an object in your telescope field of view will slowly move across the field and out of view. Continuous adjustment is needed to keep an object in the field of view. This will be explained in more detail later.
Many people choose to “star-hop” when using a telescope, a quick and relatively easy way to start. This is a method of using easily identifiable stars and constellations to serve as reference points to find other objects in the sky. A more advanced and precise method of locating specific celestial objects is by using setting circles (Fig. 3-16,17) located on your equatorial mount (Fig. 2-10) to find the celestial coordinates of that particular object.
A Brief Overview of Celestial Coordinates:
Astronomers use a system of “celestial coordinates” similar to the Earth’s latitude and longitude system to help locate objects in the sky. All celestial objects are mapped on a “celestial sphere”, an imaginary sphere of arbitrary size concentric with the Earth. If you extend the Earth’s rotational axis to infinity, both North and South, the points at which this axis intersects the celestial sphere are known as the North Celestial Pole and the South Celestial Pole. If you project the Earth’s equator outward to the celestial sphere this would be known as the “Celestial Equator”.
The equivalent to latitude lines on the celestial sphere are known as lines of "Declination", or "Dec." for short. These lines are measured in degrees, minutes and seconds. Declination readings north of the celestial equator carry a "+" sign, while readings south of the celestial equator carry a "+-" sign. Objects located on the celestial equator have a 0°0'0" Declination. The North Celestial Pole has a +90°0'0" Declination while the South Celestial Pole has a -90°0'0" Declination. The star Polaris is located very near the North Celestial Pole and has a +89.2° Declination.
The equivalent to longitude lines on the celestial sphere are known as lines of "Right Ascension" or "R.A." for short. These lines are measured in hours, minutes and seconds starting at the "zero" line of R.A. which passes through the constellation Pegasus. There are 24 primary lines of R.A. located at 15^ intervals along the celestial equator. Right Ascension coordinates range from 0hr 0min 0sec to (but not including) 24hr 0min 0sec.
Every celestial object has a corresponding R.A. and Dec. coordinate. Given the proper coordinates, you can use the setting circles on your telescope mount to locate any celestial object. The coordinates can only be used if the telescope is first aligned with the North (or South) Celestial Pole.
Polar Alignment:
If the telescope is accurately aligned with the celestial pole, very little declination adjustment will be necessary to track a celestial object. Most of the tracking can be done using the Right Ascension cable (Fig. 1-8). To line up your telescope with the pole:
- Make sure the equatorial mount is locked in the "home" position, meaning that the optical tube assembly is parallel to the corresponding portion of the mount below it and that the declination axis is straight up and down with the counter weight (Fig. 2-13) in its lowest position. For reference, the equatorial mount in Fig. 2 is in the home position.
- Loosen the equatorial mount locking screw (Fig. 3-21) so that the entire telescope (with mount) rotates freely on the tripod.
- Rotate the entire telescope until the polar axis points due North. If you are not sure which direction is North, locate Polaris and point the polar axis towards it. Polaris is less than one degree away from the Celestial North Pole and is accurate enough for polar alignment.
- If needed, level the mount by adjusting the tripod legs accordingly.
- Determine the latitude of the area you are in. Use the latitude turn screws (Fig. 3-19) to tilt the telescope until the pointer indicates the correct latitude on the latitude dial (Fig. 3-18).
- Then fine tune the latitude turn screws (Fig. 3-19) until Polaris appears in the center of your telescope field of view.
- Do not move the telescope in R.A. or Dec. while polar aligning. These adjustments should remain locked.
- If you live in the Southern Hemisphere, you should follow these steps but point the polar axis due South and locate Sigma Octantis instead of Polaris.
Your telescope is now polar aligned for the area you are using it. You will need only to point the telescope North (or South in the Southern Hemisphere) when using it from now on. You will only need to repeat the polar alignment if you move to a different location and your latitude has changed.
Using the Telescope:
Once you have properly assembled, balanced and aligned your telescope you are finally ready to start using it.
• To locate an object using the telescope, first loosen the R.A. lock (Fig. 3-22) and Dec. lock (Fig. 3-15) allowing the telescope to rotate along both axes. Look through the finder scope (Fig. 1-1) to sight the object you are looking for and center it in the finder scope cross-hairs. You may need to focus the finder scope by turning the finder scope focus knob (Fig. 5-25). Then re-tighten the R.A. and Dec. locks.
- It is best to use the lowest power eyepiece (the Kellner 20mm eyepiece) at first. This allows for a wider field of view making it easier to locate objects. Once the object is centered in the field of view you can switch the eyepiece to higher magnifications.
- Once the object is centered in the field of view, turn the focus knobs (Fig. 4-4) on the eyepiece focuser (Fig. 4-2) until the image is clear and sharp.
- You will notice that the object you are viewing will slowly move across the field of view (caused by the rotation of the Earth). You will need to turn the R.A. flexible cable (Fig. 1-8) to keep the object centered.
Image Orientation:
You will notice that the image you see through your finder scope and telescope are inverted (upside down). This is normal for Newtonian Reflector telescopes.

Normal view when looking with unaided eye.
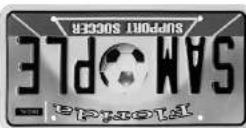
Inverted image, normal when viewing with Newtonian Reflector telescopes.
Using Setting Circles:
The setting circles (Fig. 3-16,17) on your equatorial mount can be used to locate hard to find celestial objects. Follow the instructions below to use the setting circles effectively:
- Make sure your telescope is assembled properly and polar aligned.
- Look up the celestial coordinates of an easy to spot object located nearby to the object you seek on a star chart or atlas (not included).
- Center this easy to spot object in the field of view of your telescope.
- Rotate the R.A. setting circle (Fig. 3-17) on your telescope's mount by hand until the proper coordinate lines up with the R.A. indicator. You will notice that the R.A. setting circle has two sets of numbers. The top numbers are for the Northern hemisphere. The bottom numbers are for the Southern hemisphere. Once complete your setting circles are now calibrated. You are now ready to locate the hard to find object.
- Loosen the Dec. lock (Fig. 3-15) and move the telescope in Declination until the indicator points to the correct coordinate. Re-tighten the Dec. Lock when finished
- Loosen the R.A. lock (Fig. 3-22) and move the telescope in R.A. until the indicator points to the correct coordinate. Re-tighten the R.A. lock when finished.
- Look through the finder scope (Fig. 1-1) to see if you have located the object you are looking for and center the object in the crosshairs of the finder scope.
- Look through the telescope eyepiece and the object you are searching for should be centered in the field of view.
- This process must be repeated every time you set up your telescope.
There are many conditions that may affect your ability to focus or observe celestial objects clearly.
- Brightly lit areas (light pollution) will make it difficult to see faint objects in the sky. It will also make it difficult for your eyes to adjust to the dark. You should try and find a dark area and allow your eyes to adjust to the dark before making observations. Using a red filtered flashlight to view charts and your telescope components is recommended to preserve your night sight. The best viewing conditions are when the sky is inky black.
- Hazy skies, pollution, clouds and moisture can all affect the clarity of your viewing image.
- Avoid touching the cycpiece or optical tube while looking through the telescope. The vibrations caused by this contact will cause the object you are looking at to move. You should also make sure that the surface you place your telescope on does not vibrate or move as this will also cause your viewing object to move.
- You should avoid setting up your telescope inside a room looking through an open window. The difference in air temperatures may result in a blurry image.
- Viewing through a closed window might also result in a distorted image due to the varying densities of window glass.
- Avoid viewing objects that are low on the horizon. Objects that are higher up in the sky will appear much sharper.
- Sudden changes in temperature may cause condensation to appear on the optical components of the telescope. It is best to set up your telescope ahead of time and then wait while the telescope adjusts to the new temperature before using it.
Care and Maintenance of Your Telescope:
Cleaning:
- Always replace dust covers and lens caps when not in use. This will minimize the amount of dust and debris that gets into your telescope.
- Cleaning should be performed only if absolutely necessary. If dust has built up on the optics use a soft camel's hair brush or pressurized air to gently remove it.
- If dew collects on the optics of your telescope or moisture condenses inside the optics, remove all accessories and place the telescope in a dry, dust free environment and point the telescope downward. This should help eliminate the moisture.
- Avoid touching the surface of the mirror.
- Do not attempt to take apart your telescope to clean it.
Collimation of the Optics:
The internal optics of the telescope have already been “collimated” or “aligned” at the factory. However, rough handling of the telescope may knock the optics out of collimation, resulting in poor optical performance. Please refer to Fig. 10 to better understand the internal layout of your telescope. To determine if your telescope needs collimation perform the following steps:
- Remove the eyepiece (Fig. 1-3) from the focuser (Fig. 1-2) and turn the focusing knob (Fig. 1-4) until the tube is at its innermost position.
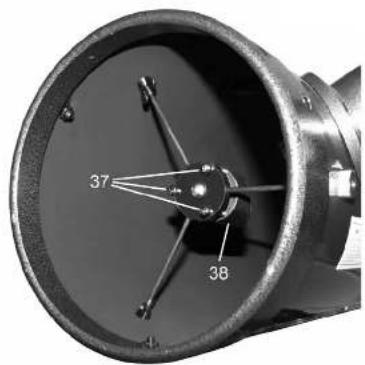
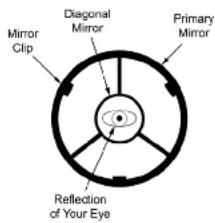
- Point the telescope at a plain background and then peer through the empty focuser. You should see a series of concentric circles (See Fig. 11). The outer most circle being a reflection of the primary mirror (with three mirror clips). The inner circle is the diagonal mirror, which should be precisely centered inside the primary mirror. You should see the reflection of your eye in the diagonal mirror.
Fig.10
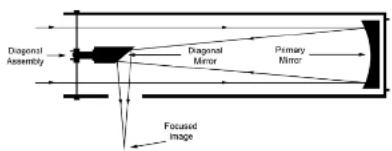
Fig.11
Adjusting the Diagonal Holder:
If the telescope is properly collimated you should see the primary mirror (See Fig. 10) and three clips in their entirety. If the primary mirror is not centered properly (See Fig. 12) you will need to adjust the diagonal mirror (See Fig. 10) to correct this. Loosen the diagonal mirror so that you can move the diagonal holder (See Fig. 10) with your hand. Tilt the diagonal holder until the entire primary mirror is visible and carefully retighten the screws to lock it into place. If necessary, turn the three screws slightly to make fine adjustments.
Fig.12
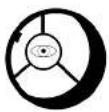
Diagonal Mirror Needs Adjustment
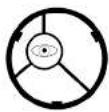
Primary Mirror Needs Adjustment
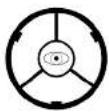
Both Mirors
Property Colimated
Adjusting the Primary Mirror:
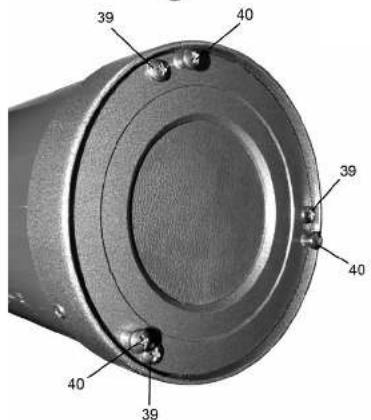
If the telescope is properly collimated you should see the diagonal mirror (See Fig. 10) at the exact center of the primary mirror. If the diagonal mirror appears off-center (See Fig. 12) you will need to adjust the primary mirror (See Fig. 10) located on the outside lower-end of the main tube. To do this you will first need to loosen the primary mirror locking screws (Fig. 9-39). These are the screws that are flush against the surface of the telescope. Then alternately loosen and tighten the Primary Mirror Tilt Screws until the diagonal mirror is centered inside the primary mirror. The primary mirror screws are easily identified because they stick out from the surface of the telescope. Once the adjustment is complete, re-tighten the primary mirror locking screws.
Night Time Star Collimation Testing:
- To test the accuracy of your collimation, equip your telescope with the 20mm eyepiece and focus on a moderately bright star.
- With the star centered in the field of view, slowly turn the focus wheel (Fig. 1-4) until the star is out of focus.
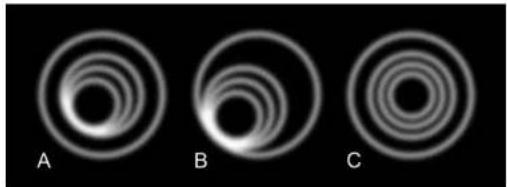
- If properly collimated, you should see a series of concentric circles around a black center dot (Fig. 13-C).
- If the circles are not concentric and the black dot is not centered (Fig. 13A) you will need to make adjustments to the primary mirror. Loosen the primary mirror locking screws (Fig. 9-39) and use the R.A. and Dec. cables to move the circles to the edge of the telescope field of view (Fig. 13-B). Then turn the primary mirror tilt screws (Fig. 9-40) until the black dot moves to the center of the image with the concentric circles radiating from it (Fig. 13-C). Once centered, tighten down the locking screws.
Fig.13
natural_image
Three circular patterns labeled A, B, and C against a black background (no text or symbols beyond labels)Specifications:
Optical Design: Newtonian Reflector
Aperture: 114mm (4.49")
Focal Length: 900mm (35.43")
Focal Ratio: 7.89
Finder Scope: 6x30mm
Eycpiece 1: Kellner 20mm
Magnification 1: 45x
Eyepiece 2: Kellner 9mm
Magnification 2: 100x
Mount: Equatorial
Weight: 19.7 lbs.
Warnings:
- Never use this telescope (or its viewfinder) to look directly at or near the sun. Viewing the sun can cause instant and irreversible eye damage.
• Always supervise children when using this telescope. - Do not leave telescope unattended at any time. Untrained adults or children may not be familiar with the correcting operating procedure.
- Do not point the telescope at the sun even when you are not looking through it. This will cause internal damage to the telescope.
- Handle this telescope with care. Rough handling might knock the internal optical components out of alignment.
Customer Service:
We will be happy to help you with any problems you may experience while using your telescope. Please call our toll-free customer service line at 1-800-967-8427.
Warranty Information:
This Carson product is warranted to be free from defects in material and workmanship for a period of one year from date of purchase. During this period Carson will, at its option and without charge, either repair any part or assembly of parts found to be defective in material or workmanship, or replace this Carson product with a Carson product of comparable value and condition, subject to the limitations and exclusions noted herein.
This warranty extends to the original purchaser only and is not assignable or transferable. It shall not apply to any product that has been subject to misuse, abuse, negligence or accident, or to any defects or damage directly or indirectly caused by the use of unauthorized replacement parts and/or service performed by unauthorized personnel.
This warranty gives you specific legal rights, and you may also have other rights which could vary from state to state. Some states do not allow limitations on the life of an implied warranty and/or do not allow excluding or limiting incidental or consequential damages. If so, the above limitations or exclusions may not apply to you.
Warranty Procedure:
Provide proof of purchase. A receipt or other dated proof of purchase must be included with merchandise being returned for a warranty claim to be processed.
Call or write for authorization. Before returning any product for a warranty claim, a Return Authorization (RA) number must be obtained. No merchandise will be accepted without an RA, and failure to obtain an RA will prevent or delay processing of the warranty claim.
To obtain an RA call 631-963-5000, or write to Carson Warranty Service, 2070 5th Avenue, Ronkonkoma NY, 11779 with a description of the problem. Include your name, address and telephone number.
Package the return carefully. Shippers will not reimburse for damages due to insufficient packaging, even if the merchandise is insured.
Print the RA number prominently on the top of the package.
Prepay shipping. Insure the package. Send it to:
Carson Warranty Service, 2070 5th Avenue, Ronkonkoma NY, 11779.
Merchandise must be shipped prepaid. Carson will not accept merchandise C.O.D.
- CARSON
- Table of Contents:
- IMPORTANT: DO NOT USE YOUR RED PLANET™ TELESCOPE TO LOOK AT OR NEAR THE SUN! DOING SO WILL CAUSE INSTANT AND PERMANENT EYE DAMAGE.
- Key to Figures 1-9:
- Assembly of your Red Planet Telescope:
- Setting Up Your Tripod:
- Attaching the Equatorial Mount:
- Attaching the Counterweight:
- Attaching the Slow Motion Cables:
- Attaching the Telescope Tube to the Mount:
- Attaching the Finder Scope:
- Attaching the Eyepieces:
- Balancing the Telescope:
- Balancing the Mount in R.A.:
- Balancing the Mount in Dec.:
- Aligning the Finder Scope:
- Calculating Power:
- Understanding Celestial Movement:
- A Brief Overview of Celestial Coordinates:
- Polar Alignment:
- Using the Telescope:
- Image Orientation:
- Using Setting Circles:
- Care and Maintenance of Your Telescope:
- Cleaning:
- Collimation of the Optics:
- Adjusting the Diagonal Holder:
- Adjusting the Primary Mirror:
- Night Time Star Collimation Testing:
- Specifications:
- Warnings:
- Customer Service:
- Warranty Information:
- Warranty Procedure:
Brand : Carson
Model : RedPlanet RP-300
Category : Telescope