Elements 8777 - TV Stand BDI - Free user manual and instructions
Find the device manual for free Elements 8777 BDI in PDF.


User questions about Elements 8777 BDI
0 question about this device. Answer the ones you know or ask your own.
Ask a new question about this device
Download the instructions for your TV Stand in PDF format for free! Find your manual Elements 8777 - BDI and take your electronic device back in hand. On this page are published all the documents necessary for the use of your device. Elements 8777 by BDI.
USER MANUAL Elements 8777 BDI
Product Registration
bdiusa.com
customerservice@bdiusa.com
Registering your new BDI product allows us to send you important product updates, service information and helpful hints related to your BDI products. Register today, and you will be entered to win free a BINK table from BDI: www.bdiusa.com/register
Placement and Maintenance
Your Elements Media Cabinet is designed for indoor use on level floors. Clean wood veneer and steel parts with a moist cloth.
Elements is engineered for easy assembly. Carefully follow this procedure to prevent any damage. Do not use power tools for assembly of this product.
Your Elements cabinet includes an air-purifier pouch containing chemical-free, non-toxic, activated carbon. This pouch is designed to absorb and remove traces of odor which may remain as a result of the unique manufacturing processes used to create Elements. While any such odor will naturally dissipate over a period of time, the pouch is provided to accelerate the effect. Please feel free to utilize the pouch inside the cabinet indefinitely or transfer it to any other area in the home where you wish to manage moisture and odors. If you choose to use it elsewhere (shoe racks, closets, basements, etc.), please be aware that the pouch can be “re-charged” by placing in direct sunlight for 1-2 hrs after 2-3 months of continuous usage.
Step 1
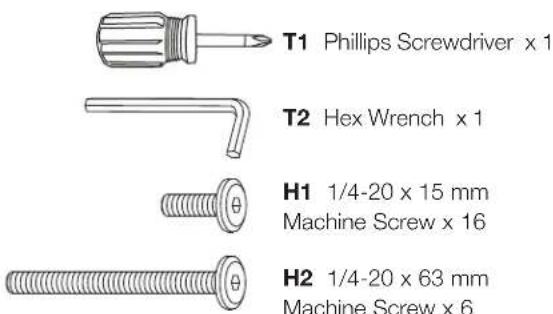
Unpack and identify the parts listed below. The assembly workspace should be a non-marring surface such as carpet. For missing hardware pieces, contact BDI Customer Service at: customerservice@bdiusa.com. For all other concerns, please contact your BDI retailer.
![Note: Door pattern may be different A1 Cabinet x 1 [quad (shown) or triple wide] C3 Middle Shelf x 1 C4 Side Shelf x 2 A2 Base Rails x 2 A3 Left Leg x 1 C5 Back Panels x 2 A4 Right Leg x 1](/content/2026/05/954134/images/f64057d58987edd796fc116ebbebedeaa08a93f59f51679fdf2cae6682f5e00b.jpg)
Designed by BDI Studio.
These distinctive product configurations are protected by US and international patents, trade dress, and/or copyright laws. Elements & BDI are trademarks of Becker Designed, Inc. All rights reserved. ©2016, BDI Made in China. 03.27.2017 7 V2
Step 2 - Build Base Assembly
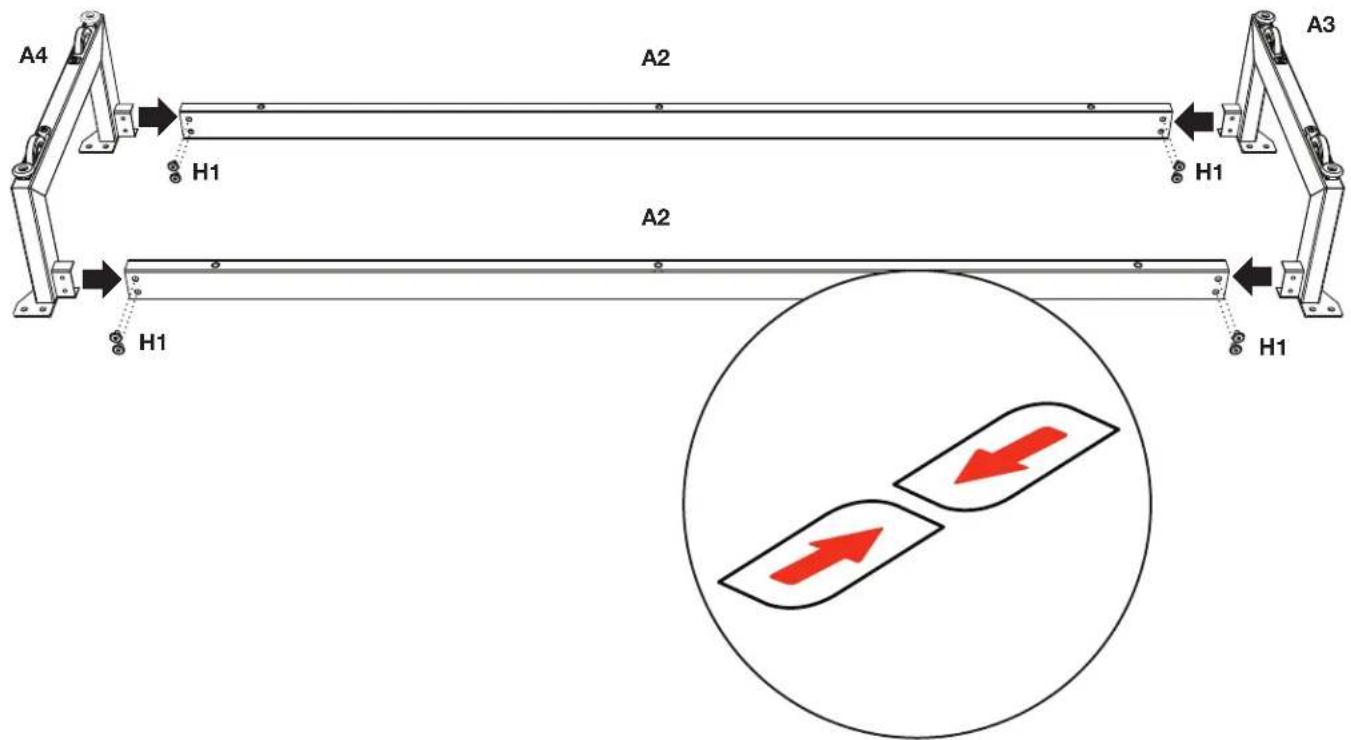
Slide Legs A3 & A4 into Base Rails A2 and attach by using Hex Wrench T2 and 8 Screw H1. NOTE: You MUST align arrows on Base Rails A2 with arrows on Metal Legs E for proper orientation.
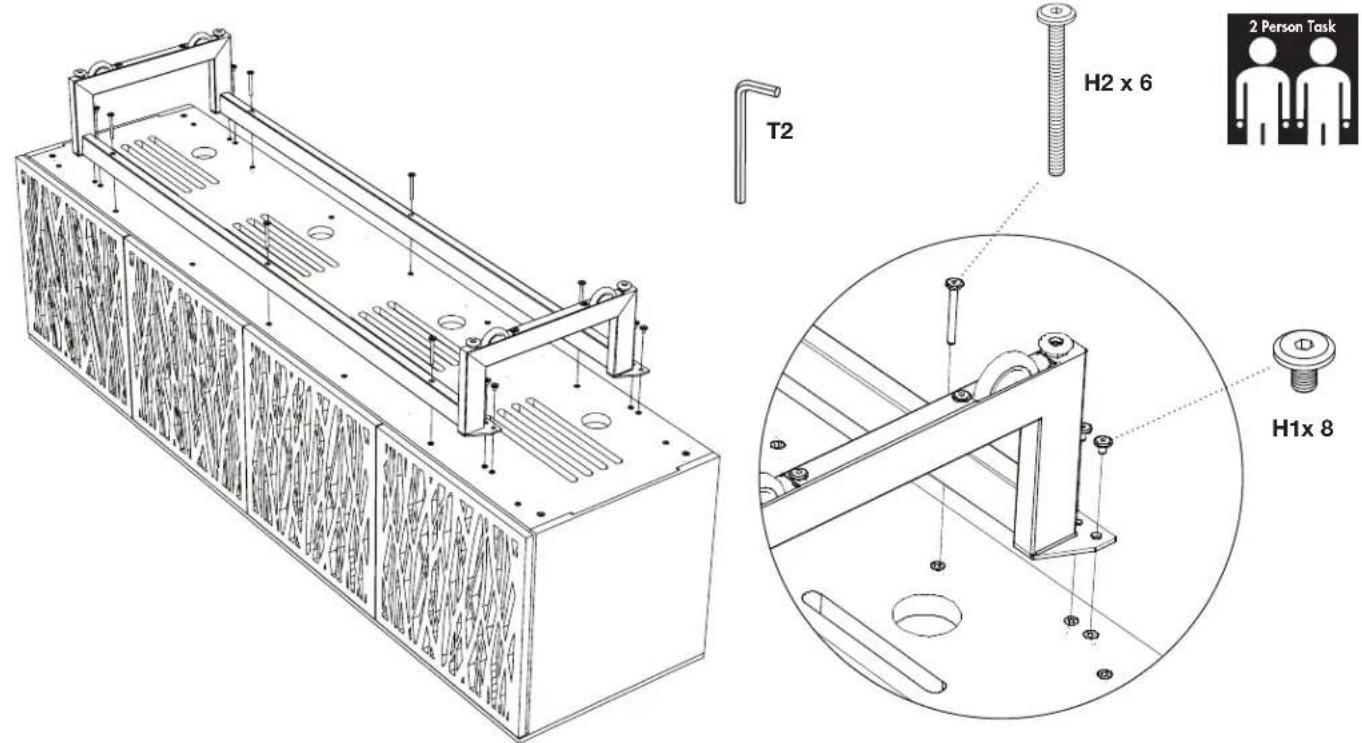
Step 3 Quad - With help from another person, carefully position the cabinet A1 upside-down (as shown) or on its back. Caution-do not remove blocking above the shelves. Attach the base to the cabinet with 8 Screws H1 and 6 Screws H2 using Hex Wrench T2. Do NOT fully tighten until all screws are started.
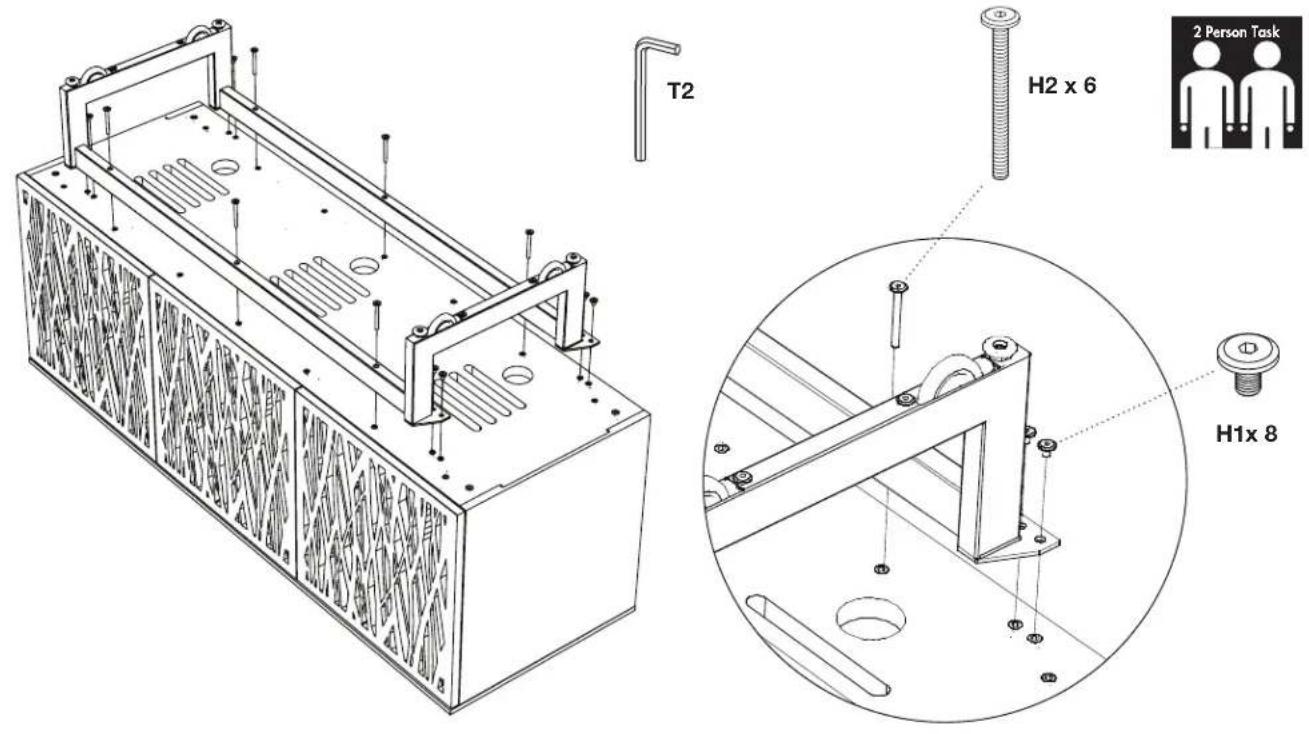
Step 3 Triple - With help from another person, carefully position the cabinet A1 upside-down (as shown) or on its back. Attach the base to the cabinet with 8 Screws H1 and 6 Screws H2 using Hex Wrench T2. Do NOT fully tighten until all screws are started.
Step 4 Quad Only - Adjustable Shelves
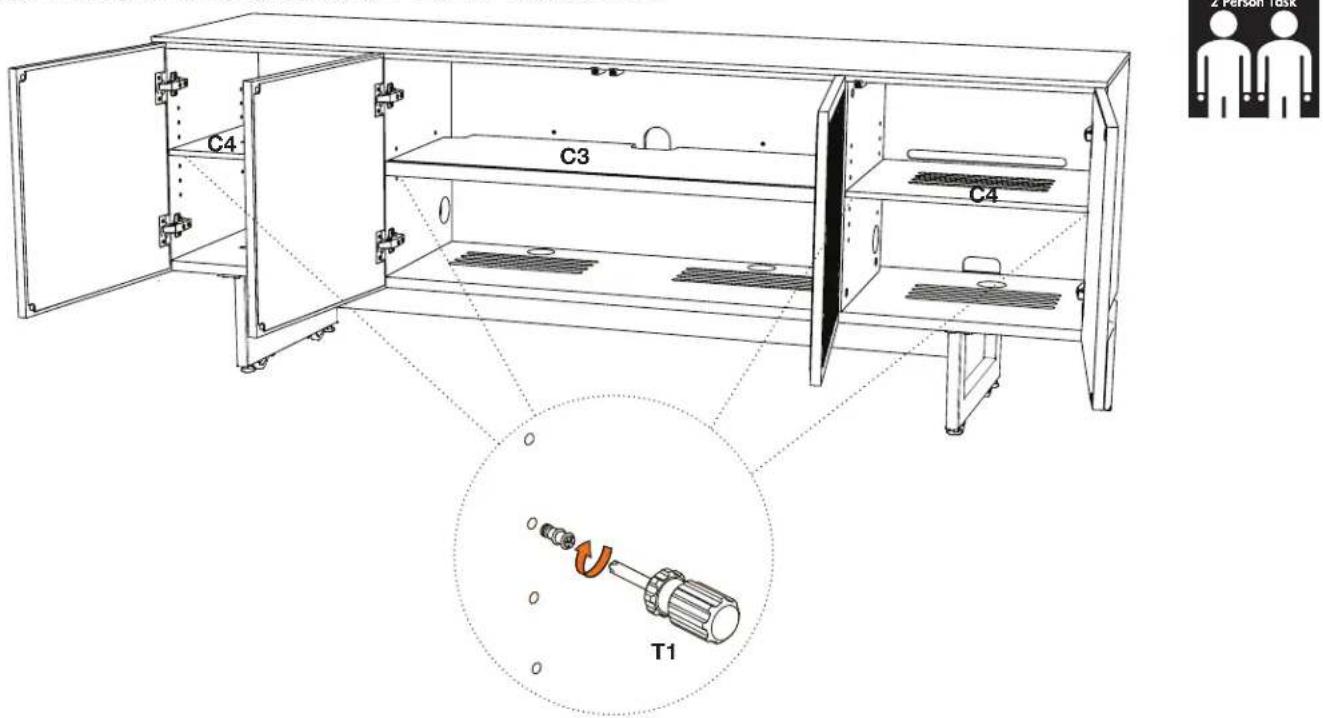
With help from another person, carefully rotate your Elements Media Cabinet onto its feet. The shelf pins located inside all three cabinet spaces may be repositioned using Screwdriver T1, allowing you to raise or lower Middle and Side Shelves C3 and C4 to the desired level.
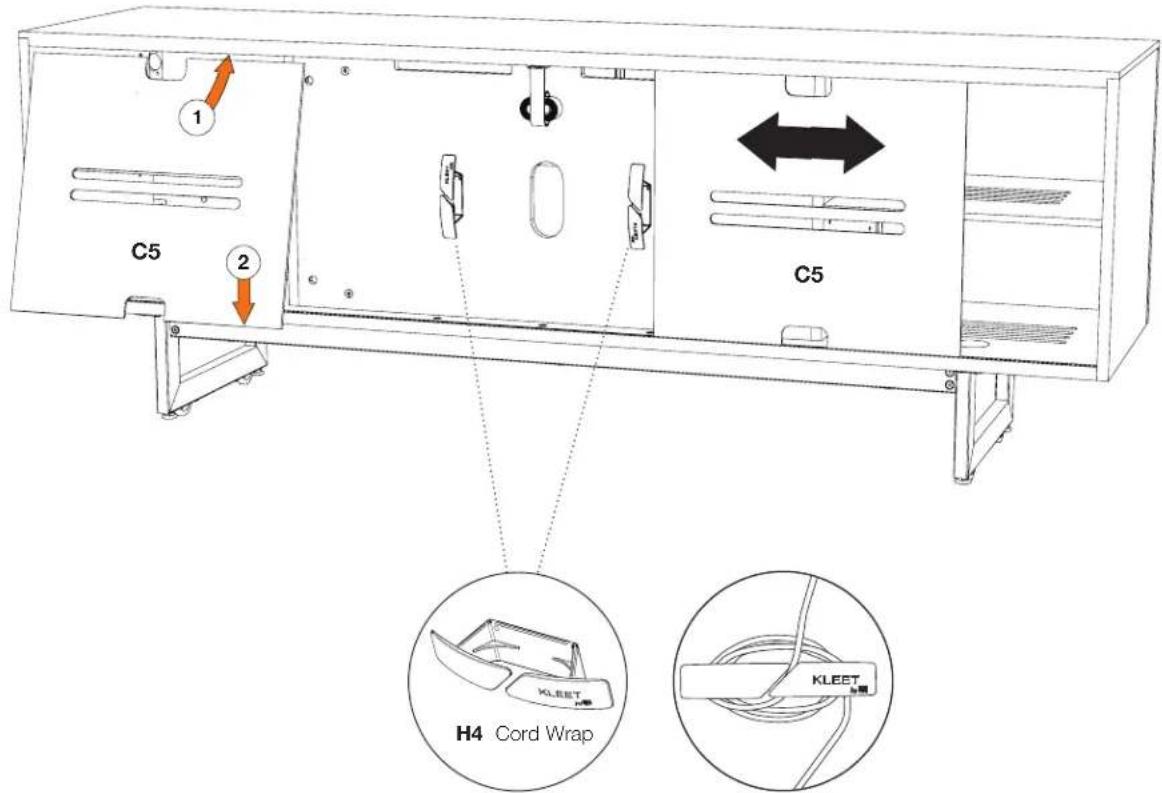
Step 4 - The 2 Back Panels C5 are removable and can slide towards the middle. To remove lift up and pull the bottom edge out of its groove. To re-install, put the top edge of the back panel into the top groove, then drop the bottom edge into the bottom groove.
Your Elements Media Cabinet comes with 2 KLEET Cord Wraps H4. Remove the adhesive backing and adhere the Cord Wraps onto the back as shown (or where desired).
Fine tuning your new BDI Media Furniture
These steps are to be followed after you have unpacked and completed the simple assembly instructions for your console. Due to jostling in freight or perhaps an uneven floor, the doors on your cabinet may not appear to be in perfect alignment. Making a few minor adjustments can rectify this situation. The high-quality European hinge hardware is adjustable. Through a little adjustment, you can modify the orientation of the cabinet doors to make sure that they are sitting perfectly on your unit.
STEP 1 - Level your unit
Levelers are integrated into each leg assembly and are accessed at the bottom of each cabinet leg. If your floor is uneven, you may extend one or more levelers to attain a level, stable cabinet placement. Turning the leveler clockwise will extend the leveler; turning it counter-clockwise will retract it.
STEP 2 - Adjust Door Hinges (if needed)
The doors on your cabinet should be evenly spaced and the doors should open and close freely without rubbing against the door frame. If the cabinet's doors appear out of alignment, this condition can be corrected with minor adjustment to the European hinges on each door. Because these hinges are adjustable, adjusting one hinge element can sometimes cause the need for adjustments to other elements. But with a few adjustments, you can modify the orientation of the cabinet doors to make sure that they hang perfectly within your cabinet.
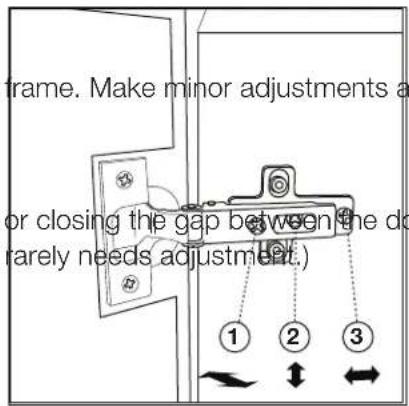
Use the Phillips Screwdriver T1 supplied to adjust the door hinges:
- By adjusting Screw 1, the door will move LEFT or RIGHT within the both top and bottom hinges for
best
- By adjusting Screw 2, the door will move UP or DOWN.
• By adjusting Screw 3 the entire door will move IN or OUT, opening
or closing the gap between the door frame and cabinet. (This screw
rarely needs adjustment.)
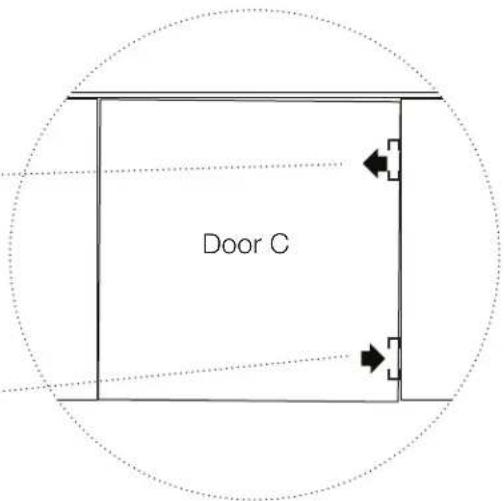
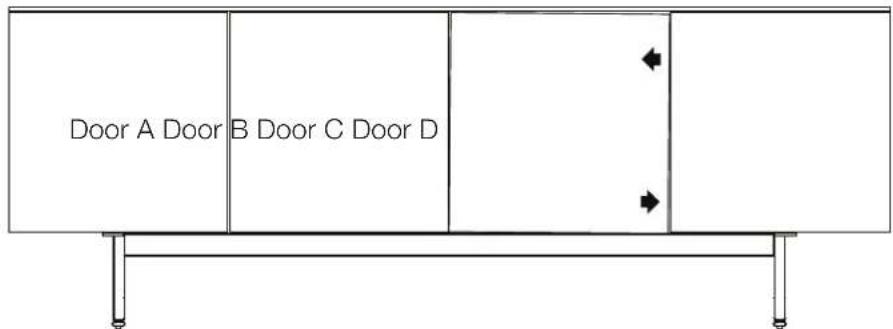
Tightening screw 1 on top hinge will open the seam between Door C & Door D here.
Loosening screw 1 on this hinge will close the seam between Door C & Door D here.
Brand : BDI
Model : Elements 8777
Category : TV Stand