
TSSTTV10LTB - Oven OSTER - Free user manual and instructions
Find the device manual for free TSSTTV10LTB OSTER in PDF.


| Product Type | Countertop Toaster Oven |
| Model | TSSTTV10LTB (also TSSTTV10LTR) |
| Functions | Toast, Bake, Broil (top and bottom heating elements) |
| Controls | Temperature Control Dial (up to 450°F), Toast Color Control/30-minute Timer Dial, Stay-On Setting, Function Knob (Toast/Bake) |
| Accessories Included | Baking Pan, Cooking Rack, Swing-Open Crumb Tray |
| Cooking Rack Positions | Toast Position (high), Bake Position (low) |
| Indicator Light | Yes (shows when appliance is on) |
| Safety Features | Automatic shut-off with bell, short power cord, cool-touch handles (implied), caution against flammable materials |
| Cleaning | Wipe exterior with damp cloth; crumb tray swings open for easy cleaning; wire rack dishwasher safe (top rack); do not immerse in water |
| Power Cord | Short supply cord provided; extension cord allowed if same electrical rating |
| Warranty | One year limited warranty (see insert for details) |
| Usage | Household use only; not for commercial or outdoor use |
Frequently Asked Questions - TSSTTV10LTB OSTER
User questions about TSSTTV10LTB OSTER
0 question about this device. Answer the ones you know or ask your own.
Ask a new question about this device
Download the instructions for your Oven in PDF format for free! Find your manual TSSTTV10LTB - OSTER and take your electronic device back in hand. On this page are published all the documents necessary for the use of your device. TSSTTV10LTB by OSTER.
USER MANUAL TSSTTV10LTB OSTER
natural_image
Illustration of two Oster brand cooktops with front covers and control knobs (no text or symbols on the devices themselves)MODELO
MODEL
TSSTTV10LTR &
TSSTTV10LTB
PLEASE READ ALL INSTRUCTIONS BEFORE USING THIS APPLIANCE
MANUAL DE INSTRUÇÕES
natural_image
Line drawing of a rack with a handle and a checkmark indicating a detail (no text or symbols present)natural_image
Line drawing of a metal rack with a checkmark indicating a detail (no text or symbols present)natural_image
Line drawing of a kitchen interior with a checkmark indicating a location (no text or symbols present)When using electrical appliances, basic safety precautions should always be followed including the following:
- READ ALL INSTRUCTIONS, PRODUCT LABELS AND WARNINGS BEFORE USING THE TOASTER OVEN.
- DO NOT touch hot surfaces “△”. Always use oven mitts when handling hot materials and allow metal parts to cool before cleaning. Allow the unit to cool thoroughly before putting in or taking off parts. Always use the oven handles when moving the unit.
- When the unit is not in use and before cleaning, unplug the oven from the wall outlet. NOTE: Make sure the oven is turned off before unplugging.
- To protect against risk of electrical shock, do not immerse the appliance in water or any other liquids.
- DO NOT operate this or any appliance with a frayed or damaged cord or plug or after the appliance malfunctions or is dropped or has been damaged in any manner. Take this appliance only to the nearest Authorized Oster® Service Center for examination, repair or adjustment.
- DO NOT use attachments not recommended by the manufacturer; they may cause fire, electric shock or personal injury.
- DO NOT use outdoors or for commercial purposes.
- DO NOT use this appliance for other than its intended use.
- DO NOT let the cord dangle over the edge of a tabletop or countertop or touch hot surfaces.
- DO NOT place the appliance near a hot gas or electric burner or in a heated oven.
- Extreme caution should be used when using containers constructed of material other than metal or glass.
- A fire may occur if the toaster oven is covered or touching flammable materials, including curtains, draperies, walls, etc., when in operation. Do not store any items on top of the appliance when in operation.
- When using the oven, pull the unit out a minimum of 15 cm (6 inches) away from walls on all sides. Remove cords from other products from behind the oven.
- DO NOT store any materials, other than manufacturer's recommended accessories, in this unit when not in use.
- DO NOT place any flammable materials in oven, such as paper, cardboard, plastic or any materials that may catch fire or melt.
- DO NOT cover the oven with metal foil. This will cause overheating of the appliance.
- Oversized foods or metal utensils must not be inserted in the appliance as they may create a fire or risk of electrical shock.
-
DO NOT clean with metal scouring pads. Pieces can break off the pad and touch electrical parts involving a risk of electrical shock.
-
When broiling, use extreme caution when removing tray or disposing of hot grease.
- The door and the outer surface may get hot when appliance is used.
- To turn this appliance off, return all controls to the "off" position.
- This appliance is not intended for use by persons (including children) with reduced physical, sensory or mental capabilities, or lack of experience and knowledge, unless they have been given supervision or instruction concerning use of the appliance by a person responsible for their safety. Children should be supervised to ensure that they do not play with the appliance.
- Close supervision is necessary when any appliance is used by or near children, or incapacitated individuals.
- The instructions shall state that appliances are not intended to be operated by means of an external timer or separate remote-control system
- This appliance is intended to be used in household and similar applications such as: staff kitchen areas in shops, offices and other working environments, farm houses, by clients in hotels, motels and other residential type environments, bed and breakfast type environments.
THIS UNIT IS FOR HOUSEHOLD USE ONLY.
SAVE THESE INSTRUCTIONS
SPECIAL CORD SET INSTRUCTIONS
- A short power supply cord is provided to reduce the hazards resulting from becoming entangled in or tripping over a longer cord.
- An extension cord may be purchased and used if care is exercised in its use.
- If an extension cord is used the marked electrical rating of the extension cord must be the same as the product. The extended cord must be arranged so that it will not drape over the counter top or tabletop where it can be pulled on by children or tripped over accidentally.
DESCRIPTION OF THE APPLIANCE
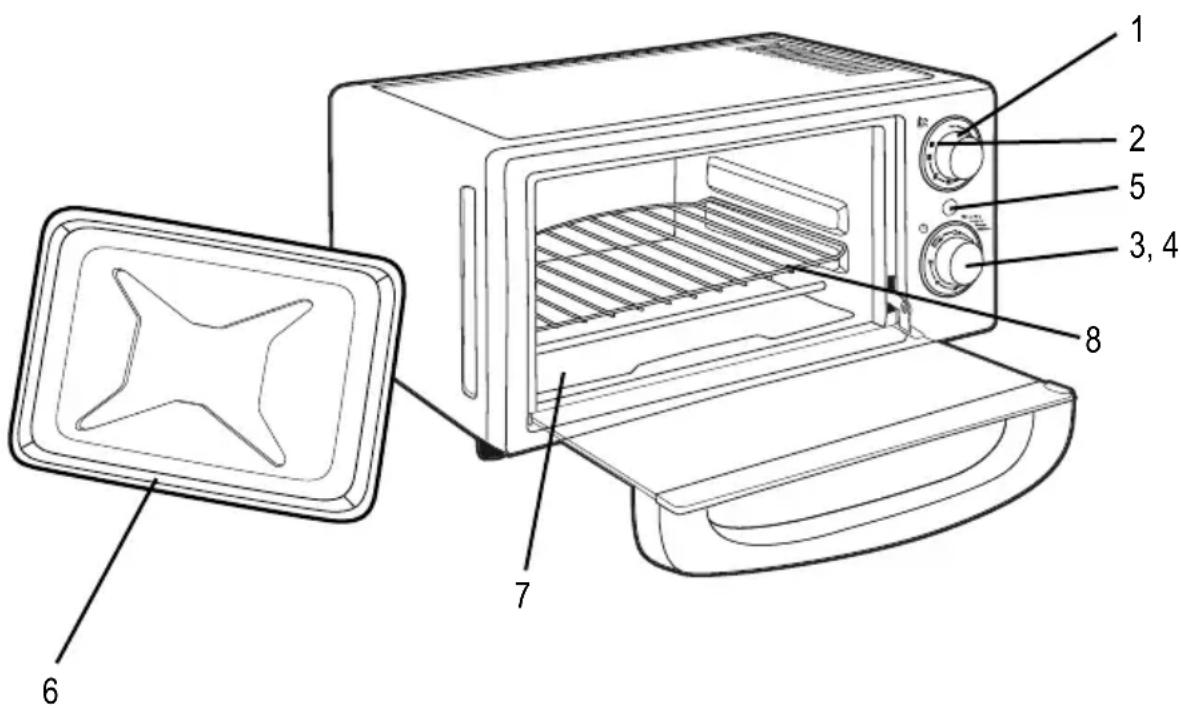
- Temperature Control Dial
- Toast Setting
- Toast Color Control/30-minute Timer Dial
-
Stay-On Setting
-
Indicator Light
- Baking Pan
- Swing-Open Crumb Tray (under unit)
- Cooking Rack
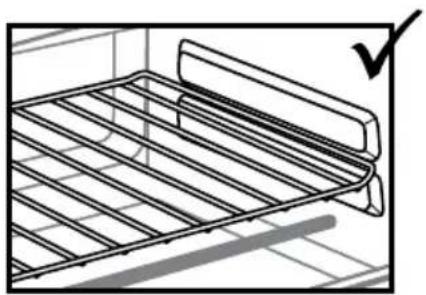
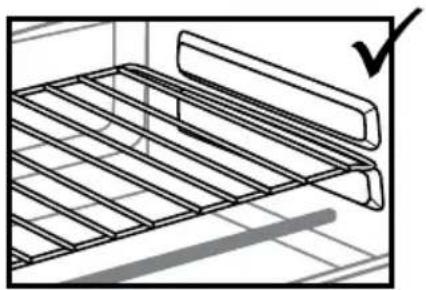
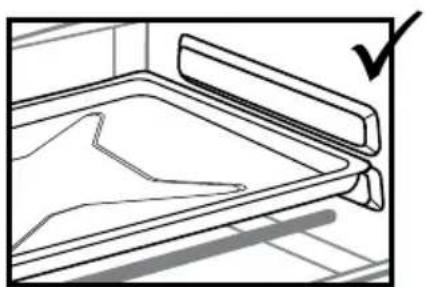
COOKING RACK AND BAKING PAN POSITIONING GUIDE

Correct Positioning
Placing between guides
natural_image
Line drawing of a metal rack with a handle and a checkmark indicator (no text or symbols)Cooking rack in bake position
natural_image
Line drawing of a metal rack with a checkmark indicating a detail (no text or symbols present)Cooking rack in toast position
natural_image
Line drawing of a kitchen drawer with a checkmark indicating a detail (no text or symbols present)Baking pan

Incorrect Positioning
Placing on top of guides
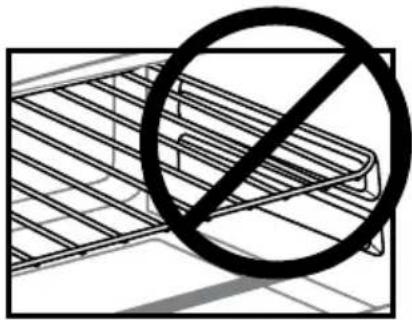
Cooking rack in bake position
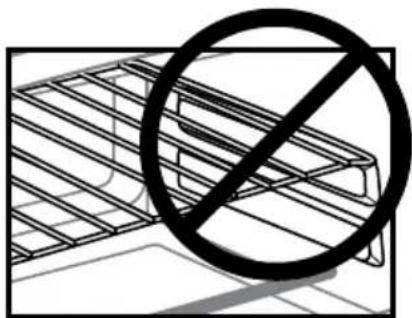
natural_image
Simple line drawing of a grid structure with a large 'no' symbol overlay (no text or symbols present)Cooking rack in toast position
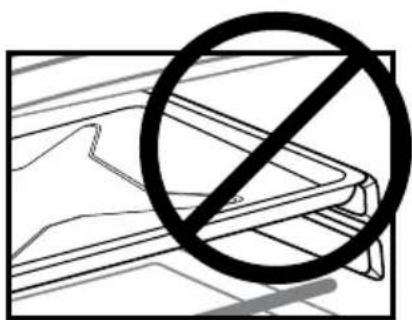
Baking pan
OPERATING INSTRUCTIONS
Your Oster® Toaster Oven is equipped with all the options of a full-size oven in a countertop appliance; toasts and bakes.
NOTE: During initial start up you may detect a slight smell and/or smoke. Turn the temperature to max and let run for approximately 5 minutes.
HOW TO TOAST
- Place oven rack in Toast position. Place food on rack.
- Turn the function knob to Toast "■".
- Rotate Toast Color Control/Timer dial clockwise past 10 minutes then back to desired toast shade.
IMPORTANT
When choosing Toast color light, medium (set between light and dark) and dark, always rotate timer over 10 minutes and then rotate back to Dark, Medium or Light. This will ensure that the timer operates correctly and safely. When the toast cycle is finished the bell will ring and the electrical power is automatically turned off. To stop the cycle at any time, turn the timer counterclockwise to the off "O" position and the bell will ring.
In this cycle both the top and bottom heating elements operate, however they may not glow red hot. Please note this is normal and they are operating properly.
BAKING
- Place the food on the baking pan and then place the pan on the top of the Wire Rack in the oven. Close the oven door.
NOTE: We suggest to always preheat the oven before placing the food inside.
-
Rotate the Temperature Dial "☐" to the desired temperature.
-
The Timer Dial "💡" is the On/Off Switch.
-
After rotating the Temperature Dial "to your desired temperature, then you must select from the following options on the Timer Dial:
For items requiring shorter baking times, rotate the Timer Dial clockwise (up to 30 min). At the sound of the bell, the bake function will automatically turn off "O".
- or -
For longer baking times, rotate the Timer Dial “clockwise” counterclockwise to the stay on “Mantener Encendido” setting. Baking will continue until the Timer Dial “is manually turned to the off” position and the bell will sound.
During this cycle, both the top and bottom heating elements operate.
NOTE: Always monitor the food at this setting to ensure that you are not overcooking. Do not use oven plastic or paper cooking bags in the toaster oven.
CARE AND CLEANING
Do not immerse oven in liquids. Wipe oven with damp cloth and dry. Before using your Oster® Toaster Oven, wash all of the non-electrical accessories and the wire rack and baking pan in hot water with detergent or soap. Always make sure that the appliance is unplugged and cool before cleaning.
- Turn all knobs to off position "Othen unplug unit and let it cool.
- Wipe unit down with damp cloth. DO NOT IMMERSE IN WATER. Make sure to only use mild, soapy water. Abrasive cleaners, scrubbing brushes and chemical cleaners will damage the continuous clean coating on this unit.
- Swing-open the crumb tray, tip back oven and pull the crumb tray knob forward and then down.
- Shake off crumbs from crumb tray. Cleaning the crumb tray often will avoid any accumulations.
- Remove wire rack and clean with damp cloth or place in the top rack of the dishwasher.
PRECAUÇÕES IMPORTANTES
Colocar entre as guias
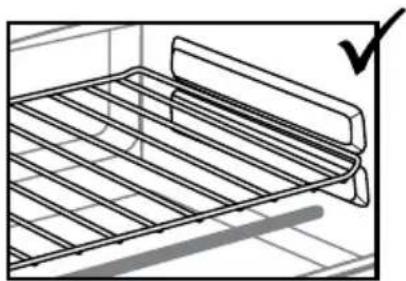
natural_image
Line drawing of a metal rack with a handle and a checkmark indicator (no text or symbols)natural_image
Line drawing of a metal rack with a checkmark indicating a detail (no text or symbols present)natural_image
Line drawing of a kitchen drawer with a checkmark indicating a detail (no text or symbols present)Bandeja para assar

natural_image
Black and white line drawing of a grid structure with a circle overlay (no text or symbols)Bandeja para assar
INSTRUÇÕES DE USO
XXX where X is any number between 0 and 9 or any letter between A and Z.
The following information is intended for Mexico only.
© 2014 Sunbeam Products, Inc. All rights reserved. Distributed by Sunbeam Latin America, LLC,
5200 Blue Lagoon Drive, Suite 860, Miami, FL 33126.
One year limited warranty – please see insert for details.
Brand : OSTER
Model : TSSTTV10LTB
Category : Oven