
FZ105BT - Hi-Fi System CLARION - Free user manual and instructions
Find the device manual for free FZ105BT CLARION in PDF.


| Product Type | Car Stereo / Hi-Fi System |
| Brand | Clarion |
| Model | FZ105BT |
| Dimensions (W x H x D) | 180 x 50 x 160 mm (1 DIN) |
| Weight | 1.0 kg |
| Power Supply | 12V DC (car battery) |
| Maximum Power Output | 4 x 50 Watts |
| Bluetooth | Yes (hands-free calling and audio streaming) |
| USB Port | Yes (front panel, supports MP3/WMA) |
| AUX Input | Yes (3.5 mm jack) |
| Radio Tuner | FM/AM with RDS |
| CD Player | Yes (compatible with CD-R/RW) |
| Display | LCD with white illumination |
| Remote Control | Included (wired or wireless) |
| Maintenance | Clean with soft dry cloth; avoid liquids |
| Safety Precautions | Disconnect battery negative terminal before installation |
| Spare Parts | Remote control, wiring harness, mounting sleeve |
| Repairability | Refer to authorized Clarion service centers |
| Manual Language | English (10 pages PDF) |
Frequently Asked Questions - FZ105BT CLARION
User questions about FZ105BT CLARION
0 question about this device. Answer the ones you know or ask your own.
Ask a new question about this device
Download the instructions for your Hi-Fi System in PDF format for free! Find your manual FZ105BT - CLARION and take your electronic device back in hand. On this page are published all the documents necessary for the use of your device. FZ105BT by CLARION.
USER MANUAL FZ105BT CLARION
For USA and Canada only
www.clarion.com
Dear Customer:
Congratulations on your purchase of a Clarion mobile electronic product. We are confident that you'll enjoy your Clarion experience.
There are many benefits to registering your product. We invite you to visit our website at
www.clarion.com to register your Clarion product.
We have made the product registration simple with our easy to use website.
The registration form is short and easy to complete. Once you're registered, we can keep you
posted on important product information.
Register at www.clarion.com - it's easy to keep your Clarion product up to date.
INFORMATIONS DE L'ENREGISTREMENT DE PRODUITS CLARION
Under Industry Canada Regulations, this radio transmitter may only operate using an antenna of a certain type and maximum (or lesser) gain approved for the transmitter by industry Canada.
To reduce potential radio interference to other users, the antenna type and its gain should be chosen so that the equivalent isotropically radiated power (e.i.r.p.) is no more than the required one for successful communication.
Contents
Thank you for purchasing this Clarion product.
- Please read this owner's manual in its entirety before operating this equipment.
• After reading this manual, keep it handy, such as in your glove compartment.
• Save your sales receipt. The warranty and your sales receipt are essential for warranty service.
-
FEATURES .... 3
-
PRECAUTIONS 3
-
CAUTIONS ON HANDLING 3
-
CONTROLS.... 4
Operation panel 4
Names of buttons and their functions 4
Notes for use of optional remote control 4
Notes for use of optional remote control: 4
- OPERATIONS 5
Basic operation 5
System menu 5
Audio menu
Radio operation
USB and SD mode operation
Aux mode operation
iPhod/iPhone mode operation
Bluetooth mode operation
Bluetooth mode operation
-
TROUBLESHOOTING ....
-
SPECIFICATIONS
-
INSTALLATION AND WIRE OPERATION 9
1. FEATURES
AM/FM Radio
■ Front USB port
■ MP3/WMA Compatible with ID3-TAG display
■ Front 3.5mm AUX Input
■ 45W x 4 Built-In Amplifier
■ IR Remote control
Built-in Bluetooth®
■ Compatible with iPod ^b /iPhone ^e

Expanding Systems
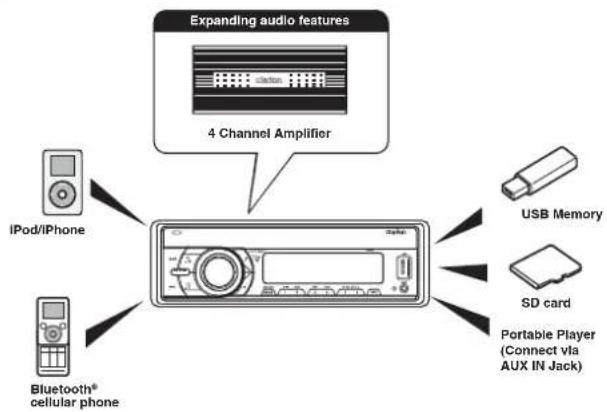
flowchart
graph TD
    A["IPod/iPhone"] --> D["4 Channel Amplifier"]
    B["Bluetooth® cellular phone"] --> D
    C["USB Memory"] --> D
    E["SD card"] --> D
    F["Portable Player (Connect via AUX IN Jack)"] --> D
2. PRECAUTIONS
WARNING
For your safety, the driver should not operate the controls while driving. Also, while driving, keep the volume to a level at which external sounds can be heard.
- This unit has precision parts inside. Even in the event that trouble arises, never open the case, disassemble the unit, or lubricate the parts.
- FCC STATEMENT
2.1 This device complies with Part 15 of the FCC Rules. Operation is subject to the following two conditions: (1) This device may not cause harmful interference.
(2) This device must accept any
interference received, including interference that may cause undesired operation.
2.2 Changes or modifications not expressly approved by the party responsible for compliance could void the user's authority to operate the equipment.
Note:
- This equipment has been tested and found to comply with the limits for a Class B digital device, pursuant to Part 15 of the FCC Rules. These limits are designed to provide reasonable protection against harmful interference in a residential installation. This equipment generates uses and can radiate radio frequency energy and, if not installed and used in accordance with the instructions, may cause harmful interference to radio communications.
However, there is no guarantee that interference will not occur in a particular installation. If this equipment does cause harmful interference to radio or television reception, which can be determined by turning the equipment off and on, the user is encouraged to try to correct the interference by one or more of the following measures:
- Reorient or relocate the receiving antenna.
- Increase the separation between the equipment and receiver.
g Connect the equipment into an outlet on a circuit different from that to which the receiver is connected. - Consult the dealer or an experienced radio/TV technician for help.
FCC Radiation Exposure Statement This equipment complies with FCC radiation exposure limits set forth for an uncontrolled environment. This equipment should be installed and operated with minimum distance 20cm between the radiator & your body
3. CAUTIONS ON HANDLING
Protect from high temperature. Expose to direct sunlight for an extended period of time can produce very high temperature in your vehicle. Cool down the interior before starting the playback.
4. CONTROLS
Operational Panel
![[SOURCE] [MENU] [I/≈][OPEN]UTE [♪] USB Port clarlon [VOLUME] [AS/PS] [1~6] [INFO] AUX Input](/content/2026/05/953567/images/c3a8a76a3532df1fc9eee6d9b2062cd2af0c4a03f147b9767c9f529a08d83593.jpg)
Names of Buttons and their Functions
[SOURCE] Button
- Press SOURCE button to toggle the audio source
[OPEN] Button
- Unlock the front panel
[IC !=] Button
- Dial / Answer / Transfer call / Press and hold to Redial
[ (b)/MUTE] Button
- Press this button to turn power On or Off. (long press).
- Press this button to mute the audio output, press it again to unmute the audio output.
- Press to confirm the selection.
[ ] Button
- Press to adjust the sound effect setting: EQ -> XBS(iXBass) -> BAL(balance)-> FAD ->SUB(Subwoofer)(fader)
[MENU] Button
- Press access into the system menu mode.
[◀◀/▶▶] Button
- Use these buttons for tuning up and down in Tuner mode, SD mode and USB mode.
- Press and hold to Fast Forward/ Backward in SD mode and USB mode.
[ ] Button
- Terminate call - Press this button to quick return to previous menu or mode.
[VOLUME] Button
- Rotate to adjust the volume level.
[AS/PS] Button (radio mode)
- Auto Store / Preset scan - Press and hold enter auto memory store mode
[BAND/SEARCH] Button
- Press to select tuner band in Tuner mode. - Press to activate the MP3 file searching mode, then use the volume to select / search by file number in USB and SD mode.
[1\~6] Buttons
• [1] Button: Play / Pause / Preset station 1
• [2] Button: Scan play / Preset station 2
• [3] Button: Repeat play / Preset station 3
• [4] Button: Random play / Preset station 4
• [5] Button: Previous folder / Preset station 5
• [6] Button: Next folder / Preset station 6
[INFO] Button
- Press to view the Clock
- Press to change the display indication.
Notes for use of Optional Remote Control
- Aim the remote control at the remote sensor on the unit.
- Remove the battery from the remote control or insert a battery insulator if the battery has not been used for a month or longer.
- DO NOT store the remote control under direct sunlight or in high temperature environment, or it may not function properly.
- Use "button shaped" lithium battery "CR2025" (3V) only.
- DO NOT subject battery to recharge, disassemble, heat or dispose in fire or water.
- Insert the battery in proper direction according to the (+) and (-) polarities.
- Store the battery in a place where children cannot reach to avoid the risk of accident.
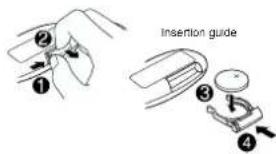
Inserting the Battery
- Slide remote control units rear cover in the direction shown.
- Insert battery (CR2025) into insertion guides with printed side (+) up.
- Press battery into compartment as shown.
- Replace and slide cover until it clicks into place.
Remote Control
[ ] Button
- Mute or Unmute the audio output
[ ] [ =] Button
- Press ± button to increase the volume. - Press ± button to decrease the volume.
[...] Button
- Preset station up/down
• Previous / next track - Press and hold for Fast Forward / Backward
[SRC] Button
• Toggle the audio source
[①] Button
- Press the button to turn power on or off.
[AUDIO] Button
- Press the button to enter the Audio Menu mode.
![CLARION FZ105BT - [AUDIO] Button - 1](/content/2026/05/953567/images/932dd4c4b30b761458a1fc97a2f2ad6cc0936644f6f006bcd14dc6123fc48b45.jpg)
5. OPERATIONS
Basic Operation
Note: Be sure to read this chapter referring to the chapter "4.CONTROLS"
CAUTION
When the unit is turned on, starting and stopping the engine with its volume raised to the maximum level it may cause hearing damage. Be careful about adjusting the volume.
Power On/Off
Note:
- Start the engine before using this unit.
-
Be careful about using this unit for a long time without running the engine. If you drain the vehicle battery too far, you may not be able to start the engine and this can reduce the service life of the battery.
-
Start the engine. The power button / knob illumination on the unit will light up.

Engine ON position
- Press the [ ◎/ MUTE ] button to turn the power On or Off .
Selecting a mode
- Press the [SOURCE] button to display
menu.source
* External equipment not connected to this unit is not displayed. - Rotating the [VOLUME] to increase/decrease
the volume.
The adjustable range of volume is 0 to 46.
Adjusting the volume
Mute
Press the [MUTE] button to turn the mute On and Off.
Display System Information
Press the [INFO] button on the front panel to switch the display information, system time and playing source.
System Menu
In any mode, press [MENU] button to enter System Menu. Press [◀◀] or [▶▶] button to select options, rotate the [VOLUME] knob to adjust a value / option.
CLOCK
Rotate the [VOLUME] knob to set clock, rotate the [VOLUME] clockwise to adjust the minutes and counterclockwise to adjust the hours.
12/24H
Rotate the [VOLUME] knob to choose time format: 12 or 24 hours.
BEEP ON/OFF
Rotate the [VOLUME] knob to choose button Beep sound On or Off.
DIMMER
Rotate the [VOLUME] knob to adjust the LCD display backlight level between High or Low.
DIS-CON / RE-CON
Disconnect / Re-connect currently connected mobile phone.
Press the [MUTE] button to disconnect / Re-connect.
DEFAULT VOL
Rotate the [VOLUME] knob to adjust the default volume.
DX / LO (radio mode)
Rotate the [VOLUME] knob to choose radio Local or distant at RADIO mode.
- LO: Only stations with strong signal can be received.
- DX: Stations with strong and weak signals can be received.
TUNE AREA (radio mode)
Rotate the [VOLUME] knob to select suitable country region:
• U.S.A (United States)
• LATIN (Latin America)
• EUROPE (Eastern/Western Europe)
• ASIA (Asia Pacific)
Audio Menu
Press [♪] button to enter sound effect setting mode. Press [◀◀] or [▶◀] button to select options, rotate the [VOLUME] knob to adjust a value / option.
EQ (Preset Equalizer Setting)
Rotate the [VOLUME] knob to change EQ: Flat->Jazz->Pop->Classic->Rock->News->Urban->Rave->Movie->Techno->User
When the [EQ USER] is appear, press the
[MUTE] button to enter into below option and rotate the [VOLUME] knob to adjust a value:
• BASS(bass): range -7 to +7
• MID(middle): range -7 to +7
• TREB (treble): range -7 to +7
XBS On/Off
Rotate the [VOLUME] knob to turn On or Off the X-BASS bosster function.
SUB On/Off
Rotate the [VOLUME] knob to select subwoofer between ON and OFF
SUB LPF (SUB ON)
Rotate [VOLUME] knob to adjust the subwoofer Low Pass Filter range: 80HZ/120HZ/160HZ
SUB GAIN (SUB ON)
Rotate the [VOLUME] knob to adjust the subwoofer gain range: 0 to 12
BAL (Balance)
Rotate the [VOLUME] knob to adjust the balance between the right and left speakers from 01 R (full right) to 10L (full left).
FAD (Fader)
Rotate the [VOLUME] knob to adjust the fader between the front and rear speakers from 10R (full rear) to 10F (full front).
Radio Operation
Select Radio as Playing Source
Press the [SOURCE] button to select the
RADIO mode.
Selecting the Radio Band
Press the [ BAND / SEARCH ] button on the
front panel to select one Radio band among F1, F2, F3, AM.
[▶▶] Tuning Up / [◀◀]
Tuning Down Buttons
-
Press the [▶] / [◀◀] button to seek to the next strongest station.
-
Press and hold the [▶] / [◀◀] button change intervals step by step.
Preset Scan
Preset scan receives the stations stored in preset memory in order. This function is useful when searching for a desired station in memory.
-
Press the [AS/PS] button.
-
When a desired station is tuned in, press the [AS/PS] button again to continue receiving that station.
Auto Store
Only stations with sufficient signal strength will be detected and stored in the memory.
Press and hold the [AS/PS] button to start automatically select six strong stations and store them into six presets. The new stations replace any stations already stored in the band.
Manual Store
When one expected radio station has been detected, press and hold number button 1-6 to store it in the memory.
Recall the Stored Stations
Press one numeric button among 1 to 6 on the front panel to select the corresponding stored stations.
Local Seeking
When LOCAL seeking is ON, only those radio stations with strong radio signal could be received.
To select LOCAL function, press the [MENU] button on the front panel, then press the [▶▶]
/[1] button repeatedly until LO or DX display on the LCD, rotate the [VOLUME] knob to select local or distant mode.
Area Set
This option allows you to select the appropriate
frequency spacing for your area.
-
Press the [MENU] button
-
Press the [▶/◀] button to select "AREA"
-
Rotate the [VOLUME] knob to select:
"U.S.A", "LATIN", "EUROPE", "ASIA"
- Press the [MUTE] button to confirm.
USB and SD Mode Operation
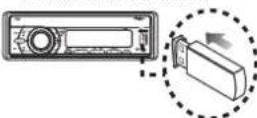
Insert the USB device
-
Slide the USB socket cover USB to left.
-
Insert the USB device into the USB socket. Press the [SOURCE] button to select USB / IPOD mode to start playing.
-
To remove the USB device, you should first select another source or turn off the power, order to avoid damaging the USB device. In Then take off the USB device.
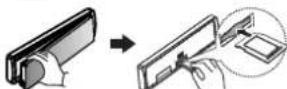
Insert the SD Card
-
Press the [OPEN] button to unlock the front panel.
-
Hold the left hand side of the panel & pull
forward to disengage it from the chassis.
- Insert the SD Card into the slot with label
facing left until a "CLICK" sounds is heard.
- Replace the front panel and press the [SOURCE] button to select SD mode to start playing.
Selecting a Track
- Press the [▶▶] button to advance to the next track/song.
Press the [ ◀◀◀ ] button to go to previous track/song.
- Press and Hold in the [▶▶] button to fast forward through the track/song.
Press and Hold in the [ ◀◀◀ ] button to fast backward through the track/song.
Play / Pause
Press the [▶▶▶] button to pause the track/song that is currently playing.
Press the [▶■] button to resume playing the track/song that has been paused.
Folder Select
This function allows you to select a folder containing MP3/WMA files and start playing from the first track in the folder.
Press the [▼5/▲6] button to select a folder.
Search Function
Press the [BAND/SEARCH] button on front panel access the MP3 / WMA file mode search
-
Rotate the [VOLUME] knob to search through all folders on the device then press [∅/MUTE] to make your selection.
-
Rotate the [VOLUME] knob to select the desired track within the previously selected folder and press [ / MUTE ] to start play
Display Function
During playback, pressing the [ INFO ] button will cycle through the following automatically information on the file being played on the LCD: FOLDER NAME->FILE NAME ->>TITLE ARTIST->ALBUM
Top function
The top function resets the USD and SD player to the first track of the device. Press the [1] button (long press) to play the first track (track No. 1) on the USB or SD mode.
AUX Mode Operation
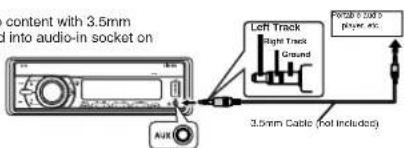
Press the [SOURCE] button on the front panel to select "AUX IN".
AUX IN is just for audio content with 3.5mm Jack connector plugged into audio-in socket on the front panel.
iPod/iPhone Mode Operation
Connect
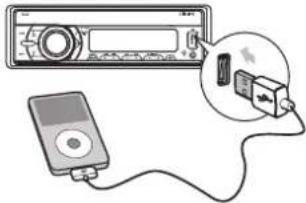
Connect an iPod/iPhone to the USB socket on front panel. When connecting a device, press the [SOURCE] button to select USB/iPod mode to start playing. The track information displays on the screen once start.playback
Compatible iPod/iPhone
You can connect the following iPod/iPhone:
- iPod nano (6G)
- iPhone 4
- iPod nano (7G)
- iPhone 4S
- iPod touch (4G)
- iPhone 5
- iPod touch (5G)
- iPhone 5C
- iPhone 3GS
- iPhone 5S
• Minimum iOS 5.0 or higher
Note:
Please make sure the iPod/iPhone cable is connected correctly. And please only use original iPod/iPhone cable.
Selecting a Track
- Press the [▶] button to advance to the next track/song. Press the [◀◀] button to go to previous track/song.
- Press and hold the [▶] button to fast forward through the track/song. Press and hold the [◀◀] button to fast backward through the track/song.
Play / Pause
Press the [▶] button to pause the track/song that is currently playing.
Press the [▶] button to resume playing the track/song that has been paused.
iPod Menu Search
- Press the [BAND/SEARCH] button to select the iPod menu mode.
- Rotate the [VOLUME] knob to switch between categories.
PLAYLISTS, ARTIST, ALBUM, GENRE, SONGS, COMPOSER, AUDIOBOOK
- Press [∅ /MUTE] button to confirm selection.
- When display the desired Playlist or Artist Album or Songs or Genre or Composer or Audiobook, then press the [ /MUTE] button to confirm.
- Rotate the [VOLUME] knob to choose the desired song to hear.
- Press the ⏻ /MUTE] button to confirm selection and then you will hear the chosen song.
Display Function
During playback, pressing the [ INFO ] button will automatically cycle through the following information on the file being played on the LCD: ALBUM -> SONGS -> ARTIST -> CLOCK
Bluetooth mode Operation
Pairing the Bluetooth Device
- From your Bluetooth enabled device, turn the Bluetooth ON and search for Bluetooth devices.
- When a list of available Bluetooth devices on your Bluetooth device, select appear "CLARION".
- "CONNECTED" will appear on the display.
- The unit will automatically enter the BT Audio source and you can now start streaming audio from your Bluetooth enabled device.
Note: If the mobile phone doesn't support SSP (Simple Secure Pairing) Profile, please enter the pass code of "0000".
Making a Call
You can dial number through the mobile phone.
1. Use the Mobile Phone to dial and make an call.outgoing
2. Once completed the dialing [CALLING] is displayed
Redlal
You can call last dialed number.
1. Press the [ IC / ≈ ] on front panel to redial.
2. Once completed the dialing [CALLING] is displayed
Answering a Call
- You can answer an incoming call by pressing the [∠C/⇌] button.
- Press the [☐/→] button to reject an incoming call.
Call Transfer
You can switch Handsfree call and mobile phone call.
Press the [∠/≠] button during call (long press).
DIS-CON / RE-CON
- Press and hold the [MENU] button to enter System menu.
- Press the [◀/▶] button until "RE-CON" or "DIS-CON" is displayed.
- Press [ /MUTE] button to confirm the selection.
Audio Streaming Operations
What is audio streaming?
Audio streaming is a technique for transferring audio data such that it can be processed as a steady and continuous stream. Users can stream music from their external audio player to their audio system wirelessly and listen to the tracks through the car speakers. Please consult your nearest Clarion dealer for more information on the product of wireless audio streaming transmitter offered.
CAUTION
Please avoid operating your connected mobile phone while audio streaming as this may cause noise or sound choppy on the song playback. Audio streaming may or may not resume after telephone interrupt as this is dependent on mobile phone.
Search Function
-
Press the [BAND/SEARCH] button on front panel access the search mode.
-
Rotate the [VOLUME] knob to switch between categories. PLAYLISTS->ARTIST->ALBUMS-> GENRES->SONGS->COMPOSERS-> AUDIOBOOK->PODCASTS
- Press [ ◎/MUTE ] button to confirm the selecting.
- When display the desired Playlist or Artist or Album or Genres or Songs or Composers or Audiobook or Podcasts, press [MUTE] music file will be displayed.
- Rotate the [VOLUME] knob to select File.
- Press [O/MUTE] button to confirm wanted file to play.
Note:
The search feature requires the paired and connected device that the minimum Bluetooth AVRCP1.4 be incorporated to function.
Play / Pause
Press the [▶] button to pause the track/song
that is currently playing
Press the [▶] button to resume playing the
track/song that has been paused
Selecting a Track
- Press the [▶] button to advance to the
next track/song.
Press the [
track/song - Press and hold the [ ] button to fast
forward through the track/song
Press and hold the [ ] button to fast
backward through the track/song.
Note:
Playing order will depend on Bluetooth audio player. When [ ] button is pressed, some A2DP devices will restart the current track depends on the duration of playback.
During music streaming playback "A2DP" will
be shown on the display. When A2DP and
HFP device is disconne ct, "BLUETOOTH
DISCONNECT" will be shown on the display
and return to previously selected audio source.
Some Bluetooth audio players may not have
play / pause synchronized with this unit. Please make sure both devices and main unit are in the
make sure both device and main unit are in the same play / pause status in BT MUSIC mode.
ID3 Display
During music streaming playback, press [INFO] to
view the ID3 display information
TITULO -> ARTIST -> ALBUM -> CLOCK
6. TROUBLESHOOTING
GENERAL
| Problem Cause Measure | ||
| Unit cannot power on. | Unit fuse blown. | Replace with new fuse of correct rating. |
| Car battery fuse blown. | Replace with new fuse of correct rating. | |
| No/low audio output. | Improper audio output connection | Check wiring and correct. |
| volume set too low. | Increase volume level. | |
| Speakers damaged. | Replace speakers. | |
| Heavily biased volume balance. | Adjust the channel balance to center position. | |
| Speaker wiring is in contact with metal part of car. | Insulate all speaker wiring connections. | |
| Poor sound quality or distortion. | Speaker power rating does not match unit. | Replace speakers. |
| Wrong connections. | Check wiring and correct. | |
| Speaker is shorted. | Check wiring and correct. | |
| Unit resets itself when engine is off. | Incorrect connection between ACC and Battery. | Check the wiring and correct. |
USB
| Problem | Cause | Measure |
| USB device cannot be inserted. | The USB device has been inserted with wrong direction. | Reversing the connection direction of the USB device, try it again. |
| The USB connector is broken | Replace with a new USB device. | |
| USB device is not recognized. | The USB device is damaged. | Disconnect the USB device and reconnect. If the device is still not recognized, try replacing with a different USB device. |
| Connectors are loose. | ||
| No sound heard with the display "No File" shown. | No MP3/WMA file is stored in the USB device. | Store these files properly in the USB device. |
| Sound skips or is noisy. | MP3/WMA files are not encoded properly. | Use MP3/WMA files encoded properly. |
Bluetooth
| Problem Cause | Measure | |
| Cannot pair the Bluetooth enabled device with the audio system. | The device does not support the profiles required for the system. | Use another device to connect. |
| The Bluetooth function of the device is not enabled. | Refer to the user manual of the device for how to enable the function. | |
| The audio quality is poor after connection with a Bluetooth-enabled device. | The Bluetooth reception is poor. | Move the device closer to the audio system or remove any obstacle between the device and the system. |
7. SPECIFICATIONS
FM Tuner
Frequency Range: 87.5 - 107.9MHz
Usable Sensitivity: Less than 10dB at S/N 30dB
Stereo Separation: >30dB(1kHz)
Signal/noise ratio: >55dB
AM Tuner
Frequency Range: 530 -1710KHz
Usable Sensitivity: Less than 40dB
MP3/WMA mode
MP3 sampling rate: 32kHz, 44.1kHz, 48kHz
MP3 bit rate: 8-320kbps and varibale bit
rate 2014 bit rate 8.000kbps
WMA bit rate: 6\~320kbps Logical format: ISO9660, Jolint
Number of file: Maximum 999
Max directory 10
depth
Sorting Method: Tree sorting
Max File/Directory 64Byte
Name
ID3 tag: V2.0 or later
USB
USB Host: Host 1.1 compatibles 2.0
Maximum memory capacity: 32GB
Playable folders: up to 99
Playable files: up to 5000
SD
Maximum memory capacity: 32GB
Playable folders: up to 99
Playable files: up to 5000
Bluetooth
Specification: Bluetooth Version. 2.0+EDR
(Enhanced Data Rate)
Supported Profiles: A2DP (Advanced Audio Distribution Profile)
Distribution Profile) AVRCB 1.4 /AudioVideo
Remote Control Profile)
SSP (Simple Secure Pairing)
Send/Receive Sensitivity: Class 2
Bluetooth module
Model: CW51
Brand: CSR CB05-MULTIMEDIA EXTERNAL
General
Power Supply Voltage: 12V DC (10.8 to 15.6V).
Negative Ground
Fuse: 15A
Speaker Impedance: 4-8 ohms per channel
Power output: 45W x 4 channels
Aux-in level: ≥ 650mV
Note: Specifications and design are subject to
change without notice for further improvement.
Power Output:
14W × 4 Channels at 4 Ω
and 1% THD+N
Signal to Noise Ratio:
60dB (reference: LPF 1 W into 4Ω)

Clarion Co., Ltd.
Copyright © 2015 Clarion Co., Ltd.
Printed in China / Imprimé en Chine / Impreso en China
PN:
- INFORMATIONS DE L'ENREGISTREMENT DE PRODUITS CLARION
- Contents
- FEATURES
- PRECAUTIONS
- WARNING
- CAUTIONS ON HANDLING
- CONTROLS
- Names of Buttons and their Functions
- [SOURCE] Button
- [OPEN] Button
- [IC !=] Button
- [ (b)/MUTE] Button
- [ ] Button
- [MENU] Button
- [◀◀/▶▶] Button
- [VOLUME] Button
- [AS/PS] Button (radio mode)
- [BAND/SEARCH] Button
- [1\~6] Buttons
- [INFO] Button
- Notes for use of Optional Remote Control
- Inserting the Battery
- Remote Control
- [ ] [ =] Button
- [...] Button
- [SRC] Button
- [①] Button
- [AUDIO] Button
- OPERATIONS
- Basic Operation
- CAUTION
- Power On/Off
- Note:
- Selecting a mode
- Adjusting the volume
- Mute
- Display System Information
- System Menu
- CLOCK
- 12/24H
- BEEP ON/OFF
- DIMMER
- DIS-CON / RE-CON
- DEFAULT VOL
- DX / LO (radio mode)
- TUNE AREA (radio mode)
- Audio Menu
- EQ (Preset Equalizer Setting)
- When the [EQ USER] is appear, press the
- XBS On/Off
- SUB On/Off
- SUB LPF (SUB ON)
- SUB GAIN (SUB ON)
- BAL (Balance)
- FAD (Fader)
- Radio Operation
- USB and SD Mode Operation
- AUX Mode Operation
- iPod/iPhone Mode Operation
- Connect
- Compatible iPod/iPhone
- Selecting a Track
- Play / Pause
- iPod Menu Search
- Display Function
- Bluetooth mode Operation
- Pairing the Bluetooth Device
- Making a Call
- Redlal
- Answering a Call
- Call Transfer
- Audio Streaming Operations
- What is audio streaming?
- Search Function
- ID3 Display
- TROUBLESHOOTING
- SPECIFICATIONS
- FM Tuner
- AM Tuner
- MP3/WMA mode
- USB
- SD
- Bluetooth
- General
- Clarion Co., Ltd.
Brand : CLARION
Model : FZ105BT
Category : Hi-Fi System