
DB255 - Hi-Fi System CLARION - Free user manual and instructions
Find the device manual for free DB255 CLARION in PDF.


| Product Type | Hi-Fi System / Car Stereo |
| Brand | Clarion |
| Model | DB255 |
| Dimensions (W x H x D) | 178 mm x 50 mm x 160 mm (1 DIN) |
| Weight | 1.5 kg |
| Power Supply | 12V DC, negative ground |
| Max Power Output | 4 x 50W |
| Radio Frequency Range | FM: 87.5 - 108 MHz, AM: 530 - 1710 kHz |
| RDS | Yes |
| Playback Media | CD, CD-R/RW, MP3, WMA |
| Audio Input | Front AUX (3.5mm) |
| Audio Outputs | Preamp: Front, Rear, Subwoofer |
| Audio Controls | Bass, Treble, Balance, Fader, Loudness |
| Playback Modes | Random, Repeat, Intro Scan |
| Display | LCD with adjustable illumination |
| Detachable Faceplate | Yes, anti-theft |
| Remote Control | Included |
| Maintenance | Clean with soft dry cloth; do not use liquids or solvents |
| Repairs | Contact authorized Clarion service center |
| Spare Parts | Available through Clarion distributors |
Frequently Asked Questions - DB255 CLARION
User questions about DB255 CLARION
0 question about this device. Answer the ones you know or ask your own.
Ask a new question about this device
Download the instructions for your Hi-Fi System in PDF format for free! Find your manual DB255 - CLARION and take your electronic device back in hand. On this page are published all the documents necessary for the use of your device. DB255 by CLARION.
USER MANUAL DB255 CLARION
natural_image
Close-up of a textured surface with no visible text, numbers, or symbols1. PRECAUTIONS
- When the inside of the car is very cold and the player is usual soon after switching on the heater, moisture may form on the disc or the optical parts of the player and proper playback may not be possible. If moisture forms on the disc, wipe it off with a soft cloth. If moisture forms on the optical parts of the player, do not use the player for about one hour and the condensation will disappear naturally to allow normal operation.
- Driving on extremely bumpy roads which cause severe vibration may cause the sound to skin.
- This unit uses a precision mechanism. Even in the event that trouble arises, never open the case, disassemble the unit, or lubricate the rotating parts.
The equipment has been tested and found to comply with the limits for a Cass B digital device, pursuant to Part 15 of the FCC Rules. These limits are designed to provide reasonable protection against harmful interference in a residential installation. This equipment may be used to control the equipment to ensure energy and, if not installed and use it accordance with the instructions, may cause harmful interference to radio communications. However, there is no guarantee that interference will not occur in a particular installation. If this equipment does cause harmful interference to radio or television operation, which can be determined by lowering the equipment, all other user is encouraged to consult a dealer or an experienced radio/TV technician for help.
CAUTION
USE OF CONTROLS, ADJUSTMENTS, OR PERFORMANCE OF PROCEDURES OTHER THAN THOSE SPECIFIED HEREIN, MAY RESULT IN HAZARDOUS RADIATION EXPOSURE. THE COMPACT DISC PLAYER SHOULD NOT BE ADJUSTED OR REPAIRED BY ANYONE EXCEPT PROPERLY QUALIFIED SERVICE PERSONNEL.
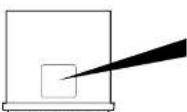
Bottom View of Source Unit
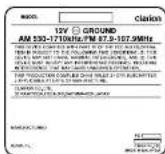
INFORMATION FOR USERS:
CHANGES OR MODIFICATIONS TO THIS PRODUCT WILL VOID THE WARRANTY AND WILL VIOLATE FCC APPROVAL.
Be sure to unfold and read the next page.
Veuillez deployer et vous referer à la page suivante. Cerciórese de desplegar y de leer la página siguiente.
0225 2
2001/9 (D-M)
Clarion Co., Ltd.
At Rights. Received Copyright © 2011 Central Co., Ltd. Pileno / Marzela, Impi and J. Mahale - prometo en Mawala
PE-2420B 280-7643-01
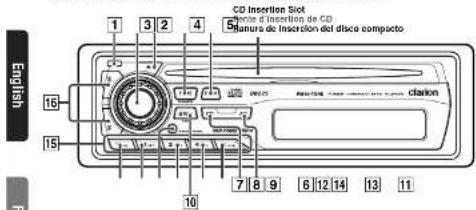
2. CONTROLS / COMMANDES / CONTROLES
Note: Be sure to would this page and refer to the front diagrams as you read each chapter.
Remanque: Vruez aployer cette page en vous referer aux schanas apoyo vous lesc chaque cheille. Nota: Cuerto los capitales, desflugues esta ségras y censate los cispamas.
SOURCE UNIT / APPAREIL PILOTE / UNIDAD FUENTE
DISPLAY
AFFICHEUR
VISUALIZADOR
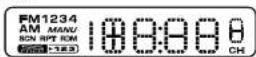
Note: The above illustration shows the front panel of the model 56225.
- Be sure to read this chapter referring to the front diagrams of chapter 2. CONTROLS on page 3 (unified)
T DCP Release Button
2 Volume Knob
3 Eject (▲) Ballon
4 POWER Button
FNC (Function) Button
5 Z-ENCR (Z-enhancer) Bullon
6 AS (Auto Store) Button
7 PS [Present Scan] Button
8 PlayPause (▶/II) Button
9 DISP (Display) Button
10 END (Band) Button
TOP Button
11 RDM (Random) Button
2 A-M [Audio Mode] Button
13 RPT (Repeat) Button
14 SCN (Scan) Button
15 Presel Buttons (1 to 6)
SRCH (Search) Up and Down (A and V) Buttons
4. FEATURES
■ Rotary Encoder Volume Control
■ DIN Chassis with Detachable Control Panel (1DIN, Full DCP feature)
■ Z-Enhancer with 3 Mode Sound Selector
■ MAGI-TUNE® FM Reception System
■ Seek / Manual Up / Down Tuning
■ 8-Times Oversampling Digital Filter and Dual 1-Bit D/A Converters
■ Preset Station Scan (PS), Automatic Store (AS)
■ 2-Channel RCA Line Level Output
■ AM 1 band, FM 4 bands each 5 channels total 25 channels, Preset Memory Function
■ Repeat/Random Play/Intro Music Scan
■ 200W (50 W · 4) Maximum Power Output
5. HANDLING COMPACT DISCS
This unit has been designed specifically for play-back of compact discs bearing the mark. No other discs can be played.
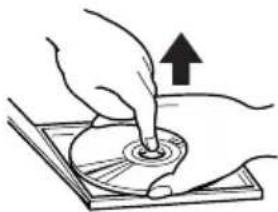
Single CD (8cm) cannot be played with the unit. To remove the compact disc from its storage case, press down on the center of the case and lift the disc out, holding it carefully by the edges.
Removing the disc
natural_image
Illustration of hands using a tool to press or install a CD or DVD (no text or symbols present)Proper way to hold the compact disc
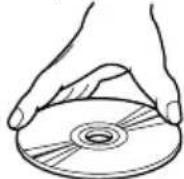
Always handle the compact disc by the edges. Never touch the surface.
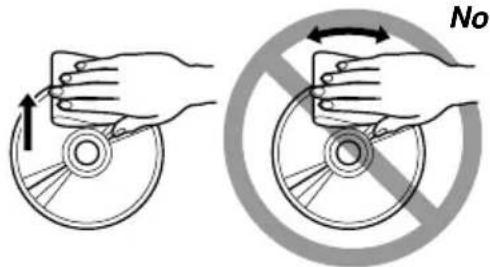
To remove fingermarks and dust, use a soft cloth, and wipe in a straight line from the center of the compact disc to the circumference.
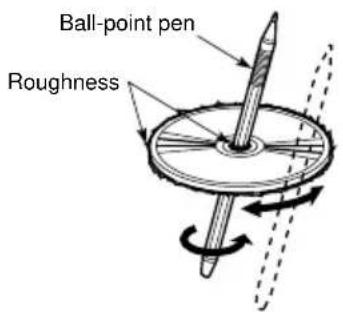
New discs may have some roughness around the edges. The unit may not work or the sound may skip if such discs are used. Use a ball-point pen, etc. to remove roughness from the edge of the disc.
Note on Compact Discs
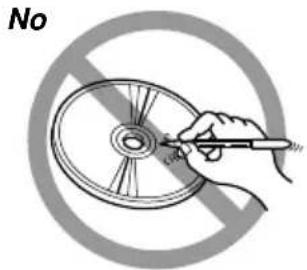
Never stick labels on the surface of the compact disc or mark the surface with a pencil or pen.
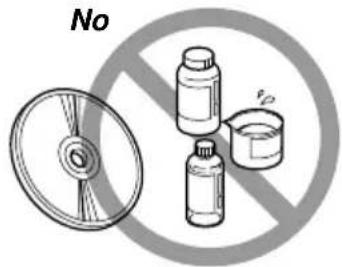
Do not use any solvents such as commercially available cleaners, anti-static spray, or thinner to clean compact discs.
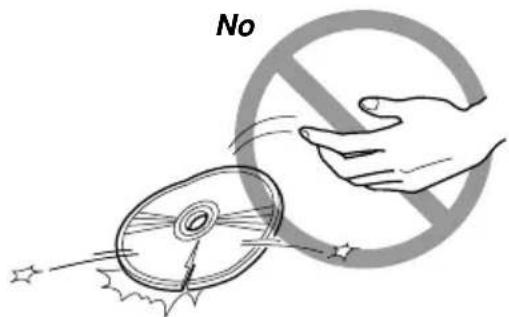
Do not use compact discs that have large scratches, are misshapen, or cracked, etc. Use of such discs will cause misoperation or damage.
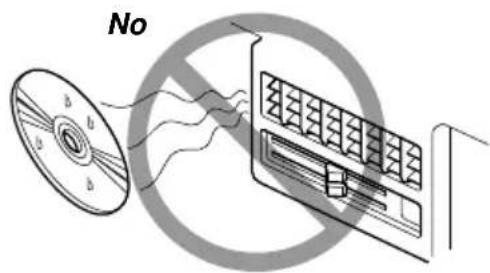
Do not expose compact discs to direct sunlight or any heat source.
Note:
- Do not use commercially available CD protection sheets or discs equipped with stabilizers, etc. These may get caught in the internal mechanism and damage the disc.
6. DCP (Detachable Control Panel)
The control panel can be detached to prevent theft. We recommend taking the DCP with you when leaving the car.
Removing the DCP
- Turn off the power.
- Press the DCP Release button 1.
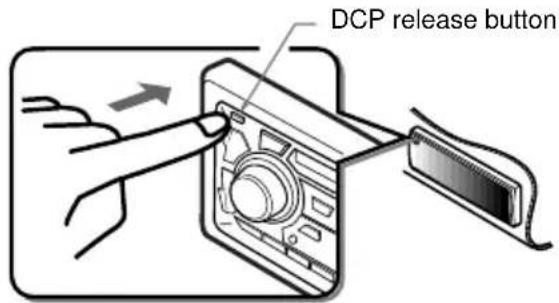
- Remove the DCP.
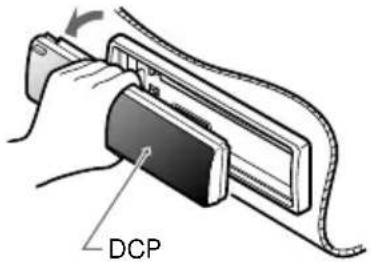
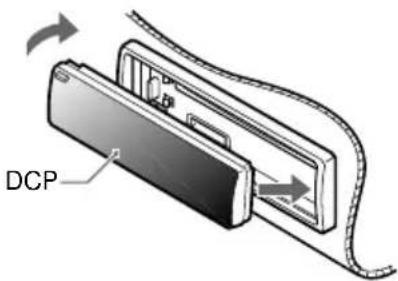
Attaching the DCP
- Insert the side of the DCP into the main unit.
- Insert the left side of the DCP into the main unit.
CAUTION
Do not insert the DCP from the left side. Doing so may damage it.
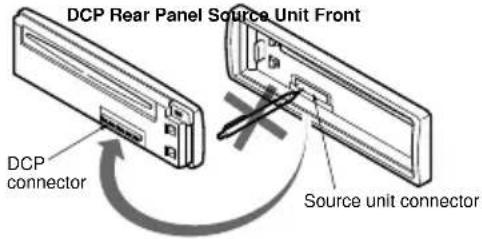
CAUTION
- The DCP can easily be damaged by shocks. After removing it, place it in a protective case and be careful not to drop it or subject it to strong shocks. - When the release button is pressed and the DCP is unlocked, the car's vibrations may cause it to fall. To prevent damage to the DCP, always store it in a protective case after detaching it. - The rear connector that connects the source unit and the DCP is an extremely important part. Be careful not to damage it by pressing on it with fingernails, pens, screwdrivers, etc.
Note:
- If the DCP is dirty, wipe off with a soft, dry cloth only.
7. OPERATION
Note:
- Be sure to read this chapter referring to the front diagrams of chapter 2. CONTROLS on page 3 (unfold).
Basic Operations
CAUTION
When this unit is turned on, starting and stopping the engine of a car with its volume raised to the maximum level may harm your hearing. Be careful about adjusting the volume.
Turning ON the Power and Adjusting the Volume
1) Press the POWER button 4.
*To turn off the power, press the POWER button ④ for 1 second or longer.
2) Press the FNC button 4 and select another operation mode. Every time the FNC button 4 is pressed, the display changes the operation mode as:
Radio → CD → Radio
Note:
- If the CD mode is selected when no disc is inserted, the display flashes "DISC" and blinking.
3) Turning the Rotary knob 2 clockwise increases the volume; turning it counterclockwise decreases the volume.
*The volume level is from 0 (minimum) to 33 (maximum).
Audio Mode Adjustments
Press the A-M button 12 to select the adjustment mode. The mode switches as follows each time the A-M button is pressed:
BASS → TREB → BAL → FAD → Previous mode
Adjusting the Bass
1) Press A-M button 12 and select "BAS".
2) Turning the Rotary knob 2 clockwise emphasizes the bass; turning it counterclockwise attenuates the bass.
*The factory default setting is "0". (Adjustment range: -6 to +6)
3) When the adjustment is complete, press A-M button 12 several times until the function mode is reached.
Adjusting the Treble
1) Press A-M button 12 and select "TRE".
2) Turning the Rotary knob ② clockwise emphasizes the treble; turning it counterclockwise attenuates the treble.
* The factory default setting is "0". (Adjustment range: -6 to +6)
3) When the adjustment is complete, press A-M button 12 several times until the function mode is reached.
Adjusting the Balance
1) Press A-M button 12 and select "BAL".
2) Turning the Rotary knob 2 clockwise emphasizes the sound from the right speaker; turning it counterclockwise emphasizes the sound from the left speaker.
* The factory default setting is "0". (Adjustment range: L9 to r9)
3) When the adjustment is complete, press A-M button 12 several times until the function mode is reached.
Adjusting the Fader
1) Press A-M button 12 and select "FAD".
2) Turning the Rotary knob 2 clockwise emphasizes the sound from the front speakers; turning it counterclockwise emphasizes the sound from the rear speakers.
* The factory default setting is "0". (Adjustment range: F9 to r9)
3) When the adjustment is complete, press A-M button 12 several times until the function mode is reached.
Note:
- Bass and Treble can only be adjusted when the "Z-enhancer" is off.
Setting the Z-enhancer
This unit comes with three types of sound tone effects stored in memory. Select the one you prefer.
*The factory default setting is "Z-EHCR OFF".
Each time you press Z-EHCR button 5, the tone effect changes in the following order.
“Z-ENHANCER 1” → “Z-ENHANCER 2” →
"Z-ENHANCER 3" → "Z-EHCR OFF" →
"Z-ENHANCER 1"...
• Z-ENHANCER 1: bass emphasized
• Z-ENHANCER 2: treble emphasized
• Z-ENHANCER 3: bass and treble emphasized
• Z-EHCR OFF: no sound effect
Switching the Clock Display
Press and hold the BND button 10, and then press the DISP button 9 to switch between the operation mode and the clock display.
Setting the Clock
1) Press and hold the BND button 10, and then press the DISP button 9 to display the clock display.
2) Press and hold the BND button 10, and then press the DISP button 9 for 2 seconds or longer.
3) Press the SRCH Up button 16, then set the current hour.
4) Press the SRCH Down button 16, then set the current minute.
5) Press the BND button 10, then the clock is set.
Notes:
- If you select another operation mode while you are setting the clock, the clock setting operation will be canceled.
- If you remove the vehicle's battery for a check or repair, the clock will be reset, so you must set it again.
Radio Mode Operations
FM Reception
For enhanced FM performance the MAGI-TUNE ^® tuner includes signal actuated stereo control and Multipath noise reduction circuits.
Listening to the Radio
1) Press the FNC button 4 to select the radio mode, then the radio will be on.
2) To select a preset band, press the BND button 10, then select one of the preset bands such as FM1, FM2, FM3, FM4, or AM. Every time the BND button 10 is pressed, the display will change as:

flowchart
graph LR
    A["→ FM1 FM2 FM3 FM4 AM"] --> B["→"]
3) Press the SRCH Up/Down button 16, then the station at which there is a broadcast will be selected (Seek selection).
Manual Tuning
1) Press the BND button 10, then select FM1, FM2, FM3, FM4 or AM.
2) Press and hold the BND button 10 for 2 seconds or longer, then the display will show "MANU", which means that a manual selection function is on.
3) Press the SRCH Up/Down button 16 and select the right station.
Seek Tuning
1) Press the BND button 10, then select FM1, FM2, FM3, FM4 or AM.
2) If the "MANU" on the display is on, press and hold the BND button 10 for 2 seconds or longer. When the "MANU" display is off, the Seek Selection function is on.
3) Press the SRCH Up/Down button 16 , then when it selects the station in which there is a broadcast, it automatically stops.
Preset Memory Function
Preset Memory Function can store up to 25 stations: five stations for each of FM1, FM2, FM3, FM4 and AM.
Note:
- When the present memory function is used, all the content of the memory will be erased.
Manual memory function
1) Press the BND button 10, and select the band you want to store in the memory.
2) Press the SRCH Up/Down button 16 then select the station you want to store in the memory.
3) Press and hold the Preset button 15 for 2 seconds or longer, then the station will be stored in the memory.
Auto store function (Automatic Station Store)
1) Press the BND button 10, then select the band you want to store in the memory.
2) Press and hold the AS button 6 for 2 seconds or longer, then the station at which the reception is the strongest will be automatically stored in the memory.
Note:
- When the number of stations stored is less than five, the previous content of the memory for each direct button will be retained.
Preset Scanning (Preset Station Scan)
When the PS button 7 is preset, the preset memory numbers flash and the stations are tuned in for 7 seconds each in the order in which they were stored. Press the PS button again to cancel the preset scanning mode.
CD Mode Operations
Loading a Disc
Insert a CD into the centre CD insertion slot with the labeled side facing up, "LOAD" appears in the display, the CD enters into the slot and start playing.
Notes:
- Single CD (3" (8 cm)), cannot be played with the unit.
- Do not put your hand, fingers, or foreign objects into the CD insertion slot.
- If a CD has already been loaded, another CD cannot be inserted. Do not insert another one forcefully.
- Discs not bearing the mark cannot be played with the unit. CD-ROMs cannot be played.
- Some CDs recorded in CD-R mode may not be usable.
- CD recorded in CD-RW mode cannot be played with the unit
Listening to the Disc already Inserted
Press the FNC button 4 to select the CD mode, the CD will start playing.
Stopping (pausing) Playback
While the CD playing, pressing the Play/Pause button 8 will stop the CD and "PAUS" indicate. Press the Play/Pause button 8 again to resume playback.
Ejecting the CD
Press the Eject button 3, then the CD will be ejected.
Note:
- If the ejected CD is left as it is, it will be reloaded after 15 seconds.
Top Function
Press the TOP button 10, then the CD will start playing from the first song (track number 1).
Selecting Tracks (songs)
Press the SRCH Up/Down button 16.
^ : Playback will start from the next track.
: Playback will start from the beginning of the track currently playing. When this button is pressed again, the CD will play from the previous track.
Fast-Forward and Fast-Backward
Press and hold the SRCH Up/Down button 16.
^ : To fast-forward
↓ : To fast-backward
*Pressing the SRCH Up/Down button for 1 second or longer will move forward or backward 5 times faster than normal play, and pressing it for 3 seconds or longer will do the operation 30 times faster.
Scan Play (Intro Music Scan)
Press the SCN button 14, then the display shows "SCN", then the CD will play the first 10 seconds of each track of the whole disc. Press the SCN button 14 again to disengage the unit from scan play.
*A scan play will start from the track following the one currently.
Repeat Play
Press the RPT button 13, then the display shows "RPT", then the track currently playing will be played repeatedly. Press the RPT button 13 again to disengage the unit from repeat play.
Random Play
Press the RDM button 11, then the display will show "RDM", then the entire tracks on the disc will be played at random. Press the RDM button 11 again to disengage the unit from random play.
Switching between CD Play Time, Clock Display and CDTrack Number
Press and hold the BND button 10, and then press the DISP button 9, the display changes in the following order:

flowchart
graph LR
    A["CD Track No. GD Play Time"] --> B["Clock Display"]
    B --> A
8. TROUBLESHOOTING
| Problem Cause Solution | ||
| Power does not turn on. (No sound is produced.) | Fuse is blown. | Replace with a fuse of the same amperage. If the fuse blows again, consult your store of purchase. |
| Incorrect wiring. | Consult your store of purchase. | |
| Compact disc cannot be loaded. | Another compact disc is already loaded. | Eject the compact disc before loading the new one. |
| Sound skips or is noisy. | Compact disc is dirty. | Clean the compact disc with a soft cloth. |
| Compact disc is heavily scratched or warped. | Replace with a compact disc with no scratches. | |
| Sound is bad directly after power is turned on. | Water droplets may form on the internal lens when the car is parked in a humid place. | Let dry for about 1 hour with the power on. |
| Nothing happens when buttons are pressed. Display is not accurate. | Microprocessor has malfunctioned due to noise, etc. | Turn off the power, then press the DCP Release button 1 and remove the DCP. Press the reset button for about 2 seconds with a thin rod. 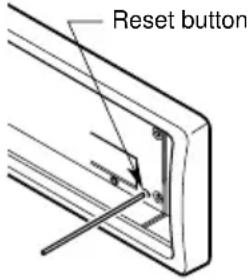 |
| DCP or source unit connectors are dirty. | Wipe the dirt off with a soft cloth moistened with cleaning alcohol. |
9. ERROR DISPLAYS
■ To protect the system, this unit has been equipped with self diagnostic functions. If a fault arises, a warning is issued by various error displays. Follow the corrective measures and remove the fault.
| Error Display Corrective Measure | |
| Er 2 | This error display indicates that a fault has arisen in the mechanism of the source unit (for example, the disc cannot be ejected).→ Check the source unit. |
| Er 3 | This error display indicates that the pickup focus is off because of a scratched disc or some other factor during source unit play.→ Check the compact disc. |
| Er 6 | This indicates that the CD's TOC (table of contents) cannot be read, for example because the selected disc is upside-down. |
10. SPECIFICATIONS
FM Tuner
Frequency Range: 87.9 MHz to 107.9 MHz
Usable Sensitivity: 11 dBf
50 dB Quieting Sensitivity: 17 dBf
Alternate Channel Selectivity: 75 dB
Stereo Separation (1 kHz): 35 dB
Frequency Response (±3 dB): 30 Hz to 15 kHz
AM Tuner
Frequency Range: 530 kHz to 1,710 kHz
Usable Sensitivity: 25 μV
CD Player
System: Compact disc audio system
Usable Discs: Compact disc
Frequency Response: 10 Hz to 20 kHz (±1 dB)
Signal-to-Noise Ratio: 100 dB (1 kHz) IHF-A
Dynamic Range: 95 dB (1 kHz)
Harmonic Distortion: 0.01%
Audio
Maximum Power Output:
200 W (50 W · 4 ch)
Continuous Average Power Output:
17 W · 4, into 4 Ω, 20 Hz to 20 kHz, 1% THD
Bass Control Action (30 Hz): ±13 dB
Treble Control Action (10 kHz): ±12 dB
Line Output (with A/C 1 kHz, 10 kΩ): 1.8 V
General
Power Supply Voltage: 14.4 V DC (10.8 V to 15.6 V allowable), negative ground
Current Consumption: Less than 15 A
Speaker Impedance: 4 Ω (4 Ω to 8 Ω allowable)
Weight: 3.31 lb. (1.5 kg)
Dimensions:
7" (178 mm) Width · 2" (50 mm) Height ·
6" (152 mm) Depth
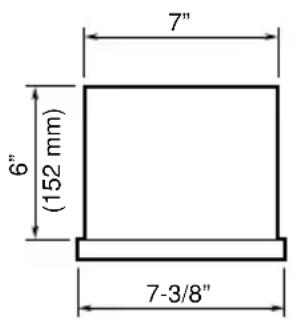
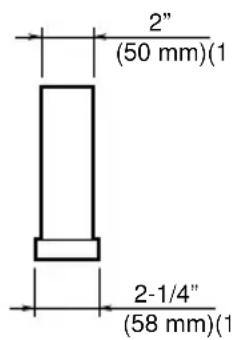
Notes:
- Specifications comply with EIA Standards.
- Specifications and design are subject to change without notice for further improvement.
- Please make sure when connecting external power amplifier, that you properly, to the car chassis, ground the amplifier.
- If this is not done, severe damage to the source unit way happen.
- PRECAUTIONS
- INFORMATION FOR USERS:
- Clarion Co., Ltd.
- CONTROLS / COMMANDES / CONTROLES
- FEATURES
- HANDLING COMPACT DISCS
- Note on Compact Discs
- Note:
- DCP (Detachable Control Panel)
- Removing the DCP
- Attaching the DCP
- CAUTION
- OPERATION
- Basic Operations
- Turning ON the Power and Adjusting the Volume
- Audio Mode Adjustments
- Adjusting the Bass
- Adjusting the Treble
- Adjusting the Balance
- Adjusting the Fader
- Setting the Z-enhancer
- Switching the Clock Display
- Setting the Clock
- Notes:
- Radio Mode Operations
- FM Reception
- Listening to the Radio
- Manual Tuning
- Seek Tuning
- Preset Memory Function
- Manual memory function
- Auto store function (Automatic Station Store)
- Preset Scanning (Preset Station Scan)
- CD Mode Operations
- Loading a Disc
- Listening to the Disc already Inserted
- Stopping (pausing) Playback
- Ejecting the CD
- Top Function
- Selecting Tracks (songs)
- Fast-Forward and Fast-Backward
- Scan Play (Intro Music Scan)
- Repeat Play
- Random Play
- Switching between CD Play Time, Clock Display and CDTrack Number
- TROUBLESHOOTING
- ERROR DISPLAYS
- SPECIFICATIONS
- FM Tuner
- AM Tuner
- CD Player
- Audio
- General
Brand : CLARION
Model : DB255
Category : Hi-Fi System