
DB355MP - Hi-Fi System CLARION - Free user manual and instructions
Find the device manual for free DB355MP CLARION in PDF.


| Product Type | Car Stereo / Hi-Fi System |
| Brand | Clarion |
| Model | DB355MP |
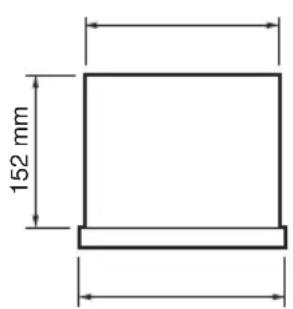
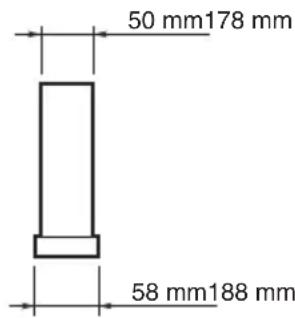
| Dimensions (Width x Height x Depth) | 178 mm x 50 mm x 152 mm |
| Weight | 1.1 kg (2.42 lb) |
| Power Supply Voltage | 14.4 V DC (10.8-15.6 V allowable), negative ground |
| Current Consumption | Less than 15 A |
| Speaker Impedance | 4 Ω (4-8 Ω allowable) |
| Maximum Power Output | 204 W (51 W x 4 ch) |
| Continuous Power Output | 17 W x 4 ch into 4 Ω, 1% THD |
| FM Tuner Frequency Range | 87.9 - 107.9 MHz |
| AM Tuner Frequency Range | 530 - 1710 kHz |
| CD Frequency Response | 10 Hz - 20 kHz (±1 dB) |
| CD Signal-to-Noise Ratio | 100 dB (1 kHz) IHF-A |
| MP3 File Support | Up to 254 files, 128 folders |
| Display Type | Blue negative display, 13 x 8 digits with screen saver |
| Detachable Control Panel | Yes (DCP included with case) |
| Remote Control | Yes (CR2025 battery) |
| Sound Enhancement | Z-Enhancer (3 types) and Magna Bass EX |
| Preset Memory | 24 stations (6 each for FM1, FM2, FM3, AM) |
| RCA Output | 2-ch, 1.8 V |
| Auto Store Function | Yes |
| Clean DCP | Use soft dry cloth only |
| Reset Method | Press reset button (under DCP) with thin rod for 2 sec |
| Safety Compliance | FCC Part 15, Class B |
Frequently Asked Questions - DB355MP CLARION
User questions about DB355MP CLARION
0 question about this device. Answer the ones you know or ask your own.
Ask a new question about this device
Download the instructions for your Hi-Fi System in PDF format for free! Find your manual DB355MP - CLARION and take your electronic device back in hand. On this page are published all the documents necessary for the use of your device. DB355MP by CLARION.
USER MANUAL DB355MP CLARION
-
BUTTON TERMINOLOGY ...... 4 Names of the Buttons and their Functions ...... 4
-
PRECAUTIONS 5
-
HANDLING COMPACT DISCS 6
-
DCP (Detachable Control Panel) 7
-
REMOTE CONTROL 8 Functions of Remote Control Unit Buttons 9
-
OPERATIONS 10
Basic Operations 10 Radio Mode Operations 12
CD Mode Operations 13
MP3 Mode Operations 14
-
TROUBLESHOOTING 17
-
ERROR DISPLAYS 17
-
SPECIFICATIONS 18
1. FEATURES
■ High Visibility & Contrast Blue Negative Display (13 x 8 Digits) with Screen Saver
■ MP3 File Playable with ID3-TAG Display
■ MP3 Search & Random Play
■ High Power 51W X 4 Built in Amplifier
■ 2 ch RCA Output
■ Remote Control and DCP Case Included
■ Z-Enhancer and Magna Bass EX for Sound Adjustment
■ "Easy to Use" Rotary Volume Knob
Be sure to unfold and read the next page.
Note : Be sure to unfold this page and refer to the front diagrams as you read each chapter.
- Be sure to read this chapter referring to the front diagrams of chapter "2. CONTROLS" on page 3.
Names of the Buttons and their Functions
[RELEASE] button
- Press the [RELEASE] button to unlock the DCP.
[▶] button
- Plays or pauses a CD while in the CD mode.
- To enter various setting.
- Performs preset scan while in the radio mode. When the button is pressed and held, auto store is performed.
[SENSOR] button
- Receiver for remote control unit.
- Operating range: 30^ in all directions.
[CD SLOT]
- CD insertion slot.
[▲] button
- Ejects a CD when it is loaded into the unit.
[D] button
- Switch the display indication (Main display, clock display).
MP3 FUNCTION-DISPLAY SELECTION
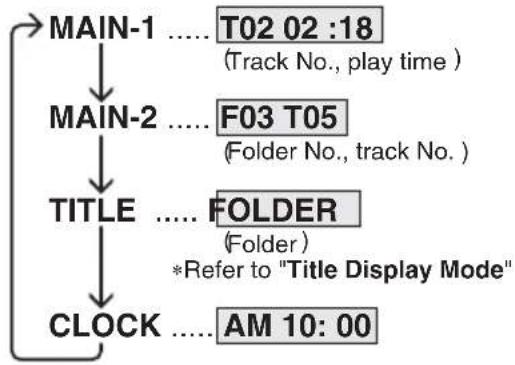
- Display changes in the following order: Track No. / Play time → Folder No. / Track No. → Title Display → Clock Display → Track No. / Play time...
- Long press to enter adjustment mode.
[SCN] button
- Performs scan play for 10 seconds for each track while in the CD mode.
[RPT] button
- Plays repeatedly while in the CD mode.
[RDM] button
• Performs random play while in the CD mode.
[UP] button
- Play first track of next folder which contain MP3 files.: * Key function only available after MP3 indicator turned on.
[DN] button
- Play first track of previous folder which contain MP3 files.
- Key function only available after MP3 indicator turned on.
[DIRECT] button
- Stores a station into memory or recall it directly while in the radio mode.
[ISR] button
• Recalls ISR radio station in memory.
- Press and hold for 2 seconds or longer: Stores current station into ISR memory (radio mode only).
[T] button
• Switches MP3 TITLE display.
- Press and hold for 1 second to scroll display data.
[BND] button
- Switches the band, or seek tuning or manual tuning while in the radio mode.
- Plays a first track while in the CD mode.
- Press and hold the button to select between CD-DA playback and MP3 playback in Multisession CD.
[ROTARY] knob
- Adjust the volume by turning the knob clockwise or counterclockwise.
- Use the knob to perform various settings.
[SRC] button
- Press the button to turn on the power. Press and hold the button for 1 second or longer to turn off the power. - Switches the operation mode among radio and CD/MP3 mode.
[A-M] button
- Press and hold the button for 1 second or longer to switch the MAGNA BASS EX on/off.
- Use the button to switch to the audio mode (bass/treble, balance/fader)
[Z] button
- Use the button to select one of the three types of sound characteristics already stored in memory. (Z-Enhancer)
[◀], [▶] button
- Selects a station while in the radio mode or selects a track when listening to a CD.
- Press and hold the button for 1 second or longer to switches the fast-forward/fast-backward.
4.PRECAUTIONS
-
When the inside of the car is very cold and the player is used soon after switching on the heater, moisture may form on the disc or the optical parts of the player and proper playback may not be possible. If moisture forms on the disc, wipe it off with a soft cloth. If moisture forms on the optical parts of the player, do not use the player for about one hour and the condensation will disappear naturally to allow normal operation.
-
Driving on extremely bumpy roads which cause severe vibration may cause the sound to skip.
- This unit uses a precision mechanism. Even in the event that trouble arises, never open the case, disassemble the unit, or lubricate the rotating parts.
This equipment has been tested and found to comply with the limits for a Class B digital device, pursuant to Part 15 of the FCC Rules.
These limits are designed to provide reasonable protection against harmful interference in a residential installation.
This equipment generates, uses, and can radiate radio frequency energy and, if not installed and used in accordance with the instructions, may cause harmful interference to radio communications. However, there is no guarantee that interference will not occur in a particular installation.
If this equipment does cause harmful interference to radio or television reception, which can be determined by turning the equipment off and on, the user is encouraged to consult the dealer or an experienced radio/TV technician for help.
CAUTION
USE OF CONTROLS, ADJUSTMENTS, OR PERFORMANCE OF PROCEDURES OTHER THAN THOSE SPECIFIED HEREIN, MAY RESULT IN HAZARDOUS RADIATION EXPOSURE.
THE COMPACT DISC PLAYER SHOULD NOT BE ADJUSTED OR REPAIRED BY ANYONE EXCEPT PROPERLY QUALIFIED SERVICE PERSONNEL.
INFORMATION FOR USERS:
CHANGES OR MODIFICATIONS TO THIS PRODUCT NOT APPROVED BY THE MANUFACTURER WILL VOID THE WARRANTY AND WILL VIOLATE FCC APPROVAL.
MODEL
DB355MP
clarion
12V

GROUND
AM 530-1710kHz/FM 87.9-107.9MHz
THIS DEVICE COMPLIES WITH PART 15 OF THE FCC RULES. OPERATION IS SUBJECT TO THE FOLLOWING TWO CONDITIONS: (1) THIS DEVICE MAY NOT CAUSE HARMFUL INTERFERENCE, AND (2) THIS DEVICE MUST ACCEPT ANY INTERFERENCE RECEIVED, INCLUDING INTERFERENCE THAT MAY CAUSE UNDESIRED OPERATION.
THIS PRODUCTION COMPLIES WITH DHHS RULES 21 CFR SUBCHAPTER J APPLICABLE AT DATE OF MANUFACTURE.
CLARION CO.,LTD.
50 KAMITODA, TODA-SHI, SAITAMA-KEN, JAPAN.
MANUFACTURED:
SERIAL No.
PE-2737B
286-6549-00
Clarion Co., Ltd.
MADE IN MALAYSIA
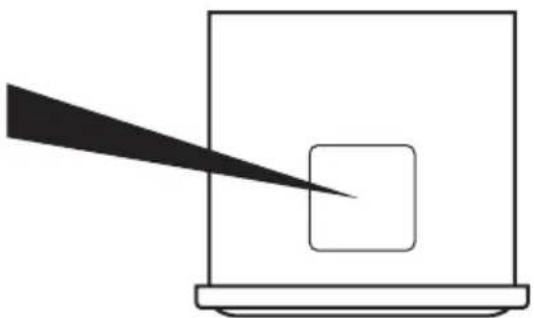
natural_image
Simple line drawing of a laptop with a screen showing a square and a diagonal arrow pointing to it (no text or symbols)Bottom View of Source Unit
5. HANDLING COMPACT DISCS
This unit has been designed specifically for playback of compact discs bearing the COMPACT DISC mark. No other discs can be played.
To remove the compact disc from its storage case, press down on the center of the case and lift the disc out, holding it carefully by the edges.
Removing the disc
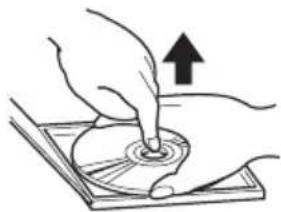
natural_image
Illustration of hands using a tool to press or install a circular component, with an upward arrow indicating motion (no text or symbols present)Proper way to hold the compact disc
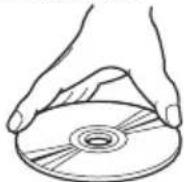
Always handle the compact disc by the edges. Never touch the surface.
To remove fingermarks and dust, use a soft cloth, and wipe in a straight line from the center of the compact disc to the circumference.
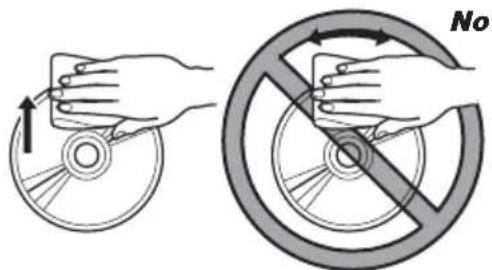
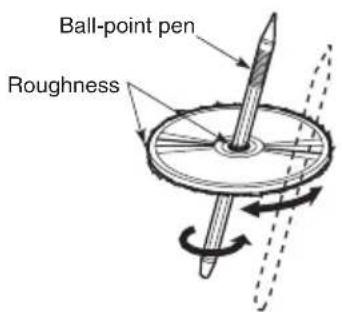
New discs may have some roughness around the edges. The unit may not work or the sound may skip if such discs are used. Use a ball-point pen, etc. to remove roughness from the edge of the disc.
Note on compact discs
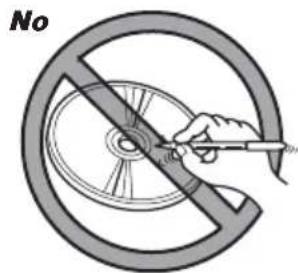
Never stick labels on the surface of the compact disc or mark the surface with a pencil or pen.
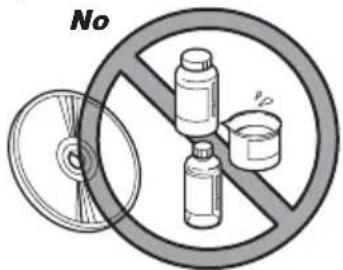
Do not use any solvents such as commercially available cleaners, anti-static spray, or thinner to clean compact discs.
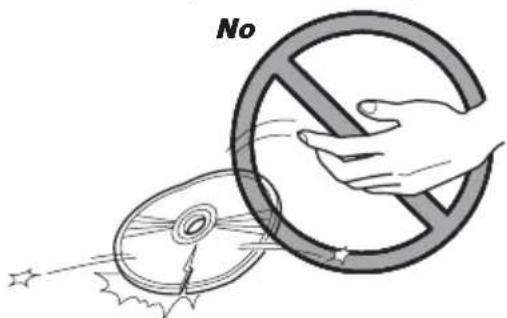
Do not use compact discs that have large scratches, are misshapen, or cracked, etc. Use of such discs will cause misoperation or damage.
Do not expose compact discs to direct sunlight or any heat source.
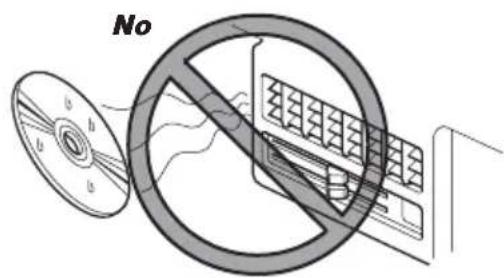
Note:
- Do not use commercially available CD protection sheets or discs equipped with stabilizers, etc. These may get caught in the internal mechanism and damage the disc.
6.DCP (Detachable Control Panel)
The control panel can be detached to prevent theft. When detaching the control panel, store it in the DCP (Detachable Control Panel) case to prevent scratches.
We recommend taking the DCP with you when leaving the car.
Removing the DCP
- Press the [SRC] button for 1 second or longer to switch off the power.
- Press in the [RELEASE] button.
![[RELEASE]button Time PCR is created by](/content/2026/05/1056622/images/c0d636102cedae87ed2514a6ca58ac31a279449944703f90d9e0ea5db12c9b7d.jpg)
* The DCP is unlocked
- Remove the DCP.
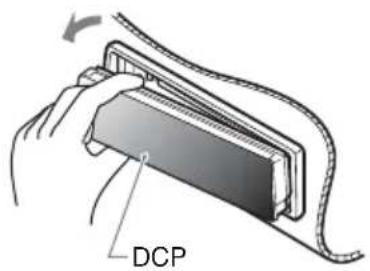
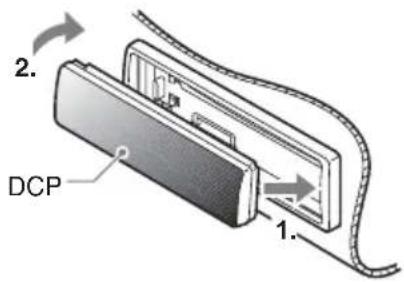
Attaching the DCP
- Insert the right side of the DCP into the main unit.
- Insert the left side of the DCP into the main unit.
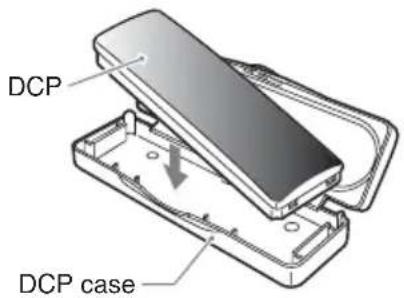
Storing the DCP in the DCP case
Hold the DCP, in the orientation as shown in the figure below, and put it into the supplied DCP case. (Ensure the DCP is in the correct orientation.)
CAUTION
- The DCP can easily be damaged by shocks. After removing it, be careful not to drop it or subject it to strong shocks.
- When the Release button is pressed and the DCP is unlocked, the car's vibrations may cause it to fall. To prevent damage to the DCP, always store it in its case after detaching it. (See figure above.)
- The connector connecting the main unit and the DCP is an extremely important part. Be careful not to damage it by pressing on it with fingernails, pens, screwdrivers, etc.
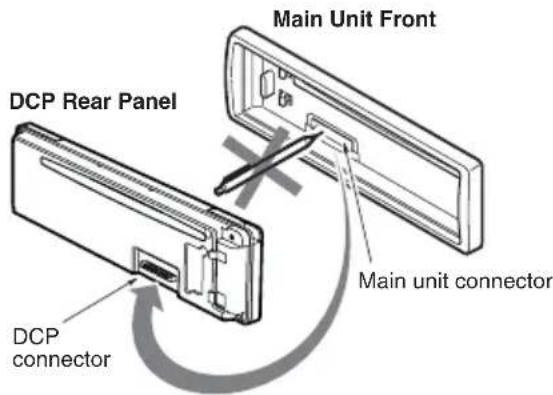
Note:
- If the DCP is dirty, wipe off the dirt with a soft, dry cloth only.
7.REMOTE CONTROL
![Signal transmitter [ SRC ] SRC BND POWER VOLUME SEARCH DISC UP TOP [ BND ] [ ▶ II ] [ ▲ ], [ ▼ ] [ ◀◀], [ ▶▶ ] [MUTE] MUTE ISR DISP [ DISP ] [ ISR ] SCN RPT RDM TV/VTR [RDM] [ RPT ] [ SCN ] clarion • WIRELESS REMOTE CONTROLLER •](/content/2026/05/1056622/images/d587ce0dd79c2a1f6ce82a2463a1956418051e562f5140204738b0bc8cb2c2f5.jpg)
Inserting the Battery
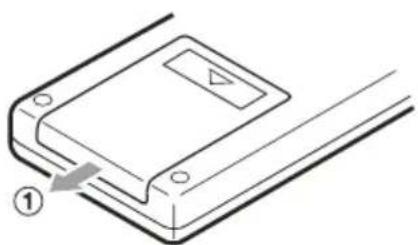
- Turn over the remote control unit and slide the cover in the direction indicated by the arrow in the illustration.
- Insert the battery (CR2025) into the insertion guides, with the printed side (+) facing upwards.
- Press the battery in the direction indicated by the arrow so that it slides into the compartment.
- Replace the cover and slide in until it clicks into place.
Notes:
Misuse may result in rupture of the battery, producing leakage of fluid and resulting in personal injury or damage to surrounding materials. Always follow these safety precautions:
• Use only the designated battery.
- When replacing the battery, insert properly, with +/- polarities oriented correctly.
- Do not subject battery to heat, or dispose of in fire or water. Do not attempt to disassemble the battery.
- Dispose of used batteries properly.
natural_image
Diagram of a device with a labeled component and directional arrow, no readable text or symbols present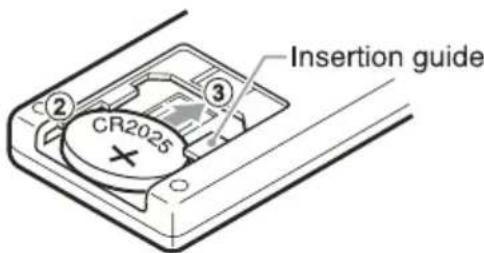
Functions of Remote Control Unit Buttons
| ModeButton | Radio CD | MP3 | |
| [ SRC ] | Turns power on and off. When press and held for 1 second: Turns power off.Switches between radio and CD/MP3. | ||
| [BND] | Switches reception band. | Plays the first track.Top play. | Plays the first track of the current folder. |
| [▲], [▼] | Increases and decreases volume (in all modes). | ||
| [◀], [▶] | Moves preset channels up and down. | Moves tracks up and down.When pressed and held for 1 second: Fast-forward/fast-backward. | |
| [▶II] | Turns mute on and off | Switches between playback and pause. | |
| [MUTE] | Turns mute on and off. | Switches between playback and pause. | |
| [ISR] | Recalls ISR radio station in memory.Press and hold for 2 seconds or longer: Stores current station into ISR (radio mode only). | ||
| [DISP] | Switches among main display, clock display. | Switch among main display, folder number display, TITLE display, clock display. | |
| [SCN] | Preset scan.When pressed and held for 1 second: Auto store. | Scan play. | Scan play.When pressed and held for 1 second: Folder scan. |
| [RPT] | No function | Repeat play. | Repeat play.When pressed and held for 1 second: Folder repeat. |
| [RDM] | No function | Random play. | Random play.When pressed and held for 1 second: Folder random. |
* Some of the corresponding buttons on the main unit and remote control unit have different functions.
8. OPERATIONS
Basic Operations
Note: Be sure to read this chapter referring to the front diagrams of chapter "2. CONTROLS" on page 3.
CAUTION
Be sure to lower the volume before switching off the unit power or the ignition key. The unit remembers its last volume setting. If you switch the power off with the volume up, when you switch the power back on, the sudden loud volume may hurt your hearing and damage the unit.
Turning on/off the power
Note:
- Be careful about using this unit for a long time without running the engine. If you drain the car's battery too far, you may not be able to start the engine and this can reduce the service life of the battery.
- Press the [SRC] button.
- The illumination and display on the unit light up. The unit automatically remembers its last operation mode and will automatically switch to display that mode.
- Press and hold the [SRC] button for 1 second or longer to turn off the power for the unit.
Selecting a mode
- Press the [SRC] button to change the operation mode.
- Each time you press the [SRC] button, the operation mode changes in the following order: Radio mode → CD mode → Radio mode...
Note:
- If the CD mode is selected when no disc is inserted, the display shows "NO DISC".
Adjusting the volume
Turning the [ROTARY] knob clockwise increases the volume; turning it counterclockwise decreases the volume.
* The volume level is from 0 (minimum) to 33 (maximum).
Setting the Z-Enhancer
This unit are provided with 3 types of sound tone effects stored in memory. Select the one you prefer.
* The factory default setting is Z-EHCR OFF.
Each time you press the [Z] button, the tone effect changes in the following order:
Z-ENHANCER 1 → Z-ENHANCER 2 → Z-ENHANCER 3 → Z-EHCR OFF → Z-ENHANCER 1...
• Z-ENHANCER 1 : bass emphasized
• Z-ENHANCER 2 : treble emphasized
• Z-ENHANCER 3 : bass and treble emphasized
• Z-EHCR OFF : no sound effect
Audio mode adjustments
Press the [A-M] button to select the adjustment mode. The mode switches as follows each time the [A-M] button is pressed:
BASS → TREB → BAL → FAD → Previous mode
* The display returns to the previous mode 7 seconds after the adjustment.
Adjusting the bass
- Press the [A-M] button and select "BASS".
- Turning the [ROTARY] knob clockwise emphasizes the bass; turning it counterclockwise attenuates the bass.
* The factory default setting is "0". (Adjustment range: -7 to +7)
Adjusting the treble
- Press the [A-M] button and select "TREB".
- Turning the [ROTARY] knob clockwise emphasizes the treble; turning it counterclockwise attenuates the treble.
* The factory default setting is "0". (Adjustment range: -7 to +7)
Adjusting the balance
- Press the [A-M] button and select "BAL".
- Turning the [ROTARY] knob clockwise emphasizes the sound from the right speaker; turning it counterclockwise emphasizes the sound from the left speaker.
* The factory default setting is "0". (Adjustment range: L13 to R13)
Adjusting the fader
- Press the [A-M] button and select "FAD".
- Turning the [ROTARY] knob clockwise emphasizes the sound from the front speakers; turning it counterclockwise emphasizes the sound from the rear speakers.
* The factory default setting is "0". (Adjustment range: F12 to R12)
Note:
- Bass and Treble can only be adjusted when the "Z-enhancer" is off.
Turning on/off MAGNA BASS EX
The MAGNA BASS EX does not adjust the low sound area like the normal sound adjustment function, but emphasizes the deep bass sound area to provide you with a dynamic sound.
* The factory default setting is off.
Press and hold the [A-M] button for 1 second or longer to turn the MAGNA BASS EX and "M-B EX" in the display lights on or off.
Switching display
Press the [D] button to select the desired display. The display switches in the following order:
Main Display → Clock Display → Main Display ...
* If the display is changed by other button operation when the clock is displayed, the clock display returns automatically after the operation.
Illumination dimmer function
When the illumination line of this unit is connected with the car-side illumination signal line, the display illumination of this unit dims in connection with turning on the car-side illumination.
ADJ mode adjustment
- Press [D] button more than 1 second at POWER ON mode to enter ADJ mode, the previous selected ADJ items will be called out.
- Press [D] button again at ADJ mode will cancel ADJ mode and return to previous display.
- Press [SRC] button will also release ADJ mode.
-
ADJ mode will also be released when current source mode is changed. (Mode changes of LOADING, EJECT, interruption and interruption release)
-
Press [◀]/[▶] button to switch the ADJ mode items,

- The ADJ Mode Title will be displayed for 2 seconds before showing the ADJ Mode setting.
Adjusting clock setting
- Press the [D] button and press [◀]/[▶] button to select "CLOCK (E)".
- Press [▶II] button to start clock adjustment, the HOUR is selected and blinking by default.
- Press[◀]/[▶] button to toggle HOUR and MINUTE selection.
- Turn the [ROTARY] knob clockwise to increases hour/minute or counterclockwise to decrease hour/minute.
- Press [▶II] button to confirm the clock setting, the clock will blink for 2 seconds and return to "CLOCK(E)".
Note:
- If you remove the vehicle's battery for a check or repair, the clock will be reset, so you must set it again.
Adjusting screensaver setting
- Press the [D] button and press [◀]/[▶] button to select "SCRN SVR".
- "SS ON" or "SS OFF" will be displayed after 2 seconds.
- Turn the [ROTARY] knob clockwise to turn on the screensaver or counterclockwise to turn off the screensaver.
- If Screensaver setting is set to on, Screensaver will be activated after 30 seconds no key operation.
Adjusting auto-scroll setting
- Press the [D] button and press [◀]/[▶] button to select "A-SCROLL".
- "SCRL ON" or "SCRL OFF" will be displayed after 2 seconds.
- Turn the [ROTARY] knob clockwise to turn on the auto-scroll or counterclockwise to turn off the auto-scroll.
- If Auto-Scroll setting is set to on, the MP3 Title will scroll continuously in MP3 Title Display Mode.
FM reception
For enhanced FM performance the MAGI-TUNE ^® tuner includes signal actuated stereo control and multipath noise reduction circuits.
Listening to the radio
- Press the [SRC] button and select the radio mode. then the radio will be on.
- To select a preset band, press the [BND] button, then select one of the preset bands such as FM1, FM2, FM3 or AM. Every time the [BND] button is pressed, the display will change as:
F1 → F2 → F3 → AM → F1...
- Press the [◀] or [▶] button to tune in the desired station.
Manual tuning
- Press the [BND] button to select the desired band FM1, FM2, FM3 or AM.
- Press and hold the [BND] button for 1 second or longer, then the "MANU" is lit in the display, which means that a manual selection function is on.
- Press the [◀] or [▶] button to manually tune in a station.
Seek tuning
- Press the [BND] button to select the desired band FM1, FM2, FM3 or AM.
- If the "MANU" is lit in the display, press and hold the [BND] button for 1 second or longer. When the "MANU" display is off, the seek tuning is now available.
- Press the [◀] or [▶] button to automatically seek in a station.
Preset memory function
Preset memory function can store up to 24 stations: six stations for each of FM1, FM2, FM3 and AM.
Manual memory function
- Press the [BND] button, to select a band you want to store in the memory.
- Press the [◀] or [▶] button to tune into a desired station.
- Press and hold one of the [DIRECT] button for 2 seconds or longer to store the current station into preset memory.
Auto store function (Automatic Station Store)
-
Press [BND] button to select the desired band FM1, FM2, FM3 or AM.
-
Press and hold the [▶II] button for 1 second or longer. The stations at which the reception is the strongest will be automatically stored in the memory.
Notes:
- When the auto store is performed, the station previously store in the memory at that position is overwritten.
- When the number of stations stored is less than six, the previous content of the memory for each direct button will be retained.
Preset scanning (Preset Station Scan)
When the [▶II] button is pressed, the "SCN" will be indicated with preset memory numbers and the stations are tuned in for 7 seconds each in the order in which they were stored. Press the [▶II] button again to cancel the preset scanning mode.
Instant station recall (ISR)
With this function, a specific radio station can be recalled from any mode.
ISR memory
- Press the [SRC] button, then select the radio mode.
- Select the radio station which you want to store in the memory.
- Press and hold the [ISR] button for 2 seconds or longer.
Recalling ISR
Press the [ISR] button and the display will show "ISR". Then the radio station previously memorized will be selected. Press the [ISR] button again to disengage the unit from the Recalling ISR function.
Loading a CD
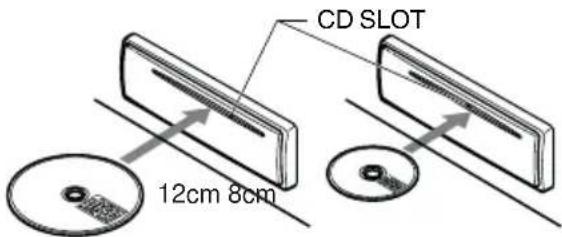
Insert a CD into the center of the CD insertion slot with the labeled side facing up. "LOADING" appears in the display, the CD enters into the slot and start playing.
Notes:
- Do not put your hand, fingers, or foreign objects into the CD insertion slot.
- If a CD has already been loaded, another CD cannot be inserted. Do not insert another one forcefully.
- Discs not bearing the disc mark cannot be played with the unit. CD-ROMs cannot be played.
- Some CDs recorded in CD-R/CD-RW mode may not be usable.
Loading 8cm compact discs:
- No adapter is required to play an 8cm CD.
- Insert the 8cm CD into the centre of the insertion slot.
Listening to the disc already inserted
Press the [SRC] button to select the CD mode, the CD will start playing.
Stopping (Pausing) playback
While the CD playing pressing the [▶II] button will stop the CD and "PAUSE" indicate.
Press the [▶II] button again to resume play-back.
Ejecting the CD
Press the [▲] button, then the CD will be ejected.
Note:
- If the ejected CD is left as it is, it will be reloaded after 15 seconds.
- 8cm CDs are not auto reloaded. Be sure to remove them when ejected.
Top function
Press the [BND] button, then the CD will start playing from the first song (track number 1).
* For MP3 mode, it will start playing from the first song of current folder.
Selecting tracks (Songs)
Press the [◀] or [▶] button.
: Playback will start from the next track.
◀ : Playback will start from the beginning of the track currently playing. When this button is pressed again, the CD will play from the previous track.
* For MP3 mode, track selection is only valid in current folder.
Fast-forward and fast-backward
Press and hold the [◀] or [▶] button.
: To fast-forward
◀ : To fast-backward
* For Audio CD mode pressing the [◀] or [▶] button for 1 second or longer will move forward or backward 5 times faster than normal play, and pressing it for 3 seconds or longer will do the operation 30 times faster.
* For MP3 mode, pressing the [◀] or [▶] button for 1 second or longer will move forward or backward 10 times faster than normal play.
Scan play (Intro Music Scan)
At Audio CD press the [SCN] button, the "SCN" is lit & display shows "TRK SCN", then the CD will play the first 10 seconds of each track of the whole disc. Press the [SCN] button again to disengage the unit from scan play.
* A scan play will start from the track following the one currently playing.
Repeat play
At Audio CD press the [RPT] button, the "RPT" is lit & display shows "TRK RPT", then the track currently playing will be played repeatedly. Press the [RPT] button again to disengage the unit from repeat play.
Random play
At Audio CD press the [RDM] button, the "RDM" is lit & display shows "TRK RDM", then the entire tracks on the disc will be played at random. Press the [RDM] button again to disengage the unit from random play.
What is MP3?
MP3 is an audio compression method and classified into audio layer 3 of MPEG standards. This audio compression method has penetrated into PC users and become a standard format. This MP3 features the original audio data compression to about 12 percent of its initial size with a high quality sound. This means that about 10 music CDs can be recorded on a CD-R disc or CD-RW disc to allow a long listening time without having to change CDs.
Precautions when creating MP3 disc
- File extensions
- Always add a file extension ".MP3" to MP3 file by using single byte letters. If you add a file extension other than specified or forget to add the file extension, the file cannot be played.
- Logical format (File system)
- When writing MP3 file on a CD-R disc or CD-RW disc, please select "ISO9660 level 1, 2, 3 or JOLIET or Romeo" as the writing software format. normal play may not be possible if the disc is recorded on another format. - The folder name and file name can be displayed as the title during MP3 play but the title must be within 16 (Folder Name) or 28 (File Name) single byte alphabetical letters and numerals (excluding an extension).
● Number of files or folders
- The MP3 recording media reproducible on this unit has the following limitations :
- Maximum number of files : 254
- Maximum number of folders : 128
- Some noise may occur depending on the type of encoder software used while recording.
Folder up down function
- This function enables you to search for a folder on the MP3 CD. The LCD will show the target MP3 CD folder.
[UP] - Folder up
[DN] - Folder down
- When a desired folder is selected, the MP3 CD player will play 1st track of target folder.
Note:
- The folder which contents of no MP3 file will be skipped.
MP3 playing order
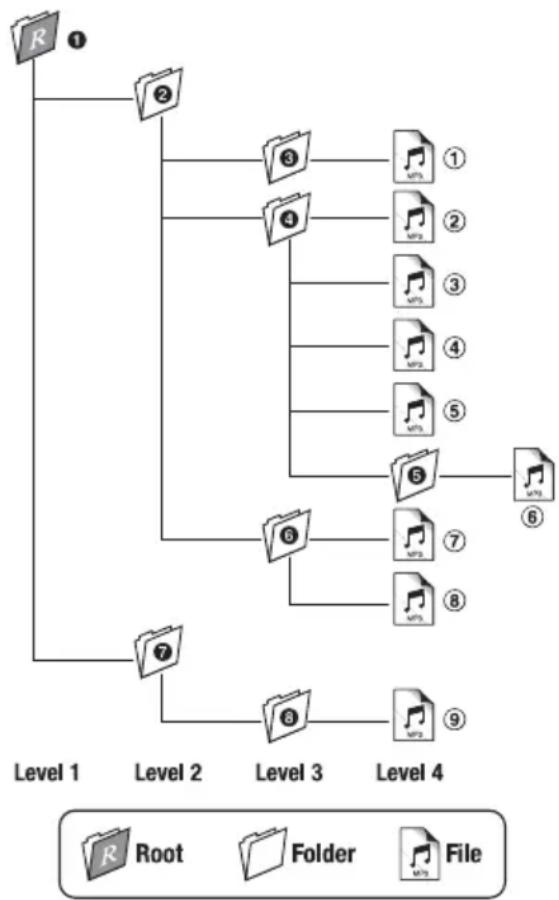
When selected for play folder up down functions, files and folders are accessed in the order in which they were written by the CD-ROM writer.
Because of this, the order in which they are expected to be played may not match the order in which they are actually played. You may be able to set the order in which MP3 are to be played by writing them onto a medium such as a CD-R with their file names beginning with play sequence numbers such as "01" to "99", depending on your CD writer.
For example, a medium with the following folder/file hierarchy is shown below.
Example of a medium's folder/file hierarchy
flowchart
graph TD
    R["Root"] --> 1["1"]
    1 --> 2["2"]
    2 --> 3["3"]
    2 --> 4["4"]
    2 --> 5["5"]
    2 --> 6["6"]
    2 --> 7["7"]
    7 --> 8["8"]
    8 --> 9["9"]
    style R fill:#f9f,stroke:#333
    style 1 fill:#ccf,stroke:#333
    style 2 fill:#cfc,stroke:#333
    style 3 fill:#fcc,stroke:#333
    style 4 fill:#cff,stroke:#333
    style 5 fill:#ffc,stroke:#333
    style 6 fill:#cfc,stroke:#333
    style 7 fill:#fcc,stroke:#333
    style 8 fill:#ffc,stroke:#333
    style 9 fill:#fcc,stroke:#333
Random MP3 CD
- This function enables you to play all the tracks in the MP3 folder or on the disc in random order.
- There are 2 types of random play accessible for MP3 CDs; Random track and Random all folders.
| Random access | Function | Display | Indicator |
| Press the [RDM] button less than 1 second | Random track in current folder only | "TRK RDM" | "RDM" |
| Press the [RDM] button more than 1 second | Random track in all folders | "FLDR RDM" | "ALL"& "RDM" |
- Each time the button is pressed, random play turns on or off.
Repeat MP3 CD
- This function enables you to replay the track or folder you are listening to.
- There are 2 types of repeat play accessible for MP3 CD; Repeat track and Repeat current folder.
| Repeat access In | Eriation | Display | |
| Press the [RPT] button less than 1 second | Repeat current song | "TRK RPT" | "RPT" |
| Press the [RPT] button more than 1 second | Repeat current folder | "FLDR RPT" | "ALL"& "RPT" |
- Each time the button is pressed, repeat play turns on or off.
Scan MP3 CD
- This function enables you to play the first 10 seconds of each track in the MP3 folder or the first track of each folder.
- There are 2 types of scan play accessible for MP3 CD; Scan track and Scan all folders.
| Repeat access | Information | Display | |
| Press the [SCN] button less than 1 second | Scan in current folder | "TRK SCN" | "SCN" |
| Press the [SCN] button more than 1 second | Scan first track of each folder | "FLDR SCN" | "ALL"& "SCN" |
- Each time the button is pressed, scan play turns on or off.
Display selection
- You can choose the display type for MP3 CD by pressing the [D] button.
To select the next type, press the [D] button again.
The arrangement is shown below.
flowchart
graph TD
    A["MAIN-1 .... T02 02 :18\n(Track No., play time)"] --> B["MAIN-2 .... F03 T05\n(Folder No., track No.)"]
    B --> C["TITLE .... FOLDER\n(Folder)\n*Refer to "Title Display Mode""]
    C --> D["CLOCK .... AM 10:00"]
Title display mode
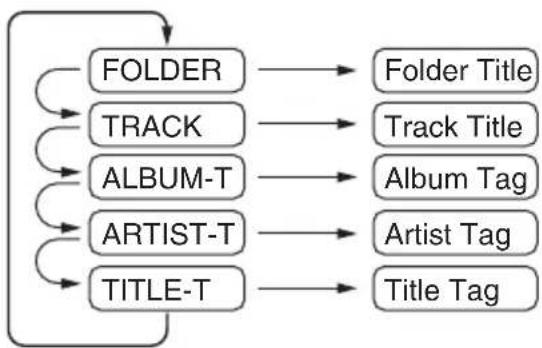
- There are 5 types of display for the Title Display mode.
- To select the next type, press the [T] button for less than 1 second.
The arrangement is shown below.
After 2 seconds
flowchart
graph TD
    A["FOLDER"] --> B["Folder Title"]
    C["TRACK"] --> D["Track Title"]
    E["ALBUM-T"] --> F["Album Tag"]
    G["ARTIST-T"] --> H["Artist Tag"]
    I["TITLE-T"] --> J["Title Tag"]
    A --> C
    C --> E
    E --> G
    G --> I
- The displayed item can be scrolled by pressing the [T] button for more than 1 second.
- If a MP3 file does not support for ID3 TAG, the display will show "NO TAG"
- If a MP3 file encode with ID3 TAG header but no consist of any TAG information, the display will show nothing.
Note:
- The folder name will be displayed as "ROOT" which the file allocates in the root folder.
- The MP3 player decodes each file ID3 TAG ver 2 by default, if ID3 TAG ver 2 is unavailable, ID3 TAG ver 1 will be decoded.
- UNICODE ID3 (Chinese, Japanese and etc) is not supported.
CD-DA/MP3 selection on Multi-Session CD
- If a multi-session CD which contains CD-DA and MP3 files is being inserted, user can select either CD-DA or MP3 files to be played.
- Default setting for files to be played on multi-session CD is CD-DA files.
- Press the [BND] button for more than 1 second will toggle between selection of CD-DA and MP3 files to be played.
- When CD-DA type is selected, display will show "M-S CD". When MP3 type is selected, display will show "M-S MP3".
- CD-DA/MP3 Selection function can only be performed in CD/MP3 mode. It will only activate after re-insert CD. For example, current setting is CD-DA type. Press [BND] button for more than 1 second to set MP3 type. User has to eject CD and re-insert it again as to play MP3 files.
- Types of recording that can be played are as follows.
| SettingDisc | Set to CD | Set to MP3 |
| Mixed with CD and MP3 type tracks | Play CD | Play MP3 |
| CD type track only P | Play CDPlay CD | |
| MP3 type track only | Play MP3Play | MP3 |
- When a mixed mode CD is loaded and CD is set, the track to be played first is MP3 file data and no sound is heard.
9.TROUBLESHOOTING
| Problem Cause Solution | ||
| Power does not turn on. (No sound is produced) | Fuse is blown. | Replace with a fuse of the same amperage. If the fuse blows again, consult your store of purchase. |
| Incorrect wiring. | Consult your store of purchase. | |
| Compact disc cannot be loaded. | Another compact disc is already loaded. | Eject the compact disc before loading the new one. |
| Sound skips or is noisy. | Compact disc is dirty. | Clean the compact disc with a soft cloth. |
| Compact disc is heavily scratched or warped. | Replace with a compact disc with no scratches. | |
| Sound is bad directly after power is turned on. | Water droplets may form on the internal lens when the car is parked in a humid place. | Let dry for about 1 hour with the power on. |
| Nothing happens when button are pressed. Display is not accurate. | The microprocessor has malfunctioned due to noise, etc. | Turn off the power, then press the [RELEASE] button and remove the DCP. Press the reset button for about 2 seconds with a thin rod.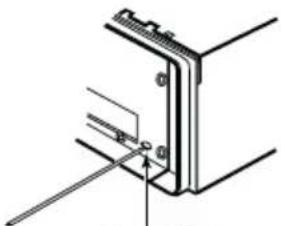 Reset button Reset button |
| DCP or main unit connectors are dirty. | Wipe the dirt off with a soft cloth moistened with cleaning alcohol. |
10.ERROR DISPLAYS
■ To protect the system, this unit has been equipped with self diagnostic functions. If a fault arises, a warning is issued by various error displays. Follow the corrective measures and remove the fault.
| Error Display Corrective Measure | |
| ERROR 2 | This error display indicates that a fault has arisen in the mechanism of the source unit (for example, the disc cannot be ejected).→ Check the source unit. |
| ERROR 3 | This error display indicates that the pickup focus is off because of a scratched disc or some other factor during source unit play.→ Check the compact disc. |
| ERROR 6 | This indicates that the CD's TOC (table of contents) cannot be read, for example because the selected disc is upside-down. |
11.SPECIFICATIONS
FM tuner
Frequency Range: 87.9 MHz to 107.9 MHz
Usable Sensitivity: 11 dBf
50 dB Quieting Sensitivity: 17 dBf
Alternate Channel Selectivity: 75 dB
Stereo Separation (1 kHz): 35 dB
Frequency Response ( ±3 dB): 30 Hz to 15 kHz
AM tuner
Frequency Range:
AM 530 kHz to 1710 kHz
Usable Sensitivity: 25 V
CD player
System: Compact disc audio system
Usable Discs: Compact disc
Frequency Response: 10 Hz to 20 kHz (±1 dB)
Signal-to-Noise Ratio: 100 dB (1 kHz) IHF-A
Dynamic Range: 95 dB (1 kHz)
Harmonic Distortion: 0.01%
MP3
Decode Format: MPEG 1,2 and 2.5 -Layer 3
Sampling rate (kHz): MPEG-1: 32,44.1,48
MPEG-2: 16,22.05,24
MPEG-2.5: 8,11.025,12
Bit-rate (kbps): 8, 16, 24, 32, 40, 48, 56, 64, 80,
96, 112, 128, 144, 160, 192, 224
256, 320, VBR
CD-ROM Format: ISO9660 Level 1, 2, Romeo and Joliet
Folder Level Limit: No limitation
Folder Support: 128
File Support: 254
Folder Name: Maximum 16 characters
File Name: Maximum 28 characters
Audio
Maximum Power Output: 204 W (51 W X 4 ch)
Continuous Average Power Output:
17 W X 4, into 4 Ω, 20 Hz to 20 kHz, 1%THD
Bass Control Action (100 Hz): ±14 dB
Treble Control Action (10 kHz): ±14 dB
Line Output (with A/C 1 kHz, 10 kΩ): 1.8 V
General
Power Supply Voltage:
14.4 V DC (10.8 V to 15.6 V allowable), negative ground
Current Consumption: Less than 15 A
Speaker Impedance: 4 Ω (4 Ω to 8 Ω allowable)
Weight: 2.42 lb. (1.1 kg)
Dimensions:
178 mm Width X 50 mm Height X 152 mm
Depth
Notes:
- Specifications comply with JEITA Standards.
- Specifications and design are subject to change without notice for further improvement.
- Please make sure when connecting external power amplifier, that you properly, to the car chassis, ground the amplifier.
- If this is not done, severe damage to the source unit may happen.
Clarion Co., Ltd.
All Rights Reserved. Copyright © 2004: Clarion Co., Ltd. Printed in Malaysia / Imprimé en Malaisie / Impreso en Malasia
- FEATURES
- Names of the Buttons and their Functions
- [RELEASE] button
- [▶] button
- [SENSOR] button
- [CD SLOT]
- [▲] button
- [D] button
- [SCN] button
- [RPT] button
- [RDM] button
- [UP] button
- [DN] button
- [DIRECT] button
- [ISR] button
- [T] button
- [BND] button
- [ROTARY] knob
- [SRC] button
- [A-M] button
- [Z] button
- [◀], [▶] button
- 4.PRECAUTIONS
- CAUTION
- INFORMATION FOR USERS:
- DB355MP
- HANDLING COMPACT DISCS
- Note on compact discs
- Note:
- 6.DCP (Detachable Control Panel)
- Removing the DCP
- Attaching the DCP
- Storing the DCP in the DCP case
- 7.REMOTE CONTROL
- Inserting the Battery
- Notes:
- OPERATIONS
- Basic Operations
- Turning on/off the power
- Selecting a mode
- Adjusting the volume
- Setting the Z-Enhancer
- Z-ENHANCER 1 → Z-ENHANCER 2 → Z-ENHANCER 3 → Z-EHCR OFF → Z-ENHANCER 1...
- Audio mode adjustments
- BASS → TREB → BAL → FAD → Previous mode
- Adjusting the bass
- Adjusting the treble
- Adjusting the balance
- Adjusting the fader
- Turning on/off MAGNA BASS EX
- Switching display
- Illumination dimmer function
- ADJ mode adjustment
- Adjusting clock setting
- Adjusting screensaver setting
- Adjusting auto-scroll setting
- FM reception
- Listening to the radio
- Manual tuning
- Seek tuning
- Preset memory function
- Manual memory function
- Auto store function (Automatic Station Store)
- Preset scanning (Preset Station Scan)
- Instant station recall (ISR)
- ISR memory
- Recalling ISR
- Loading a CD
- Loading 8cm compact discs:
- Listening to the disc already inserted
- Stopping (Pausing) playback
- Ejecting the CD
- Top function
- Selecting tracks (Songs)
- Fast-forward and fast-backward
- Scan play (Intro Music Scan)
- Repeat play
- Random play
- What is MP3?
- Precautions when creating MP3 disc
- - File extensions
- - Logical format (File system)
- ● Number of files or folders
- Folder up down function
- MP3 playing order
- Random MP3 CD
- Repeat MP3 CD
- Scan MP3 CD
- Display selection
- Title display mode
- CD-DA/MP3 selection on Multi-Session CD
- 9.TROUBLESHOOTING
- 10.ERROR DISPLAYS
- 11.SPECIFICATIONS
- FM tuner
- AM tuner
- CD player
- MP3
- Audio
- General
- Clarion Co., Ltd.
Brand : CLARION
Model : DB355MP
Category : Hi-Fi System