
XA311 - Hi-Fi System CLARION - Free user manual and instructions
Find the device manual for free XA311 CLARION in PDF.


| Product Type | Car Stereo Receiver (Hi-Fi System) |
| Brand | Clarion |
| Model | XA311 |
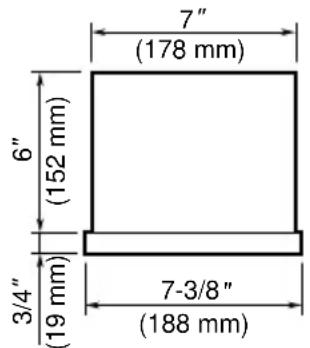
| Dimensions (W × H × D) | 7 × 2 × 6 inches (178 × 50 × 152 mm) |
| Weight | 2.87 lb (1.3 kg) |
| Power Supply Voltage | 14.4 V DC (10.8 V to 15.6 V allowable) |
| Current Consumption | Less than 10 A |
| Speaker Impedance | 4 Ω (4 Ω to 8 Ω allowable) |
| Maximum Power Output | 160 W (40 W × 4 channels) |
| Continuous Average Power Output | 15 W × 4, into 4 Ω, 20 Hz–20 kHz, 1% THD |
| FM Tuner Frequency Range (US) | 87.9 MHz to 107.9 MHz |
| AM Tuner Frequency Range (US) | 530 kHz to 1,710 kHz |
| Preset Stations | 25 (5 each for FM1, FM2, FM3, FM4, AM) |
| Tape Mechanism | Auto reverse, locking fast-forward/rewind, hard permalloy head |
| Audio Controls | Volume, Bass, Treble, Balance, Fader; Z-Enhancer with 3 modes |
| Display | Full information LCD with digital quartz clock and night illumination |
| Chassis Type | DIN chassis with ISO mounting capability |
| CD Changer Compatibility | Yes (via C-BUS interface) |
| Frequency Spacing Switchable | Yes (US: AM 10 kHz, FM 200 kHz; other: AM 9 kHz, FM 50 kHz) |
| FM Reception System | MAGI-TUNE with signal actuated stereo control and multipath noise reduction |
| Head Cleaning | Periodic cleaning with commercial head cleaner recommended |
| Safety Compliance | FCC Part 15; modifications void warranty and violate FCC rules |
Frequently Asked Questions - XA311 CLARION
User questions about XA311 CLARION
0 question about this device. Answer the ones you know or ask your own.
Ask a new question about this device
Download the instructions for your Hi-Fi System in PDF format for free! Find your manual XA311 - CLARION and take your electronic device back in hand. On this page are published all the documents necessary for the use of your device. XA311 by CLARION.
USER MANUAL XA311 CLARION
CHANGES OR MODIFICATIONS TO THIS PRODUCT NOT APPROVED BY THE MANUFACTURER WILL VOID THE WARRANTY AND WILL VIOLATE FCC APPROVAL.
1. FEATURES
Tuner
Electronic Quartz-Locked PLL Tuning
AMPH BARS-1 AM, 4 PM 20 FM95 AM Touchbutton M
20 PNS AM Tischmann Memory Seek Up/Down Tuning
Presal Station Scan (PS)
Automatic Station Store (AS)
MAGI-TUNE® FM Reception System Switchable Frequency Spacing
BANANA FRANCISCO SPACING
Tape
Auto Reversa
Lacking FF/REW
Hard Permanly Litter Gitter Head
General
Night Illumination
Digital Quartz Clock
Power ANT Turn On Trigger Full Information LCD Display
Monitor Mode
DIN Chascis
Chassis
DIN Chassis with ISO Mounting Capability
Dimansers:
7 (17mm) Width 2 (50mm) Height
6 ^th (152mm) Lcpm
Clarion Co., Ltd.
2021/1 ID-C
All Flights Reserved. Copyright © 2001: Clarion Co., Ltd.
Prepared in China: Ingrims on China: Ingrims on China
PE-1722B
280-7620-00
C-BUS

natural_image
Close-up of a textured surface with fine linear scratches (no text or symbols)Audio
Electronic Audio Controls
(Volumes/Bass/Treble/Balance/Fader)
4-Way Balance Controls 3. Estimates with 2 Months
2-Emission with 3 Mode Selector 160 W (40 W, 4) Maximum Flow
Tab 14 (46.11 - 4) Hamilton, October 25, 2017
Be sure to unfold and read the next page.
Note: De save to correct the page and rate to the next diagram as you need each chapter. Remarque: Burde digasque come from me to me at least one of these groups with your lower charge. Note: Guardo loo los canals, dispasque osta pigea y coconle los imagunes.
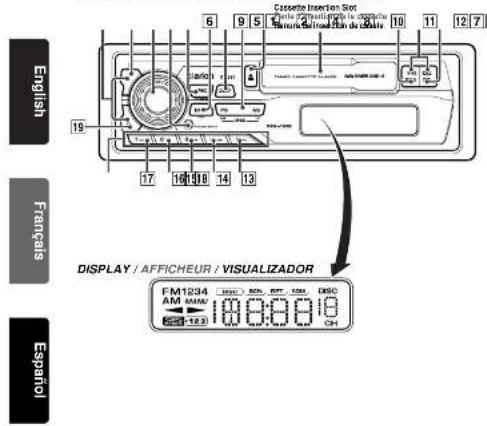
SOURCE UNIT / APPAREIL PILOTE / UNIDAD FUENTE
3. CASSETTE PRECAUTIONS AND CARE
- Tape slack can lead to operating difficulties. Remove tape slack before inserting a cassette, particularly when using C-80 or prerecorded cases.
- Use C-30 to C-90 casselles. Avoid using C-120 or longer casselles (The very thin tape may stretch or break).
-
Clean the head periodically with a good commercial head cleaner. Avoid touching the head with magnetic or hard objects.
-
Do not all the cassette mechanism.
- Always remove the cassette from the mechanism when not in use. Exposure to direct sunlight, extreme temperatures or high humidity may damage cassettes.
3
2013年1月
4
16911 33
4. BUTTON TERMINOLOGY
Note:
- Be sure to read this chapter referring to the front diagrams of chapter 2. CONTROLS on page 3 (unfold).
1 Up and Down (and) Buttons
2 Function Button 1
3 Rotary knob
4 A-M (Audio Mode) Button
5 POWER Button
FUNC (Function) Button
6 BAND (Tuning Mode) Button
7 Z-Ehcr (Z-Enhancer) Button
8 PS/AS (Preset Station Scan/Automatic Station Store) Button Disc Up and Down Button
9 Eject ▲) Button
10 REW Button
11 PROG (Program) Button
12 FF Button
13 Play/Pause (▶/II) Button
14 DISP (Display Selector) Button
15 RDM (Random play) Button
16 RPT (Repeat play) Button
17 SCN (Scan play) Button
18 Preset Buttons
19 Function Button 2
5. OPERATION
Note:
- Be sure to read this chapter referring to the front diagrams of chapter 2. CONTROLS on page 3 (unfold).
Basic Operation
CAUTION
When this unit is turned on, starting and stopping the engine of a car with its volume raised to the maximum level may harm your hearing. Be careful about adjusting the volume.
1) Press the POWER button 5.
*To turn the power off, press the POWER button for at least 1 second.
2) Press the FUNC button 5 to select another operation mode. The mode switches as follows each time the FUNC button is pressed: Radio → Tape → CD changer → Radio
*If a component is not connected, that operation mode cannot be selected.
*“CASS” appears when no tape is loaded in the source unit, and “DISC” appears when no disc is loaded in the CD changer.
Adjusting the volume
Turning the Rotary knob 3 clockwise increases the volume; turning it counterclockwise decreases the volume.
* The volume level is from 0 (minimum) to 33 (maximum).
Setting the Z-enhancer
This unit comes with 3 types of sound tone effects stored in memory. Select the one you prefer.
* The factory default setting is "OFF". Each time you press Z-EHCR button 7, the tone effect changes in the following order:
“Z-ENHANCER 1” → “Z-ENHANCER 2” → “Z-ENHANCER 3” → “OFF” → “Z-ENHANCER 1”...
• Z-ENHANCER 1 : bass emphasized
• Z-ENHANCER 2 : treble emphasized
- Z-ENHANCER 3 : bass and treble emphasized
- OFF: no sound effect
Adjusting the tone
Press A-M button 4 and select the item to adjust. Each time you press A-M button 4, the item changes in the following order:
“BASS” → “TREB” → “BAL” → “FAD” →
Function mode...
Adjusting the bass
- Press A-M button 4 and select "BASS".
- Turning the Rotary knob 3 clockwise emphasizes the bass; turning it counterclockwise attenuates the bass.
* The factory default setting is "0". (Adjustment range: -6 to +6) - When the adjustment is complete, press A-M button 4 several times until the function mode is reached.
Adjusting the treble
- Press A-M button 4 and select "TREB".
- Turning the Rotary knob 3 clockwise emphasizes the treble; turning it counterclockwise attenuates the treble.
* The factory default setting is "0". (Adjustment range: -6 to +6) - When the adjustment is complete, press A-M button 4 several times until the function mode is reached.
Adjusting the balance
- Press A-M button 4 and select "BAL".
- Turning the Rotary knob 3 clockwise emphasizes the sound from the right speaker; turning it counterclockwise emphasizes the sound from the left speaker.
* The factory default setting is "0". (Adjustment range: L9 to R9) - When the adjustment is complete, press A-M button 4 several times until the function mode is reached.
Adjusting the fader
- Press A-M button 4 and select "FAD".
- Turning the Rotary knob 3 clockwise emphasizes the sound from the front speakers; turning it counterclockwise emphasizes the sound from the rear speakers.
* The factory default setting is "0". (Adjustment range: F9 to R9) - When the adjustment is complete, press A-M button 4 several times until the function mode is reached.
Switching the Display
While pressing the BAND button 6, press the DISP button 14 to enter the clock display mode. Main display → Clock display → Main display
Setting the Clock
1) While pressing the BAND button 6, press the DISP button 14 to enter the clock display mode.
2) While pressing the BAND button 6, press and hold the DISP button 14 for 2 seconds or more. This enables the clock editing mode.
* The editable fields will be indicated when the display flashes.
3) To move between the hour and minute fields, use the Up (hour) and Down (minute) buttons 1.
4) To store the clock setting, press the BAND button 6.
Notes:
- If you select another operation mode before completing the above procedure, the clock setting operation will be canceled.
- Removing the vehicle's battery for a check or repair will cause the clock to reset to 1:00. Set the clock again if this happens.
Tape Operation
Loading Tapes
Insert the cassette tape into the Cassette insertion slot with the side on which the tape is exposed facing the right. Playback starts automatically.
* When the end of the cassette tape is reached, the auto reverse mechanism is activated and the other side of the tape begins playing automatically.
Note:
- Fully insert the cassette tape into the cassette insertion slot.
Listening to a tape which is already loaded
Press the FUNC button 5 to select the tape mode. Playback begins automatically.
Ejecting Cassette Tapes
Press the Eject button 9. The cassette tape is ejected.
* The radio mode is selected automatically 4 seconds after ejecting the tape.
Fast-Forwarding and Rewinding
Use the FF button 12 and REW buttons 10.
FF : Press this to fast-forward the tape.
REW : Press this to rewind the tape.
* It is possible to listen to the radio during fast-forward, rewind or search operations.
Switching to the Other Side of the Tape
Press the PROG button 11 both the FF button 12 and REW button 10 together at the same time. Playback is switched automatically to the other side of the cassette tape.
FM Reception
For enhanced FM performance the MAGI-TUNE
^® tuner includes signal actuated stereo control and Multipath noise reduction circuits.
Listening to the Radio
1) Press the FUNC button 5 to select the radio mode. The radio turns on.
2) To tune to a desired preset station, first press the BAND button 6 and select FM1, FM2, FM3, FM4 or AM.
The band changes as follows each time the BAND button is pressed:
FM1 → FM2 → FM3 → FM4 → AM → FM1
3) Use the corresponding Preset buttons 18 to select the desired station.
Seek Tuning
1) Press the BAND button 6 and select the desired band.
2) Press the Up or Down buttons 1 to seek up or down the frequency band. Seek tuning automatically stops when a station is found.
Manual Tuning
1) Press the BAND button 6 to select the desired band.
2) Press and hold the BAND button for more than 2 seconds. "MANU" is illuminated on the display and the manual tuning mode is selected.
3) Use the Up and Down buttons 1 to manually tune up or down the desired frequency band.
Presetting Stations
A total of 25 stations can be preset, 5 each for the FM1, FM2, FM3, FM4 and AM bands.
Note:
- When a station is preset, the station previously stored in the memory at that position is cleared.
Presetting stations manually
1) Press the BAND button 6 to select the band at which to store the station.
2) Use the Up and Down buttons 1 to tune in the station to be preset.
3) Press and hold the corresponding Preset button 18 for at least 2 seconds to store the station into memory.
Auto store function (Automatic Station Store)
1) Press the BAND button 6 to select the band at which to store the stations.
2) Press and hold the AS button 8 for at least 2 seconds. Stations with good reception are automatically stored at preset to the five buttons 18 1 to 5.
* If there are fewer than 5 stations with good reception, the stations previously stored at the remaining buttons are not cleared.
Preset Scanning (Preset Station Scan)
When the PS button 8 is pressed, the preset memory numbers flash and the stations are tuned in for 7 seconds each in the order in which they were stored. Press the PS button again to cancel the preset scanning mode.
Note:
- The auto store mode is set if the PS button is pressed for more than 2 seconds.
Area Change Function
Use this to listen to the radio outside of the United States.
Switchable frequency spacing
This car stereo is initially set to tune in frequency intervals of 10 kHz for AM and 200 kHz for FM, the standard calibrations in the U.S. When using the unit outside the U.S., use the following procedure to switch the frequency steps and frequency range:
1) Turn the power on and set the tuner mode.
2) Keep the BAND button 6 pressed and while pressing the button, press the function button 1 2.
3) Release the buttons.
This procedure changes the factory setting to 9 kHz steps for AM and 50 kHz steps for FM, the standard calibrations for countries other than the U.S.
To change the AM/FM setting back to the U.S. standard frequencies:
1) Set the tuner mode.
2) While pressing the BAND button 6, press the function button 2 19.
3) Release the buttons.
Your car stereo will once again be calibrated to receive standard U.S. transmissions.
The chart below lists the frequency specifications for the U.S. and other countries.
| Initial Setting (U.S. standard) | New Setting (outside U.S.) | ||
| AM | Frequency spacing | 10 kHz | 9 kHz |
| Frequency range | 530 to 1710 kHz | 531 to 1629 kHz | |
| FM | Frequency spacing | 200 kHz | 50 kHz |
| Frequency range | 87.9 to 107.9 MHz | 87.5 to 108 MHz | |
CD Changer Mode Operation
Listening to the Disc
Press the FUNC button 5 and select the CD changer mode, then the CD starts playing.
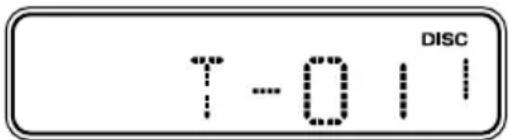
* Press the DISP button 14, then the display will show the play time.
Track No. → Play time → Track number
Stopping (pausing) Playback
Press the Play/Pause button 13.
Press the Play/Pause button 13 again to resume playback.
Selection of CDs
Press the Disc Up/Down button 8 to select the CD you wish to play.
Selection Tracks (songs)
Press the SRCH Up/Down button 1.
: Playback will start from the next track.
: Playback will start from the beginning of the track currently playing. When this button is pressed again, the CD will play from the previous track.
Fast-Forward and Fast-Backward
^ : To fast-forward
↓ : To fast-backward
* Press and hold the SRCH Up/Down button for 1 second or longer will move forward or backward 5 times faster than normal play, and pressing it for 3 seconds or longer will do the operation 30 times faster.
Scan Play (Intro Music Scan)
Press the SCN button 17, then the display shows "SCN", then the CD will play the first 10 seconds of all the tracks of all CDs. Press the SCN button 17 again to disengage the unit from scan play.
* A scan play will start from the track following the one currently playing.
Disc scan play
Press and hold the SCN button 17 for 2 seconds or longer, then the display will show “DISC” and “SCN”, and plays the first 10 seconds of the first song of all the CDs in the CD changer.
Press the SCN button 17 again to disengage the unit from disc play.
* A scan play will start from the first tracks of next CDs following the one currently playing.
Repeat Play
Press the RPT button 16, then the display shows "RPT", then the track currently playing will be played repeatedly. Press the RPT button 16 again to disengage the unit from repeat play.
Disc repeat play
Press and hold the RPT button 16 for 2 seconds or longer, then the display shows both the "disand"RPT", then the disc currently being played will be played repeatedly.
Press the RPT button 16 again to disengage the unit from disc repeat play.
Random Play
Press the RDM button 15 then the display will show "RDM", then the entire tracks on the disc will be played at random.
Press the RDM button 15 again to disengage the unit from disc random play.
6. TROUBLESHOOTING
| Problem Cause Measure | ||
| Power does not turn on (or no sound is produced) | Fuse is blown. | Replace with a fuse of the same amperage as the old fuse. |
| Connections are improper. | Read the attached “Installation/Wire Connection Guide” once again and wire properly. | |
| Sound quality is poor. | Playback head is dirty. | Use a cleaning tape, etc. to clean the head. |
| No sound while unit can be operated. | Power ANT lead is shorted to the ground. | Turn the unit off, first.Remove all connecting wires from the power ANT lead, and turn the unit on, then re-connect a wire one by one to the power ANT lead.When sound is muted again, check the unit with a wire connected last. |
7. ERROR DISPLAYS
■ To protect the system, this unit has been equipped with self diagnostic functions. If a fault arises, a warning is issued by various error displays. Follow the corrective measures and remove the fault.
| Error Display Corrective Measure | |
| Er 2 | This error display indicates that a fault has arisen in the mechanism of the source unit or CD changer (for example, the disc cannot be changed or ejected).→ Check the source unit and CD changer. |
| Er 3 | This error display indicates that the pickup focus is off because of a scratched disc or some other factor during source unit or CD changer play.→ Check the compact disc. |
| Er 6 | This indicates that the CD's TOC (table of contents) cannot be read, for example because the selected disc is upside-down. |
8. SPECIFICATIONS
FM Tuner
Frequency Range.....87.9 MHz to 107.9 MHz
Usable Sensitivity.....11 dBf
50 dB Quieting Sensitivity.....17 dBf
Alternate Channel Selectivity.....75 dB
Stereo Separation (1 kHz).....35 dB
Frequency Response (±3 dB)
.....30 Hz to 15 kHz
AM Tuner
Frequency Range.....530 kHz to 1,710 kHz
Usable Sensitivity.....25 V
Tape
Wow & Flutter (WRMS).....0.1%
Channel Separation (1 kHz).....45 dB
Signal to Noise Ratio.....120 s (normal): 52 dB
Frequency Response (±3 dB)
120 μs (normal).....30 Hz to 16 kHz
Power Amplifier
Maximum Power Output.....160 W (40 W · 4ch)
Continuous Average Power Output
..... 15 W · 4, into 4 Ω, 20 Hz to 20 kHz, 1% THD
Pre-Amplifier
Bass Control Action (100 Hz).....±10 dB
Treble Control Action (10 kHz).....±10 dB
General
Power Supply Voltage
.....14.4 V DC (10.8 V to 15.6 V allowable)
Current Consumption..... Less than 10 A
Speaker Impedance
.....4 Ω (4 Ω to 8 Ω allowable)
Weight.....2.87 lb. (1.3 kg)
Dimensions
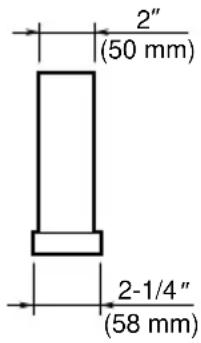
.....7"(178 mm) Width · 2"(50 mm) Height
- 6" (152 mm) Depth
Notes:
- Specifications comply with EIA Standards.
- Specifications and design are subject to change without notice for further improvement.
- FEATURES
- Tuner
- Tape
- General
- Chassis
- Clarion Co., Ltd.
- C-BUS
- Audio
- CASSETTE PRECAUTIONS AND CARE
- BUTTON TERMINOLOGY
- Note:
- OPERATION
- Basic Operation
- CAUTION
- Adjusting the volume
- Setting the Z-enhancer
- Adjusting the tone
- Adjusting the bass
- Adjusting the treble
- Adjusting the balance
- Adjusting the fader
- Switching the Display
- Setting the Clock
- Notes:
- Tape Operation
- Loading Tapes
- Listening to a tape which is already loaded
- Ejecting Cassette Tapes
- Fast-Forwarding and Rewinding
- Switching to the Other Side of the Tape
- FM Reception
- Listening to the Radio
- Seek Tuning
- Manual Tuning
- Presetting Stations
- Presetting stations manually
- Auto store function (Automatic Station Store)
- Preset Scanning (Preset Station Scan)
- Area Change Function
- Switchable frequency spacing
- CD Changer Mode Operation
- Listening to the Disc
- Stopping (pausing) Playback
- Selection of CDs
- Selection Tracks (songs)
- Fast-Forward and Fast-Backward
- Scan Play (Intro Music Scan)
- Disc scan play
- Repeat Play
- Disc repeat play
- Random Play
- TROUBLESHOOTING
- ERROR DISPLAYS
- SPECIFICATIONS
- FM Tuner
- AM Tuner
- Power Amplifier
- Pre-Amplifier
Brand : CLARION
Model : XA311
Category : Hi-Fi System