
SHD-46VDB - Lock Hanwha - Free user manual and instructions
Find the device manual for free SHD-46VDB Hanwha in PDF.


| Product Type | Door Mullion Flush Mount Kit |
| Brand | Hanwha |
| Model | SHD-46VDB |
| Compatible Camera | Hanwha XNB-6001 with SLA-T4680V lens head |
| Housing Material | Cast Aluminum Alloy 380 |
| Camera Bracket Material | Steel |
| Unit Weight (without camera) | 0.16 lbs (approx. 73 g) |
| Environment | Indoor |
| Included Components | Door Mullion Housing, Neoprene Mullion Gasket, Spare Camera Window, M3 x 4mm Screws, M3 x 16mm Screws, 6-32 x 3/4" Screws |
| Installation Tools Required | Phillips Head Screwdriver, 29 Drill Bit, Tool to cut hole pattern |
| Mounting Type | Flush mount |
| Features | Quick and simple installation, integrated solution, easy servicing |
| Maintenance | Clean with dry cloth; avoid solvents |
| Safety | For indoor use only; ensure secure mounting |
| Spare Parts Availability | Spare camera window and screws included |
Frequently Asked Questions - SHD-46VDB Hanwha
User questions about SHD-46VDB Hanwha
0 question about this device. Answer the ones you know or ask your own.
Ask a new question about this device
Download the instructions for your Lock in PDF format for free! Find your manual SHD-46VDB - Hanwha and take your electronic device back in hand. On this page are published all the documents necessary for the use of your device. SHD-46VDB by Hanwha.
USER MANUAL SHD-46VDB Hanwha
SHD-46VDE, SHD-46VDB INSTRUCTIONS
(Door Mullion Flush Mount)
DESCRIPTION
The SHD-46VDx Kit provides an economical, integrated solution for any indoor flush mount application for Hanwha XNB-6001 with SLA-T4680V lens head. Like all of our products, this mount is designed for quick, simple installation and servicing.
SUGGESTED INSTALLATION EQUIPMENT
• Phillips Head Screwdriver
- #29 Drill Bit
• Tool to cut hole pattern
COMPONENT LIST [FIGURE I]
A. Door Mullion Housing - I
B. Neoprene Mullion Gasket - I
C. Spare Camera Window - I
D. Spare M3 x 4mm Screws - 3
E. M3 x 16mm Screws - 3
F. 6-32 x 3/4" Screws - 3
INSTALLATION
I. Carefully unpack box and verify that all components listed in the component list are included.
2. Locate desired installation location, use the included template to cut out the clearance hole and drill pilot holes for the mounting screws.
3. Remove the pivot bracket from the faceplate as seen in [FIGURE 2]
4. Route cable through hole in wall.
5. Secure the Hanwha camera to the pivot bracket using the provided screws (E) as seen in [FIGURE 3]
6. Secure pivot bracket back to faceplate and Install Neoprene Gasket (B) as seen in [FIGURE 4].
7. Make all necessary connections and secure faceplate to its location using the provided screws (F) as seen in [FIGURE 5]

FIGURE I

natural_image
3D rendering of a metal bracket with mounting holes and internal components, labeled 'FIGURE 2' (no text or symbols on the diagram itself)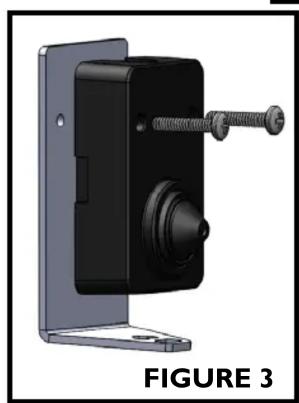
natural_image
3D rendering of a black mechanical device with a spring attached, labeled 'FIGURE 3' (no other text or symbols)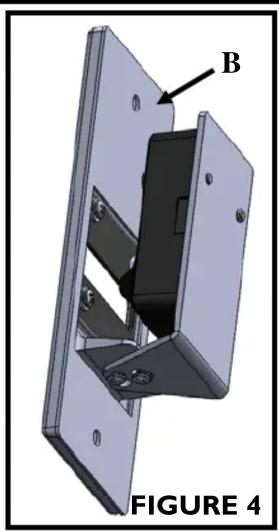
natural_image
3D mechanical assembly diagram showing a component with labeled part B, no readable text or symbols present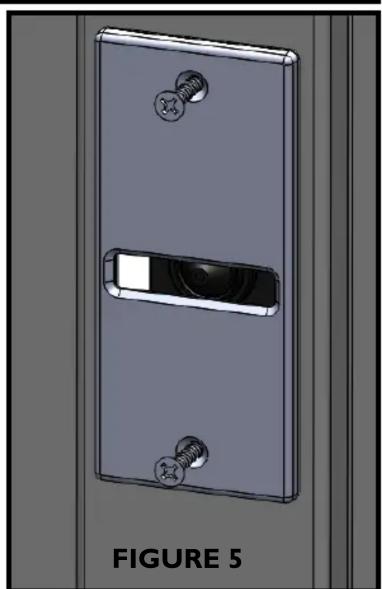
natural_image
3D rendering of a metallic door with screw holes and a central slot, labeled 'FIGURE 5' (no text or symbols on the object itself)SHD-46VDE, SHD-46VDB INSTRUCTIONS
(Door Mullion Flush Mount)
MECHANICAL PROPERTIES
• Housing: Cast Aluminum Alloy 380
• Camera Bracket: Steel
• Unit weight: 0.16 lbs without camera
ENVIRONMENT
- Indoor
![.880in [22.4mm] 3.28in [83.3mm] 4.01in [101.9mm] 1.76in [44.7mm]](/content/2026/05/952901/images/bd878a2f4f0f795e594c0488faf585e7bbfff03ae0a3ef8bd96c000d4fe639c5.jpg)
![1.11in [28.2mm]](/content/2026/05/952901/images/0390db76a44f0eb13d00167a6c9d8718f69461997586d62fe1cfbabd96ff0cd6.jpg)
Brand : Hanwha
Model : SHD-46VDB
Category : Lock