
TF-DVD7705 - Portable DVD Player COBY - Free user manual and instructions
Find the device manual for free TF-DVD7705 COBY in PDF.


| Manufacturer | Coby |
| Model | TF-DVD7705 |
| Product Type | Portable DVD Player |
| Display | 7-inch LCD screen (estimated) |
| Disc Compatibility | DVD-Video, DVD±R/RW, CD, CD-R/RW, VCD |
| Dimensions (approximate) | 200 x 150 x 30 mm (7.9 x 5.9 x 1.2 in) |
| Weight (approximate) | 0.8 kg (1.8 lb) with battery |
| Power Supply | AC 100-240V, 50/60 Hz via adapter; optional rechargeable battery pack |
| Battery Life | Up to 3 hours continuous playback |
| Audio Output | Stereo speakers, headphone jack, analog audio out (RCA), optical digital out |
| Video Output | Composite video out (RCA), AV input for external source |
| Remote Control | Card-type infrared remote with CR2025 lithium battery |
| Playback Functions | Play/Pause, Stop, Skip, Search, Slow Motion, Repeat (title/chapter/track/A-B), Zoom, Angle Select, Subtitle/Audio Language Selection |
| Setup Options | On-screen display language, subtitle language, audio language, TV shape (16:9/4:3), TV system (NTSC/PAL), parental lock, video enhance |
| Laser Classification | Class 1 (IEC 60825-1) |
| Safety Certifications | FCC Part 15, Dolby Laboratories license |
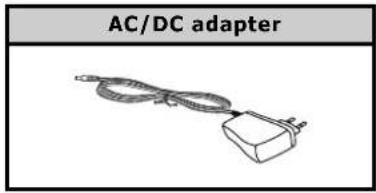
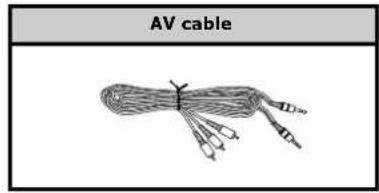
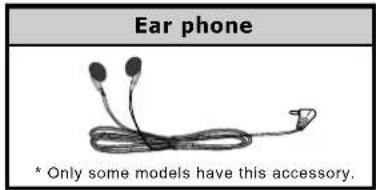
| Accessories Included | AC/DC adapter, AV cable, earphone, card remote, carrying bag (some models include car power cable, battery pack) |
| Cleaning Instructions | Use soft dry cloth; avoid alcohol, thinner, benzene; for LCD use LCD cleaner |
| Storage Conditions | Store in cool, dry place away from direct sunlight; temperature 15-25°C recommended for battery |
Frequently Asked Questions - TF-DVD7705 COBY
User questions about TF-DVD7705 COBY
0 question about this device. Answer the ones you know or ask your own.
Ask a new question about this device
Download the instructions for your Portable DVD Player in PDF format for free! Find your manual TF-DVD7705 - COBY and take your electronic device back in hand. On this page are published all the documents necessary for the use of your device. TF-DVD7705 by COBY.
USER MANUAL TF-DVD7705 COBY
natural_image
Line drawing of a DVD video player with monitor and ports (no text or symbols)Operating Instructions



Precautions
Thank you for purchasing Portable DVD player. Please read this manual carefully before operating and reserve it for future reference. It will be helpful to you if you encounter any operational problem.
WARNING: TO REDUCE THE RISK OF FIRE OR ELECTRIC SHOCK, DO NOT EXPOSE THIS APPLIANCE TO RAIN OR MOISTURE, DRIPPING OR SPLASHING AND THAT NO OBJECTS FILLED WITH LIQUIDS, SUCH AS VASES, SHALL BE PLACED ON THE APPARATUS. DANGEROUS HIGH VOLTAGES ARE PRESENT INSIDE THE ENCLOSURE. DO NOT OPEN THE CABINET. REFER SERVICING TO QUALIFIED PERSONNEL ONLY.
ATTENTION: TO PREVENT ELECTRIC SHOCK, MATCH WIDE BLADE OF PLUG TO WIDE SLOT, FULLY INSERT.
LASER: This Digital Video Display by a Laser System.
To ensure proper use of this product, please read this owner's manual carefully and retain for future reference. Should the unit require maintenance, contact an authorized service location - see service procedure.
Use of controls, adjustments or the performance of procedures other than those specified may result in hazardous radiation exposure.
To prevent direct exposure to laser beam, do not try to open the enclosure.
Visible and invisible laser radiation when open and interlocks defeated.
DO NOT STARE INTO BEAM
LASER
Type
Wave length
Output Power
Beam divergence
Semiconductor laser GaAlAs
650 nm/780nm
5mW
60degree
CLASS 1
LASER PRODUCT
Precautions
WARNING:
To reduce the risk of fire or electric shock, do not expose this appliance to rain or moisture.
CAUTION:
Use of controls or adjustments or performance of procedures those specified may result in hazardous radiation exposure.
CAUTION
RISK OF ELECTRIC SHOCK. DO NOT OPEN
To reduce the risk of electric shock, do not remove cover (or back).
No user serviceable parts inside. Refer servicing to qualified service personnel

The lightning flash with arrowhead symbol, with in an equilateral triangle, is intended to alert user to the presence of uninsulated "dangerous voltage" within the product enclosure that may be of sufficient magnitude to constitute a risk of electric shock to persons.

The exclamation point within an equilateral triangle is intended to alert the user to the presence of important operating and maintenance (servicing) instruction in the literature accompanying the appliance.

CAUTION:
INVISIBLE LASER RADIATION WHEN OPEN AND INTERLOCK FAILED OR DEFEATED. AVOID DIRECT EXPOSURE TO LASER BEAM.
Precautions
MACROVISION: This product incorporates copyright protection technology that is protected by U.S. patents and other intellectual property rights. Use of this copyright protection technology must be authorized by Macrovision, and is intended for home and other limited viewing uses only unless otherwise authorized by Macrovision. Reverse engineering or disassembly is prohibited.
FCC NOTICE: This device complies with part 15 of the FCC Rules. Operation is subject of the following two conditions: (1) this device may not cause harmful interference, and (2) this device must accept any interference received, including interference that may cause und sired operation.e
DOLBY: Manufactured under license from Dolby Laboratories. "Dolby" and the double-D symbol are trademarks of Dolby Laboratories. Confidential unpublished works. Copyright 1992-1997 Dolby Laboratories. All rights reserved.
Table Of Contents
| INTRODUCTION |
| PRECAUTIONS......1 |
| TABLE OF CONTENTS....4 |
| CAUTIONS ON USING THIS PLAYER......6 |
| PRECAUTIONS FOR BATTERY PACK OPERATION ......8Operation of the battery pack......8Storage......8Service life and disposal......8 |
| TYPES OF DISCS PLAYABLE ON THIS PLAYER......9Marks Indicated on DVDs......9Disc structure......10 |
| USING THESE OPERATING INSTRUCTIONS......11 |
| BEFORE USING |
| CHECKING THE ACCESSORIES......12 |
| REMOTE CONTROL UNIT AND MAIN UNIT PREPARATIONS......13 |
| Notes on using the remote control unit......13 |
| Replacing the battery......13 |
| Remote control unit operating range......14 |
PARTS AND
FUNCTIONS......15
Liquid crystal display....15
Main unit control section....15
Main unit left side....16
Main unit right panel....17
Main unit rear side....18
How to stand.... 18
Main unit bottom side.....18
Remote control unit (frequently
used buttons)....19
Remote control unit (other
buttons)....20
Names of battery parts and
their functions.... 21
CONNECTING THE PLAYER TO OTHER
DEVICES......22
Connecting to a TV.... 22
Connecting to a Dolby Digital/ DTS/
MPEG decoder or an amplifier
with built-in decoder....23
Connecting to a digital amplifier
that is not Dolby Digital/ DTS/
MPEG compatible.... 24
Connecting to active speaker
systems....25
Connecting earphone.... 26
USING THE BATTERY...27
Recharging the battery pack..... 27
Notes for recharging.... 28
Attaching the battery pack to
the player....28
AC power operation....29
Removing the battery pack
from the player....29
Table Of Contents
BASIC OPERATIONS
TURNING ON THE
POWER......30
PLAYBACK
FUNCTIONS......31
Loading ....31
Playing....32
If a menu screen appears....32
Stopping playback....33
Pausing playback....33
Returning to the previous chapter
or track(DVDs, video CDs and
CDs)....34
Moving to the next chapter or
track(DVDs, video CDs and
CDs)....34
Removing the disc....34
TURNING OFF THE
POWER......35
ADVANCED OPERATCONS
VARIOUS LANGUAGE
AND SUBTITLE
SETTINGS......36
Setting the on-screen display
language....36
Setting the subtitle language.....36
Setting the audio language....36
ADVANCED
FUNCTIONS......37
Searching for a specific scene... 37
Viewing in slow motion DVDs and
video CDs....37
Repeating DVDs, video CDs and
CDs....37
Selecting angle
(multi-angle)....37
Changing from AV OUT
to AV IN....38
Setting Parental Lock Level.....38
Video Enhance....38
CAUTIONS ON USING..39
TROUBLE SHOOTING.. 40
Cautions on Using this Player
Do not move the player during playback
During playback, the disc spins at high speed, so do not lift or move the player. Doing so may damage the disc.
Transporting the player
When transporting the player be sure to remove the disc and turn off the power, then unplug the power cord.
Place of installation
Select a stable place near the TV or stereo system to which you are going to connect the player.
Do not place the player on top of a TV or color monitor. Install the player away from cassette decks or other devices which are easily affected by magnetic forces.
Do not place objects on top of the player
Do not place any objects on top of the player.
Turn off the power when not using the player
If the player is connected to your TV but not in use then switch the power off this will prevent interference with your normal TV picture.
Noise problems may also be experienced if used near a radio.
Special note regarding use of player in vehicles
■ We strongly advise against using the player while driving.
■ Most countries and states have laws which prohibit or severely restrict the use of the player in vehicles while driving.
■ Do not leave the player or the battery pack in places where the temperature is extremely low (about-10 or lower) or extremely high (about 60 or higher), such as inside the passenger cabin or trunk in midsummer. Doing so may warp the outer case or reduce the performance or quality of the battery pack.
When carrying on planes
Heed the airline company's rules.
When carrying in hospitals
Heed the hospital's rules.
Cautions on Using this Player
Cleaning the player
Normally clean the player using a soft, dry cloth. For tough dirt, apply some neutral detergent diluted in 5 to 6 parts water to a soft cloth, wring out thoroughly, wipe off the dirt, then wipe the player with a dry cloth. Note that alcohol, thinner, benzene, insecticides, etc., may cause the print or coating to peel off. Also avoid leaving rubber or plastic products in contact with the player for long periods of time, as this may damage the cabinet. When using chemically treated cloths, read the cloth's instructions carefully. Always unplug the power cord from the power outlet before cleaning the player.
To clean dirt off the liquid crystal display, wipe the display gently with a soft, dry cloth(such as an eyeglass cleaning cloth). Note that leaving water droplets on the display for long periods of time may result in discoloration or stains. For tough dirt, use a commercially available liquid crystal display cleaner.
Copyrights
Unauthorized duplication, broadcast, public performance or rental of discs is prohibited by law.
Precautions for Battery Pack Operation
Operation of the battery pack
■ Charge the battery pack fully before using it for the first time.
■ When the surrounding temperature is high, the battery pack may sometimes be unusable due to activation of protection circuitry.
■ When the portable DVD player is powered from the battery pack and if the player has not been operated for about 10 minutes with the power switched on, the player will turn off automatically. (Auto power off) The battery pack becomes hot after use and the portable DVD player also becomes hot during use. This is not malfunction.
■ When the battery pack is not to be used for a long period, be sure to remove it from the portable DVD player. If the battery pack is left attached, continual flow of weak current renders it overdischarged and eventually unusable even when you try to charge it later.
■ If the portable DVD player is switched on while the battery pack is not fully charged, the operation may sometimes be unstable. Be sure to charge the battery pack fully before use.
Storage
■ The battery pack should be stored under an surrounding temperature between 15° and 25°. Avoid storing it under extremely low temperatures, in a place with high temperature and high humidity or in a place subject to
soot, etc.
■ When the battery pack is stored for a long period, at least once an year it is recommended to discharge it fully on the portable DVD player, recharge it fully and store it again.
Service life and disposal
■ When the charging time or available operation time becomes extremely short, the battery may be reaching the end of its life. The battery pack can be used for about 300 cycles of recharging and operations.
■ To dispose of a used battery pack, wrap a piece of tape around the terminal section and treat it in compliance with your local regulations.
Caution:
■ Danger of explosion if battery is incorrectly replaced. Replace only with the same or equivalent type.
Types of Discs Playable on this Player
■ The discs listed on the table below can be played on this player without an adapter.
■ The marks shown on the table below are indicated on the disc's label, package or jacket.
| Types of playable discs and their marks | Diameter/Playable sides | Playback time | |
DVD-Video disc VIDEO VIDEO | DVD video12cm/single-sided12cm/doublesided | 1 layer2 layer1 layer2 layer | Playback time(MPEG 2 format)133 minutes (4.7GB)242 minutes (8.5GB)266 minutes (9.4GB)484 minutes (17GB) |
| DVD video8 cm/single-sided8 cm/doublesided | 1 layer2 layer1 layer2 layer | (MPEG 2 format)41 minutes75 minutes82 minutes150 minutes | |
CD | CD12 cm/single-sided | 74 minutes | |
| CD8 cm/single-sided | 20 minutes | ||
Marks indicated on DVDs
DVD discs or packages include the marks shown below. These marks indicate the type of video or audio signals recorded on the disc and the functions that can be used.
| Mark | Meaning |
| 2) | Indicates the number of audio tracks. |
| Indicates the number of angles. | |
| 16:9 LB | Indicates the selectable picture aspect ratio. |
| Indicates the playable region number. |
Types of Discs Playable on this Player
Disc structure
CDs are divided in units called tracks. (Generally one track corresponds to one song. Tracks are sometimes further divided into indexes.)
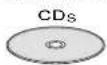
Track1 Track2 Track3 Track4 Track5


DVDs are divided in units called titles, which are further divided in chapters. They also include menu screens that do not belong to any title. With movies, normally one movie corresponds to one title. On karaoke discs, one song corresponds to one title. Some discs are not divided in this way, however, so be careful when using the search and programming functions.
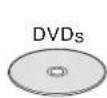
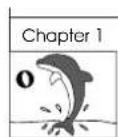
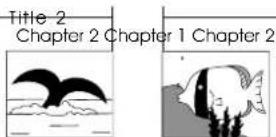
Using These Operating Instructions
Be sure to read the operating instructions carefully before using the player. It can ensure you taking maximum advantage of all functions of this player.
When this player is connected to a TV or AV amplifier, the setup screen should be displayed. Choose the various corresponding settings according to the connected equipment.
With DVDs it is possible to use setup to change the subtitle and audio languages and select the desired sound mode from among multiple sound tracks.
In order to take full advantage of the many functions of this player, be sure to store this OPERATING INSTRUCTIONS in an accessible place.
Checking the Accessories
After unpacking, check that all the accessories listed below are included.
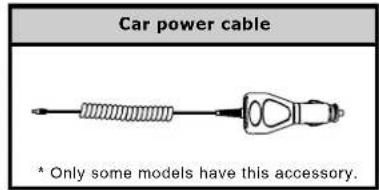
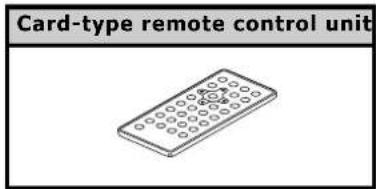
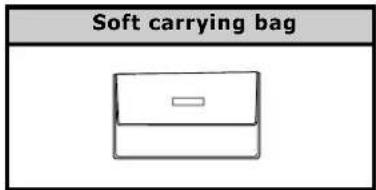
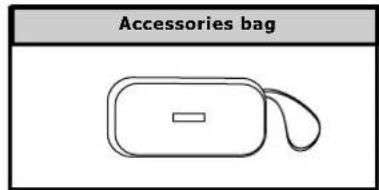
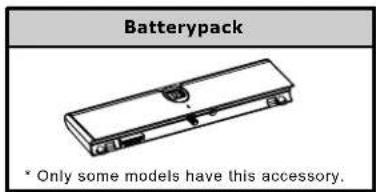
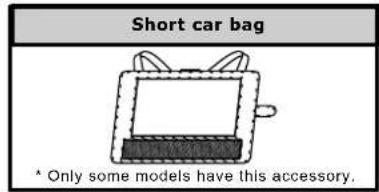
Remote Control Unit and Main Unit Preparations
Notes on using the remote control unit
■ Do not drop or step on the remote control unit or subject it to shocks. Doing so may damage it.
Note that the remote control unit may not work if there are obstacles between it and the remote sensor.
■ Do not expose the remote sensor to strong light. Doing so may make operation impossible.
■ Use the remote control unit within the specified operating range.
Replacing the battery
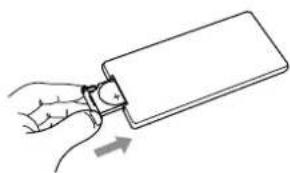
1 Insert your finger nails into A and B on the diagram below, press A according to the direction, then pull out the battery holder.
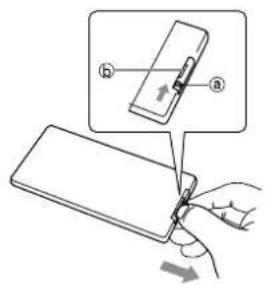
2 Remove the old battery, then insert the new battery into the battery holder with the + side facing upwards.
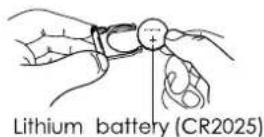
3 Fit the battery holder back to its place.
natural_image
Line drawing of a hand inserting a small component into a rectangular device (no text or symbols)Note:
To prevent leakage of fluid from the lithium battery, remove the battery when not using the remote control unit for long periods of time (one month or more). If the battery leaks fluid, carefully wipe it out of the battery case, then change to a new lithium battery.
Remote Control Unit and Main Unit Preparations
Remote control unit operating range
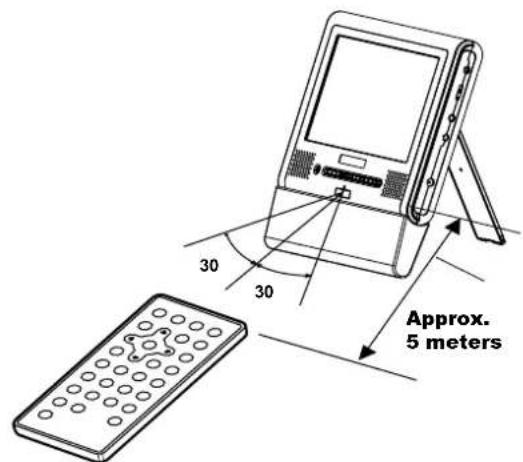
The remote control unit can operate within a distance of approximately 5 meters.
Note:
Most of the player's operations can be done by using the remote control unit. Some operations, however, can only be done by using the main unit buttons.
Parts and Functions
Liquid crystal display
The portable DVD player is equipped with a liquid crystal display.
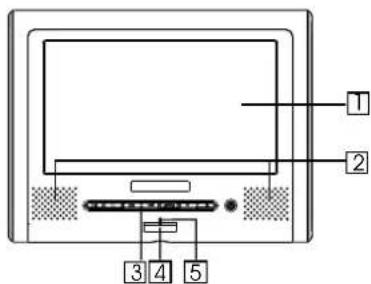
1 Liquid crystal display
2 Speakers
3 Control section
Control buttons
4 Remote sensor
The remote control signals are received here.
5 Power indicator ^5
Off: No power connection.
Red: The player is set to standby mode.
Blue:The player is on. Turn on the power using ON button on the main unit or the STANDBY
button on the remote control unit.
Main unit control section

Parts and Functions
1 Play/pause button
Press it to play. When pressing during playback mode, pause mode is set. Press again to resume playback.
Keep pressing it for about 1.5 seconds to power on the unit.
2 Stop /off button
Press it to stop playback.
Keep pressing it for about 1.5 seconds to turn off the unit (standby status).
3 Previous/next buttons
Use it to locate at the beginning of previous/next tracks or chapters.
Keep pressing it for about 1.5 seconds during playback to switch playing speed of backward/forward through X2, X4, X8, X20, X2.
4 Mode button
Use +/- key to adjust after entering one mode.
BRIGHTNESS: Level 0 to 8.
COLOR: Level 0 to 8.
TFT MODE: switch screen between
16:9 and 4:3.
VIEW MODE: switch screen between reverse and observe.
AV INPUT/OUTPUT: switch the AV
function between input and output.
Keep pressing the button about 1.5 seconds to turn off the display. and press it to resume.
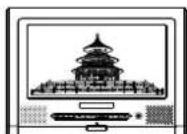
obverse
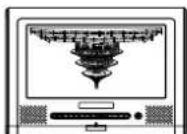
reverse
5-/+buttons
Press it to adjust display mode.
6 OPEN button
Press it to slide the tray out
Main unit left side
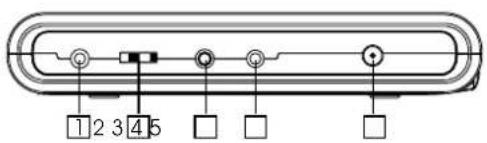
Parts and Functions
1 Phone jack
For connecting stereo headphone or an amplifier.
2 Volume control
Use it to adjust the volume of the speakers or headphone.
3 Video in/out jack
Input or output video signals to connected device by setting AV IN/OUT mode value.
The included AV cable is connected here.
4 Audio in/out and optical output jack
Input or output audio signals to connected device by setting AV IN/OUT mode value.
Output optical audio signals to connected device.
The included AV cable or optical digital cable is connected here.
5 DC in
Connect the included AC adapter here.
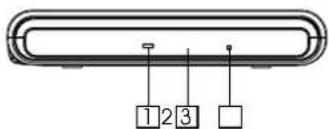
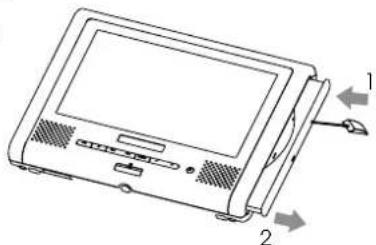
Main unit right panel
1 Loader status indicator LED Indicate loader status.
2 Tray
3 Open hole
When you insert the open-stick into this hole, the tray will slide out. Please turn off the unit before this operation.
natural_image
Line drawing of a computer monitor with labeled ports and connectors (no text or symbols)Parts and Functions
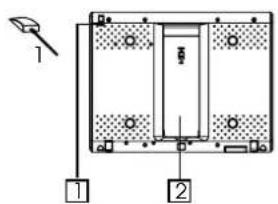
Main unit rear side
1 Open-stick Support
You can use it to open the tray.
2
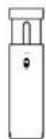
The unit can stand with this device.
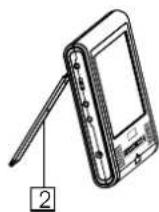
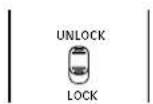
How to stand
1 Pull out the support.
2 Draw out the support to a proper position.
3 Pull down the button to lock it.
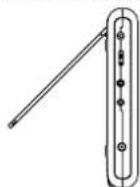
123
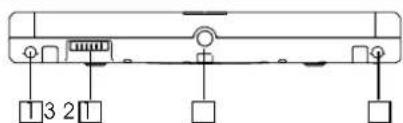
Main unit bottom side
1 Hole for Battery Pack
2 Nut for Battery Pack
3 Battery connector
Note:
Remember to insert back the rubber cover to "3. BATTERY CONNECTOR" after using the battery pack.
Parts and Functions
Remote control unit (frequently used buttons)
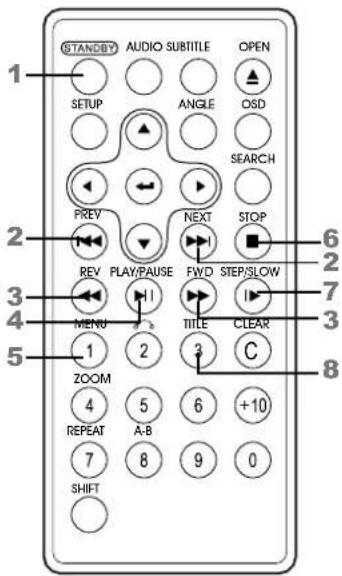
1 STANDBY button
Press this button to turn on or off the power.
▶: Forward direction
← : Backward direction
4 PLAY/PAUSE button(▶)
Use this button to play or pause playback.
5 MENU button
Press this button to display the DVD's menu screen.
6 STOP button(■)
Press this button to stop playback.
7 STEP/SLOW buttons(▶)
Press this button to slow playback at 1/2, 1/4, 1/6, 1/7 speed. If at pause status, press this button to playback step-by-step.
TITLE button8
Press this button to display the DVD's title.
2 PREVIOUS/NEXT button(◀◀)
and ▶▶)
Use these buttons to search for the beginnings of tracks or chapters.
◀◀: Backward direction
▶▶: Forward direction
3 Scan buttons (and ▶)
Use these buttons to switch playing speed of playing forward or backward.
Parts and Functions
Remote control unit (other buttons)
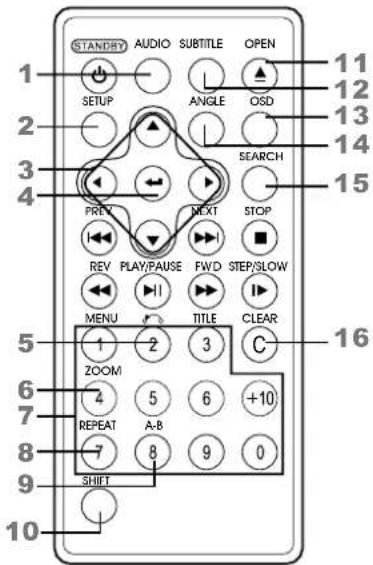
1 AUDIO button
Press this button to switch the audio language.
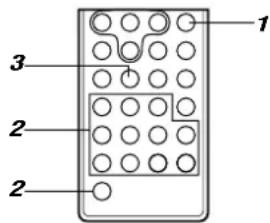
2 SETUP button?
Press this button to display setup screen when at stop status. Press this button to display Video Enhance screen during playback.
3 Cursor buttons
Use these buttons to move the cursor up, down, left and right when selecting setting items.
4 ENTER button
Press it to enter/confirm setting item.
5 RETURN button
Press it to return back the previous item.
(Only for VCD, PBC on)
6 zoom
Zoom the picture on screen.
7 Number buttons
Press these buttons to input numbers. Pressing the SHIFT button to switch from function to number if necessary.
8 REPEAT button
For DVDs, use this button to play titles or chapters repeatedly. For CDs, use this button to play tracks or the entire disc repeatedly.
9 A-B REPEAT button
Press this button during playback to set two points and play the section between them repeatedly.
SHIFT button10
Press the shift button to switch number & function. (Default: function)
OPEN11
Open the tray and replace/take disk.
12 SUBTITLE button
Press it to switch the DVD's subtitle language.
13 OSD button
Press this button to display the disc information.
14 ANGLE button
Press it to switch angle.
15 SEARCH button
Locate a title/ chapter/ time and play.
16 CLEAR button
Clear the numbers inputted before.
Parts and Functions
Names of battery parts and their functions
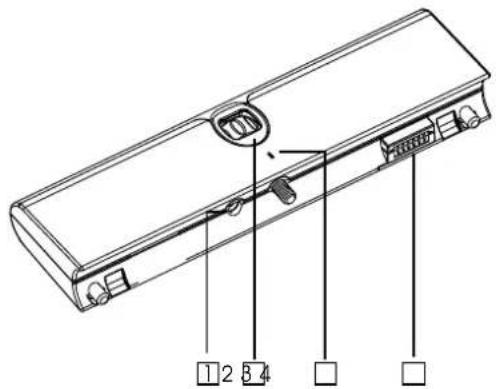
1 DC IN connector
Connect the power adapter to recharge.
2 Battery knob
Twist to tighten/detach the battery pack.
3 Battery indicator LED.
When the battery is discharging, LED is off. When recharging the battery, LED is red. When the LED becomes green, means finishing recharge.
4 Player terminals
Supply power to the player.
CAUTION:
Do not short-circuit the terminals.
Connecting the Player to Other Devices
Before connecting
Turn off the power of the player and the devices to be connected.
Connecting to a TV
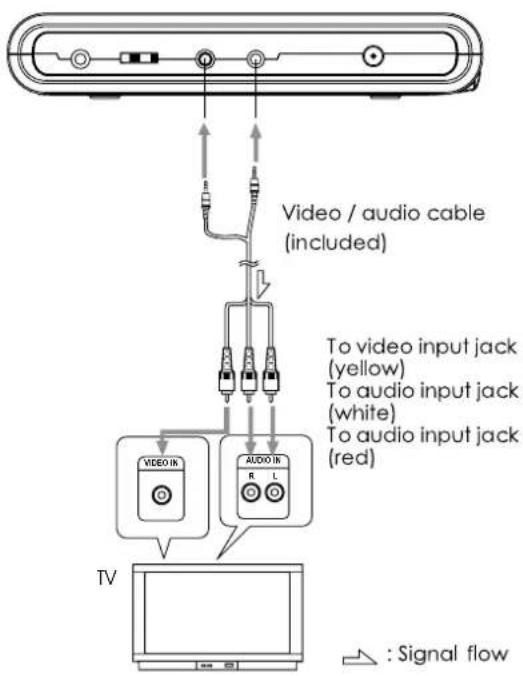
Connecting the Player to Other Devices
Connecting to a Dolby Digital / DTS / MPEG decoder or an amplifier with built-in decoder
With this player, you can enjoy powerful Dolby Digital, DTS or MPEG sound. Output the digital signals from the player's digital output to a decoder or amplifier with built-in decoder.
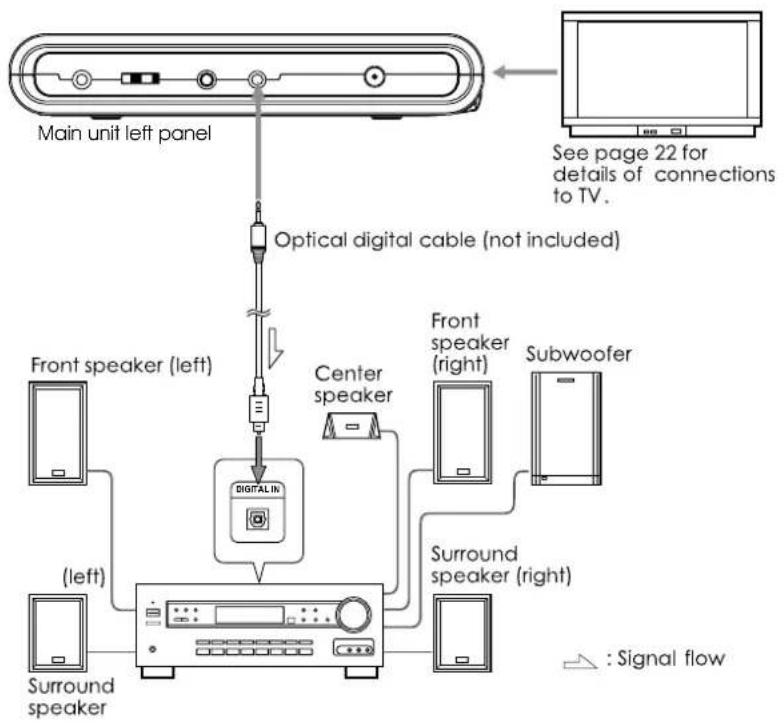
flowchart
graph TD
    A["Main unit left panel"] --> B["Optical digital cable (not included)"]
    B --> C["Front speaker (left)"]
    B --> D["Center speaker"]
    B --> E["Subwoofer"]
    C --> F["(left)"]
    D --> G["Surround speaker"]
    E --> H["Surround speaker (right)"]
    I["See page 22 for details of connections to TV."] --> A
Hint: For a compatible decoder or amplifier, 5 speakers (front left/right, center and surround left/right) and a subwoofer are required to enjoy Dolby Digital /DTS 5.1-channel sound.
Connecting the Player to Other Devices
Connecting to a digital amplifier that is not Dolby Digital / DTS / MPEG compatible
Output the digital signals from the player's digital output to a digital amplifier that is not Doby/DTS/MPEG compatible.
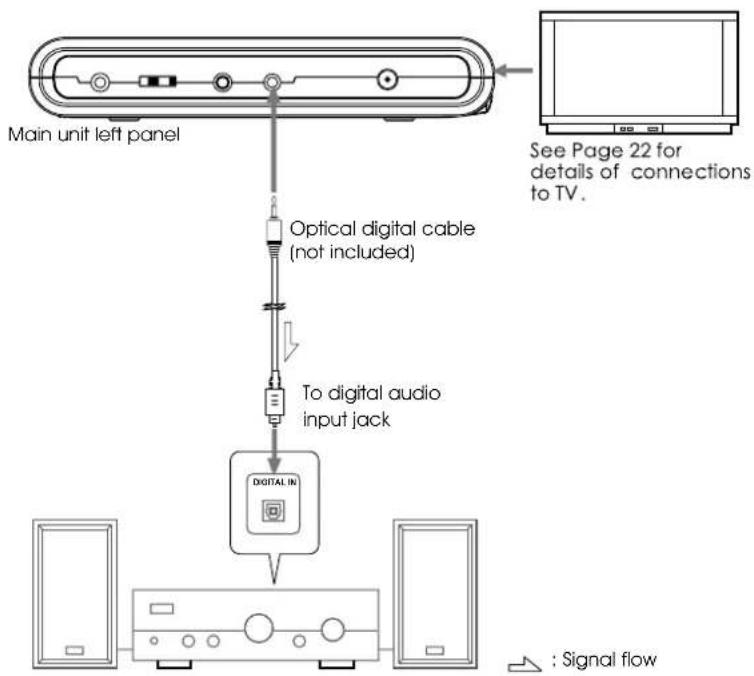
flowchart
graph TD
    A["Main unit left panel"] --> B["Optical digital cable (not included)"]
    B --> C["To digital audio input jack"]
    C --> D["Digital In"]
    D --> E["Signal flow"]
Notes:
■ Carefully check the player's digital output settings before connecting the player to an amplifier equipped with a digital audio input jack which is not Dolby Digital / DTS / MPEG compatible.
Do not play DVDs when the audio settings are not correct. Or may cause strong noise and damage your speakers.
Connecting the Player to Other Devices
Connecting to active speaker systems
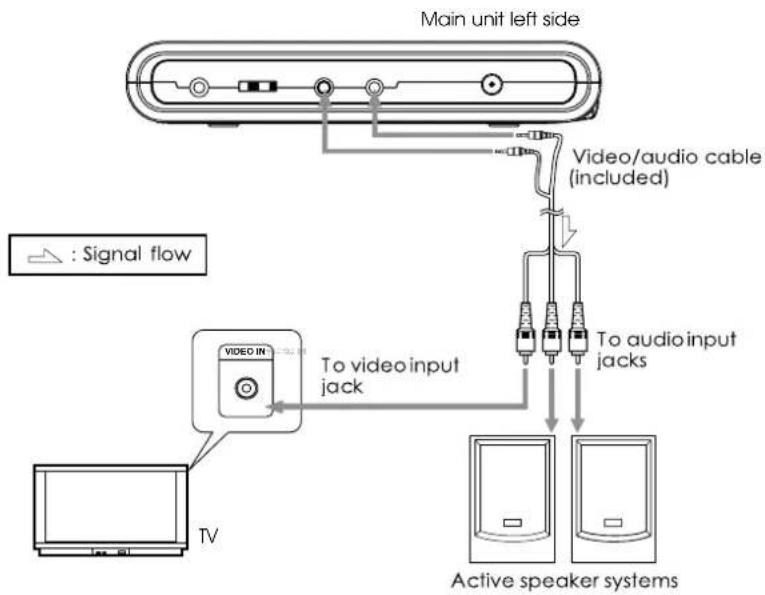
Connecting the Player to Other Devices
Connecting earphone
Connect the earphone's plug securely to the PHONE JACK on the player. To listen to music through the earphone, first use the VOLUME CONTROL on the left side of the main unit to lower the volume to minimum level, then adjust the volume to comfortable level. Be careful not to set the volume to too high level when using earphone.
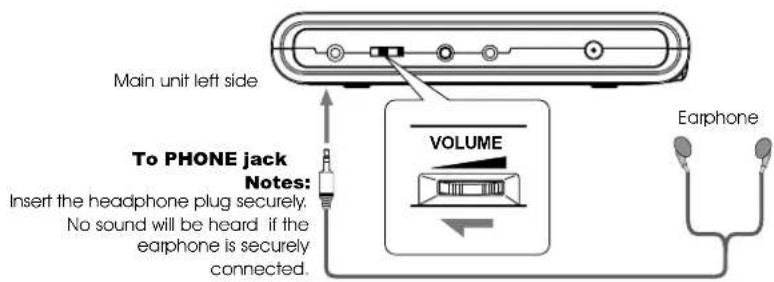
Note:
It is not possible to hear the sound of DTS-compatible DVDs over earphone. Strong noise is produced when DTS discs are played, so do not listen to such discs through earphone.
Using the Battery
Recharging the battery pack
Recharging the battery pack as described below.
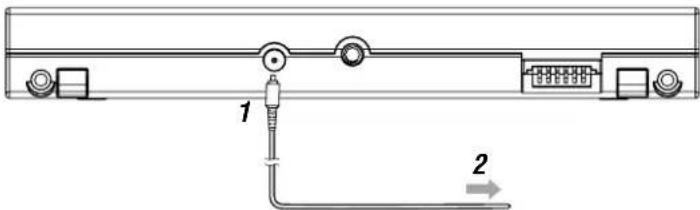
1 Connect the DC output plug of AC adapter to the battery pack.
2 Connect the AC adapter to the power outlet.
■ When recharging starts, the recharge LED lights in red.
■ The recharge LED lights in green when recharging completes. Remove the power cord from battery pack.
■ Recharging usually completes in about 4\~5 hours.
The battery pack can be used for about 300 cycles of recharging and operations, though this is variable depending on the operating conditions.
Charge the battery pack fully before using it for the first time.
CAUTION
■ Place the battery pack and AC adapter on a flat surface for recharging.
■ Do not short-circuit the terminals of the battery pack and AC adapter.
Notes:
■ The battery charger(AC adapter) is compatible with supply voltage between 100 and 240 V AC and can be used universally.
■ When you want to use it on an overseas travel, however, be sure to prepare a power plug adapter matching the local power outlet.
Using the Battery
Notes for recharging
■ When the battery pack is hot, it may take longer time than usual for recharging or may sometimes be unusable to be recharged. Wait for the battery pack to cool down before retrying recharging.
If the recharge LED can not be lit, check whether the AC adapter and battery pack are connected firmly to have perfect contact.
■ To protect the battery pack, do not recharge a fully charged battery pack repeatedly. Repeated overcharging may deteriorate the battery performance.
■ The battery pack becomes hot after recharging, but this is not malfunction.
■ The battery pack may not be recharged fully if recharging at a hot place. Do not recharge it under very hot environment, it may cause explosion.
The surrounding temperature during recharging affects the recharge efficiency. Recharge is the most efficient between 10°C and 30°C Recharging the battery pack at a place within this temperature range whenever possible.
Attaching the battery pack to the player
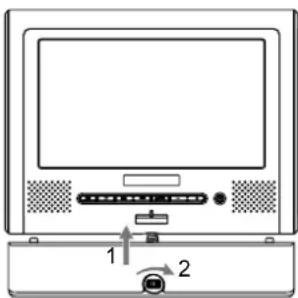
Attach the battery pack to the player as described below.
1 Attach the battery pack to the unit.
2 Align the guide hole of the player with the guide rod on the battery pack. Turning the battery knob clockwise until the battery pack is tighten with the player.
3 Now the player can be operated.
■ If the battery pack is fully recharged, the player can play DVDs continuously for over 3 hours.
natural_image
Diagram of a computer monitor with two labeled ports and an arrow indicating rotation (no text or symbols present)Using the Battery
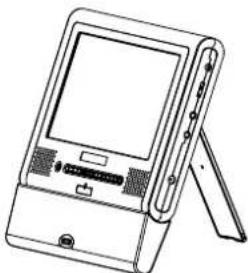
If the power is switched on while the battery pack is not fully charged, the player operation may sometimes become unstable. Be sure to charge the battery pack fully before using.
■ The battery pack is being recharged slowly while the player is playing with AC adapter connected.
■ The battery pack is being recharged as recharged separately while the player is at STAND BY mode with AC adapter connected.
■ After connecting the battery pack and power on, press OSD button on remote control at PLAY, PAUSE or STOP status to show symbol "☐". This symbol indicates capability of the battery pack.
■ While the battery pack has lower capacity, " will be flashed to remind you.
natural_image
Line drawing of a portable electronic device with a screen and stand (no text or symbols)AC power operation
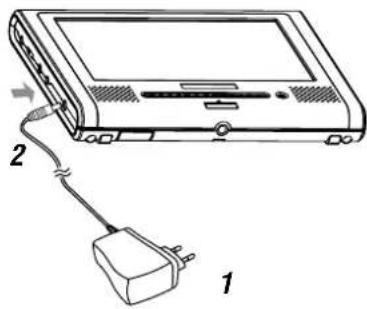
1 Connect the DC output plug of the AC adapter to the DC IN jack on the player.
2 Connect the AC adapter to a power outlet.
Now the player can be operated.
CAUTION:
Be sure to use the AC adapter provided with the player.
Before inserting or removing the DC output plug of the AC adapter, always be sure to turn off the power of the portable DVD player.
Removing the battery pack from the player
The battery pack can be removed from the player as described below.
1 Turn off the power of the player.
2 Turning the battery knob anti-clockwise to remove battery pack.
Turning On the Power
natural_image
Line drawing of a device with a plug and cable, no text or symbols presentMain unit (front panel)
Remote control unit
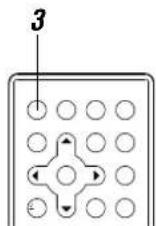
1Connect the AC adapter to a power outlet.
2Connect the DC output plug of the adapter to the DC input jack on the main unit.
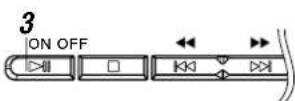
3 Keep pressing the ON button on the main unit for about 1.5 seconds.
■ The power LED is lit blue.
The player can be used now.
■ At standby mode (when the power LED is lit red), the power can also be turned on by pressing the standby button on the remote control unit.
Hint:
The included AC adapter is compatible with voltage from 100 to 240 V, you can use it on trips overseas.
Note that you need a converter plug (available in stores) suited for the region in which you are travelling.
Playback Functions
Loading
1
natural_image
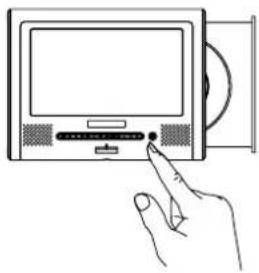
Line drawing of a hand pressing a button on a computer monitor (no text or symbols)Press OPEN button to open.1 (If no disk is placed in, the tray will open automatically after power on.)
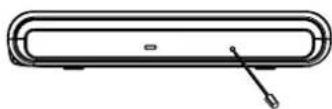
2 If no power supply, the tray will not open, you must insert the open-stick into the hole to open it.
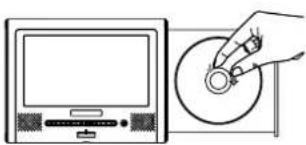
3 Place in disc and press down the disc with your fingers near the center hole.
A click is heard.
2
Notes:
- Set the disc securely. Failure to set it securely could result in damage.
- Do not use cracked or warped discs. Doing so could result in damage.
- Place single-sided DVDs or CDs in with the label (printed) side facing upwards.
For double-sided DVDs, check each side carefully, then place the disc in securely (until a click is heard).
- For CDs or one-sided DVDs, you do not have to worry about touching the label (printed) side of the disc with your fingers. Since two-sided DVDs, however, have signals recorded on both sides, so be careful not to scratch them when removing them from the player.
3
natural_image
Illustration of a hand inserting a CD into a monitor (no text or symbols)4 Push the tray into the player. The player starts loading.
Playback Functions
Playing
1 Load the disc.
■ One of the following messages appears on the screen: DVD, VCD, CD.
■ For some discs, playback starts automatically when the tray is closed.
■ For the disc which had been programmed and stored in memories, playback starts automatically in the programmed order.
2 Press the play/pause button.2
■ Playback starts.
For some discs, a menu screen appears. For video CDs, they are played according to the instructions on the disc's menu screen which is called PBC (playback control).
Hint:
■ For video CDs, it is also possible to play a disc without displaying the menu screen. For example, press 1 (number button) while at STOP mode to play track 1.
■ For CDs, in order to save power, the screen display will be closed automatically if no button is pressed for 1 minute during playing. Press any button to wake it up.
If a menu screen appears
For DVDs with menu screen or video CDs with playback control (PBC), a menu screen appears.
DVD
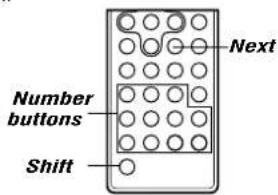
Use the cursor buttons ▲) to select the item, then press the ENTER button.
In order to use the number buttons on the remote control unit to select the item, first press the SHIFT button until NUMBER is displayed on screen, then press number buttons to select the item.
Example: For DVDs with menu screen
Playback Functions

Video CD
Select by pressing the number buttons after pressing the \$HBT to switch to display NUMBER on screen.
Example: For video CDs with playback control (PBC)

If the video CD's menu screen includes more than one page, change page based on the information on screen.
To display the menu screen
The way in which the menu screen is displayed differs from disc to disc. Press the MENU, TITLE button during playback of DVDs, the RETURN button during PBC playback of video CDs. For details, refer to the documentation included with the disc.
Stopping playback
Press the STOP button. Playback will be stopped.
Resume function (DVDs and Video CDs, except VCD2.0 with PBC function on):
After the STOP button is pressed, if the play button is pressed, playback will start from the position at which it was stopped. If the disc is removed or the STOP button is pressed again, the resume function is cancelled.
Note:
■ For some discs, playback may not start from the position at which it was stopped.
Pausing playback
Press the play/pause button to pause playback. Press this button again to resume playback.
Playback Functions
Returning to the previous chapter or track(DVDs, video CDs and CDs)
Press the previous button during playback.
After pressing the previous button, playback returns to the beginning of the previous chapter or track.
Moving to the next chapter or track(DVDS, video CDs and CDs)
Press the next button during playback.
After pressing the next button, playback moves forward to the beginning of the next chapter or track.
Removing the disc
1 Press the STOP button.
2 Press to open the tray.
3 Remove the disc.
4 Push the tray into the player.
Note:
For CDs or one-sided DVDs, you do not have to worry about touching the label (printed) side of the disc with your fingers. Two-sided DVDs, however, have signals recorded on both sides, so be careful not to scratch them when removing them from the player.
Turning Off the Power
1 When the power is on, press OFF and hold it for about 1.5S.
The power LED becomes red and the standby mode is set.
The power can also be turned off by pressing the STANDBY button on the remote control unit.
2 Unplug the power cord from the power outlet.
3 Disconnect the AC adapter from the player's DC input jack.
CAUTION:
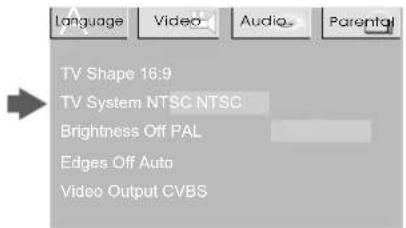
When connecting the player to an external TV monitor, please make sure that (for better audio and visual performance) you switch/adjust the "TV system"
(Marked) to the corresponding one.
Example: Change from NTSC (default setting) to PAL as the below SETUP MENU shows:
Note:
Please turning the player to the correct "TV system" before changing from "AV OUTPUT" to "AV INPUT", or you can only see the black and white picture.
Various Language and Subtitle Settings
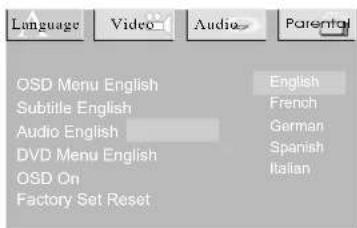
Please stop playback when you are going to change system settings. Press SETUP button on the remote control unit to display setup screen when playback is stopped.
At this section we use the setup screen to change the language and subtitle settings.
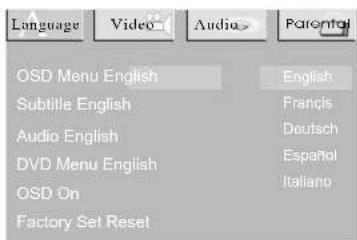
Setting the on-screen display language
Select the language to be used for the on-screen display.
You can select a preferred language for the on-screen display.
Setting the subtitle language
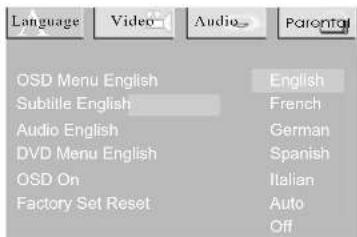
Select the language to be used for the subtitles.
You can select a preferred subtitle from those included in the DVD Video disk. (The screen on your player may have difference with the screen shown here)
Setting the audio language
Select the language to be used for the audio. You can select a preferred audio from those included on the DVD video disk.
(The screen on your player may have difference with the screen shown here)
Searching for a specific scene
1 Press the SEARCH button.
2 Press the number button to input specific time or title/chapter.
3 Press the PLAY button or ENTER button. Playback starts from the specified position.
Viewing in slow motion (DVDs and video CDs)
Press the SLOW button during playback, the playback speed changes to 1/2, 1/4, 1/6 or 1/7 of the normal speed.
Repeating DVDs, video CDs and CDs
Repeat a Title, Chapter, or Track
Press the REPEAT button.
Select the title, chapter, or track you want to repeat.
Repeat a section between point A and B.
During playback, press A-B button on the remote control unit at the starting point of the section you want to repeat. (point A)
Press A-B button again at the ending point of the section you want to repeat. (Point B) The repeating starts.
Press A-B button again to cancel the A-B repeat function.
Selecting angle (multi-angle)
Press the ANGLE button while playing a scene with multiple angles.
If your DVD disc is not recorded with multiple angles, press ANGLE button will not have function.
Advanced Functions
Changing from AV OUT to AV IN
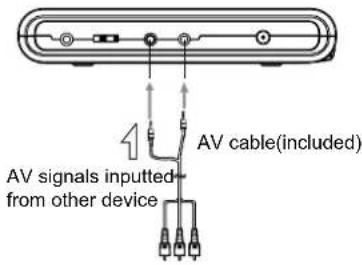
You can change the player from AV OUT(output AV signal to TV, etc) to AV IN(input AV signal from other device) and use it as a TFT Monitor. Default setting is AV OUT.
1 Press MODE button on main unit and switch LCD mode to AV IN/OUT.
2 Press + or - button to switch between AV OUT and AV IN.
Note:
Avoid to input AV signals from AV JACK when the player is set to AV OUT, or interference will be caused to affect current playback and lower down playing quality.
Setting Parental Lock Level
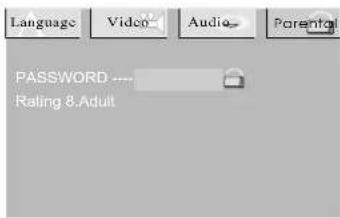
1 At STOP status, press the SETUP button to display the setup screen, use the cursor buttons to select Parental Lock.
2 You can input new password using number buttons.
Default password is 9999.
3 You can change rating by using ENTER button.
Video Enhance
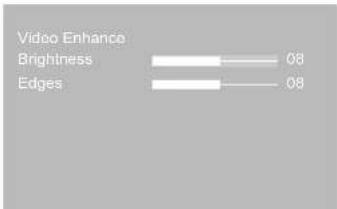
Press the SETUP button while playing disk, the Video Enhance screen will be displayed. Change brightness or edges of pictures by using cursor buttons to improve picture quality.
Cautions on Using
Handling discs
Handling
When holding with both hands
When holding with one hand
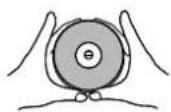
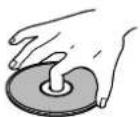
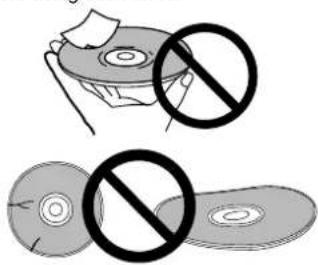
- Do not use damaged (cracked or warped) discs.
- Do not scratch the signal surface or let it get dirty.
- Do not attach paper or seals to discs.
- The player may be damaged if there is any exposed glue, etc., on discs. For rental discs in particular, extra labels are often attached to the discs. Check carefully for any exposed glue before using such discs.
natural_image
Illustration of a hand holding a paper with two prohibition symbols (no text or labels)Storing discs
• Always place discs in their case and store them vertically.
Avoid storing discs in hot or humid places, places exposed to direct sunlight and places in which the temperature is extremely low.
- Read any cautions included with the disc carefully.
Cleaning discs
- Fingerprints or dust on discs may reduce sound or picture quality.
Remove them by gently wiping the disc from the center toward the edges using a soft cloth.
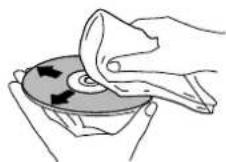
- Do not use benzene, thinner or other volatile chemicals.
Do not use record spray or antistatic spray either.
• We recommend using the separately sold cleaning set to clean discs. - For tough dirt, apply some water to a soft cloth, wring out thoroughly, wipe off the dirt, then wipe the disc with a dry cloth.
Irregular shaped discs
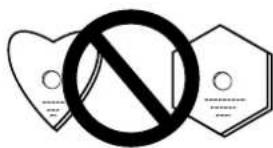
Irregular shaped discs (heart-shaped discs, hexagonal discs, etc.) cannot be played on this player.
Doing so could damage the player. Never use such discs.
Trouble shooting
Picture is disturbed when playing a DVD recorded by a VCR.
This player incorporates copyright protection technology. Some discs include signals protected against copied by a VCR. Such recorded discs can not be played properly.
Player cannot be operated with the remote control unit
- Remote control unit is too far from the main unit or have too large angle with the remote sensor. - Remote control unit's battery is worn out.
TV or other device operates erroneously
The player's remote control unit may cause some TVs with wireless remote control to operate erroneously.
No sound is produced from speakers or sound is distorted
For some discs, 96 kHz digital output of linear PCM audio signals is prohibited. Disc is dirty. Pause or slow play mode is set. Main unit's volume is set to minimum. Earphone is plugged in.
Volume is different for DVDs and CDs
This is due to the different recording methods.
No sound is produced or sound is distorted when connected to a TV, a amplifier, etc.
Connection cables are not firmly plugged in or not contacted well.
→ Connection plugs or jacks are dirty.
→ Audio cables are not properly connected.
→ Audio digital output is connected to a non-compatible AV amplifier, etc.
→ Have wrong DTS setting.
Bad playback quality
The player is set to AV OUT but there are other AV signals inputted from AV jack.
Player gets hot
This is normal.
Notes:
The player may stop operation properly due to static electricity or other external influences. In this case, usually solve the problem by unplugging the power cord and then plugging it in again. If still can not solve it, consult with the nearest service center.
Liquid crystal display
A few picture elements may be black or a particular color displayed on the LCD screen. This is normal.
-SDV17A3-ENG-NB-V1.3-
- Precautions
- LASER
- WARNING:
- CAUTION:
- CAUTION
- RISK OF ELECTRIC SHOCK. DO NOT OPEN
- PARTS AND
- FUNCTIONS......15
- CONNECTING THE PLAYER TO OTHER
- DEVICES......22
- USING THE BATTERY...27
- Table Of Contents
- BASIC OPERATIONS
- TURNING ON THE
- POWER......30
- PLAYBACK
- FUNCTIONS......31
- TURNING OFF THE
- POWER......35
- ADVANCED OPERATCONS
- VARIOUS LANGUAGE
- AND SUBTITLE
- SETTINGS......36
- ADVANCED
- FUNCTIONS......37
- CAUTIONS ON USING..39
- TROUBLE SHOOTING.. 40
- Cautions on Using this Player
- Do not move the player during playback
- Transporting the player
- Place of installation
- Do not place objects on top of the player
- Turn off the power when not using the player
- Special note regarding use of player in vehicles
- When carrying on planes
- When carrying in hospitals
- Cleaning the player
- Copyrights
- Precautions for Battery Pack Operation
- Operation of the battery pack
- Storage
- Service life and disposal
- Types of Discs Playable on this Player
- Marks indicated on DVDs
- Disc structure
- Using These Operating Instructions
- Checking the Accessories
- Remote Control Unit and Main Unit Preparations
- Notes on using the remote control unit
- Replacing the battery
- Note:
- Remote control unit operating range
- Parts and Functions
- Liquid crystal display
- Play/pause button
- Stop /off button
- Previous/next buttons
- Mode button
- 5-/+buttons
- OPEN button
- Phone jack
- Volume control
- Video in/out jack
- Audio in/out and optical output jack
- DC in
- Main unit right panel
- Tray
- Open hole
- Main unit rear side
- Open-stick Support
- 2
- How to stand
- Main unit bottom side
- Remote control unit (frequently used buttons)
- STANDBY button
- PLAY/PAUSE button(▶)
- MENU button
- STOP button(■)
- STEP/SLOW buttons(▶)
- TITLE button8
- PREVIOUS/NEXT button(◀◀)
- and ▶▶)
- Scan buttons (and ▶)
- Remote control unit (other buttons)
- AUDIO button
- SETUP button?
- Cursor buttons
- ENTER button
- RETURN button
- zoom
- Number buttons
- REPEAT button
- A-B REPEAT button
- SHIFT button10
- OPEN11
- SUBTITLE button
- OSD button
- ANGLE button
- SEARCH button
- CLEAR button
- Names of battery parts and their functions
- DC IN connector
- Battery knob
- Battery indicator LED.
- Player terminals
- Connecting the Player to Other Devices
- Before connecting
- Connecting to a Dolby Digital / DTS / MPEG decoder or an amplifier with built-in decoder
- Connecting to a digital amplifier that is not Dolby Digital / DTS / MPEG compatible
- Notes:
- Connecting to active speaker systems
- Connecting earphone
- Using the Battery
- Recharging the battery pack
- Notes for recharging
- Attaching the battery pack to the player
- AC power operation
- Removing the battery pack from the player
- Turning On the Power
- Hint:
- Playback Functions
- Loading
- Playing
- Load the disc.
- Press the play/pause button.2
- If a menu screen appears
- DVD
- Video CD
- To display the menu screen
- Stopping playback
- Pausing playback
- Returning to the previous chapter or track(DVDs, video CDs and CDs)
- Moving to the next chapter or track(DVDS, video CDs and CDs)
- Removing the disc
- Turning Off the Power
- Various Language and Subtitle Settings
- Setting the on-screen display language
- Setting the subtitle language
- Setting the audio language
- Searching for a specific scene
- Viewing in slow motion (DVDs and video CDs)
- Repeating DVDs, video CDs and CDs
- Selecting angle (multi-angle)
- Advanced Functions
- Changing from AV OUT to AV IN
- Setting Parental Lock Level
- Video Enhance
- Cautions on Using
- Handling discs
- Handling
- Storing discs
- Cleaning discs
- Trouble shooting
- Picture is disturbed when playing a DVD recorded by a VCR.
- Player cannot be operated with the remote control unit
- TV or other device operates erroneously
- No sound is produced from speakers or sound is distorted
- Volume is different for DVDs and CDs
- No sound is produced or sound is distorted when connected to a TV, a amplifier, etc.
- Bad playback quality
- Player gets hot
Brand : COBY
Model : TF-DVD7705
Category : Portable DVD Player