
TF-DVD7750 - Portable DVD Player COBY - Free user manual and instructions
Find the device manual for free TF-DVD7750 COBY in PDF.


| Product Type | Portable DVD Player with Dual Screens (Main Unit + Slave Monitor) |
| Display Size | 7-inch TFT LCD (16:9 widescreen) |
| Display Resolution | 480 x 234 pixels |
| Disc Compatibility | DVD-Video, Audio CD, MP3 CD, JPEG CD |
| Video Output (Main Unit) | Composite Video (RCA) |
| Audio Output (Main Unit) | 2x Headphone (3.5mm), Stereo Audio (3.5mm), Coaxial Digital Audio |
| Video Input (Slave Monitor) | Composite Video |
| Audio Input (Slave Monitor) | Stereo Audio (3.5mm) |
| Power Supply | Rechargeable Battery (DC 9V, 2.0A) or AC Adapter (100-240V, 50/60Hz) |
| Power Consumption | ≤ 9W |
| Main Unit Dimensions (W x H x D) | 7.09 x 6.50 x 1.49 inches |
| Main Unit Weight (with battery) | 1.54 lbs |
| Slave Monitor Dimensions (W x H x D) | 7.09 x 6.50 x 0.95 inches |
| Slave Monitor Weight | 0.96 lbs |
| Region Code | Region 1 (USA/Canada) |
| Video System | NTSC |
| Signal-to-Noise Ratio | 90 dB |
| Dynamic Range (Audio) | 90 dB |
| Remote Control | Yes (with battery) |
| Additional Features | Retractable kickstand, dual screen slave connection, headphone jacks, parental control, zoom, program play |
Frequently Asked Questions - TF-DVD7750 COBY
User questions about TF-DVD7750 COBY
0 question about this device. Answer the ones you know or ask your own.
Ask a new question about this device
Download the instructions for your Portable DVD Player in PDF format for free! Find your manual TF-DVD7750 - COBY and take your electronic device back in hand. On this page are published all the documents necessary for the use of your device. TF-DVD7750 by COBY.
USER MANUAL TF-DVD7750 COBY
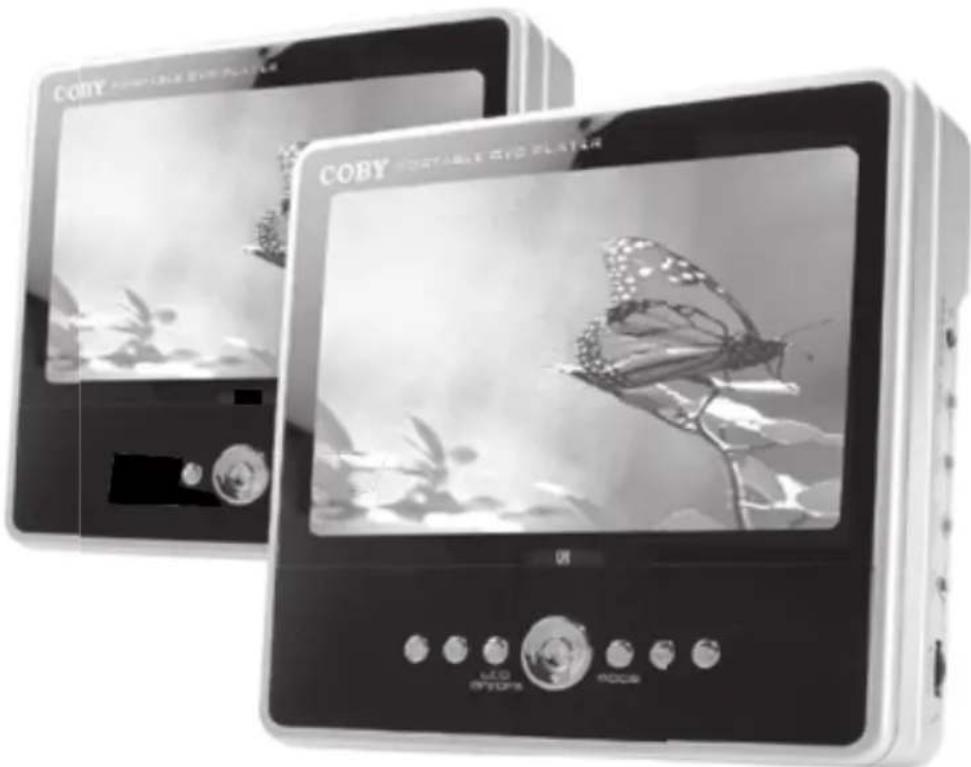
Dual Screen 7" Widescreen TFT LCD
Portable DVD/CD/MP3 Player
natural_image
Two CoBY portable electronic devices displaying a black-and-white photo of a butterfly on a plant branch (no visible text or symbols on the device body)



Instruction Manual
Please read this manual carefully before operation.
PRECAUTIONS
CAUTION
RISK OF ELECTRIC SHOCK DO NOT OPEN

CAUTION: TO REDUCE THE RISK OF FIRE AND ELECTRIC SHOCK, DO NOT REMOVE THE COVER (OR BACK) OF THE UNIT. REFER SERVICING ONLY TO QUALIFIED SERVICE PERSONNEL.
For Customer Use:
Enter below the serial number that is located on the bottom of the unit. Retain this information for future reference.
Model No. TF-DVD7750
Serial No.
The lightning flash with arrowhead symbol within an equilateral triangle is intended to alert the user to the presence of uninsulated “dangerous voltage” within the product’s enclosure that may be of sufficient magnitude to constitute a risk of electric shock.

The exclamation point within an equilateral triangle is intended to alert the user to the presence of important operation and servicing instructions in the literature accompanying the appliance.
WARNING:
To prevent fire or shock hazard, do not expose this device to rain or moisture. Dangerous high voltage is present inside the enclosure. Do not open the cabinet.
CAUTION:
This Digital Video Disc player employs a laser system. To prevent direct exposure to the laser beam, do not try to open the enclosure or defeat the safety interlocks. When open and the interlocks are defeated, visible laser radiation is present.
Use of controls, adjustments, or performance of procedures other than those specified herein may result in hazardous radiation exposure. DO NOT STARE INTO THE BEAM.
FCC Notice:
This equipment has been tested and found to comply with the limits for a Class B digital device pursuant with the FCC Rules, Part 15. These limits are designed to provide reasonable protection against harmful interference in a residential installation. This equipment generates, uses, and can radiate radio frequency energy, and if not installed and used in accordance with the instructions may cause harmful interference to radio communication.
CAUTION:
To prevent electric shock, match wide blade of plug to wide slot of outlet and fully insert.
NOTICE:
This product incorporates copyright protection technology that is protected by U.S. patents and other intellectual property rights. Use of this copyright protection technology must be authorized by Macrovision, and is intended for home and other limited viewing uses only unless otherwise authorized by Macrovision. Reverse engineering or disassembly is prohibited.

natural_image
Recycling symbol composed of three arrows forming a triangle (no text or labels)For recycling or disposal information about this product, please contact your local authorities or the Electronics Industries Alliance: www.eiae.org.
SAFETY INSTRUCTIONS
- Read Instructions: All the safety and operating instructions should be read before the product is operated.
- Retain Instructions: The safety and operating instructions should be retained for future reference.
- Heed Warnings: All warnings on the product and in the operating instructions should be adhered to.
- Follow Instructions: All operating and usage instructions should be followed.
- Cleaning: Unplug this product from the wall outlet before cleaning. Do not use liquid cleaners or aerosol cleaners. Use a damp cloth for cleaning.
- Attachments: Use only attachments recommended by the manufacturer. Use of other attachments may be hazardous.
- Water and Moisture: Do not use this product near water (e.g., near a bath tub, washbowl, kitchen sink, laundry tub, in wet basements, or near a swimming pool and the like).
- Accessories: Do not place this product on an unstable cart, stand, tripod, bracket, or table. Use only with carts, stands, tripods, brackets, or tables recommended by the manufacturer or sold with the product. Any mounting of the product should follow the manufacturer's instructions and should use a mounting accessory recommended by the manufacturer.
- A product and cart combination should be moved with care. Quick stops, excessive force, and uneven surfaces may cause the product and cart combination to overturn.
- Ventilation: Slots and openings in the cabinet are provided for ventilation to ensure reliable operation of the product and to protect it from overheating. These openings should never be blocked by placing the product on a bed, sofa, rug, or other similar surface. This product should not be placed in a built-in installation such as a bookcase or rack unless proper ventilation is provided or the manufacturer instructions have been adhered to.
- Power Sources: This product should be operated only from the type of power source indicated on the rating label. If you are not sure of the type of power supply to your home, consult your product dealer or local power company. For products intended to operate from battery power or other sources, refer to the operating instructions.
- Grounding or Polarization: This product may be equipped with a polarized alternating-current line plug that has one blade wider than the other. This plug will only fit into the power outlet in one direction. This is a safety feature. If you are unable to insert the plug fully into the outlet, try reversing the direction of the plug. If the plug should still fail to fit, contact an electrician to replace the obsolete outlet. Do not defeat the safety purpose of the polarized plug.
- Power-Cord Protection: Power supply cords should be routed so that they are not likely to be walked on or pinched by items placed upon or against them, paying particular attention to cords at plugs, convenience receptacles, and at the point which they exit from the product.
- Protective Attachment Plug: The product may be equipped with an attachment plug with overload protection. This is a safety feature. See the operating instructions for replacement or directions to reset the protective device. If replacement of the plug is required, be sure the service technician has used a replacement plug that has the same overload protection as the original plug as specified by the manufacturer.
SAFETY INSTRUCTIONS
- Outdoor Antenna Grounding: If an outside antenna is connected to the product, be sure the antenna system is grounded so as to provide some protection against voltage surges and built-up static charges. Article 810 of the National Electrical Code, ANS/NFPA 70 provides information with regard to proper grounding of the mast and supporting structure, grounding of the lead-in wire to an antenna-discharge unit, size of grounding conductors, location of antenna-discharge unit, connection to grounding electrodes, and requirements for the grounding electrode (see figure).
- Lightning: For added protection for this product, unplug it from the wall outlet and disconnect the antenna or cable system during a lightning storm or when it is left unattended and unused for long periods of time. This will prevent damage to the product due to lightning or power-line surges.
- Power Lines: An outside antenna system should not be located in the vicinity of overhead power lines or other electric light or power circuits, or where it can fall into such power lines or circuits. When installing an outside antenna system, extreme care should be taken to keep from touching such power lines or circuits, as contact with them might be fatal.
- Overloading: Do not overload wall outlets, extension cords, or integral convenience receptacles as this can result in a risk of fire or electric shock.
- Object and Liquid Entry: Never push objects of any kind into this product through openings as they may touch dangerous voltage points or shout-out parts that could result in a fire or electric shock. Never spill liquid of any kind on the product.
- Servicing: Do not attempt to service this product yourself as opening or removing covers may expose you to dangerous voltage or other hazards. Refer all servicing to qualified service personnel.
- Damage Requiring Service: Unplug this product from the wall outlet and refer servicing to qualified service personnel under the following conditions: a) when the power-supply or plug is damaged; b) if liquid has been spilled or if objects have fallen into the product; c) if the product has been exposed to rain or water; d) if the product does not operate normally by following the operating instructions. Adjust only those controls that are covered by the operating instructions as improper adjustment of other controls may result in damage and will often require extensive work by a qualified technician to restore the product to its normal operation; e) if the product has been dropped or damaged in any way; f) when the product exhibits a distinct change in performance—this indicates a need for service.
- Replacement Parts: When replacement parts are required, be sure that your service technician has used replacement parts specified by the manufacturer or have the same characteristics as the original part. Unauthorized substitutions may result in fire, electric shock, or other hazards.
- Safety Check: Upon completion of any service or repairs to this product, ask the service technician to perform safety checks to ensure that the product is in proper operating condition.
- Wall or Ceiling Mounting: The product should be mounted to a wall or ceiling only as recommended by the manufacturer.
- Heat: The product should be situated away from heat sources such as radiators, heat registers, stoves, or other products (including amplifiers) that produce heat.
Note:
The main plug is used to disconnect the device. It should remain within reach and should not be obstructed during intended use.
TABLE OF CONTENTS
PRECAUTIONS....2
SAFETY INSTRUCTIONS....3
TABLE OF CONTENTS....5
ABOUT OPTICAL DISCS....7
Disc Requirements....7
Disc Care and Maintenance ....7
Dolby Pro Logic Surround Connection....13
Headphone Connection....13
Dual Screen Slave Connection....14
Remote Control....15
Power Supply 15
Using the AC Power Adapter 15
Using the Battery Pack (DC) 16
Power Management....16
Using the Retractable Kick Stand....17
BASIC OPERATIONS 18
Basic Disc Playback....18
Play/Pause/Stop 18
Previous/Next (Skip)....18
Reverse/Forward (Scan)....18
Slow 18
Menu Navigation....19
Numeric Keypad....19
Adjusting the Volume 19
Disc Error Messages ....19
TABLE OF CONTENTS
DVD/DISC FUNCTIONS 20
Search....20
DVD Chapter/Title Search ....20
DVD Time Search (within a specified title)....20
CD Time Search: 20
Repeat Mode....20
Repeat A-B Mode 20
Multi-Angle/Subtitle/Audio 21
Zoom....21
Program 21
DVD Program Mode....21
CD Program Mode....22
MP3 Program Mode....22
FUNCTION BUTTONS 23
Mode / LCD Mode....23
LCD Display On/Off 23
Display 23
Menu and Title 23
Setup 23
DVD SETUP 24
Language Setup....24
Screen Setup 24
Audio Setup....25
Custom Setup 25
TROUBLESHOOTING....26
SPECIFICATIONS 28
ABOUT OPTICAL DISCS
Disc Requirements
This DVD player supports playback of the following discs.
| Type Disc Mark Content Type | Disc Size Max. Playback Time | |||
| DVD-Video Discs |  | Audio + Video (moving picture) | 12 cm | 133 min (SS-SL) |
| 242 min (SS-DL) | ||||
| 266 min (DS-SL) | ||||
| 484 min (DS-DL) | ||||
| Audio Compact Discs (CDs) | Audio 1  4 min 4 min | |||
| MP3 CDs |  (CD-R, CD-RW) (CD-R, CD-RW) | Audio 12 cm | ~14 hours | |
| JPEG CDs -- Still Picture 12 cm -- | ||||
This unit can play back CD-R and CD-RW discs that contain audio titles, MP3 files, or JPEG picture files. Discs not listed above are not supported by this unit (e.g., PC CD-ROM, CD-Extra, CD-G, CD-I, etc.)
Disc Care and Maintenance
Optical discs (DVDs, CDs) contain high-density compressed data and need proper handling.
Handling a Disc
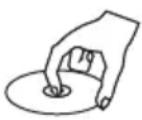
- Hold a DVD/CD by its edges. Avoid touching the recorded side of the disc. To remove a DVD/CD from its storage case, press down on the center retention mechanism of the case and lift the disc out.

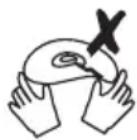
- Do not subject discs to prolonged exposure to direct sunlight, high humidity, or high temperatures.
• Do not bend or press discs. - To reduce the risk of scratches, always put discs back in their case after use. Store discs vertically in a cabinet.
• Do not place stickers or labels on either side of a disc.
Cleaning a Disc
Use a dry, soft cloth to wipe off any fingerprints and dusts from the playing surface of the disc. Wipe in a straight line radially from the center to the outside edge of the disc. Small dust particles and light stains will not affect playback quality.
- Never use chemicals such as record sprays, anti-static sprays, benzene, or thinners to clean a disc. Doing so will damage the surface of the disc permanently.
PACKAGE CONTENTS
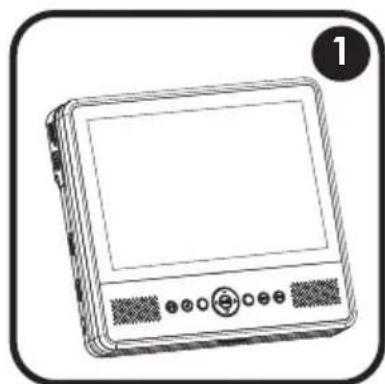
natural_image
Line drawing of a flat-screen electronic device with control buttons and indicator lights (no text or symbols)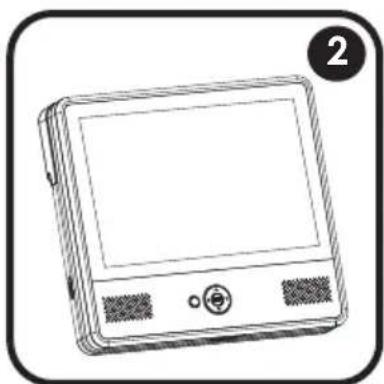
natural_image
Line drawing of a rectangular electronic device with a screen and buttons, no text or symbols present.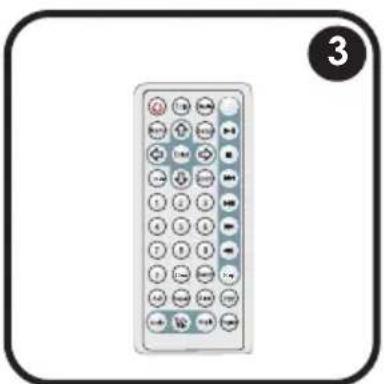
natural_image
Illustration of a remote control with icons and numbers, no text or symbols present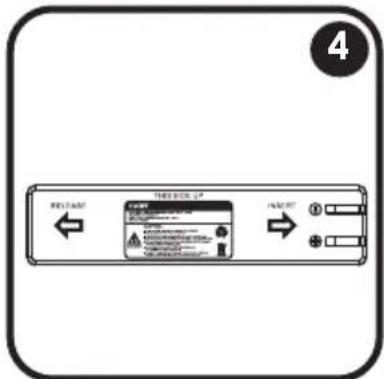
natural_image
Coiled electrical cable with two connectors and a terminal block, no text or symbols visible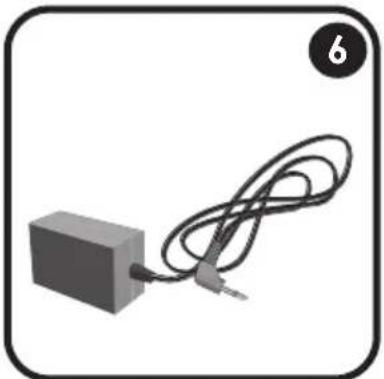
natural_image
Simple line drawing of a connected rectangular device with a coiled cable (no text or symbols)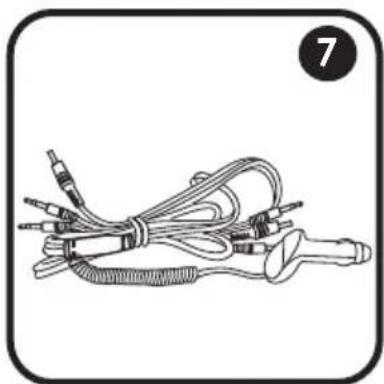
natural_image
Line drawing of a medical or electrical device with coiled wires and connectors (no text or symbols)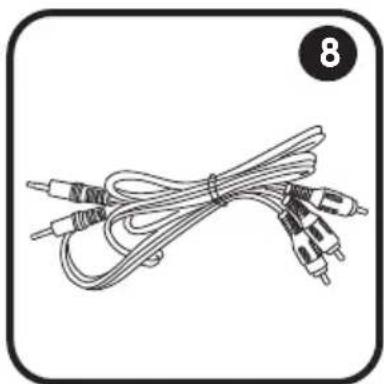
natural_image
Coiled cable with two connectors and a numbered label '8' in the corner (no text or symbols on the cables themselves)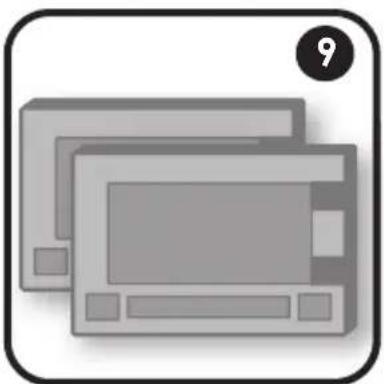
natural_image
Illustration of two overlapping credit cards with a numbered badge (9) in the top right corner, no text or symbols present.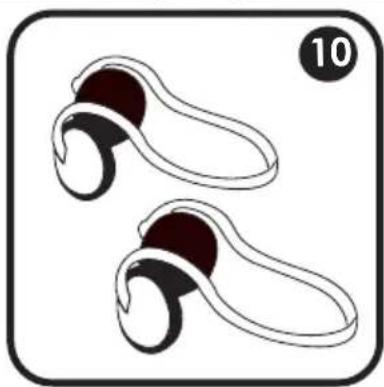
natural_image
Illustration of two types of athletic shoes with black and maroon design, no text or symbols present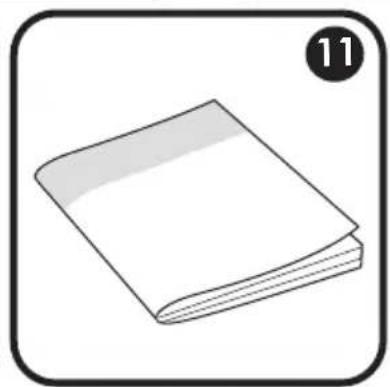
natural_image
Simple line drawing of a closed book with a bookmark, no text or symbols present- Main Unit
- Slave Monitor
- Remote Control
-
Battery Pack
-
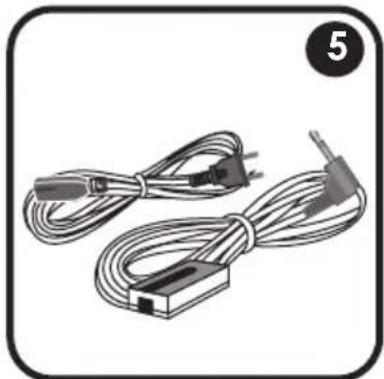
AC Adapter + Cord (1)
- AC Adapter (2)
- DC Car Adapter with Slave Connector
-
AV Cable
-
Headrest Mounting Bag (x2)
- Stereo Headphones (x2)
- Instruction Manual
LOCATION OF CONTROLS
Main Unit
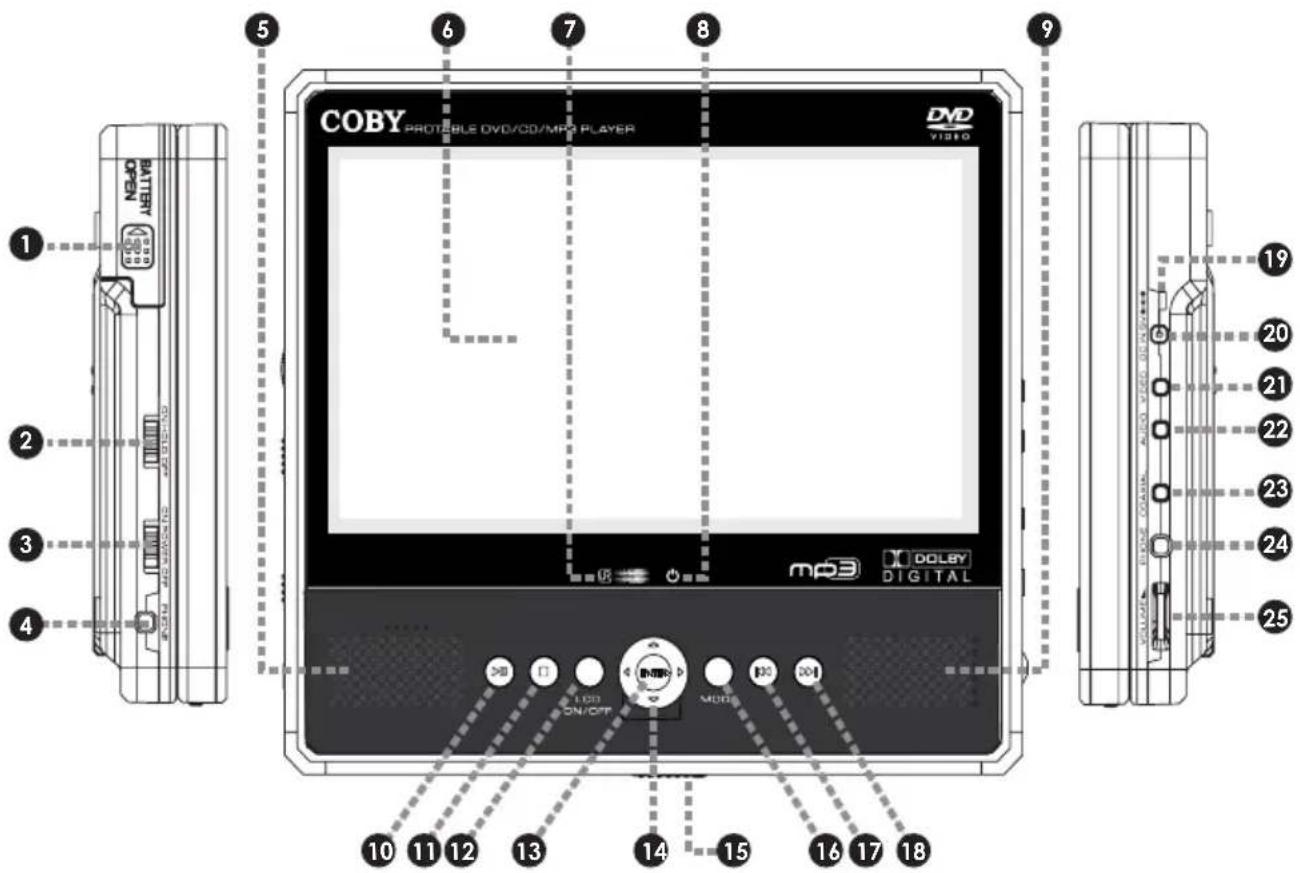
Left View
- Battery Compartment Release Latch
- Hold Switch
- Power Switch
- Headphone Out (1)
Front View
- Left Speaker
- LCD Display
- Remote Sensor
- Power Indicator
- Right Speaker
- Play / Pause
- Stop
- LCD Display On/Off
-
Enter Key
-
Navigation Keypad (Left, Right, Up, Down)
- Disc Compartment Latch
- Mode
- Previous/Reverse
- Next/Forward
Right View
- Battery Indicator
- DC 9V Power In
- Composite Video Out
- Stereo Audio Out
- Coaxial Digital Audio Out
- Headphone Out (2)
- Volume Control Dial
LOCATION OF CONTROLS
Slave Monitor
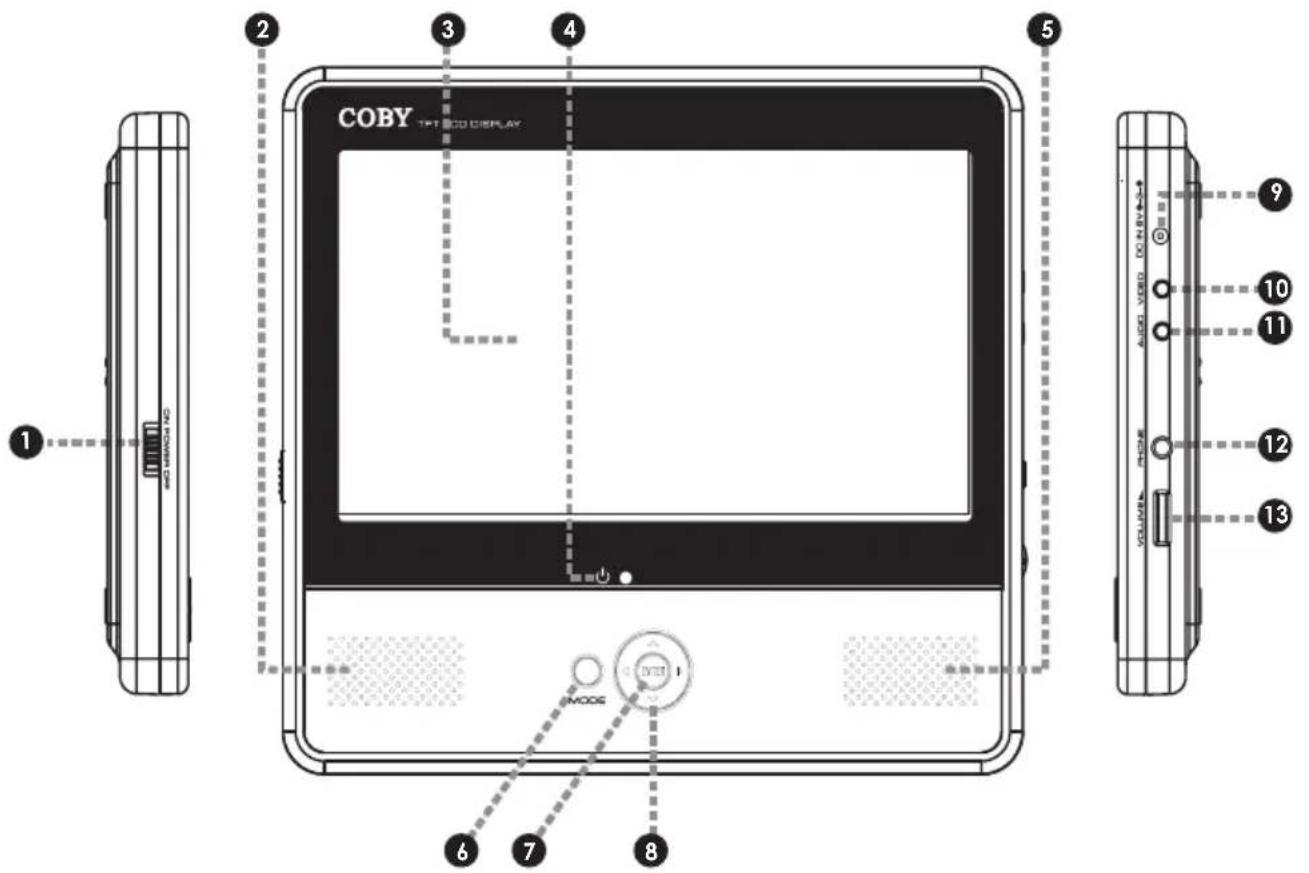
Left View
- Power Switch
Front View
- Left Speaker
- LCD Display
- Power Indicator
- Right Speaker
- Mode
- Enter Key
- Navigation Keypad (Left, Right, Up, Down)
Right View
- DC 9V Power In
- Composite Video In
- Stereo Audio In
- Headphone Out
- Volume Control Dial
LOCATION OF CONTROLS
Remote Control
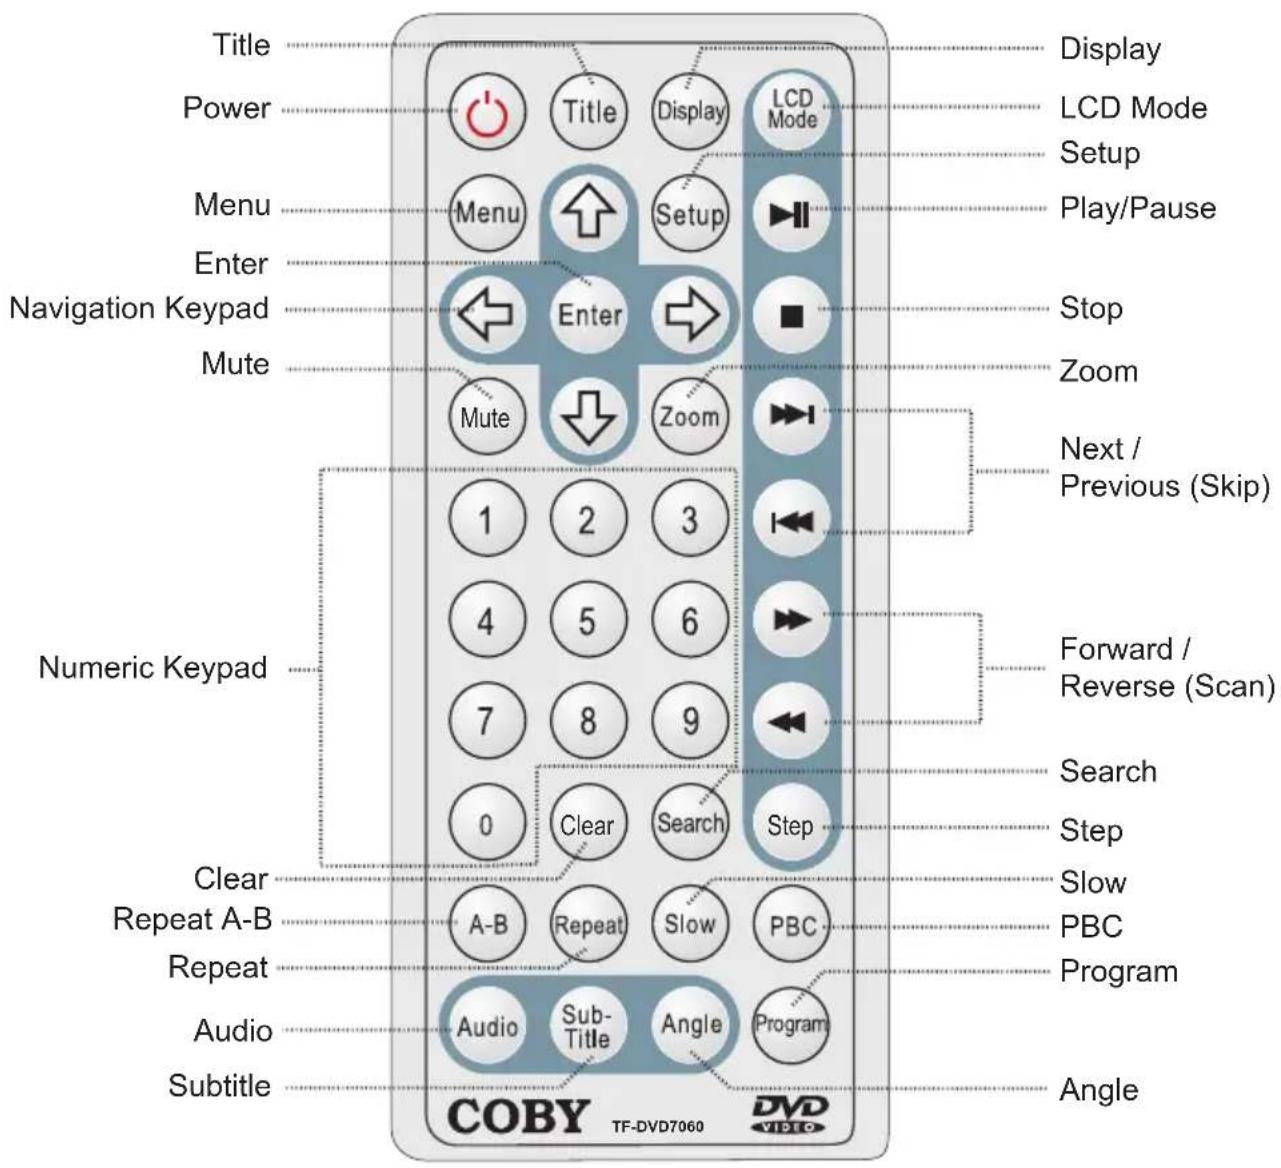
The keys on the remote control that are also on the main unit control the same functions.
CONNECTIONS
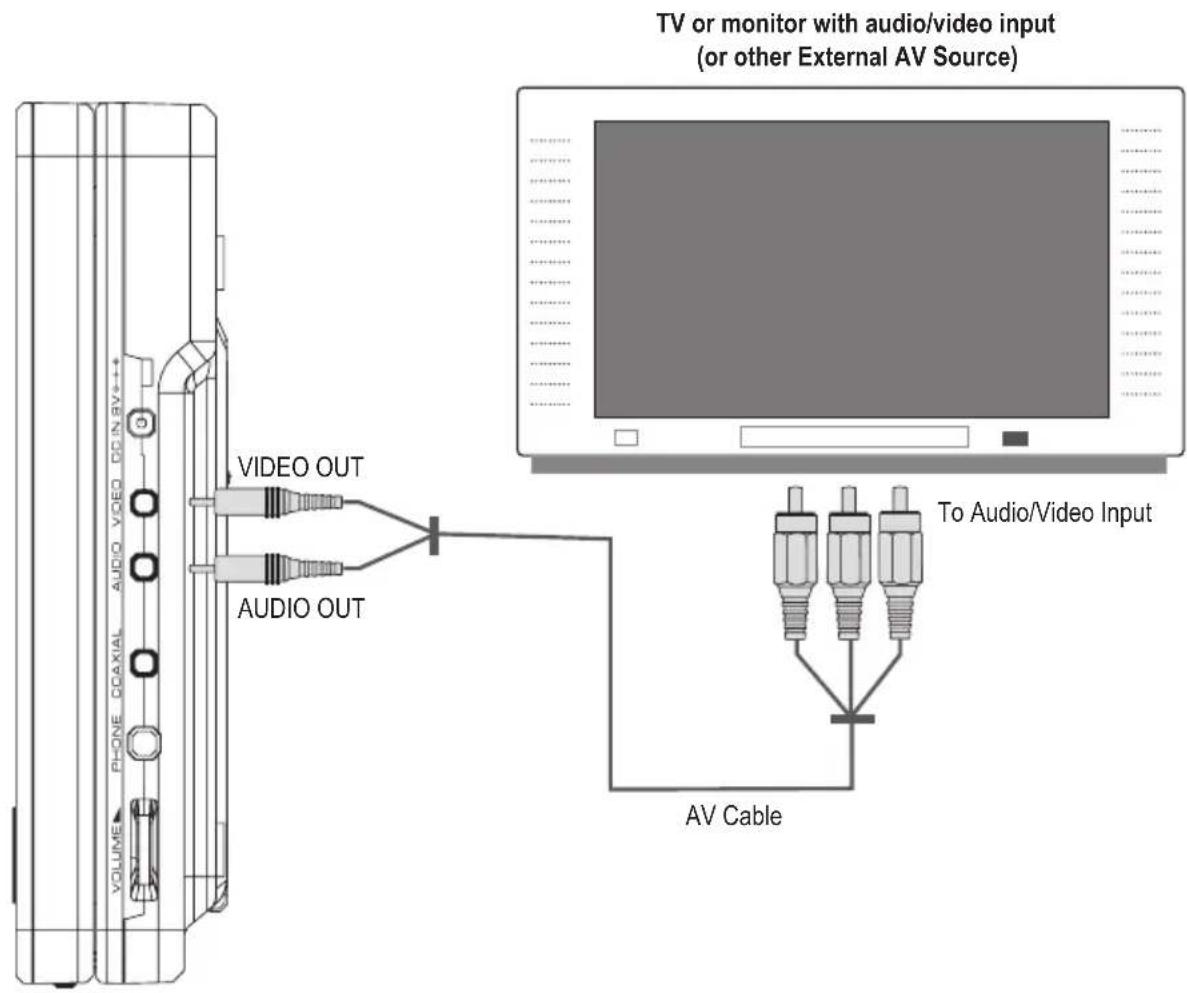
Audio/Video (AV) Output
The main unit comes equipped with AV output jacks.
Use the AV Output connection to output your player's DVD signal to an external display (e.g., a TV or monitor).
- Refer to your TV's instruction manual for more information on setting it to the proper AV mode.
• Be sure to turn off and unplug your player and TV before making these connections.
CONNECTIONS
Dolby Pro Logic Surround Connection
The main unit can output 5.1-channel surround sound audio through the Coaxial Digital Audio Out jack. You will need a Dolby Pro Logic Surround amplifier and an coaxial adapter cable to use this feature.
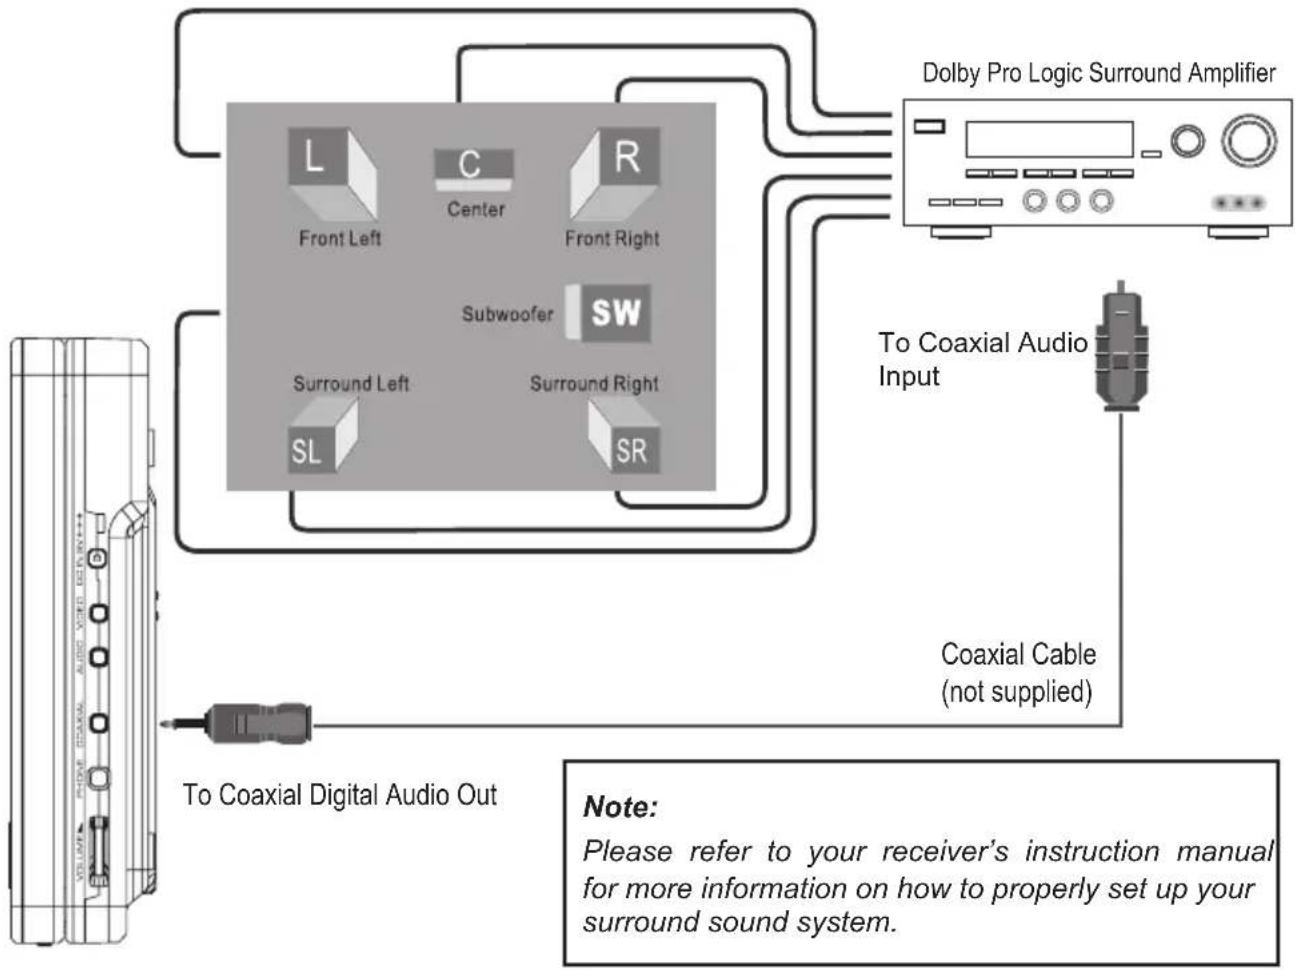
flowchart
graph TD
    A["To Coaxial Audio Input"] --> B["Dolby Pro Logic Surround Amplifier"]
    B --> C["Coaxial Cable (not supplied)"]
    C --> D["To Coaxial Digital Audio Out"]
    D --> E["Central Audio System"]
    E --> F["Front Left"]
    E --> G["Center"]
    E --> H["Front Right"]
    E --> I["Subwoofer"]
    E --> J["Surround Left"]
    E --> K["Surround Right"]
    E --> L["SL"]
    E --> M["SR"]
Headphone Connection
Connect headphones to the headphone jacks for private listening.
- Lower the volume level before connecting headphones, then gradually increase the volume for comfortable listening.
• Hearing experts advise against the constant use of personal stereos played at high volume. - Constant high-volume use can lead to hearing loss. If you experience ringing in your ears or hearing loss, discontinue use immediately and seek medical advice.
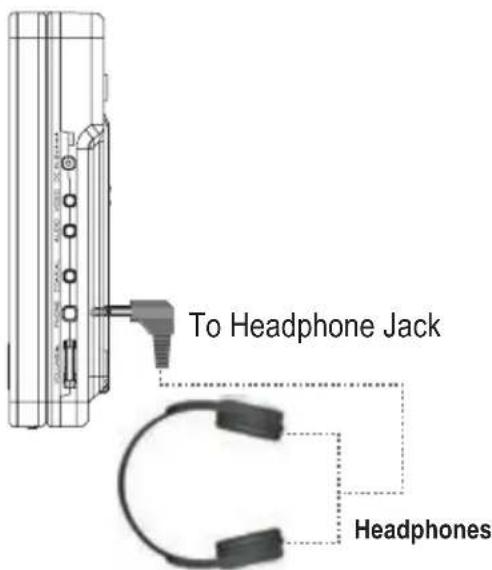
CONNECTIONS
Dual Screen Slave Connection
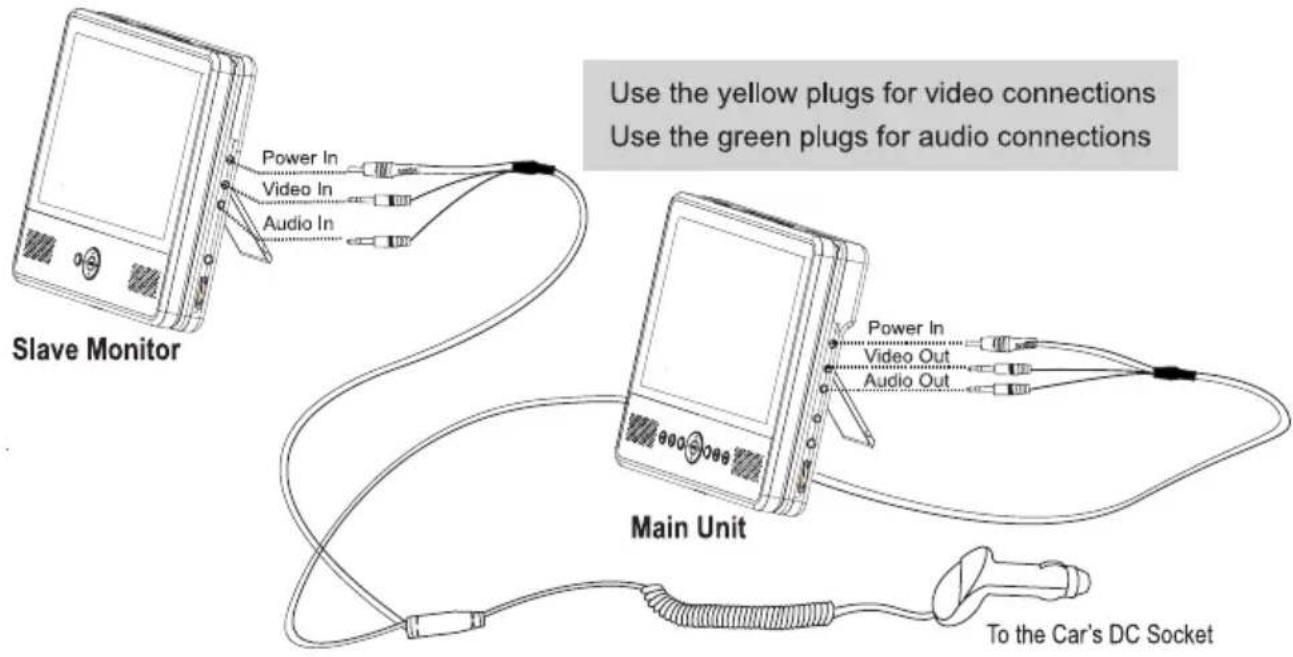
Your player comes equipped with a secondary slave monitor screen. When this connection is made, the slave monitor display will be controlled by the Main Unit.
The slave monitor can accept Audio/Video signals from any external device with the appropriate AV input/output cables.
- In-Car: Make the audio and video connections as shown in the diagram below using the DC Car Adapter with Slave Connector cable. Make the Power connections last.
- Indoors: Make the audio and video connections as shown in the diagram below using the DC Car Adapter with Slave Connector cable. Use the AC adapters provided to make the indoor power connections.
GETTING STARTED
Remote Control
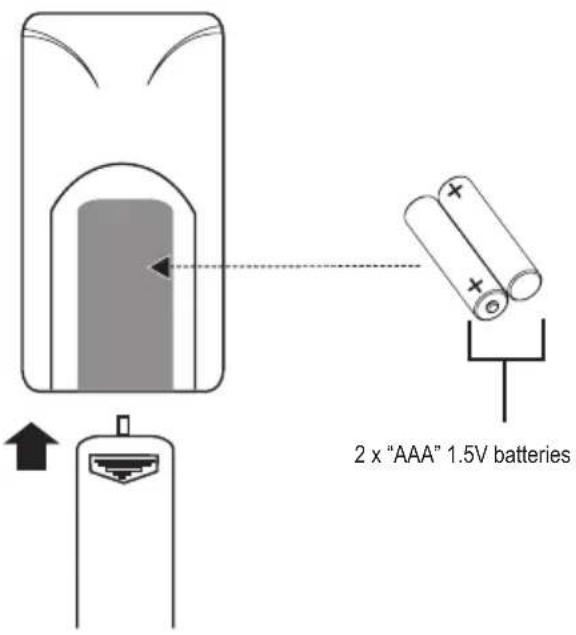
- Refer to the diagram. Remove the battery compartment cover located on the rear of the remote control. Insert batteries, making sure to match their polarities (+/-) to the markings on the inside of the compartment. Replace the cover.
- To use the remote, point it at the remote sensor of the player. Operate the remote within 15 feet of the sensor and at an angle of +/- 60 degrees.
- Batteries in the remote will last for approximately 1 year. Replace the batteries if the remote control does not work. Do not mix old with new batteries, or different types of batteries.
- Remove the batteries from the remote if it will not be used for a long period of time.
WARNING
- The battery used in this device may present a fire or chemical burn if mistreated. Do not recharge, disassemble, incinerate, or heat the battery ( 212^ ).
- Keep batteries away from children.
Power Supply
Using the AC Power Adapter
This AC adapter should be used with 100-240V 50/60Hz AC wall outlets.
- DC Out: 9V
• DC Current: 2.0A min.
Caution:
- Do not connect the power plug to a power outlet other than that which is indicated here and on the label as this may result in the risk of fire or electric shock.
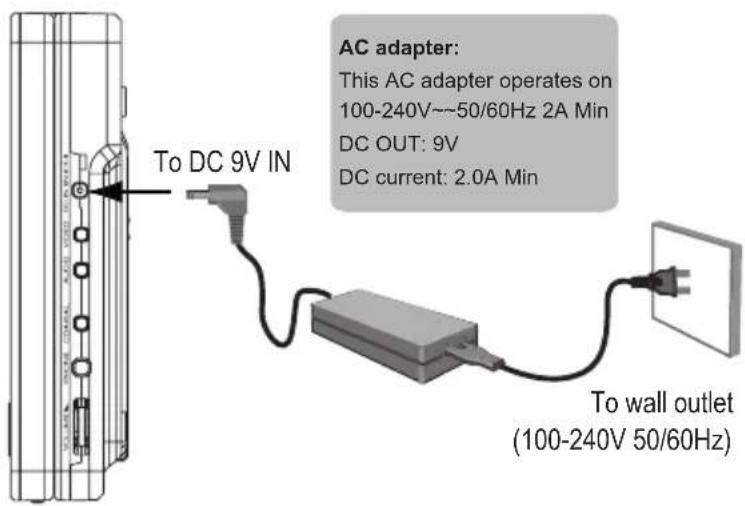
• Do not handle the power plug with wet hands. Doing so may cause electric shock.
- Only use AC adapters of the type specified here. Failure to do so may case a fire or damage the player.
•
GETTING STARTED
Using the Battery Pack (DC)
The main unit can utilize the rechargeable battery pack for on-the-go use. The slave monitor must be powered using either the AC or DC power adapter.
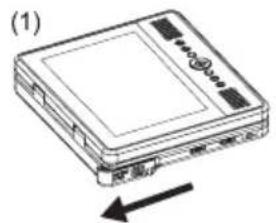
To install the battery pack:
- Slide the battery compartment release latch in the direction of the arrow to open it.
- Insert the battery pack and then close the battery compartment lid.
natural_image
Diagram of a rectangular electronic device with a scroll wheel and indicator lights, showing an arrow pointing to its bottom panel (no text or symbols present)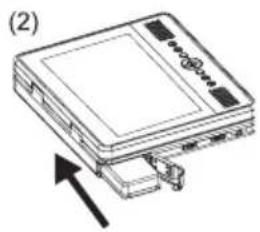
natural_image
Line drawing of a device with an arrow indicating upward movement (no text or symbols present)To charge the battery pack:
- Install the battery pack and then connect the AC adapter to the DC 9V Power In jack.
- The Battery Indicator will light red while the battery is charging; it will light green when the battery is fully charged.

The battery should be charged fully (minimum 4 hours) before its initial use to ensure optimum lifetime performance.
The rechargeable battery pack can be used for approximately 300 charge-cycles without any noticeable change in performance.
When the battery charge level is low, the unit will enter STANDBY mode automatically.
Power Management
If the player will not be in use for a long period of time, set the Power Switch to the OFF position, remove the battery, and unplug the player.
GETTING STARTED
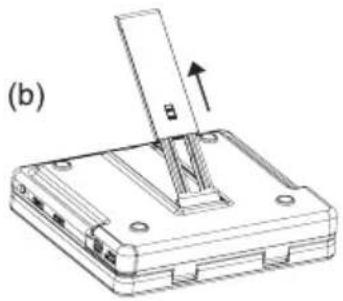
Using the Retractable Kick Stand
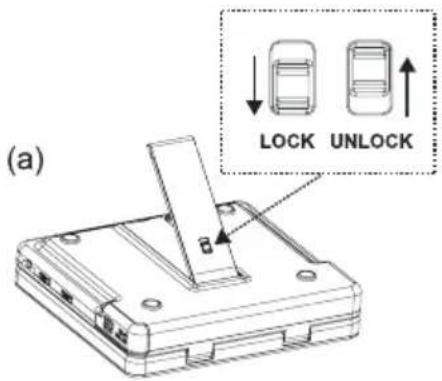
There is a retractable kick stand located on the back of your player. Use the stand for convenient table-top viewing.
- To open the stand, simply lift the stand up from its groove.
- Stand the player up using the open stand as a brace.
- To adjust the viewing angle:
a. Slide the stand lock switch upwards to unlock the stand.
b. Extend the stand to its desired length, then relock the stand with the switch.
c. Stand the player up. The longer the stand is, the steeper the viewing angle will be.
natural_image
Technical line drawing of a mechanical assembly with a lever and mounting base (no text or symbols)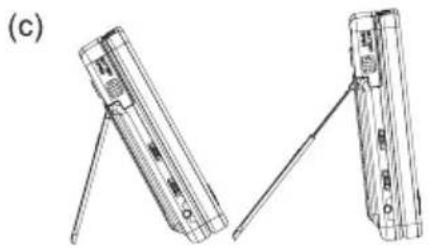
natural_image
Technical line drawing of two mechanical components with a rod, shown from different angles (no text or symbols present)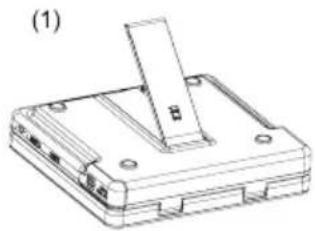
natural_image
Technical line drawing of a device casing with a vertical support and mounting holes (no text or symbols)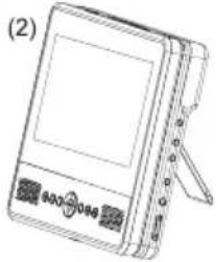
natural_image
Line drawing of a handheld electronic device with a screen and antenna (no text or symbols)BASIC OPERATIONS
Basic Disc Playback
- Prepare the power supply.
Set the Power Switch to the ON position to turn the player on.
- Load a disc.
Press the Open button to open the disc compartment lid. Insert a disc with the label-side up. Close the lid by hand (the lid will click into place).
- If a single-sided disc is inserted upside-down, the player will display "NO DISC" or "BAD DISC".
- Start playback.
Make sure the AV Switch is set to AV OUT to use the player's built-in LCD screen. Press PLAY to start playback (some discs may start playing automatically).
Play/Pause/Stop
- Press to play the disc for the first time.
- Press during playback to pause. Press again to resume playback.
- Press during playback to stop the disc ("Pre-Stop"). Press to resume playback at the time-point at which the disc was stopped.
- Press ☐ when the disc is "Pre-Stopped" to stop playback completely. (When ⏻ is pressed, the disc will start playing from the beginning.)
Previous/Next (Skip)
- Press to skip back one track (DVD, CD, MP3, etc).
- Press to skip forward one track (DVD, CD, MP3, etc).
Reverse/Forward (Scan)
Normal
x2
▶ x4
▶x8
▶ x16
▶x32
- Press to reverse through the disc. Each successive press of will change the rate of reverse playback.
- Press to fast-forward through the disc. Each successive press of will change the rate of forward playback.
Slow
Normal
▶ x1/2
▶ x1/4
▶x1/8
▶x1/16
▶x1/32
- Press SLOW for slow-motion playback. Each successive press of SLOW will change the rate of slow-motion playback. Press to resume normal playback.
- Press STEP frame-by-frame playback. Each successive press of STEP will advance the video one frame. Press 📄 to resume normal playback.
Note:
Audio will be muted during fast-forward, fast-reverse, and slow-motion playback.
Menu Navigation
To navigate DVD disc menus or the player's setup menus:
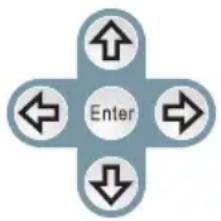
- Use the Navigation keys (Up/Down/Left/Right) to select a desired feature or option in the menu.
- Press ENTER to confirm a selection in the menu.
- For some menu options, you may be able to use the numeric keypad to input data.
- Press Clear to cancel an entry.
Adjusting the Volume
• Turn the Volume Control dial to adjust the volume level up or down.
- Press MUTE to turn the volume off completely; press mute again to restore the volume to its previous level.
Disc Error Messages
The following messages will be displayed on-screen if there is a problem with the format of the loaded disc.
- WRONG REGIONAL DISC. The region code of the disc does not match the player's region code.
- WRONG PASSWORD. The parental rating level of the disc is higher than the parental rating level setting of the player. The player will not play the disc.
- WRONG DISC. The player is equipped with automatic disc quality detection software. If the player detects a disc that is damaged or has a format problem, it may play the disc at a lower quality or stop play completely, depending on how damaged the disc is.

DVD disc production quality may vary; some discs may deviate from the industry standard. Some incorrectly-formatted discs may still play, however, the playback and operational quality of the disc may be substandard.
DVD/DISC FUNCTIONS
Search
Press SEARCH to go directly to a desired point of a disc (e.g., Title, Chapter, Time).
DVD Chapter/Title Search
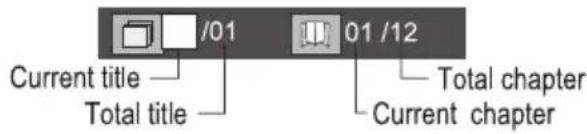
- Press SEARCH once to display the Chapter/Title Search Bar.
- Press the LEFT/RIGHT navigation keys to select (highlight) an entry field.
- Use the Numeric keypad to input the desired chapter/title number, or press the UP/DOWN navigation keys to increase/decrease the chapter/title number.
- Press ENTER to confirm and execute the search or press SEARCH to exit search mode.
DVD Time Search (within a specified title)
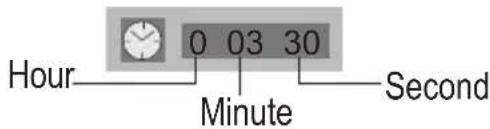
- Press SEARCH twice to display the Time Search Bar.
• Use the Numeric keypad to input the desired time (hours, minutes, seconds).
- Press CLEAR to cancel any input errors.
- Press ENTER to confirm and execute the search or press SEARCH to exit search mode.
CD Time Search:
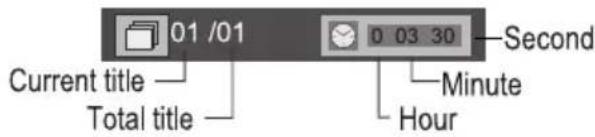
- Press SEARCH once to display the CD Time Search Bar shown to the right.
• Use the Numeric keypad to input the desired time (hours, minutes, seconds).
- Press CLEAR to cancel any input errors.
- Press ENTER to confirm and execute the search or press SEARCH to exit search mode.
Repeat Mode
Press REPEAT to change the repeat mode of the player. Each successive press of REPEAT will change the mode as follows:
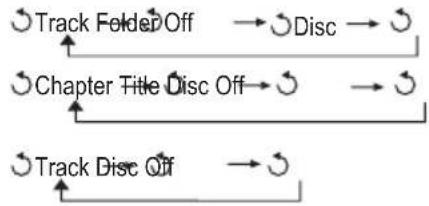
flowchart
graph TD
    A["Track Folder Off"] --> B["Disc"]
    C["Chapter Title Disc Off"] --> D["→"]
    E["Track Disc Off"] --> F["→"]
Note:
Some DVD discs do not allow Repeat mode.
Repeat A-B Mode
To repeat playback of a specific section of a disc (loop):
- Press A-B to set the desired start point ("A") of the section to be repeated.
- Press A-B again to set the desired end point ("B" of the section to be repeated.
- The section "A-B" will now play repeatedly as a loop. Press A-B again to resume normal playback.
Multi-Angle/Subtitle/Audio
- During playback of a DVD that has been mastered with multiple angles, press ANGLE to view the available alternate camera angles. (A DVD may have up to 9 selectable angles.)
- During playback of a DVD that has been mastered with subtitles, press SUBTITLE to view the available subtitle tracks. (A DVD may have up to 32 selectable subtitles.) The default subtitle language is set to English, but may be changed in the DVD Setup menu.
- During playback of a DVD that has been mastered with alternate language/audio tracks, press AUDIO to hear the alternate tracks. (A DVD may have up to 8 selectable audio tracks.) The default audio language is set to English, but may be changed in the DVD Setup menu.
Zoom
Press ZOOM to change the magnification level of the picture.
- During DVD playback, each successive press of ZOOM will change the level of magnification to: Zoom 2x, Zoom 4x, Normal.
- During JPEG CD playback, each successive press of ZOOM will change the level of magnification to: 25%, 50%, 100%, 150%, 200%.
When the magnification level is greater than Normal/100%, use the navigation keys (UP/DOWN/LEFT/RIGHT) to pan around the magnified picture.
Note: The picture quality will decrease as the zoom level increases.
Program
Enter Program mode to create a custom sequence of tracks to be played.
(Program mode is available only when the player is in NAVIGATE OFF mode. Press the PBC button to set the player to NAVIGATE OFF mode.)
Note:
You can also use the numeric keypad to enter numbers directly in the fields. Use the navigation keys to move between entry fields.
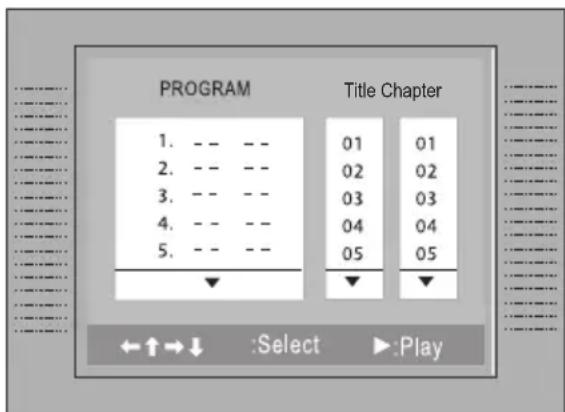
DVD Program Mode
- Load a DVD and press PROGRAM.
- Press the RIGHT navigation key to select the "Title" column; press the UP/DOWN navigation keys to select a title.
- Press RIGHT to select the "Chapter" column; press UP/DOWN to select a chapter.
- Press ENTER to confirm the selection.
-
Repeat steps 2-4 until you have finished programming your selections or when you have programmed the maximum 20 tracks.
-
Press PLAY to start playback. Press PROGRAM to cancel.
DVD/DISC FUNCTIONS
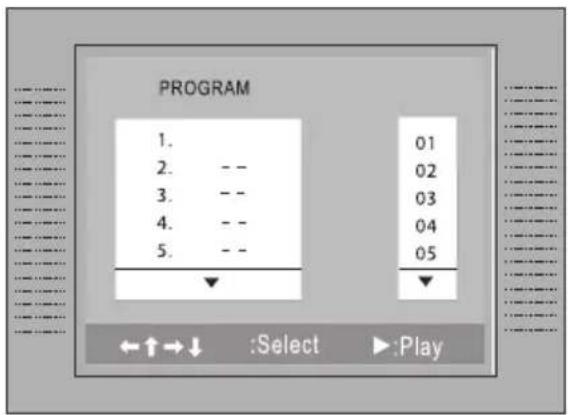
CD Program Mode
- Load a CD and press PROGRAM.
- Press the RIGHT navigation key to select the "Track" column; press the UP/DOWN navigation keys to select a track.
- Press ENTER to confirm the selection.
- Repeat steps 2-3 until you have finished programming your selections or when you have programmed the maximum 20 tracks.
- Press PLAY to start playback. Press PROGRAM to cancel.
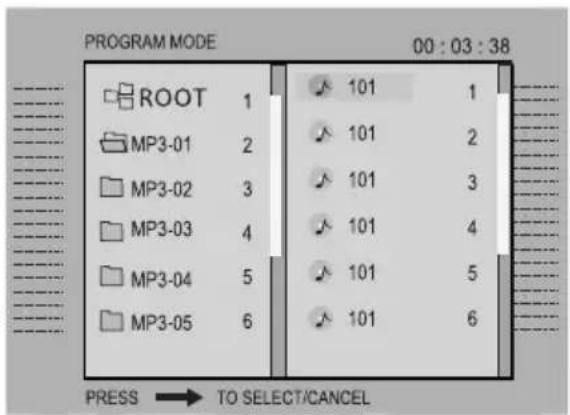
MP3 Program Mode
- Load an MP3-CD and press PROGRAM.
- Use the navigation keys to select the desired file.
• To navigate through subfolders: press the LEFT/RIGHT navigation keys to enter/exit a folder. - Press RIGHT to confirm. The confirmed file will be marked as a programmed file.
- Repeat steps 2-3 until you have finished programming your selections or when you have programmed the maximum 20 tracks.
- Press ENTER to confirm the selection.
- Press PLAY to start playback. Press PROGRAM to cancel.
FUNCTION BUTTONS
Mode / LCD Mode
Press the MODE button once (or LCD MODE on the remote) to adjust the brightness, contrast, and color of the LCD screen.
-
Press the UP/DOWN navigation keys to select the desired setting to adjust. From top to bottom, the settings are: Screen, Brightness, Contrast, Color, and Reset.
-
Press the LEFT/RIGHT navigation keys to adjust the selected setting.
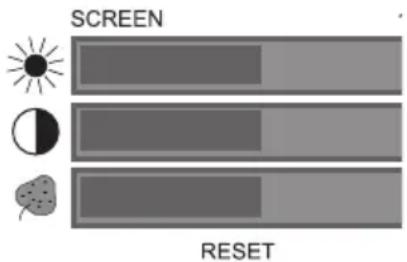
- Use the SCREEN adjustment to switch between 16:9 (widescreen) and 4:3 (standard) aspect ratios.
• Use the BRIGHTNESS adjustment to make the screen brighter or darker.
• Use the CONTRAST adjustment to display a picture with higher or lower contrast.
• Use the COLOR adjustment to display a picture with higher or lower color saturation. - Select RESET to return the LCD mode adjustments to their factory-default settings.
Press the MODE button on the main unit twice to enter DVD Setup mode (please see the DVD____Setup section for more information).
LCD Display On/Off
Press the LCD Display On/Off to turn the LCD Display on or off. You may turn the LCD display off to conserve battery life during MP3 or CD playback.
Display
- Press the DISPLAY button once to show time information on-screen; press it twice to show status information on-screen; press it a third time to exit the on-screen display mode.
- When the player is in AV mode, press the DISPLAY button to toggle between TV System modes (NTSC or PAL).
Menu and Title
- Press the MENU button during DVD playback to return to the DVD's Main menu.
- Press the TITLE button during DVD playback to return to the DVD's Title menu.
Setup
Press the SETUP button to access the player's DVD setup menu. Enter the DVD setup menu to adjust the player's internal DVD settings; please see the DVD SETUP section for more details.
DVD SETUP
Enter DVD Setup mode to adjust the various internal DVD settings of the player. To access all possible Setup options, make sure the player has been completely stopped before entering Setup mode.
- Press SETUP while the player is in DVD mode to access the DVD Setup menu.
- Use the NAVIGATION keys to select a desired item.
- Press ENTER to confirm a selection.
- Press SETUP to exit Setup mode (or select EXIT and press ENTER).
Language Setup
Use the NAVIGATION keys to highlight the desired language selection and press ENTER to confirm.
| Item Description | Options (Default is in Bold) | |
| OSD | Sets the language of the player's on-screen display. | English, French, German, Spanish |
| Menu | Sets the default menu language of loaded DVDs. | English, Chinese, Japanese, French, German, Italian, Spanish, Portuguese, Hindi, Thai, Russian, Korean, Others |
| Audio | Sets the default language audio track of loaded DVDs. | English, Chinese, Japanese, French, German, Italian, Spanish, Portuguese, Hindi, Thai, Russian, Korean, Others |
| Subtitle | Sets the default subtitle track of loaded DVDs. | English, Chinese, Japanese, French, German, Italian, Spanish, Portuguese, Hindi, Thai, Russian, Korean, Others |
Screen Setup
Use the NAVIGATION keys to highlight the desired screen selection and press ENTER to confirm.
| Item Description | Options (Default is in Bold) | |
| TV Type | Sets the aspect ratio of the display.4:3 LB (Letter Box): For use with “regular” TV displays. Widescreen images will be displayed with black bands on the top and bottom of the screen.4:3 PS (Pan & Scan): For use with “regular” TV displays. Widescreen images are magnified to fill the screen, resulting in a loss of image at the periphery.16:9 (Wide Screen): For use with wide-screen TV displays. | 4:3 PS, 4:3 LB, 16:9Note: Some DVD discs have been mastered for widescreen (16:9) or letter box (4:3) only. Adjusting this option will not affect these discs. |
| Screen Saver | The screensaver prevents burn-in damage to the player’s screen. | On, Off |
DVD SETUP
| TV System | Sets the player’s Video Out signal type. Set this to correspond with your TV. | NTSC, PAL, Auto |
| Brightness Select | ct a preset screen brightness. Normal, Bright, Soft | |
| Contrast Adjust | the screen’s contrast. -4 to +4 (0 is default) |
Audio Setup
Use the NAVIGATION keys to highlight the desired audio selection and press ENTER to confirm.
| Item Description | Options (Default is in Bold) | |
| Digital Out | Sets the player’s Coaxial Digital Audio Out signal. For use with 5.1-channel receivers (see your receiver’s manuals for more details). | SPDIF/RAW, SPDIF/PCM, Off |
To minimize circuit interference, set the Digital Out option to "Off" when the coaxial digital audio connection is not in use.
Custom Setup
Use the NAVIGATION keys to highlight the desired Custom Setup selection and press ENTER to confirm.
| Item Description | Options (Default is in Bold) | |
| Parental Ctrl | Sets the maturity rating level of the player. The player will not play any discs rated higher than this setting.This setting is password protected (the default password is: 8888). | Levels 1 to 8. (8: ADULT is default) |
| Password | Change the Parental Ctrl password. Enter the old password, the new password, and then the new password again to verify.DO NOT FORGET THE PASSWORD; this password cannot be reset. | |
| Angle Mark | Displays an on-screen prompt whenever an alternate angle becomes available for viewing (press ANGLE to view). | On, Off |
| Default | Resets all settings to their factory-default state.This will not reset the Parental Ctrl password. | Read |
TROUBLESHOOTING
If you have a problem with this player, please read the troubleshooting guide below and check our website at www.cobyusa.com for Frequently Asked Questions (FAQs) and firmware updates. If these resources do not resolve the problem, please contact Technical Support.
COBY Electronics Technical Support
56-65 Rust St.
Maspeth, NY 11378
Hours: Monday to Friday, 8:30 AM–11:00 PM EST Saturday to Sunday, 9:00 AM–11:00 PM EST
Email: techsupport@cobyusa.com
Phone: 800-681-2629 or 718-416-3197
Web: www.cobyusa.com
There is no power to the device.
- Ensure that the Power Switch is physically set to the ON position.
• Ensure that the AC adapter cord is securely connected to the player and the proper wall outlet.
• Ensure that the battery pack is fully charged.
The device does not play.
- Ensure that a supported disc is loaded in the player label-side up.
- Ensure that the disc's rating level does not exceed the player's.
- Ensure that the disc is not damaged or too dirty. Clean the disc or try another disc.
- Moisture may have condensed inside the player. Remove the disc and leave the player on for 1-2 hours and then try again.
There is no picture.
- Press the LCD On/Off button to ensure that the LCD Display has been turned on.
- Ensure that the TV set has been powered on and is set to the correct AV mode.
• Ensure that the connections between the player and the TV are secure and correct.
• Check if the connection cables are damaged.
The picture is noisy or distorted.
• The disc may be damaged or dirty. Clean the disc or try another one.
- Reset your TV's color system.
- Ensure that the player is connected directly to the TV (and not through a VCR, cable box, satellite receiver, etc.)
• Try adjusting the antenna for better reception, or connect the player to an external antenna.
TROUBLESHOOTING
There is no sound or distorted sound.
• Ensure that the TV and amplifier have been turned on and properly set up.
• Ensure that the TV and amplifier connections are secure and correct.
• Try a different Audio track of the DVD by pressing AUDIO.
• Ensure that the MUTE function of the TV, Amplifier, or Player is not engaged.
The remote control doesn't work.
- Ensure that the Power Switch has been physically set to the ON position.
- Ensure that there are no obstacles between the remote and the player.
- Point the remote at the remote sensor on the main unit.
• Ensure that the batteries in the remote retain a charge and have been installed correctly.
The player has malfunctioned.
- Unplug the player and remove the battery pack for 30 minutes. After that, reinstall the battery and plug in the player. Power on the player -- the restore function should reset the player.
SPECIFICATIONS
Power Supply Rechargeable Battery
DC: 9V, 2.0A
AC: 100-240V UL Listed Adapter
Power Consumption ≤ 9W
Video Signal System NTSC
Video Output (main unit) Composite Video
Audio Output (main unit) 3.5mm Headphone (x2)
3.5mm Stereo
Coaxial Digital Audio
Audio Output (slave monitor) 3.5mm Headphone
Video Input (slave monitor) Composite Video
Audio Input (slave monitor) 3.5mm Stereo
S/N Ratio 90dB Typical
Dynamic Range (Audio) 90dB Typical
Display Type 7" TFT LCD (16:9)
Display Resolution 480 x 234
Operating Temperature 32°F - 95°F
Unit Dimensions 7.09" x 6.50" x 1.49" (WHD) (main unit)
7.09" x 6.50" x 0.95" (WHD) (slave monitor)
Weight 1.54 lbs (main unit + battery)
0.96 lbs (slave monitor)
Specifications and manual are subject to change without prior notice.
NOTES
NOTES
NOTES
COBY Electronics Corp.
56-65 Rust Street
Maspeth, NY 11378
www.cobyusa.com
www.ecoby.com
- Dual Screen 7" Widescreen TFT LCD
- Portable DVD/CD/MP3 Player
- Instruction Manual
- PRECAUTIONS
- CAUTION
- For Customer Use:
- WARNING:
- CAUTION:
- FCC Notice:
- NOTICE:
- SAFETY INSTRUCTIONS
- Note:
- TABLE OF CONTENTS
- DVD/DISC FUNCTIONS 20
- FUNCTION BUTTONS 23
- DVD SETUP 24
- TROUBLESHOOTING....26
- SPECIFICATIONS 28
- ABOUT OPTICAL DISCS
- Disc Requirements
- Disc Care and Maintenance
- Handling a Disc
- Cleaning a Disc
- PACKAGE CONTENTS
- LOCATION OF CONTROLS
- Left View
- Front View
- Right View
- CONNECTIONS
- Audio/Video (AV) Output
- Dolby Pro Logic Surround Connection
- Headphone Connection
- Dual Screen Slave Connection
- GETTING STARTED
- Remote Control
- WARNING
- Power Supply
- Using the AC Power Adapter
- Using the Battery Pack (DC)
- To install the battery pack:
- To charge the battery pack:
- Power Management
- Using the Retractable Kick Stand
- BASIC OPERATIONS
- Basic Disc Playback
- Play/Pause/Stop
- Previous/Next (Skip)
- Reverse/Forward (Scan)
- Slow
- Menu Navigation
- Adjusting the Volume
- Disc Error Messages
- DVD/DISC FUNCTIONS
- Search
- DVD Chapter/Title Search
- DVD Time Search (within a specified title)
- CD Time Search:
- Repeat Mode
- Repeat A-B Mode
- Multi-Angle/Subtitle/Audio
- Zoom
- Program
- DVD Program Mode
- CD Program Mode
- MP3 Program Mode
- FUNCTION BUTTONS
- Mode / LCD Mode
- LCD Display On/Off
- Display
- Menu and Title
- Setup
- DVD SETUP
- Language Setup
- Screen Setup
- Audio Setup
- Custom Setup
- TROUBLESHOOTING
- COBY Electronics Technical Support
- There is no power to the device.
- The device does not play.
- There is no picture.
- The picture is noisy or distorted.
- There is no sound or distorted sound.
- The remote control doesn't work.
- The player has malfunctioned.
- SPECIFICATIONS
- NOTES
Brand : COBY
Model : TF-DVD7750
Category : Portable DVD Player