
TF-DVD7006 - Portable DVD Player COBY - Free user manual and instructions
Find the device manual for free TF-DVD7006 COBY in PDF.


| Product Type | Portable DVD Player |
| Brand | Coby |
| Model | TF-DVD7006 |
| Display | 7-inch Widescreen TFT LCD (16:9) |
| Display Resolution | 480 x 234 (QVGA) |
| Media Compatibility | DVD, DVD±R/RW, CD, CD-R/RW, JPEG, MP3 |
| Video Output | Composite Video via 3.5mm AV jack |
| Audio Output | 3.5mm stereo headphone jack, 3.5mm AV jack |
| Audio Decoder | Dolby Digital |
| Signal-to-Noise Ratio | 90 dB typical |
| Dynamic Range | 90 dB typical |
| Power Supply | DC 9V, 2A via AC adapter (100-240V) or car adapter |
| Power Consumption | ≤9W |
| Battery | Built-in rechargeable lithium-ion, 7.4V |
| Operating Temperature | 32°F – 95°F (0°C – 35°C) |
| Dimensions (W x H x D) | 7.36 x 1.97 x 6.69 inches |
| Weight (with battery) | 2.07 lbs |
| Additional Features | Progressive scan, anti-skip, parental lock, picture zoom, multiple languages/subtitles/camera angles |
| Accessories Included | Remote control, AC adapter, car/boat adapter, stereo earphones |
| Cleaning | Use a dry, soft cloth. Do not use liquid cleaners. |
| Safety Certifications | FCC Class B, Dolby Laboratories license |
| Repair | Refer servicing to qualified personnel only. Do not open enclosure. |
Frequently Asked Questions - TF-DVD7006 COBY
User questions about TF-DVD7006 COBY
0 question about this device. Answer the ones you know or ask your own.
Ask a new question about this device
Download the instructions for your Portable DVD Player in PDF format for free! Find your manual TF-DVD7006 - COBY and take your electronic device back in hand. On this page are published all the documents necessary for the use of your device. TF-DVD7006 by COBY.
USER MANUAL TF-DVD7006 COBY
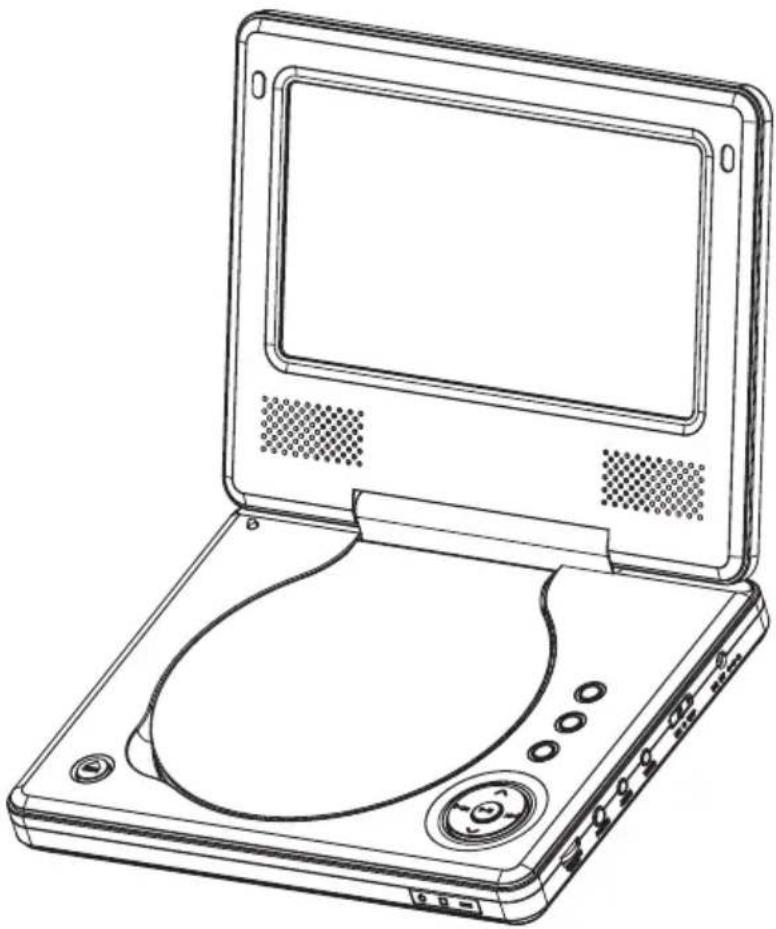
7" Widescreen TFT LCD
Portable DVD/CD/MP3 Player
natural_image
Line drawing of a portable electronic device with open lid and screen (no text or symbols)



Instruction Manual
Please read this manual carefully before operation
PRECAUTIONS
CAUTION: TO REDUCE THE RISK OF FIRE AND ELECTRIC SHOCK, DO NOT REMOVE THE COVER (OR BACK) OF THE UNIT. REFER SERVICING ONLY TO QUALIFIED SERVICE PERSONNEL.
For Customer Use:
Enter below the serial number that is located on the unit. Retain this information for future reference.
Model No. TF-DVD7006
Serial No.
The lightning flash with arrowhead symbol within an equilateral triangle is intended to alert the user to the presence of uninsulated "dangerous voltage" within the product's enclosure that may be of sufficient magnitude to constitute a risk of electric shock.

The exclamation point within an equilateral triangle is intended to alert the user to the presence of important operation and servicing instructions in the literature accompanying the appliance.
WARNING:
To prevent fire or shock hazard, do not expose this device to rain or moisture. Dangerous high voltage is present inside the enclosure. Do not open the cabinet.
CAUTION:
This Digital Video Disc player employs a laser system. To prevent direct exposure to the laser beam, do not try to open the enclosure or defeat the safety interlocks. When open and the interlocks are defeated, visible laser radiation is present.
Use of controls, adjustments, or performance of procedures other than those specified herein may result in hazardous radiation exposure. DO NOT STARE INTO THE BEAM.
CAUTION:
Any changes or modifications not expressly approved in this manual could void your authority to operate this equipment.
FCC Notice:
This equipment has been tested and found to comply with the limits for a Class B digital device pursuant with the FCC Rules, Part 15. These limits are designed to provide reasonable protection against harmful interference in a residential installation. This equipment generates, uses, and can radiate radio frequency energy, and if not installed and used in accordance with the instructions may cause harmful interference to radio communication. However, there is no guarantee that interference will not occur in a particular installation. If this equipment does cause harmful interference to radio or television reception, which can be determined by turning the equipment off and on, the user is encouraged to correct the interference by one or more of the following measures:
- Reorient or relocate the receiving antenna.
- Increase the separation between the equipment and the receiver.
- Connect the equipment into an outlet on a circuit different from that to which the receiver is connected.
- Consult the dealer or an experienced radio/TV technician for help.
WARNING: Handling the cords on this product will expose you to lead, a chemical known to the State of California to cause cancer, and birth defects or other reproductive harm. Wash hands after handling.
CAUTION:
To prevent electric shock, match wide blade of plug to wide slot of outlet and fully insert.
PRECAUTIONS
NOTICE:
The LCD panel used in this player contains millions of thin film transistors that have been manufactured using a high-technology process to deliver a crisp, clear, and detailed picture. Occasionally, a few of these transistors may become stuck or non-active; please note that this is a normal result of the manufacturing process and does not affect the performance of the player.
NOTICE:
This product incorporates copyright protection technology that is protected by U.S. patents and other intellectual property rights. Use of this copyright protection technology must be authorized by Macrovision, and is intended for home and other limited viewing uses only unless otherwise authorized by Macrovision. Reverse engineering or disassembly is prohibited.

This player has built-in copyright protection technology that prevents copying from a DVD disc to any media.
If a video recorder is connected to the player, the video output image will be distorted during recording.
Manufactured under license from Dolby Laboratories. Dolby and the double-D symbol are trademarks of Dolby Laboratories.
Confidential Unpublished Works.
© 1992-1997 Dolby Laboratories. All rights reserved.

For recycling or disposal information about this product, please contact your local authorities or the Electronics Industries Alliance: www.eiae.org.
IMPORTANT SAFETY INSTRUCTIONS
- Read Instructions: All the safety and operating instructions should be read before the product is operated.
- Retain Instructions: The safety and operating instructions should be retained for future reference.
- Heed Warnings: All warnings on the product and in the operating instructions should be adhered to.
-
Follow Instructions: All operating and usage instructions should be followed.
-
Cleaning: For your safety, always unplug this product from the wall outlet before cleaning. Do not use liquid cleaners or aerosol cleaners. Use a dry or slightly damp (not wet) cloth for cleaning or dusting.
-
Attachments: Use only attachments recommended by the manufacturer. Use of other attachments may be hazardous.
-
Accessories: Do not place this product on an unstable cart, stand, tripod, bracket, or table. Use only with carts, stands, tripods, brackets, or tables recommended by the manufacturer or sold with the product. Any mounting of the product should follow the manufacturer's instructions and should use a mounting accessory recommended by the manufacturer.
-
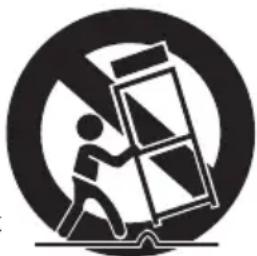
A product and cart combination should be moved with care. Quick stops, excessive force, and uneven surfaces may cause the product and cart combination to overturn.
natural_image
Symbolic icon of a person pushing a ladder inside a circle (no text or symbols)-
Water and Moisture: Water is a natural conductor of electricity. To avoid the possibility of shock or severe injury, do not use this product in or near any sources of water (e.g., a bath tub, washbowl, kitchen sink, laundry tub, in wet basements, a swimming pool and the like).
-
Object and Liquid Entry: Never push objects of any kind into this product, through openings or otherwise; this may result in objects touching dangerous voltage points or short-out parts that could result in a personal or property damage or injury, including fire or electric shock. Never spill liquid of any kind on the product.
-
Ventilation: Any electrically powered consumer electronic product generates heat while in use, thereby requiring proper ventilation. To ensure reliable operation of the product and to protect it from overheating, do not operate the product on a bed, sofa, rug, or other similar soft surface, and never block any ventilation slots or openings provided for the unit. This product should not be operated in any enclosed area such as a cabinet, bookcase or rack unless proper ventilation is provided for the unit.
-
Heat: The product should be situated away from any heat sources such as radiators, heat registers, stoves, or other products (including amplifiers) that produce heat.
-
Power Sources: This product should be operated only from the type of power source indicated on the rating label. If you are not sure of the type of power supply to your home, consult your product dealer or local power company. For products intended to operate from battery power or other sources, refer to the operating instructions.
IMPORTANT SAFETY INSTRUCTIONS
-
Grounding or Polarization: This product may be equipped with a polarized alternating-current line plug that has one blade wider than the other. This plug will only fit into the power outlet in one direction. This is a safety feature. If you are unable to insert the plug fully into the outlet, try reversing the direction of the plug. If the plug should still fail to fit, your outlet may be obsolete; contact a licensed electrician to replace it. Never attempt to defeat the safety purpose of the polarized plug.
-
Power-Cord Protection: Care must be taken to ensure that power supply cords are routed so as to avoid being damaged, such as by being walked on or pinched by items placed upon or against them. You should pay particular attention to cords at plugs, convenience receptacles, and at the point where they exit from the product.
-
Protective Attachment Plug: The product may be equipped with an attachment plug with overload protection. This is a safety feature. See the operating instructions for replacement or directions to reset the protective device. If replacement of the plug is required, please consult an authorized service technician, and make sure s/he has used a replacement plug that has the same overload protection as the original plug as specified by the manufacturer.
-
Outdoor Antenna Grounding: If an outside antenna is connected to the product, be sure the antenna system is grounded so as to provide some protection against voltage surges and built-up static charges. Article 810 of the National Electrical Code, ANS/NFPA 70 provides information with regard to proper grounding of the mast and supporting structure, grounding of the lead-in wire to an antenna-discharge unit, size of grounding conductors, location of antenna-discharge unit, connection to grounding electrodes, and requirements for the grounding electrode (see figure).
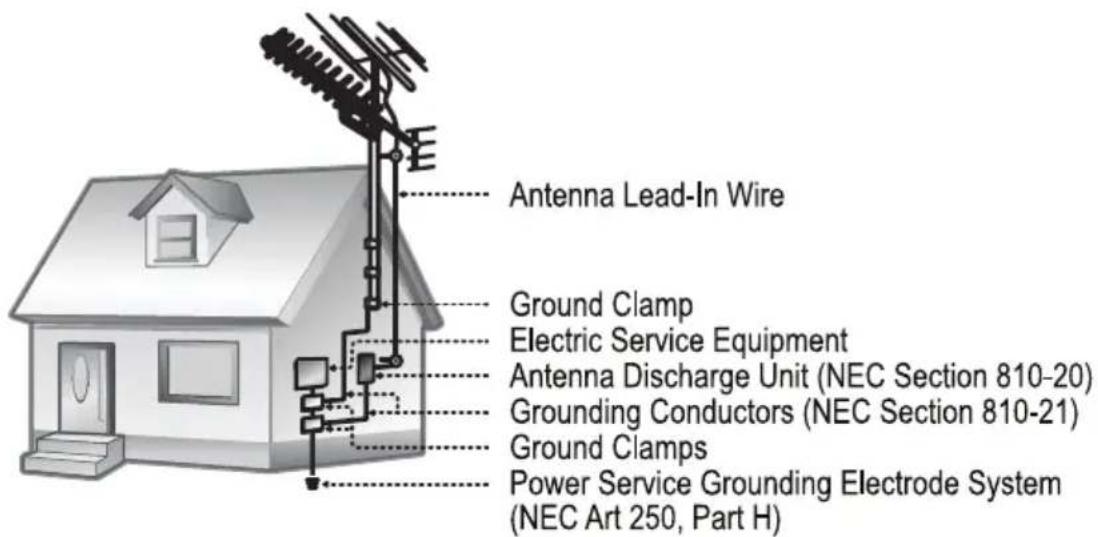
- Lightning: Lightning can cause power surges, which may damage or destroy your product. For added protection, unplug it from the wall outlet and disconnect the antenna or cable system during a lightning storm or when it is left unattended and unused for long periods of time. Power Lines: An outside antenna system should not be located in the vicinity of overhead power lines or other electric light or power circuits, or where it can fall into such power lines or circuits. When installing an outside antenna system, extreme care should be taken to keep from touching such power lines or circuits, as contact with them might be fatal.
IMPORTANT SAFETY INSTRUCTIONS
- Overloading: Always operate any electrical device in accordance with applicable electrical codes. Never overload wall outlets, extension cords, or integral convenience receptacles as this can result in a risk of personal or property damage or injury, including fire or electric shock.
- Servicing: Do not attempt to service this product yourself as opening or removing covers may expose you to dangerous voltage or other hazards, including the risk of injury or damage to persons or property. Your warranty will also be voided. Refer all servicing to qualified service personnel.
- Damage Requiring Service: Unplug this product from the wall outlet and refer servicing to qualified service personnel if: a) the power-supply or plug is damaged in any way; b) liquid has been spilled or if objects have fallen or been introduced into the product; c) the product has been exposed to rain, water or other sources of moisture; d) the product does not operate normally by following the operating instructions. Adjust only those controls that are covered by the operating instructions as improper adjustment of other controls may result in damage and/or require extensive work by a qualified service technician to restore the product to its normal operation; e) the product has been dropped or damaged in any way; f) the product exhibits a distinct change in performance indicative of a need for service.
- Replacement Parts: When replacement parts are required, be sure that your service technician has used replacement parts specified by the manufacturer or have the same characteristics as the original part. Unauthorized substitutions may result in injury to property or persons including the risk of fire, electric shock, or other hazards, and your warranty will be voided.
- Safety Check: Upon completion of any service or repairs to this product, ask the service technician to perform appropriate safety checks to ensure that the product is in proper operating condition.
- Wall or Ceiling Mounting: the product should only be mounted to a wall or ceiling only as recommended in this Manual.
ABOUT OPTICAL DISCS
Disc Requirements
This DVD player supports playback of the following discs, as well as CD-R and CD-RW discs that contain audio titles or JPEG picture files. Disc types not listed here are not supported by this unit (e.g., PC CD-ROM, CD-Extra, CD-G, CD-I, etc.)
| Type Disc Mark Content Type | Disc Size | Max. Playback Time | |
| DVD-Video Disc (DVD, DVD±R/RW) |  | Audio + Video (moving picture) | 12 cm |
| Audio Compact Discs (CD, CD-R/RW) |  | Audio 12 cm | 74 min |
| MP3 CDs (CD, CD-R/RW) |  | Audio 12 cm | ~14 hr |
| JPEG CD -- Still Picture | 12 cm | -- |

Depending on the condition of the CD-R/RW or DVD±R/RW disc, or the condition of the recording equipment used to make the disc, some CD-R/RW or DVD±R/RW discs may not play on the unit.

DTS Discs: This player does not have a built-in DTS decoder.
Connect to a digital amplifier using a Digital Audio Connection (optical or coaxial) to enjoy DTS audio discs.
Select Dolby 5.1 or 2-Channel Stereo Downmix instead of the DTS setting.
ABOUT OPTICAL DISCS
DVD Features
Each DVD disc contains features that may vary depending upon the production of the disc. Some of the icons you may see that represent these features are shown below.
 | Number of Audio Tracks |
 | Number of Subtitles |
 | Angle Indicator |
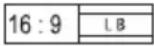 | Screen Format (Aspect Ratio) |
 | Zoom |

Some of the DVD features enabled by this player depend on how the DVD was produced. Some features may not be enabled if the disc does not support the feature, or it may require special settings. Check the features printed on the DVD package or follow the instructions found on the disc's on-screen menu.
DVD Region Codes
DVD discs and DVD players are manufactured under a compulsory worldwide agreement, the DVD Regional Code System. DVD players will only operate with DVD discs encoded with the same corresponding Regional Code.
| Region Code | Region |
| 1 Canada, USA | |
| 2 | Europe (including Poland, Romania, Czech Republic), Japan, Middle East (including Saudi Arabia, Egypt, Iran, South Africa) |
| 3 East Asia (including Hong Kong, Taiwan, South Korea), Southeast Asia | |
| 4 Australia, Caribbean, Central America, South America, Mexico, New Zealand | |
ABOUT OPTICAL DISCS
| Region Code Region | |
| 5 Africa, | the former Soviet Union, India, North Korea, Pakistan, Turkmenistan |
| 6 China | |
Disc Care and Maintenance
Optical discs (DVDs, CDs) contain high-density compressed data and need proper handling.
Handling a Disc
- Hold a DVD/CD by its edges. Avoid touching the recorded side of the disc. To remove a DVD/CD from its storage case, press down on the center retention mechanism of the case and lift the disc out.
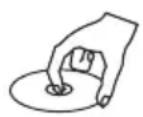


• Do not bend or press discs.
- Do not subject discs to prolonged exposure to direct sunlight, high humidity, or high temperatures.
- To reduce the risk of scratches, always put discs back in their case after use. Store discs vertically in a cabinet.
- Do not place stickers or labels on either side of a disc.
Cleaning a Disc
Use a dry, soft cloth to wipe off any fingerprints and dusts from the playing surface of the disc. Wipe in a straight line radially from the center to the outside edge of the disc. Small dust particles and light stains will not affect playback quality.

Never use chemicals such as record sprays, anti-static sprays, benzene, or thinners to clean a disc. Doing so will damage the surface of the disc permanently.
TABLE OF CONTENTS
PRECAUTIONS 2
IMPORTANT SAFETY INSTRUCTIONS ....4
ABOUT OPTICAL DISCS ....7
Disc Requirements ....7
DVD Features 8
DVD Region Codes 8
Disc Care and Maintenance 9
TABLE OF CONTENTS ...... 10
PACKAGE CONTENTS....12
FEATURES 13
CONTROLS AT A GLANCE ....14
Main Unit: Top View 14
Main Unit: Right View 15
Remote Control 16
CONNECTIONS 19
Power 19
AC Adapter 19
Rechargeable Battery Pack ....20
DC Car/Boat Adapter ....21
Power Management ....22
Optional Audio/Video Output Connections ....23
Using Headphones or Earphones ....23
Connecting Video and Audio to a Television 24
Connecting Audio to a Stereo Receiver System ....25
GETTING STARTED 26
Basic Operations ......26
Basic Playback Controls ....27
On-Screen Display 28
TABLE OF CONTENTS
PLAYER FUNCTIONS 30
Menu/Title and Setup Controls ....30
Extended Playback Controls ....30
Random/Program 32
DVD Program Mode ....32
CD Program Mode ....33
LCD Mode 33
SETUP 34
Language Settings ....34
Display Settings 34
Audio Settings 35
Parental Settings 35
TROUBLESHOOTING 36
SPECIFICATIONS 39
PACKAGE CONTENTS
Please make sure the following items are included in the package. If any items are missing, contact your local dealer.
- DVD Player
- Remote Control
• 100-240V AC Adapter
• Car/Boat DC Adapter - Stereo Earphones
FEATURES
• Progressive Scan DVD Player
• Compact Portable Design with Anti-Skip Circuitry
• 7" Widescreen (16:9) TFT Color Display
• DVD, DVD±R/RW, CD, CD-R/RW, JPEG and MP3 Compatible
• Dolby Digital Decoder
• AV Outputs for use with Home Theater Systems
• Headphone Jack for Private Listening
• Multiple Language, Subtitle, and Camera Angle Support
• Parental Lock Control
• Picture Zoom Function
CONTROLS AT A GLANCE
Main Unit: Top View
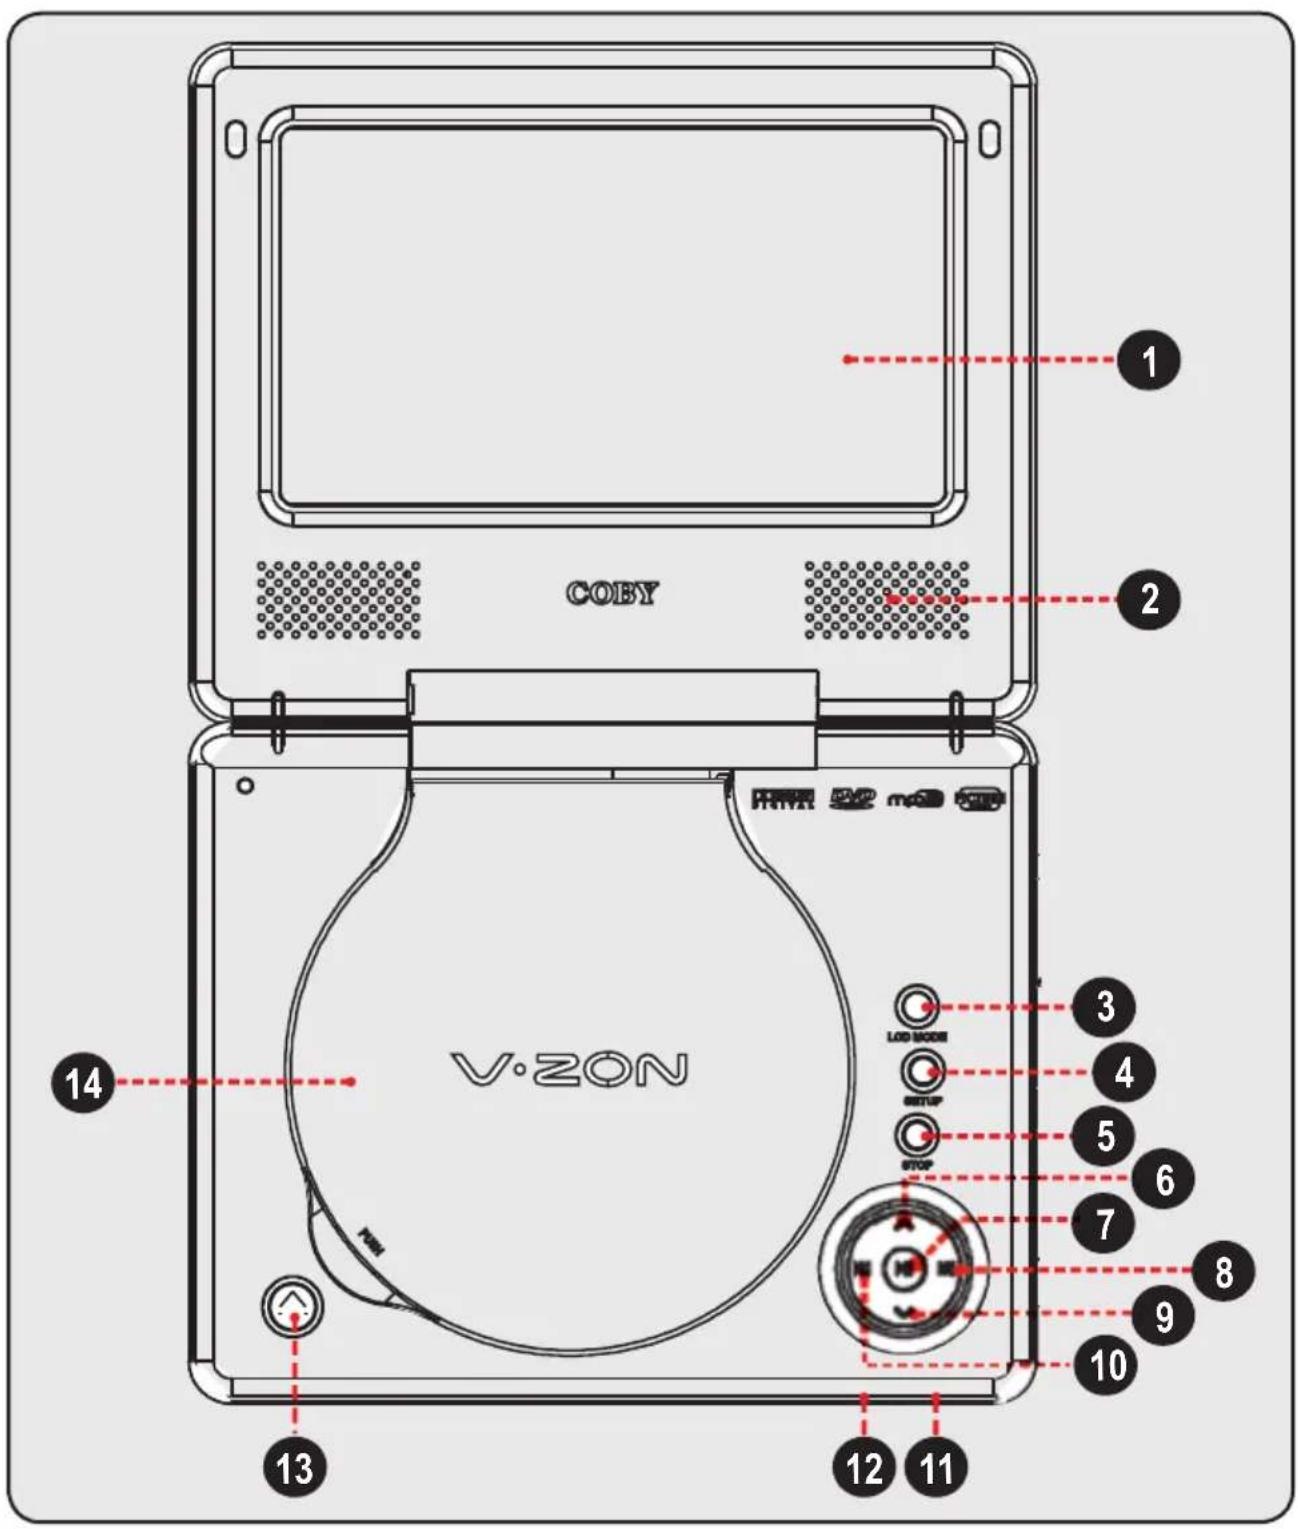
GETTING STARTED
- LCD Display Screen
- Stereo Speakers
- LCD Mode
- Setup
- Stop
- Up (Navigation)
- Play/Pause, Enter
-
Right (Navigation), Next/Forward
-
Down (Navigation)
- Left (Navigation), Previous/Reverse
- Power Indicator
- Remote Sensor
- Open
- Disc Compartment Lid
Main Unit: Right View
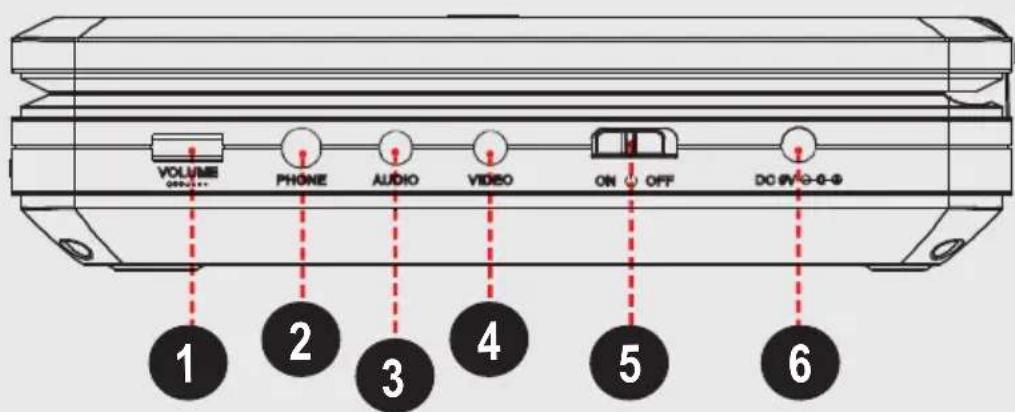
- Volume Dial
- Headphone Out
-
Audio Out
-
Video Out
- Power Switch
- DC Power In
Remote Control
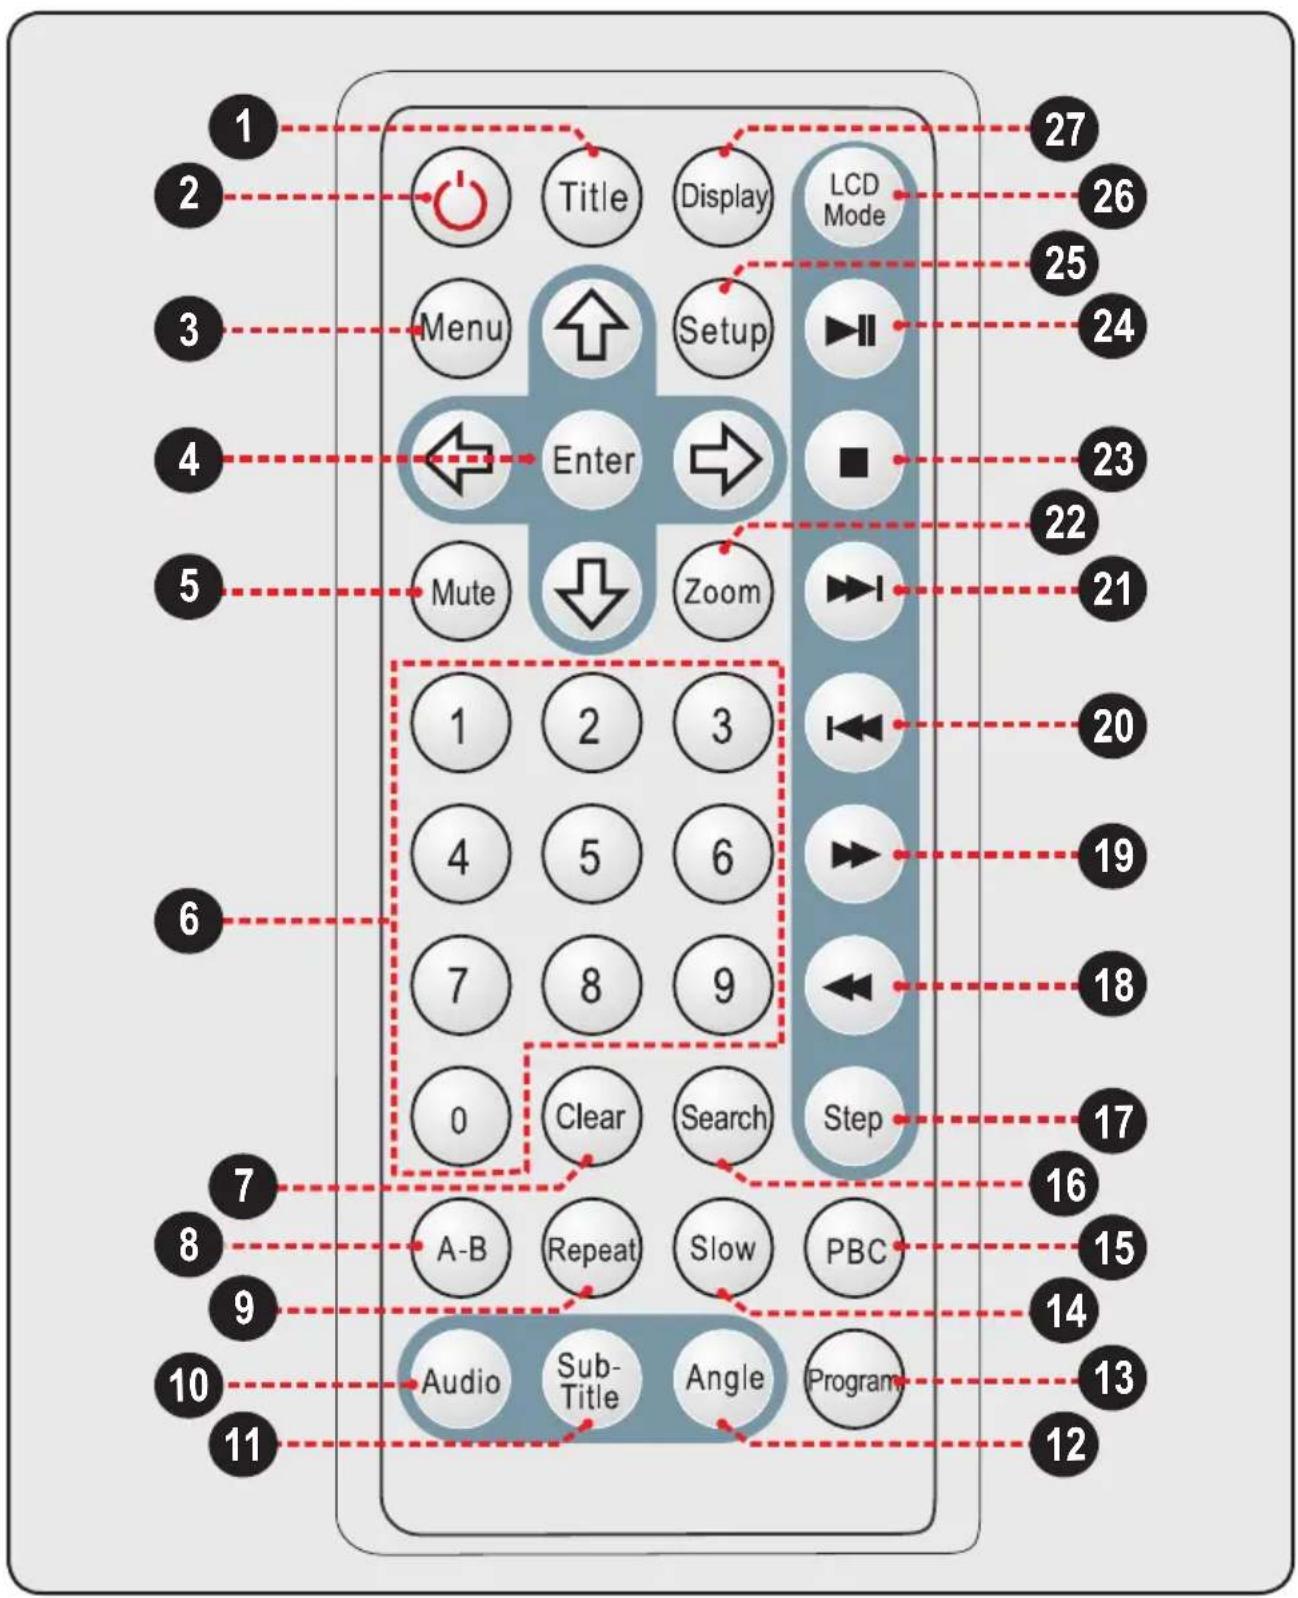
GETTING STARTED
-
Title
-
Power/Standby
-
Menu
-
Navigation Keypad:


- Slow

- PBC

- Search

-
Step
-
Reverse
-
Forward

- Previous

- Next

- Zoom

- Stop

- Play/Pause

- Setup

-
LCD Mode
-
Display


The remote control transmits a directional infrared beam. Be sure to aim the remote control directly at the infrared remote sensor during operation. The sensor may not be able to receive signals properly if the sensor is covered, if there is a large object between the remote control and the sensor, or if it is exposed to direct sunlight or a strong artificial light (e.g., fluorescent or strobe lights). In this case, change the direction of the light or reposition the unit to avoid direct lighting.
• To use the remote, point it at the remote sensor of the player. Operate the remote within 15 feet of the sensor and at an angle of ±60 degrees.
GETTING STARTED
- To install batteries in the remote control, refer to the diagram. Remove the battery compartment cover located on the rear of the remote control. Insert batteries, making sure to match their polarities (+/-) to the markings on the inside of the compartment. Replace the cover.
- Batteries in the remote will last for approximately 1 year. Replace the batteries if the remote control does not work. Do not mix old with new batteries, or different types of batteries.
- Remove the batteries from the remote if it will not be used for a long period of time.
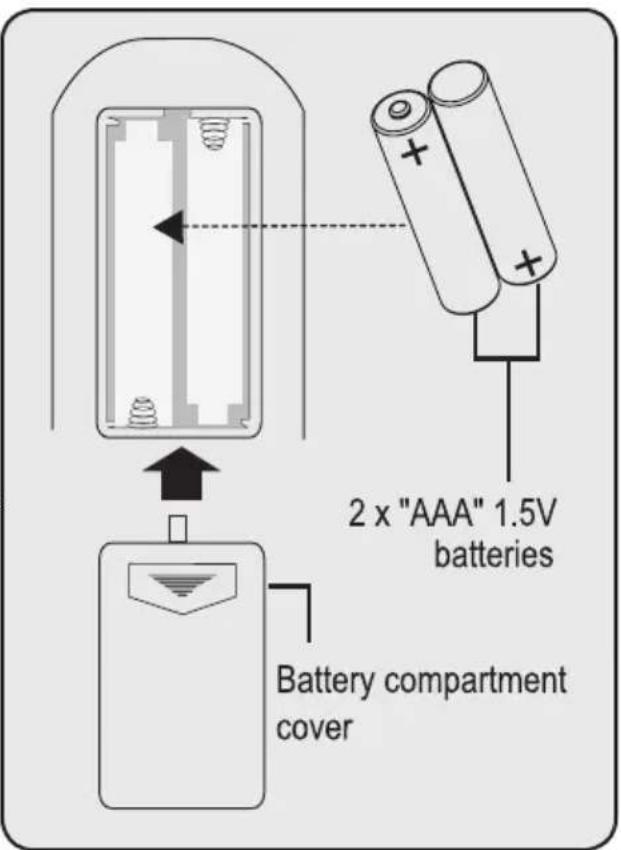

The batteries used in the remote control may present a fire or chemical burn if mistreated. Do not recharge, disassemble, incinerate, or heat the battery ( 212°F).
Keep batteries away from children.
CONNECTIONS
Power
AC Adapter
This unit should be used with AC 100-240V 50/60Hz wall outlets, only. Complete all system connections (optional) before connecting the power.
- Connect one end of the supplied AC adapter into the DC IN jack of the player. Connect the other end of the adapter into an AC 100-240V wall outlet.
- The AC adapter operates on AC 100-240V \~50/60Hz (DC Out: 9V; DC Current: 2.0A minimum).
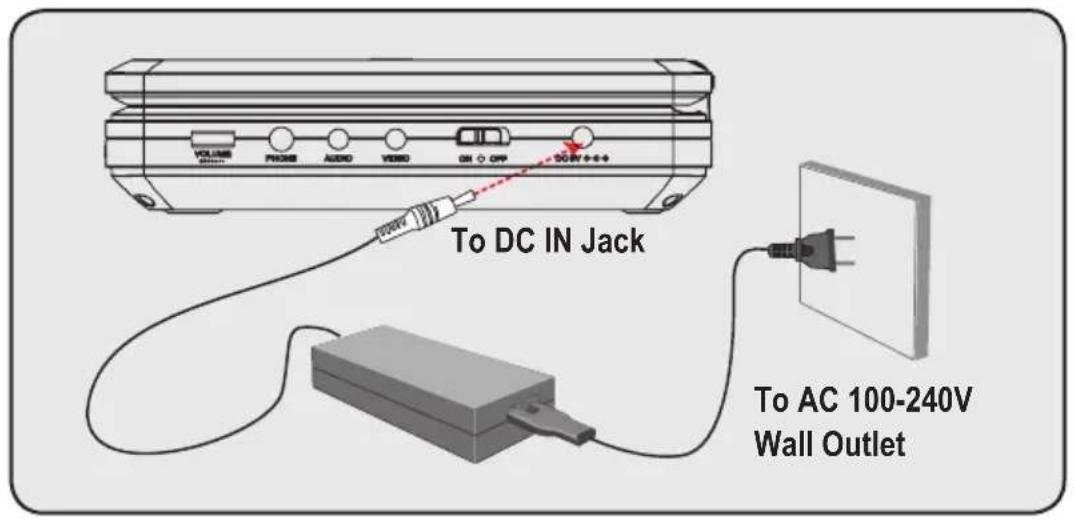

Do not connect the power plug to a power outlet other than that which is indicated here and on the label as this may result in the risk of fire or electric shock.
Do not handle the power plug with wet hands. Doing so may cause electric shock.
Only use AC adapters of the type specified here. Failure to do so may case a fire or damage the player.

Playback should be stopped prior to disconnecting the player from AC power. Disconnecting the AC power during playback may cause the player to malfunction.
CONNECTIONS
Rechargeable Battery Pack
This unit may be powered by a rechargeable battery when an AC outlet is not available.
To install the battery pack:
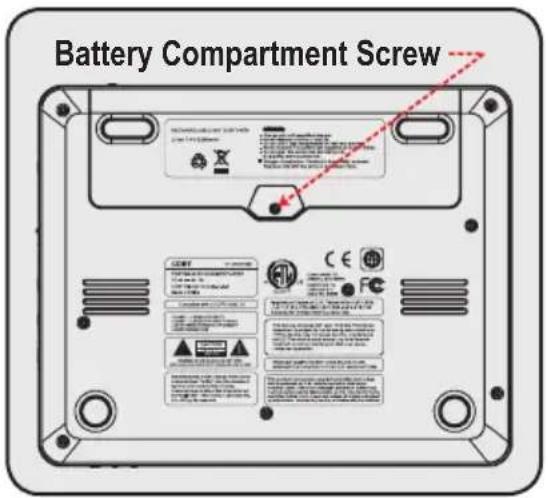
This unit comes preinstalled with a 7.4V lithium-ion rechargeable battery pack.
If the battery pack does not work to your expectations, please contact Coby Technical Support or a qualified service technician.
To charge the battery pack:
- Connect one end of the supplied AC adapter into the DC IN jack of the player (or the Battery Recharge jack if applicable).
- Connect the other end of the adapter into an AC 100-240V wall outlet.

A new or exhausted battery pack should be charged fully (minimum 4 hours) before its initial use to ensure optimum lifetime performance. The battery pack can be used for approximately 300 charge-cycles without any noticeable change in performance.
Disconnect the battery as soon as it has been charged. Leaving it connected may result in reduced battery performance.
When the battery charge is low, the player will enter STANDBY mode automatically.
CONNECTIONS
Use only the battery supplied with this player.
Do not short the terminals. Do not open the terminal covers of the player.
Do not allow dust to come into contact with the terminals of the player and battery.
Do not disassemble, puncture, impact, heat, or incinerate the battery.
Do not leave the battery or player in a car with its windows closed or any place subject to direct sunlight.
Keep the battery dry.
Dispose of used batteries properly.
DC Car/Boat Adapter
This unit may be powered using the supplied DC Car/Boat adapter when an AC outlet is not available.
- Connect one end of the supplied DC adapter into the DC IN jack of the player. Connect the other end of the adapter into a car/boat cigarette lighter socket.
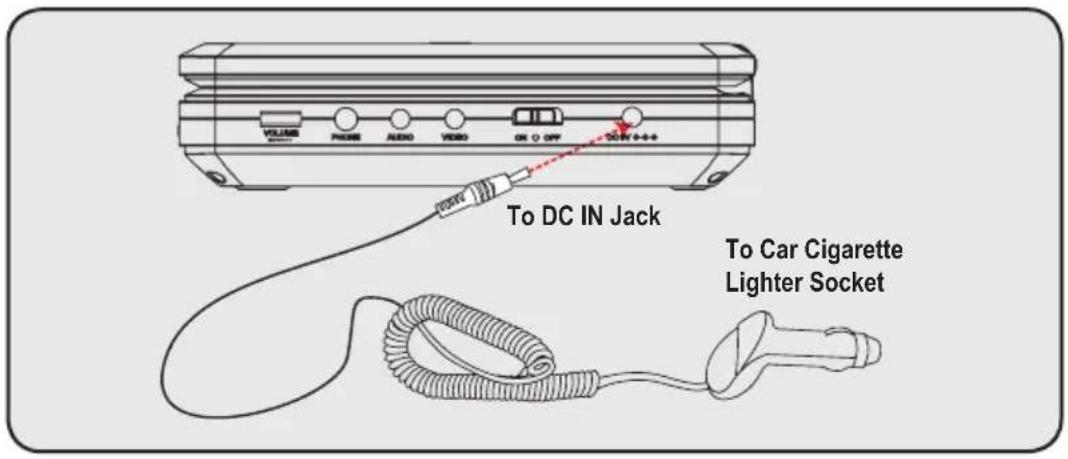

When using the player in a moving vehicle, route the cords so that they will not interfere with the driver.
Some states restrict the use of monitors and televisions in vehicles. Where use is permitted, install the unit so that the display will not be viewable by the driver.
CONNECTIONS
Power Management
If the player will not be in use for a long period of time, turn the player off, unplug the player, and remove any batteries, as applicable.

When disconnecting the AC power cord (mains lead), grasp the plug itself and not the cord.
CONNECTIONS
Optional Audio/Video Output Connections
There are various connection options depending on your TV or other equipment; please refer to the documentation supplied by the manufacturer of your TV or stereo system for more connection information as necessary.
Using Headphones or Earphones
Your player can output audio to a pair of headphones or earphones for private listening during playback.
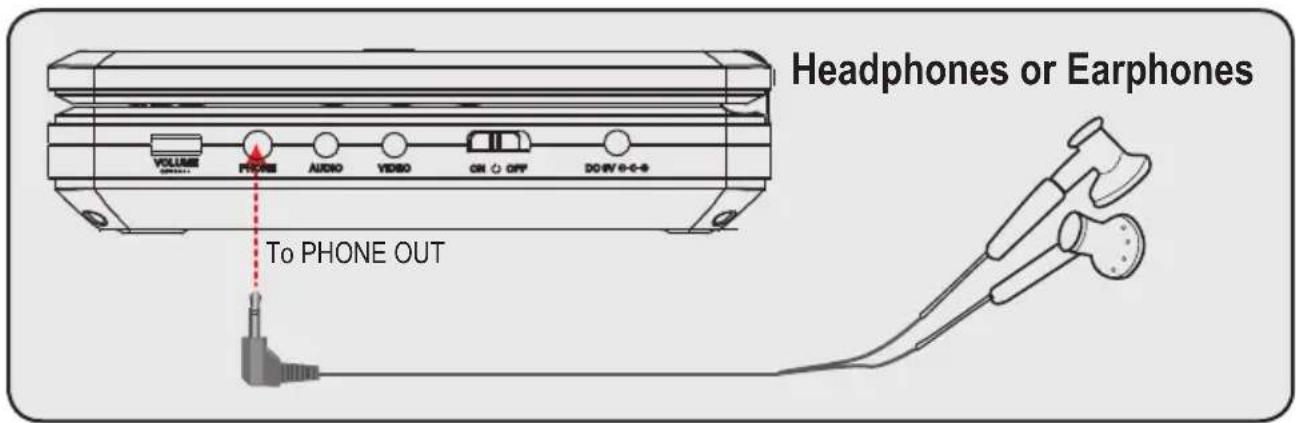
- Lower the volume of the unit.
- Connect a pair of headphones or earphones terminating in a 3.5mm plug to the Headphone Out jack of the unit.
- Increase the volume gradually until a comfortable level has been reached.

Audio output to the integrated stereo speakers will stop automatically when headphones are connected.
Hearing experts advise against the constant use of personal stereos played at high volume. Constant high volume use can lead to hearing loss. If you experience ringing in the ears or hearing loss, discontinue use immediately and seek medical advice.
CONNECTIONS
Connecting Video and Audio to a Television
Your player can output video and audio to an external display (e.g., a television).
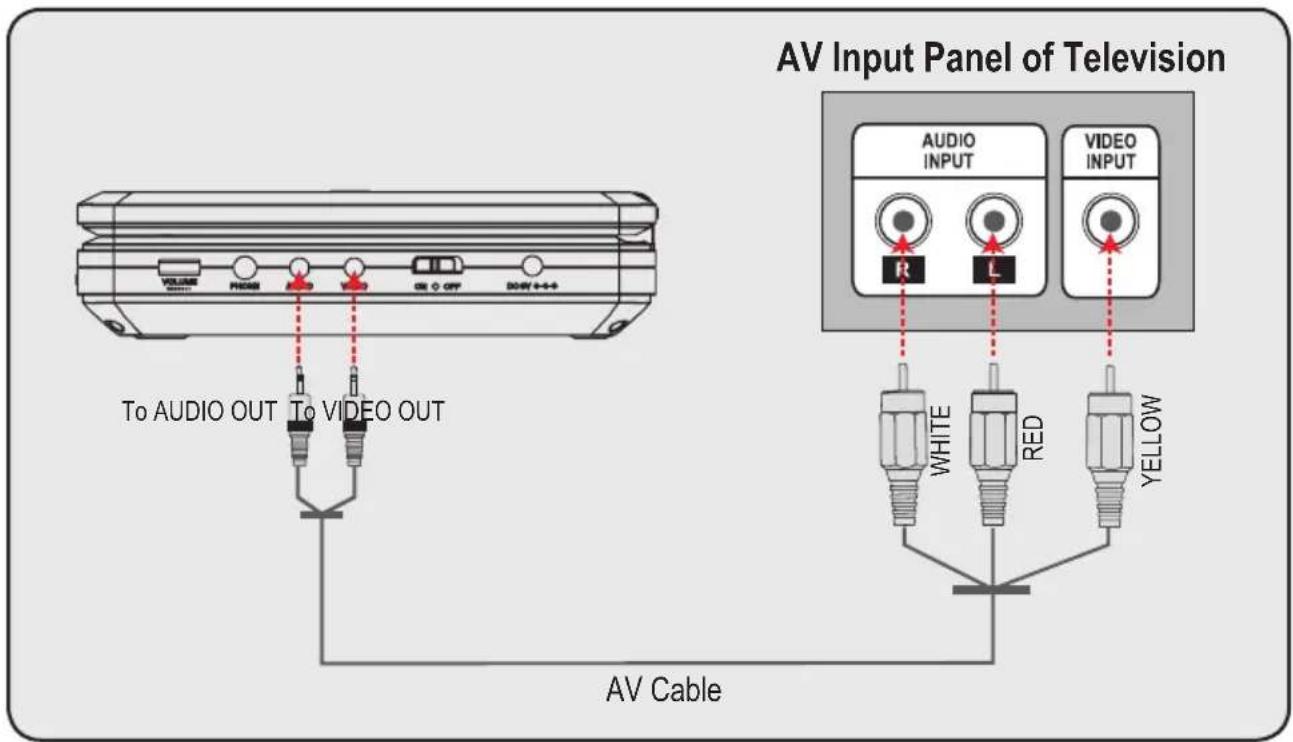
-
Using an AV patch cable, connect the player's Video Out jack to the Composite Video In jack (yellow) of your TV.
-
Using an AV patch cable, connect the player's Audio Out jack to the RCA Stereo In jacks (red and white) of your TV.
-
Set the TV to the correct input line. Please refer to the documentation supplied by the TV manufacturer for more information.

An AV patch cable (optional) is required for Audio/Video output connections.
CONNECTIONS
Connecting Audio to a Stereo Receiver System
Your player can output audio to an external stereo system (e.g., a receiver or amplifier).
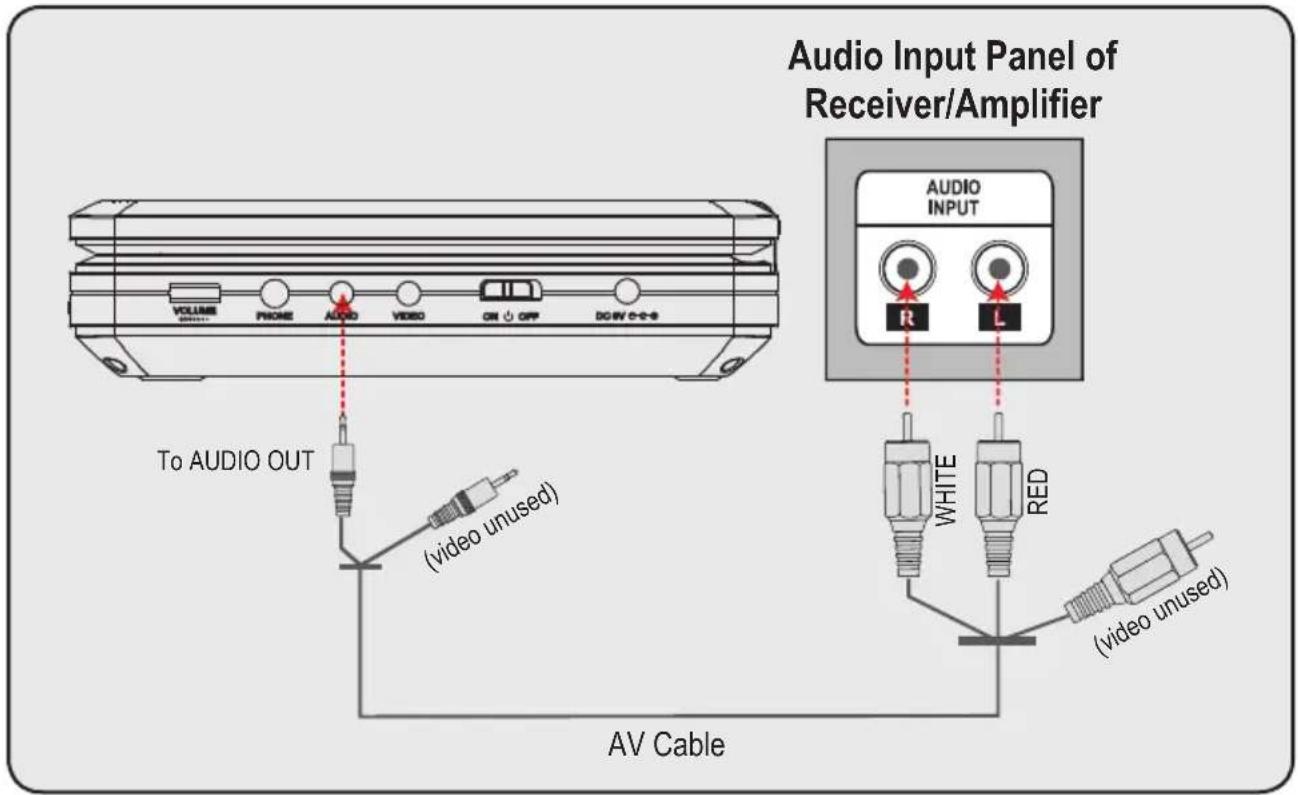
-
Using an AV patch cable, connect the player's Audio Out jack to the RCA Stereo In jacks (red and white) of your stereo system.
-
Set the receiver or amplifier to the correct input line. Please refer to the documentation supplied by the receiver/amplifier manufacturer for more information.

The video output of the unit is active but unused in the example shown above. You may choose to connect the video output to a TV or other device.
An AV patch cable (optional) is required for Audio/Video output connections.
GETTING STARTED
All instructions refer to the remote control unless indicated otherwise.
Basic Operations
1. Prepare the connections and power supply.
Set the Power Switch to the ON position to turn the player on.
2. Load a disc.
Press the Open button on the player to open the Disc Compartment Lid. Insert a disc with the label-side up. Close the lid by hand until it clicks.
- If a single-sided disc is inserted upside-down, the player will display the error message "NO DISC" or "BAD DISC".

The following messages will be displayed on-screen if there is a problem with the format of the loaded disc:
WRONG REGIONAL DISC. The region code of the disc does not match the player's region code (Region 1).
WRONG PASSWORD. The parental rating level of the disc is higher than the parental rating level setting of the player. The player will not play the disc.
WRONG DISC. The player is equipped with automatic disc quality detection software. If the player detects a disc that is damaged or has a format problem, it may play the disc at a lower quality or stop play completely, depending on how damaged the disc is.

DVD disc production quality may vary; some discs may deviate from the industry standard. Some incorrectly-formatted discs may still play, however, the playback and operational quality of the disc may be substandard.
GETTING STARTED
3. Start playback.
Press 📋 to start playback.
- Some discs may start playing automatically or display a DVD menu specific to the disc. If a menu appears, use the Navigation Keypad to select a desired feature or option and then press Ete confirm.
4. Adjust the volume.
Turn the Volume Dial on the player to adjust the volume level.
To disable/restore all audio output, press Mute
Basic Playback Controls
To control basic playback functions:
| Remote Key Function | |
 | Play a disc for the first time. |
 | Pause the disc during playback.Resume the disc when paused. |
 | Skip to the next track. |
 | Skip to the previous track. |
| Numeric Keypad | Skip to a track directly.(Some discs may not allow direct track access.) |
 | Access the DVD Main Menu (if available). |
 | Access the DVD Title Menu (if available). |
 | Forward-scan through the current track.Each successive keypress will change the scanning speed: To resume normal playback speed, press To resume normal playback speed, press  |
GETTING STARTED
| Remote Key Function | |
 | Reverse-scan through the current track.Each successive keypress will change the scanning speed: To resume normal playback speed, press ▶II To resume normal playback speed, press ▶II |
 | Slow the playback speed (slow-motion).Each successive keypress will change the slow-motion playback speed: To resume normal playback speed, press ▶II To resume normal playback speed, press ▶II |
 | Play the video frame by frame.Each successive keypress will advance the video one frame.Press  resume normal playback speed. resume normal playback speed. |
 | Stop the disc during playback (“Pre-Stop”).During Pre-Stop mode:Press ▶to resume playback from the time-point at which the disc was stopped.Press ▶stop the disc completely. |

Audio will be muted during forward-scan, reverse-scan, and slow-motion playback.
On-Screen Display
The On-Screen Display (OSD) indicator is a user-friendly interface designed to display playback status on the screen. The OSD will display information based on the type of disc that has been loaded (e.g., DVD or CD). To activate the OSD, press 🟢
GETTING STARTED
When a DVD disc is playing:
- Press once to display DVD time info.
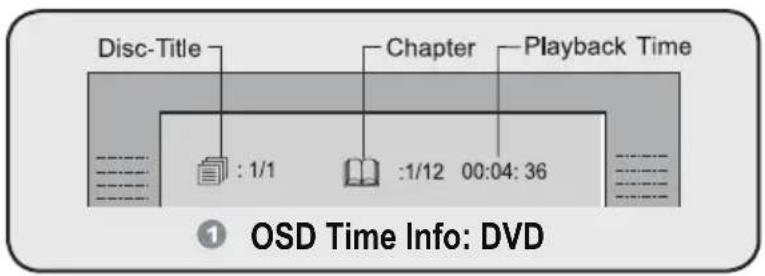
- Press again to display DVD status info.
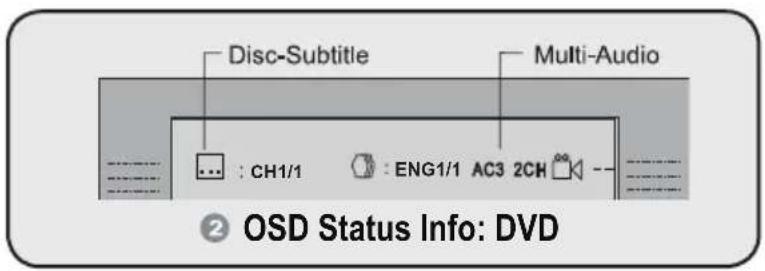
- Press again to exit the OSD display.
When a CD is playing:
- Press once to display CD time info.
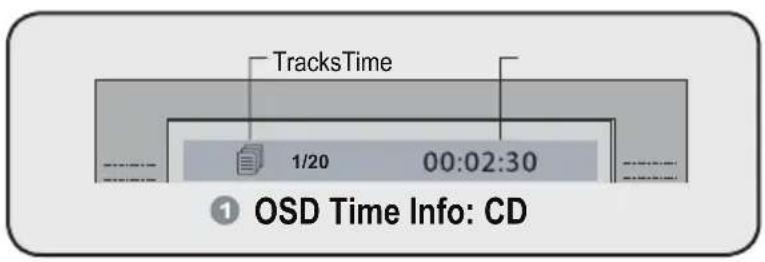
- Press again to exit the OSD display.
Menu/Title and Setup Controls
To navigate DVD disc menus or the player's setup menus:
| Remote Key Function | |||
 | Access the DVD Title Menu (if available).The DVD Title Menu may allow you to access special features. | ||
 | Access the DVD Menu (if available).The DVD Menu may allow you to set camera angle, language, or subtitle options, or allow access to disc chapters. | ||
Navigation Keypad    | Select a desired menu feature or option. | ||
Navigation Keypad | Confirm a selected menu feature or option. | ||
 | Access the setup menu to adjust the player's internal settings; refer to the “Setup” section of this manual for more information. | ||
 | Cancel an entry in the setup menu. | ||
Extended Playback Controls
To control extended playback functions:
| Remote Key Function | |
 | Each successive press of will change the repeat mode.DVD: Repeat Title, Repeat Chapter, Repeat Off.CD: Repeat Track, Repeat Disc, Repeat Off. Some DVD Discs do not allow Repeat mode. |
PLAYER FUNCTIONS
| Remote Key Function | |
 | Repeat a specific section of a disc (play on a loop).Press to set the desired start point ("A") of the section to be repeated.Press again to set the desired end point ("B").The section "A-B" will now play repeatedly as a loop. Press again to resume normal playback. |
 | Press to view alternate camera angles of a DVD, if available. A DVD has may be mastered with up to 9 selectable camera angles. |
 | Press to view alternate subtitle tracks, if available. A DVD has may be mastered with up to 9 selectable subtitles. |
 | Press to hear alternate language/audio tracks, if available. A DVD has may be mastered with up to 8 selectable language/audio tracks. |
 | Each successive press of will change the magnification level of the picture: 2x, 3x, 4x, 1/2x.When the magnification level is 2x or higher, use the Navigation Keypad to pan around the enlarged picture. The picture quality will decrease as the zoom level (magnification) increases. The picture quality will decrease as the zoom level (magnification) increases. |
| [6KSA] | Access the Search bar to skip directly to a time point or track/chapter number. -- /12 [SAC] --- /001 [CEX3] :03 Off [SSX]Use the Navigation Keypad to move between input fields .Use the Numeric Keypad to input data to the fields and then press Enter to execute the search.Press cancel any input mistakes, or press to exit the Search -- /12 [SAC] --- /001 [CEX3] :03 Off [SSX]Use the Navigation Keypad to move between input fields .Use the Numeric Keypad to input data to the fields and then press Enter to execute the search.Press cancel any input mistakes, or press to exit the Search |
PLAYER FUNCTIONS
Random/Program
To play tracks in random order, press twice to display "Random" and then press to confirm.
Enter Program mode to create a custom sequence of tracks to be played. Press three times to display "PROGRAM" and then press to confirm.
(Program mode is available only when the player is in NAVIGATE OFF mode. Press the PBC key to set the player to NAVIGATE OFF mode.)

Use the Numeric Keypad to input numbers directly to the fields. Use the Navigation Keypad to move between entry fields
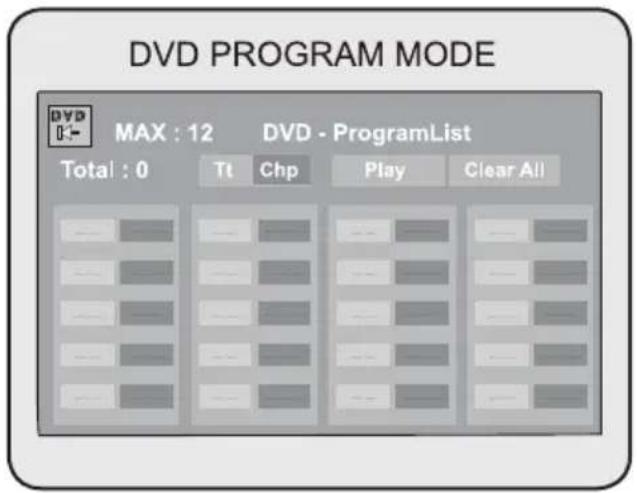
DVD Program Mode
-
Load a DVD and enter Program mode.
• Use the Navigation Keypad to select a field. -
Enter track numbers in the left "Tt" columns with the Numeric Keypad (or press to clear the field).
-
Enter chapter numbers in the right "Chp" columns with the Numeric Keypad (or press to clear the field).
-
To start over, use the Navigation Keypad to select "Clear All" to delete all Track/Chapter selections.
- To play your programmed selections, use the Navigation Keypad to select "Play" or press to cancel.
CD Program Mode
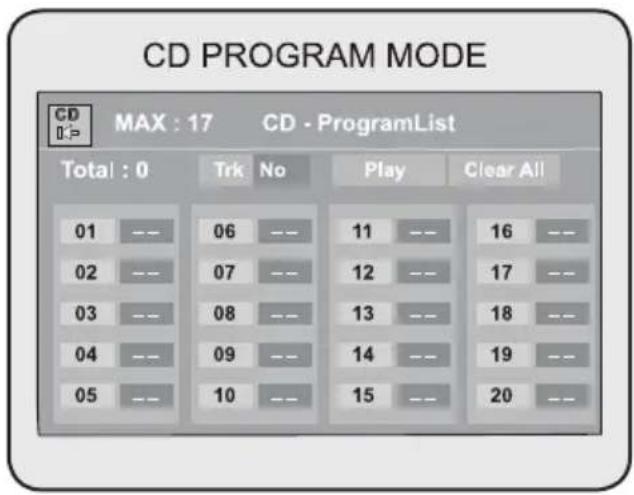
- Load a CD and enter Program mode.
• Use the Navigation Keypad to select a field.
• The left column designates the program order number.
- Enter track numbers in the right "Trk" columns with the Numeric Keypad (or press to clear the field).
- To start over, use the Navigation Keypad to select "Clear All" to delete all Track selections.
- To play your programmed selections, use the Navigation Keypad to select "Play" or press to cancel.
LCD Mode
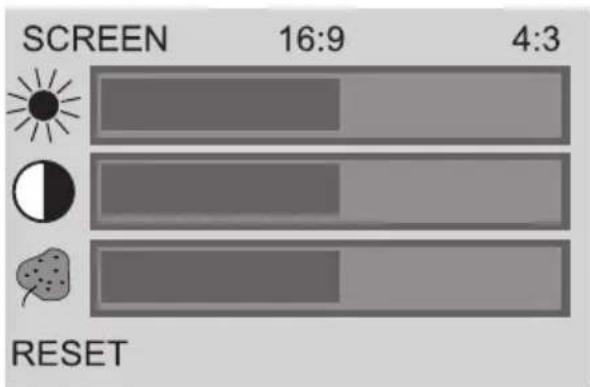
Adjust the LCD display settings. Press to access the LCD Mode menu.
• To select an option, press or .
• To adjust the selected option, press or
- When SCREEN is selected, press or set the screen aspect ratio as 16:9 (widescreen) or 4:3 (standard).
- When RESET is selected, press 📄 to confirm and return all LCD display options to their default settings.
SETUP
Enter Setup mode to adjust the various internal settings of the player. Make sure the player has been completely stopped before entering Setup mode.
- Press to access the Setup menu.
- Use the Navigation Keypad to select a desired item.
- Press to confirm a selection.
- Press set exit the Setup menu (or select EXIT and then press). Enter
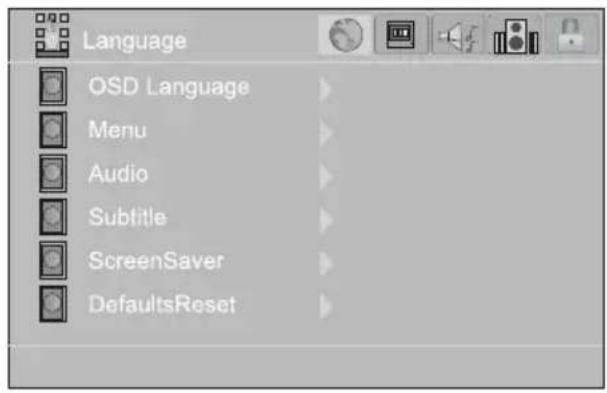
Language Settings
| Item Description Default Setting | ||
| OSD Set the language of the player's on-screen display. English | ||
| Menu Set the default menu language of loaded DVDs. English | ||
| Audio Set the default language audio track of loaded DVDs. English | ||
| Subtitle Set the default subtitle track of loaded DVDs. English | ||
| Screen Saver | Turn the screen saver feature on or off.The screensaver prevents burn-in damage to the player's screen. | On |
| Defaults Reset | Reset all settings to their factory-default state. | |
Display Settings
| Item Description | Default Setting | |
| TV Type | Set the aspect ratio of the display. Select 4:3 for standard television displays; select 16:9 for wide-screen television displays. | 16:9 |
| TV System | Sets the player's video signal type. Set this to correspond with your TV's Video System type (NTSC is the standard used in North America). | NTSC |
Audio Settings
| Item Description Default Setting | |
| Channel Output Sets the audio channel mix mode (LT/RT, Stereo). Stereo |
Parental Settings
You must input the four-digit password to access the Parental settings. The initial password is 8888.
| Item Description | Default Setting | |
| Change | To change the password, you will need to enter the old password first.Choose a new password, and then enter the new password again to verify and confirm. DO NOT FORGET THE PASSWORD; this password cannot be reset. Restoring the player's default settings will not reset the password. | |
| Rating Level | Sets the maturity rating level of the player. The player will not play any discs rated higher than this setting.There are eight rating levels:Level 1 will restrict playback to discs suitable for people of all ages.Level 8 will allow playback of all discs, including those suitable for adults only. | 8 |
TROUBLESHOOTING
If you have a problem with this unit, please read the troubleshooting guide below and check our website at www.cobyusa.com for Frequently Asked Questions (FAQs) and firmware updates. If these resources do not resolve the problem, please contact Technical Support.
COBY Electronics Technical Support
56-65 Rust Street
Maspeth, NY 11378
Hours: 8:00 AM–11:00 PM EST, seven days a week.
Phone: 718-416-3197, 800-681-2629, or 800-727-3592
Email: techsupport@cobyusa.com
Web: www.cobyusa.com
There is no power to the device.
- Ensure that the Power Switch on the main unit is physically set to the ON position.
- Ensure that the AC adapter cord is securely connected to the player and the proper wall outlet.
The device will not play the disc.
- Ensure that a supported disc is loaded in the player label-side up.
- Ensure that the disc's rating level does not exceed the player's parental rating level.
- Ensure that the disc is not damaged or too dirty. Clean the disc or try another disc.
- Moisture may have condensed inside the player. Remove the disc and leave the player on for 1-2 hours and then try again.
TROUBLESHOOTING
There is no picture.
- Ensure that the TV set has been powered on and is set to the correct AV mode.
- Ensure that the connections between the player and the TV are secure and correct.
- Check if the connection cables are damaged.
- Restore the player to it's factory-default settings: open the disc tray, and then press and together.
The picture is noisy or distorted.
• The disc may be damaged or dirty. Clean the disc or try another one.
- Reset your TV's color system.
- Ensure that the player is connected directly to the TV (and not through a VCR, cable box, satellite receiver, etc.)
The picture is not full-screen.
- Change the aspect ratio setting of your player from the Setup menu.
- Select a different aspect ratio option from the DVD disc menu.
There is no sound or distorted sound.
- Ensure that the MUTE function of the TV, Amplifier, or Player is not engaged.
- Ensure that the TV and amplifier have been turned on and properly set up.
- Ensure that the TV and amplifier connections are secure and correct.
• Try a different Audio track of the DVD by pressing AUDIO.
TROUBLESHOOTING
The remote control doesn't work.
- Ensure that the Power Switch has been physically set to the ON position.
- Ensure that there are no obstacles between the remote and the player.
- Point the remote at the remote sensor on the main unit.
- Ensure that the batteries in the remote retain a charge and have been installed correctly.
• Try replacing the remote's batteries.
The player has malfunctioned.
- Unplug the player. After 30 minutes, plug in and power on the player—the restore function should reset the player.
SPECIFICATIONS
| Display Type 7" Widescreen (16:9) TFT LCD | |
| Display Resolution 480 x 234 (Q VGA) | |
| Media Support DVD, DVD±R/RW, CD, CD-R/RW, JPEG, MP3 | |
| Video Output Composite Video | |
| Audio Output 3.5mm Stereo | 3.5mm Headphone |
| Digital Audio Decoders Dolby Digital | |
| S/N Ratio 90dB typical | |
| Dynamic Range 90dB typical | |
| Video System NTSC/PAL | |
| Operating Conditions 32°F–95°F | |
| Power | DC 9V 2A |
| Power Consumption | ≤9W |
| Unit Dimensions | 7.36" x 1.97" x 6.69" (WHD) |
| Weight | 2.07lbs. (Main Unit + Battery) |
COBY Electronics Corp.
56-65 Rust Street
Maspeth, NY 11378
www.cobyusa.com
www.ecoby.com
- 7" Widescreen TFT LCD
- Portable DVD/CD/MP3 Player
- Instruction Manual
- PRECAUTIONS
- For Customer Use:
- WARNING:
- CAUTION:
- FCC Notice:
- NOTICE:
- IMPORTANT SAFETY INSTRUCTIONS
- ABOUT OPTICAL DISCS
- Disc Requirements
- DVD Features
- DVD Region Codes
- Disc Care and Maintenance
- Handling a Disc
- Cleaning a Disc
- TABLE OF CONTENTS
- PRECAUTIONS 2
- IMPORTANT SAFETY INSTRUCTIONS ....4
- ABOUT OPTICAL DISCS ....7
- TABLE OF CONTENTS ...... 10
- PACKAGE CONTENTS....12
- FEATURES 13
- CONTROLS AT A GLANCE ....14
- CONNECTIONS 19
- GETTING STARTED 26
- PLAYER FUNCTIONS 30
- SETUP 34
- TROUBLESHOOTING 36
- SPECIFICATIONS 39
- PACKAGE CONTENTS
- FEATURES
- CONTROLS AT A GLANCE
- GETTING STARTED
- CONNECTIONS
- Power
- AC Adapter
- Rechargeable Battery Pack
- To install the battery pack:
- To charge the battery pack:
- DC Car/Boat Adapter
- Power Management
- Optional Audio/Video Output Connections
- Using Headphones or Earphones
- Connecting Video and Audio to a Television
- Connecting Audio to a Stereo Receiver System
- Basic Operations
- Prepare the connections and power supply.
- Load a disc.
- Start playback.
- Adjust the volume.
- Basic Playback Controls
- On-Screen Display
- When a DVD disc is playing:
- When a CD is playing:
- Menu/Title and Setup Controls
- Extended Playback Controls
- PLAYER FUNCTIONS
- Random/Program
- DVD Program Mode
- CD Program Mode
- LCD Mode
- SETUP
- Audio Settings
- Parental Settings
- TROUBLESHOOTING
- COBY Electronics Technical Support
- There is no power to the device.
- The device will not play the disc.
- There is no picture.
- The picture is noisy or distorted.
- The picture is not full-screen.
- There is no sound or distorted sound.
- The remote control doesn't work.
- The player has malfunctioned.
- SPECIFICATIONS
Brand : COBY
Model : TF-DVD7006
Category : Portable DVD Player