
RP3720 - Alarm clock radio RCA - Free user manual and instructions
Find the device manual for free RP3720 RCA in PDF.


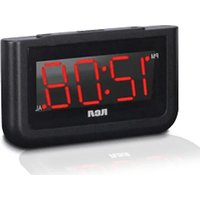
| Product Type | Alarm Clock Radio |
| Brand | RCA |
| Model | RP3720 |
| Power Supply | 120V ~ 60Hz |
| Power Consumption | 9 Watts |
| Battery Backup | 2 x AA batteries (included) |
| Radio Bands | FM, AM |
| Built-in AFC | Automatic Frequency Control (FM only) |
| Antenna | AM: built-in ferrite rod; FM: power cord |
| Time Format | 12-hour with AM/PM indicators |
| Automatic Time Set | Yes (when plugged in) |
| Time Zone Setting | Pacific, Mountain, Central, Eastern |
| Daylight Saving Time | Yes (slide switch on bottom) |
| Dual Alarms | Wake 1 and Wake 2 |
| Wake Sources | Tone or Radio |
| Gradu-wake | Gradual volume increase in 30-45 seconds |
| Sleep Timer | 1 minute to 2 hours (to radio) |
| Nap Timer | 10 minutes to 2 hours (tone only) |
| Snooze | Adjustable 1-30 minutes (default 9 minutes) |
| Auto Brightness Control | Yes (sensor on top; slide switch) |
| Display | LED with AM/PM, band indicators |
| Maintenance | Clean with soft cloth or damp chamois; no solvents |
| Safety | Keep away from water and high temperatures; do not expose to rain |
| Warranty (USA) | 1 year from purchase (defects in materials/workmanship) |
| Warranty (Canada) | 1 year replacement (return included) |
Frequently Asked Questions - RP3720 RCA
User questions about RP3720 RCA
0 question about this device. Answer the ones you know or ask your own.
Ask a new question about this device
Download the instructions for your Alarm clock radio in PDF format for free! Find your manual RP3720 - RCA and take your electronic device back in hand. On this page are published all the documents necessary for the use of your device. RP3720 by RCA.
USER MANUAL RP3720 RCA
Trademark(s) © Registered
Marca(s) © Registrada(s)
Marque(s) © Denosée(s)
5588844A (EN/E/F)
www.rca.com
Printed in China/Impreso en China
RP3720
It is important to read this instruction book prior to using your new product for the first time.
A_RP3720 cover 3/25/04, 9:20 AM2-3


natural_image
Color palette bar with grayscale gradient from black to white (no text or symbols)
natural_image
Color palette bar with a gray rectangle and a cursor pointer (no text or symbols)
A_RP3720 EN 3/25/04. 9:20 AM1





FCC Information
EN
FCC Information
This device complies with Part 15 of the FCC Rules. Operation is subject to the following two conditions: (1) This device may not cause harmful interference, and (2) this device must accept any interference received, including interference that may cause undesired operation.
In accordance with FCC requirements, changes or modifications not expressly approved by Thomson Inc. could void the user's authority to operate this product.
This device generates and uses radio frequency (RF) energy, and if not installed and used properly, this equipment may cause interference to radio and television reception.
If this equipment does cause interference to radio or television reception (which you can determine by unplugging the unit), try to correct the interference by one or more of the following measures:
- Re-orient the receiving antenna (that is, the antenna for the radio or television that is "receiving" the interference).
- Move the unit away from the equipment that is receiving interference.
- Plug the unit into a different wall outlet so that the unit and the equipment receiving interference are on different branch circuits.
If these measures do not eliminate the interference, please consult your dealer or an experienced radio/television technician for additional suggestions. Also, the Federal Communications Commission has prepared a helpful booklet, "How To Identify and Resolve Radio TV Interference Problems." This booklet is available from the U.S. Government Printing Office, Washington, DC 20402. Please specify stock number 004-000-00345-4 when ordering copies.

THE LIGHTNING FLASH AND ARROWHEAD WITHIN THE TRIANGLE IS A WARNING SIGN ALERTING YOU OF "DANGEROUS VOLTAGE" INSIDE THE PRODUCT.
CAUTION: TO REDUCE THE RISK OF ELECTRIC SHOCK, DO NOT REMOVE COVER (OR BACK). NO USER-SERVICEABLE PARTS INSIDE. REFER SERVICING TO QUALIFIED SERVICE PERSONNEL.

THE EXCLAMATION POINT WITHIN THE TRIANGLE IS A WARNING SIGN ALERTING YOU OF IMPORTANT INSTRUCTIONS ACCOMPANYING THE PRODUCT.
SEE MARKING ON BOTTOM / BACK OF PRODUCT
WARNING TO PREVENT FIRE OR ELECTRICAL SHOCK HAZARDO NOT EXPOSE THIS PRODUCT TO RAIN OR MOISTURE.
A_RP3720 EN 3/25/04.9:20 AM2-3
FCC Information
For Your Safety
The AC power plug is polarized (one blade is wider than the other) and only fits into AC power outlets one way. If the plug will not go into the outlet completely, turn the plug over and try to insert it the other way.
If it still does not fit, contact a qualified electrician to change the outlet, or use a different one. Do not attempt to bypass this safety feature.
For Your Records
In the event that service should be required, you may need the model number. In the space below, record the date and place of purchase:
Date of Purchase:
Place of Purchase:
Technical Information
Product: Clock Radio
Brand: RCA
Model: RP3720
Electrical Consumption
Power Supply: 120V \~ 60Hz Power Consumption: 9 Wat
IMPORTER
This product should be serviced only by those specially trained in appropriate servicing techniques. For instructions on how to obtain service, refer to the warranty included in this Guide.
The descriptions and characteristics in this owner's manual are for the purpose of general reference only and not as a guarantee. In order to provide you with the highest quality product, we may make changes or modifications without prior notice. The English version serves as the final reference on all product and operational details should any discrepancies arise in other languages.
EN





Safety Information
EN

• Make sure that you keep your set away from water and high temperatures.
- To prevent personal injury, do not reverse any batteries and do not mix battery types.
Ecology

Help protect the environment - we recommend that you dispose of used batteries by putting them into specially designed receptacles.
Maintenance

Clean the unit with a soft cloth, or a damp chamois leather. Never use solvents.
Table of Contents
FCC information / Safety Information
Before Your Begin 2
- Before Plugging-In for Power ..... 2
Automatic Time Set .... 2 Setting Time Zone .... 2 U.S. Time Zone (Figure 1) .... 3 Canadian Time Zone (Figure 2) .... 3 - Plugging In for Power 4
For Your Safety 4 - Daylight Saving Time .... 4
Battery Back-Up Operation .... 5 Power Failure Indicator .... 5
General Controls 6
Top View 6
Side Views 6
Display 7
Setting the Clock 8
Setting Clock 8
Radio 9
Built-In AFC 9
Antennas 9
Turning on/off the Radio 9
Selecting Bands 9
Tuning to Stations 9
Wake Settings 10
Setting Wake Time 10
Selecting Wake Source 10
Wake to Tone 10
Wake to Radio 11
Cancel Wake Settings 11
Turning off Alarm 11
Operating the Clock 12
Sleep Mode 12
Nap Mode 13
Snooze Alarm Operation 14
Auto Brightness Control 14
U.S. Warranty 15
Canadian Warranty 17





Before You Begin
EN
1. Before Plugging-In for Power
Automatic Time Set
You do not have to set the clock time as a built-in automatic time set system is equipped in this clock powered by 3V (2 x "AA" batteries (included)). All you have to do is to plug this clock for power and current time will be shown automatically.
Before plugging in for power, follow the steps below to select time zone.
Setting Time Zone
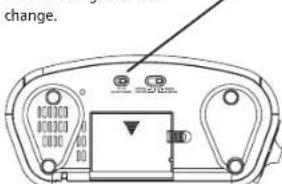
You may slide the time zone selector at the bottom of the clock to Pacific, Mountain, Cent or Eastern.
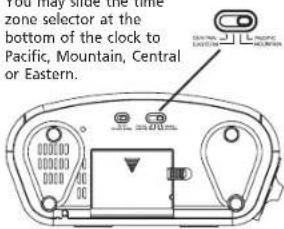
Refer to Figure 1 for U.S. Time Zone details. Refer to Figure 2 for Canadian Time Zone details.
Before You Begin
U.S. Time Zone (Figure 1)
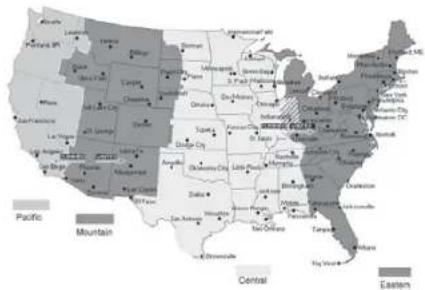
Canadian Time Zone (Figure 2)

2
A_RP3720 EN 3/25/04. 9:20 AM6-7
3





Before You Begin
EN
2. Plugging In For Power AC OUTLET POWER SUPPLY:
120V\~60Hz
For Your Safety
The AC power plug is polarized (one blade is wider than the other) and only fits into AC power outlets one way. If the plug will not go into the outlet completely, turn the plug over and try to insert it the other way. If it still does not fit, contact a qualified electrician to change the outlet, or use a different one. Do not attempt to bypass this safety feature.

Note: Note:
Power is fed to the unit even when it is not functioning. To cut the power supply off, the power cable must be unplugged.
3. Daylight Saving Time
Slide the DAYLIGHT SAVING
switch on the bottom of the unit to turn on/off daylight saving time in areas observing/not observing such time change.

The daylight saving time icon ● will be displayed when the feature is activated.

Warning: Warning:
Please avoid playing with the DAYLIGHT SAVING slide switch and TIME ZONE switch after entering the Clock/Wake set mode.
Before You Begin
Battery Back-Up Operation
The power failure protection circuit will not operate unless batteries are installed.
When the battery backup functions, the digital display will not light, however, the function of wake still occurs during the power interruption if remaining battery power is adequate.
Normal operation will resume after AC power is restored so you will not have to reset the time or wake.
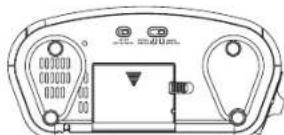
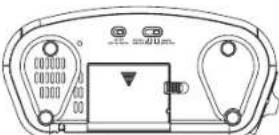
Install battery as follow:
- Before inserting the batteries, observe the polarities (That is, + and -) of the battery, then relate the polarities to the engraved diagram inside the battery compartment. Insert 2 "AA" size batteries in the battery compartment
- Replace the compartment door and lock the door in place by pushing the tab towards the compartment door.

Note: Note:
We recommend that you replace the batteries every 2-3 years.
Power Failure Indicator
When AC power is interrupted (disconnected) for a short period of time, both time and alarm settings will change (unless batteries are installed). After AC power is restored (reconnected), the Digital Display will blink to indicate that power was interrupted and you should readjust the time and alarm settings.
4
A_RP3720 EN 3/25/04.9:21 AM8-9
5





General Controls
EN
Top View
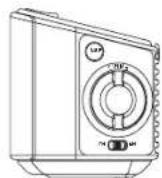
Side View
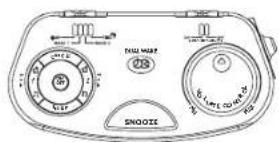
ON / OFF - Turns radio on and off. Turns the wake, nap and sleep alarm off.
1 - Activates Wake 1 settings and change wake 1 mode.
2 - Activates Wake 2 settings and change wake 2 mode.
CANCEL - Cancels wake settings
SLEEP - Activates sleep function.

- Rotate the scroll wheel clockwise to increase clock time in clock, wake, snooze, sleep and nap setting mode.
Rotate the scroll wheel counterclockwise to decrease clock time in clock, wake, snooze, sleep and nap setting mode.

Auto brightness control sensor.
Function Selector:
Locks setting mode.
WAKE 1 - Sets wake 1 time.
WAKE 2 - Sets wake 2 time.
TIME - Enters clock setting mode.
AUTO BRIGHTNESS ON / OFF - Adjust display brightness. Select ON to dim the display. Select OFF to brighten the display.
VOLUME CONTROL - Adjusts volume level.
SNOOZE - Enters snooze mode where the alarm will quiet but will sound again once the snooze period is over.
NAP - Activates nap function.
TUNING - Tunes radio frequency.
FM / AM - Selects between FM and AM radio band.
Display
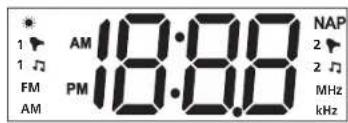
- Daylight Saving Time activated.
1 ♩- Wake 1 to tone.
1 Wake 1 to radio.
FM - In FM radio band.
AM - In AM radio band.
AM - AM time indicator.
PM - PM time indicator.
NAP - Nap is activated.
2 - Wake 2 to tone.
2 ♩ Wake 2 to radio.
MHz / kHz - Radio frequency unit.
EN

A_RP3720 EN 3/25/04. 9:21 AM10-11


Setting the Clock
EN
Setting Clock
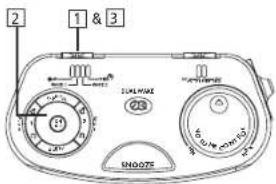
- Slide the Function Selector to TIME to enter clock setting mode.

Tip: Tip:
The ":" flashes on the display in clock setting mode.
- Rotate the scroll wheel around the ON/OFF button clockwise to increase clock time and rotate it counter-clockwise to decrease clock time.
- Slide the Function Selector to lock

Note: Note:
The clock is in 12 hour format. The AM or PM indicator lights to show am and pm time.

Tip: Tip:
Radio frequency will not be displayed when setting the clock or wake time in radio mode.

A_RP3720 EN 3/25/04. 9:21 AM12-13


Radio
Built-In AFC
The Built-In Automatic Frequency Control (AFC) works only on FM. It helps to reduce drift on FM reception and to keep the radio locked in on the FM station to which it is tuned.
Antennas
AM Antenna - A built-in ferrite rod antenna eliminates the need for an outside antenna for AM reception. Rotating the unit slightly may improve reception of distant AM stations.
FM Antenna - The power cord acts as your FM antenna. The power cord picks up moderate to strong stations and eliminates the need for an external antenna in most strong signal areas. Be sure the power cord is stretched out to its full length. Do not coil or bunch the cord together. Changing position of the power cord may improve reception.
Turning on/off the Radio
Press the ON/OFF button on the top of the unit to turn on the radio. Press again to turn off the radio.
Selecting Bands
Slide the band switch on the side of the unit to select between FM and AM band.
Tuning to Stations
Rotate the TUNING knob on the side of the unit clockwise to tune up radio frequency.
Rotate it counter-clockwise to tune down radio frequency.

Tip: Tip:
Radio frequency will not be displayed when setting the clock or wake time in radio mode.




Wake Settings
EN
Setting Wake Time
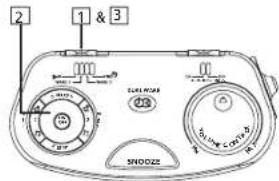
- Slide the Function Selector to WAKE 1 or WAKE 2 to set wake 1 or wake 2 time.

Tip:
Tip:
The ":" flashes on the display in wake time setting mode.
- Rotate the scroll wheel around the ON/OFF button clockwise to increase clock time and rotate it counterclockwise to decrease clock time.
- Slide the Function Selector to lock
Selecting Wake Source
Press 📁 1 🌐 repeatedly to select wake source for wake 1.
1 lights on the display when wake 1 to tone is selected.
1 📌 lights on the display when wake 1 to radio is selected.
Press 🔔 2 🌐 repeatedly to select wake source for wake 2.
2 lights on the display when wake 2 to tone is selected.
2 lights on the display when wake 2 to radio is selected.
Wake to Tone
When wake to tone is selected, the icon will be displayed.

Note: Note:
The unit equips with GRAD-U-GRAD-U-WAKEWAKE, the alarm tone volume will increase gradually to its maximum in about 30 to 45 seconds.

Tip:Tip:
If you set SLEEP function with low volume level before going to bed, we advise using Wake to tone mode to wake you up since its volume will automatically increase.
Wake Settings
Wake to Radio
When wake to radio is selected, the 📂 icon will be displayed.
Setting Wake Station
- Select radio band.
- Select desired station.
- Adjust the volume by turning VOLUME.

Note: Note:
When you turn off the alarm by pressing ON/OFFON/OFF will turn on at the same time tomorrow.
Turning off Alarm
Silence the alarm momentarily
Press SNOOZE. The alarm will sound again when the snooze period is over. (see "Snooze Alarm Operation").
Stop the alarm
Press ON/OFF. Then, the alarm will be on the following day at the same time.

Tip:Tip:
You can activate the previously set alarm time by pressing
When AC power is interrupted and the unit is operating through the DC backup batteries, all wake mode will work with buzzer instead.





Operating the Clock
EN
Sleep Mode
In sleep mode, the unit will turn off automatically after a specified time.
Setting Sleep Time
- Press SLEEP then the time display will exhibit 0:59 and the radio will turn on.
- While holding SLEEP, rotate the scroll wheel around the ON/OFF button clockwise to increase sleep time and rotate it counter-clockwise to decrease sleep time.
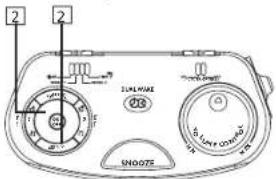
Sleep to Radio
The radio is turned on after step 1 in Setting Sleep Time and you may select the station as usual. The radio will turn off when the preset time elapses. If you decide to turn off the radio sooner, press SNOOZE or ON/OFF.
View Remaining Sleep Time
Press SLEEP to read the remaining sleep time.

Note: Note:
When SLEEP GLEEPvated again, the sleep time will be the same as the one you have set before.

Note: Note:
The time range is from 1 minute to 2 hours.
- Release SLEEP and the current time will be shown again.
Operating the Clock
Nap Mode
This function wakes you up after a short period of time. Only alarm sound can be selected for Nap.
- Press and release the NAP button on the side of the unit. The NAP indicator will flash.
- During this period, adjust NAP time by rotating the scroll wheel around the ON/OFF button.
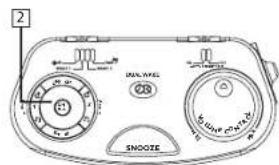

Note: Note:
The nap range is from 10 minutes to 2 hours.
- Press NAP to confirm nap time or if no button is pressed after 5 seconds, the clock will be shown. The NAP indicator lights.
View NAP time
Press NAP once to show time left.
Cancel NAP
Press and hold NAP to cancel the nap setting.
Stop the Nap alarm
Press NAP or follow "Turning off Alarm".

Note: Note:
Nap will not be activated again the following day at the same time.
Nap alarm is equipped with GRAD-U-WAKEGRAD-U-WAKE

Tip:Tip:
Nap time increases and decreases at an interval of 10 minutes.
12
A_RP3720 EN 3/25/04. 9:21 AM16-17
13





Operating the Clock
EN
Snooze Alarm Operation
This operation allows extra sleep time after the alarm is on. The alarm will be off by pressing SNOOZE until the snooze period is over. Snooze function can be used repeatedly up to 2 hours. After this, the alarm will turn off until the next alarm conditions are met. Set the "quiet" period as follow:
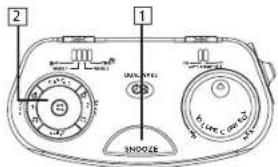
1. Press and hold SNOOZE
- Rotate the scroll wheel around the ON/OFF button clockwise to increase snooze time and rotate it counterclockwise to decrease snooze time. Release button, then, the "quiet" period is set.

Note: Note:
The "quiet" period is from 1 minute to 30 minutes. (the default time is 9 minutes)
Auto Brightness Control
There is a brightness control sensor located on the top of the unit.
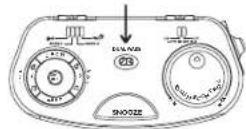
Slide the AUTO BRIGHTNESS switch to ON to turn on auto brightness control. The brightness of the LED display will vary automatically according to the environment. Slide to the OFF position, the display will remain at its brightest level.

Note: Note:
Avoid putting anything on top of the unit that causes the sensor to be covered. If the sensor is cover, there will be no effect for Auto Brightness Control even if it is set to the ON position.
U.S. Warranty
What your warranty covers:
• Defects in materials or workmanship.
For how long after your purchase:
• One year from date of purchase.
The warranty period for rental units begins with the first rental or 45 days from date of shipment to the rental firm, whichever comes first.
What we will do:
- Provide you with a new, or at our option, a refurbished unit. The exchange unit is under warranty for the remainder of the original product's warranty period.
- Proof of purchase in the form of a bill of sale or receipted invoice which is evidence that the product is within the warranty period must be presented to obtain warranty service. For rental firms, proof of first rental is also required.
How to make a warranty claim:
- Properly pack your unit. Include any cables, etc., which were originally provided with the product. We recommend using the original carton and packing materials.
- Include evidence of purchase date such as the bill of sale. Also print your name and address and a description of the defect. Send via standard UPS or its equivalent to:
Thomson Inc.
Product Exchange Center
11721 B Alameda Avenue
- Insure your shipment for of loss or damage. Thomson accepts no liability in case of damage or loss en route to Thomson.
- Pay any charges billed to you by the Exchange Center for service not covered by the warranty.
- A new or refurbished unit will be shipped to you freight prepaid.
What your warranty does not cover:
- Customer instruction. (Your Owner's Manual provides information regarding operating Instructions and user controls. For additional information, ask your dealer.)
• Installation and set-up service adjustments. - Batteries.
• Damage from misuse or neglect. - Products which have been modified or incorporated into other products.
- Products purchased or serviced outside the USA.
- Acts of nature, such as but not limited to lightning damage.

U.S. Warranty
Limitation of Warranty:
• THE WARRANTY STATED ABOVE IS THE ONLY WARRANTY APPLICABLE TO THIS PRODUCT. ALL OTHER WARRANTIES, EXPRESS OR IMPLIED (INCLUDING ALL IMPLIED WARRANTIES OF MERCHANTABILITY OR FITNESS FOR A PARTICULAR PURPOSE) ARE HEREBY DISCLAIMED. NO VERBAL OR WRITTEN INFORMATION GIVEN BY THOMSON INC., ITS AGENTS OR EMPLOYEES SHALL CREATE A GUARANTY OR IN ANY WAY INCREASE THE SCOPE OF THIS WARRANTY. • REPAIR OR REPLACEMENT AS PROVIDED UNDER THIS WARRANTY IS THE EXCLUSIVE REMEDY OF THE CONSUMER. THOMSON INC. SHALL NOT BE LIABLE FOR INCIDENTAL OR CONSEQUENTIAL DAMAGES RESULTING FROM THE USE OF THIS PRODUCT OR ARISING OUT OF ANY BREACH OF ANY EXPRESS OR IMPLIED WARRANTY ON THIS PRODUCT. THIS DISCLAIMER OF WARRANTIES AND LIMITED WARRANTY ARE GOVERNED BY THE LAWS OF THE STATE OF INDIANA. EXCEPT TO THE EXTENT PROHIBITED BY APPLICABLE LAW, ANY IMPLIED WARRANTY OF MERCHANTABILITY OR FITNESS FOR A PARTICULAR PURPOSE ON THIS PRODUCT IS LIMITED TO THE APPLICABLE WARRANTY PERIOD SET FORTH ABOVE.
How state law relates to this warranty:
- Some states do not allow the exclusion nor limitation of incidental or consequential damages, or limitations on how long an implied warranty lasts, so the above limitations or exclusions may not apply to you.
- This warranty gives you specific legal rights, and you also may have other rights that vary from state to state.
If you purchased your product outside the USA:
This warranty does not apply. Contact your dealer for warranty information.
Canadian Warranty
Thomson multimedia Ltd. warrants to the purchaser or gift recipient that if any manufacturing defect becomes apparent in this product within 1 year from the original date of purchase, it will be replaced free of charge, including return transportation.
This warranty does not include damage to the product resulting from accidents, misuse or leaking batteries.
Should your product not perform properly during the warranty period, either:
- Return it to the selling dealer with proof of purchase for replacement,
OR
- Remove the batteries (where applicable), and pack product complete with accessories in the original carton (or equivalent). Mail prepaid (with proof of purchase) and insured to:
Thomson multimedia Ltd.
6200 Edwards Blvd.,
Mississauga, Ontario L5T 2V7
Canada
The provisions of this written warranty are in addition to and not a modification of or subtraction from the statutory warranties and other rights and remedies contained in any applicable legislation, and to the extent that any such provisions purport to disclaim, exclude or limit any such statutory warranties and other rights and remedies, such provisions shall be deemed to be amended to the extent necessary to comply therewith.
If you are unable to find a qualified servicer for out of warranty service, you may write to:
Thomson Inc.
P.O. Box 0944
Indianapolis, Indiana, U.S.A., 46206-0944
Attach your sales receipt to this booklet for future reference. This information is required if service is needed during the warranty period.
PURCHASE DATE
NAME OF STORE
- FCC Information
- EN
- WARNING TO PREVENT FIRE OR ELECTRICAL SHOCK HAZARDO NOT EXPOSE THIS PRODUCT TO RAIN OR MOISTURE.
- For Your Safety
- For Your Records
- Technical Information
- Electrical Consumption
- Safety Information
- Ecology
- Maintenance
- Table of Contents
- FCC information / Safety Information
- Before Your Begin 2
- General Controls 6
- Display 7
- Setting the Clock 8
- Radio 9
- Wake Settings 10
- Operating the Clock 12
- U.S. Warranty 15
- Before You Begin
- Before Plugging-In for Power
- Automatic Time Set
- Setting Time Zone
- Plugging In For Power AC OUTLET POWER SUPPLY:
- Note: Note:
- Daylight Saving Time
- Slide the DAYLIGHT SAVING
- Warning: Warning:
- Battery Back-Up Operation
- Power Failure Indicator
- General Controls
- Function Selector:
- Display
- Setting the Clock
- Tip: Tip:
- Radio
- Built-In AFC
- Antennas
- Turning on/off the Radio
- Selecting Bands
- Tuning to Stations
- Wake Settings
- Selecting Wake Source
- Wake to Tone
- Tip:Tip:
- Wake to Radio
- Setting Wake Station
- Turning off Alarm
- Silence the alarm momentarily
- Stop the alarm
- Operating the Clock
- Sleep Mode
- Setting Sleep Time
- Sleep to Radio
- View Remaining Sleep Time
- Nap Mode
- View NAP time
- Cancel NAP
- Stop the Nap alarm
- Snooze Alarm Operation
- Press and hold SNOOZE
- Auto Brightness Control
- U.S. Warranty
- What your warranty covers:
- For how long after your purchase:
- What we will do:
- How to make a warranty claim:
- Thomson Inc.
- What your warranty does not cover:
- Limitation of Warranty:
- How state law relates to this warranty:
- If you purchased your product outside the USA:
- Canadian Warranty
- Thomson multimedia Ltd.
Brand : RCA
Model : RP3720
Category : Alarm clock radio