
KCO211BM - Oven KITCHENAID - Free user manual and instructions
Find the device manual for free KCO211BM KITCHENAID in PDF.


| Product Type | Toaster Oven |
| Brand | KitchenAid |
| Model | KCO211BM |
| Power Supply | 120 V ~ 60 Hz, 1800 W |
| Cooking Functions | Toast, Bagel, Pizza, Cookies, Bake, Broil, Roast, Keep Warm, Reheat |
| Special Modes | Frozen, Automatic Preheating |
| Toasting Capacity | 1 to 6 slices |
| Bagel Capacity | 1 to 6 halves |
| Temperature Range | 150-450 °F (65-232 °C) depending on mode |
| Browning Level | 8 levels (from light to dark) |
| Display | High-contrast LCD screen |
| Interior Material | Nonstick coating |
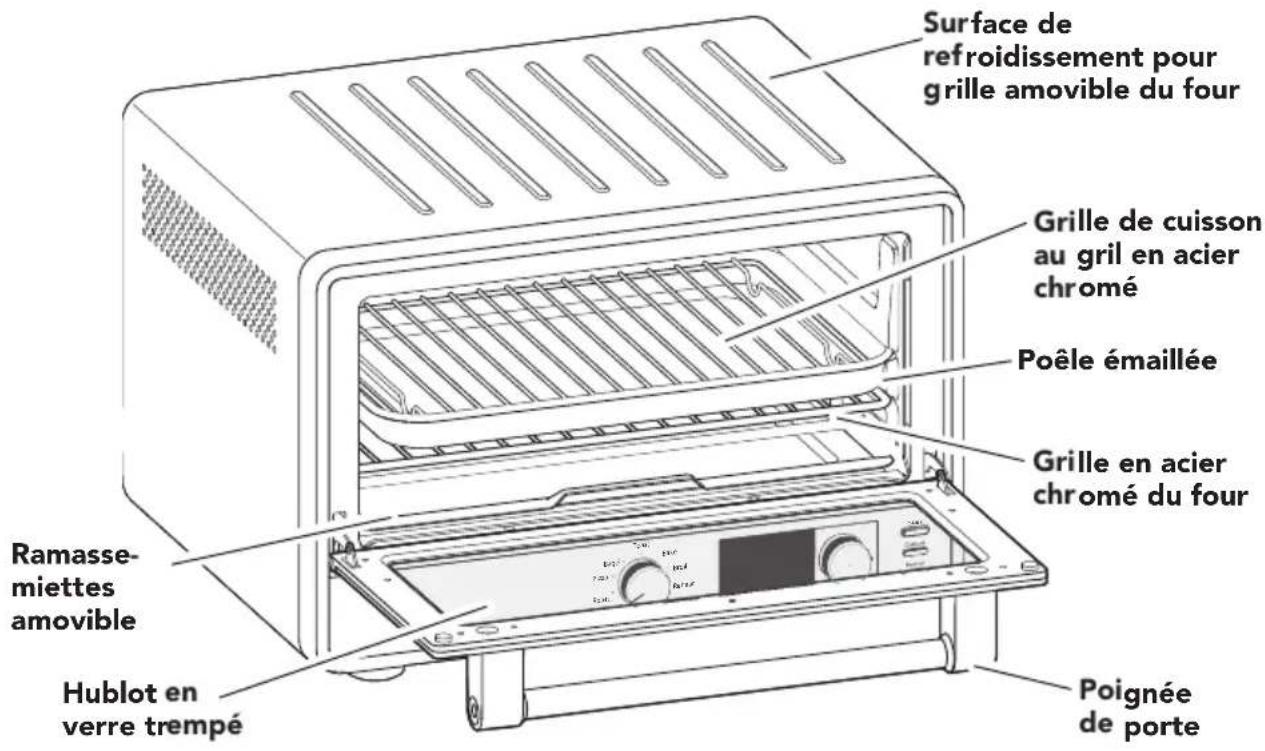
| Included Accessories | Oven rack, broil rack, multifunction pan, removable crumb tray |
| Safety | 3-prong grounded plug, hot surfaces, child lock not specified |
| Maintenance | Nonstick interior cleaning, removable crumb tray, racks and pan dishwasher safe |
| Warranty | 1 year (hassle-free replacement in U.S. and Canada) |
| Color | Black (based on model KCO211BM) |
| Dimensions (estimated) | Approximately 46 x 36 x 30 cm (L x D x H) |
Frequently Asked Questions - KCO211BM KITCHENAID
User questions about KCO211BM KITCHENAID
0 question about this device. Answer the ones you know or ask your own.
Ask a new question about this device
Download the instructions for your Oven in PDF format for free! Find your manual KCO211BM - KITCHENAID and take your electronic device back in hand. On this page are published all the documents necessary for the use of your device. KCO211BM by KITCHENAID.
USER MANUAL KCO211BM KITCHENAID
natural_image
Exterior view of a KitchenAid electric stove with digital display and open tray (no text or symbols on main subject)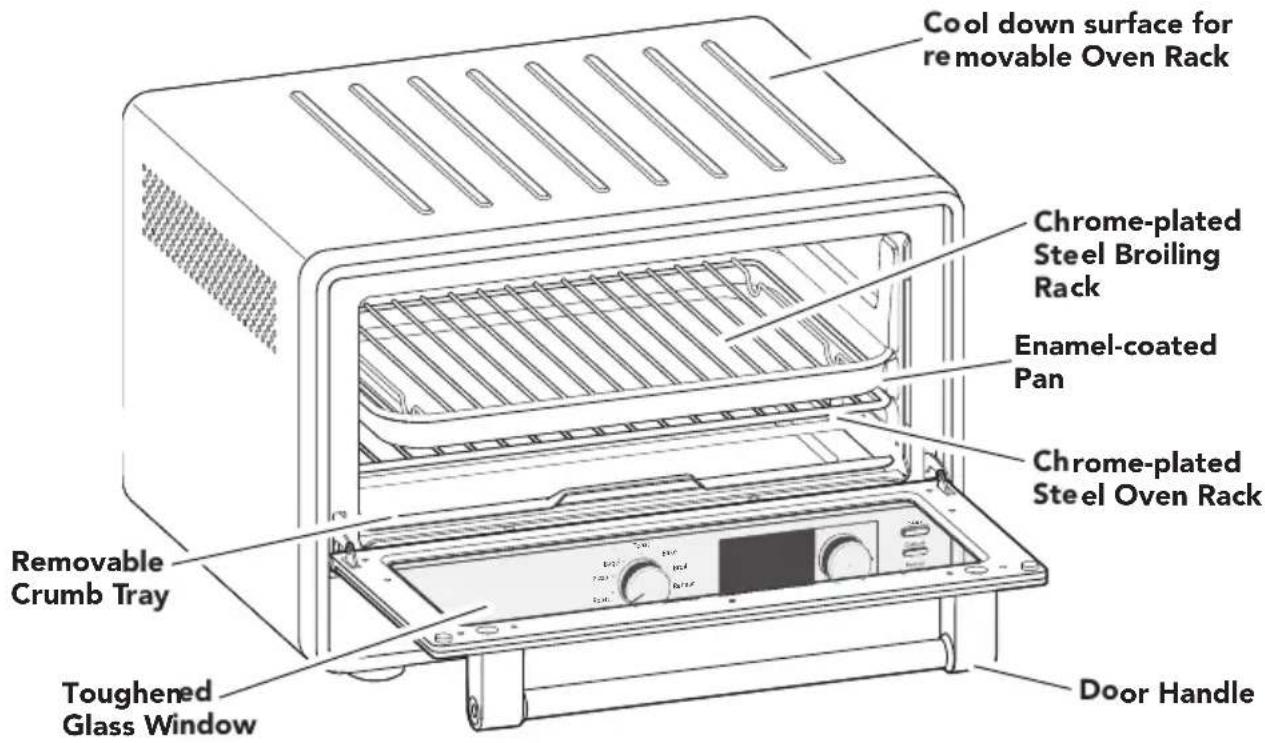
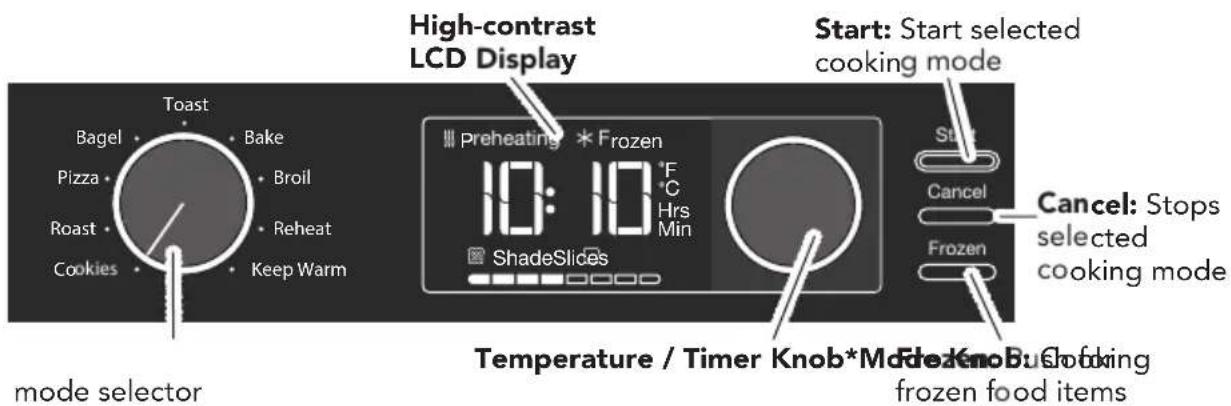
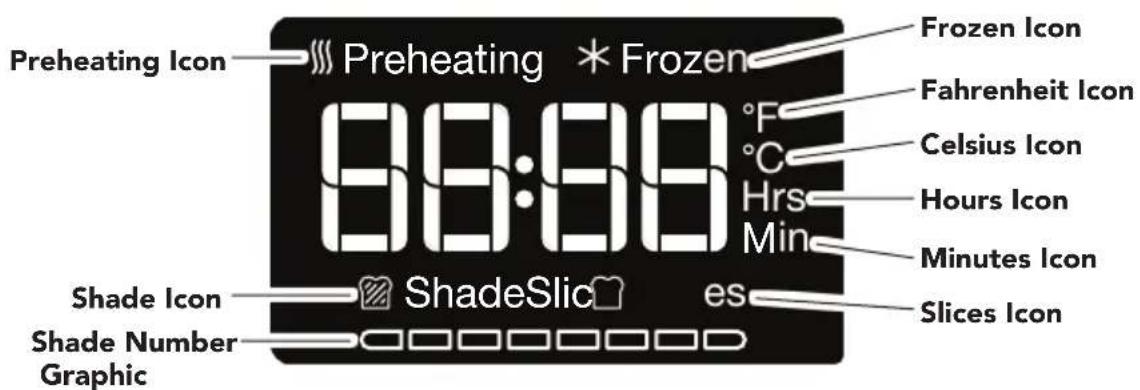
NOTE: Press and hold the Frozen button for 3 seconds to switch between the temperature units Fahrenheit (°F) and Celsius (°C).
*Adjust the time by 1 minute for the first hour and then by 5 minutes for the next hour. Adjust by 5^ or 1^ temperature, depending on the unit selected. Rotate and press to select desired shade and number of slices while using the Toast or Bagel mode.
Your safety and the safety of others are very important.
We have provided many important safety messages in this manual and on your appliance. Always read and obey all safety messages.

This is the safety alert symbol.
This symbol alerts you to potential hazards that can kill or hurt you and others.
All safety messages will follow the safety alert symbol and either the word "DANGER" or "WARNING." These words mean:
! DANGER
You can be killed or seriously injured if you don't immediately follow instructions.
WARNING
You can be killed or seriously injured if you don't follow instructions.
All safety messages will tell you what the potential hazard is, tell you how to reduce the chance of injury, and tell you what can happen if the instructions are not followed.
IMPORTANT SAFEGUARDS
When using electrical appliances, basic safety precautions should always be followed, including the following:
- Read all instructions.
- Do not touch hot surfaces. Use handles or knobs.
- To protect against risk of electrical shock, do not put cord, plugs, or any parts of the Countertop Oven in water or other liquid.
- Close supervision is necessary when any appliance is used by or near children.
- Unplug from outlet when not in use and before cleaning. Allow to cool before putting on or taking off parts.
- Do not operate any appliance with a damaged cord or plug, or after the appliance malfunctions, or is dropped or damaged in any manner. Return appliance to the nearest Authorized Service Facility for examination, repair, or adjustment.
- The use of accessory attachments not recommended by the appliance manufacturer may cause injuries.
- Do not let cord hang over edge of table or counter, or touch hot surfaces.
- Do not place on or near a hot gas or electric burner, or in a heated oven.
- Extreme caution must be used when moving an appliance containing hot oil or other hot liquids.
- Use extreme caution when removing Broiling Rack, Multipurpose Pan, Oven Rack, or disposing of hot grease.
- Oversize foods or metal utensils must not be inserted in a Countertop Oven as they may create a re or risk of electric shock.
- A re may occur if Countertop Oven is covered or touching ammable material, including curtains, draperies, walls and the like, when in operation. Do not store any item on top of the appliance when in operation.
COUNTERTOP OVEN SAFETY
- Do not clean with metal scouring pads. Pieces can break off the pad and touch electrical parts, creating a risk of electric shock.
- Extreme caution should be exercised when using containers constructed of materials other than metal or glass.
- Do not store any materials, other than manufacturer's recommended accessories, in this Countertop Oven when not in use.
- Do not place any of the following materials in the Countertop Oven: paper, cardboard, plastic, or anything similar.
- Do not cover crumb drawer or any part of the Countertop Oven with metal foil. This will cause overheating of the oven.
- To disconnect, turn the Countertop Oven "off" by pressing Cancel button, then remove plug from wall outlet.
- Do not use outdoors.
- Do not use appliance for other than intended use.
SAVE THESE INSTRUCTIONS
This product is designed for household use only.
ELECTRICAL REQUIREMENTS
WARNING
Electrical Shock Hazard
Plug into a grounded 3 prong outlet.
Do not remove ground prong.
Do not use an adapter.
Do not use an extension cord.
Failure to follow these instructions can result in death, fire, or electrical shock.
Voltage: 120 VAC
Frequency: 60 Hz
Wattage: 1800 Watts
NOTE: If the plug does not fit in the outlet, contact a qualified electrician or serviceperson. Do not modify the plug in any way. Do not use an adapter.
Do not use an extension cord. If the power supply cord is too short, have a qualified electrician or serviceperson to install an outlet near the appliance.
The cord should be arranged so that it will not drape over the countertop or tabletop where it can be pulled on by children or tripped over unintentionally.
GETTING STARTED
PREPARING THE COUNTERTOP OVEN FOR USE
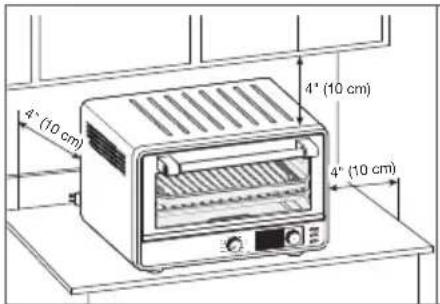
- Place the Countertop Oven on a dry, flat, level surface such as a countertop or table.
- Be sure the sides, back, and top of the oven are at least 4" (10 cm) away from any walls, cabinets, or objects on the counter or table.
- Remove all accessories and wash in warm, sudsy water. Dry thoroughly before placing in the Oven.
- Remove all packaging materials and labels, if present.
Follow below guidelines to position the Oven Rack:
- (Top): Use for broiling most meats, toast and cookies.
- (Bottom): Optimal for most baking and cooking operations. This position is suitable for cooking taller food items.
NOTE: Upon first use, the Countertop Oven may produce light smoke. This is normal.
COUNTERTOP OVEN FUNCTIONS
Your Countertop Oven features 9 cooking modes specially designed for a variety of cooking tasks. Memory settings allow you to customize the time and temperature in each mode to fit your specific needs. Your Countertop Oven will remember all your settings for the next use (until unplugged). Frozen modes (available on certain cooking modes) allow you to take countertop cooking to a whole new level.
Refer to the detailed explanations and tips for each cooking mode below, or see quick guide charts for cooking or toasting mode options.
TOASTING MODES
Toast Mode
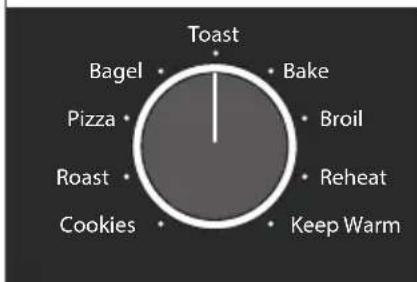
In Toast mode, the oven distributes power between the top and bottom heating elements to deliver fast and even toasting. Use the Toast mode for bread, toaster pastries, frozen waffles.
If reheating pastries, use the Reheat mode.
Tips:
- Place oven rack in position 1. Place bread in the center of the oven rack.
- Bread slices do not need to be flipped during the toasting cycle.
- Select the Frozen option to allow frozen bread or similar items extra time to thaw while cooking.
COUNTERTOP OVEN FUNCTIONS
Bagel Mode
pie
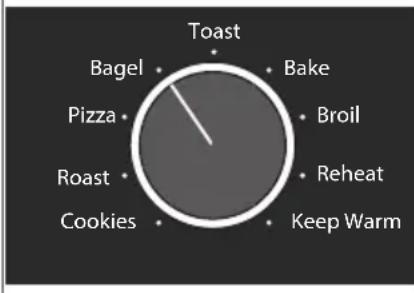
| Category | Value | |---|---| | Toast | 100 | | Bake | 50 | | Broil | 25 | | Reheat | 15 | | Keep Warm | 10 | | Cookies | 5 | | Roast | 5 | | Pizza | 5 | | Bagel | 5 |In Bagel mode, the oven distributes power between the top and bottom heating elements to nicely brown the top of cut bagels while gently warming the outside.
Tips:
- Place bagels directly on the oven rack with the cut sides facing UP.
- Bagels do not need to be flipped during the Bagel cycle.
- Select the Frozen option to allow frozen bagels extra time to thaw while cooking.
TOASTING MODES CHART
| Mode | Rack Position | Preset Shade | Shade Range (Light to Dark) | Preset Slices | Range (# of slices) |
| Toast | 1 4 1 - | 8 2 1 - 6 | |||
| Bagel | 1 4 1 - | 8 2 1 - 6 |
COOKING MODES
Pizza Mode
pie
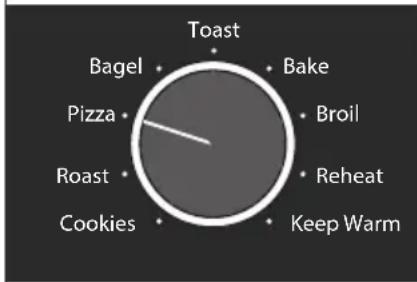
| Category | Value | |---|---| | Toast | 100 | | Bake | 50 | | Broil | 30 | | Reheat | 20 | | Keep Warm | 15 | | Cookies | 10 | | Roast | 8 | | Pizza | 7 | | Bagel | 6 |In Pizza mode, your oven distributes power to the top and bottom heating elements to maintain the desired oven temperature.
Frozen mode:
Pizza setting will default to Frozen mode. You may use the Frozen button to provide extra time for frozen pizzas to cook, or deselect it when cooking freshly prepared pizzas.
Tips:
- For frozen pizzas, it is recommended to follow time and temperature directions included on the food packaging.
- Thick crust, self-rising, or deep-dish pizzas will require longer cooking times. Use a 12" (30 cm) non stick pan for fresh or deep-dish pizzas to maintain shape and keep sauce contained.
Cookies Mode
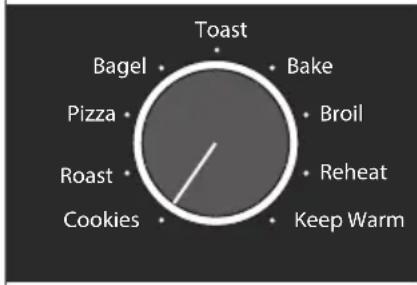
In Cookies mode, your oven distributes power to the top and bottom heating elements to maintain the desired oven temperature.
Tips:
- Cookies will cook faster and more efficiently because their surface area is relatively small.
- Keep heat loss to a minimum by opening the oven door only when necessary.
COUNTERTOP OVEN FUNCTIONS
Bake Mode
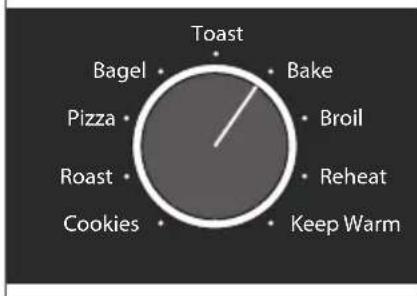
pie
| Category | Value | |---|---| | Toast | 100 | | Bake | 50 | | Broil | 25 | | Reheat | 20 | | Keep Warm | 15 | | Cookies | 10 | | Roast | 5 | | Pizza | 5 | | Bagel | 5 |In Bake mode, your oven distributes power to the top and bottom heating elements to maintain the desired oven temperature.
Tip:
- Food may finish cooking up to 30% faster. Check baked goods such as cakes, muffins, and pastries before the expected finish time to avoid overcooking.
Broil Mode
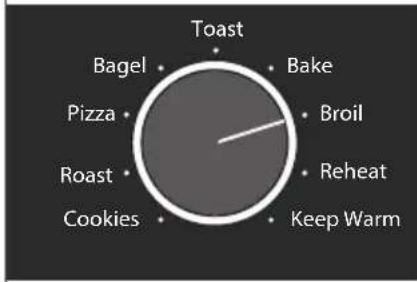
pie
| Category | Value | |---|---| | Toast | 100 | | Bake | 50 | | Broil | 25 | | Reheat | 20 | | Keep Warm | 15 | | Cookies | 10 | | Roast | 5 | | Pizza | 5 | | Bagel | 5 |Broiling uses direct radiant heat to cook food from above. Your oven will distribute power to the top two heating elements. To deliver efficient broiling, the bottom elements will run then shut off after the oven preheats.
Tips:
- For best results, use the 9" x 13" multipurpose pan and rack. It is designed to drain juices and help avoid spatter and smoke. - For proper draining, do not cover the rack with foil. Instead, the bottom of the multipurpose pan may be lined with aluminum foil for easier cleaning.
Roast Mode
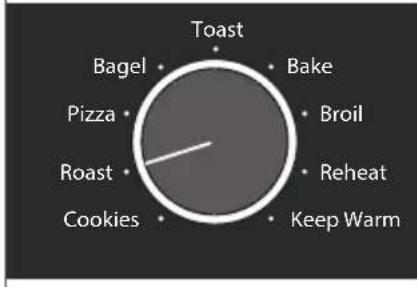
pie
| Category | Value | |---|---| | Toast | 100 | | Bake | 50 | | Broil | 25 | | Reheat | 15 | | Keep Warm | 10 | | Cookies | 5 | | Roast | 5 | | Pizza | 5 | | Bagel | 5 |In Roast mode, your oven distributes power to the top and bottom heating elements to maintain the desired oven temperature.
Keep Warm Mode
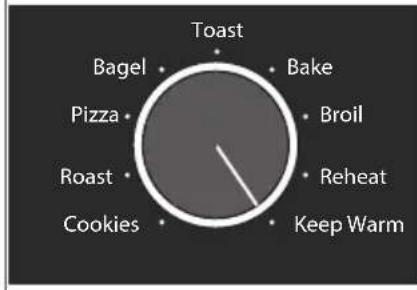
In Keep Warm mode, your oven distributes power to the bottom elements to keep food warm before serving.
Tip:
- The preset temperature is 170^ F ( 77^ C), but you may wish to adjust this depending on the item being warmed.
Reheat Mode
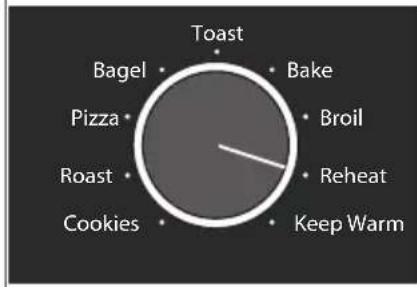
Your oven distributes power to the top and bottom elements to bring food to serving temperature.
Tip:
- The preset suggested temperature is 300^ F ( 149^ C), but you may need to adjust this depending on the item being reheated. Reheating too long may overcook or dry out food.
COUNTERTOP OVEN FUNCTIONS
NOTE: The Countertop Oven will automatically preheat when, Pizza, Cookies, Bake, Broil, Roast modes are selected.
If you choose to start cooking directly and skip preheating, press the Start button twice and the timer will start without preheating the Countertop Oven.
COOKING MODES CHART
| Mode | Rack No. | Preset Temp. (°F / °C) | Temp. Range (°F / °C) | Preset Time (Mins) | Recommended Foods |
| Pizza | 1 - 2 | 400°F (204°C) | 150-450°F65-232°C | 17 | Fresh and frozen Pizza |
| Cookies | 1 375 | °F (190°C) | 150-450°F66-232°C | 10 Cookie Dough | |
| Bake | 1 - 2 | 350°F (177°C) | 150-450°F66-232°C | 30 | Cakes, breads, casseroles, muffins |
| Broil* | 1 - 2 | 450°F (232°C) | 350°F (177°C)450°F (232°C) | 8 | Chops, fish, seafood, browning |
| Roast | 2 350 | °F (177°C) | 150-450°F66-232°C | 60 | Chicken, meat and vegetables |
| Keep Warm | 1 - 2 | 170°F (77°C) | 150-200°F66-93°C | 60 Keeps food warm | |
| Reheat | 1 - 2 | 300°F (149°C) | 150-450°F66-232°C | 15 Leftovers |
* Broil mode allows temperatures of 350°F (177°C) and 450°F (232°C) only.
USING THE COUNTERTOP OVEN
| 1 | 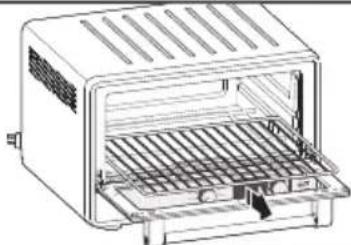 | To adjust the Oven Rack position, Open the door of oven and slide the Oven Rack out completely. |
| 2 | 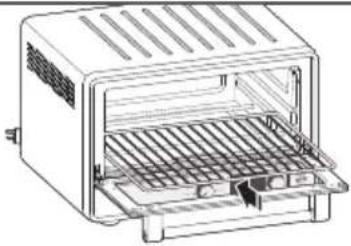 | Align the sides of the oven rack with the grooves for the desired position (1 or 2) and slide the Oven Rack straight in. |
USING THE COUNTERTOP OVEN
FROZEN MODE
The Frozen option adds additional cycle time to the selected cooking mode to allow for thawing which helps in proper cooking of frozen food items. The additional time varies depending on the selected cooking mode.
NOTE: The Frozen option is NOT available on Broil, Roast, Reheat, or Keep Warm cooking mode.
PREHEATING
Preheating your Countertop Oven is important for consistent and even results. Once you select your desired cooking mode and any other settings, and press START, and your oven will saturate the walls and cooking racks above the oven's set temperature to remove cold spots that draw heat away from food. This also helps the oven stay at the desired temperature when the door is opened for short periods of time.
During preheating, the light ring around the Start button will be on, and the Preheat indicator will show on the LCD. Once the oven has reached the set temperature, a tone will sound to let you know you can insert food and begin cooking. Preheating is NOT necessary in all cooking modes.
To skip the Preheat and start the timer directly, push the START button a second time.
SETTING A COOKING OR TOASTING MODE
1
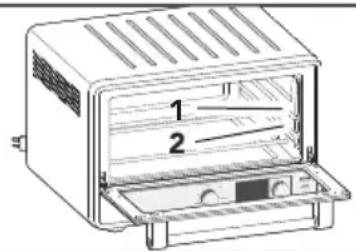
Make sure there will be enough clearance between the top of the food item and the top elements. If necessary, adjust the Oven Rack position between 1 or 2. Close the door.
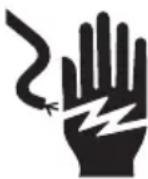
WARNING
Electrical Shock Hazard
Plug into a grounded 3 prong outlet.
Do not remove ground prong.
Do not use an adapter.
Do not use an extension cord.
Failure to follow these instructions can result in death, fire, or electrical shock.
2
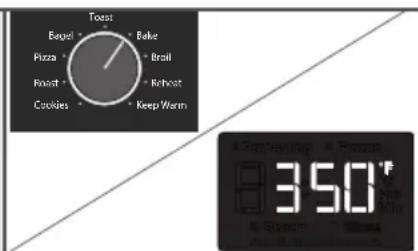
Plug into a grounded outlet. Turn the Mode knob to select the desired cooking or toasting mode.
The preset temperature will be shown for a selected cooking mode.
Shade and slices will be shown if selected Bagel or Toast mode.
USING THE COUNTERTOP OVEN
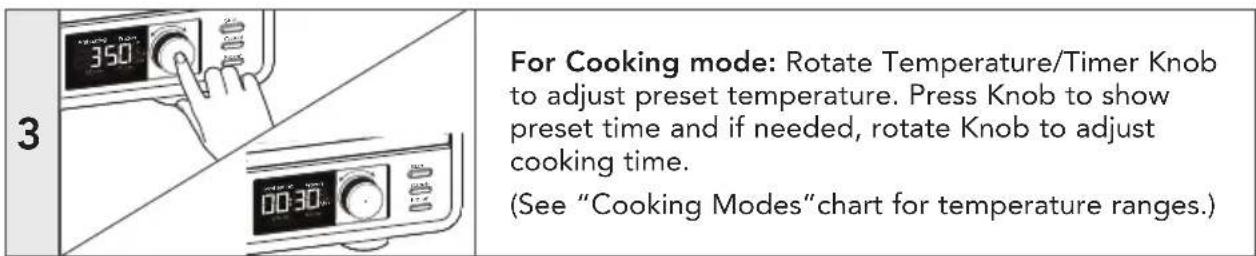
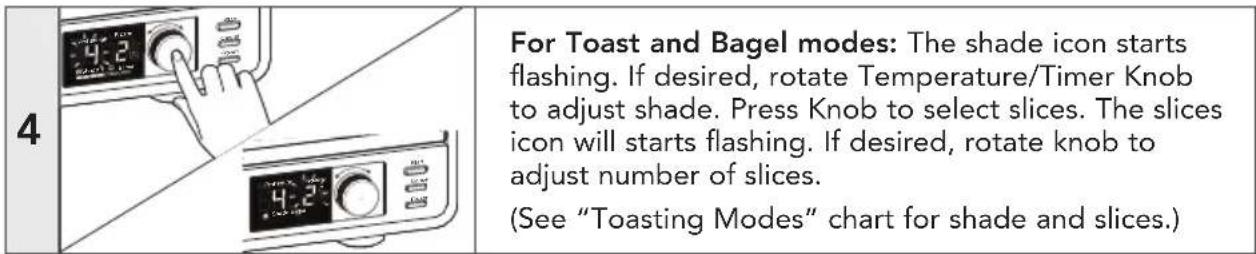
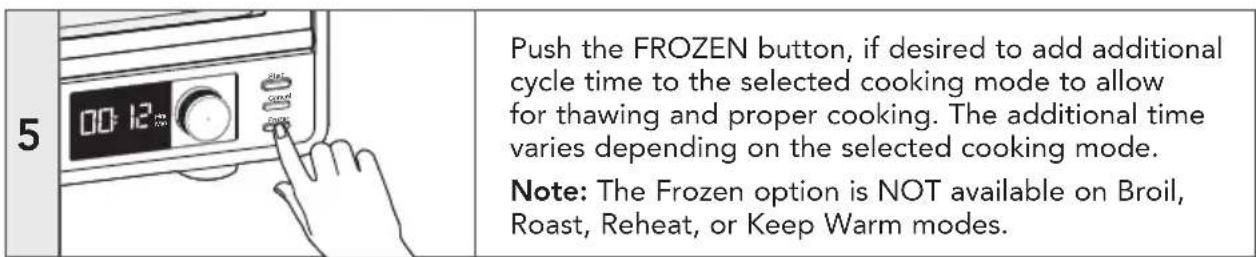
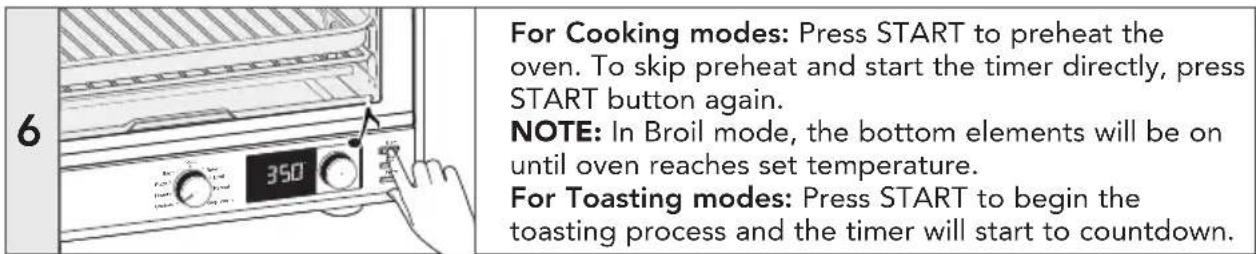
NOTE: Preheating is NOT available on Keep Warm, Reheat, Toast, or Bagel modes.
| 7 | For Cooking modes: A chime sounds when preheat is complete. The display will change to show the time counting down. Open the oven door and place the food on the rack. Then, close the door. Rotate temperature/ timer knob to adjust time, if needed. |
| 8 | When the cooking cycle is complete, a chime will sound. | |
NOTE: Always use oven mitts when removing pans or racks.
FOR DETAILED INFORMATION ON USING THE COUNTERTOP OVEN
Visit kitchenaid.com/quickstart for additional instructions with videos, inspiring recipes, and tips on how to use your Countertop Oven.
Are guesstimates for Toast Mode OK?
Experience will teach you how much time to use for toasting various kinds of bread. Frozen, dark, or whole-grain breads require a longer time. Rye breads are the most susceptible to over-toasting and spot charring. Fresh, soft, or white breads require a shorter time.
For foods that melt
When cooking small pieces of food or foods that will melt, use the multipurpose pan. This will keep food from falling onto the cooking elements.
To minimize cleanup
Spray the multipurpose pan with nonstick cooking spray for easier cleanup when cooking wet or sticky foods. Wash pan
thoroughly after each use to avoid buildup of cooking spray.
Size limits for food and cooking containers
For best results, food and/or oven-safe containers (see "Food Cooking Tips" section) must fit into the Countertop Oven without touching the cooking elements or inside walls of the Countertop Oven. The door must close completely. This allows air to circulate around the food, helping ensure consistent cooking temperature.
For extended use
When cooking for a long time at high temperatures, you may detect a slight odor from the Countertop Oven insulation materials. This is normal.
FOOD COOKING TIPS
- Check food cooking progress through the clear, tempered glass door window. Your Countertop Oven will perform better and be more energy efficient if you open the door less often.
- If top of food item browns too fast, lower the oven rack position or reduce temperature. If bottom of food item browns too fast, raise rack position or reduce temperature.
- Remove all plastic and/or paper wrappers from foods before cooking.
-
Use only loosely covered oven-safe containers. Airtight containers may cause food to boil over or splatter.
-
Although more energy efficient and faster than traditional ovens, countertop oven surfaces can become hot during cooking. Touch only the door handle and knobs during oven operation.
- Do not place items on top or near Countertop Oven while in use. Only use the included cooling rack to gently cool food on the top of this oven.
- Replace cardboard, glass, or plastic lids with aluminum foil for use in the Countertop Oven.
CHOOSING BAKEWARE FOR COUNTERTOP OVEN USE
- The nonstick multipurpose pan included with the Countertop Oven is suitable for items such as cookies, rolls, biscuits, nachos, and pork chops.
- A variety of standard baking dishes, such as a 9" (23 cm) round or square cake pan, a 6-cup (1.5 L) muffin pan, small baking sheets, and 1 and 2 qt (0.95 mL and 1.9 L) round, square, and rectangular casserole dishes, may be used. The door must close completely.
-
Choose bakeware made of metal, ovensafe glass, ceramic, or silicone.
-
Use lowest oven rack position when using deep, oven-safe glass or ceramic containers and allow at least 1" (2.5 cm) clearance between the top of the container and the upper cooking elements.
- Do not use glass lids. If a cover is desired, use a loosely fitted sheet of aluminum foil shiny side up or down.
- Many convenience foods are packaged in nonmetallic containers only suitable for use in microwave ovens. Check package directions to determine whether the container is suitable for use in a regular oven.
CARE AND CLEANING
REMOVING AND CLEANING THE CRUMB TRAY
| 1 | Unplug your Countertop Oven from the outlet.To remove the crumb tray, open the door, grasp thecrumb tray handle and slide straight out. |
CLEANING YOUR COUNTERTOP OVEN
NOTE: Unplug your Countertop Oven from the outlet before cleaning. Allow Countertop Oven and accessories to cool completely before cleaning.
INTERIOR:
- For easy cleaning, the inside walls of the Countertop Oven feature a nonstick coating. Remove heavy spatter after use with a nylon or polyester mesh pad, sponge, or cloth dampened with warm water. Dry with a paper towel or soft, dry cloth.
IMPORTANT: Do not use cleaning agents, cleansers, or metal scouring pads on the inner oven coating, as they may reduce its effectiveness. The nonstick coating inside the oven is scratch-resistant.
- Handwashing is recommended for racks and pan. Remove all items from the Countertop Oven. Wash the oven rack, broiling rack, and multipurpose pan in warm, sudsy water. Rinse and dry thoroughly.
NOTE: The oven rack, multipurpose pan, and broiling rack are dishwasher safe, but hand washing is recommended.
EXTERIOR:
- Do not use abrasive cleaners or metal scouring pads. They could scratch the surface.
- For painted surfaces: Wipe the outside of the Countertop Oven with a clean, damp cloth and dry thoroughly.
- For stainless steel surfaces: Wipe the outside of the Countertop Oven with a clean, damp cloth and dry thoroughly. A non abrasive liquid cleaner may be used for stubborn stains. KitchenAid recommends the use of affresh® stainless steel cleaner for all stainless steel surfaces. The affresh® cooktop cleaner and scrubbing pads are also recommended for cleaning the toughest baked-on residue on stainless steel and glass surfaces. Ensure all surfaces are completely dry before using your oven. Please visit www.affresh.com to learn more.
FOR DETAILED INFORMATION ON CLEANING THE COUNTERTOP OVEN
Visit kitchenaid.com/quickstart for additional instructions with videos, inspiring recipes, and tips on how to clean your Countertop Oven.
WARNING
Electrical Shock Hazard
Plug into a grounded 3 prong outlet.
Do not remove ground prong.
Do not use an adapter.
Do not use an extension cord.
Failure to follow these instructions can result in death, fire, or electrical shock.
- Is the Countertop Oven plugged into a grounded 3 prong outlet? Plug the Countertop Oven into a grounded 3 prong outlet.
- Is the fuse in the circuit to the Countertop Oven in working order? If you have a circuit breaker box, make sure the circuit is closed. Try unplugging the Countertop Oven, then plug it back in.
- Upper cooking elements visibly glow, but bottom cooking elements do not. The upper cooking elements use higher power for better browning performance. The lower cooking elements are on, but may not visibly glow like the upper cooking elements. This is normal and your Countertop Oven is working properly.
- If the problem cannot be corrected: See the "KitchenAid Warranty and Service" sections. Do not return the Countertop Oven to the retailer – retailers do not provide service.
- If the wrong temperature unit is displayed: Press and hold the Frozen button for 3 seconds to switch between Fahrenheit (°F) and Celsius (°C) temperature units.
- If "E1 or E2" flashes on the display and a chime sounds: The NTC Sensor may not be working. This issue can not be corrected. Please see the "KitchenAid Warranty and Service" sections.
WARRANTY AND SERVICE
KITCHENAID COUNTERTOP OVEN WARRANTY FOR THE 50 UNITED STATES, THE DISTRICT OF COLUMBIA, PUERTO RICO, AND CANADA
This warranty extends to the purchaser and any succeeding owner for Countertop Ovens operated in the 50 United States, the District of Columbia, Puerto Rico, and Canada.
| Length of Warranty: One Year Full Warranty from date of purchase. | |
KitchenAid Will Pay for Your Choice of: | Hassle-Free Replacement of your Countertop Oven. See the next page for details on how to arrange for service, or call the Customer eXperience Center toll-free at 1-800-541-6390.ORThe replacement parts and repair labor costs to correct defects in materials and workmanship. Service must be provided by an Authorized KitchenAid Service Center. |
| KitchenAid Will Not Pay for: | A. Repairs when your Countertop Oven is used in other than normal single family home use.B. Damage resulting from accident, alteration, misuse or abuse.C. Any shipping or handling costs to deliver your Countertop Oven to an Authorized Service Center.D. Replacement parts or repair labor costs for Countertop Oven attachments operated outside the 50 United States, District of Columbia, Puerto Rico, and Canada. |
| DISCLAIMER OF IMPLIED WARRANTIES; LIMITATION OF REMEDIESIMPLIED WARRANTIES, INCLUDING TO THE EXTENT APPLICABLE WARRANTIES OF MERCHANTABILITY OR FITNESS FOR A PARTICULAR PURPOSE, ARE EXCLUDED TO THE EXTENT LEGALLY PERMISSIBLE. ANY IMPLIED WARRANTIES THAT MAY BE IMPOSED BY LAW ARE LIMITED TO ONE YEAR, OR THE SHORTEST PERIOD ALLOWED BY LAW. SOME STATES AND PROVINCES DO NOT ALLOW LIMITATIONS OR EXCLUSIONS ON HOW LONG AN IMPLIED WARRANTY OF MERCHANTABILITY OR FITNESS LASTS, SO THE ABOVE LIMITATIONS OR EXCLUSIONS MAY NOT APPLY TO YOU.IF THIS PRODUCT FAILS TO WORK AS WARRANTED, CUSTOMER'S SOLE AND EXCLUSIVE REMEDY SHALL BE REPAIR OR REPLACEMENT ACCORDING TO THE TERMS OF THIS LIMITED WARRANTY. KITCHENAID AND KITCHENAID CANADA DO NOT ASSUME ANY RESPONSIBILITY FOR INCIDENTAL OR CONSEQUENTIAL DAMAGES. This warranty gives you specific legal rights and you may also have other rights which vary from state to state or province to province. | |
WARRANTY AND SERVICE
HASSLE-FREE REPLACEMENT WARRANTY—50 UNITED STATES, DISTRICT OF COLUMBIA, AND PUERTO RICO
We're so confident the quality of our products meets the exacting standards of KitchenAid that, if your Countertop Oven should fail within the first year of ownership, KitchenAid will arrange to deliver an identical or comparable replacement to your door free of charge and arrange to have your original Countertop Oven returned to us. Your replacement unit will also be covered by our one year limited warranty.
If your Countertop Oven should fail within the first year of ownership, simply call our toll-free
Customer eXperience Center at 1-800-541-6390 Monday through Friday. Please have your original sales receipt available when you call. Proof of purchase will be required to initiate the claim. Give the consultant your complete shipping address (no P.O. Box numbers, please).
When you receive your replacement Countertop Oven, use the carton, packing materials, and prepaid shipping label to pack up your original Countertop Oven and send it back to KitchenAid.
HASSLE-FREE REPLACEMENT WARRANTY—CANADA
We're so confident the quality of our products meets the exacting standards of the KitchenAid brand that, if your Countertop Oven should fail within the first year of ownership, we will replace your Countertop Oven with an identical or comparable replacement. Your replacement unit will also be covered by our one year limited warranty. If your Countertop Oven should fail within the first year of ownership, simply call our toll-free Customer eXperience Center at
1-800-807-6777 Monday through Friday. Please have your original sales receipt available when you call. Proof of purchase will be required to initiate the claim. Give the consultant your complete shipping address.
When you receive your replacement Countertop Oven, use the carton, packing materials, and prepaid shipping label to pack up your original Countertop Oven and send it back to KitchenAid.
ARRANGING FOR SERVICE AFTER THE WARRANTY EXPIRES, OR ORDERING ACCESSORIES AND REPLACEMENT PARTS
In the United States and Puerto Rico:
For service information, or to order accessories or replacement parts, call toll-free at 1-800-541-6390 or write to:
Customer eXperience Center, KitchenAid Small Appliances, P.O. Box 218, St. Joseph, MI 49085-0218
Outside the United States and Puerto Rico:
Consult your local KitchenAid dealer or the store where you purchased the Countertop Oven for information on how to obtain service.
For service information in Canada:
Call toll-free 1-800-807-6777.
For service information in Mexico:
Call toll-free 01-800-0022-767.
PIÈCES ET CARACTÉRISTIQUES
PIÈCES ET ACCESSOIRES
pie
| Category | Value | |---|---| | Toast | 0 | | Bake | 0 | | Broil | 0 | | Reheat | 0 | | Keep Warm | 0 | | Cookies | 0 | | Roast | 0 | | Pizza | 0 | | Bagel | 0 |pie
| Category | Value | |---|---| | Toast | 100 | | Bake | 50 | | Broil | 25 | | Reheat | 15 | | Keep Warm | 10 | | Cookies | 5 | | Roast | 5 | | Pizza | 5 | | Bagel | 5 |pie
| Category | Value | |---|---| | Toast | 100 | | Bake | 50 | | Broil | 30 | | Reheat | 20 | | Keep Warm | 15 | | Cookies | 10 | | Roast | 5 | | Pizza | 5 | | Bagel | 5 |natural_image
Line drawing of a microwave oven with ventilation grilles and tray (no text or symbols)natural_image
Line drawing of a bathroom sink with faucet and toilet (no text or symbols)Customer eXperience Center, KitchenAid Small Appliances, P.O. Box 218, St. Joseph, MI 49085-0218
pie
| Category | Value | |---|---| | Toast | 100 | | Bake | 50 | | Broil | 25 | | Reheat | 15 | | Keep Warm | 10 | | Cookies | 5 | | Roast | 5 | | Pizza | 5 | | Bagel | 5 |pie
| Category | Value | |---|---| | Toast | 100 | | Bake | 50 | | Broil | 30 | | Reheat | 20 | | Keep Warm | 15 | | Cookies | 10 | | Roast | 8 | | Pizza | 7 | | Bagel | 6 |pie
| Category | Value | |---|---| | Toast | 100 | | Bake | 50 | | Broil | 30 | | Reheat | 20 | | Keep Warm | 15 | | Cookies | 10 | | Roast | 8 | | Pizza | 7 | | Bagel | 6 |pie
| Category | Value | |---|---| | Toast | 100 | | Bake | 50 | | Broil | 30 | | Reheat | 20 | | Keep Warm | 15 | | Cookies | 10 | | Roast | 8 | | Pizza | 7 | | Bagel | 6 |natural_image
Line drawing of a microwave oven with ventilation slots and lid (no text or symbols)natural_image
Line drawing of a bathroom sink with faucet and toilet (no text or symbols)Customer eXperience Center, KitchenAid Small Appliances, P.O. Box 218, St. Joseph, MI 49085-0218.
natural_image
Red background with a white telephone handset icon (no text or symbols)PRODUCT QUESTIONS OR RETURNS
QUESTIONS SUR LE PRODUIT OU LES RETOURS
MEXICO: KitchenAid.com.mx
LATIN AMERICA: KitchenAid-Latam.com
natural_image
Silhouette of a kitchen mixer on a dark background (no text or symbols)KitchenAid®
®/™ ©2018 KitchenAid. All rights reserved. KITCHENAID and the design of the stand mixer are trademarks in the U.S. and elsewhere. Used under license in Canada.
- Your safety and the safety of others are very important.
- ! DANGER
- WARNING
- IMPORTANT SAFEGUARDS
- When using electrical appliances, basic safety precautions should always be followed, including the following:
- COUNTERTOP OVEN SAFETY
- SAVE THESE INSTRUCTIONS
- GETTING STARTED
- PREPARING THE COUNTERTOP OVEN FOR USE
- COUNTERTOP OVEN FUNCTIONS
- TOASTING MODES
- Tips:
- COOKING MODES
- Frozen mode:
- Tip:
- USING THE COUNTERTOP OVEN
- FROZEN MODE
- PREHEATING
- SETTING A COOKING OR TOASTING MODE
- Are guesstimates for Toast Mode OK?
- For foods that melt
- To minimize cleanup
- Size limits for food and cooking containers
- For extended use
- FOOD COOKING TIPS
- CHOOSING BAKEWARE FOR COUNTERTOP OVEN USE
- CARE AND CLEANING
- REMOVING AND CLEANING THE CRUMB TRAY
- CLEANING YOUR COUNTERTOP OVEN
- INTERIOR:
- EXTERIOR:
- WARRANTY AND SERVICE
- HASSLE-FREE REPLACEMENT WARRANTY—CANADA
- In the United States and Puerto Rico:
- Outside the United States and Puerto Rico:
- PIÈCES ET CARACTÉRISTIQUES
- KitchenAid®
Brand : KITCHENAID
Model : KCO211BM
Category : Oven