
DCM24S - Microwave Dacor - Free user manual and instructions
Find the device manual for free DCM24S Dacor in PDF.


| Product type | Built-in microwave |
| Brand | Dacor |
| Model | DCM24S |
| Width | 24 inches (61 cm) |
| Depth | 17.5 inches (44.5 cm) |
| Height | 13 inches (33 cm) |
| Weight | Approximately 23 kg (50 lb) |
| Interior capacity | 1.6 cubic feet (45 liters) |
| Cooking power | 1100 W |
| Power supply | 120 V, 60 Hz, 15 A |
| Exterior material | Stainless steel |
| Main functions | Quick cook, defrost, keep warm, popcorn, beverages, reheat |
| Technologies | Cooking sensor, 10 power levels, programmable clock |
| Interior lighting | Incandescent lamp |
| Turntable | Yes, glass |
| Child safety | Control panel lock |
| Control type | Touch electronic and buttons |
| Display | Digital LED |
| Multi-step cooking | Up to 3 steps |
| Metal rack | Not included (use a microwave rack) |
| Cleaning | Easy to clean stainless steel interior |
| Spare parts | Available: bulb, turntable, waveguide |
| Repairability | Repairability score to check (estimated 7/10) |
| Certification | ENERGY STAR® |
Frequently Asked Questions - DCM24S Dacor
User questions about DCM24S Dacor
0 question about this device. Answer the ones you know or ask your own.
Ask a new question about this device
Download the instructions for your Microwave in PDF format for free! Find your manual DCM24S - Dacor and take your electronic device back in hand. On this page are published all the documents necessary for the use of your device. DCM24S by Dacor.
USER MANUAL DCM24S Dacor
natural_image
Front view of a microwave oven with control panel and display screen (no visible text or symbols)Model DCM24
For use with model
DCM24
Table of Contents
Important Safety Instructions 1-2
Information You Need to Know 3-7
Parts of the Microwave 8-9
Before Operating 10
To Set The Clock....10
Stop/Clear....10
Manual Operation 10
Time Cooking....10
To Set Power Level....10
Microwave Features ....11-14
Auto Defrost 11
Manual Defrost....11
Sensor Cooking 12
Sensor Reheat / Popcorn .....13
Sensor Cook 14
Convection Automatic Operation....15-17
Auto Broil 15
Auto Roast....16
Auto Bake 17
Manual Convection And
Automatic Mix Cooking....18-20
Convection Cooking ....18
Automatic Mix Cooking....19
Other Features 21-22
Help Guide ....21 Help ....21
Easy Minute....21
More or Less Time Adjustment .....22
Multiple Sequence Cooking .....22
Kitchen Timer 22
Demonstration Mode....22
Instant On....22
Cleaning and Care 23
Service Call Check 24
Specifications....25
Product Warranty 26
Warranty Card ......Back Cover
dacor®
The Life of the Kitchen.
To Our Valued Customer: Our unique combination of features, style and latest in Dacor® products! Our unique combination of features, style and home.
Congratulations on your purchase of the very latest 1998 performance make us The Life of the Kitchen ^™ , and a great addition to your new distinctive appliance, which is not possible to function functions and full potential of your new Distinctive Appliance, read this section.
In order to familiarize yourself with the controls, further improve the use and care manual thoroughly, beginning with the Important Safety Instruction. All Dacor appliances are designed and manufactured with quality and pride, while working within the framework of our company value. Should you ever experience a problem with your product, please first check the Before You Call for Service section of this manual for guidance. It provides useful suggestions and remedies prior to calling for service.
Valuable customer input helps us to continuously improve our Customer Service Team for assistance with any of your product support needs.
Customer Service Team
Dacor Customer 1485 Clark Avenue
14425 Clark
City of Industry, CA
Telephone: (800) 793-0093 (626) 403-3130
Fax: Monday through Friday
Hours of Operation: Monday to 5:00 P.M. Pacific Time
6:00 A.M. 10 5.00
www.dacor.com
Web Site:
Thank you for choosing Dacor for your home. We are a company that is willing to serving yours. We are confident that your new Dacor product will deliver a high level of enjoyment for many years to come.
Sincerely,
The Dacon Customer Service Team
IMporTanT SafETy InSTruCTlonS
Installer: Leave these instructions with the appliance.
Customer: Please read and keep this use and care manual for future reference. This guide provides proper use and maintenance information. Keep this guide and the sales receipt and/or cancelled check in a safe place for future reference. Proof of original purchase date is needed for warranty service.
If you have any questions, call:
Dacor® Customer Service
1-800-793-0093 (U.S.A. and Canada)
Monday — Friday 6:00 AM to 5:00 PM Pacific Time
Web site: www.Dacor.com
Have complete model and serial number identification of your appliance ready.
The name plate includes the model and serial number. Open the microwave door. The label is located on the bottom left side of the door surface.
Record these numbers below for easy access.
Model Number
Serial Number
Date of Purchase
For service and warranty information, see page 26.
At Dacor, we continuously improve the quality and performance of all our products. We may need to make changes to this appliance without updating these instructions.
IMporTanT InForMaTlon about SaFETy InSTruCTlonS
The Important Safety Instructions and warnings in this manual are not meant to cover all possible conditions and situations that can occur. Use common sense and caution when installing, maintaining or operating this or any other appliance.
Always contact the Dacor Customer Service Team about problems or situations that you do not understand.
SaFETy SyMbolS anD labEIS

DANGER
Immediate hazards that WILL result in severe personal injury or death.

WARNING
Hazards or unsafe practices that COULD result in severe personal injury or death.

CAUTION
Hazards or unsafe practices that COULD result in minor personal injury or property damage.

WARNING
PRECAUTIONS TO AVOID POSSIBLE EXPOSURE TO EXCESSIVE MICROWAVE ENERGY
(a) Do not attempt to operate this oven with the door open since open-door operation can result in harmful exposure to microwave energy. It is important not to defeat or tamper with the safety interlocks.
(b) Do not place any object between the oven front face and the door or allow soil or cleaner residue to accumulate on sealing surfaces.
(c) Do not operate the oven if it is damaged. It is particularly important that the oven door close properly and that there is no damage to the: (1) door (bent), (2) hinges and latches (broken or loosened), (3) door seals and sealing surfaces.
(d) The oven should not be adjusted or repaired by anyone except properly qualified service personnel.

WARNING
State of California Proposition 65 Warnings:
WARNING: This product contains one or more chemicals known to the State of California to cause cancer.
WARNING: This product contains one or more chemicals known to the State of California to cause birth defects or other reproductive harm.
IMporTanT SafETy InSTruCTlonS

WARNING
When using electrical appliances basic safety precautions should be followed, including the following:
WARNING
To reduce the risk of burns, electric shock, fire, injury to persons or exposure to excessive microwave energy:
- Read all instructions before using the appliance.
- Read and follow the specific "PRECAUTIONS TO AVOID POSSIBLE EXPOSURE TO EXCESSIVE MICROWAVE ENERGY" on page 1.
- This appliance must be properly grounded. Connect only to properly grounded outlet. See "ELECTRICAL GROUNDING INSTRUCTIONS" on page 3.
- Install or locate this appliance only in accordance with the provided installation instructions.
- Some products such as whole eggs and sealed containers - for example, closed glass jars—can explode and should not be heated in the microwave oven.
- Use this appliance only for its intended use as described in this manual. Do not use corrosive chemicals or vapors in this appliance. This microwave is specifically designed to heat and cook food. It is not designed for industrial or laboratory use.
- As with any appliance, close supervision is necessary when used by children.
- Do not operate this appliance if it has a damaged cord or plug, if it is not working properly or if it has been damaged or dropped.
- This appliance should be serviced only by qualified service personnel. Contact nearest Dacor Authorized Servicer for examination, repair or adjustment.
- Do not cover or block any openings on the appliance.
- Do not store or use this appliance outdoors. Do not use this product near water—for example, near a kitchen sink, in a wet basement, near a swimming pool or similar locations.
- Do not immerse the power cord or plug in water.
- Keep the power cord away from heated surfaces.
- Do not let cord hang over edge of table or counter.
- See door surface cleaning instructions on page 23.
-
Do not store anything directly on top of the appliance surface when the appliance is in operation.
-
Do not mount over a sink.
-
To reduce the risk of fire in the appliance cavity:
a. Do not overcook food. Carefully attend appliance when paper, plastic or other combustible materials are placed inside the microwave oven to facilitate cooking.
b. Remove wire twist-ties from paper or plastic bags before placing bag in microwave oven.
c. If materials inside the appliance ignite, keep microwave oven door closed, turn microwave off and shut off power at the fuse or circuit breaker panel.
d. Do not use the microwave oven for storage purposes. Do not leave paper products, cooking utensils, or food in the microwave oven when not in use. -
Liquids, such as water, coffee or tea are able to be overheated beyond the boiling point without appearing to be boiling due to surface tension of the liquid. Visible bubbling or boiling when the container is removed from the appliance is not always present. THIS COULD RESULT IN VERY HOT LIQUIDS SUDDENLY BOILING OVER WHEN A SPOON OR OTHER UTENSIL IS INSERTED INTO THE LIQUID.
To reduce the risk of injury to persons:
a. Do not overheat the liquid.
b. Stir the liquid both before and halfway through heating.
c. Do not use straight-sided containers with narrow necks. Use a wide-mouthed container.
d. After heating, allow the container to stand in the microwave oven for at least 20 seconds before removing the container.
e. Use extreme care when inserting a spoon or other utensil into the container.
- If the oven light fails, consult a DACOR AUTHORIZED SERVICER.
READ AND SAVE THESE INSTRUCTIONS
Information You Need To Know
Unpacking and Examining Your Microwave Oven
- Remove all packing materials from inside the microwave oven cavity; however, DO NOT REMOVE THE WAVE-GUIDE COVER, which is located on the top cavity wall. Read all enclosures and SAVE the use and care manual.

- Check the microwave oven for any damage, such as a misaligned or bent door, damaged door seals and sealing surfaces, broken or loose door hinges and latches and dents inside the cavity or on the door. If there is any damage, do not operate the microwave oven and contact your dealer or DACOR AUTHORIZED SERVICER.
Choosing a Location for Your Microwave Oven
Plan your microwave's location so that it is easy to get to and use. It's wise, if possible, to have counter space on at least one side of the microwave oven. Allow at least 2 inches on the sides, top and at the rear of the microwave oven for air circulation.

Your oven can be built into a cabinet or wall by itself or above any DACOR electric wall oven or warming drawer model except IOWO24 or OWD24.
GROUNDING INSTRUCTIONS
This appliance must be grounded. This oven is equipped with a cord having a grounding wire with a grounding plug. It must be plugged into a wall receptacle that is properly installed and grounded in accordance with the National Electrical Code and local codes and ordinances. In the event of an electrical short circuit, grounding reduces the risk of electric shock by providing an escape wire for the electric current.
WARNING - Improper use of the grounding plug can result in a risk of electric shock.
ELECTRICAL REQUIREMENTS
The electrical requirements are a 120 volt 60 Hz, AC only, 15 amp. or more protected electrical supply. It is recommended that a separate circuit serving only the microwave oven be provided.
The oven is equipped with a 3-prong grounding plug. It must be plugged into a wall receptacle that is properly installed and grounded. Should you only have a 2-prong outlet, have a qualified electrician install a grounded wall receptacle.
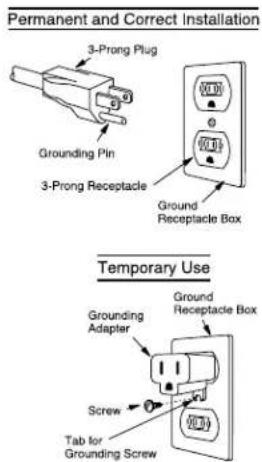
A 3-prong adapter may be purchased and used temporarily if local codes allow. Follow package directions.
A short power-supply cord is provided to reduce risk of becoming entangled in or tripping over a longer cord.
EXTENSION CORD
If it is necessary to use an extension cord, use only a 3-wire extension cord that has a 3-prong grounding plug and a 3-slot receptacle that will accept the plug on the microwave oven. The marked rating of the extension cord should be AC 115-120 volt, 15 Amp. or more.
Be careful not to drape the cord over the countertop or table where it can be pulled on by children or tripped over accidentally.
Notes:
- If you have any questions about the grounding or electrical instructions, consult a qualified electrician or service person.
- Neither Dacor nor the dealer can accept any liability for damage to the microwave oven or personal injury resulting from failure to observe the correct electrical connection procedures.
RADIO OR TV INTERFERENCE
Should there be any interference caused by the microwave oven to your radio or TV, check that the microwave oven is on a different electrical circuit, relocate the radio or TV as far away from the microwave oven as feasible or check the position and signal of receiving antenna.
Information You Need To Know
About Your Microwave Oven
This use and care manual is valuable: read it carefully and always save it for reference.
The Dacor Convection Microwave Cookbook is a valuable asset. Check it for microwave cooking principles, techniques, hints and recipes.
NEVER use the microwave oven without the turntable and support nor turn the turntable over so that a large dish could be placed in the microwave oven. The turntable will turn both clockwise and counterclockwise.
ALWAYS have food in the microwave oven when it is on to absorb the microwave energy.
When using the oven at power levels below 100%, you may hear the magnetron cycling on and off. It is normal for the exterior of the oven to be warm to the touch when cooking or reheating.
Condensation is a normal part of microwave cooking. Room humidity and the moisture in food will influence the amount of moisture that condenses in the oven. Generally, covered foods will not cause as much condensation as uncovered ones. Vents on the oven back must not be blocked.
After using convection, automatic mix or broil, you will hear the sound of the cooling fan. The fan may continue to operate as long as 5 minutes, depending on the oven temperature.
Be aware that, unlike microwave-only ovens, convection microwave ovens have a tendency to become hot during convection, automatic mix and broil cooking.
The oven is for food preparation only. It should not be used to dry clothes or newspapers.
Your microwave output is rated 900 watts using the IEC Test Procedure. In using recipes or package directions, check food at the minimum time and add time accordingly.
About Microwave Cooking
- Arrange food carefully. Place thickest areas towards outside of dish.
- Watch the cooking time. Cook for the shortest amount of time indicated and add more as needed. Food severely overcooked can smoke or ignite.
- Cover foods while cooking. Check a recipe or cookbook for suggestions like: paper towels, wax paper, microwave plastic wrap or a lid. Covers prevent spattering and help foods to cook evenly.
- Shield with small flat pieces of aluminum foil any thin areas of meat or poultry to prevent overcooking before dense, thick areas are cooked thoroughly.
- Stir foods from outside to center of dish once or twice during cooking, if possible.
- Turn foods over once during microwaving to speed cooking of such foods as chicken and hamburgers. Large items like roasts must be turned over at least once.
- Rearrange foods such as meatballs, halfway through cooking both from top to bottom and from right to left.
- Add standing time. Remove food from microwave oven and stir, if possible. Cover during standing time, allowing the food to finish cooking without overcooking.
- Check for doneness. Look for signs indicating that cooking temperatures have been reached.
Signs of doneness include:
- Food steams throughout, not just at edge.
- Poultry thigh joints move easily.
- Meat and poultry show no pinkness.
- Fish is opaque and flakes easily with a fork.
About Utensils And Coverings
It is not necessary to buy all new cookware. Many pieces already in your kitchen can be used successfully in your new convection microwave oven. The chart below will help you decide what utensils and coverings should be used in each mode.
| UTENSILS AND COVERINGS | MICROWAVE ONLY | CONVECTION BROIL, SLOW COOK | HIGH MIX/ ROAST LOW MIX/BAKE |
| Aluminum foil YES. Small flat pieces of aluminum foil placed smoothly on food can be used to shield areas from cooking or defrosting too quickly. Keep foil at least 1 inch from walls of oven. | YES. For shielding YES. | For shielding | |
| Aluminum containers | YES. Can be used if 3/4 filled with food. Keep 1 inch away from walls and do not cover with foil. | YES. Broil-No cover YES. | Can be used if 3/4 filled with food. Keep 1 inch away from walls and do not cover with foil. |
| Browning dish YES. Do not exceed recommended preheating time. Follow manufacturer's directions. | NO NO | ||
| Glass ceramic (Pyroceram®) | YES. Excellent YES. Excellent YES. Excellent | ||
| Glass, heat-resistant | YES. Excellent. YES. Excellent YES. Excellent | ||
| Glass, non-heat-resistant | NO NO NO | ||
| Lids, glass YES YES. Broil-No cover YES | |||
| Lids, metal NO | YES. Broil-No cover NO | ||
| Metal cookware | NO | YES | YES. Do not use metal covering. |
| Metal, misc: dishes with metallic trim, screws, bands, handles. Metal twist ties | NO | NO NO | |
| Oven cooking bags | YES. Good for large meats or foods that need tenderizing. DO NOT use metal twist ties. | YES. Broil-No cover YES. | Do not use metal twist ties. |
| Paper plates | YES. For reheating. | NO NO | |
| Paper towels | YES. To cover for reheating and cooking. Do not use recycled paper towels which may contain metal fillings. | NO NO | |
| Paper, ovenable | YES YES. For temperatures | up to 400°F. Do not use for broiling. | YES. For temperatures up to 400°F. |
| Microwave-safe plastic containers | YES. Use for reheating and defrosting. Some microwave-safe plastics are not suitable for cooking foods with high fat and sugar content. Follow manufacturer's directions. | NO NO | |
Information You Need
| UTENSILS AND COVERINGS | MICROWAVE ONLY | CONVECTION BROIL, SLOW COOK | HIGH MIX/ ROAST LOW MIX/BAKE |
| Plastic, Thermoset® | YES YES. Are heat resistant | up to 425°F. Do not use for broiling. | YES |
| Plastic wrap YES. Use | brands specially marked for microwave use. DO NOT allow plastic wrap to touch food. Vent so steam can escape. | NO NO | |
| Pottery, porcelain stoneware | YES. Check manufacturer's recommendation for being microwave safe. | YES YES. Must be microwave safe AND ovenable. | |
| Styrofoam YES. For reheating. NO NO | |||
| Wax paper YES. Good | covering for cooking and reheating. | NO NO | |
| Wicker, wood, straw | YES. May be used for short periods of time. Do not use with high fat or high sugar content foods. Could char. | NO NO | |
DISH CHECK: If you wish to check if a dish is safe for microwaving, place the empty dish in the oven and microwave on HIGH for 30 seconds. If the dish becomes very hot, do NOT use it for microwaving.
ACCESSORIES: There are many microwave accessories available for purchase. Evaluate carefully before you purchase so that they meet your needs. A microwave-safe thermometer will assist you in determining correct doneness and assure you that foods have been cooked to safe temperatures when using microwave-only cooking. Dacor is not responsible for any damage to the oven when accessories are used.
About Safety
Check foods to see that they are cooked to the United States Department of Agriculture's recommended temperatures.
145^ - Fish
160°F - Pork, ground beef/veal/lamb, egg dishes
165°F - For leftover, ready-to-reheat refrigerated, and deli and carry-out "fresh" food. Whole, pieces and ground turkey/chicken/duck.
To test for doneness, insert a meat thermometer in a thick or dense area away from fat or bone. NEVER leave the thermometer in the food during cooking, unless it is approved for microwave use.
- ALWAYS use potholders to prevent burns when handling utensils that are in contact with hot food. Enough heat from the food can transfer through utensils to cause skin burns.
- Avoid steam burns by directing steam away from the face and hands. Slowly lift the farthest edge of a dish's covering and carefully open popcorn and microwave oven cooking bags away from the face.
-
Stay near the microwave oven while it's in use and check cooking progress frequently so that there is no chance of overcooking food.
-
NEVER use the cavity for storing cookbooks or other items.
- Select, store and handle food carefully to preserve its high quality and minimize the spread of foodborne bacteria.
- Keep waveguide cover clean. Food residue can cause arcing and/or fires.
- Use care when removing items from the microwave oven so that the utensil, your clothes or accessories do not touch the safety door latches.
- Keep aluminum foil used for shielding at least 1 inch away from walls, ceiling and door of microwave oven.
About Foods
| FOOD DO DON'T | ||
| Eggs, sausages, fruits & vegetables | · Puncture egg yolks before cooking to prevent "explosion". · Pierce skins of potatoes, apples, squash, hot dogs and sausages so that steam escapes. | · Cook eggs in shells. · Reheat whole eggs. · Dry nuts or seeds in shells. |
| Popcorn · Use specially bagged popcorn for the microwave. · Listen while popping corn for the popping to slow to 1 or 2 seconds or use the special POPCORN pad. | · Pop popcorn in regular brown bags or glass bowls. · Exceed maximum time on popcorn package. | |
| Baby food · Transfer baby food to small dish and heat carefully, stirring often. Check temperature before serving. · Put nipples on bottles after heating and shake thoroughly. "Wrist" test before feeding. | · Heat disposable bottles. · Heat bottles with nipples on. · Heat baby food in original jars. | |
| General · Cut baked goods with filling after heating to re-lease steam and avoid burns. · Stir liquids briskly before and after heating to avoid "eruption". · Use deep bowl, when cooking liquids or cereals, to prevent boilovers. | · Heat or cook in closed glass jars or airtight containers. · Heat cans in the microwave as harmful bacteria may not be destroyed. · Deep fat fry. · Dry wood, gourds, herbs or wet papers. | |
About Children And The Microwave
Children below the age of 7 should use the microwave oven with a supervising person very near to them. Between the ages of 7 and 12, the supervising person should be in the same room.
The child must be able to reach the microwave oven comfortably; if not, he/she should stand on a sturdy stool.
At no time should anyone be allowed to lean or swing on the microwave oven door.
Children should be taught all safety precautions: use potholders, remove coverings carefully, pay special attention to packages that crisp food because they may be extra hot.
Don't assume that because a child has mastered one cooking skill he/she can cook everything.
Children need to learn that the microwave oven is not a toy. See page 21 for Safety Lock feature.
Parts of the Microwave
1 Ventilation openings (Rear side)
2 Oven door with see-through window
3 Oven light: It will light when the door is opened or when oven is in operation.
4 Turntable support
5 Removable turntable: The turntable will rotate clockwise or counterclockwise.
6 Safety door latches: The oven will not operate unless the door is securely closed.
7 Waveguide cover: DO NOT REMOVE.

8 Door open button
9 Auto-Touch control panel
10 Lighted digital display
11 Convection air openings
12 Removable low rack (Broiling rack)
13 Removable high rack (Baking rack)
14 Turntable motor shaft
15 Serial plate
ACCESSORIES
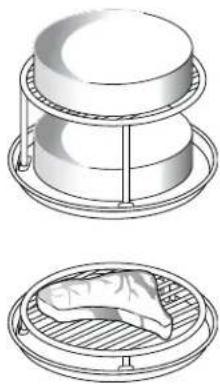
The following accessories are designed especially for use in this oven only for convection, mix or broil cooking. DO NOT USE FOR MICROWAVE ONLY COOKING. Do not substitute similar types of racks for these specially designed ones.
High rack (Baking rack)—for convection and low mix.
- This rack is placed on the turntable for two-level cooking, such as layer cakes, muffins, etc.
Low rack (Broiling rack)-for convection, broiling or high mix.
- Place on the turntable and use for roasting or broiling to allow juices to drain away from food.
natural_image
Illustration of two types of food preparation setups: a cylindrical steamer and a triangular plate with a fish inside (no text or symbols)CONTROL PANEL

Numbers next to the padsheet illustration indicate page numbers where feature descriptions and usage information is located.
Before Operating
Before operating your new microwave oven make sure you read and understand this use and care manual completely.
- Before using the microwave, follow these steps:
- Plug in the microwave oven. Close the door. The display will show WELCOME PRESS CLEAR AND PRESS CLOCK.
- Touch the STOP/CLEAR pad. " : " will appear.
- Set the clock.
To Set The Clock
- Touch the CLOCK pad.
- Enter the correct time of day by touching the numbers in sequence. Touch the CLOCK pad again.
The microwave is equipped with a 12 hour clock. If you attempt to enter an incorrect clock time, ERROR will appear in the display. Touch the STOP/CLEAR pad and re-enter the time.
- If electrical power to your microwave oven is interrupted, the display will intermittently show WELCOME PRESS CLEAR AND PRESS CLOCK after the power is restored. If power is interrupted during cooking, the program will be erased. The time of day will also be erased. Simply touch the STOP/CLEAR pad and reset the clock for the correct time of day.
Stop/Clear
Touch the STOP/CLEAR pad to:
- Clear a mistake made during programming.
- Cancel the timer.
- Stop the microwave oven temporarily during timed cooking.
- Return the display to time of day.
- Cancel a program during cooking, touch twice for timed cooking.
Manual Operation
Time Cooking
Your microwave oven can be programmed for 99 minutes and 99 seconds (99.99). Always enter the seconds after the minutes, even if they are both zeros.
For example, to cook for 5 minutes at 100%.
- Enter cooking time by touching the number pads 500.
- Touch the START/INSTANT ON pad.
To Set Power Level
The microwave has 11 preset power levels.
Using lower power levels increases the cooking time which is recommended for foods such as cheese, milk and, long slow cooking of meats or defrosting. Consult a cookbook or recipes for specific recommendations.
For example, to defrost for 5 minutes at 30%.
- Enter the defrosting time by touching the number pads 500.
- Touch the POWER LEVEL pad and number 3.
- Touch the START/INSTANT ON pad.
You can program up to 4 automatic cooking sequences. Follow directions on page 22. Note that the power level must be entered first when programming multiple sequences.
| TOUCH POWER LEVEL PAD ONCE THEN TOUCH | APPROXIMATE PERCENTAGE OF POWER | COMMON WORDS FOR POWER LEVELS |
| Power Level 100% High | ||
| 9 90% | ||
| 8 80% | ||
| 7 70% Medium High | ||
| 6 60% | ||
| 5 50% Medium | ||
| 4 40% | ||
| 3 30% Med Low/Defrost | ||
| 2 20% | ||
| 1 10% Low | ||
| 0 | 0% | |
Microwave Features
Auto Defrost
Auto Defrost automatically defrosts foods shown in the Auto Defrost Chart.
For example, to defrost a 2.0 pound steak:
- Touch the AUTO DEFROST pad once.
- Select the desired food by touching the AUTO DEFROST pad until the display shows the food name. Ex. touch twice for steak.
- Enter the weight by touching the number pads 20.
- Touch the START/INSTANT ON pad.
The oven will stop and directions will be displayed. Follow the indicated message. -
After the 1st stage, open the door. Turn the steak over and shield any warm portions. Close the door. Touch the START/INSTANT ON pad.
-
After the 2nd stage, open the door. Shield any warm portions. Close the door. Touch the START/INSTANT ON pad.
After the defrost cycle ends, cover and let stand as indicated in chart below.
NOTE:
- If you attempt to enter more or less than the allowed amount as indicated in the chart, an error message will appear in the display.
- Auto Defrost can be programmed with More or Less Time Adjustment. See page 22.
- To defrost other foods or foods above or below the weights allowed on the Auto Defrost Chart, see Manual Defrost below.
AUTO DEFROST CHART
| FOOD AMOUNT PROCEDURE | |
| 1. Ground meat .5 - 3.0 lb. Remove any thawed pieces after each stage. Let stand, covered, for 5 to 10 minutes. | |
| 2. Steaks (Chops, fish) .5 - 4.0 lb. After each stage of defrost cycle, rearrange and if there are warm or thawed portions, shield with small flat pieces of aluminum foil. Remove any meat or fish that is nearly defrosted. Let stand, covered, 10–20 minutes. | |
| 3. Chicken pieces .5 - 3.0 lb. After each stage of defrost cycle, if there are warm or thawed portions, rearrange or remove. Let stand, covered, 10–20 minutes. |
Manual Defrost
If the food that you wish to defrost is not listed on the Auto Defrost Chart or is above or below the limits in the AMOUNT column on the Auto Defrost Chart, you need to defrost manually.
You can defrost any frozen food, either raw or previously cooked, by setting the Power Level to 30%. Follow the exact 3-step procedure found under To Set Power Level on page 10. Estimate the defrosting time and press 3 for 30% when you select the power level.
For either raw or previously cooked frozen food, the rule of thumb is approximately 5 minutes per pound. For example, defrost 5 minutes for 1 pound of frozen spaghetti sauce.
Always stop the oven periodically to remove or separate the portions that are defrosted. If food is not defrosted at the end of the estimated defrosting time, program the oven in 1 minute increments on Power Level 3 until totally defrosted.
When using plastic containers from the freezer, defrost only long enough to remove from the plastic in order to place in a microwave-safe dish.
Microwave Features
Sensor Cooking
The Sensor is a semi-conductor device that detects the vapor (moisture and humidity) emitted from food as it heats. The Sensor adjusts the cooking times and power level for various foods and quantities.
USING SENSOR SETTINGS:
- After the oven is plugged in, wait 2 minutes before using the Sensor settings.
- Be sure the exterior of the cooking container and the interior of the oven are dry. Wipe off any moisture with a dry cloth or paper towel.
- Sensor Reheat and Popcorn can only be entered within 1 minute after cooking, opening and closing the door, or touching the STOP/CLEAR pad.
- During the first part of Sensor cooking, the food name will appear in the display. Do not open the oven door or touch STOP/CLEAR during this part of the cooking cycle. The measurement of vapor will be interrupted. If this occurs, an error message will appear. To continue cooking, touch the STOP/CLEAR pad and select the cooking time and variable power.
When the Sensor detects the vapor emitted from the food, the remainder of cooking time will appear. The door may be opened when the remaining cooking time appears on the display. At this time, you may stir or season food, as desired. -
Check the food temperature after cooking. If additional time is needed, continue to cook with variable power and time.
-
If the Sensor does not detect vapor properly when popping popcorn, the oven will turn off and the correct time of day will be displayed. If the Sensor does not detect vapor properly when using Sensor Reheat, ERROR will be displayed and the oven will turn off.
- Any Sensor cooking mode can be programmed with More or Less Time Adjustment. See page 22.
- Each food has a cooking hint. Touch HELP GUIDE when the HELP indicator is lighted in the display.
SELECTING FOODS:
- The Sensor works with foods at normal storage temperature. For example, food for dinner plate reheat would be at refrigerator temperature and popcorn at room temperature.
- Foods weighing less than 3 ounces should be reheated by time and variable power.
COVERING FOODS:
Some foods work best when covered. Use the cover recommended for these foods.
- Casserole lid
- Plastic wrap: Use plastic wrap recommended for microwave cooking. Cover the dish loosely; allow approximately 1/2 inch to remain uncovered to allow steam to escape. Plastic wrap should not touch the food.
- Wax paper: Cover the dish completely; fold excess wrap under the dish to secure it. If the dish is wider than the paper, overlap two pieces at least one inch to cover it.
Be careful when removing any covering to allow steam to escape away from you.
Microwave Oven Cooking
Sensor Reheat
You can reheat many foods by touching just one pad. You don't need to calculate reheating time or power level.
For example, to heat prepared chili:
Touch the SENSOR REHEAT pad.
When the Sensor detects the vapor emitted from the food, the remainder of reheating time will appear.
Popcorn
For example, to pop a 3.5 oz. bag of popcorn:
- Touch the POPCORN pad once.
This Sensor setting works well with most brands of microwave popcorn. You may wish to try several and choose your favorite. Pop only one bag at a time. Unfold the bag and place in oven according to directions.
SENSOR REHEAT / POPCORN CHART
| FOOD AMOUNT PROCEDURE | |
| Sensor ReheatLeftovers such as rice, potatoes, vegetables, casserole Soups 1 - 4 cups After reheating, stir well, if possible. Foods should be very hot. If not, continue to heat with variable power and time. After stirring, recover and allow to stand 2 to 3 minutes.Canned entrees and vegetables 4 - 36 oz. Use Less Time Adjustment by touching POWER LEVEL pad twice for small quantities of canned vegetables. | |
| Popcorn Only 1 package at a time3.0 - 3.5 oz. bag (Regular size)1.5 - 1.75 oz. bag (Snack size) | Use only popcorn packaged for microwave oven use. Try several brands to decide which you like best. Do not try to pop unpopped kernels. More Or Less Time Adjustment can be used to provide adjustment needed for older popcorn or individual tastes.Touch POPCORN pad once. This setting works well with most 3.0-3.5 oz. bags of microwave popcorn.Touch POPCORN pad twice within 2 seconds for snack size bags. |
Microwave Oven Cooking
Sensor Cook
For example, to cook a baked potato:
- Touch the SENSOR COOK pad.
-
Select the desired sensor setting. Ex: touch the number pad 1 to cook baked potatoes.
-
Touch the START/INSTANT ON pad.
When Sensor detects the vapor emitted from the food, the remainder of cooking thime will appear.
SENSOR COOK CHART
| FOOD AMOUNT PROCEDURE | ||
| 1. Baked potatoes | 1 - 8 med. | Pierce. Place on paper-towel-lined microwave oven. After cooking, remove from microwave, wrap in aluminum foil and let stand 5 to 10 minutes. |
| 2. Frozen vegetables 1 - 8 cups Do not add water. Cover with lid or plastic wrap. After cooking, stir, and let stand covered for 3 minutes. | ||
| 3. Fresh vegetables: soft Broccoli | .25 - 2.0 lb. | Wash and place in casserole. Do not add water if vegetables have just been washed. Cover with lid for tender vegetables. Use plastic wrap for tender-crisp vegetables. After cooking, stir, if possible. Let stand covered for 2 to 5 minutes. |
| Brussel sprouts | .25 - 2.0 lb. | |
| Cabbage | .25 - 2.0 lb. | |
| Cauliflower (flowerets) | .25 - 2.0 lb. | |
| Cauliflower (whole) | 1 med. | |
| Spinach | .25 - 1.0 lb. | |
| Zucchini | .25 - 2.0 lb. | |
| Baked apples | 2 - 4 med. | |
| 4. Fresh vegetables: hard Carrots, sliced | .25 - 1.5 lb. | Place in casserole. Add 1 - 4 tablespoons water. Cover with lid for tender vegetables. Use plastic wrap cover for tender-crisp vegetables. After cooking, stir, if possible. Let stand covered for 2 to 5 minutes. |
| Corn on the cob | 2 - 4 pcs. | |
| Green beans | .25 - 1.5 lb. | |
| Winter squash: diced | .25 - 1.5 lb. | |
| halves | 1 - 2 | |
| 5. Frozen entrees 6 - 17 oz. Use for frozen convenience foods. It will give satisfactory results for most brands. You may wish to try several and choose your favorite. Remove package from outer wrapping and follow package directions for covering. After cooking, let stand covered for 1 to 3 minutes. | ||
| 6. Hot dogs 1 - 4 servings | Place hot dog in bun and wrap in paper towel or paper napkin. | |
| 7. Bacon | 2 - 6 slices | Place bacon on paper plate lined with paper towel. Bacon should not extend over the rim of plate. Cover with paper towel. Put another paper plate upside down on turntable. Place plate of bacon on top of overturned plate. |
| 8. Fish, seafood | .25 - 2.0 lb. | Arrange in ring around shallow glass dish (roll fillet with edges underneath). Cover with vented plastic wrap. After cooking, let stand covered for 3 minutes. |
Convection Automatic Operation
This section of the operation manual offers instructions for preparing 12 popular foods using Auto Broil, Auto Roast and Auto Bake.
After selecting the desired feature, follow the directions indicated in the display.
For helpful hints, simply touch HELP GUIDE anytime HELP is lighted in the display.
A CAUTION The oven cabinet, cavity, door, turntable, turntable support, racks and dishes will become hot. To PREVENT BURNS, use thick oven gloves when removing the food or turntable from the oven.
Auto Broil
Auto Broil automatically broils hamburgers, chicken pieces, steaks and fish steaks.
For example, to broil 2 hamburgers:
-
Touch the AUTO BROIL pad.
-
Select the desired setting. Ex: for hamburgers, touch number pad 1.
-
Touch the number pad to enter quantity. Ex: 2. Follow the information in display for cooking information.
For well done or rare burgers, touch the POWER LEVEL pad to select More for well done or Less for rare. See More Or Less Time Adjustment on page 22.
- Touch the START/INSTANT ON pad.
After the broil preheat cycle ends, the oven will stop and directions will be displayed. Follow the indicated message. Open the door and place hamburgers into oven. Close the door.
- Touch START/INSTANT ON pad.
NOTE:
-
Auto Broil can be programmed with More Or Less Time Adjustment. See page 22.
-
If you attempt to enter more or less than the allowed amount as indicated in chart below, an error message will appear in the display.
-
To broil other foods or foods above or below the weight or number allowed on Auto Broil Chart, follow the instructions in the Convection Microwave Cookbook. See Convection Broiling Chart.
AUTO BROIL CHART
| SETTING/FOOD AMOUNT RACK PROCEDURE | |||
| 1. Hamburgers 1 - 8 pieces0.25 lb each | Low Use this setting to broil hamburger patties. Place on low rack. | ||
| 2. Chicken pieces | 0.5 - 3.5 lb. Low Arrange pieces on low rack. After cooking, let stand 3-5 minutes.Dark meat should be 180^ , and white meat should be 170^ . | ||
| 3. Steaks | 0.5 - 2.0 lb. | Low | Use this setting to broil steaks from 3/4" to 1" thick. Individual bonelesssteaks broil evenly. Place steak on low rack. For well done, touch PowerLevel once; for rare, touch POWER LEVEL twice. |
| 4. Fish steaks | 0.5 - 2.0 lb. | Low | Use this setting to broil fish steak, which is 3/4" to 1" thick. Place on lowrack. |
Convection Automatic
Auto Roast
Auto Roast automatically roasts chicken, turkey, turkey breast or pork.
For example, to roast a 2.5 pound chicken:
- Touch the AUTO ROAST pad.
- Select the desired setting. Ex: for chicken, touch the number pad 1.
- Touch the number pad to enter the weight. Ex: 25 lb.
- Touch the START/INSTANT ON pad.
After the Auto Roast cycle ends, a long tone will sound. Follow the indicated message.
NOTE:
- Auto Roast can be programmed with the More Or Less Time Adjustment. See page 22.
- If you attempt to enter more or less than the allowed weight as indicated in chart below, an error message will appear in the display.
- To roast other food or foods above or below the weights allowed on Auto Roast Chart, check the Dacor Convection Microwave Cookbook Combination Roasting Chart.
AUTO ROAST CHART
| SETTING/FOOD AMOUNT RACK PROCEDURE | |||
| 1. Chicken 2.5 - 7.5 lb. Low After the cycle ends, cover with foil and let stand for 5 to 10 minutes. | |||
| 2. Turkey 6.5 - 16.0 lb. Low Season as desired. Place on low rack. After the cycle ends, cover with foil and let stand 10 minutes. Internal temperature of white meat should be 170^ and dark meat, 180^ . | |||
| 3. Turkey breast 3.0 - 6.0 lb. Low Season as desired. Place on low rack. After the cycle ends, cover with foil and let stand 10 minutes. Internal temperature of white meat should be 170^ . | |||
| 4. Pork | 2.0 - 3.5 lb. | Low | Boneless pork loin is recommended because it cooks evenly. Place on a low rack. After cooking, remove from oven, cover with foil and allow to stand 5 to 10 minutes. Internal temperature should be 165^ . |
Convection Automatic Operation
Auto Bake
Auto Bake automatically bakes cakes, brownies, muffins and french fries.
For example, to bake a bundt cake:
- Touch the AUTO BAKE pad.
- Select the desired setting. Ex: for bundt cake, touch the number pad 1.
- Touch the START/INSTANT ON pad.
NOTE:
- Auto Bake can be programmed with the More Or Less Time Adjustment. See page 22.
- To bake other foods, see the Dacor Convection Microwave Cookbook's baking section.
AUTO BAKE CHART
| SETTING/FOOD AMOUNT RACK PROCEDURE | ||
| 1. Bundt cake 1 cake No rack Ideal for packaged cake mix or your own recipe. Prepareaccording to package or recipe directions and place in a greased and floured bundt pan. Place pan in oven. Cool before frosting and serving. | ||
| 2. Cookies 1 or 2 pizza pans 1 pizza panNo rack2 pizza pansHigh | Ideal for refrigerated cookie dough. Prepare according to package or recipe directions and place on a greased and floured 12" pizza pan. Cookies should be approximately 1/3 inch thick and 2 inches in diameter for best results. After the preheat is over, place pan in oven. Cool before serving | |
| 3. Muffins 6 - 12 muffins1 or 2 muffin pans | 1 pan No rack2 pans High | Ideal for packaged muffin mix or your own recipe for 6-12 medium size muffins. Prepare according to package or recipe directions and place in muffin pan. After the preheat is over, place pan in oven. |
| 4. French fries 3 - 24 oz.1 or 2 pizza pansFor more than12 oz. use 2 pans | 1 pizza panNo rack2 pizza pansHigh | Use frozen prepared french fries. No preheat is required for the french fries baking procedure. Place french fries on pizza pan. For shoestring potatoes, touch POWER LEVEL pad twice to enter less time before touching START/INSTANT ON pad. |
Manual Convection And Automatic Mix Cooking
This section gives you specific cooking instructions and procedures. Please consult your Dacor Convection Microwave Cookbook for helpful hints for convection and combination cooking.
The oven should not be used without the turntable in place, and it should never be restricted so that it cannot rotate. You may remove the turntable when preheating the oven and when preparing food to be cooked directly on the turntable.
A CAUTION The oven cabinet, cavity, door, turntable, turntable support, racks and dishes will become hot. To PREVENT BURNS, use thick oven gloves when removing the food or turntable from the oven.
Convection Cooking
During convection heating, hot air is circulated throughout the oven cavity to brown and crisp foods quickly and evenly. This oven can be programmed for ten different convection cooking temperatures for up to 99 minutes, 99 seconds.
TO COOK WITH CONVECTION
For example, to cook at 350^ F for 20 minutes:
- Touch the CONVECTION pad.
- Select the temperature by touching the number pad 6 350°F.
- Enter the cooking time by touching the number pads 2000.
- Touch the START/INSTANT ON pad.
NOTE: If you wish to know the programmed oven temperature, simply touch the CONVECTION pad. As long as your finger is touching the CONVECTION pad, the programmed oven temperature will be displayed.
TO PREHEAT AND COOK WITH CONVECTION
Your oven can be programmed to combine preheating and convection cooking operations. You can preheat to the same temperature as the convection temperature or change to a higher or lower temperature.
For example, to preheat to 350^ F and then cook 25 minutes at 375^ F convection:
- Touch the PREHEAT pad.
- Select the temperature by touching the number pad 6350^ .
- Touch the CONVECTION pad.
- Select the temperature by touching the number pad 7 375°F.
-
Select the cooking time by touching the number pads 2 5 0 0.
-
Touch the START/INSTANT ON pad.
When the oven reaches the programmed temperature, a signal will sound 4 times*. The oven will stop, and directions will be displayed. Follow the indicated message.
- Open the door. Place the food in the oven. Close the door. Touch the START/INSTANT ON pad.
* If the oven door is not opened, the oven will automatically hold at the preheat temperature for 30 minutes. After this time has elapsed, an audible signal will sound and the oven will turn off.
NOTE:
- To program only preheat, touch the START/INSTANT ON pad after step 2. Preheating will start. When the oven reaches the programmed temperature, follow the indicated message.
- To preheat and cook with the same temperature, enter same temperature in steps 2 and 4.
BROIL
Preheating is automatic when the Broil setting is used. Only actual cooking time is entered; the oven signals when it is preheated to 450^ F. Oven temperature cannot be changed. Use Broil setting for steaks, chops, chicken pieces and many other foods. See the Convection Broiling Chart in the cookbook.
For example, to broil a steak for 15 minutes:
- Touch the BROIL pad.
- Enter the cooking time by touching the number pads 1 5 0 0.
- With no food in the oven, touch the START/INSTANT ON pad.
When the oven reaches the programmed temperature, a signal will sound 4 times*.
- Open the door, place the food in the oven and close the door. Touch the START/INSTANT ON pad.
* If the oven door is not opened, the oven will automatically hold at the preheat temperature for 30 minutes. After this time has elapsed, an audible signal will sound and the oven will turn off.
NOTE:
- Preheating for broil may take from 7 to 10 minutes depending on temperature of room and available power.
- Although time is usually set for the maximum broiling time, always check food at the minimum time recommended in the chart of cookbook. This will eliminate the need to completely reprogram the oven if additional cooking time is needed. Simply close the oven door and touch START/INSTANT ON to continue.
Manual Convection And Automatic Mix Cooking
- Should you need more broiling time, reprogram within 1 minute of the end to eliminate preheating.
A CAUTION The oven cabinet, cavity, door, turntable, turntable support, racks and dishes will become hot. To PREVENT BURNS, use thick oven gloves when removing the food or turntable from the oven.
SLOW COOK
Slow Cook is preset at 300^ F for 4 hours. The temperature can be changed to below 300^ F. The cooking time cannot be changed. This feature can be used for foods such as baked beans or marinated chuck steak.
For example, to change oven temperature from 300^ F to 275^ F:
- Touch the SLOW COOK pad.
- Touch the SLOW COOK pad once more if you want to change the temperature from 300^ F.
- Touch the temperature pad 3278°.
- Touch the START/INSTANT ON pad.
NOTE: If you do not change the temperature, omit steps 2 and 3.
Automatic Mix Cooking
This oven has two pre-programmed settings that make it easy to cook with both convection heat and microwave automatically.
Oven temperature Microwave power
High Mix/Roast 300°F 30%
Low Mix/Bake 350°F 10%
With the exception of those foods that cook best by convection heating alone, most foods are well suited to mix cooking using either Low Mix/Bake or High Mix/Roast.
The marriage of these two cooking methods produces juicy meats, moist and tender cakes and fine textured breads, all with just the right amount of browning and crispness.
The temperatures can be changed; however, the microwave power cannot.
The oven temperature can be changed from 100^ F to 450^ F. To change the temperature, first touch HIGH MIX or LOW MIX then touch the same pad again. When the display says SELECTTEMP, touch the desired temperature pad. Ex: HIGH MIX, HIGH MIX pad, 7. The mix temperature will change to 375^ F automatically.
TO COOK WITH AUTOMATIC MIX
For example, to bake a cake for 25 minutes on Low Mix/Bake:
- Touch the LOW MIX/BAKE pad.
- Enter the cooking time by touching the number pads 2 5 0 0.
- Touch the START/INSTANT ON pad.
TO PREHEAT AND COOK WITH AUTOMATIC MIX
Your oven can be programmed to combine preheating and automatic mix cooking operations. You can preheat at the same temperature as the preset combination temperature or change it to a different temperature.
For example, to preheat to 350^ F and then cook 25 minutes on 325^ F Low Mix/Bake:
- Touch the PREHEAT pad.
- Touch the temperature pad 6 350°F.
- Touch the LOW MIX pad.
- Touch the LOW MIX pad once more to change the cooking temperature.
- Touch the temperature pad 5 325°F.
- Enter the cooking time by touching the number pads 2 5 0 0.
- Touch the START/INSTANT ON pad.
When the oven reaches the programmed temperature, a signal will sound 4 times*. The oven will stop and directions will be displayed. Follow the indicated message.
- Open the door, place the food in the oven and close the door. Touch the START/INSTANT ON pad.
* If the oven door is not opened, the oven will automatically hold at the preheat temperature for 30 minutes. After this time has elapsed, an audible signal will sound and the oven will turn off.
NOTE: To program only preheat, touch the START/INSTANT ON pad after step 2. Preheating will start.
When the oven reaches the programmed temperature, follow the indicated message.
Manual Convection And Automatic Mix Cooking
HELPFUL HINTS FOR CONVECTION AND AUTOMATIC MIX COOKING
Your convection microwave oven can cook any food perfectly because of the number of ways it can cook: microwave only, automatic mix, convection only or broil. The cookbook that comes with your oven has excellent instructions, guidelines, hints, charts and recipes to help you get the best use of your oven. Consult it often until you are familiar with it. This use and care manual tells you how to program the oven.
The oven cannot be used without the turntable in place. Never restrict the movement of the turntable.
CONVECTION COOKING:
- When preheating, the turntable can be left in or removed. When using the high rack for 2 shelf baking in a preheated oven, it is easier to remove the turntable for preheat.
Place the high rack on turntable along with food. When preheat is over, open the oven door and quickly place the turntable, high rack and food to be baked inside. - Do not cover the turntable, low rack or high rack with aluminum foil. It interferes with air flow that cooks food.
- Round pizza pans are excellent cooking utensils for many convection-only items. Choose pans that do not have extended handles.
- Using a preheated low rack can give a grilled appearance to steaks, hot dogs etc.
AUTOMATIC MIX COOKING:
- Meats are best when roasted directly on the low rack. A dish can be placed below the meat if gravy is to be made from the drippings.
- Less tender cuts of meat can be roasted and tenderized using oven cooking bags.
- When baking, check for doneness after time has elapsed. If not completely done, let stand in oven a few minutes to complete cooking.
NOTE:
During mix baking, some metal baking utensils may cause arcing when they come in contact with the turntable, oven walls or accessory racks. Arcing is a discharge of electricity that occurs when microwaves come in contact with metal.
If arcing occurs, place a heat resistant dish (Pyrex® pie plate, glass pizza dish or dinner plate) between the pan and the turntable or rack. If arcing occurs with other metal baking utensils, discontinue their use for mix cooking.
Other Features
Help Guide
Help Guide provides 5 features which make using your microwave oven easy because specific instructions are provided in the interactive display.
1. SAFETY LOCK
The safety lock prevents unwanted microwave oven operation, such as by small children. The microwave oven can be set so that the control panel is deactivated or locked. To set, touch HELP GUIDE, the number 1 and the START/INSTANT ON pads. Should a pad be touched, LOCK will appear in the display.
To cancel, touch the HELP GUIDE and STOP/CLEAR pads.
2. AUDIBLE SIGNAL ELIMINATION
If you wish to have the microwave oven operate with no audible signals, touch HELP GUIDE, the number 2 and the STOP/CLEAR pads.
To cancel and restore the audible signal, touch HELP GUIDE, the number 2 and the START/INSTANT ON pads.
3. AUTO START
If you wish to program your microwave oven to begin cooking automatically at a designated time of day, follow this procedure:
For example, to start cooking a stew on 50% for 20 minutes at 4:30. Before setting, check to make sure the clock is showing the correct time of day:
- Touch the HELP GUIDE pad.
- Touch the number 3 to select the auto start.
- To enter a start time of 4:30, touch numbers 4, 3 and 0.
- Touch the CLOCK pad.
- To enter cooking program, touch POWER LEVEL, number 5 and then touch numbers 2, 0, 0, and 0 for cooking time.
- Touch the START/INSTANT ON pad. The chosen auto start time will appear in the display.
NOTE:
- Auto start can be used for manual cooking, Auto Broil, Auto Roast, Auto Bake, if the clock is set.
- If the microwave oven door is opened after programming auto start, it is necessary to touch the START/INSTANT ON pad for auto start time to appear in the readout so that the microwave oven will auto-
matically begin programmed cooking at the chosen auto start time.
- Be sure to choose foods that can be left in the microwave oven safely until the auto start time. Acorn or butternut squash are often a good choice.
- If you wish to know the time of day, simply touch the CLOCK pad. As long as your finger is touching the CLOCK pad, the time of day will be displayed.
4. LANGUAGE SELECTION
The microwave oven comes set for English. To change, touch HELP GUIDE and the number 4 pad. Continue to touch the number 4 pad until your choice is selected, then touch the START/INSTANT ON pad.
Touch number 4 once for English.
Touch number 4 twice for Spanish.
Touch number 4 three times for French.
5. WEIGHT AND TEMPERATURE SELECTIONS
The microwave oven comes set for U.S. Customary Unit-pounds. To change, touch HELP GUIDE and the number 5. Continue to touch the number 5 until your choice is selected. Then, touch the START/INSTANT ON pad.
Touch number 5 once for LB / °F.
Touch number 5 twice for KG / °C.
Help
Each setting of Auto Defrost, Auto Broil, Auto Roast, Auto Bake, Sensor Cook, Sensor Reheat and Popcorn has a available cooking hint. Touch the HELP GUIDE pad when HELP is lighted in the interactive display to see the hints.
Easy Minute
Easy Minute allows you to cook for a minute at 100% by simply touching the EASY MINUTE pad. You can also extend cooking time in multiples of 1 minute by repeatedly touching the EASY MINUTE pad during manual cooking.
For example, to heat a cup of soup for one minute:
Touch the EASY MINUTE pad.
NOTE:
- To use Easy Minute, touch pad within 1 minute after cooking, closing the door, touching the STOP/CLEAR pad or during cooking.
- Easy Minute cannot be used with Sensor Reheat, Popcorn, Sensor Cook, Auto Defrost, Auto Broil, Auto Roast or Auto Bake.
Other Features
More Or Less Time Adjustment
Should you discover that you like any of the Sensor Cook, Sensor Reheat, Popcorn or Auto Defrost settings slightly more done, touch the POWER LEVEL pad once after touching your selection. The display will show MORE.
For slightly less done, touch the POWER LEVEL pad twice after touching your selection. The display will show LESS.
Multiple Sequence Cooking
Your microwave oven can be programmed for up to 4 automatic cooking sequences, switching from one power level setting to another automatically.
Sometimes cooking directions tell you to start on one power level and then change to a different power level. Your microwave oven can do this automatically.
For example, to cook roast beef for 5 minutes at 100% and then continue to cook for 30 minutes at 50%:
- First touch the POWER LEVEL pad twice for 100% power. Then enter the cooking time 500.
- Touch the POWER LEVEL pad. Touch number pad 5 for 50% power. Then enter second cooking time 3 0 0 0.
- Touch the START/INSTANT ON pad.
NOTE:
- If the POWER LEVEL pad is touched twice, HIGH will be displayed.
- If you wish to know the power level during cooking, simply touch the POWER LEVEL pad. As long as your finger is touching the POWER LEVEL pad, the power level will be displayed.
Kitchen Timer
For example, to time a 3 minute long distance phone call:
- Touch the KITCHEN TIMER pad.
- Enter time by touching the number pads 300.
- Touch the START/INSTANT ON pad.
Demonstration Mode
To demonstrate, touch CLOCK, the number 0 and then touch the START/INSTANT ON pad and hold for 3 seconds. END ON will appear in the display. Cooking operations and specific special features can now be demonstrated with no power in the microwave oven. For example, touch the EASY MINUTE pad and the display will show 1.00 and count down quickly to END.
To cancel, touch CLOCK, then the number 0 and STOP/CLEAR pads. If easier, unplug the microwave oven from the electrical outlet and reconnect.
Instant On
Instant On allows you to cook at 100% power by touching the START/INSTANT ON pad continuously. Instant On is ideal for melting cheese, bringing milk to just below boiling etc.
The maximum cooking time is 3 minutes:
For example, to melt cheese on a piece of toast:
- Continuously touch the START/INSTANT ON pad. The cooking time will begin counting up.
- When the cheese is melted to desired degree, remove your finger from the START/INSTANT ON pad. The microwave oven stops immediately.
NOTE:
- Take note of the required cooking time for frequently prepared foods and set the microwave accordingly in the future.
- To use Instant On, touch the pad within 1 minute after cooking, opening and closing the door or touching the STOP/CLEAR pad.
- Instant On can only be used 3 times in a row. To use Instant On additional times, open and close door or touch STOP/CLEAR.
Cleaning and Care
Disconnect the power cord before cleaning or leave the door open to inactivate the microwave oven during cleaning.
Exterior
The outside surface is painted. Clean the outside with mild soap and water; rinse and dry with a soft cloth. Do not use any type of household or abrasive cleaner.
Door
Wipe the window on both sides with a damp cloth to remove any spills or spatters. Metal parts will be easier to maintain if wiped frequently with a damp cloth. Avoid the use of spray and other harsh cleaners as they may stain, streak or dull the door surface.
Touch Control Panel
Care should be taken in cleaning the touch control panel. If the control panel becomes soiled, open the microwave oven door before cleaning. Wipe the panel with a cloth dampened slightly with water only. Dry with a soft cloth. Do not scrub or use any sort of chemical cleaners. Close the door and touch the STOP/CLEAR pad.
Interior - after microwave cooking
Cleaning is easy because little heat is generated to the interior surfaces; therefore, there is no baking and setting of spills or spattering. To clean the interior surfaces, wipe with a soft cloth and warm water. DO NOT USE ABRASIVE OR HARSH CLEANERS OR SCOURING PADS. For heavier soil, use baking soda or a mild soap; rinse thoroughly with hot water. NEVER SPRAY OVEN CLEANERS DIRECTLY ONTO ANY PART OF THE MICROWAVE OVEN.
Interior - after convection, mix or broil cooking
Spatters may occur because of moisture and grease. Wash immediately after use with hot, soapy water. Rinse and polish dry. Harder to remove spatters may occur if oven is not thoroughly cleaned or if there is long time/high temperature cooking. If so, you may wish to purchase an oven cleaner pad with liquid cleaner within
it —not a soap filled steel pad—for use on stainless or porcelain surfaces. Follow manufacturer's directions carefully and be especially cautious not to get any of the liquid cleaner in the perforations on the wall or ceiling or any door surfaces. Rinse thoroughly and polish dry.
After cleaning the interior thoroughly, residual grease may be removed from the interior ducts and heater by simply operating the oven on 450^ F for 20 minutes without food. Ventilate the room if necessary.
Waveguide Cover
The waveguide cover is made from mica so it requires special care. Keep the waveguide cover clean to assure good microwave oven performance. Carefully wipe with a damp cloth any food spatters from the surface of the cover immediately after they occur. Built-up splashes may overheat and cause smoke or possibly catch fire. Do not remove the waveguide cover.
Odor Removal
Occasionally, a cooking odor may remain in the microwave oven. To remove, combine 1 cup water, grated peel and juice of 1 lemon and several whole cloves in a 2-cup glass measuring cup. Boil for several minutes using 100% power. Allow to set in microwave oven until cool. Wipe interior with a soft cloth.
Turntable/Turntable Support/Racks
The turntable, turntable support and racks can be removed for easy cleaning. Wash them in mild, sudsy water; for stubborn stains use a mild cleanser and a non-abrasive scouring sponge. They are also dishwasher-proof. Use top rack of dishwasher for turntable support.
Foods with high acidity, such as tomatoes or lemons, will cause the porcelain enamel turntable to discolor. Do not cook highly acidic foods directly on the turntable; if spills occur, wipe up immediately.
The turntable motor shaft is not sealed, so excess water or spills should not be allowed to stand in this area.
Service Call Check
Please check the following before calling for service:
- Place one cup of water in a glass measuring cup in the microwave oven and close the door securely.
Operate the microwave oven for one minute at HIGH 100%.
A. Does the microwave oven light come on? YES ____ NO ____
B. Does the cooling fan work? (Put your hand over the rear ventilating openings.) YES ____ NO ____
C. Does the turntable rotate? (It is normal for the turntable to turn in either direction.) YES ____ NO ____
D. Is the water in the microwave oven warm? YES ____ NO ____
- Remove water from the oven and operate the oven for 5 minutes at CONVECTION 450°F.
Operate the microwave oven for one minute at HIGH 100%.
A. Do CONV and COOK indicators light? YES ____ NO ____
B. After the oven shuts off, is inside of the microwave oven hot? YES ____ NO ____
If "NO" is the answer to any of the above questions, please check electrical outlet, fuse and/or circuit breaker. If they are functioning properly, CONTACT YOUR NEAREST DACOR AUTHORIZED SERVICER.
A microwave oven should never be serviced by a "do-it-yourself" repair person.
NOTE:
If time appearing in the display is counting down very rapidly, see Demonstration Mode on page 22 and cancel.
For warranty repairs, call:
Dacor Distinctive Service
Phone: (800) 793-0093 Ext. 2822 (U.S.A. and Canada)
Monday — Friday 6:00 am to 5:00 pm Pacific Time
For a list of Dacor service agents for non-warranty repairs:
Dacor Customer Service
Phone: (800) 793-0093 Ext. 2813 (U.S.A. and Canada)
Monday — Friday 6:00 am to 5:00 pm Pacific Time
Specifications
| AC Line Voltage: Single phase 120V, 60Hz, AC only | |
| AC Power Required: Microwave 1.55 kw, 13.0 amps. Convection 1.55 kw, 13.0 amps. | |
| Output Power: Microwave* 900 watts Convection Heater 1450 watts | |
| Frequency: 2450 MHz | |
| Outside Dimensions: 24 | 5/8"(W) x 14 7/8"(H) x 19"(D) |
| Cavity Dimensions: 16 | 1/8"(W) x 9 5/8"(H) x 16 1/8"(D) |
| Microwave oven Capacity:** 1.5 Cu. Ft. | |
| Cooking Uniformity: Turntable system | |
| Weight: Approx. 60 lb. | |
* The International Electrotechnical Commission's standardized method for measuring output wattage. This test method is widely recognized.
** Internal capacity is calculated by measuring maximum width, depth and height. Actual capacity for holding food is less.
In compliance with standards set by:
FCC – Federal Communications Commission Authorized.
DHHS – Complies with Department of Health and Human Services (DHHS) rule, CFR, Title 21, Chapter I, Subchapter J.
cULus - This symbol on the nameplate means the product is listed by Underwriters Laboratories, Inc. for use in USA or Canada.
Product Warranty
What Is Covered
CERTIFICATE OF WARRANTIES
WITHIN THE FIFTY STATES OF THE U.S.A., THE DISTRICT OF COLUMBIA AND CANADA\*:
FULL ONE YEAR WARRANTY
If your DACOR product fails to function within one year of the original date of purchase, due to a defect in material or workmanship, DACOR will remedy the defect without charge to you or subsequent users. The owner must provide proof of purchase upon request and have the appliance accessible for service.
* Warranty is null and void if non-CSA approved product is transported from the U.S.
OUTSIDE THE FIFTY STATES OF THE U.S.A., THE DISTRICT OF COLUMBIA AND CANADA:
LIMITED FIRST YEAR WARRANTY
If your DACOR product fails to function within one year of the original date of purchase, due to a defect in material or workmanship, DACOR will furnish a new part, F.O.B. factory, to replace the defective part. All delivery, installation and labor costs are the responsibility of the purchaser. The owner must provide proof of purchase upon request and have the appliance accessible for service.
What Is Not Covered
- Failure of the product caused by faulty installation, improper usage, or neglect of required maintenance.
• Service calls to educate the customer in the proper use and care of the product. - Failure of the product when used for commercial, business, rental or any application other than for residential consumer use.
- Replacement of house fuses or fuse boxes, or resetting of circuit breakers.
- Damage to the product caused by accident, fire, flood or other acts of God.
- Breakage, discoloration or damage to glass, metal surfaces, plastic components, trim, paint, porcelain or other cosmetic finish, caused by improper usage or care, abuse, or neglect.
THE REMEDIES PROVIDED FOR IN THE ABOVE EXPRESS WARRANTIES ARE THE SOLE AND EXCLUSIVE REMEDIES THEREFORE NO OTHER EXPRESS WARRANTIES ARE MADE, AND OUTSIDE THE FIFTY STATES OF THE UNITED STATES AND THE DISTRICT OF COLUMBIA, ALL IMPLIED WARRANTIES, INCLUDING BUT NOT LIMITED TO, ANY IMPLIED WARRANTY OF MERCHANTABILITY OR FITNESS FOR A PURCHASE. IN NO EVENT SHALL DACOR BE LIABLE FOR INCIDENTAL EXPENSE OR CONSEQUENTIAL DAMAGES. NO WARRANTIES, EXPRESS OR IMPLIED, ARE MADE TO ANY BUYER FOR RESALE.
Some states do not allow limitations on how long an implied warranty lasts or do not allow the exclusion or limitation of incidental or consequential damages, so the above limitations or exclusions may not apply to you. This warranty gives you specific legal rights, and you may also have other rights that vary from state to state.
natural_image
Front view of a modern kitchen oven with control panel and display screen (no visible text or symbols)Modèle DCM24
Cuisson Par Convection....19
City of Industry, CA 91745
Téléphone : (800) 793-0093 (626) 403-3130
Télécopieur :
natural_image
Technical line drawing of a two-tiered steamer with a fish inside, showing internal structure (no text or symbols)Les parties de la Micro-onde
FEUILLE DES TOUCHES

TABLEAU SENSOR COOK (CUISSON AU CAPTEUR)
Service Dacor Distinction
FCC – Federal Communications Commission
FIRST-CLASS MAIL CITY OF INDUSTRY CAPERMIT NO 1600
POSTAGE WILL BE PAID BY ADDRESSEE
DACOR
ATTN WARRANTY PROCESSING DEPT
PO BOX 90070
CITY OF INDUSTRY CA 91715-9907

IMPORTANT:
Your warranty will not be activated until you activate it online or return this form to Dacor. If you have purchased more than one Dacor product, please return all forms in one envelope or activate the warranty for each product online.
Please rest assured that under no conditions will Dacor sell your name or any of the information on this form for mailing list purposes. We are very grateful that you have chosen Dacor products for your home and do not consider the sale of such information to be a proper way of expressing our gratitude!
Owner's Name:
Street:
City: State: Zip:
Purchase Date: Email: Telephone:
Dealer:
City: ____ State: ____ Zip: ____
Your willingness to take a few seconds to fill in the section below will be sincerely appreciated. Thank you.
- How were you first exposed to Dacor products? (Please check one only.)
A. T.V. Cooking Show □ F Builder
B. Magazine G. Architect/Designer
C. Appliance Dealer Showroom
D. Kitchen Dealer Showroom
E. Home Show
H. Another Dacor Owner
□ I. Model Home
□ J. Other
- Where did you buy your Dacor appliances?
A. Appliance Dealer
B. Kitchen Dealer
D. Builder
E. Other
C. Builder Supplier
- For what purpose was the product purchased?
A. Replacement only
B. Part of a Remodel
D. Other
C. New Home
- What is your household income?
A. Under \$75,000
B. \75,000 - \100,000
C. \100,000 - \150,000
D. \150,000 - \200,000
E. \200,000 - \250,000
☐ F. Over \$250,000
- What other brands of appliances do you have in your kitchen?
A. Cooktop
C. Dishwasher
B. Oven
D. Refrigerator
- Would you buy or recommend another Dacor product?
□ Yes
□ No
Comments:
Thank you very much for your assistance. The information you have provided will be extremely valuable in helping us plan for the future and giving you the support you deserve.

- Table of Contents
- dacor®
- IMporTanT SafETy InSTruCTlonS
- Dacor® Customer Service
- For service and warranty information, see page 26.
- IMporTanT InForMaTlon about SaFETy InSTruCTlonS
- SaFETy SyMbolS anD labEIS
- DANGER
- WARNING
- CAUTION
- PRECAUTIONS TO AVOID POSSIBLE EXPOSURE TO EXCESSIVE MICROWAVE ENERGY
- State of California Proposition 65 Warnings:
- READ AND SAVE THESE INSTRUCTIONS
- Information You Need To Know
- Unpacking and Examining Your Microwave Oven
- Choosing a Location for Your Microwave Oven
- GROUNDING INSTRUCTIONS
- ELECTRICAL REQUIREMENTS
- EXTENSION CORD
- Notes:
- RADIO OR TV INTERFERENCE
- About Your Microwave Oven
- About Microwave Cooking
- About Utensils And Coverings
- Information You Need
- About Safety
- About Foods
- About Children And The Microwave
- Parts of the Microwave
- ACCESSORIES
- CONTROL PANEL
- Before Operating
- To Set The Clock
- Stop/Clear
- Manual Operation
- Time Cooking
- To Set Power Level
- Microwave Features
- Auto Defrost
- NOTE:
- AUTO DEFROST CHART
- Manual Defrost
- Sensor Cooking
- USING SENSOR SETTINGS:
- SELECTING FOODS:
- COVERING FOODS:
- Microwave Oven Cooking
- Sensor Reheat
- Popcorn
- Sensor Cook
- Convection Automatic Operation
- Auto Broil
- Convection Automatic
- Auto Roast
- Auto Bake
- Manual Convection And Automatic Mix Cooking
- Convection Cooking
- TO COOK WITH CONVECTION
- TO PREHEAT AND COOK WITH CONVECTION
- BROIL
- SLOW COOK
- Automatic Mix Cooking
- TO COOK WITH AUTOMATIC MIX
- TO PREHEAT AND COOK WITH AUTOMATIC MIX
- HELPFUL HINTS FOR CONVECTION AND AUTOMATIC MIX COOKING
- CONVECTION COOKING:
- AUTOMATIC MIX COOKING:
- Other Features
- Help Guide
- SAFETY LOCK
- AUDIBLE SIGNAL ELIMINATION
- AUTO START
- LANGUAGE SELECTION
- WEIGHT AND TEMPERATURE SELECTIONS
- Help
- Easy Minute
- More Or Less Time Adjustment
- Multiple Sequence Cooking
- Kitchen Timer
- Demonstration Mode
- Instant On
- Cleaning and Care
- Exterior
- Door
- Touch Control Panel
- Interior - after microwave cooking
- Interior - after convection, mix or broil cooking
- Waveguide Cover
- Odor Removal
- Turntable/Turntable Support/Racks
- Service Call Check
- Specifications
- Product Warranty
- What Is Covered
- WITHIN THE FIFTY STATES OF THE U.S.A., THE DISTRICT OF COLUMBIA AND CANADA\*:
- FULL ONE YEAR WARRANTY
- OUTSIDE THE FIFTY STATES OF THE U.S.A., THE DISTRICT OF COLUMBIA AND CANADA:
- LIMITED FIRST YEAR WARRANTY
- What Is Not Covered
- Les parties de la Micro-onde
- IMPORTANT:
Brand : Dacor
Model : DCM24S
Category : Microwave