
T2 Classic 9045 - Bike rack THULE - Free user manual and instructions
Find the device manual for free T2 Classic 9045 THULE in PDF.


| Product Type | Hitch-mounted bike rack |
| Brand | Thule |
| Model | T2 Classic 9045 |
| Bike Capacity | 2 bikes |
| Max Load per Bike | 60 lbs (27 kg) |
| Total Max Load | 120 lbs (54 kg) |
| Hitch Size | 2 inches (50.8 mm) |
| Dimensions (folded) | 50 x 12 x 8 in (127 x 30 x 20 cm) |
| Dimensions (unfolded) | 50 x 40 x 28 in (127 x 102 x 71 cm) |
| Weight | 51 lbs (23 kg) |
| Material | Steel frame with powder coat finish |
| Folding Design | Ratchet arm folds down when not in use |
| Integrated Locking | Locking knob secures rack to hitch; lock cores included |
| Tire Tray | Adjustable length trays with ratcheting arms |
| Power Source | None (manual operation) |
| Maintenance | Wipe with damp cloth; lubricate pivot points annually |
| Cleaning | Mild soap and water; avoid abrasive cleaners |
| Safety Features | Reflectors, integrated lock, safety cables included |
| Spare Parts Availability | Replacement straps, knobs, and trays available |
| Warranty | Limited lifetime warranty |
Frequently Asked Questions - T2 Classic 9045 THULE
User questions about T2 Classic 9045 THULE
0 question about this device. Answer the ones you know or ask your own.
Ask a new question about this device
Download the instructions for your Bike rack in PDF format for free! Find your manual T2 Classic 9045 - THULE and take your electronic device back in hand. On this page are published all the documents necessary for the use of your device. T2 Classic 9045 by THULE.
USER MANUAL T2 Classic 9045 THULE
EN = North American English / ES = Latin American Spanish / FR = Canadian French / PT = Brazilian Portuguese
EN PARTS INCLUDED / ES PIEZAS INCLUIDAS / FR PIÈCES INCLUDES / PT PEÇAS INCLUSAS

RQPHKL
| EN partES piezaFR piècePT peça | EN descriptionES descripciónFR descriptionPT descrição | EN qty.ES cant.FR qtéPT qtd. |
| A | EN hitch and backbone assembly T2 2" / ES ensamblaje del enganche y sostén T2 de 5 cm (2 pulg.) /FR ensemble d'attelage et de poutre centrale T2 de 5 cm (2 po) / PT montagem de engate e trave central T2 de 5,1 cm (2") | 1 |
| B | EN locking ratchet arm assembly / ES ensamblaje del brazo de trinquete de cierre /FR bras à cliquet de verrouillage / PT montagem do braço de catraca de travamento | 2 |
| C | EN wheel tray molded T2 / ES riel para las ruedas moldeado T2 /FR rail pour roues moulé T2 / PT bandeja das rodas moldada T2 | 2 |
| D | EN spar and pivot tube / ES larguero y tubo de pivote /FR barre transversale et tube de pivotement / PT trave e tubo pivotante | 2 |
| E | EN rear wheel retention device / ES mecanismo de retención para la rueda trasera /FR système de retenue de roue arrière / PT mecanismo de retenção para roda traseira | 2 |
| F | EN lockwasher 12mm id / ES arandela de seguridad de 12 mm diá. int. /FR rondelles de blocage de 12 mm dia. Int. / PT arruela de pressão de 12 mm de diâmetro interno | 1 |
| G | EN STL2 hitch lock pin / ES pasador de seguridad para enganche STL2 /FR goupille de verrouillage pour attelage STL2 / PT pino de travamento de engate STL2 | 1 |
| H | EN washer 12mm id 24mm od / ES arandela de 12 mm diá. int. 24 mm diá. ext. /FR rondelle de 12 mm dia. int. et 24 mm dia. ext. / PT arruela de 12 mm de diâmetro interno e 24 mm de diâmetro externo | 9 |
| I | EN hitch tool / ES herramienta de enganche / FR outil d'attelage / PT ferramenta de engate | 2 |
| J | EN hex key M5 / ES llave hexagonal M5 / FR clé hexagonale M5 / PT chave hexagonal M5 | 1 |
| K | EN 5/16" x 1" slotted cutting bolt / ES perno autoperforante ranurado de 5/16" x 1" /FR boulon coupant à filets interrompus 5/16 po x 1 po / PT parafuso perfurado ranhurado 8 mm x 2,5 cm (5/16" x 1") | 4 |
| L | EN lock plug / ES tapón de cierre / FR bouchon de verrou / PT plugue da trava | 4 |
| M | EN hex bolt 1/2 unc-13 / ES perno hexagonal 1/2 unc-13 /FR vis hexagonale 1/2 unc-13 / PT parafuso hexagonal 1/2 unc-13 | 4 |
| EN PARTS INCLUDED (CONTINUED) / ES PIEZAS INCLUIDAS(CONTINUACION) / FR PIECES INCLUDES (SUITE) / PT PEÇAS INCLUSAS (CONTINUAÇÃO) | ||
| EN partES piezaFR piècePT peça | EN descriptionES descripciónFR descriptionPT descrição | EN qty.ES cant.FR qtéPT qtd. |
| N | EN 1/2 - 13 lock nut / ES tuerca de seguridad de 1/2 -13 /FR écrou bloquant 1/2 - 13 / PT porca de trava 1/2 - 13 | 4 |
| O | EN STL2 hitch lock / ES traba para enganche STL2 /FR dispositif de verrouillage STL2 / PT trava de engate STL2 | 1 |
| P | EN lock cylinder / ES cerradura cilíndrica / FR barillet / PT cilindro de trava | 1 |
| Q | EN locking key / ES llave de cierre / FR clé / PT chave da trava | 2 |
| R | EN change key / ES llave de cambio /FR clé de rechange / PT chave de troca | 1 |
EN
TOOLS REQUIRED:
- 2 - Thule Tools (included)
- 1 - 5mm Allen Wrench (included)
- 1 - Flat Head Screwdriver
ES

EN Not acceptable if distance is less than 1.5"
- For both safety and performance, Thule requires the distance from the center of the hitch pin hole to the face of the receiver be at least 1.5 inches.
ES
WARNINGS / LIMITATIONS:
- Fits 20-29" wheels up to 5" wide tires.
- Carries up to 60lbs per tray with a 2" hitch and 160lbs total with a 2 bike add-on (4 bikes max.)
- Carries up to 60lbs per tray with a 1-1/4" hitch and 100lbs total (2 bikes max.)
- Carries bikes with wheelbases up to 48"
- Check tightness of all bolts and knobs periodically.
- Not intended for off-road use.
- Check straps for wear and replace if worn.
- Not intended for tandems or recumbents.
- Your vehicle must be equipped with a 2" or 1-1/4" receiver hitch.
- DO NOT INSTALL on a trailer or other towed vehicle.
- The maximum capacity for class 1 hitches is 2 bikes.
- DO NOT USE product with bike that has tire fenders. This prevents snug hook grip on tire.
- Load heaviest bike closest to vehicle and lightest bike last.
- Remove rack before entering an automatic car wash.
- Do not transport bicycles with attached baby seats, panniers, wheel covers or full bike covers.
- It is the user's responsibility to ensure compliance with all federal, state and local laws when using any Thule product.
- Drive slowly over speed bumps 5-10mph (8-16 kph) max.
- WARNING:
Set screw located on underside of the main backbone must remain installed. If screw is not in place there is the risk the bike tray can slide off the rack if not tightened properly. See step 4 for further clarification.
ES
B
natural_image
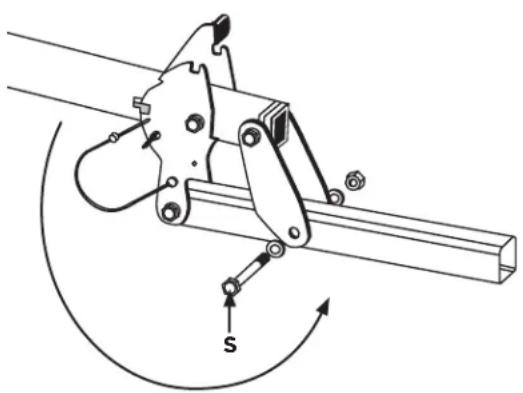
Mechanical linkage mechanism diagram showing a lever and fulcrum with rotational motion indicator (no text labels)EN
A. Remove the bolt, nut and washer from the rear linkage bars using the 2 Thule tools provided.
B. Swing the hitch base 180 degrees and line up the bushings in the middle hole with the linkage bars.
C. Replace the bolt, nut and washers and tighten firmly using Thule tools provided.
ES
B

natural_image
Technical line drawing of a knife with a hammer and screw, showing mechanical components and an arrow indicating direction (no text or symbols)EN
A. Insert hitch base (A) into vehicle's hitch receiver (B).
B. Insert STL2 receiver bolt, 12mm lock washer and 12mm flat washer as illustrated and tighten firmly using the Thule tools provided.
ES
- Insert the wheel trays into the spar tube as illustrated. Tighten using flat head screwdriver. Use caution not to over-tighten.
ES
natural_image
Technical line drawing of a mechanical assembly with two screwdrivers and a lever mechanism (no text or symbols)4
EN safety set screw
B
natural_image
Technical line drawing of a mechanical assembly with no visible text or symbolsEN
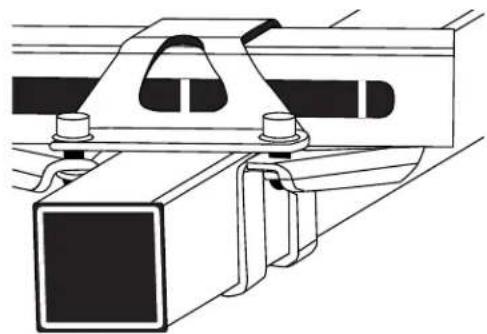
- Loosen all 4 bracket bolts with 5mm hex wrench.
- Slide the first bike mount assembly oriented with the front wheel cradle on the driver's side of the vehicle onto the backbone of the rack.
- Position the tray so that the bracket lines up just beyond the E of the Thule logo (fig. A) and the centerline on the side of the spar tube shows through the cutout in the bracket (fig. B).
- Tighten all 4 bolts with the 5mm Allen wrench until the lower bracket wings touch the bottom of the spar tube. (fig. B) Fasteners must be tight and should be checked periodically with rack use.
- Repeat 1-4 with second bike mount assembly oriented with the wheel cradle on the passenger side. Line the bracket up just before the T of the Thule logo (fig. A) and center it with the center line mark (fig. B).
WARNING: Safety set screw must remain installed at all times. If you need to remove it to add the 2 bike extension, the screw must be reinstalled after it has been removed.
ES
natural_image
Line drawing of a mechanical tool with a handle and base component (no text or symbols)EN
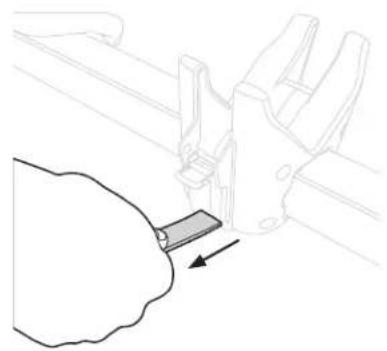
- Rotate the support arm forward. While grabbing the grip assembly on the support arm, depress the gray trigger and slide the hook to the end of the support arm as illustrated.
ES
natural_image
Illustration of a bicycle wheel with a hand operating the steering wheel (no text or symbols)EN
- Place bike in first tray nearest to the vehicle with the front wheel in the wheel cradle and rear wheel in the rear wheel holder.
- While holding the bike with one hand, rotate the support arm up until it sits within 1" of the bicycle brake or fork crown.
- Ratchet the arm tightly against the wheel. You should hear a minimum of 2 clicks past initial contact with the tire.
WARNING:
The support arm V-notch must be firmly seated against the tire within 1" of the bicycle brake or fork crown. Failure to do so may result in bike instability. Always shake your bike to ensure the hook is fully seated.
ES
natural_image
Technical line drawing of a mechanical assembly with no visible text or symbolsB
natural_image
Technical line drawing of a mechanical clamp or bracket assembly with an arrow indicating force direction (no text or symbols present)C

natural_image
Line drawing of a hand holding a car trim, with an upward arrow indicating motion (no text or symbols)EN
A. Secure rear wheel by inserting strap into buckle and pulling down firmly.
B. For "fat bike" and "plus sized" tires, first remove the rear wheel strap as shown.
C. Then re-route the strap as shown so that your length of usable strap is increased. No modifications need to be made to the front wheel holder to accommodate these wheel sizes.
ES
natural_image
Technical illustration of a mechanical assembly with hands operating a tool (no text or symbols present)EN
- With bikes unloaded, pull release lever away from vehicle and lift rack toward vehicle (fig. A).
- Carrier will "click" into stowed position (fig. B).
WARNING: "Folding for Storage," may be hindered by spare tires and other rear of car features. Ensure that there is adequate clearance when installed on vehicle and carrier is in locked position before travel.
ES
EN FOLDING FOR REAR VEHICLE ACCESS
ES PLEGAR PARA TENER ACCESO A LA PARTE TRASERA DEL VEHÍCULO
FR PLIAGE POUR LE RANGEMENT
PT DOBRA PARA ACESSO À TRASEIRA DO VEÍCULO

natural_image
Technical line drawing of a mechanical assembly with bolts and a tool (no text or symbols)
natural_image
Technical illustration of a mechanical assembly with hands operating a tool (no text or symbols present)EN
- Pull safety pin from linkage bar as illustrated.
- Pull release lever away from vehicle and lower carrier to stop position. See step 8 (fig. A)
WARNING: Carrier will drop rapidly under weight of load. It is strongly recommended to support weight of carrier when lowering. Keep hands and other objects clear of linkage during operation of this feature.
ES
- Adjusting rack to prevent bike interference with each other or with car.
A. Pitch - Distance Between Bikes - To adjust pitch, loosen all 4 bracket bolts and slide the tray in or out. Re-tighten bolts to secure tray.
B. Offset - Side to Side Distance - To adjust offset, loosen all 4 bracket bolts and slide tray left or right. Re-tighten bolts to secure tray.
NOTE: Do not slide the tray past offset limit marks on either side of the bracket or failure may occur.
ES
natural_image
Simple line drawing of a mechanical component with a knob and handle, no text or symbols presentB
C

natural_image
Simple line drawing of a mechanical component with a curved arrow pointing to it (no text or symbols)D
natural_image
Technical illustration of a mechanical component with a cylindrical part inserted into a housing, showing a separate view (no text or symbols present)E
natural_image
Diagram showing a key being inserted into a lock, with arrows indicating direction of movement (no text or symbols)EN
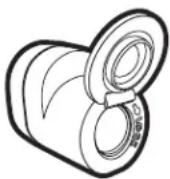
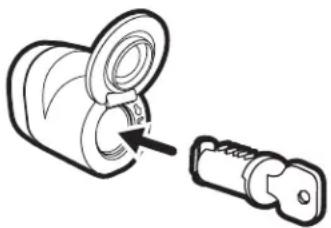
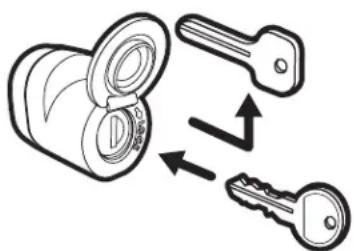
A. Remove and discard plug.
B. Opencover.
C. Insert change key into lock cylinder.
D. Insert cylinder into STL2 lock housing.
E. Remove change key. Insert locking key.
ES
EN LOCKING FEATURES: STL INSTRUCTIONS
ES FUNCIONES DE TRABA: INSTRUCCIONES PARA STL
FR CARACTÉRISTIQUES DE VERROUILLAGE : INSTRUCTIONS STL
PT CARACTERÍSTICAS DE TRAVAMENTO: INSTRUÇÕES DE STL
natural_image
Diagram showing a car seatbelt mechanism with a key inserted into the lock and a close-up of the handle (no text or symbols present)EN
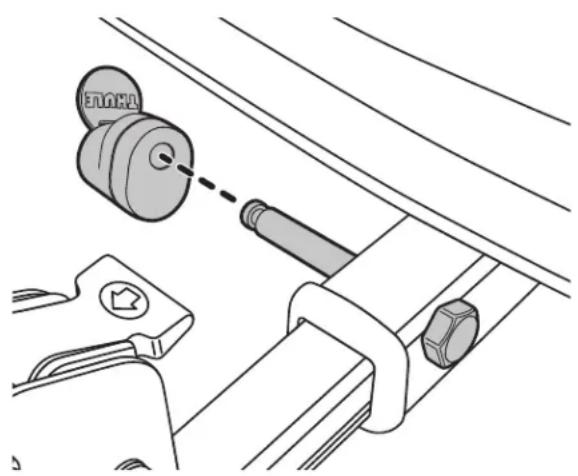
- Slide STL2 onto hitch pin, keeping key vertical.
- Turn key clock wise to lock, remove key.
-Closecover.
ES
natural_image
Technical line drawing of a mechanical clamp or bracket component with a key inserted (no text or symbols)
natural_image
Technical line drawing of a mechanical clamp or bracket with key inserted (no text or symbols)EN
A. Insert change key into lock cylinder. Insert lock cylinder into lock cylinder slot.
B. Remove change key, insert key to lock and unlock.
- Insert lock plug on opposite side of grip, into the lock cylinder.
WARNING: Ensure ratchet arm is fully engaged to bicycle wheel before locking.
ES
When using Thule Load carriers and accessories, the user must understand the precautions. The points listed below will assist you in using the rack system and will encourage safety.
- For quality fits and safety, use only the recommended rack or accessory as stated in Thule's current Fit Guide. Do not assume a rack will fit, always check the current Fit Guide when obtaining a new vehicle.
- The maximum load specified in the assembly instructions is not to be exceeded. However, this limit is always subordinate to the maximum load recommended by the manufacturer of the car itself. It is always the lower maximum recommended load that applies. Max roof load = load carrier weight + any fitted carrier accessories + the weight of the load itself.
- Always make sure all doors are open when mounting a roof rack system. Make sure all knobs, bolts, screws, straps, and locks are firmly attached, tightened and locked before every trip. Knobs, bolts, screws, straps and locks must be periodically inspected for signs of wear, corrosion, and fatigue. Check your load at stops during the trip to ensure continued fastening security.
- Check local and state laws governing projection of objects beyond the perimeter of a vehicle. Be aware of the width and height of your cargo since low clearance branches, bridges, and parking garages can affect the load. All cargo will affect the vehicle's driving behavior. Never drive with any lock, knob or rack in an open or unlocked position. All long loads such as, but not limited to, sailboards, surfboards, kayaks, canoes, and lumber must be tied down front and rear to the bumpers or tow hooks of the vehicle.
- Remove your Thule rack and accessories when they are not in use and before entering automatic car washes.
- All locks must be turned and moved periodically to ensure smooth operation. Use graphite or dry lubricant to help this. Thule locks are designed to deter vandalism and theft but should not be considered theft proof. Remove valuable gear if your vehicle is unattended for an extended period. Place at least one key in the glove compartment.
- For safety to your vehicle and rack system, obey all posted speed limits and traffic cautions. Adapt your speed to the conditions of the road and the load being carried.
- Do not use Thule load carriers and accessories for purposes other than those for which they were designed. Do not exceed their carrying capacity. Failure to follow these guidelines or the product's instructions will void the warranty.
- All loads must be secured using the provided straps.
- Consult with your Thule dealer if you have any questions regarding the operations and limits of Thule products. Review all instructions and warranty information carefully.
• Not for use on trailers or towed vehicles. - Not for offroad use.
- Keep bicycle tires away from hot exhaust.
Register online at www.thule.com/warranty
THULE will warranty all THULE brand car rack systems and its accessories manufactured by THULE during the time that an original retail purchaser owns the product. This warranty terminates if a purchaser transfers the product to any other person.
Subject to the limitations and exclusions described in this warranty, THULE will remedy defects in materials or workmanship by repairing or replacing, at its option, a defective product without charge for parts or labor. In addition, THULE may elect, at its option, not to repair or replace a defective product but rather issue to a purchaser a refund equal to the purchase price paid for the product or a credit to be used toward the purchase of a new THULE load carrier system.
No warranty is given for defects caused by normal wear and tear, cosmetic rust, scratches, accidents, unlawful vehicle operation, or modification of, or any types of repair of, a load carrier system other than those authorized by THULE.
No warranty is given for defects resulting from conditions beyond THULE's control including, but not limited to, misuse, overloading, or failure to assemble, mount or use the product in accordance with THULE's written instructions or guidelines included with the product or made available to the purchaser.
In the event that a product is defective, the purchaser should contact the THULE dealer from whom the product was purchased or an Authorized Thule Service Center. If the dealer or Authorized Thule Service Center is not able to correct the defect, the purchaser should contact THULE in writing or by phone using the contact information listed at the bottom of this page.
In the event that a product needs to be returned to THULE, a THULE technician at the address or telephone number listed below will provide the purchaser with the appropriate mailing address and any additional instructions. Please note that the purchaser will be responsible for the cost of mailing the product to THULE and that proof of purchase in the form of an original purchase invoice or receipt and a detailed description of the defect must be included in the mailing.
DISCLAIMER OF LIABILITY REPAIR OR REPLACEMENT OF A DEFECTIVE PRODUCT OR THE ISSUANCE OF A REFUND OR CREDIT (AS DETERMINED BY THULE) IS A PURCHASER'S EXCLUSIVE REMEDY UNDER THIS WARRANTY. DAMAGE TO A PURCHASER'S VEHICLE, CARGO AND/OR TO ANY OTHER PERSON OR PROPERTY IS EXCLUDED.
THIS WARRANTY IS EXPRESSLY MADE IN LIEU OF ANY AND ALL OTHER WARRANTIES, EXPRESS OR IMPLIED, INCLUDING THE WARRANTIES OF MERCHANTABILITY AND FITNESS FOR A PARTICULAR PURPOSE.
THULE'S SOLE LIABILITY TO ANY PURCHASER IS LIMITED TO THE REMEDY SET FORTH ABOVE. IN NO EVENT WILL THULE BE LIABLE FOR ANY LOST PROFITS, LOST SALES, OR FOR ANY CONSEQUENTIAL, DIRECT, INDIRECT, INCIDENTAL, SPECIAL, EXEMPLARY, OR PUNITIVE DAMAGES OR FOR ANY OTHER DAMAGES OF ANY KIND OR NATURE.
SOME STATES DO NOT ALLOW THE EXCLUSION OR LIMITATION OF INCIDENTAL OR CONSEQUENTIAL DAMAGES, SO THE ABOVE LIMITATIONS MAY NOT BE APPLICABLE.
THIS WARRANTY GIVES YOU SPECIFIC LEGAL RIGHTS, AND YOU MAY ALSO HAVE OTHER RIGHTS WHICH VARY FROM STATE TO STATE.
GARANTÍA DE POR VIDA LIMITADA PARA LOS SISTEMAS PORTAEQUIPAJES PARA AUTOS THULE
Thank you and congratulations for purchasing the most durable and functional roof rack system in the world. In order to keep you up-to-date on information relating to your product, please visit our website and complete our product registration form. The address is:
www.thule.com/register
Be sure to enter to win cool Thule products.
500-0099-08
Bring your life thule.com
THULE LIMITED LIFETIME WARRANTY [EFFECTIVE JANUARY 1, 2006]
THULE will warranty all THULE brand car rack systems and its accessories manufactured by THULE during the time that an original retail purchaser owns the product. This warranty terminates if a purchaser transfers the product to any other person.
Subject to the limitations and exclusions described in this warranty, THULE will remedy defects in materials or workmanship by repairing or replacing, at its option, a defective product without charge for parts or labor. In addition, THULE may elect, at its option, not to repair or replace a defective product but rather issue to a purchaser a refund equal to the purchase price paid for the product or a credit to be used toward the purchase of a new THULE load carrier system.
No warranty is given for defects caused by normal wear and tear, cosmetic rust, scratches, accidents, unlawful vehicle operation, or modification of, or any types of repair of, a load carrier system other than those authorized by THULE.
No warranty is given for defects resulting from conditions beyond THULE's control including, but not limited to, misuse, overloading, or failure to assemble, mount or use the product in accordance with THULE's written instructions or guidelines included with the product or made available to the purchaser.
No warranty is given for Thule products purchased outside of the United States, Canada and Mexico.
In the event that a product is defective, the purchaser should contact the THULE dealer from whom it purchased the product or an Authorized Thule Service Center. If the dealer or Authorized Thule Service Center is not able to correct the defect, the purchaser should contact THULE in writing or by phone at:
THULE • 42 Silvermine Road • Seymour, Connecticut 06483 • Attn: Customer Service • 203 881-9600
In the event that a product needs to be returned to THULE, a THULE technician at the address or telephone number listed above will provide the purchaser with the appropriate mailing address and any additional instructions. Please note that the purchaser will be responsible for the cost of mailing the product to THULE and that proof of purchase in the form of an original purchase invoice or receipt and a detailed description of the defect must be included in the mailing.
DISCLAIMER OF LIABILITY
REPAIR OR REPLACEMENT OF A DEFECTIVE PRODUCT OR THE ISSUANCE OF A REFUND OR CREDIT (AS DETERMINED BY THULE) IS A PURCHASER'S EXCLUSIVE REMEDY UNDER THIS WARRANTY. DAMAGE TO A PURCHASER'S VEHICLE, CARGO AND/OR TO ANY OTHER PERSON OR PROPERTY IS EXCLUDED.
THIS WARRANTY IS EXPRESSLY MADE IN LIEU OF ANY AND ALL OTHER WARRANTIES, EXPRESS OR IMPLIED, INCLUDING THE WARRANTIES OF MERCHANTABILITY AND FITNESS FOR A PARTICULAR PURPOSE.
THULE'S SOLE LIABILITY TO ANY PURCHASER IS LIMITED TO THE REMEDY SET FORTH ABOVE. IN NO EVENT WILL THULE BE LIABLE FOR ANY LOST PROFITS, LOST SALES, OR FOR ANY CONSEQUENTIAL, DIRECT, INDIRECT, INCIDENTAL, SPECIAL, EXEMPLARY, OR PUNITIVE DAMAGES OR FOR ANY OTHER DAMAGES OF ANY KIND OR NATURE.
SOME STATES DO NOT ALLOW THE EXCLUSION OR LIMITATION OF INCIDENTAL OR CONSEQUENTIAL DAMAGES, SO THE ABOVE LIMITATIONS MAY NOT BE APPLICABLE.
THIS WARRANTY GIVES YOU SPECIFIC LEGAL RIGHTS, AND YOU MAY ALSO HAVE OTHER RIGHTS WHICH VARY FROM STATE TO STATE.


- EN
- ES
- - WARNING:
- 4
- B
- WARNING:
- EN FOLDING FOR REAR VEHICLE ACCESS
- ES PLEGAR PARA TENER ACCESO A LA PARTE TRASERA DEL VEHÍCULO
- FR PLIAGE POUR LE RANGEMENT
- PT DOBRA PARA ACESSO À TRASEIRA DO VEÍCULO
- GARANTÍA DE POR VIDA LIMITADA PARA LOS SISTEMAS PORTAEQUIPAJES PARA AUTOS THULE
- www.thule.com/register
- THULE LIMITED LIFETIME WARRANTY [EFFECTIVE JANUARY 1, 2006]
- DISCLAIMER OF LIABILITY
Brand : THULE
Model : T2 Classic 9045
Category : Bike rack