
123288 - Security Camera AVIDSEN - Free user manual and instructions
Find the device manual for free 123288 AVIDSEN in PDF.


| Product Type | Motorized 720P WiFi IP Camera |
| Brand | Avidsen |
| Model | 123288 |
| Power Supply | 5 VDC / 1 A (mains adaptor included, 230 VAC 50 Hz) |
| Video Resolution | Primary stream: up to 1280x720 pixels; Secondary stream: up to 640x352 pixels |
| Video Compression | H.264 |
| Wireless Connectivity | WiFi IEEE 802.11b/g/n (not compatible with 5 GHz or HT40) |
| Wired Network | 10/100 Mbps Ethernet port |
| Night Vision | Automatic dusk-to-dawn sensor, range 10 m |
| Pan/Tilt Range | Horizontal: 350°, vertical: 120° |
| Lens | f: 3.6 mm |
| Audio | Built-in microphone and speaker for two-way audio |
| Storage | microSD card slot up to 128 GB (card not included) |
| Motion Detection | Adjustable sensitivity; supports email alerts, app notifications, and SD recording |
| Compatible App | Visia Avichen (iOS and Android) |
| Indoor Use Only | Yes (0°C to 40°C, 20% to 85% RH non-condensing) |
| Reset Button | Yes, on back of camera (press 10 seconds with thin tool) |
| Warranty | 2 years parts and labour (proof of purchase required) |
| Maintenance | Unplug before cleaning; use soft, slightly damp cloth; no abrasives or aerosols |
| Safety Precautions | Do not install outdoors; avoid direct sunlight, humidity extremes, and acidic chemicals; do not daisy-chain power adapters |
Frequently Asked Questions - 123288 AVIDSEN
User questions about 123288 AVIDSEN
0 question about this device. Answer the ones you know or ask your own.
Ask a new question about this device
Download the instructions for your Security Camera in PDF format for free! Find your manual 123288 - AVIDSEN and take your electronic device back in hand. On this page are published all the documents necessary for the use of your device. 123288 by AVIDSEN.
USER MANUAL 123288 AVIDSEN
Motorised 720P WiFi IP camera
ref. 123288



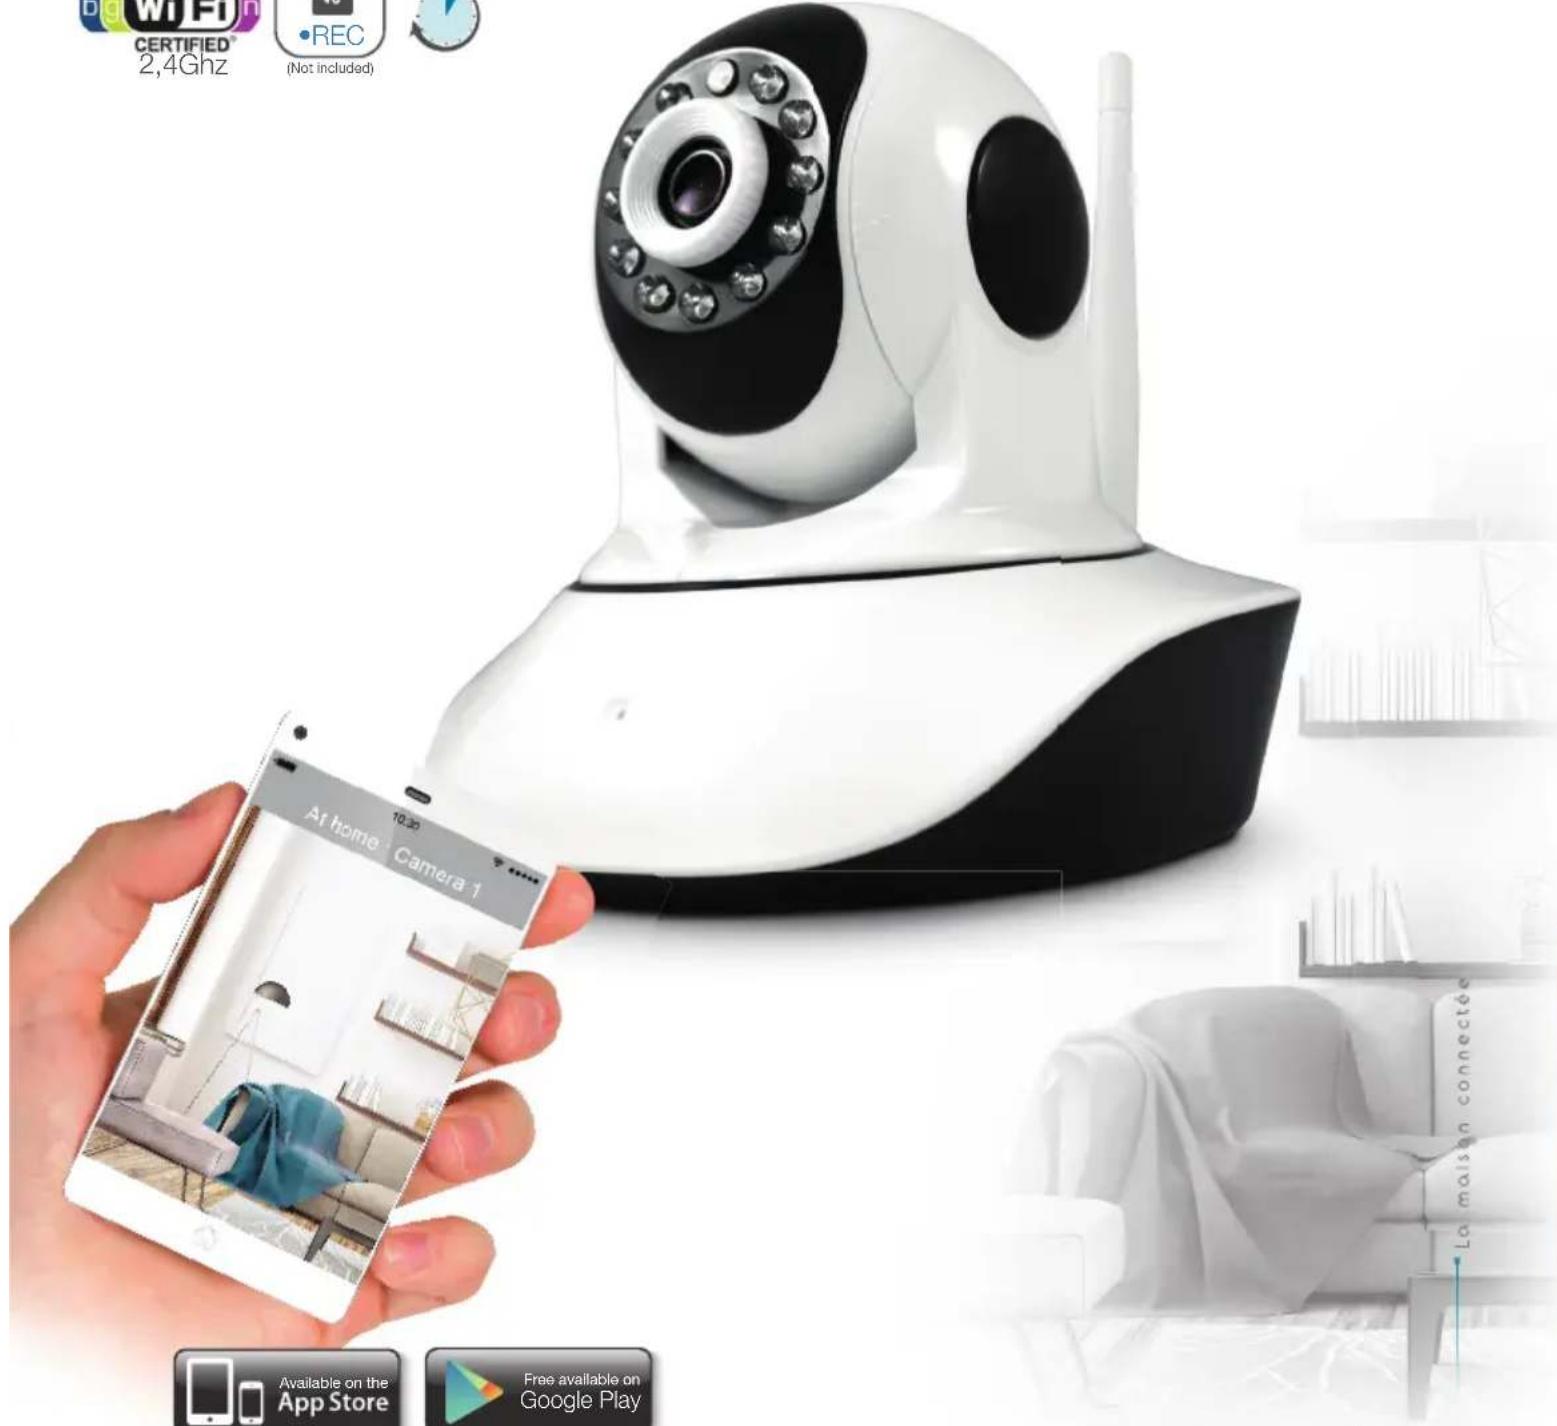
TABLE OF CONTENTS
A - SAFETY INSTRUCTIONS 05
1 - OPERATING PRECAUTIONS 05
2 - MAINTENANCE AND CLEANING 05
3 - RECYCLING 05
B - PRODUCT DESCRIPTION 06
1 - CONTENTS OF THE KIT 06
2 - CAMERA 06
3 - MAINS ADAPTOR 06
C - INSTALLATION 07
1 - INSTALLING THE CAMERA 07
2 - CONNECTING THE CAMERA 07
D - CONFIGURATION 08
1 - CONFIGURING THE CAMERA AND ADDING IT TO THE APP 08
2 - ACCESS TO ALL SETTINGS 10
2.1 - CONFIGURATION 10
2.2 - EXAMPLE: PROGRAMMING AN EMAIL ALERT TO BE SENT WHEN MOTION IS DETECTED 10
E - OPERATION 13
1 - LIVE VIDEO 13
2 - VIEWING PHOTOS AND VIDEOS TAKEN BY THE CAMERA 13
F - RESETTING 14
G - TECHNICAL AND LEGAL INFORMATION 15
1 - TECHNICAL CHARACTERISTICS 15
2 - WARRANTY 15
3 - HELP AND ADVICE 15
4 - PRODUCT RETURNS/AFTER-SALES SERVICE 16
5 - DECLARATION OF CONFORMITY 16
A - SAFETY INSTRUCTIONS
1 - OPERATING PRECAUTIONS
- The cameras must not be installed where the lens filter may be vulnerable to scratching and dirt.
- The camera is not designed for outside installation and should not be installed in locations that are subject to extremes of humidity or temperature.
- Do not expose the lens to direct sunlight or any reflected light source.
- Do not daisy-chain extension cords and/or multi-socket adapters.
- Do not install near acidic chemicals, ammonia or sources of toxic gases.
- The camera uses precision electronics. Do not handle the motors by hand as it could cause irreparable damage and voiding of the warranty.
- The installation and use of the camera must comply with local laws.
2 - MAINTENANCE AND CLEANING
• Always unplug the product from the mains before carrying out any maintenance.
- Never use abrasive or corrosive substances to clean the products.
- Use a soft, slightly damp cloth.
- Never use an aerosol to spray the product as this may damage the internal workings.
3 - RECYCLING
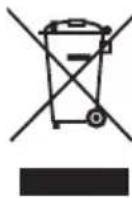
This logo indicates that devices which are no longer in use must not be disposed of as household waste. They are likely to contain hazardous substances which are dangerous to both health and the environment. Return the equipment to your local distributor or use the recycling collection service provided by your local council.

| 1 | Camera |
| 2 | 230 V A/C 50 Hz mains adaptor / 5 V 1 A |
| 3 | USB cable for powering the camera |
4 Wall fastening arm
5 Wall plugs for attaching the base
6 Screws for attaching the base
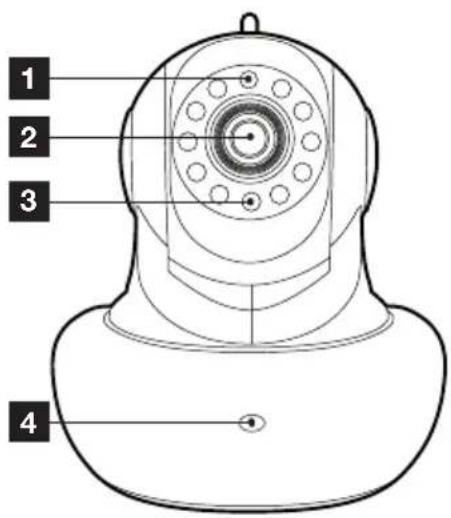
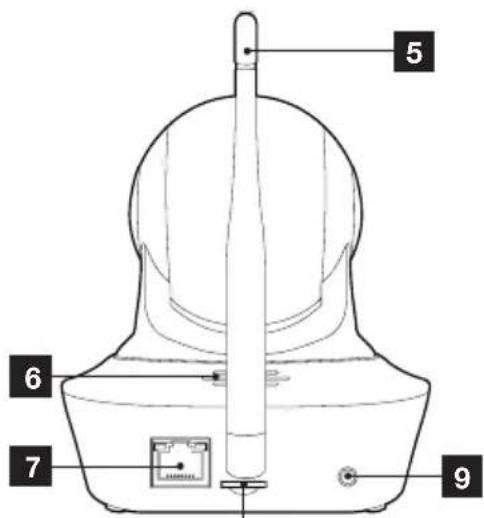
2 - CAMERA
natural_image
Pure technical diagram of a rounded rectangular component with internal grid pattern and mounting holes (no text or symbols)10
8
| 1 | Brightness sensor |
| 2 | Lens |
| 3 | infrared light for night vision |
| 4 | Microphone |
| 5 | WiFi antenna |
| 6 | Loudspeaker |
7 Wired network socket
8 MicroSD card slot (card not included)
95 V D/C 1 A mains adaptor power supply included in the kit
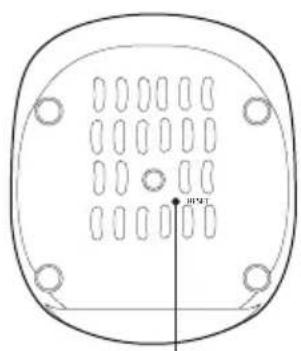
10 Reset button
3 - MAINS ADAPTER
A 230VAC 50Hz / 5VDC 1A mains adapter for powering the camera is included in the kit. Do not use other power supplies as they could damage the camera and invalidate the warranty.
1 - INSTALLING THE CAMERA
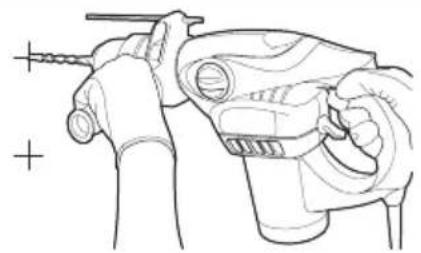
Mount the camera using suitable screws and wall plugs for the type of surface (the screws and plugs supplied are suitable for solid walls).
Make sure the camera is properly secured to prevent it from falling. The camera can also be fitted to a flat surface.
natural_image
Line drawing of a hand holding a drill bit with a tool, no text or symbols present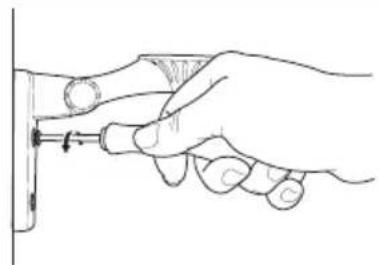
natural_image
Line drawing of a hand holding a screwdriver inserted into a vertical component (no text or symbols)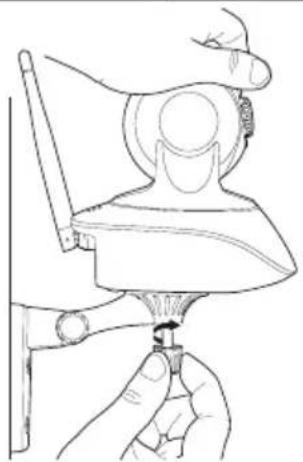
natural_image
Line drawing of a hand using a tool to adjust or install a mechanical component (no text or symbols present)2 - CONNECTING THE CAMERA
natural_image
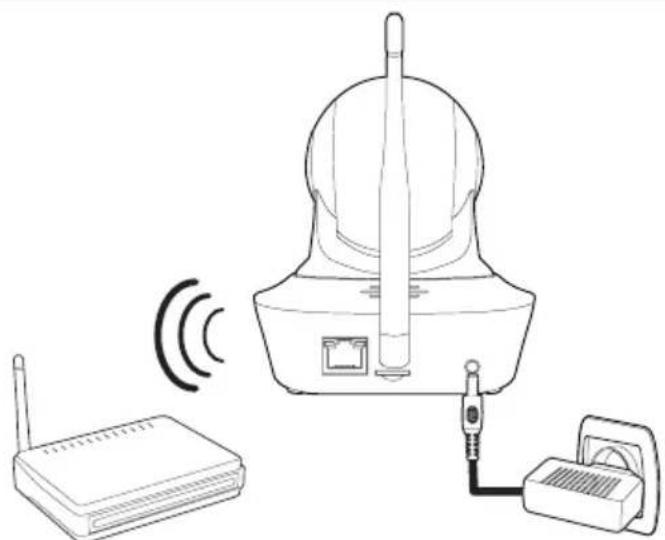
Line drawing of a wireless router connected to an antenna and a separate device (no text or symbols present)Note: once it is connected to a power supply, the camera will produce an audible tone at regular intervals to indicate that it is not yet connected to your WiFi network.
D - CONFIGURATION
1 - CONFIGURING THE CAMERA AND ADDING IT TO THE APP

Download and install the Visia avichen app from the appstore or Google Play on your smartphone or tablet, then launch the app.
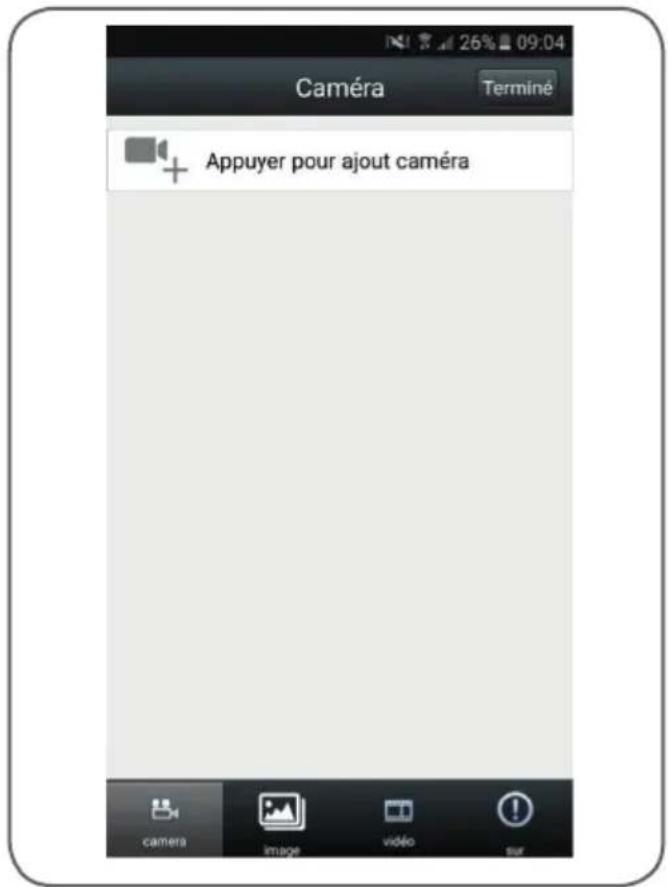
Important: connect your smartphone or tablet to the wifi network that your camera should be using.
Not compatible with HT40 WiFi, not compatible with 5 GHz WiFi. Please check the WiFi parameters of your box with your internet service provider.
The special characters (#! “ &, etc.) in your security key may lead to diffi culties connecting to the wifi.
| 1 | The name of the camera in the app (according to your preference) |
| 2 | User name to log in to the camera (“admin”, by default) |
| 3 | Camera UID (unique code shown on the camera). You are not required to enter it: the app will complete this information by itself. |
| 4 | Password to log in to the camera (“admin”, by default) |
After indicating your camera's connection password ("admin", by default), click on
"Recherche WiFi" (Scan WiFi) so that the app scans for nearby cameras that are not yet connected.
Note: if your camera was already configured and connected, click on "Recherche sur réseau local" (search local network) to find it. (Useful for adding a camera to the app on a second smartphone or tablet).
The app will the request the password for logging in to the WiFi network in order to send this information to your camera:
D - CONFIGURATION
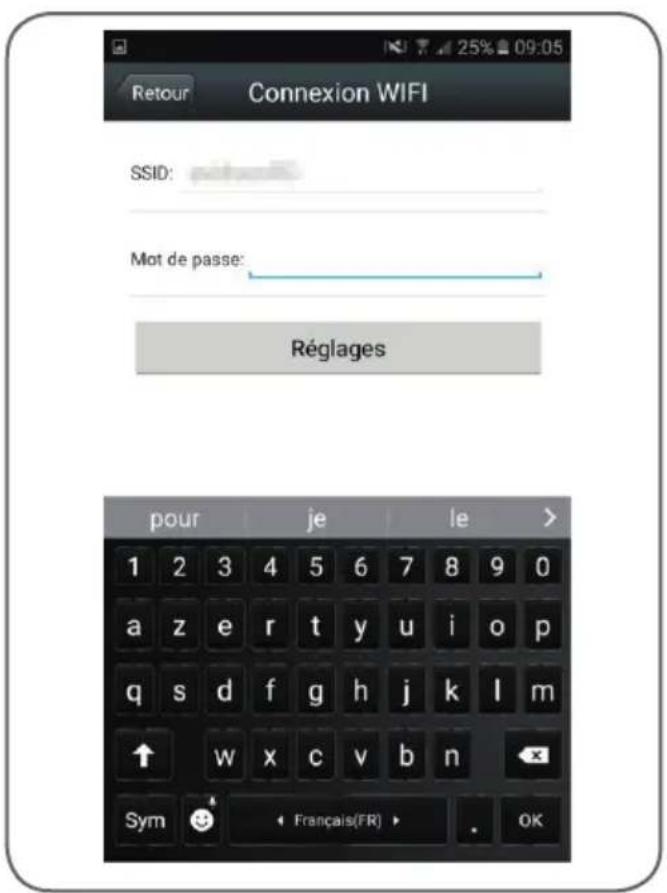
After entering the password for the WiFi network that the camera should be using, click on "Réglages" (Settings): your tablet or smartphone is asking if the camera is accessible and if it is ready to be configured.
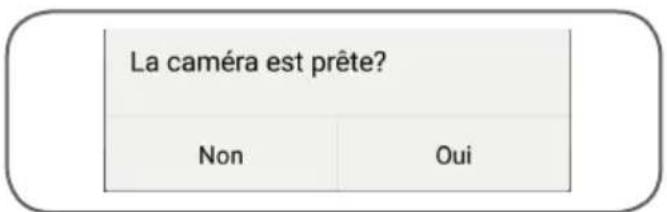
If your camera is nearby and beeping at regular intervals, click on Oui (Yes) to begin configuration using the app.
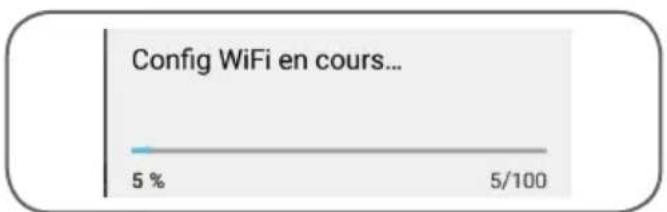
Once the WiFi connection information has been sent to the camera by the app, the camera will send out a different tone and then connect to the network using WiFi.
Your smartphone or tablet will then display the cameras detected on the network:
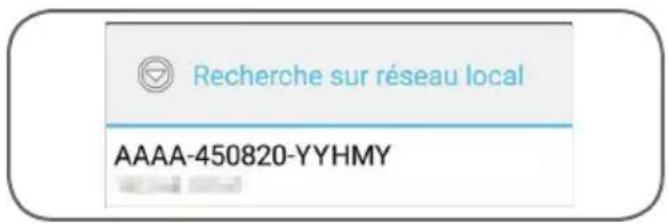
Click on the row corresponding to your camera.
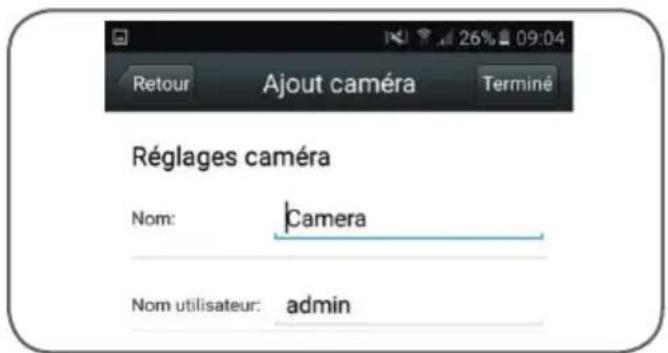
Finally, click on "Terminé" (Done) on the upper right-hand side of the screen, to add the camera to the list of cameras recognized by the app.
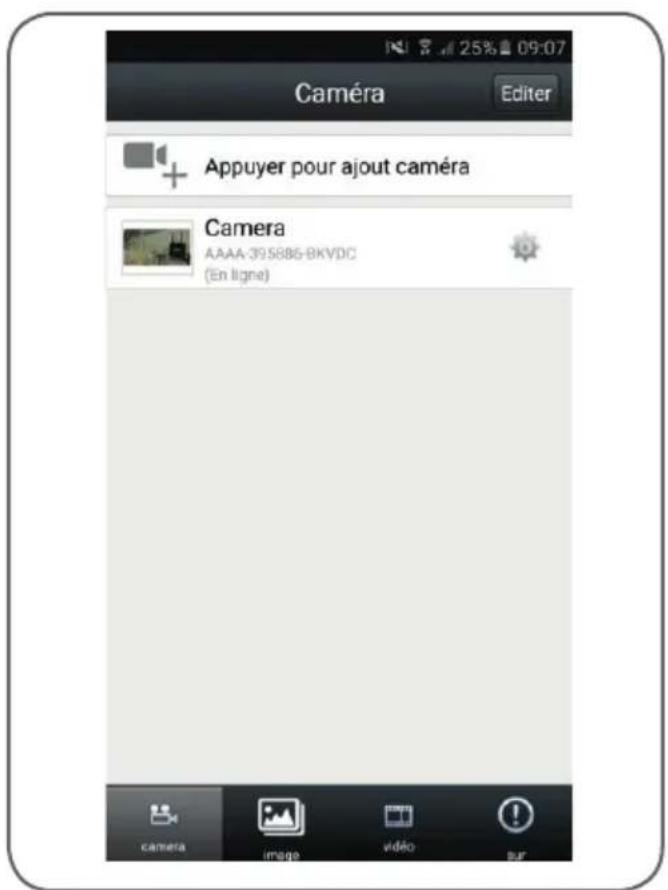
Your camera will appear in the list and you access to its video and settings.
D - CONFIGURATION
2 - ACCESS TO ALL SETTINGS
2.1 - Configuration
From the camera list, click on the icon

to the right of your camera's name to display the configuration menus:
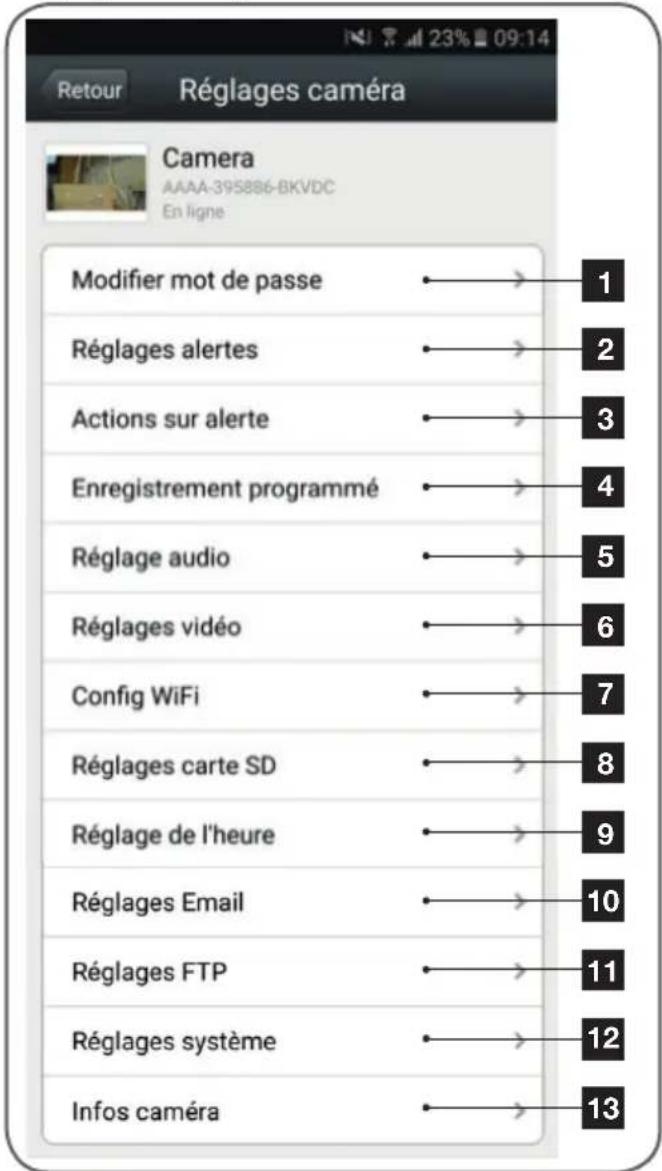
1 Changing the password to log in to the camera ("admin", by default)
2 Activation/deactivation and sensitivity of the motion detector
3 Actions to take if motion is detected: notification, send an email, saving a file to the memory card (requires a micro SD card [not included] to be inserted into the camera)
| 4 | Activation/deactivation of continuous recording to the micro SD card and the length of videos (requires a micro SD card [not included] to be inserted into the camera) |
| 5 | Volume of the microphone and speaker |
| 6 | Video quality settings and number of frames per second. Warning: if you set the video quality to high with respect to the quality of the internet connection of your camera and smartphone or tablet, you may experience choppy video or loss of connection. Two streams can be adjusted: they correspond to the maximum resolution = "résolution Max", and low resolution = "résolution faible", which you can select from the live video display. |
| 7 | Configure the camera's current WiFi settings |
| 8 | If a micro SD card has been inserted into the camera, you can reformat it and display its total and free memory |
| 9 | Setting the date and time stamps on the camera's video |
| 10 | Settings for sending emails in the event of an alert (see the example below) |
| 11 | Settings for saving to an FTP server |
| 12 | Remote camera restart |
| 13 | Camera network information |
2.2 - Example: programming an email alert to be sent when motion is detected
To program an alert to be sent when motion is detected, you need 2 email addresses: the address of the sender which will be used by the camera, and the address which will receive the alerts. The camera uses the username and password of the sender address to connect and send the email. Configuration depends on the chosen email provider's settings.
Note: the 2 email addresses can be the same (you will simply be sending an email to yourself).
In our example, we use
www.gmail.com:
sender-address@gmail.com sends the alerts, recipient@gmail.com receives the alerts. Both addresses need to have been created beforehand.
First, go to "Réglages Email" (Email settings):
D - CONFIGURATION
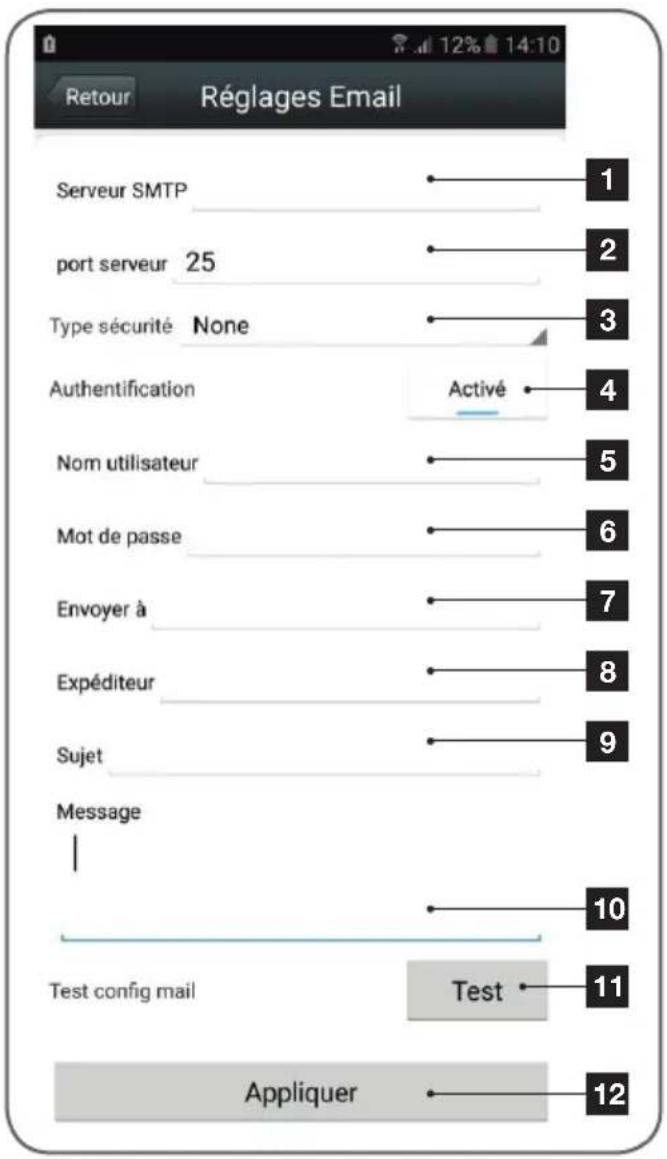
| 1 | SMTP server: varies with the email provider of the address sending the alert. In our example, using Gmail, smtp.gmail.com |
| 2 | Server port: depends on the email provider of the address sending the alert. I our example using Gmail, 587 |
| 3 | Security type: security when logging in, associated with the email provider. In our example using gmail, STARTTLS |
| 4 | Authentication: indicates whether the SMTP server used requires a username or password to connect. In our example, this must be activated. |
| 5 | Username: Name that you should enter to log in to the email box which will send the alerts. In our example using Gmail, this is the sender address: sender-address@gmail.com |
| 6 | Password: The password used to log in tosender-address@gmail.com, in our example |
| 7 | Send to: Enter the email address here that will receive the alerts. In our example:addressee@gmail.com |
| 8 | Sender: Name that you should enter to log in to the email box which will send the alerts. In our example using Gmail, this is the sender address:sender-address@gmail.com |
| 9 | Subject: subject of the email alert |
| 10 | Message: body of the email |
| 11 | Test: allows you to simulate an alert, send an email and to check that your camera is correctly configured. |
| 12 | Click on "Appliquer" (Apply) to save your settings. |
Note: it does not matter who the email provider of the recipient is, as it is the email provider of the sender that dictates what needs to be entered. However, you must ensure that the alerts are not treated as spam by the recipient's inbox.
When you have finished configuring your camera, it will be able to send emails. Next, it is time to configure when it does so, in the
"Action sur alerte" (Action upon alert) menu in the camera settings:
D - CONFIGURATION
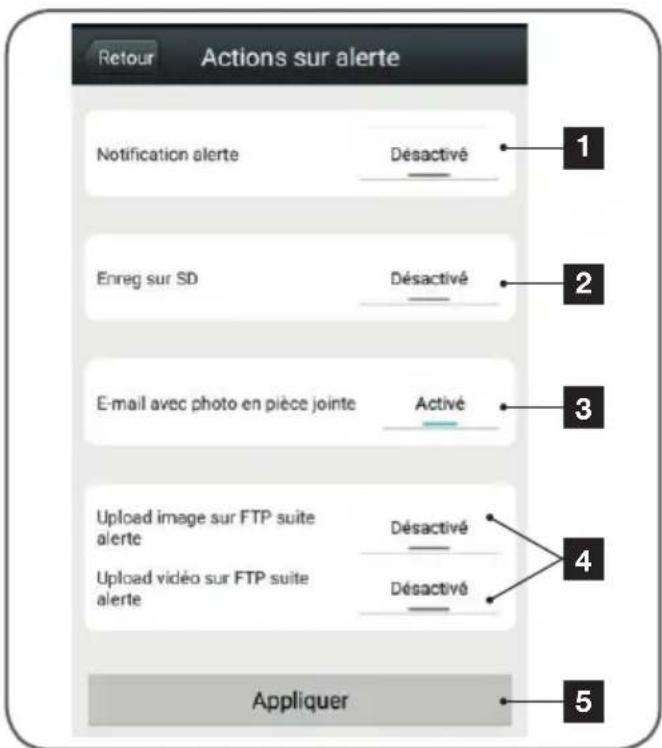
1 App notification in the event of an alert: all devices on which the camera was added to the Visia app will be notified if there is movement (the app must be running in the background on the tablet or smartphone)
2 Saving to SD: if a micro SD card was inserted into the camera, any alert triggers a video, which is saved to the card. The video can be viewed remotely (see below)
3 Email with attached photo: if email was set up (see the previous paragraph), an email will be sent when movement is detected
4 FTP options, not discussed here
5 Click on "Appliquer" (Apply) to save your settings.
720P WIFI IP CAMERA
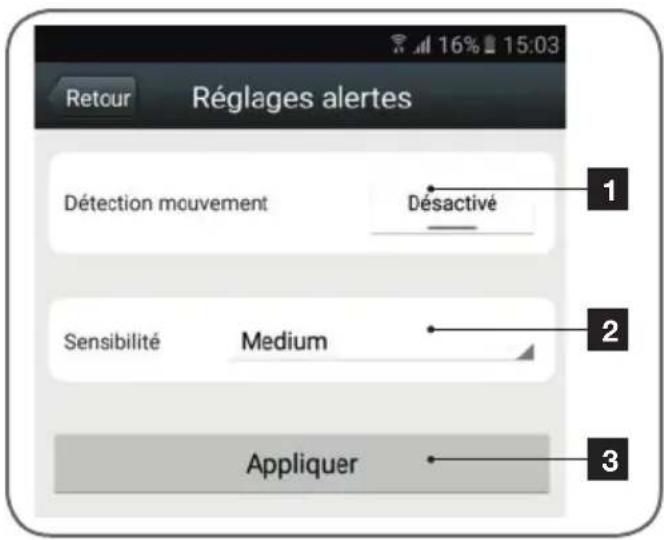
1 Click here to activate motion detection
2 Use this to adjust the sensitivity of the motion detector. When set to high sensitivity the smallest movement will send an alert, in low sensitivity, only large movements on the screen will send an alert
3 Click on "Appliquer" (Apply) to save your settings.
This completes the configuration. From this point on, any movement in front of the camera will result in an email alert, a Visia app notification and/or a file to be saved to the memory card, depending on your settings.
1 - LIVE VIDEO
From the list of cameras, click on the image to the left of the name of your camera to display the live video:
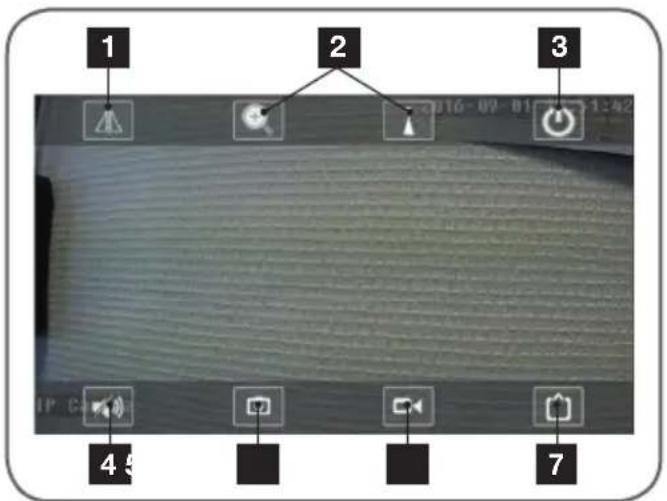
| 1 | Flipping/inverting the image |
| 2 | Not used on this model |
| 3 | Return to the list of cameras |
| 4 | Activate the camera microphone. If you activate sound, a microphone symbol appears on the screen: hold it down to speak from the camera through your smartphone or tablet microphone. |
| 5 | Take a snapshot and save to the smartphone/tablet |
| 6 | Record a video and save to the smartphone/tablet |
| 7 | Video quality selection (useful if the network or mobile connection is poor) |
2 - VIEWING PHOTOS AND VIDEOS TAKEN BY THE CAMERA
From the list of cameras, you have access to the photos taken by the camera and saved to the smartphone or tablet, videos saved to the smartphone or tablet and videos saved to the camera's microSD card (not included).
After receiving an alert, if you have activated memory card recording, you can view the video showing what was detected.
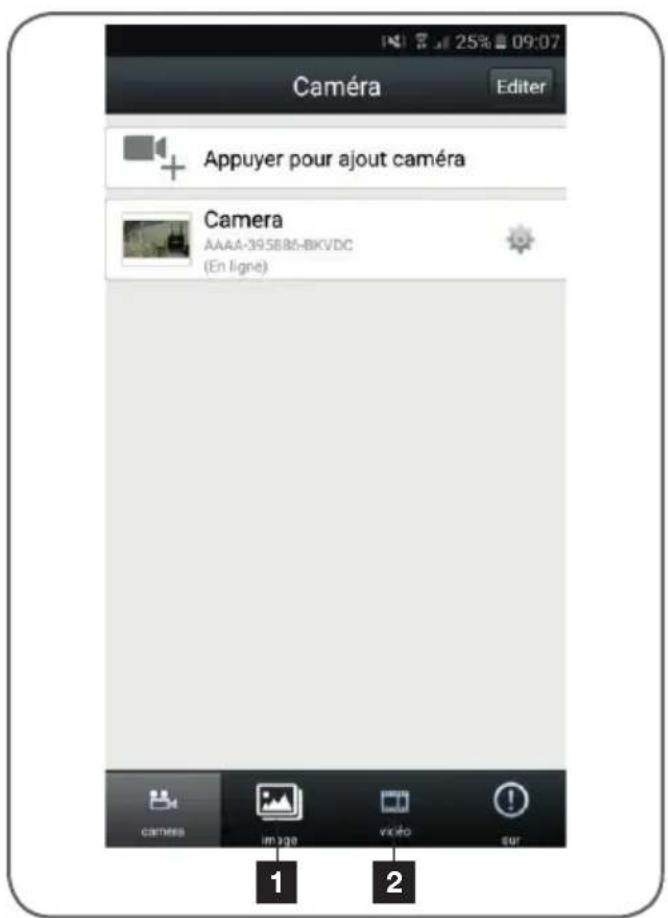
| 1 | Viewing photos taken by the camera and saved to the smartphone or tablet ("" icon on the camera's live view). |
| 2 | Viewing the videos taken by the camera and saved to the smartphone or tablet ("" on the camera's live view, "local" button in the Vidéo [Video] menu) or to the micro SD card inserted into the camera (following an alert or continuous recording, "en ligne" [online] button in the Vidéo [Video] menu). |
F - RESETTING
If there is a problem or the login details have been lost, the camera can be reset to its default settings by pressing the Reset button on the back of the camera for 10 seconds, using a thin tool. A tone sounds, indicating resetting.
G - TECHNICAL AND LEGAL INFORMATION
1 - TECHNICAL CHARACTERISTICS
| Camera | |
| Power supply | 5VDC / 1A |
| Wireless network interface | WiFi IEEE 802.11b/g/n, wired 10/100 Mbps |
| Optical sensor | 1⁄4” CMOS |
| Minimum luminous intensity | 0 lux |
| Night vision | Automatic (dusk-to-dawn sensor)Range: 10m |
| Lens | f: 3.6 mm |
| Buttons | Reset button: restores factory settings |
| Video compression | H.264 |
| Resolution | Primary stream: up to 1280x720 pixelsSecondary stream: up to 640x352 pixels |
| Audio | Built-in microphone and loudspeaker for two-way audio communication |
| Storage | 1 microSD card slot up to 128 GB memory for storing video via remote access |
| Motors | 350° horizontal sweep120° vertical sweep |
| Operating temperature and humidity | 0°C to 40°C, 20% to 85% RH non-condensingFor indoor use only |
| Storage temperature and humidity | -10°C to 60°C, 0% to 90% RH, non-condensing |
2 - WARRANTY
- This product is under warranty for parts and labour for 2 years from the date of purchase. Proof of purchase must be retained for the duration of the warranty period.
- The warranty does not cover damage caused by negligence, knocks or accidents.
- to be opened or replaced by non-Avidsen employees.
- The warranty will be void if the device is tampered with.
3 - HELP AND ADVICE
- If, despite the care we have taken in designing our products and drafting these instructions, you do encounter difficulties when installing your product or you have any questions, we recommend you contact one of our specialists who will be glad to help.
- If you encounter operating problems during the installation or a few days afterwards, it is essential that you are in front of your installation when contacting us, so that one of our technicians can diagnose the source of the problem, as it will probably be the result of a setting that is incorrect or an installation that is not to specification.
G - TECHNICAL AND LEGAL INFORMATION
Contact our after sales team technicians on:
0 892 701 369
Monday to Friday, 9AM to 12PM and 2PM to 6PM.
4 - PRODUCT RETURNS / AFTER SALES SERVICE
If, despite the care we have taken in designing and manufacturing your product, it needs to be returned to our customer service centre, you can check the progress of the work on our website at the following address: http://sav.avidsen.com
Avidsen undertakes to keep a stock of spare parts for this product throughout the contractual warranty period.
5 - DECLARATION OF CONFORMITY
Per the RED directive
Avidsen hereby declares that the equipment designated below:
Motorised 720P WiFi IP camera 123288
Complies with the RED directive and its conformity has been assessed pursuant to the applicable standards in force:
EN 60065:2014
EN 62479:2010
EN301 489-1 V2.1.0:2016-04
EN 301 489-17 V3.1.0 :2016-04
EN 300 328 V2.0.20 :2016-03
Chambray les Tours, date: 17/10/2016
Alexandre Chaverot, CEO
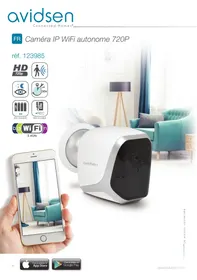
- Motorised 720P WiFi IP camera
- TABLE OF CONTENTS
- A - SAFETY INSTRUCTIONS 05
- B - PRODUCT DESCRIPTION 06
- C - INSTALLATION 07
- D - CONFIGURATION 08
- E - OPERATION 13
- F - RESETTING 14
- G - TECHNICAL AND LEGAL INFORMATION 15
- A - SAFETY INSTRUCTIONS
- - OPERATING PRECAUTIONS
- - MAINTENANCE AND CLEANING
- - RECYCLING
- - CAMERA
- - MAINS ADAPTER
- - INSTALLING THE CAMERA
- - CONNECTING THE CAMERA
- D - CONFIGURATION
- - CONFIGURING THE CAMERA AND ADDING IT TO THE APP
- - ACCESS TO ALL SETTINGS
- - Configuration
- - LIVE VIDEO
- - VIEWING PHOTOS AND VIDEOS TAKEN BY THE CAMERA
- F - RESETTING
- G - TECHNICAL AND LEGAL INFORMATION
- - WARRANTY
- - HELP AND ADVICE
- - PRODUCT RETURNS / AFTER SALES SERVICE
- - DECLARATION OF CONFORMITY
Brand : AVIDSEN
Model : 123288
Category : Security Camera