
FFLE3911QW - Washing machine FRIGIDAIRE - Free user manual and instructions
Find the device manual for free FFLE3911QW FRIGIDAIRE in PDF.


| Product type | Washer-dryer combo (combined washing machine and dryer) |
| Brand | Frigidaire |
| Model | FFLE3911QW |
| Power supply (electric dryer version) | 240 V, 30 A, 60 Hz, single phase |
| Power supply (gas dryer version) | 120 V, 15 A, 60 Hz, single phase |
| Plug type (electric dryer) | NEMA 10-30R (3 prongs) or NEMA 14-30R (4 prongs) |
| Gas supply | Natural gas or LP gas (requires conversion kit for LP gas) |
| Water supply | Hot and cold water, pressure 206.8 to 827.4 kPa |
| Vent type | Rigid or semi-rigid metal duct 102 mm (4 in) to the outside |
| Minimum drain height | 84 cm (33 in) |
| Functions | Integrated washing and drying, automatic cycles, temperature and water level options |
| Safety | Door lock, mandatory grounding, manual gas shutoff (gas version), water leak detection |
| Maintenance | Regular cleaning of lint filter, inspection of vent duct, checking for water leaks |
| Available accessories | Mobile home installation kit, water supply hose kits, drying rack, universal wrench, touch-up pens |
| Repairability | Spare parts from the dealer; intervention by a qualified technician mandatory |
| Documentation | User and installation manual available for free PDF download |
Frequently Asked Questions - FFLE3911QW FRIGIDAIRE
User questions about FFLE3911QW FRIGIDAIRE
0 question about this device. Answer the ones you know or ask your own.
Ask a new question about this device
Download the instructions for your Washing machine in PDF format for free! Find your manual FFLE3911QW - FRIGIDAIRE and take your electronic device back in hand. On this page are published all the documents necessary for the use of your device. FFLE3911QW by FRIGIDAIRE.
USER MANUAL FFLE3911QW FRIGIDAIRE
of your Laundry Center

natural_image
Silhouette illustration of various household appliances including washing machines, refrigerators, and a refrigerator (no text or symbols)TABLE OF CONTENTS
Important Safety Instructions 2-3
Installation Requirements 4-12
Unpacking laundry center 13
Installation Instructions 14-19
Accessories....20
Français 21
Español 41

WARNING
For your safety the information in this manual must be followed to minimize the risk of fire or explosion or to prevent property damage, personal injury or loss of life. Do not store or use gasoline or other flammable vapors and liquids in the vicinity of this or any other appliance.
⚠ WARNING - RISK OF FIRE
Read all of the following instructions before installing and using this appliance:
- Destroy the carton and plastic bags after the laundry center is unpacked. Children might use them for play. Cartons covered with rugs, bedspreads, or plastic sheets can become airtight chambers causing suffocation. Place all materials in a garbage container or make materials inaccessible to children.
- Clothes dryer installation and service must be performed by a qualified installer, service agency or the gas supplier.
- Install the appliance according to the manufacturer's instructions and local codes.
- The electrical service to the appliance must conform with local codes and ordinances and the latest edition of the National Electrical Code, ANSI/NFPA 70, or in Canada, the Canadian electrical code C22.1 part 1.
- The gas service to the dryer must conform with local codes and ordinances and the latest edition of the National Fuel Gas Code ANSI Z223.1, or in Canada, CAN/ACG B149.1-2000. An individual manual shut-off valve must be installed within 6 ft (1.83 m) of the dryer in accordance with the National Fuel Gas Code, ANSI Z223.1/NFPA 54.
- The laundry center is designed under ANSI Z 21.5.1 or ANSI/UL 2158 - CAN/CSA C22.2 No. 112 (latest editions) for HOME USE only. This dryer is not recommended for commercial applications such as restaurants, beauty salons, etc.
- Do not install a clothes dryer with flexible plastic or flexible foil venting material. Flexible venting materials are known to collapse, be easily crushed and trap lint. These conditions will obstruct clothes dryer airflow and increase the risk of fire.
- The instructions in this manual and all other literature included with this appliance are not meant to cover every possible condition and situation that may occur. Good safe practice and caution MUST be applied when installing, operating and maintaining any appliance.
WHAT TO DO IF YOU SMELL GAS:
- Do not try to light any appliance.
- Do not touch any electrical switch; do not use any phone in your building.
- Clear the room, building or area of all occupants.
- Immediately call your gas supplier from a neighbor's phone. Follow the gas supplier's instructions.
- If you cannot reach your gas supplier, call the fire department.

CAUTI ON
EXCESSIVE WEIGHT HAZARD
To avoid back or other injury, have more than one person move or lift the appliance.
Save these instructions for future reference.
Pre-Installation Requirements
Tools and materials needed for installation:
- Adjustable pliers
- Phillips, straight, & square bit screwdrivers
- Adjustable wrench
- Pipe wrench for gas supply (gas dryer)
-
LP-resistant thread tape (for natural gas or LP supply, gas dryer)
-
Carpenter's level
- External vent hood
- 4-inch (102 mm), rigid metal or semi-rigid metal exhaust duct work
• 3-wire or 4-wire 240 volt cord kit (electric dryer)
• 4 in. (102 mm) clamp
• Gas line shutoff valve (gas dryer)
- 12 NPT union fl are adapters (x2) and fl exible gas supply line (gas dryer)
• Metal foil tape (not duct tape)
- Inlet hoses (x2)

NOTE
Hoses are not included with washer purchase. See "Accessories" section for various inlet hose kits to fit your specific installation.

WARNING
Please read all instructions before using this appliance.
Recognize safety symbols, words and labels
Safety items throughout this manual are labeled with a WARNING or CAUTION based on the risk type as described below:
Definitions
This is the safety alert symbol. It is used to alert you to potential personal injury hazards. Obey all safety messages that follow this symbol to avoid possible injury or death.

DANGER
DANGER indicates an imminently hazardous situation which, if not avoided, will result in death or serious injury.

WARNING
WARNING indicates a potentially hazardous situation which, if not avoided, could result in death or serious injury.

CAUTION
CAUTION indicates a potentially hazardous situation which, if not avoided, may result in minor or moderate injury.

IMPORTANT
IMPORTANT indicates installation, operation or maintenance information which is important but not hazard-related.

Installation Checklist
Shipping Hardware
☐ Foam shipping restraint (inside wash tub) removed and stored
☐ Foam shipping support (underneath appliance) removed and stored
Leveling
□ Laundry Center is level, side-to-side and front-to-back
□ Cabinet is setting solid on all corners
Water Supply
☐ Use only new hoses and verify rubber sealing washers are installed
☐ HOT supply is connected to HOT inlet and COLD supply is connected to COLD inlet
☐ HOT and COLD water supply turned on
☐ No leaks present at water supply connections or appliance inlet connections - recheck in 24 hours
Drain
☐ Stand pipe or wall drain height minimum 33"
☐ Drain hose secured in place with cable tie (shipped in drum)
Exhaust Venting
☐ Free-flowing, clear of lint buildup
☐ 4 inch (102 mm) rigid or semi-rigid ducting of minimal length and turns
☐ NO foil or plastic venting material
☐ Approved vent hood exhausted to outdoors
Gas Supply (Gas Dryer)
☐ Manual shutoff valve present in supply
☐ All connections sealed with approved sealer and wrench tight
☐ Conversion kit for LP system
☐ Gas supply turned on
☐ No leaks present at all connections - check with soapy water, NEVER check with flame
240v Electric Supply (Electric Dryer)
☐ Approved NEMA 10-30R or 14-30R service cord with all screws tight on terminal block
□ Approved strain relief installed
☐ Terminal access cover installed before initial operation
Electrical Power
House power turned on
□ Laundry Center plugged in
Final Checks
☐ Installation Instructions and Use and Care Guide read thoroughly
☐ Water enters drum when cycle starts with lid lowered. Dryer door latches and drum tumbles when cycle starts.
☐ Registration card sent in
INSTALLATION REQUIREMENTS

NOTE
Because of potentially inconsistent voltage capabilities, the use of this dryer with power created by gas powered generators, solar powered generators, wind powered generators or any other generator other than the local utility company is not recommended.
Electrical requirements for Laundry Center with electric dryer
CIRCUIT - Individual 30 amp. branch circuit fused with 30 amp. time delay fuses or circuit breakers. POWER SUPPLY - 3-wire or 4-wire, 240 volt, single phase, 60 Hz, Alternating Current.

IMPORTANT
This laundry center is internally grounded to neutral unless it was manufactured for sale in Canada. Only a 4-conductor cord shall be used when the appliance is installed in a location where grounding through the neutral conductor is prohibited. Grounding through the neutral link is prohibited for: (1) new branch circuit installations, (2) mobile homes, (3) recreational vehicles, and (4) areas where local codes do not permit grounding through the neutral.
OUTLET RECEPTACLE - NEMA 10-30R or NEMA 14-30R receptacle to be located so the power supply cord is accessible when the dryer is in the installed position. GROUNDING CONNECTION - See "Grounding requirements" in Electrical Installation section.
3-WIRE POWER SUPPLY CORD KIT (not supplied)

3-wire receptacle (NEMA type 10-30R)
The dryer MUST employ a 3-conductor power supply cord NEMA 10-30 type SRDT rated at 240 volt AC minimum, 30 amp, with 3 open end spade lug connectors with upturned ends or closed loop connectors and marked for use with clothes dryers. For 3-wire cord connection instructions see ELECTRICAL CONNECTIONS FOR A 3-WIRE SYSTEM.
4-WIRE POWER SUPPLY CORD KIT (not supplied)

4-wire receptacle (NEMA type 14-30R)
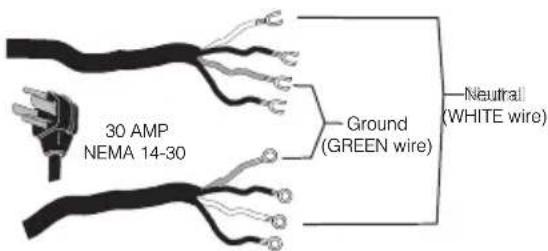
The dryer MUST employ a 4-conductor power supply cord NEMA 14-30 type SRDT or ST (as required) rated at 240 volt AC minimum, 30 amp, with 4 open end spade lug connectors with upturned ends or closed loop connectors and marked for use with clothes dryers. For 4-wire cord connection instructions see ELECTRICAL CONNECTIONS FOR A 4-WIRE SYSTEM.

NOTE
Laundry centers manufactured for sale in Canada have factory-installed, 4-wire power supply cord (NEMA 14-30R).
Electrical requirements for Laundry Center with gas dryer
CIRCUIT - Individual, properly polarized and grounded 15 amp. branch circuit fused with 15 amp. time delay fuse or circuit breaker.
POWER SUPPLY - 2-wire, with ground, 120 volt, single phase, 60 Hz, Alternating Current.
POWER SUPPLY CORD - The dryer is equipped with a 120 volt 3-wire power cord.
GROUNDING CONNECTION - See "Grounding requirements" in Electrical Installation section.
Grounding type wall receptacle
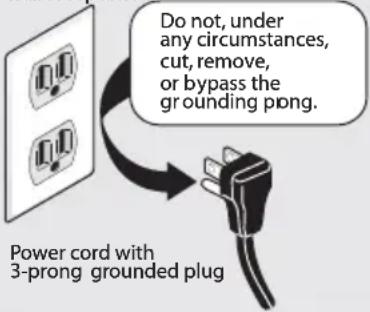
Gas supply requirements

WARNING
EXPLOSI ON HAZARD
Uncoated copper tubing will corrode when subjected to natural gas, causing gas leaks. Use ONLY black iron, stainless steel, or plastic-coated brass piping for gas supply.
1 Installation MUST conform with local codes, or in the absence of local codes, with the National Fuel Gas Code, ANSI Z223.1 (latest edition).
2 The gas supply line should be 1/2 inch (1.27 cm) pipe.
3 If codes allow, flexible metal tubing may be used to connect your dryer to the gas supply line. The tubing MUST be constructed of stainless steel or plastic-coated brass.
4 The gas supply line MUST have an individual shutoff valve installed in accordance with the B149.1, Natural Gas and Propane Installation Code.
5 A 1/8 inch (0.32 cm) N.P.T. plugged tapping, accessible for test gauge connection, MUST be installed immediately upstream of the gas supply connection to the dryer.
6 The dryer MUST be disconnected from the gas supply piping system during any pressure testing of the gas supply piping system at test pressures in excess of 1/2 psig (3.45 kPa).
7 The dryer MUST be isolated from the gas supply piping system during any pressure testing of the gas supply piping system at test pressures equal to or less than 1/2 psig (3.45 kPa).
8 Connections for the gas supply must comply with the Standard for Connectors for Gas Appliances, ANSI Z21.24.
Water supply requirements
Hot and cold water faucets MUST be installed within 42 inches (107 cm) of your washer's water inlet. The faucets MUST be 3/4 inch (1.9 cm) with threading for laundry hose connection. Water pressure MUST be between 10 psi (0.69 bars) and 120 psi (8.27 bars). Pressure difference between hot and cold cannot be more than 10 psi. Your water department can advise you of your water pressure.

NOTE
Washers connected to water supplies with lower inlet pressure will experience longer fllling times and may not complete cycles as quickly.
INSTALLATION REQUIREMENTS
Drain system requirements
1 Drain capable of eliminating 17 gals (64.3 L) per minute.
2 A standpipe diameter of 1-1/4 in. (3.18 cm) minimum.
3 The standpipe height above the floor should be:
Minimum height: 33 in. (84 cm)
Maximum height: 96 in. (244 cm)

NOTE
For installations requiring a longer drain hose, have a qualified technician install a longer drain hose (according to your model number) available from an authorized parts distributor. For drain systems in the floor, install a syphon break kit available from your local hardware store.

Exhaust system requirements
Use only 4 inch (102 mm) diameter rigid or flexible metal duct and approved vent hood which has a swing-out damper(s) that open when the dryer is in operation. When the dryer stops, the dampers automatically close to prevent drafts and the entrance of insects and rodents. To avoid restricting the outlet, maintain a minimum of 12 inches (30.5 cm) clearance between the vent hood and the ground or any other obstruction.

WARNING
FIRE HAZARD
Failure to follow these instructions can create excessive drying times and fire hazards.
The following are specific requirements for proper and safe operation of your dryer.

WARNING
FIRE HAZARD
Do not install a clothes dryer with flexible plastic or metal foil venting materials. Flexible venting materials are known to collapse, be easily crushed and trap lint. These conditions will obstruct clothes dryer airflow and increase the risk of fire.
If your present system is made up of plastic duct or metal foil duct, replace it with a rigid or semi-rigid metal duct. Also, ensure the present duct is free of any lint prior to installing dryer duct.
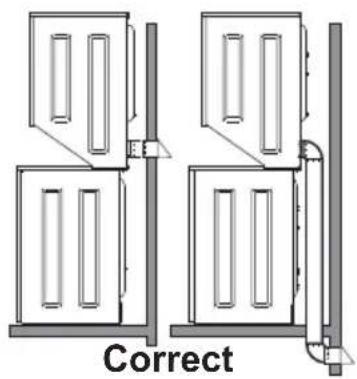
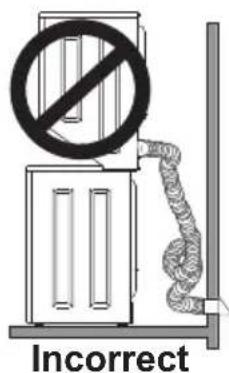
Exhaust system requirements, continued
WARNING
FIRE HAZARD
A clothes dryer must be exhausted outdoors. Do not exhaust dryer into a chimney, a wall, a ceiling, an attic, a crawl space or any concealed space of a building. A clothes dryer produces combustible lint. If the dryer is not exhausted outdoors, some fi ne lint will be expelled into the laundry area. An accumulation of lint in any area of the home can create a health and fi re hazard.
The dryer must be connected to an exhaust outdoors. Regularly inspect the outdoor exhaust opening and remove any accumulation of lint around the outdoor exhaust opening and in the surrounding area.
WARNING
FIRE HAZARD
- Do not allow combustible materials (for example: clothing, draperies/curtains, paper) to come in contact with exhaust system. The dryer MUST NOT be exhausted into a chimney, a wall, a ceiling, or any concealed space of a building which can accumulate lint, resulting in a fire hazard.
- Do not screen the exhaust ends of the vent system, or use any screws, rivets or other fasteners that extend into the duct to assemble the exhaust system. Lint can become caught in the screen, on the screws or rivets, clogging the duct work and creating a fi re hazard as well as increasing drying times. Use an approved vent hood to terminate the duct outdoors, and seal all joints with metal foil duct tape. All male duct pipe fi ttings MUST be installed downstream with the flow of air.
WARNING
FIRE HAZARD
Exceeding the length of duct pipe or number of elbows allowed in the "MAXIMUM LENGTH" charts can cause an accumulation of lint in the exhaust system. Plugging the system could create a fire hazard, as well as increase drying times.
| Number of 90° turns | MAXIMUM LENGTHof 4" (102 mm) Rigid Metal Duct | |||
| VENT HOOD TYPE | ||||
| (Preferred) | ||||
 |  were were |  | ||
| 0 56 | ft. (17 m) 42 ft. (13 m) | |||
| 1 48 | ft. (14.5 m) 34 ft. (10.5 m) | |||
| 2 40 | ft. (12 m) 26 ft. (8 m) | |||
| 3 32 | ft. (9.5 m) 18 ft. (5.5 m) | |||
WARNING
FIRE HAZARD
- Do not install flexible plastic or flexible foil venting material.
- If installing semi-rigid venting, do not exceed 8 ft. (2.4 m) duct length.
INSTALLATION REQUIREMENTS
Exhaust system requirements, continued
Install male fittings in correct direction:

In installations where the exhaust system is not described in the charts, the following method must be used to determine if the exhaust system is acceptable:
1 Connect an inclined or digital manometer between the dryer and the point the exhaust connects to the dryer.
2 Set the dryer timer and temperature to air fluff (cool down) and start the dryer.
3 Read the measurement on the manometer.
4 The system back pressure MUST NOT be higher than 0.6 inches of water column. If the system back pressure is less than 0.6 inches of water column, the system is acceptable. If the manometer reading is higher than 0.6 inches of water column, the system is too restrictive and the installation is unacceptable.
Although vertical orientation of the exhaust system is acceptable, certain extenuating circumstances could affect the performance of the dryer:
- Only rigid metal duct work should be used.
- Venting vertically through a roof may expose the exhaust system to down drafts causing an increase in vent restriction.
- Running the exhaust system through an uninsulated area may cause condensation and faster accumulation of lint.
- Compression or crimping of the exhaust system will cause an increase in vent restriction.
- The exhaust system should be inspected and cleaned a minimum of every 18 months with normal usage. The more the dryer is used, the more often you should check the exhaust system and vent hood for proper operation.
Exhaust direction
The laundry center may be exhausted four (4) ways with rear flush installation:
- Straight back
- Down (8 inch [20.3 cm] length of 4 inch diameter [102 mm] rigid duct and 1 elbow down)
- Left (8 inch [20.3 cm] length of 4 inch diameter [102 mm] rigid duct, 1 elbow down and 1 elbow left)
- Right (8 inch [20.3 cm] length of 4 inch diameter [102 mm] rigid duct, 1 elbow down and 1 elbow right)

natural_image
Diagram of a mechanical device with directional arrows indicating motion or force (no text or symbols)To exhaust up, add an 11 inch (28 cm) length of standard 4 inch (102 mm) diameter duct and a 90° elbow. The unit will be positioned about 4.5 inches (11.5 cm) away from the wall (fl ush to wall exhausting may be done by going below the dryer then sideways).
An exhaust hood positioned to line up with the dryer exhaust can be installed directly through the outside wall. To exhaust to the side or down, add an 8 inch (20.3 cm) length of standard 4 inch (102 mm) diameter duct and a 90° elbow.
See also Clearance Requirements on the next page.
Manufactured or mobile home installation
1 Installation MUST conform to current Manufactured Home Construction & Safety Standard, Title 24 CFR, Part 32-80 (formerly the Federal Standard for Mobile Home Construction and Safety, Title 24, HUD Part 280) or Standard CAN/CSAZ240 MH.
2 Dryer MUST be exhausted outside (outdoors, not beneath the mobile home) using metal ducting that will not support combustion. Metal ducting must be 4 inches (10.16 cm) in diameter with no obstructions. Rigid metal duct is preferred.
3 If dryer is exhausted through the floor and area beneath the mobile home is enclosed, the exhaust
system MUST terminate outside the enclosure with the termination securely fastened to the mobile home structure.
4 Refer to previous sections in this guide for other important exhaust venting system requirements.
5 When installing a gas dryer into a mobile home, a provision must be made for outside make up air. This provision is to be not less than twice the area of the dryer exhaust outlet.
6 Installer MUST anchor this laundry center to the floor with approved Mobile Home Installation Kit - P/N 137067200.
Installation in a Recess or Closet
1 A dryer installed in a bedroom, bathroom, recess or closet, MUST be exhausted outdoors.
2 No other fuel burning appliance shall be installed in the same closet as the gas dryer.
3 Your dryer needs the space around it for proper ventilation.
DO NOT install your dryer in a closet with a solid door.
4 Closet door ventilation required: A minimum of 120 square inches (774.2 cm²) of opening, equally divided at the top and bottom of the door, is required. Openings should be located 3 inches (7.6 cm) from bottom and top of door. Openings are required to be unobstructed when a door is installed. A louvered door with equivalent air openings for the full length of the door is acceptable.

closet door
INSTALLATION REQUIREMENTS
Clearance requirements
| MINIMUM INSTALLATION CLEARANCES - Inches (cm) | ||||
| SIDES REAR TOP FRONT | ||||
| Alcove | 0"(0 cm) | 0"(0 cm) | 1"(2.5 cm) | n/a |
| Closet | 0"(0 cm) | 0"(0 cm) | 1"(2.5 cm) | 1"(2.5 cm) |

WARNING
EXPLOSION HAZARD
Do not install the dryer where gasoline or other fl ammables are kept or stored. If the dryer is installed in a garage, it must be a minimum of 18 inches (45.7 cm) above the floor. Failure to do so can result in death, explosion, fire or burns.


IMPORTANT
DO NOT INSTALL YOUR LAUNDRY CENTER:
1 In an area exposed to dripping water or outside weather conditions. The ambient temperature should never be below 60° F (15.6° C) to maximize detergent effectiveness.
2 In an area where it will come in contact with curtains, drapes, or anything that will obstruct the flow of combustion and ventilation air.
3 On carpet. Floor MUST be solid with a maximum slope of 1 inch (2.5 cm). To minimize vibration or movement, reinforcement of the floor may be necessary.
Laundry Center Dimensions

^1 Power supply cord length on gas unit approximately 60 inches (152.5 cm).
^2 Loose drain hose length beyond clamp approximately 51.5 inches (131 cm).
Electrical installation
The following are specific requirements for proper and safe electrical installation of your dryer. Failure to follow these instructions can create electrical shock and/or a fire hazard.

WARNING
ELECTRICAL SHOCK HAZARD
- This appliance MUST be properly grounded. Electrical shock can result if the dryer is not properly grounded. Follow the instructions in this manual for proper grounding.
- Do not use an extension cord with this dryer. Some extension cords are not designed to withstand the amounts of electrical current this dryer utilizes and can melt, creating electrical shock and/or fire hazard. Locate the dryer within reach of the receptacle for the length power cord to be purchased, allowing some slack in the cord. Refer to the pre-installation requirements in this manual for the proper power cord to be purchased.

WARNING
ELECTRICAL SHOCK HAZARD
- A U.L.-approved strain relief must be installed onto power cord. If the strain relief is not attached, the cord can be pulled out of the dryer and can be cut by any movement of the cord, resulting in electrical shock.
- Do not use an aluminum wired receptacle with a copper wired power cord and plug (or vice versa). A chemical reaction occurs between copper and aluminum and can cause electrical shorts. The proper wiring and receptacle is a copper wired power cord with a copper wired receptacle.

NOTE
Dryers operating on 208 volt power supply will have longer drying times than dryers operating on 240 volt power supply.
Grounding requirements - Electric dryer (USA)

WARNING
ELECTRICAL SHOCK HAZARD
Improper connection of the equipment grounding conductor can result in a risk of electrical shock. Check with a licensed electrician if you are in doubt as to whether the appliance is properly grounded.
For a grounded, cord-connected dryer:
1 The dryer MUST be grounded. In the event of a malfunction or breakdown, grounding will reduce the risk of electrical shock by a path of least resistance for electrical current.
2 After you purchase and install a 3 wire or 4 wire power supply cord having an equipment-grounding conductor and a grounding plug that matches you
wiring system, the plug MUST be plugged into an appropriate, copper wired receptacle that is properly installed and grounded in accordance with all local codes and ordinances. If in doubt, call a licensed electrician.
3 DO NOT modify the plug you've installed on this appliance. If it will not fit the outlet, have a proper outlet installed by a qualified electrician.
For a permanently connected dryer:
1 The dryer MUST be connected to a grounded metal, permanent wiring system; or an equipment grounding conductor must be run with the circuit conductors and connected to the equipment-grounding terminal or lead on the appliance.
Grounding requirements - Electric dryer (Canada)

WARNING
ELECTRICAL SHOCK HAZARD
Improper connection of the equipment grounding conductor can result in a risk of electrical shock. Check with a licensed electrician if you are in doubt as to whether the appliance is properly grounded.
For a grounded, cord-connected laundry center:
1 The laundry center MUST be grounded. In the event of a malfunction or breakdown, grounding will reduce the risk of electrical shock by a path of least resistance for electrical current.
2 Since your laundry center is equipped with a power supply cord having an equipment-grounding conductor and a grounding plug, the plug must be plugged into an appropriate outlet that is properly installed and grounded in accordance with all local codes and ordinances. If in doubt, call a licensed electrician.
3 DO NOT modify the plug provided with this appliance. If it will not fit the outlet, have a proper outlet installed by a qualified electrician.
Grounding requirements - Gas dryer (USA and Canada)
1 The laundry center is equipped with a three-prong (grounding) plug for your protection against shock hazard and should be plugged directly into a properly grounded three-prong receptacle.
2 The plug must be plugged into an appropriate outlet that is properly installed and grounded in accordance with all local codes and ordinances. If in doubt, call a licensed electrician.
3 DO NOT modify the plug provided with this appliance. If it will not fit the outlet, have a proper outlet installed by a qualified electrician.
Grounding type wall receptacle

Unpacking Instructions

IMPORTANT
To prevent vibration, possible machine damage and maximize performance, the following steps must be completed.
- If foam tub block has been removed, reinsert it now and retape the lid securely.

natural_image
Technical line drawing of a mechanical assembly with no visible text or symbols- Carefully cut the front and back corners of the left side of the remaining cardboard.

- With help from a second person, carefully tip the laundry center slightly to the left as shown in the picture below. First remove the foam shipping support to the right side only and then remove the foam base. Save these items for future use.

- Carefully lower the laundry center to an upright position and remove the tape holding the lid shut. Remove the foam tub block and other tub contents.
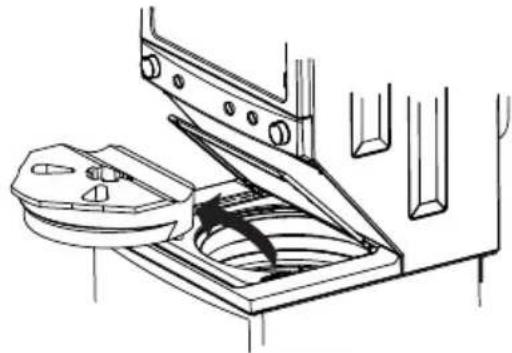
natural_image
Technical line drawing of a mechanical device with an open lid and internal components (no text or symbols)
NOTE
If the laundry center is to be transported at a later date, the tub blocking pad, foam base and tub support should be retained.
- From the back of the washer, remove the wire shipping clip securing the drain hose.
- DO NOT remove the PLASTIC CLAMP which secures the drain hose to the right side of the washer backsheet. It helps form a standpipe to prevent water siphoning.

- Carefully move the laundry center to within 4 feet of the fi nal location for the start of the installation.

CAUTION
EXCESSIVE WEIGHT HAZARD
To avoid back or other injury, have more than one person move or lift the appliance.
INSTALLATION INSTRUCTIONS
Gas connection
1 Remove the shipping cap from gas pipe at the rear of the dryer.

IMPORTANT
DO NOT connect the dryer to L.P. gas service without converting the gas valve. An L.P. conversion kit must be installed by a qualified gas technician.
2 Connect a 1/2 inch (1.27 cm) I.D. semi-rigid or approved pipe from gas supply line to the 3/8 inch (0.96 cm) pipe located on the back of the dryer. Use a 1/2 inch to 3/8 inch (1.27 cm to 0.96 cm) reducer for the connection. Apply an approved thread sealer that is resistant to the corrosive action of liquefi ed gases on all pipe connections.

flowchart
graph LR
    A["Manual Shutoff Valve"] --> B["Flare Union"]
    B --> C["elppiN"]
    C --> D["Flexible Connector"]
    D --> E["Inlet Pipe on Back of Dryer"]
    F["Closed"] --> G["Open"]
    H["GAS FLOW"] --> I["Flare Union"]
    style A fill:#f9f,stroke:#333
    style B fill:#ccf,stroke:#333
    style C fill:#cfc,stroke:#333
    style D fill:#fcc,stroke:#333
    style E fill:#cff,stroke:#333
    style F fill:#ffc,stroke:#333
    style G fill:#cfc,stroke:#333
    style H fill:#fcc,stroke:#333
    note bottom
        All connections must be wrench-tightened
    end

IMPORTANT
The supply line must be equipped with an approved manual shutoff valve. This valve should be located in the same room as the dryer and should be in a location that allows ease of opening and closing. Do not block access to the gas shutoff valve.
3 Open the shutoff valve in the gas supply line to allow gas to flow through the pipe. Wait a few minutes for gas to move through the gas line.

4 Check for gas system leaks with a manometer. If a manometer is not available, test all connections by brushing on a soapy water solution.

WARNING
EXPLOSION HAZARD
NEVER test for gas leaks with an open flame.
Electrical connection (non-Canada) - 3 wire cord

3-wire receptacle (NEMA type 10-30R)
WARNING
ELECTRICAL SHOCK HAZARD
Failure to disconnect power source before servicing could result in personal injury or even death.
1 Turn off power supply to outlet.
2 Remove the screw securing the terminal block access cover on the back of the dryer.
3 Install a UL-approved strain relief according to the power cord/strain relief manufacturer's instructions in the power cord entry hole below the access panel. At this time, the strain relief should be loosely in place.
4 Thread an UNPLUGGED, UL-approved, 30 amp. power cord, NEMA 10-30 type SRDT, through the strain relief.
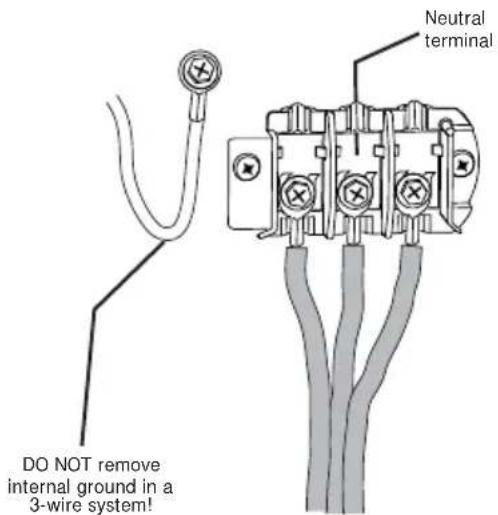
5 Attach the power cord neutral (center wire) conductor to the SILVER colored center terminal on the terminal block. Tighten the screw securely.
6 Attach the remaining two power cord outer conductors to the outer, BRASS colored terminals on the terminal block. Tighten both screws securely.
WARNING
ELECTRICAL SHOCK HAZARD
Do not make a sharp bend or crimp wiring/conductor at connections.
7 Follow manufacturer's guidelines for firmly securing the strain relief and power cord.
8 Reinstall the terminal block cover.
IMPORTANT
If moving dryer from a 4-wire system and installing it in a 3-wire system, move the internal ground from the center terminal back to the GREEN screw next to the terminal block.

INSTALLATION INSTRUCTIONS
Electrical connection (non-Canada) - 4 wire cord

4-wire receptacle (NEMA type 14-30R)

WARNING
ELECTRICAL SHOCK HAZARD
Failure to disconnect power source before servicing could result in personal injury or even death.
1 Turn off power supply to outlet.
2 Remove the screw securing the terminal block access cover on the back of the dryer.
3 Install a UL-approved strain relief according to the power cord/strain relief manufacturer's instructions in the power cord entry hole below the access panel. At this time, the strain relief should be loosely in place.
4 Thread an UNPLUGGED, UL-approved, 30 amp. power cord, NEMA 14-30 type ST or SRDT, through the strain relief.
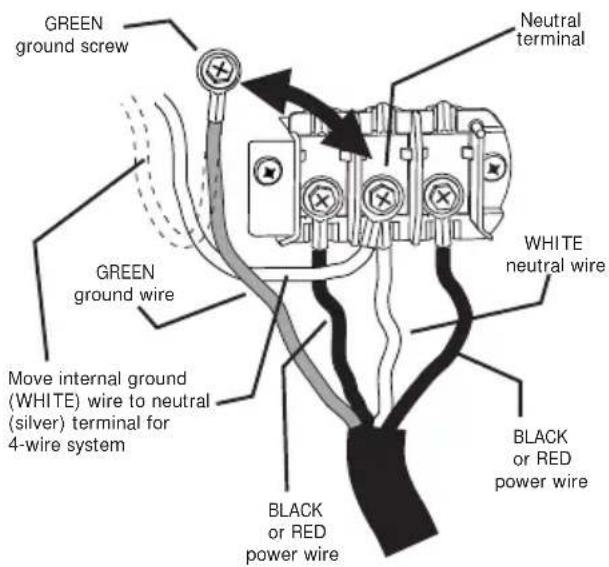
5 Disconnect the internal (WHITE) dryer harness ground wire from the (GREEN) ground screw next to the terminal block.
6 Attach the ground (GREEN) power cord wire to the cabinet with the ground (GREEN) screw. Tighten the screw securely.
7 Move the internal dryer harness ground (WHITE) wire to the terminal block and attach it along with the neutral (WHITE) power cord wire conductor to the center, SILVER colored terminal on the terminal block. Tighten the screw securely.
8 Attach the RED and BLACK power cord conductors to the outer, BRASS colored terminals on the terminal block. Tighten both screws securely.

WARNING
ELECTRICAL SHOCK HAZARD
Do not make a sharp bend or crimp wiring/conductor at connections.
9 Follow manufacturer's guidelines for firmly securing the strain relief and power cord.
10 Reinstall the terminal block cover.
Leveling your laundry center
Excessive noise and vibration can be prevented by properly leveling the laundry center.
1 With the laundry center within 4 feet (1 m) of its final location, place a level on top of the washer lid.
2 Use adjustable pliers to adjust the leveling legs so the laundry center is level front-to-rear and side-to-side, and stable corner-to-corner.
3 Press down on alternate corners and sides and feel for the slightest movement. Adjust the appropriate leg(s) so the laundry center sits solidly on the floor on ALL four legs. Keep the leveling leg extension at a minimum for best performance of the washer.

Connecting inlet water
1 Run some water from the hot and cold faucets to flush the water lines and remove particles that might clog the water valve screens and to determine which faucet is hot and which is cold supply.


NOTE
Hoses are not included with laundry center purchase. See "Accessories" section for various inlet hose kits to fit your specific installation.
2 Connect the HOT inlet hose to the HOT inlet connection on the washer and the COLD inlet hose to the COLD inlet connection on the washer. Tighten by hand until snug. Then tighten each supply connection another 2/3 turn with pliers. Do not cross thread or over-tighten these connections.
3 Connect the HOT inlet hose to the HOT water supply and the COLD inlet hose to the COLD water supply. Tighten by hand until snug. Then tighten each supply connection another 2/3 turn with pliers. Do not bend, kink or pinch water inlet hoses.
4 Turn on the water and check for leaks.

INSTALLATION INSTRUCTIONS
Connecting venting
1 Remove the two screws (items A, to the right) securing the dryer front access panel to the dryer cabinet. Lift the panel until the tabs can be disengaged from the cabinet, remove the panel and set aside.
2 Connect the exhaust duct to the outside exhaust system. Use of a 4" (10.2 cm) clamp (item B, to the right) is recommended to connect the dryer to the exhaust vent system. Use metal foil tape to seal all other joints.
3 Reinstall the dryer front access panel.
4 Carefully slide the laundry center to its final position. Recheck for level and rock corners for stability.


natural_image
Diagram showing a structural element with two circular insets illustrating a mechanical setup (no text or symbols present)Connecting drain and electrical
1 Form a "U" shape on the end of the drain hose with the hose pointed toward the drain. Place the formed end in a laundry tub or a standpipe and secure the drain hose with the cable tie (provided in the enclosure package) to the standpipe, inlet hose, laundry tub, etc. so the hose does not pull out from the force of the water.

NOTE
The standpipe inside diameter must be 1-1/4" (3.2 cm) minimum. There must be an air gap around the drain hose in the standpipe. A snug hose fi t can cause a siphoning action.

IMPORTANT
Check to ensure the power is off at a circuit breaker/fuse box before plugging the power cord into an outlet.
2 Plug the power cord into a grounded outlet.


natural_image
Illustration of three different types of electrical plugs, one with three-pin socket, two with four-pin socket, and one with two-pin plug (no text or symbols present)3 Turn on the power at the circuit breaker/fuse box.
4 Read the Use & Care Guide provided with the laundry center. It contains valuable and helpful information that will save you time and money.
5 Run the washer through a complete cycle, checking for water leaks and proper operation.
6 If you have any questions during initial operation, please review the "Avoid Service Checklist" in your Use & Care Guide before calling for service.
7 Place these instructions in a location near the appliance for future reference.

NOTE
A wiring diagram and technical data sheet are located behind the dryer access panel.


natural_image
Line drawing of a kitchen appliance with a door, control panel, and indicator light (no text or symbols)ACCESSORI ES
LP CONVERSION KIT
P/N PCK3100
Gas dryers intended for use in a location supplied with LP must use a conversion kit prior to installation.
MOBILE HOME INSTALLATION KIT
P/N 137067200
Installation in a mobile home requires the use of a MOBILE HOME INSTALLATION KIT.
INLET HOSE KITS
Please call 866-233-8353 (in Canada, 800-265-8352) to explore hose kit options that will meet your specific installation needs.
DRYING RACK
Depending on the model you purchased, a drying rack may have been included in the initial purchase of your laundry center. If your model did not include a drying rack or you desire another drying rack, you may order one.
UNIVERSAL APPLIANCE WRENCH
P/N 137019200
A UNIVERSAL APPLIANCE WRENCH is available to aid in dryer/washer feet adjustment.
TOUCH UP PAINT PENS\*
Classic White Touch Up Pen - P/N 5304468812
Classic Slate Touch Up Pen - P/N 5304475700
* Other colors may be available. Contact the source where you purchased your laundry center.
CAUTION
Failure to use accessories manufactured by (or approved by) the manufacturer could result in personal injury, property damage or damage to the washer.

natural_image
Technical line drawing of a door opening with internal compartments and a separate fork-like tool (no text or symbols)Replacement parts:
If replacements parts are needed for your laundry center, contact the source where you purchased your laundry center or refer to your Use and Care Guide for more information.
WARNING
ELECTRICAL SHOCK HAZARD
Label all wires prior to disconnection when servicing controls. Wiring errors can cause improper and dangerous operation. Verify proper operation after servicing.
Tout à propos de
Installation
natural_image
Silhouette illustration of various household appliances including washing machines, refrigerators, and a refrigerator (no text or symbols)TABLE DES MATIÈRES
natural_image
Diagram of a mechanical device with directional arrows indicating motion or flow (no text or symbols)porte de placard
EXI GENCES D'INSTALLATION
natural_image
Technical line drawing of a mechanical assembly with no visible text or symbolsnatural_image
Technical line drawing of a mechanical device with an open lid and internal components (no text or symbols)
REMARQUE
natural_image
Diagram showing a structural element with two circular insets illustrating a mechanical setup (no text or symbols present)natural_image
Three types of electrical plugs shown in different orientations: three straight plug, one with three-pin socket, and one with three-pin plug (no text or symbols present)natural_image
Line drawing of a kitchen appliance with a door, control panel, and indicator lights (no text or symbols)ACCESSOI RES
NÉCESSAI RE DE CONVERSION AU GPL
PIÈCE N° PCK3100
natural_image
Technical line drawing of a door opening with internal compartments and a separate tool (no text or symbols)natural_image
Silhouette illustration of various household appliances including washing machines, refrigerators, and a refrigerator (no text or symbols)ÍNDICE
natural_image
Diagram of a pipe elbow joint with directional arrows indicating flow or movement (no text or labels)CORRECTO

natural_image
Diagram of a bent pipe with directional arrows indicating flow or force (no text or symbols)INCORRECTO
natural_image
Diagram of a mechanical or electrical component with directional arrows indicating flow or movement (no text or symbols)puerta del armario
natural_image
Technical line drawing of a mechanical assembly with no visible text or symbolsnatural_image
Technical line drawing of a mechanical device with an open lid and internal components (no text or symbols)
NOTA


natural_image
Diagram showing a structural element with two circular insets illustrating a mechanical setup (no text or symbols present)natural_image
Illustration of three different types of electrical plugs, one with three-pin socket, two with four-pin socket, and one with four-pin plug (no text or symbols)natural_image
Line drawing of a kitchen appliance with an open lid and control panel (no text or symbols)ACCESORIOS
natural_image
Technical line drawing of a door opening with internal compartments and a separate tool (no text or symbols)Piezas de repuesto:
- of your Laundry Center
- TABLE OF CONTENTS
- WARNING
- ⚠ WARNING - RISK OF FIRE
- CAUTI ON
- EXCESSIVE WEIGHT HAZARD
- Save these instructions for future reference.
- Pre-Installation Requirements
- NOTE
- Recognize safety symbols, words and labels
- Definitions
- DANGER
- CAUTION
- IMPORTANT
- Installation Checklist
- Shipping Hardware
- Leveling
- Water Supply
- Drain
- Exhaust Venting
- Gas Supply (Gas Dryer)
- 240v Electric Supply (Electric Dryer)
- Electrical Power
- Final Checks
- INSTALLATION REQUIREMENTS
- Electrical requirements for Laundry Center with electric dryer
- Electrical requirements for Laundry Center with gas dryer
- Gas supply requirements
- EXPLOSI ON HAZARD
- Water supply requirements
- Drain system requirements
- Exhaust system requirements
- FIRE HAZARD
- Exhaust system requirements, continued
- Exhaust direction
- Manufactured or mobile home installation
- Installation in a Recess or Closet
- Clearance requirements
- EXPLOSION HAZARD
- Laundry Center Dimensions
- Electrical installation
- ELECTRICAL SHOCK HAZARD
- Grounding requirements - Electric dryer (USA)
- Grounding requirements - Electric dryer (Canada)
- Grounding requirements - Gas dryer (USA and Canada)
- Unpacking Instructions
- INSTALLATION INSTRUCTIONS
- Gas connection
- Electrical connection (non-Canada) - 3 wire cord
- Electrical connection (non-Canada) - 4 wire cord
- Leveling your laundry center
- Connecting inlet water
- Connecting venting
- Connecting drain and electrical
- ACCESSORI ES
- LP CONVERSION KIT
- MOBILE HOME INSTALLATION KIT
- INLET HOSE KITS
- DRYING RACK
- UNIVERSAL APPLIANCE WRENCH
- TOUCH UP PAINT PENS\*
- Replacement parts:
- Tout à propos de
- Installation
- TABLE DES MATIÈRES
- EXI GENCES D'INSTALLATION
- REMARQUE
- ACCESSOI RES
- NÉCESSAI RE DE CONVERSION AU GPL
- ÍNDICE
- NOTA
- ACCESORIOS
- Piezas de repuesto:
Brand : FRIGIDAIRE
Model : FFLE3911QW
Category : Washing machine