
PA1550W - Heating JATA - Free user manual and instructions
Find the device manual for free PA1550W JATA in PDF.


| Brand | Jata |
| Model | PA1550W |
| Product Type | Electric Radiant Panel Heater |
| Power Supply | 220-240 V, 50 Hz |
| Power | 1500 W (high) / 750 W (low) |
| Approximate Dimensions (W x H x D) | 75 x 45 x 10 cm |
| Approximate Weight | 5 kg |
| Temperature Range | 15 °C to 35 °C |
| Timer | 0 to 24 hours (delayed start or stop) |
| Control | Manual (buttons) and via Tuya Smart app (Wi-Fi) |
| Weekly Programming | Yes, via the app |
| Lock Function (Child Safety) | Yes, activation by long press on the power button |
| Installation | On feet (on the floor) or wall mounting (bracket provided) |
| Minimum Distance from Floor (Wall Mounting) | 50 cm |
| Minimum Distance from Side Walls | 15 cm |
| Protection | Do not cover; avoid water; do not obstruct the grilles |
| Maintenance | Clean with a dry cloth; do not use abrasive products |
| Spare Parts and Reparability | Repair by an authorized center; power cable replaceable by a professional |
| Warranty | In accordance with current legislation |
| Target Audience | Adults; children over 8 years under supervision |
| Usage | Well-insulated spaces or occasional use |
Frequently Asked Questions - PA1550W JATA
User questions about PA1550W JATA
0 question about this device. Answer the ones you know or ask your own.
Ask a new question about this device
Download the instructions for your Heating in PDF format for free! Find your manual PA1550W - JATA and take your electronic device back in hand. On this page are published all the documents necessary for the use of your device. PA1550W by JATA.
USER MANUAL PA1550W JATA
INSTRUCCIONES DE USO
INSTRUÇÕES DE UTILIZAÇÃO • INSTRUCTIONS OF USE
INSTRUCTIONS D'USAGE • ISTRUZIONI PER L'USO
BEDIENUNGSANLEITUNG
PANEL ALUTHERMIC WIFI
PAINEL ALUTHERMIC WIFI
ALUTHERMIC PANEL WIFI
PANEAU ALUTHERMIC WIFI
PANNELLO ALUTHERMIC WIFI
ALUTHERMIC FELD WLAN
Mod. PA1550W
Electrodomésticos JATA, S.A.
ESPAÑA
Pol. La Serna, c/ D - 31500 TUDELA - Navarra
Tel. 94 621 55 40 · Fax 94 681 44 44
www.jata.es
PORTUGAL
Avenida Engenheiro Duarte Pacheco, Torre 2-3, Sala 3
1070-102 Lisboa
Tel.213 876 355 · Fax 213 867 398
www.jata.pt


natural_image
Back view of a white electronic device with ventilation grilles and a black diagonal line marking part 10 (no text or symbols on the device itself)
natural_image
Technical diagram of a mechanical component with labeled parts (Fig. A, Fig. B), showing no readable text or symbols beyond labels.
natural_image
Technical line drawing of a mechanical tool or device with a screwdriver inserted (no text or symbols visible)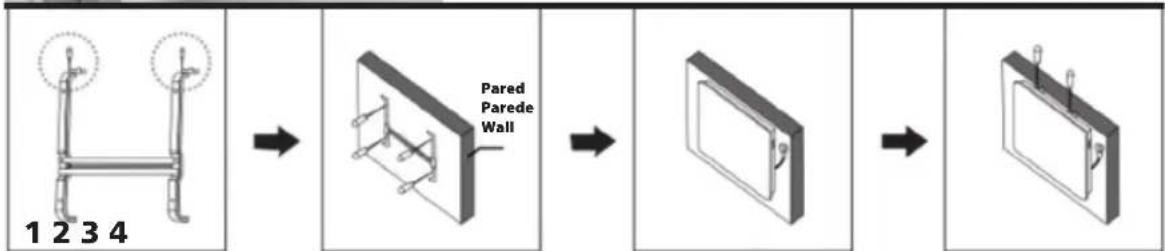
flowchart
graph LR
    A["1 2 3 4"] --> B["Pared Parede Wall"]
    B --> C[" "]
DATOS TÉCNICOS • DADOS TECNICOS • TECHNICAL DATA Julio 2018
| Mod. PA1550W 230 | V~ 50 Hz 1.500 W |
- On switch.
- Display.
- On button.
- Temperature button.
- Power button.
- Timer button.
- Air outlet grid.
- Legs.
- Panel.
- Wall supports.
PRINCIPAUX COMPOSANTS
APLICACIÓN MOVIL
In order to control the device from your smartphone, you have to download the application "Tuya Smart" through "Play Store" (for Android) or "App Store" (for Apple). You can also download it by scanning the QR code:

Fig 1
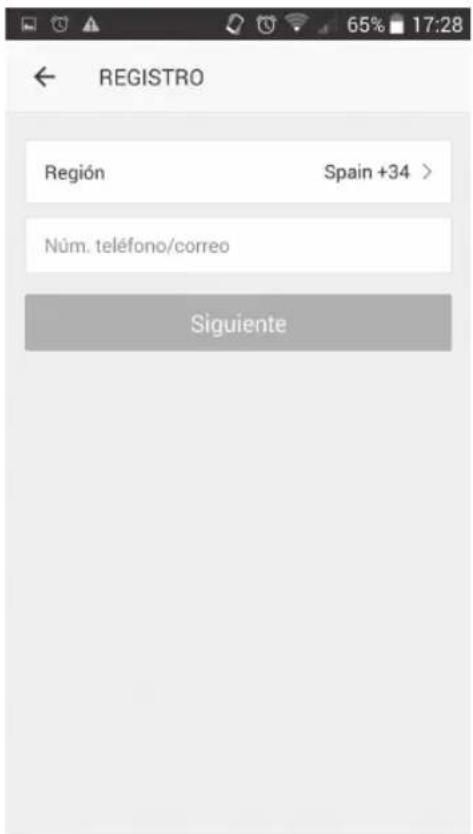
Fig 5
- Carefully read these instructions before using the appliance for the first time and keep it for future enquires.
- This appliance is only suitable for well insulated spaces and occasional use.
- This appliance can be used by children at the age of 8 or more and people with reduced physical, sensory or mental capabilities or lack of experience and knowledge if they have been given an appropriate supervision or instruction concerning the safety use of the appliances and understand the dangers involved.
• Children under 3 years should be kept out of reach of the appliance unless constantly supervised. - Children ages 3 and under 8 should only be able to turn on and off the unit, provided that this has been placed or installed in its normal operating position and provided they are supervised or have been instructed to use the device on a safely and understand the risks that the device has. Children ages 3
and under 8 years old should not plug, regular and clean the appliance or make performing maintenance.
- Keep all plastic bags and packaging components out of the reach of children. They are potentially dangerous.
- Do not connect the appliance to the mains without checking that the voltage on the rating plate and that of your household are the same.
• Make sure the base of the plug is adequately earthed.
• Do not submerge or wet the appliance. - Manipulation or replacement of any component must be performed by an authorized service center.

To avoid over heating do not cover the heater.
- The appliance must not be used if the panel is broken or damaged
CAUTION: Some parts of this appliance may become hot and cause burns. Particular attention should be made when children and vulnerable people are present.
• Do not situate under or close to a plug.
- Don’t allow children play with the appliance. Keep the appliance out of the reach of children.
- The external metallic sides heat up. Avoid any contact with these parts until some time after the radiator has been disconnected.
- Do not obstruct the upper and lower air outlet and intake grids.
- Do not place it close to showers, bathtub or swimming-pools.
- Do not place near curtains, objects or inflammable products.
• To unplug, pull from the plug, never from the cable.
- Use the appliance in an horizontal position and in plane and solid surfaces.
- If the appliance is fixed to the wall must be placed in such a way that the plug of the power cord was accessible.
- The fixed installation of this appliance on the wall of a bathroom always must be done at a distance where no person in the shower or in the bath may touch it or switch it on.
- Do not rest the cable on the hot sides of the appliance and avoid placing it on the air output grid.
- The cleaning and maintenance done by users, can not be done by children without any supervision.
- If the cable were to deteriorate it must be changed by an Authorised Service Centre.
LEGS ASSEMBLING
- The legs (8) must be assembled at the ends of the lower part of the appliance (Fig. A).
- Make coincide the holes of the legs with the corresponding holes of the appliance and screw them by using the screws of shortest length included (Fig. B).
WALL ASSEMBLING
- Attention: the minimum distances for wall mounting:
- From the floor: 50 cm.
- From the lateral walls: 15 cm.
- Warning: all objects (table, shelf, etc) must be over the appliance.
- Fix the appliance to the wall by following the steps detailed in the diagram:
- Warning: all objects (table, shelf, etc) must be over the appliance. - Fix the appliance to the wall by following the steps detailed in the diagram:
- Remove the bracket by unscrewing it and then pressing on the upper tabs in order to remove it. (Point 1 of the scheme).
- Place the bracket on the wall and mark the four holes on the wall.
- With the help of a drill, make the four holes and insert the supplied plugs.
- Screw the bracket to the wall using the longer screws that are attached. (Point 2 of the scheme).
- Place the appliance by matching the top and bottom flanges of the stand to the stand. (Point 3 of the scheme).
- Screw the tabs on the upper side so that they press and fix the device. (Point 4 of the scheme).
- With the help of a drill, make the four holes and insert the supplied plugs. - Screw the bracket to the wall using the longer screws that are attached. (Point 2 of the scheme). - Place the appliance by matching the top and bottom flanges of the stand to the stand. (Point 3 of the scheme). - Screw the tabs on the upper side so that they press and fix the device. (Point 4 of the scheme).
INSTRUCTIONS OF USE
- Plug the appliance into the mains.
- Turn the On switch (1).
- This device can be controlled manually or through a mobile application.
MANUAL MODE
- Press the on button (3) to activate the appliance. The display (2) will light up indicating the room temperature. If it is not connected, keep pressed till listening a noise, it is already unlocked. Press to switch it on.
- Press button (4) to set the desired temperature in a range from 15ircC to 35ircC .
- You can select high power or low power by pressing the power button (5). The display will show (jj) for low power and (jjjj) for high power.
- An operating time can be programmed by pressing the timer button (6) in a range from 0h (timer off) to 24h. After this time the appliance will automatically switch off.
- You can also set a time in a range from 0h to 24h by pressing the timer button (6), after which, the appliance will operate. To do so, the display (2) must be in the off position, but with the ignition switch (1) activated.
- To lock the device, press and hold the push-on button (3).
MOBILE APP
- In order to control the device from your smartphone, you have to download the application "Tuya Smart" through "Play Store" (for Android) or "App Store" (for Apple). You can also download it by scanning the QR code:

- Make sure you have a Wi-Fi network to connect to your device at all times.
- Once you have installed the application, enter it and it will appear Fig.1 on your screen. Press "Register" to begin.
- Next, you will see Fig.2. Select your country and enter your phone number or email, to which a password will be sent later. Click "Next" to continue.
- You have 1 minute to enter the password that was sent to you and create a password. Press "Confirm" to save it. Fig. 3.
- Click on the "+" on the upper right tab to add the device. Fig.4
-
Select "Calefactor" to add your heater. Fig.5
-
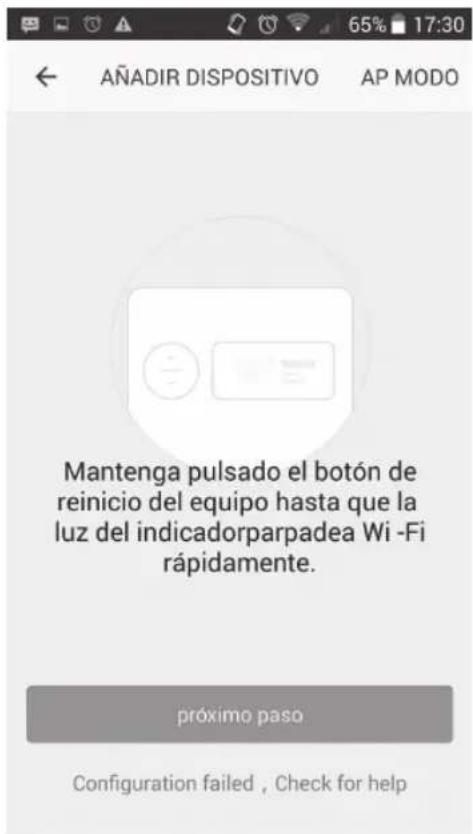
To establish a connection between your smartphone and the device, turn on the device and press its power button (5) for a few seconds until the Wi-Fi indicator ◆ flashes on the display (2). Click "la luz de confirmación en el flash" to continue. Fig.6
- Enter the Wi-Fi key to which you want to connect the device and press "Confirmar". Fig.7
- Wait a few seconds until the connection is complete. In the meantime make sure to keep the device and your Smartphone within the active area of the Wi-Fi. Fig.8. If there is any error, go to help option and press "como establecer el LED parpadee".
- Once the connection is established, press "Inicio" to complete the process. Fig.9
-
You can then display the control screen of the device, where you can display the ambient temperature and handle the ignition, temperature, power, timer, weekly timer and the lock. Fig 10:
-
Press 📁 to turn the unit on or off.
- Set the desired temperature by pressing "+" or "-"
- To select the power, press ☑ "High" for high power and "Low" for low power.
- Press ☒ with the device on to select the time you want the device to operate, after which it will turn off automatically. If you want to set a time after which the device starts to operate, select the time with the device off.
- Press 📊 with the device on, to program the heater weekly.
-
To activate or deactivate the lock, press 🔒.
-
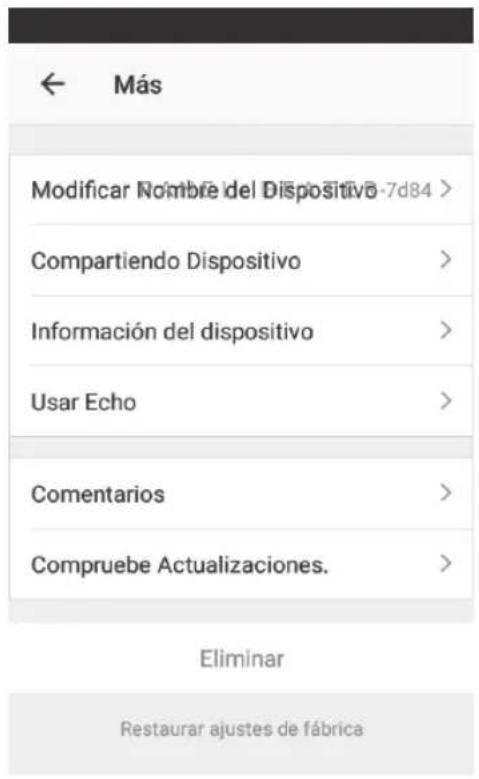
You can control the device from other smartphone if you wish. To do this, click on the upper right tab of fig.10.
- Select "Sharing device". Fig.11.
- Click on "Add device". Fig.12
- Set the country code to "Region" and the telephone number.
- Then press "Confirm" and the phone will be added. Fig.13.
- You can already control the device from the paired smartphone.
- To switch off the device, press the push button (3) on your device or 📋 in your application. The display will turn off.
- Then, turn off the power switch (1) and unplug it from the mains.
MAINTENANCE AND CLEANING
- Before you proceed to cleaning, ensure the appliance is unplugged from the mains.
- Leave cool down the warm parts and clean with a soft dry cloth.
- Keep clean the air entrance and output grid.
- Never use chemical or abrasives, metal scourers, which may deteriorate the surfaces of the appliance.
ENVIRONMENT PROTECTION
- Dispose the appliance according to the local garbage regulations.
- Never throw it away to the rubbish. So you will help to the improvement of the environment.

FRANÇAIS
ATTENTION
APPLICAZIONE SMARTPHONE
GARANTIA GERAL (2 ANOS) - GARANTIA TOTAL
In the rest of countries, the holder of the guarantee will enjoy all the rights that his legislation in force concedes.
FRANÇAIS:
- INSTRUCCIONES DE USO
- PRINCIPAUX COMPOSANTS
- APLICACIÓN MOVIL
- CAUTION: Some parts of this appliance may become hot and cause burns. Particular attention should be made when children and vulnerable people are present.
- LEGS ASSEMBLING
- WALL ASSEMBLING
- INSTRUCTIONS OF USE
- MANUAL MODE
- MOBILE APP
- MAINTENANCE AND CLEANING
- ENVIRONMENT PROTECTION
- FRANÇAIS
- ATTENTION
- APPLICAZIONE SMARTPHONE
- GARANTIA GERAL (2 ANOS) - GARANTIA TOTAL
- FRANÇAIS:
Brand : JATA
Model : PA1550W
Category : Heating