
MCSWOE24S - Oven Magic Chef - Free user manual and instructions
Find the device manual for free MCSWOE24S Magic Chef in PDF.


| Product Type | 24-Inch Built-In Wall Oven |
| Dimensions (H x W x D) | 23.5" x 23.5" x 21.5" (594 x 594 x 543 mm) |
| Weight | 72 lbs (32.5 kg) |
| Power Supply | 240 V / 60 Hz |
| Rated Power | 2300 W |
| Capacity | 2.2 Cu. Ft. |
| Cooking Modes | Broil, Fan Grill, Convection Cooking, Defrost |
| Control Type | Knobs and Digital Clock with Timer |
| Oven Light | Interior light with replaceable bulb (25W, E14, 208-240V) |
| Racks Included | 2 oven racks |
| Accessories | Broiler pan and broiler pan rack |
| Safety Features | Auto shut-off, cooling fan, child safety warnings |
| Cleaning | Manual cleaning; non-self-cleaning; removable oven door |
| Installation | Built-in; requires proper ventilation; 3-wire or 4-wire electrical connection |
| Warranty | 1 year parts and labor |
Frequently Asked Questions - MCSWOE24S Magic Chef
User questions about MCSWOE24S Magic Chef
0 question about this device. Answer the ones you know or ask your own.
Ask a new question about this device
Download the instructions for your Oven in PDF format for free! Find your manual MCSWOE24S - Magic Chef and take your electronic device back in hand. On this page are published all the documents necessary for the use of your device. MCSWOE24S by Magic Chef.
USER MANUAL MCSWOE24S Magic Chef
24-Inch Built-In Wall Oven
User's Manual
natural_image
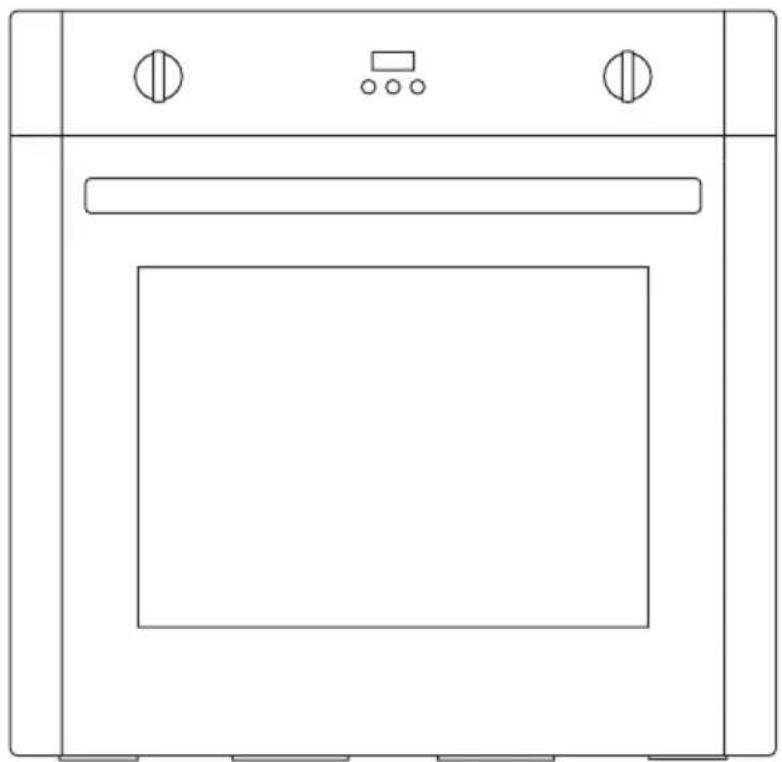
Line drawing of a simple kitchen oven with front panel and side outlets (no text or symbols)Model MCSWOE24S
PLEASE READ THIS MANUAL CAREFULLY BEFORE USING YOUR WALL OVEN AND KEEP IT FOR FUTURE REFERENCE.
PRODUCT REGISTRATION
Thank you for purchasing this Magic Chef® product. The first step to protect your new product is to complete the product registration on our website: www.mcappliance.com/register. The benefits of registering your product include the following:
- Registering your product will allow us to contact you regarding a safety notification or product update.
- Registering your product will allow for more efficient warranty service processing when warranty service is required.
- Registering your product could act as your proof of purchase in the event of insurance loss.
Once again, thank you for purchasing this Magic Chef product.
CONTENTS
PRODUCT REGISTRATION 2
PRECAUTIONS 4
IMPORTANT SAFETY INSTRUCTIONS 5
SPECIFICATIONS....7
PARTS AND FEATURES 8
INSTALLATION INSTRUCTIONS 9
BEFORE USE 13
OPERATION INSTRUCTIONS.... 14
CARE AND MAINTENANCE....18
TROUBLESHOOTING....21
LIMITED WARRANTY 22
PRECAUTIONS
EXPLANATION OF SYMBOLS
WARNING
Hazards or unsafe practices which COULD result in severe personal injury or death.
CAUTION
Hazards or unsafe practices which COULD result in minor personal injury.
⚠ WARNING: Read and understand all safety precautions. Failure to follow all instructions described in this user manual may result in electric shock, fire and/or serious personal injury. The warnings, cautions and instructions discussed in this user manual cannot cover all possible conditions and situations that may occur.
IMPORTANT SAFETY INSTRUCTIONS
⚠ WARNING: When properly cared for, your wall oven has been designed to be safe and reliable. Read all instructions carefully before use. These precautions will reduce the risk of burns, electric shock, fire and injury to people. When using this kitchen appliance, basic safety precautions must be followed; including those in the following pages.
PROPER INSTALLATION AND MAINTENANCE
▲ IMPORTANT: Save this manual for the local electrical inspectors use.
• Have the installer show you the location of the circuit breaker or fuse. Mark it for easy reference.
- Be sure your appliance is properly installed and grounded by a qualified service personnel. Connect only to a properly grounded outlet. (Refer to "Installation Instructions" on page 9 for details.)
- This appliance is intended for normal family household use only. It is not approved for outdoor use. If you have any questions, contact the manufacturer.
- DO NOT store or use corrosive chemicals, vapors, flammables or nonfood products in or near this appliance. It is specifically designed for use when heating or cooking food. The use of corrosive chemicals in heating or cleaning will damage the appliance and could result in injury.
- DO NOT operate this appliance if it is not working properly, or if it has been damaged. Contact an qualified service personnel.
• DO NOT obstruct oven vents.
• DO NOT repair or replace any part of the appliance, unless specifically recommended in this manual. Refer all servicing of this appliance to a qualified service personnel.
FIRE SAFETY
- DO NOT use aluminum foil or protective liners to line any part of the appliance, especially the oven bottom. Installing these liners may result in risk of electric shock or fire.
- If materials inside an oven should ignite, keep door closed. Turn off the appliance and disconnect the circuit at the circuit breaker box.
- Use this appliance only for its intended purpose as described in this manual. For example, NEVER use the appliance for warming or heating the room. NEVER use the appliance for storage.
• ALWAYS have a working smoke detector near the kitchen. - In the event that personal clothing or hair catches fire, drop and roll immediately to extinguish flames. Smother flames from food fires other than grease fires with baking soda.
• Have an appropriate fire extinguisher available, nearby, highly visible and easily accessible near the oven.
⚠ WARNING: To reduce the risk of personal injury in the event of a grease fire, observe the following.
- Smother flames with a close-fitting lid, cookie sheet, or metal tray, then turn off the burner. Exercise caution to prevent burns. If the flames do not go out immediately, evacuate and call the fire department.
• NEVER pick up a flaming pan. You may be burned.
• DO NOT use water on grease fires. - Smother the fire or flame. Or use dry chemical or foam-type extinguishers.
• Use an extinguisher ONLY if:
1) You know you have a Class ABC extinguisher, and you already know how to operate it.
2) The fire is small and contained in the area where it started.
3) The fire department is being called.
4) You can fight the fire with your back to an exit.
BURN PREVENTION
- DO NOT touch heating elements or interior surfaces of oven. Heating elements may be hot even though they are dark in color. Interior surfaces of an oven become hot enough to cause burns. During and after use, DO NOT touch, or let clothing, potholders, or other flammable materials contact heating elements or interior surfaces of oven until they have had sufficient time to cool. Other surfaces of the appliance may become hot enough to cause burns. Among these surfaces are oven vent openings, surfaces near these openings and oven doors.
- Exercise caution when opening the appliance. Standing to the side, open the door slowly and slightly to let hot air and/or steam escape. Keep your face clear of the opening and make sure there are no children or pets near the unit. After the release of hot air and/or steam, proceed with your cooking. Keep doors shut unless necessary for cooking or cleaning purposes. DO NOT leave open doors unattended.
- DO NOT heat or warm unopened food containers. Build-up of pressure may cause the container to burst and cause injury.
- ALWAYS place oven racks in desired location while oven is cool. If a rack must be moved while oven is hot, DO NOT let potholder contact the heating elements.
- ALWAYS use dry potholders. Moist or damp potholders on hot surfaces may result in burns from steam. DO NOT let potholder touch hot heating elements. DO NOT use a towel or other bulky cloth.
- Secure all loose garments before beginning. Tie long hair so that it does not hang loose, and DO NOT wear loose fitting clothing or hanging garments, such as ties, scarves, jewelry, or dangling sleeves.
CHILD SAFETY
- When children become old enough to use the appliance, it is the legal responsibility of the parents or legal guardians to ensure that they are instructed in safe operation of the appliance by qualified persons.
- DO NOT allow anyone to climb, stand, lean, sit, or hang on any part of the appliance, especially a door, warming drawer or storage drawer. This can damage the appliance, and the unit may tip over, potentially causing severe injury.
- DO NOT allow children to use this appliance unless closely supervised by an adult. Children and pets should not be left alone or unattended in the area where the appliance is in use. They should NEVER be allowed to play in its vicinity, whether or not the appliance is in use.
- Items of interest to children should NOT be stored in an appliance, in cabinets above an appliance or on the backsplash. Children climbing on an appliance to reach items could be potentially cause serious injury.
SAVE THESE INSTRUCTIONS FOR FUTURE REFERENCE
SPECIFICATIONS
Figure 1
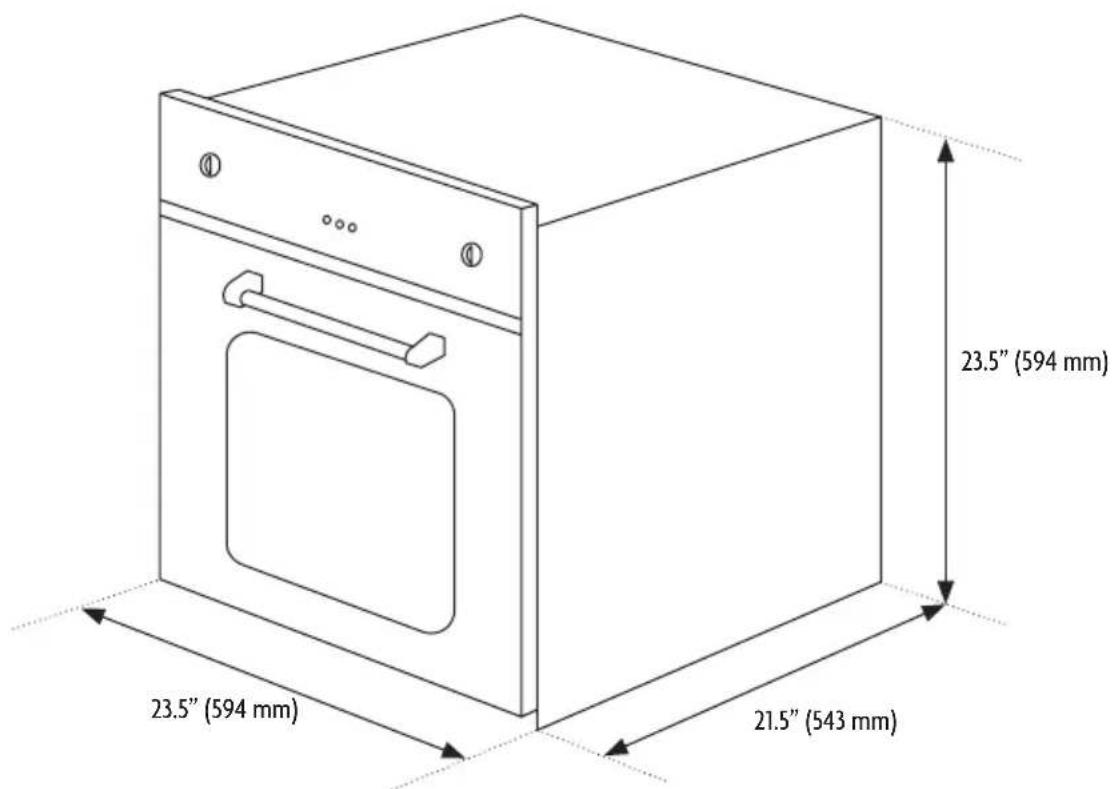
| Height 23.5” (594 mm) | |
| Width 23.5” (594 mm) | |
| Depth 21.5” (543 mm) | |
| Weight 72 lbs. (32.5 kg) | |
| Power Supply 240 V / 60 Hz | |
| Capacity 2.2 Cu. Ft. | |
| Rated Power 2300 W |
PARTS AND FEATURES
PRODUCT PARTS & ACCESSORIES
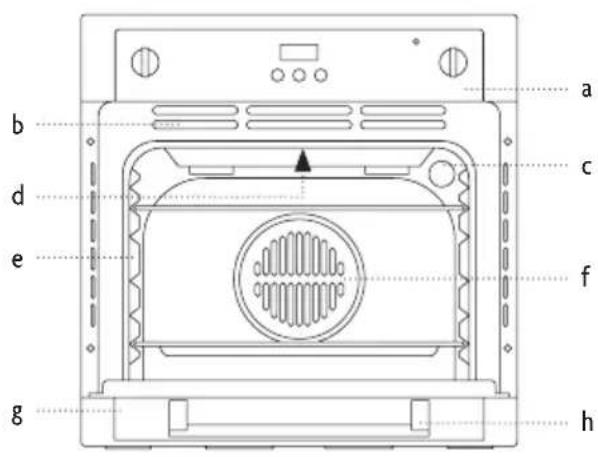
Figure 1
natural_image
Pure grid pattern with vertical lines and a horizontal line, no text or symbols present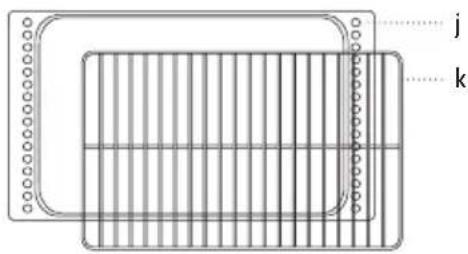
a. Control Panel
b. Cooling Vents
c. Oven Interior Light
d. Top Central Heating Element
e. Rack Position Guide
f. Convection Fan and Heating Element
g. Oven Door
h. Door Handle
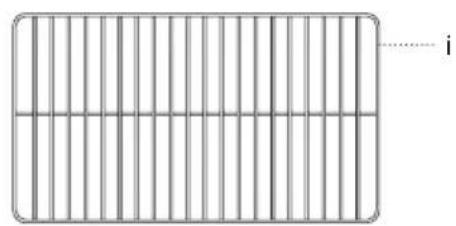
i. Oven Rack (2)
j. Broiler Pan
k. Broiler Pan Rack
INSTALLATION INSTRUCTIONS
⚠ WARNING: Only a qualified service personnel in compliance with the instructions provided must install the appliance. The manufacturer declines all responsibility for improper installation, which may harm persons and animals and damage property.
LOCATION REQUIREMENTS
In order to ensure that the built-in appliance functions properly, the cabinet containing it must be appropriate. The figures below and the next page give the dimensions of the cut-out for installation in a wall cabinet unit or under the counter. (Refer to Figure 2 and 3.)
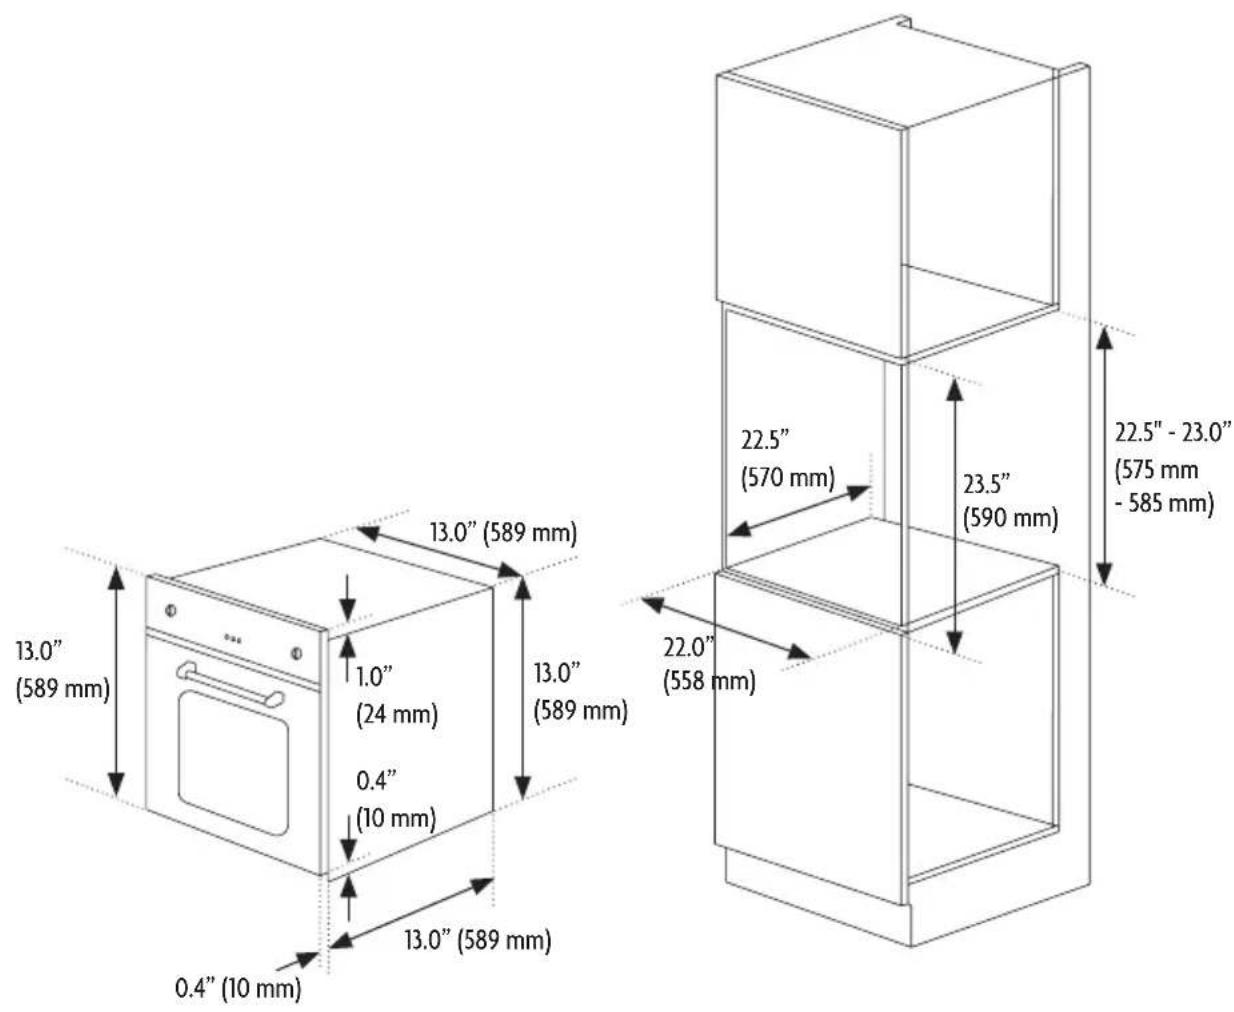
Installation in a Wall Cabinet Unit
Figure 3
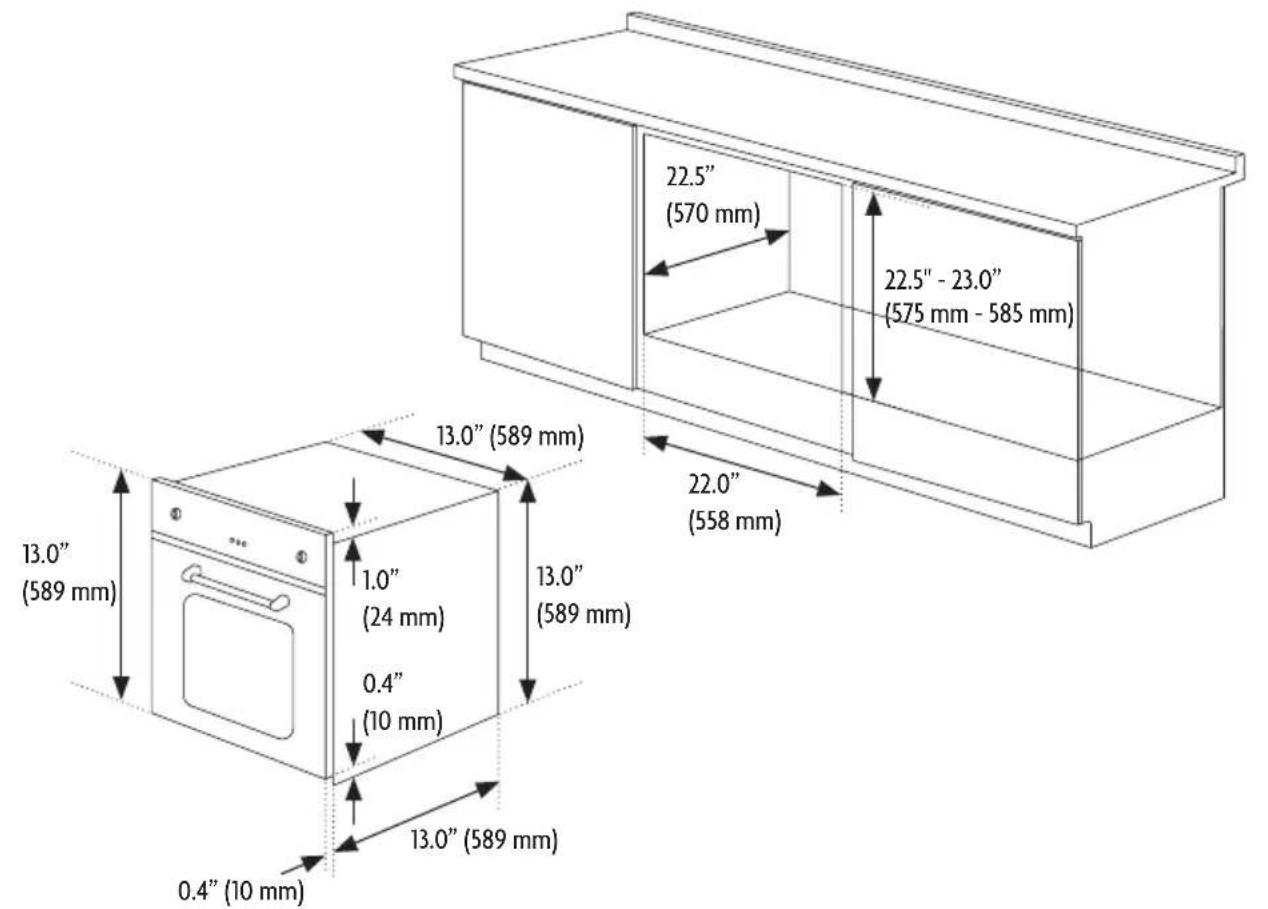
Installation Under the Counter
▲ IMPORTANT: Installation must be in compliance with the consumption declaration. In order to ensure adequate ventilation, the back panel of the cabinet unit must be removed. Installing the oven so that it rests on two strips of wood is preferable. If the oven rests on a continuous, flat surface, there must be an aperture of at least 1 ^3/4 " x 22" (45 x 560mm). (Refer to Figure 4.)
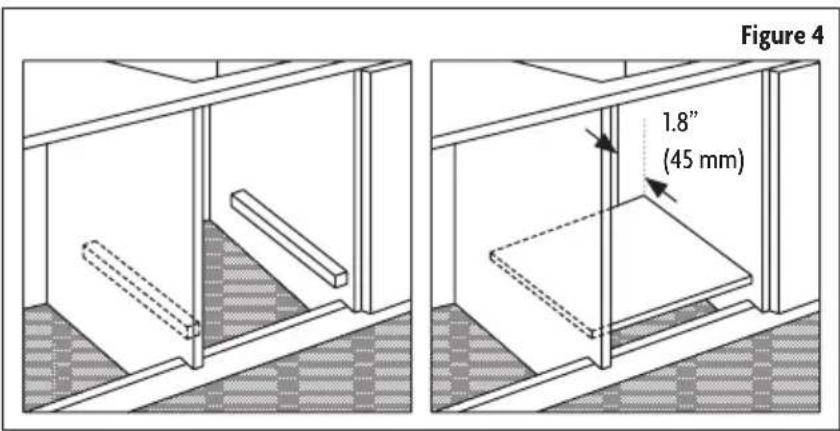
- The panels of the adjacent cabinets must be made of heat-resistant material. In particular, cabinets with a veneer exterior must be assembled with glues which can withstand temperatures of up to 212°F.
- In compliance with current safety standards, contact with the electrical parts of the oven must not be possible once it has been installed.
• All parts, which ensure the safe operation of the appliance, must be removable only with the aid of a tool. - To fasten the oven to the cabinet, open the door of the oven and attach it by inserting the 4 wooden screws into the 4 holes located on the perimeter of the frame.
ELECTRICAL REQUIREMENTS
⚠ WARNING: Electrical Shock Hazard
• DO NOT use an extension cord.
- Failure to follow these instructions can result in death, fire, or electrical shock.
- Any additions, changes or conversions required in order for this appliance to satisfactorily meet the application needs must be made by a qualified service personnel in accordance with the manufacturer's instructions and all codes and requirements of the authority having jurisdiction. Failure to follow the instructions could result in serious injury or property damage. The qualified service personnel performing this work assumes responsibility for the conversion.
- This appliance needs to be installed directly to the main (without a plug). To do so, follow instructions in the “Three-Wire Connection” section on page 12. If you wish to install this appliance directly to the main (without a plug), it must be installed by a qualified service personnel.
- DO NOT operate this appliance using a 2-prong adapter or an extension cord. If a 2-prong wall receptacle is the only available outlet, it is the personal responsibility of the consumer to have it replaced with a properly grounded 3-prong or 4-prong wall receptacle installed by a qualified service personnel. Severe shock or damage to the range may occur if the range is not installed by a qualified service personnel.
- This appliance features a pilotless electric ignition for energy savings and reliability. It operates on a 208-240V/50-60Hz 12-15 Amp power supply.
• A separate circuit, protected by a 15 amp time delay fuse or circuit breaker, is required.
• For personal safety, the appliance must be properly grounded.
ELECTRICAL INSTALLATION
⚠ WARNING: It is the responsibility and obligation of the consumer to contact a qualified service personnel to ensure the electrical installation is adequate and conformance with all local codes and ordinances.
▲ IMPORTANT: The power supply to the appliance must be cut off before any adjustments or maintenance work is done on it. Air duct is supposed to use in ventilation.
This oven is dual rated, designed to be connected to either 208/240V AC, 60Hz, 3-wire, two-phase power supply.
The electrical supply should be 3-wire two-phase AC. Install a suitable conduit box (not furnished). An appropriately-sized, U-listed conduit connector must be used to correctly attach the conduit to the junction box.
| CIRCUIT REQUIRED | |
| 208V, 60Hz 240V,60Hz | |
| 12 AMP 15 AMP |
3-WIRE BRANCH CIRCUIT
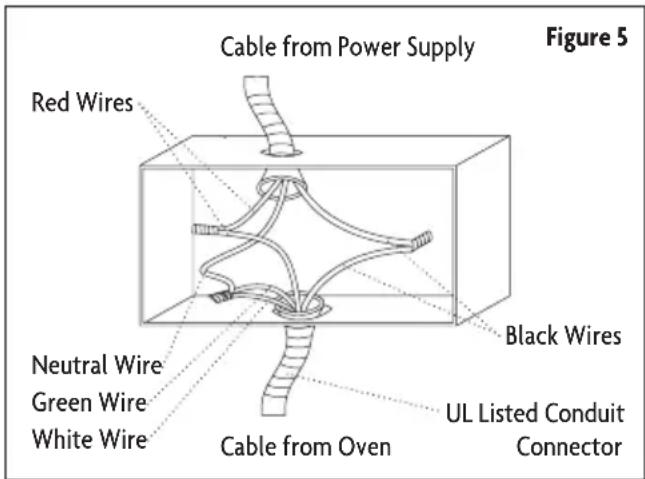
Where local codes allow the connection of green ground wire from the oven to the branch circuit white neutral wire:
- If local codes permit, connect the green ground wire from the oven and the white neutral wire from the oven to the branch circuit neutral wire (gray or white colored wire).
- Connect the red and black wires from the oven to the corresponding wires in the junction box.
• Refer to Figure 5.
4-WIRE BRANCH CIRCUIT
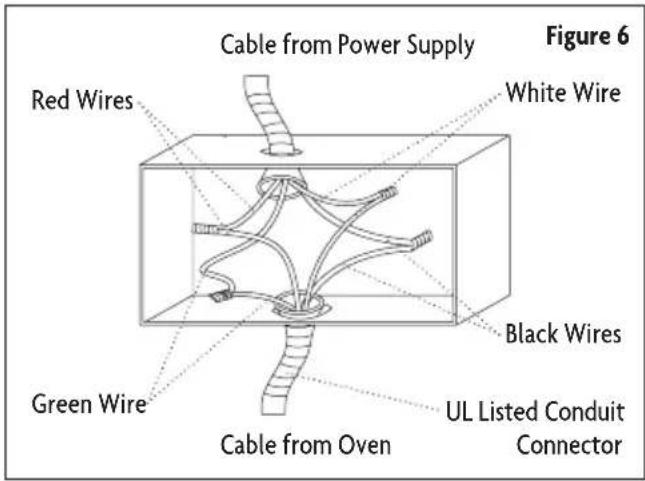
- Disconnect ground from neutral at free end of conduit.
- Connect the green ground wire from the oven to the bare or green ground wire in the juction box.
- Connect the red and black wires from the oven to the corresponding wires in the junction box.
- Connect the white wire from the oven to the white neutral wire in the junction box.
BEFORE USE
This multi-function oven combines the advantages of traditional convection ovens with those of the more modern fan assisted models in a single appliance. It is an extremely versatile appliance that allows you to choose easily and safely between different cooking modes.
▲ IMPORTANT: The first time you use your appliance, we recommend that set the thermostat to the highest setting and leave the oven on for about half an hour with nothing in it, with the oven door shut. Then open the oven door and let the room air in. The odor that is often detected during this initial use is due to the evaporation of substances used to protect the oven during storage and until it is installed.
▲ IMPORTANT: Place the dripping pan provided on the bottom shelf of the oven to prevent any sauce and/or grease from dripping onto the bottom of the oven only when grilling food.
- For all other types of cooking, NEVER use the bottom shelf and NEVER place anything on the bottom of the oven when it is in operation because this could damage the enamel.
- ALWAYS place your cookware (dishes, aluminum foil, etc.) on the grid provided with the appliance inserted especially along the oven guides.
OPERATION INSTRUCTIONS
COOKING MODES
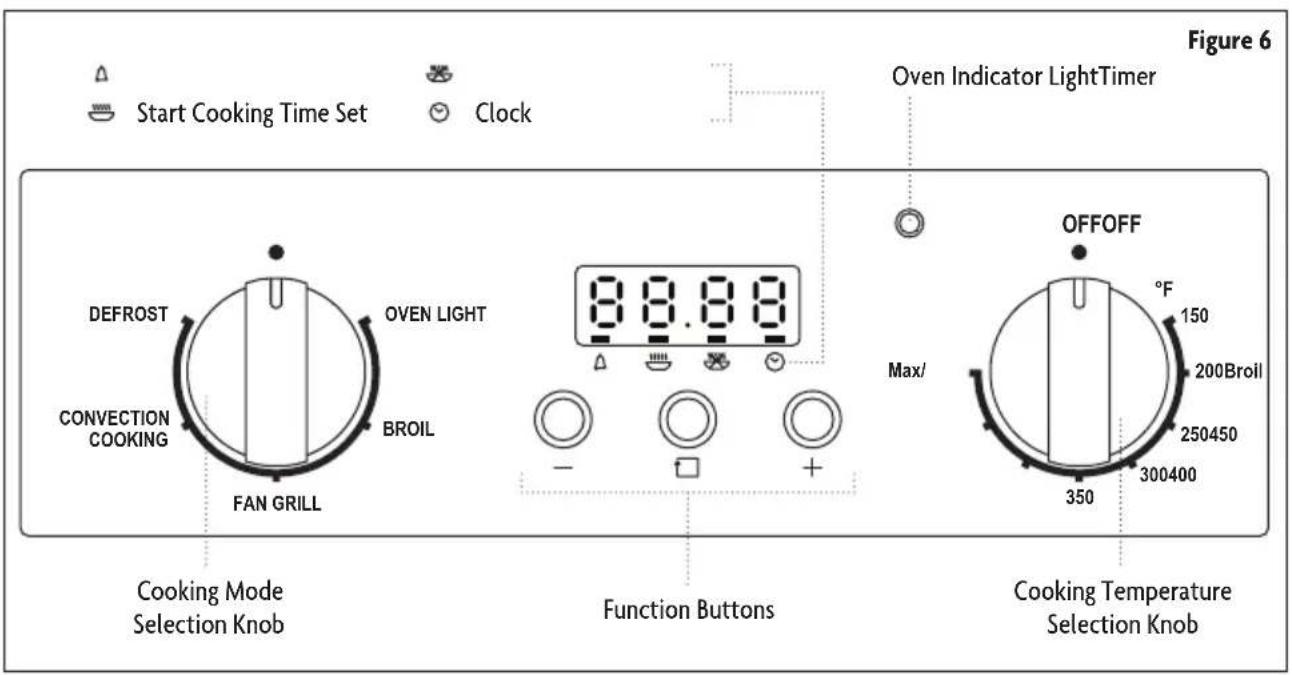
- Oven Light: Turns the oven light on when selected.
- Broil: Best for melting cheese, toasting and browning. For optimal results, use in conjunction with the Broil temperature setting.
- Fan Grill: Utilizes a high heat grilling element and fan to circulate hot air throughout the oven. Ideal for cooking large cuts of meats so that they are moist inside and crisp on the outside. Use a thermometer to check the internal temperature. It is recommended to set the temperature no higher than 400°F.
- Convection Cooking: Utilizes the powerful heating element surrounding the fan to evenly distribute heat throughout the oven. This is great for multi-shelf cooking because the fan ensures each rack is heated.
- Defrost: Circulates air at room temperature to defrost food. For foods such as meat, fish, and bread, Convection Cooking Mode, set between 175°\~225°F, can be used to accelerate the Defrosting process.
DIGITAL CLOCK
- Once the oven is connected to electrical power, the clock display will show "12:00" with the "■" symbol above "○". (Refer to Figure 6.)
- Press the " + " or "-" - " button to increase or decrease the number until it reaches the right time.
- After 5 seconds the clock will start automatically or you can press the " " button to make it work.
TIMER
Kitchen Timer Setting
- Press the " " button repeatedly until the " " symbol above " " flashes.
-
Press " + " or " - " button until the time you wish shows on the display. The longest cooking time that can be set is 23 hours and 59 minutes.
-
After setting the proper time (hour/minute), the " " symbol above the " " begins to flash.
- The time countdown begins.
- When it reaches the set time, the " " symbol above the " " flashes, and the alarm will ring.
- To stop the alarm ringing, press any button.
▲ NOTE: This setting does not control the oven.
IMPORTANT:
• The setting must be carried out in 5 seconds.
• If electricity fails suddenly, all the set procedure and the proper clock time (hour/minute) will disappear.
- After electrical power is on again, "12:00" and the "■" symbol above "⊗" will show on the display, you will need to set it again.
Full Automatic Timer Setting
- Press the "☐" button repeatedly until the "■" symbol above the "💡" flashes, and press "+" or "-" button to set how long oven needs to cook.
- Press the "☐" button repeatedly until the "■" symbol above the "☒" flashes, and press "+" or "-" button to set the time for the oven to stop cooking and switch off.
- Adjust knobs to select cooking mode and temperature.
- The "■" symbols above the "☐" and "☒" will flash. It indicates the cooking timer has been set. The cooking will start and finish as per programmed into the timer.
For example, if the food is required to bake for 45 minutes, and it is supposed to stop at "2:00":
- Press the "☐" button repeatedly until the "■" symbol above "💡" flashes, and set the time of baking to 45 minutes.
- Press the function button repeatedly until the "■" symbol above "💡" flashed, and set the finish of baking at "2:00".
- The proper time (hour/minute) and the " " symbol will show on the display. It indicates the setting of cooking timer has been set.
- When the clock shows "1:15", the oven will switch on automatically and cooking will start.
- During the cooking time, the " " symbol will keep flashing.
- When the clock shows "2:00", cooking will stop and the oven will switch off automatically, the alarm will ring, and the "■" symbol will flash.
- To stop the alarm ringing, press any button.
Semi-Automatic Timer Setting
A. Setting Timer for How Long to Cook
- Longest time that can be set is 10 hours maximum.
- Press the "☐" button repeatedly until the "■" symbol above "###" flashes. Press " + " or " - " button and set the timer for how long the oven needs to cook.
- Adjust knobs to select cooking mode and temperature.
- When the full amount of time set has passed, the cooking will stop and the oven will switch off automatically.
- The "symbol above" "will flash and the alarm will ring.
- To stop the alarm ringing, press any button.
B. Setting timer with the end time of cooking
- Longest time that can be set is 23 hours and 59 minutes.
- Press the "☐" button repeatedly until the "■" symbol above "💡" flashes. Press "+" or "-" button and set the time for oven to stop cooking.
- Immediately adjust knobs to select cooking mode and temperature.
- When it reaches the time set, cooking will stop and the oven will switch off automatically.
- The "symbol above" "flashes, and the alarm will ring.
- To stop the alarm ringing, press any button.
NOTE: The set timer procedure could be seen by pressing any function button repeatedly at any time.
NOTE: By adjusting the end time of cooking to the current time, the set timer procedure can be cancelled.
PRACTICAL COOKING ADVICE
Broil
- Position temperature knob between 150^ F and Max/Broil.
- The top central heating element will come on.
- The extremely high and direct temperature of the heating element makes it possible to brown the surface of meats and roasts while locking the juices in to keep them tender.
- The "Broil" mode is also highly recommended for dishes that require a high temperature on the surface like beef steaks, veal, rib steak, filets, and hamburgers.
Fan Grill
- Position temperature knob between 150^ F and 400^ F.
- The top central heating element and fan will come on.
- This combination of features increases the effectiveness of the unidirectional thermal radiation of the heating element through forced circulation of the air throughout the oven.
- This helps prevent food from burning on the surface, allowing the heat to penetrate right into the food.
- Excellent results are achieved with kebabs made with meats and vegetables, sausages, ribs lamb chops, chicken in a spicy sauce, quail, and pork chops.
- The "Fan Grill" mode is also ideal for cooking fish steaks like swordfish and stuffed cuttlefish.
Convection Cooking
- Position temperature knob between 150^ F and 475^ F.
- The rear heating element and fan will come on, guaranteeing delicate heat distributed uniformly throughout the oven.
- The "Convection Cooking" mode is also ideal for baking and cooking delicate foods, especially cakes that need to rise and for the preparation of certain tartlets on 3 shelves at the same time. Here are a few examples: cream puffs, sweet and savory biscuits, savory puffs, Swiss rolls and small portions of vegetables au gratin.
Defrost
-
Position temperature knob to any temperature.
-
The fan in the oven will circulate the air at room temperature around the food.
- This is recommended for defrosting of any type of food, but in particular for delicate types of food which do not require heat, such as ice cream cakes, cream or custard desserts, and fruitcakes.
- By using the fan, the defrosting time is approximately halved. In case of meat, fish and bread, it is possible to accelerate the process using the “Convection Cooking” and setting the temperature between 175^ F and 225^ F.
Cooling Ventilation
In order to cool down the exterior of the appliance, this model is equipped with a cooling fan, which comes on automatically when the oven is hot. When the fan is on, a normal flow of air can be heard exiting between the oven door and the control panel.
▲ NOTE: When cooking is done, the fan stays on until the oven cools down sufficiently.
CARE AND MAINTENANCE
CLEANING
⚠ WARNING: To avoid the risk of electric shock, ALWAYS ensure the appliance is turned off and completely cool before cleaning or doing any sort of maintenance.
CAUTION:
• To avoid possible burns, use care when cleaning the appliance.
• DO NOT attempt to clean the appliance whenever the oven or burner heads are still hot.
- To avoid possible burns, DO NOT attempt any of the following cleaning instructions before turning off all of the surface burners and allowing them to cool.
▲ NOTE: ALWAYS follow label instructions on cleaning products.
Control Knobs
• For general cleaning, use hot, soapy water and a cloth.
- For more difficult soils and built-up grease, apply a liquid detergent directly onto the soil. Rinse with a damp cloth and dry.
• DO NOT use steel wool or acidic cleaners on the knobs as they can scratch.
Stainless Steel Exterior
• Clean stainless steel with hot, soapy water and a dishcloth. Rinse with clean water and a cloth.
• DO NOT use cleaners with high concentrations of chlorides or chlorines. DO NOT use harsh scrubbing cleaners. Only use kitchen cleaners that are especially made for cleaning stainless steel.
Glass Door Exterior
- Clean the glass door using non-abrasive products or sponges and dry it with a soft cloth.
• Use glass cleaner. Apply glass cleaner to soft cloth or sponge, not directly on panel.
Oven Interior
• This appliance DOES NOT have a self-cleaning feature.
• Use an appropriate cleaning product designed specifically to clean the inside of ovens.
• The soap should be rinsed away and the interior dried thoroughly.
- Avoid using abrasive detergents (for example cleaning powders, etc) and abrasive sponges for dishes or acids (such as lime scale – remover, etc) as these could damage the enamel.
- If the grease spots and dirt are particularly tough to remove, use a special product for oven cleaning, following the instructions provided on the packet.
• NEVER use a steam cleaner for cleaning inside of oven.
• If you use your oven for an extended period of time, condensation may form. Dry it using a soft cloth.
- There is a rubber seal surrounding the oven opening which guarantees its perfect functioning. Check the condition of this seal on a regular basis. If necessary, clean it and avoid using abrasive products or objects to do so. If damaged, contact the vendor. It is recommend to avoid using the oven until it has been repaired.
- NEVER line the oven bottom with aluminum foil, as the consequent accumulation of heat could compromise the cooking and even damage the enamel.
NOTE: ALWAYS follow label instructions on cleaning products.
Interior Lower Grill Element
• To remove the element, support one side with your hand while removing the retainer with the other.
- When cleaning, make sure not to apply excessive force on the element as it is fragile.
- Reposition the element and secure the retainer back in place.
• DO NOT use the oven with the grill element hanging down – it must be repositioned after cleaning.
Removing Oven Door
WARNING:
• Make sure oven is cool and power to the oven has been turned off before removing the door. Failure to do so could result in electrical shock or burns.
- The oven door is heavy and fragile. Use both hands to remove the oven door. The door front is glass. Handle carefully to avoid breaking.
- Grasp only the sides of the oven door. DO NOT grasp the handle as it may swing in your hand and cause damage or injury.
• Failure to grasp the oven door firmly and properly could result in personal injury or product damage.
• To avoid injury from hinge bracket snapping closed, be sure that both levers are securely in place before removing the door. Also, DO NOT force door open or closed. The hinge could be damaged and injury could result.
Follow these instructions:
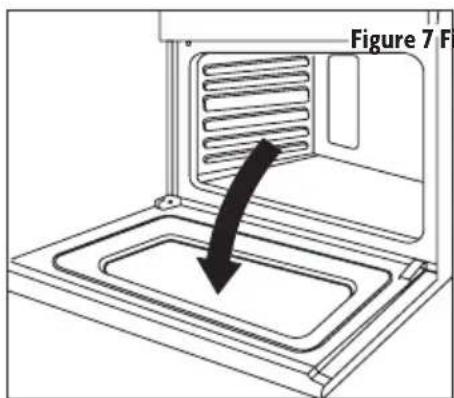
- Open the door fully. (Refer to Figure 7.)
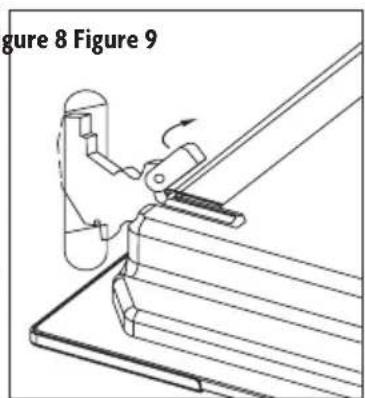
- Lift up and push the small levers located on the two hinges all the way back. (Refer to Figure 8.)
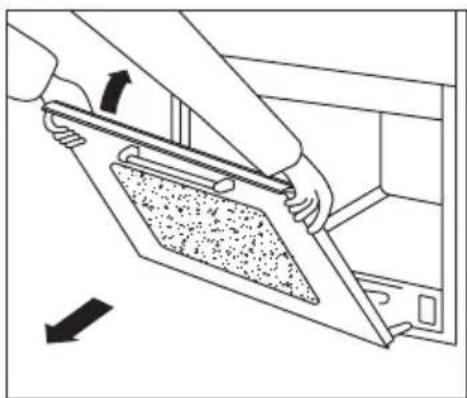
- While holding the door on each side, shut the door until it touches the levers. Then continue closing the door until it is about 4 inches (10cm) from being fully closed.
- Pull the door towards you, pulling it out of its seat. Door will gently come away from the oven. (Refer to Figure 9.)
- To replace the door, perform the reverse of the above procedure.
NOTE: If door does not come away from oven easily, DO NOT force it.
natural_image
Diagram of a person using a tool to adjust or install a component, with no visible text or symbols.REPLACING OVEN INTERIOR LIGHT
⚠ WARNING: Electrical Shock Hazard
Failure to follow these instructions can result in death, fire, or electrical shock.
- Disconnect the oven from the power supply by means of the omni-polar switch used to connect the appliance to the electrical mains, or unplug the appliance if the plug is accessible.
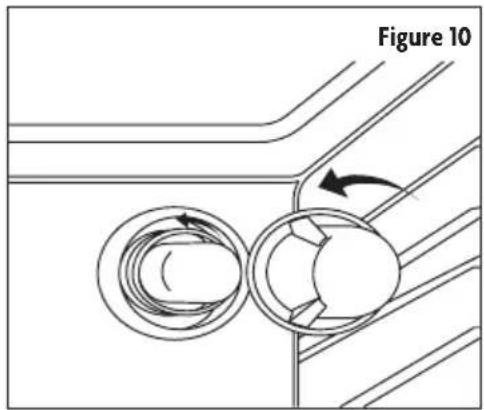
- Remove the glass cover of the light bulb holder turning counter-clockwise. (Refer to Figure 10.)
- Replace the old light bulb with a new oven-safe light bulb with the following characteristics:
• Voltage: 208-240V
- Wattage: 25W
- Type: E14
- Put the glass cover back and reconnect the oven to the main power supply.
TRANSPORTING
⚠ WARNING: Electrical Shock Hazard
Failure to follow these instructions can result in death, fire, or electrical shock.
- Before moving your oven, or performing maintenance, disconnect it from the power supply.
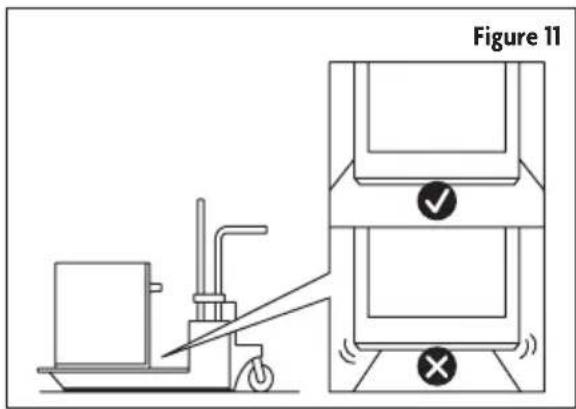
- To avoid damage to the oven vent, use transpotation that is wide enough to hold the entire bottom of the unit. (Refer to Figure 11.)
TROUBLESHOOTING
| Problem Possible | Causes Solutions | |
| Will not operate or turn on. | No power | Verify that the electrical wires are connected to the mains properly. Refer to “Electrical Installation” section on page 11. |
| Household fuse is blown or circuit breaker is tripped. | Replace the fuse or reset the circuit breaker. | |
| Oven will not operate. | Oven controls are set incorrectly. | Make sure the oven is on and set on the correct cooking mode. |
| Cooling fan runs during baking and broiling. | No problem | It is normal for the fan to automatically run while the oven is in use and for some time after to cool. |
| Oven temperature too high or too low. | Oven was not preheated. | Allow the oven to preheat so it is at the proper temperature when your food goes in. |
| Racks are positioned incorrectly. Try changing the rack position. | ||
| Batter is not evenly distributed. Check that the batter is level in the pan. | ||
| Improper cook time was being used. | Adjust the cook time. | |
| Oven door was opened while cooking. | Oven peeking releases oven heat and can result in longer cook times. | |
| Baked items are too brown on the bottom. | Oven rack is placed too low. Move rack to a higher position in the oven. | |
| Pie crust edges are browning early. | Temperature is too hot. | Use aluminum foil to cover the edge of the crust and/or reduce baking temperature. |
| Oven light does not work. | Light bulb is loose or defective. Tighten or replace the bulb. | |
| Switch operating light is broken. Contact a qualified technician. | ||
| Oven makes clicking noise. | No problem | This is the sound of the heating element turning on and off and is normal. |
| Display flashes. Power outage or surge Reset the clock. If the oven was in use, reset it. | ||

LIMITED WARRANTY
MC Appliance Corporation warrants each new Wall Oven to be free from defects in material and workmanship, and agrees to remedy any such defect or to furnish a new part(s), at the company's option, for any part(s) of the unit that has failed during the warranty period. Parts and labor expenses are covered on this unit for a period of one year from the date of purchase. A copy of the dated sales receipt/invoice is required to receive warranty service, replacement or refund.
This warranty covers appliances in use within the contiguous United States, Alaska, Hawaii and Puerto Rico. This warranty does not cover the following:
• Damages due to shipping damage or improper installation.
• Damages due to misuse or abuse.
• Content losses due to failure of the unit.
• Repairs performed by unauthorized service agents.
• Service calls that do not involve defects in material and workmanship such as instructions on proper use of the product or improper installation.
- Replacement or resetting of house fuses or circuit breakers.
• Failure of this product if used for other purposes than its intended purpose.
• Disposal costs for any failed unit not returned to our factory.
• Any delivery/installation costs incurred as the result of a unit that fails to perform as specified.
- Expenses for travel and transportation for product service if your appliance is located in a remote area where service by an authorized service technician is not available.
- The removal and reinstallation of your appliance if it is installed in an inaccessible location or is not installed in accordance with published installation instructions.
• Refunds for non repairable products are limited to the price paid for the unit per the sales receipt.
- This warranty is non transferable. This warranty applies only to the original purchaser and does not extend to any subsequent owner(s).
Limitations of Remedies and Exclusions:
Product repair in accordance with the terms herein, is your sole and exclusive remedy under this limited warranty. Any and all implied warranties including merchantability and fitness for a particular purpose are hereby limited to one year or the shortest period allowed by law. MC Appliance Corporation is not liable for incidental or consequential damages and no representative or person is authorized to assume for us any other liability in connection with the sale of this product. Under no circumstances is the consumer permitted to return this unit to the factory without the prior written consent of MC Appliance Corporation.
Some states prohibit the exclusion or limitation of incidental or consequential damages, or limitations on implied warranties. This warranty gives you specific legal rights, and you may also have other rights which vary from state to state.
Model
Parts
Labor
Type of Service
MCSWOE24S
One Year
One Year
Carry In
For Service or Assistance please call 888-775-0202 or visit us on the web at www.mcappliance.com to request warranty service or order parts.

CNA International, Inc. d/b/a MC Appliance Corporation. All rights reserved. Magic Chef® logo is a registered trademark of CNA International, Inc.
www.mcappliance.com Printed in China

natural_image
Line drawing of a simple kitchen oven with control buttons and door (no text or symbols)Modelo MCSWOE24S
LEA ESTE MANUAL ANTES DE UTILIZAR SU HORNO DE PARED Y GUÁRDELO PARA FUTURA REFERENCIA.

natural_image
Pure grid pattern with vertical lines and a horizontal line, no text or symbols present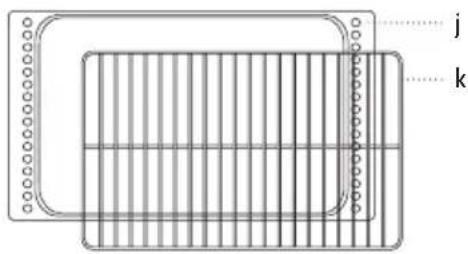
RELOJ DIGITAL (DIGITAL CLOCK)
natural_image
Diagram of a mechanical assembly with directional arrows indicating movement (no text or symbols)- 24-Inch Built-In Wall Oven
- PRODUCT REGISTRATION
- CONTENTS
- PRECAUTIONS
- EXPLANATION OF SYMBOLS
- WARNING
- CAUTION
- IMPORTANT SAFETY INSTRUCTIONS
- PROPER INSTALLATION AND MAINTENANCE
- FIRE SAFETY
- BURN PREVENTION
- CHILD SAFETY
- SAVE THESE INSTRUCTIONS FOR FUTURE REFERENCE
- SPECIFICATIONS
- PARTS AND FEATURES
- PRODUCT PARTS & ACCESSORIES
- INSTALLATION INSTRUCTIONS
- LOCATION REQUIREMENTS
- ELECTRICAL REQUIREMENTS
- ⚠ WARNING: Electrical Shock Hazard
- ELECTRICAL INSTALLATION
- 3-WIRE BRANCH CIRCUIT
- 4-WIRE BRANCH CIRCUIT
- BEFORE USE
- OPERATION INSTRUCTIONS
- COOKING MODES
- DIGITAL CLOCK
- TIMER
- Kitchen Timer Setting
- IMPORTANT:
- Full Automatic Timer Setting
- Semi-Automatic Timer Setting
- PRACTICAL COOKING ADVICE
- Broil
- Fan Grill
- Convection Cooking
- Defrost
- Cooling Ventilation
- CARE AND MAINTENANCE
- CLEANING
- CAUTION:
- Control Knobs
- Stainless Steel Exterior
- Glass Door Exterior
- Oven Interior
- NOTE: ALWAYS follow label instructions on cleaning products.
- Interior Lower Grill Element
- Removing Oven Door
- WARNING:
- Follow these instructions:
- NOTE: If door does not come away from oven easily, DO NOT force it.
- REPLACING OVEN INTERIOR LIGHT
- TRANSPORTING
- TROUBLESHOOTING
- LIMITED WARRANTY
- Limitations of Remedies and Exclusions:
- RELOJ DIGITAL (DIGITAL CLOCK)
Brand : Magic Chef
Model : MCSWOE24S
Category : Oven