
SURJETEUSE SLR4D - Overlocker TOYOTA - Free user manual and instructions
Find the device manual for free SURJETEUSE SLR4D TOYOTA in PDF.

| Brand | Toyota |
| Model | SLR4D |
| Product Type | Overlocker (overlock sewing machine) |
| Number of threads | 2, 3 or 4 threads |
| Number of needles | 2 needles (1 needle possible) |
| Stitch length | 0.8 to 5 mm |
| Overlock width | 5 mm (5 to 6.5 mm) |
| Differential feed | 1:0.7 to 2 |
| Maximum sewing speed | 1200 stitches/min |
| Compatible needles | Standard 705/130 (HA×1SP or HA×1T) No.80 (#11) |
| Needle spacing | 2 mm |
| Dimensions (L × W × H) | 300 × 230 × 290 mm (max 320 × 255 × 555 mm) |
| Weight | 8.1 kg |
| Lighting | 15 W bulb of identical type |
| Main functions | 4-thread overlock (2 needles), 3-thread overlock (1 needle), 2-thread overedge, rolled hem, flatlock, overlock with cord |
| Adjustments | Thread tension (4 knobs), presser foot pressure, stitch length, differential feed |
| Maintenance | Regular lubrication, cleaning lint, replacing knives and bulb |
| Waste bin | Installed to collect fabric clippings |
| Safety | Unplug before maintenance, do not use near water, keep fingers away from moving parts |
| Included accessories | Not specified in detail, see manual (p.85) |
Frequently Asked Questions - SURJETEUSE SLR4D TOYOTA
User questions about SURJETEUSE SLR4D TOYOTA
0 question about this device. Answer the ones you know or ask your own.
Ask a new question about this device
Download the instructions for your Overlocker in PDF format for free! Find your manual SURJETEUSE SLR4D - TOYOTA and take your electronic device back in hand. On this page are published all the documents necessary for the use of your device. SURJETEUSE SLR4D by TOYOTA.
USER MANUAL SURJETEUSE SLR4D TOYOTA
SL1T-X Series All Models
TOYOTA
English
UK ONLY
IMPORTANT
PLEASE READ CAREFULLY
The wires in this mains lead are coloured in accordance with the following code:
BLUE-NEUTRAL
BROWN-LIVE (OR ACTIVE)
As the colours of the mains lead of this appliance may not correspond with the coloured markings identifying the terminals in your plug - PROCEED AS FOLLOWS: The earth plug pin is unnecessary. As the Machine is designed under double insulation structure, the earth wire is removed from the machine. The wire coloured BROWN must be connected to the terminal marked L or A or coloured RED.
The wire coloured BLUE must be connected to the terminal marked N or coloured BLACK. Neither core is to be connected to the earth terminal of a three-pin plug.
English
IMPORTANT SAFETY INSTRUCTIONS
When using an electrical appliance, basic safety precautions should always be followed, including the following:
Read all instructions before using (this appliance).
DANGER — — To reduce the risk of electric shock:
An appliance should never be left unattended when plugged in. Always unplug this appliance from the electric outlet immediately after using and before cleaning.
WARNING — — To reduce the risk of burns, fire, electric shock, or injury to persons:
- Do not allow to be used as a toy. Close attention is necessary when this appliance is used by or near children.
- Use this appliance only for its intended use as described in this manual. Use only attachments recommended by the manufacturer as contained in this manual.
- Never operate this appliance if it has a damaged cord or plug, if it is not working properly, if it has been dropped or damaged, or dropped into water. Return the appliance to the nearest authorized dealer or service center for examination, repair, electrical or mechanical adjustment.
- Never operate the appliance with any air openings blocked. Keep ventilation openings of the sewing machine and foot controller free from the accumulation of lint, dust, and loose cloth.
- Never drop or insert any object into any opening.
- Do not use outdoors.
- Do not operate where aerosol (spray) products are being used or where oxygen is being administered.
- To disconnect, turn all controls to the off ("O") position, then remove plug from outlet.
- Do not unplug by pulling on cord. To unplug, grasp the plug, not the cord.
DANGER
- Always unplug before relamping. Replace the bulb with same type rated 15 watts.
- Do not reach for an appliance that has fallen into water. Unplug immediately.
- Do not place or store appliance where it can fall or be pulled into a tub or sink. Do not place or drop into water or other liquid.
English
WARNING
- Switch off or unplug the appliance when leaving it unatteneded.
- Unplug the appliance before carrying out maintenance or replacing lamps.
- Keep fingers away from all moving parts. Special care is required around the sewing machine needle.
- Always use proper needle plate. The wrong plate can cause the needle to break.
- Do not use bent needles.
- Do not pull or push fabric while stitching. It may deflect the needle causing it to break.
- Switch the sewing machine off ("O") when making any adjustments in the needle area, such as threading needle, changing needle, threading bobbin, or changing presser foot, etc.
- Always unplug sewing machine from the electrical outlet when removing covers, lubricating, or when making any other user servicing adjustments mentioned in the instruction manual.
- Never operate on a soft surface such as a bed or couch where the air openings may be blocked.
SAVE THESE INSTRUCTIONS
English
CONTENTS
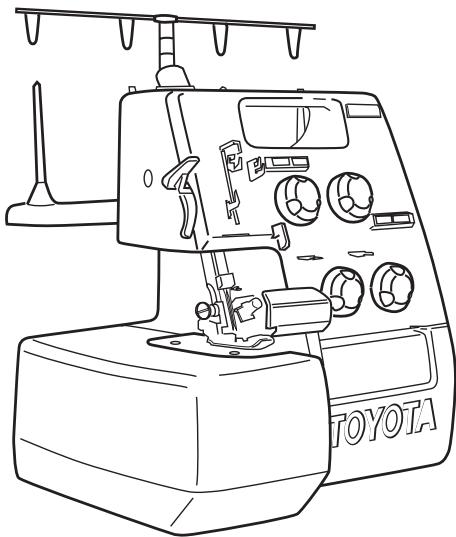
- NAMES OF PARTS 1
- PREPARATION FOR SEWING 3
Connecting Power Cord 3
Setting Telescopic Thread Stand 5
Opening The Front Panel and Side Cover 7
How to Change Threads 9
Replacing Needles 11
Threading 13
Preparation for Sewing and Checking 23
- FOUR THREAD OVEREDGING STITCH USING 2 NEEDLES..... 25
Before Sewing 25
Presser Foot Lifter 25
Beginning and Ending of Sewing 27
Adjustment of The Presser Foot Pressure 29
Thread Tension Adjustment 29
Adjustments for the Differential Feed 41
Adjustments for Size of Bite 47
How to Adjust Stitch Length 49
Sewing for Curved Seams 49
StandardChartfortheThreadTension 51
- SETTING WASTE TRAY 53
- THREE THREAD OVEREDGING STITCH USING ONE NEEDLE
55
TWO THREAD OVERLOCK 57
- ROLL HEMMING 59
7.PIN TUCKING 65
8.CORDEDOVERLOCK 69 - REPLACING THE CUTTING KNIVES 71
- CHANGING THE LIGHT BULB 75
- LUBRICATION 77
- TABLE OF SEWING MATERIALS, NEEDLES AND THREAD 79
13 ACCESSORIES 85 - SPECIFICATIONS 87
Espanol
Connecting Power Cord
Connect foot controller and power cord ① ②.
Before plugging in your machine, be sure that the voltage is same as that of your machine.
(written on a plate at back of machine).
* Specifications vary from country to country.
Press the switch on the machine to turn on the power and the sewing light.
Always switch off or unplug machine when not in use.
The more you press foot controller, the faster the machine runs.
When the power switch is turned off, the machine will not operate even by pressure on the tool controller.
*Electronic type of controller
This foot controller is powerful and stable, even at a slow speed. It is possible to operate simply and produce neat finish, even detailed operation.
Espanol
PREPARACION PARA LA COSTURA
English: Electronic type of foot controller
Extend the telescopic thread stand to its full height, then turn it until the shaft clicks into its locked position.
Espanol
Instalacion Del Guia Hilos Telescopico
Opening The Front Panel and Side Cover
- How to Open the Front Panel:
a. Push panel to the right as far as it will go, and
b. Pull panel down towards you.
Espanol
English: Front panel
Espanol: Panel frontal
François: Panneau frontal
- How to Open Side Cover:
a. Push cover to the left to unlock, and b. Swing cover back away from you. -
How to Close Side Cover:
a. Push cover to the right, and b. Lock into place. -
Cómo cerre la Tapa Lateral:
a. Presionar la tapa hacía la derecha, y b. Cerra con carrojo en sirio.
English: Side cover
Espanol: Tapa lateral
When threading the machine from the beginning, threading must be carried out in the following sequence:
First: Upper looper threading (B)
Second: Lower looper threading (A)
Finally: Needle threading (C,D)
Lower looper threading
Push the front cover to the right, and fold it down towards you. Take the thread drawn from the spool and pass it, through guide ② of the thread stand and then, in order, through guides ③, ④, ⑤ and thread tension dial ⑥. (Fig. A)
Espanol
Enhebrado Del Hilo
Pass the thread through guides ⑦ ⑧ ⑨
and ⑥. Bring the lower looper to the far left position by turning handwheel towards you, and pass the thread ① through lower looper thread guide . Then, move the lower looper slightly to the right by turning the handwheel towards you. (Fig. B)
Pass the thread through lower looper thread guide ② as shown. (Fig. C) Then thread the hole of lower looper ③ using tweezzrs. Cut the thread leaving about 10 cm (4^ ) of spare thread. (Fig. D)
Upper looper threading
- Bring the upper looper to its lowest position by turning handwheel toward you.
- Draw thread from spool and pass it, through guide ② of the thread stand and then, in order, through guides ③ (Fig. A).
- Thread the hole of upper looper ① using tweezers. Cut the thread leaving about 10cm (4^ ) of spare thread (Fig. E).
- Close the front cover.
Espanol
Pase el hilo a工程技术 de las guias ⑦,8 ⑨ 10
Right needle threading
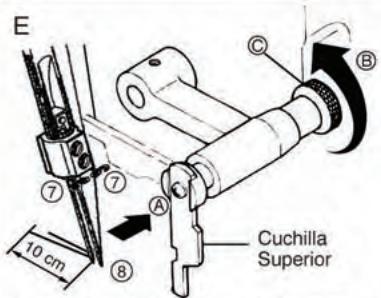
- For ease in threading, push the upper knife holder screw from side with the forefinger of your left hand and grasp the right end of the holder and turn it in the direction of arrow 串 with your right hand. (Fig. F)
Take the thread drawn from spool, and pass it through thread guide 已 已 then thread to the right-hand needle's eye 9 from front to back. Cut the thread leaving about 10cm(4^ ) of spare thread.(Fig.A)
Left needle threading
Take the thread drawn from spool, and pass it through thread guides ② ④ ⑥ ⑧ ,and thread the left-hand needle's eye ⑨ from front to back. (Fig.A,F)
Espanol
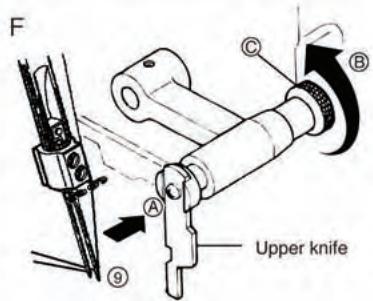
As the upper knife is sharpened, care should be taken when moving this part.
Bring the lower looper to the far left position by turning handwheel towards you, and pass the thread through lower looper thread guide ⑨ Pass thread through lower looper slit ⑩ from behind.(Fig.B)
Then move the lower looper slightly to the right by turning the handwheel towards you.
Then thread the hole of lower looper using tweezers. Cut the thread leaving about 10cm (4^ ) of spare thread. (Fig. C)
Upper looper threading
- Bring the upper looper to its lowest position by turning handwheel towards you.
- Draw thread from spool and pass it, through guide ① of the thread stand and then, in order, through guides ② ~ ⑧. (Fig. A)
- Thread the hole of upper looper ⑨ using tweezers. Cut the thread leaving about 10cm (4^ ) of spare thread. (Fig. D).
- Close the front cover.
Espanol
Right needle threading
- For ease in threading, turn the moveable knife to the non-operating position. Push the upper knife holder screw from with the forefinger of your left hand and grasp the right end of the holder and turn it in the direction of arrow 包 with your right hand. (Fig. E)
- Take the thread drawn from spool, and pass it through thread guide ① ⑦ . Then thread the eye of right-hand needle's eye ⑧ from front to back using tweezers. Cut the thread leaving about 10cm ( 4^ ) of spare thread. (Fig. E)
Left needle threading
Take the thread drawn from spool, and pass it through thread guides ① ③ ④ ⑦ ,and thread the lefthand needle's eye 8 from front to back. (Fig.A,E)
- Return the moveable knife to the cutting position.
Espanol
As the upper knife is sharpened, care should be taken when moving this part.
Preparation for Sewing and Checking
- Check that no thread slips off or snaps.
- Confirm that the upper knife moves against the lower knife correctly by turning the handwheel slowly towards you. If it is not correct, check if there is any fabric or waste thread between knives.
- Turn the handwheel towards you with your right hand to check that the thread winds around the stitch finger of the needle plate.
If the thread doesn't wind around the stitch finger of the needle plate, check if any threads are threaded incorrectly.
Espanol
Revision Y Preparacion Para La Costura
Adjustment of the Presser Foot Pressure
The presser foot pressure is preadjusted for materials of medium (standard) thickness.
Adjustment is necessary only when you work on very thin or very thick materials. Accordingly, sew thinner materials with less pressure and thicker materials with more pressure. Increase the pressure of the presser foot by tightening the adjustment screw.
Espanol
Ajustando La Presion Del Prensatelas
English: Tighten Loosen
Espanol: Apriete Afloje
Francais: Serrer Desserer
Thread Tension Adjustment
Set the balance of the tension as weak as possible.
Balance of the Loopwer thread:
When the lower looper thread is pulled to the top of material, loosen tension dial ③ counterclockwise. (or tighten tension dial ④ clockwise.) When the upper looper thread is pulled to the underside, tighten tension dial ③ clockwise. (or loosen tension dial ④ counterclockwise.)
Ajustando La Tension Del Hilo
- Lower looper thread and upper thread should be well balanced with same tension. (Both looper threads should make crosses at the edge of the fabric.)
- Needle thread should not be slacken, or pulled.
Espanol
Tension correcta
Unbalanced upper looper thread wraps round and over the back
Tighten the thread tension of the upper looper (Dial ③) or loosen the thread tension of the lower looper (Dial ④).
Espanol
Unbalanced lower looper thread wraps round and over the face
Tighten the thread tension of the lower looper (Dial 4) or loosen the thread tension of the upper looper (Dial 3).
Espanol
Unbalanced left needle thread too loose
Tighten the thread tension of the left needle (Dial ①) or loosen both looper thread (Dial ③ and ④).
Espanol
Unbalanced right needle thread too loose
Tighten the thread tension of the right needle (Dial ②).
Espanol
Adjustments For The Differential Feed
Differential feeding performs the function of stretching or condensing the edge of the fabric, since two independent feed dogs, one in front and one behind the needles, can be adjusted to feed at different ratio.
The function has the effect of producing a neat finish of overdging for stretchable and condensable fabrics.
- "N" indicates the neutral position.
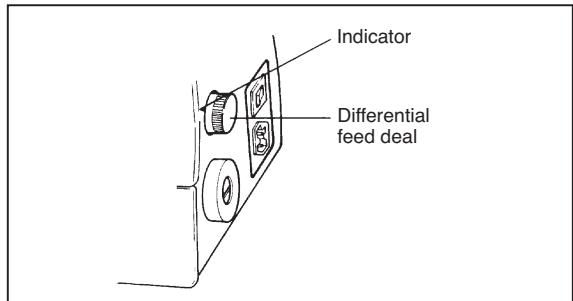
Refer to the below chart and test stitch performance on a scrap of material you are going to use.
| Fabric | Differential feed ratio is set “N”. | Differential feed ratio | Result of adjustment | |||
| Stretchable materials | Knit Jersey | N-2 | ||||
| Unstretchable and uncondensable materials | Medium woven fabrics | N | ||||
| Condensable materials | Georgette | 0.7-N | ||||
Espanol
Ajuste De La Alimentacion De La Tela
Adjustments for Size of Bight
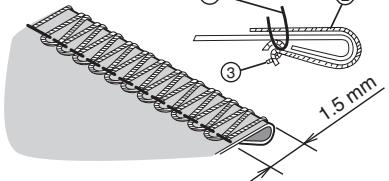
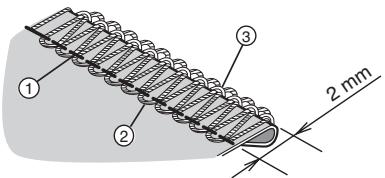
- Adjust the size of the bight from 5mm (0.2^ ) to 6.5mm(0.28^ ) according to the kind of material.
The standard bight size is 5 mm (0.2^ ) - Open the side cover to adjust the bight size.
(1) If the cutting width is narrower than the bight size, turn the bite width adjusting dial to the direction of arrow. (To bigger number)
(2) If the cutting width is wider than the bight size, turn the bite width adjusting dial to the direction of the arrow. (a smaller number)
The right figure shows that the size of the bite between the left needle and the edge of the material 5mm
Espanol
How to Adjust Stitch Length
The machine is pre-set to a 2.5mm stitch length for regular seaming and overedging. You may adjust the stitch length from 1mm (Narrow rolled hemming) to 5mm by one-touch of the stitch length adjustment lever.
For normal overedging set the stitch length from 2.5mm to 5mm . A stitch length less than 2.5mm is used only for rolled hemming.
Sewing for Curved Seams
For a neat and clean finish of curved seams:
For inside curves, guide the fabric gently with the trimming line of the fabric under the right front of the presser foot, applying pressure to the fabric with your left hand, at the same time, apply a little pressure in the opposite direction with your right hand as shown.
For outside curves, apply pressure in the opposite directions of the above.
Espanol
Standard Chart for the Thread Tension
The tension for each of the thread tension dials should be different according to the pattern stitches as in the chart on the right.
Since the figures in the chart are for average strength of threads tension, it may be necessary to adjust the thread tension a litte.
Thread tensions will differ according to the kind of fabric and the thread.
The differential feed ratio is normally "N". (See p.41)
Espanol
Guía Standard Para Tension Del Hilo
SETTING WASTE TRAY (Option on some models)
(1) Insert the right guide @ of the waste tray to the right leg of the overlock machine as illustrated. Turn the waste tray in the direction of arrow.
(2) Push the left end of the waste tray in the direction of arrow.
Espanol
INSTALANDO LA BANDEJA DE RECORTES
- Open the front cover.
- Use one needle thread (left or right needle) and lower looper thread.
- Turn the handwheel toward you to move the upper looper to the right side of the needle.
- Hold the ① by hand and gently push it down.
Warning:
Pushing converter down too hard may bend converter.
- Insert the tip ② of the 2-thread converter into the eye ③ of the upper looper.
- Close the front cover.
For 3-thread/4-thread overlock sewing, set 2-thread overlock converter in the up position as illustrated, by removing the tip ② out of the eye ③ of the upper looper.
Espanol
(Option on some models)
Roll hemming is achieved by rolling the fabric and overlocking. The 2 types as illustrated on left is ideal for use with thin materials.
Espanol
ORILLADO DOBLE
The fabric is rolled by adjusting.
The thread tension and is overlocked with upper looper thread.
Orillado doble
The fabric is rolled and overlocked with upper and lower looper thread.
Orillado doble bajo
(1) Remove the left needle.
(2) Pull the stitch finger lever towards you.
(3) Set the stitch width adjusting dial to 5.
(4) Set the stitch length adjuster to 1.
Espanol
The figures in the above chart may be a little different according to the kind of the fabric and the threads. (See p.41 and p.79)
For roll hem sewing, pass the needle thread to the left side (solid line) of thread guide @ as illustrated. (For normal sewing, pass it to the right side (dotted line) of thread guide @)
(3) At the beginning of sewing, gently pull the end of the thread chain.
For roll hem sewing, pull the material gently towards the rear of the machine, and you'll get neater stitches.
Pin tucking is overlocked so avoid cutting the fabric by raising the upper knife.
Pin tucking is suited to the design of a child's clothing and a lady's blouse.
* Use the presser foot marked "A" and needle plate "A".
(1) Remove the left or right needle to your required width. (Sew only with the one needle.)
(2) Raise the upper knife. (See p.17)
Lower the presser foot lifter.
(3) The tension is set the same as the one for overedging. (See p.51)
The fabric is ironed along the line of the pin tucking in advance.
* The differential feed ratio is normally "N".
Espanol
PINZAS, PESPUNTES
REPLACING THE CUTTING KNIVES
The upper knife and lower knife are made of a special long-lasting steel and will seldom have to be replaced. However, when they do not cut the fabric even though they are set in the right position. Replace them in the following way: Before replacing the knife, be sure the power supply plug is take out.
Move the front cover to the right, then open it toward you.
Espanol
REEMPLAZANDO LOS CUCHILLOS
REEMPLACEMENT DES COUTEAUX
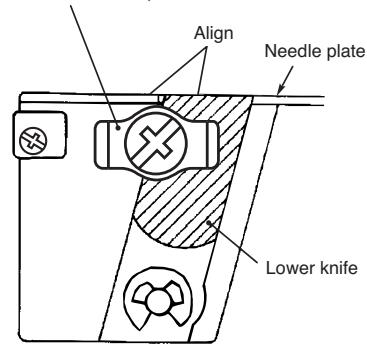
Lower knife clamp screw
Loosen the lower knife clamp screw and change the knife for a new one. Align the top of the lower knife with the top of the needle plate.
(2) Replacing the upper knife:
Move the upper knife to its lowest position by turning the handwheel towards you.
Loosen the upper knife screw, while holding the upper knife. Change the knife for a new one.
Check if the biting position ⑧ of upper knife is positioned downwards 1.6 2.0 from the top of biting position of lower knife.
Tighten the upper knife screw.
Espanol
CHANGING THE LIGHT BULB
When the light does not come on even though it is switched on:
(1) Take out the power supply plug.
(2) Remove the lamp cover.
(3) Change the light bulb.
(4) Replace the lamp cover.
Espanol
CAMBIANDO LA AMPOLLETA
Lubrication is not necessary for this machine since the important parts are all made of a special oil impregnated sintered metal. However, one or two drops of oil will increase durability.
CLEANING
First disconnect machine from power supply by removing plug from the electric outlet.
- Open front cover and side cover.
- Using a brush which may or may not be supplied with your machine.
STORAGE
(Option on some models)
- When the machine is not in use, please disconnect it from the power supply by removing plug from the electric outlet.
- Using a vinyl cover which may or may not be supplied with your machine.
- Store away from bright and damp places.
SERVICING
Any questions regarding service and or operation is to be addressed to the store where the machine was purchased.
Espanol
LUBRICACION
TABLE OF SEWING MATERIALS NEEDLES AND THREAD
| HA×1SP Needle HA×1T (705/130) (For home-use sewing machine) | Thread | Thread tension (Needle thread) | Overedging width (Between left needle and edge) | Stitch length | |
| Thin material (crept, georgette) | #11 (80) | Polyestel (spun, filament) #60/2 Twisted thread ~ #80/2 twisted thread (#80/3 Twisted thread ~ #100/3 twisted thread) (Three-thread overedging stitch). | Loose | 5 mm | 2 ~ 2.5 mm |
| Medium to thick material (Serge, gabardine, etc.) | #11 or #14 (80) | #60/2 Twisted thread (Three or four-thread overedging stitch). | Medium | 5 mm | 2.5 ~ 3 mm |
| Thick material (thick denim) | #14 (90) | #50/2 Twisted thread ~ #60/2 twisted thread (Three or four-thread overedging stitch). | Tight | 5 mm | 2.5 ~ 3 mm |
Use ball point needles for Man-Made fibres or stretch fabrics
Espanol
ACCESSORIES / ACCESSORIOS / ACCESSOIRES / ZUBEHÖR / ACCESSOIRES / ACCESSORI
| 1 * | 4 * | 8 |
| 2 HA × 1SP HA × 1T (705/130) #14...3 (90) | 5 * | 9 |
| 6 | 10 | |
| 3 * | 7 * | 11 * |
| English | Français | Nederlands |
| 1. Screw drivers | 1. Tournevis | 1. Schroevedraiaers |
| 2. Needles | 2. Aiguilles | 2. Naalden |
| 3. Cleaning brush | 3. Brosse de nettoyage | 3. Schoonmaakborsteltje |
| 4. Accessory Box | 4. Boite d'accessoires | 4. Accessoires doos |
| 5. Lower knife | 5. Couteau inférieur | 5. Onderste mes |
| 6. Oiler | 6. Huile | 6. Oliespuitje |
| 7. Vinyl cover | 7. Housse | 7. Vinyl afdekhoes |
| 8. Net | 8. Fillet | 8. Net |
| 9.Tweezers | 9. Pinces | 9. Pincet |
| 10.Spool Adapter | 10. Suport bobine | 10. Spoelhulpstuk |
| 11.Waste tray | 11. Bac à déchets | 11. Afvalbak |
| *Accessories shown below in some case are optional | *Les accessoires ci-dessous sont, dans certains cas, en option | *Accessoires als hier onder afgebeeld zichin in sommige geallen als extra verkrijgbaar |
| Espanol | Deutsch | Italiano |
| 1. Destornilladores | 1. Pinzette | 1. Cacciavite |
| 2. Agujas | 2. Nadeln | 2. Aghi |
| 3. Cepillo de limpieza | 3. Reinigungsbürste | 3. Pennello |
| 4. Caja de accesorios | 4. Zubehö-Box | 4. Scatola accessori |
| 5. Cuchillo inferior | 5. Unterver Abschneider | 5. Coltello inferiore |
| 6. Aceitero | 6. Ölkännchen | 6. Oliatore |
| 7. Cobertor Vinilico | 7. Abdeckhaube | 7. Copertina |
| 8. Malla | 8. Netz | 8. Rete |
| 9. Pinzas | 9. Schraubenzieher | 9. Pinzette |
| 10. Adaptador de carrete | 10. Abdeck-Kappe | 10. Copri- rocchetto |
| 11. Bandeja de recortes | 11. Schnittrest-Auffänger | 11. Vaschetta raccoglipolverve |
| * Los accesorios más abaso son, en alsunos ca sos, en opcción | * Das unten abgebildete Zubehör kann Unterschiede gegenüber dem der Maschine beigepackten Zubehör aufweisen | * Gli accessori fatto iluminati, in alcuni casi sono optional. |
Section
14
English
SPECIFICATIONS
| Number of threads | 4 Threads (3 threads, 2 threads) | Stitch length | 0.8 ~ 5 mm |
| Number of needles | 2 Needles (1 needle) | Differential feed ratio | 1:0.7 ~ 2 |
| Needles | Standard HA × 1SP or HA × 1T (705/130) #11(80) #14(90) | Maximum sewing speed | 1200 RPM |
| Width between two needles | 2 mm | Machine dimensions | Width 300mm (Max. 320mm) Depth 230mm (Max. 255mm) Height 290mm (Max. 340mm~555mm) |
| Overedge width Size of bight | Standard 5mm (Range 5~6.5mm) | Weight (Head only) | 8.1 kg |
Espanol
ESPECIFICACIONES
- English
- UK ONLY
- IMPORTANT
- PLEASE READ CAREFULLY
- BLUE-NEUTRAL
- BROWN-LIVE (OR ACTIVE)
- IMPORTANT SAFETY INSTRUCTIONS
- Read all instructions before using (this appliance).
- DANGER — — To reduce the risk of electric shock:
- WARNING — — To reduce the risk of burns, fire, electric shock, or injury to persons:
- DANGER
- WARNING
- SAVE THESE INSTRUCTIONS
- CONTENTS
- Espanol
- Connecting Power Cord
- PREPARACION PARA LA COSTURA
- Instalacion Del Guia Hilos Telescopico
- Opening The Front Panel and Side Cover
- Lower looper threading
- Enhebrado Del Hilo
- Upper looper threading
- Right needle threading
- Left needle threading
- Preparation for Sewing and Checking
- Revision Y Preparacion Para La Costura
- Adjustment of the Presser Foot Pressure
- Ajustando La Presion Del Prensatelas
- Thread Tension Adjustment
- Ajustando La Tension Del Hilo
- Tension correcta
- Adjustments For The Differential Feed
- Ajuste De La Alimentacion De La Tela
- Adjustments for Size of Bight
- How to Adjust Stitch Length
- Sewing for Curved Seams
- Standard Chart for the Thread Tension
- Guía Standard Para Tension Del Hilo
- SETTING WASTE TRAY (Option on some models)
- INSTALANDO LA BANDEJA DE RECORTES
- Warning:
- (Option on some models)
- ORILLADO DOBLE
- PINZAS, PESPUNTES
- REPLACING THE CUTTING KNIVES
- REEMPLAZANDO LOS CUCHILLOS
- REEMPLACEMENT DES COUTEAUX
- Replacing the upper knife:
- CHANGING THE LIGHT BULB
- CAMBIANDO LA AMPOLLETA
- CLEANING
- STORAGE
- SERVICING
- LUBRICACION
- ACCESSORIES / ACCESSORIOS / ACCESSOIRES / ZUBEHÖR / ACCESSOIRES / ACCESSORI
- Section
- 14
Brand : TOYOTA
Model : SURJETEUSE SLR4D
Category : Overlocker