
GRP3842 - Grill GEORGE FOREMAN - Free user manual and instructions
Find the device manual for free GRP3842 GEORGE FOREMAN in PDF.


| Product Type | Electric Contact Grill |
| Model | GRP3842 |
| Dimensions (W x D x H) | 15 x 12 x 5 inches (38 x 30 x 13 cm) |
| Weight | 8.5 lbs (3.9 kg) |
| Power | 1200 Watts |
| Cooking Surface | 120 sq in (774 sq cm) |
| Coating | Non-stick, scratch-resistant |
| Temperature Control | Adjustable thermostat with 5 settings |
| Indicator Lights | Power and ready lights |
| Drip Tray | Removable, dishwasher-safe |
| Plates | Removable, dishwasher-safe |
| Floating Hinge | Yes, adjustable to food thickness |
| Handle | Cool-touch, ergonomic |
| Cord Length | 36 inches (91 cm) |
| Voltage | 120V AC, 60Hz |
| Wattage | 1200W |
| Material | Stainless steel housing with plastic handles |
| Cleaning | Plates and drip tray dishwasher-safe; wipe exterior with damp cloth |
| Safety Features | Automatic shut-off, cool-touch handles, non-slip feet |
| Included Accessories | Drip tray, instruction manual with recipes |
Frequently Asked Questions - GRP3842 GEORGE FOREMAN
User questions about GRP3842 GEORGE FOREMAN
0 question about this device. Answer the ones you know or ask your own.
Ask a new question about this device
Download the instructions for your Grill in PDF format for free! Find your manual GRP3842 - GEORGE FOREMAN and take your electronic device back in hand. On this page are published all the documents necessary for the use of your device. GRP3842 by GEORGE FOREMAN.
USER MANUAL GRP3842 GEORGE FOREMAN
Please Read and Save this Use and Care Book
Accessories/Parts (USA/Canada)
When using electrical appliances, basic safety precautions should always be followed, including the following:
Read all instructions.
☐ Do not touch hot surfaces. Use handles or knobs.
☐ To protect against electrical shock do not immerse cord, plugs or appliance in water or other liquid.
☐ Close supervision is necessary when any appliance is used by or near children.
☐ Unplug from outlet when not in use and before cleaning. Allow to cool before putting on or taking off parts.
☐ Do not operate any appliance with a damaged cord or plug, or after the appliance malfunctions or has been damaged in any manner. Call the appropriate toll-free number on the cover of this manual.
☐ The use of accessory attachments not recommended by the appliance manufacturer may cause injuries.
☐ Do not use outdoors.
☐ Do not let cord hang over edge of table or counter, or touch hot surfaces.
☐ Do not place on or near a hot gas or electric burner, or in a heated oven.
☐ Extreme caution must be used when moving an appliance containing hot oil or other hot liquids.
☐ To disconnect, power OFF, then remove plug from wall outlet.
☐ Do not use this appliance for other than intended use.
SAVE THESE INSTRUCTIONS.
This product is for household use only.
POLARIZED PLUG (USA/Mexico)
This appliance has a polarized plug (one blade is wider than the other). To reduce the risk of electric shock, this plug is intended to fit into a polarized outlet only one way. If the plug does not fit fully into the outlet, reverse the plug. If it still does not fit, contact a qualified electrician. Do not attempt to modify the plug in any way.
GROUNDED PLUG (Canada models only)
As a safety feature, this product is equipped with a grounded plug, which will only fit into a three-prong outlet. Do not attempt to defeat this safety feature. Improper connection of the grounding conductor may result in the risk of electric shock. Consult a qualified electrician if you are in doubt as to whether the outlet is properly grounded.
TAMPER-RESISTANT SCREW
Warning: This appliance is equipped with a tamper-resistant screw to prevent removal of the outer cover. To reduce the risk of fire or electric shock, do not attempt to remove the outer cover. There are no user-serviceable parts inside. Repair should be done only by authorized service personnel.
ELECTRICAL CORD
a) A short power-supply cord (or detachable power-supply cord) is provided to reduce the risk resulting from becoming entangled in or tripping over a longer cord.
b) Longer detachable power-supply cords or extension cords are available and may be used if care is exercised in their use.
c) If a long detachable power-supply cord or extension cord is used,
1) The marked electrical rating of the detachable power-supply cord or extension cord should be at least as great as the electrical rating of the appliance,
2) If the appliance is of the grounded type, the extension cord should be a grounding-type 3-wire cord, and
3) The longer cord should be arranged so that it will not drape over the counter-top or tabletop where it can be pulled on by children or tripped over.
Note: If the power supply cord is damaged, it should be replaced by qualified personnel. In Latin America, by an authorized service center.
Product may vary slightly from what is illustrated.
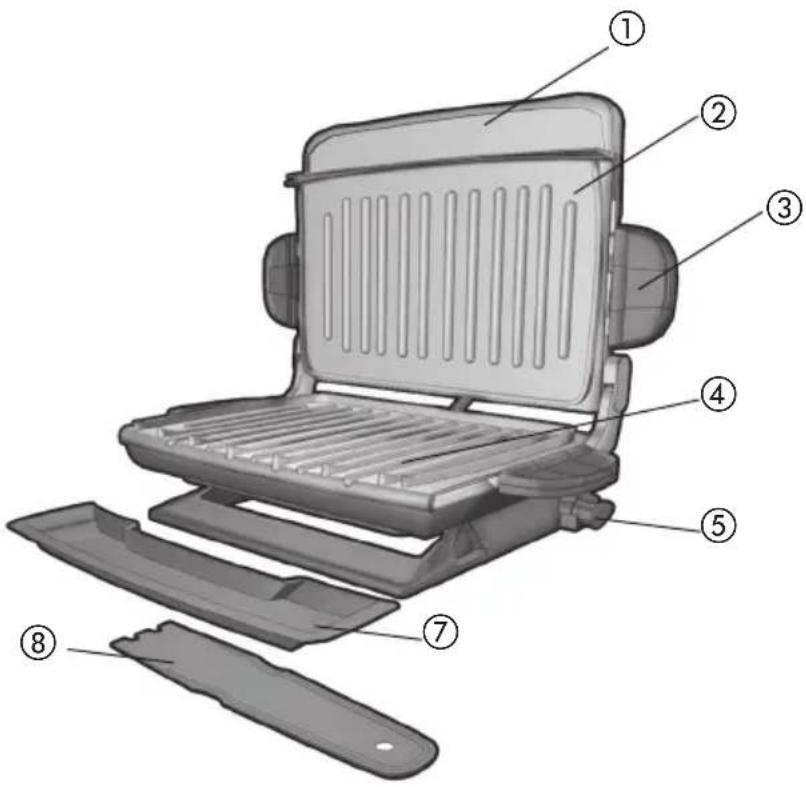
A1
- Integrated handle
† 2. Upper ceramic grill plate (Part # GRP5842-03)
- Grill plate release handles (both sides)
† 4. Lower ceramic grill plate (Part # GRP5842-04)
-
Adjustable grill slope knob
-
Power cord (not shown)
† 7. Drip tray (Part # GRP5842-01)
† 8. Spatula (Part # GRP5842-02)
† Consumer replaceable/removable parts
-
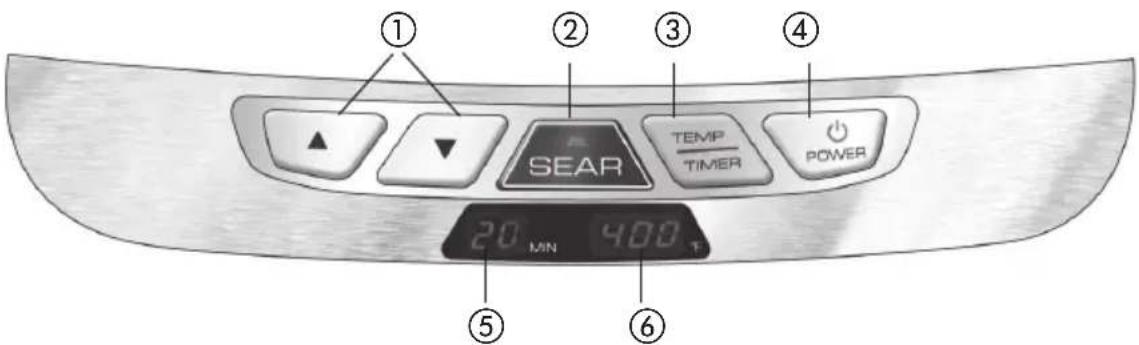
Up/down selection
-
Sear button
-
Temp/Timer selector
-
Power button
-
Time display
-
Temp display
A2
natural_image
Illustration of three kitchen utensils: a flat grater, a rectangular stove, and a baking pan with circular cutouts (no text or symbols)| Plate Included Part # | ||
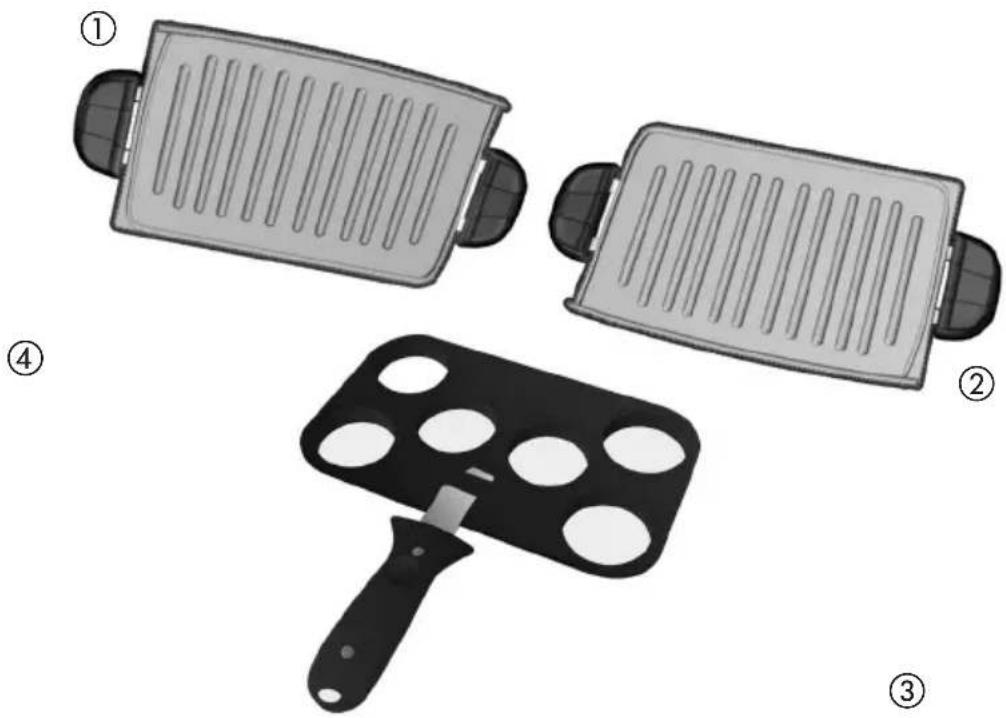
| 1. Upper ceramic grill plate | 1 GRP5842-03 | |
| 2. Lower ceramic grill plate | 1 GRP5842-04 | |
| 3. Slider plate 1 | GRP4-09 (plate);GRP4-10 (handle); | |
How to use:
This product is for household use only.
GETTING STARTED
- Remove all packing material, any stickers, and the plastic band around the power plug.
- Remove and save literature.
- Go to www.prodprotect.com/applica to register your warranty.
- Wash drip tray as instructed in CARE AND CLEANING section of this manual.
- Wipe grill plates with a damp cloth or sponge to remove any dust. Wipe dry with a soft cloth or paper towels.
- Select location where unit is to be used, leaving enough space between back of unit and wall to allow heat to flow without damage to cabinets and walls.
ATTACH GRILL PLATES
Important: This appliance should always be used with 2 grill plates securely attached.
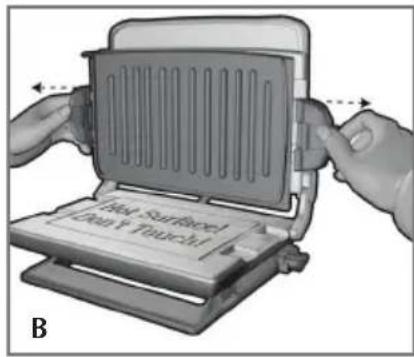
Ceramic Grill Plates (See illustration A3)
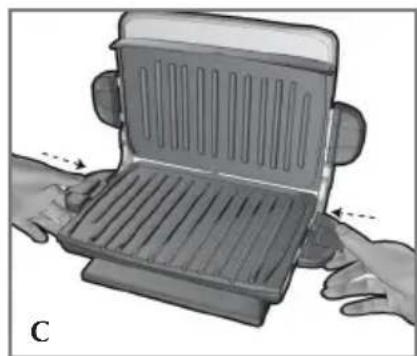
- Securely attach top and bottom grill plates using release handles on sides of plates (B and C).
natural_image
Illustration of hands opening a grater with ventilation slots (no text or symbols)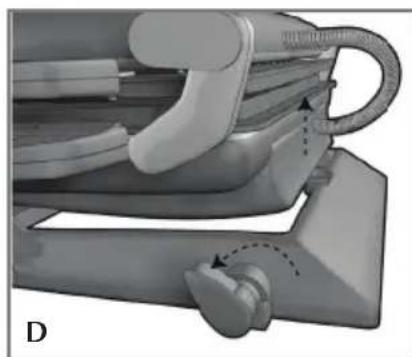
natural_image
Mechanical assembly diagram showing a clamping mechanism with no visible text or symbolsImportant: When grilling meats, use the grill plates and turn the slope knob so that the grill is in the angled grilling position and drippings drain into the grease tray.
Note: This position should only be used when grilling.
- Place drip tray under front sloped section of bottom plate on grill.
SLIDER PLATE
- Securely attach grill plates using release handles on sides of plates.
Important: When using the Slider Plate, always use it with the grill plates and turn the slope knob so that the grill is in the angled grilling position and drippings drain into the grease tray.
Note: Your slider plate comes with a cool-touch handle to assist in inserting and removing the plate. Always use the handle to avoid touching hot surfaces. Remove handle when cooking.
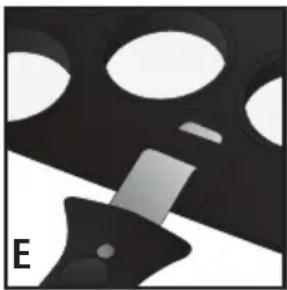
- Attach the cool-touch plate handle to the slider plate by sliding the flat end into the indented opening in the plate.
Important: Be sure the handle is assembled and fastened properly.
- Set the slider plate onto the bottom plate and then remove the handle.
natural_image
Abstract black-and-white graphic with circular and rectangular shapes, no text or symbols presentCaution: Remove the cool-touch handle from the slider plate when cooking.
- Place drip tray under the front of the grill (E).
- Set temperature to 425^ F and allow grill to preheat as described in Preheating the Grill
- Once grill is preheated, place 2 ounces of meat for each patty in the slider plate, close the grill, and set the time to 4 minutes as described in Preheating the Grill.
PREHEATING THE GRILL:
- Close lid on grill.
- Unwind cord and plug it into standard electrical outlet. LCD display will show dashes where time and temperature will be displayed.
- Press POWER to turn grill on. 5 minutes will appear on timer display and 300^ F will appear flashing on temperature display.
-
To adjust the desired cooking time, press the "TEMP/TIMER" function button. The "TEMP/TIMER" allows you to toggle between the two functions to adjust grill settings.
-
The Timer can be changed at any time in one-minute increments by tapping ▲ or ▼ repeatedly. The Timer can be set for a minimum of 1 minute and maximum of 20 minutes.
-
Set desired temperature by tapping ▲ repeatedly to select desired temperature. Temperature changes in 25° increments.
-
Temperature settings range from 300^ to 425^ .
-
"SEAR" may also be selected (see "SEARING").
-
Once preheated, the grill will beep and the temperature will stop flashing.
- Carefully place foods to be cooked on bottom grill plate. This grill usually accommodates 5 servings. Do not overload grill.
- Close lid and allow food to cook to desired doneness.
See suggested cooking times found in GRILLING CHART on page 9.
- Using pot holder or oven mitts carefully open lid.
- Check food with thermometer to verify doneness after cooking.
- When finished cooking, remove cooked food. Press POWER and unplug grill to turn off.
Important: Heat continues to be ON until the power button is turned off or the grill is unplugged.
Note: Always use heatproof plastic, nylon or wood utensils to avoid scratching nonstick surface of grill plates. Never use metal skewers, tongs, forks or knives.
SEARING DIRECTIONS:
Pressing "SEAR" will illuminate the red LED and automatically set the highest temperature (500°F) for a duration of time.
- For best searing results, make sure the food surface is free of moisture.
- Turn on grill and set temperature to 350^ F then press SEAR. A red LED will illuminate and the display will flash 500^ F while preheating.
- When the grill reaches 500^ F (approximately 8-10 minutes), the temperature display will stop flashing and an audible “beep” will be heard.
- IMMEDIATELY place food on the grill plate and close lid. Meat will sear for 90 seconds then default back to 350°F.
- Continue to cook food to the desired doneness using chart below. Let meat stand 1-2 minutes before cutting
Caution: Grill will be hot during searing.
GRILLING MEAT, POULTRY, FISH AND SANDWICHES:
When grilling meats, poultry and fish, use the grill plates and turn the slope knob so that the grill is in the angled grilling position and drippings drain into the grease tray. When grilling sandwiches, turn the slope knob so that the grill is in the horizontal position.
- Select time and temperature desired, following directions in PREHEATING GRILL. Allow time for preheating grill.
- Before first use, if desired, lightly oil grill plates.
Note: Aerosol cooking spray should not be used on ceramic or nonstick surface. Chemicals that allow spray to come out of can build up on surface of grill plates and reduce their efficiency.
- Carefully place food on bottom grill plate of preheated grill.
Note: Do not overload grill plate.
- Close lid directly onto food
Note: Use suggested cooking times found in GRILLING CHART
- Allow food to cook for selected time.
Important: Do not leave the appliance unattended during use.
- During cooking, timer display will count down. When selected time has elapsed, grill will give audible signal. Grill will remain on until powered off or unplugged.
- After selected time, food should be done. If you would prefer longer cooking, simply follow steps beginning at step 4.
- Using pot holder, carefully open lid.
- Remove cooked food.
Note: Always use heatproof plastic, nylon or wood utensils to avoid scratching nonstick surface of grill plates. Never use metal skewers, tongs, forks or knives.
- Press POWER to turn off and unplug grill.
Caution: To avoid sparks at outlet while disconnecting plug, make sure unit is powered off before disconnecting plug from outlet.
- Allow drip tray to cool before removing from under grill. Wash and dry the drip tray after each use.
Note: Be sure liquid in drip tray has cooled.
Caution: Do not remove grill plates while grill is hot. Always allow them to cool to room temperature before removing or cleaning.
SEARING GUIDELINES CHART
| FOOD COOKING TIME(after searing) | RECOMMENDED FINISHEDINTERNAL TEMPERATURE | |
| Boneless Steak Med Rare - Sear + 1 min. 140°F(3⁄4-1-inch thick) (5 oz.)Med - Sear + 2 min.Med well - Sear + 3 min. 160°F | Med - Sear + 2 min. | 150°F |
| Boneless Chicken Breast (5 oz.) | Sear + 3 – 4 minutes 170°F | at thickest point |
| Salmon Fillet (5 oz.) | Sear + 2 – 4 minutes | 140-150°F. Note: Salmon will continue cooking after it is removed from grill |
| Fresh Hamburger (5 oz.)3⁄4-inch thick | Sear + 2 – 3 minutes | 160°F |
Please note: To be sure your food is fully cooked the USDA recommends the following guidelines: Use a meat thermometer to test for doneness by inserting the meat thermometer into the center of the food being cooked and make sure the thermometer is not touching the bone.
SUGGESTED GRILLING CHART FOR MEATS, POULTRY, FISH AND SANDWICHES
The following are meant to be used as a guideline only. Times reflect full grill of food. Cooking time will depend upon thickness and cut being used. Use cooking thermometer as test for doneness. If food needs longer cooking, check periodically to avoid overcooking food. Suggested cooking temperatures are printed under the grill handle surface for reference.
| FOOD COOKING TIME COMMENTS | ||
| MEAT | ||
| Hamburger (5 oz.) 4 – 6 minutes 34 -inch thickCooked to medium (160°F) | ||
| Frozen hamburgers (5 oz.) 5 – 6 minutes Cooked to medium (160°F) | ||
| Flank steak ( 34 lb.) 6 – 8 minutes 34 -inch thickCooked to medium rare (145°F) | ||
| Skirt steak ( 12 lb.) 4 – 6 minutes Cooked to medium (160°F) | ||
| NY strip steak 6 – 8 minutes 34 -inch thick(shell steak) (6 oz.) Cooked to medium rare (145°F) | ||
| Beef tenderloin (5 oz.) 4 – 6 minutes 34 -inch thickCooked to medium rare (145°F) | ||
| Beef kabobs 5 – 7 minutes Cooked to medium (160°F) | ||
| Pork loin chops, boneless Cooked to 160°F | 4 – 6 minutes 34 -inch thick | |
| Pork loin chops, bone in Cooked to 160°F | 4 – 6 minutes 12 -inch thick | |
| Sausage, link or pattyHot dogs | 4 – 6 minutes Cooked to 160°F | |
| 4 – 5 minutes Cooked to 168°F | ||
| Bacon | 6 – 8 minutes | |
| Smoked pork loin chops,boneless | 4 – 6 minutes Cooked to 160°F | |
| Lamb chops, loin Cooked to medium (160°F) | 5 – 7 minutes 34 -inch thick | |
| FOOD COOKING TIME COMMENTS | ||
| POULTRY | ||
| Chicken breast, 11 – 13 minutes Cooked to 170°F boneless and skinless (8 oz.) | ||
| Chicken tenderloins 4 – 6 minutes Cooked to 170°F (4 to 6 pieces) | ||
| Turkey tenderloin (3⁄4 lb.) 9 – 11 minutes Cooked to 170°F | ||
| Turkey burgers (5 oz.) 4 – 6 minutes Cooked to 170°F | ||
| FISH | ||
| Tilapia fillets (6 oz., ea.) 5 – 7 minutes Cooked to 145°F | ||
| Trout fillet (6 oz.) 4 – 6 minutes Cooked to 145°F | ||
| Salmon fillet (8 oz. piece) 5 – 7 minutes Cooked to 145°F | ||
| Salmon steak (8 oz.) 7 – 9 minutes Cooked to 145°F | ||
| Tuna steak (6 oz.) 4 – 6 minutes Cooked to 145°F | ||
| Shrimp 3 – 4 minutes Cooked to 145°F | ||
| SANDWICHES | ||
| Grilled cheese | 2 – 3 minutes Cook until cheese is melted and sandwich is golden brown | |
| Grilled cheese with tomato tuna, ham or bacon | 3 – 4 minutes | Cook until cheese is melted and sandwich is golden brown |
| Quesadillas | 2 – 3 minutes Cook until cheese is melted and tortilla is lightly browned | |
Please note: To be sure your food is fully cooked the USDA recommends the following guidelines: Use a meat thermometer to test for doneness by inserting the meat thermometer into the center of the food being cooked and make sure the thermometer is not touching the bone.
GRILLING FRUITS AND VEGETABLES
The following are meant to be used as a guideline only. The times reflect a full grill of food. Cooking time will depend upon thickness of food. Use a fork inserted into the center of the food to test for doneness. (Be careful not to touch the grill plate.) If the food needs longer cooking, check periodically to avoid overcooking the food.
| FOOD GRILLING TIME | |
| Asparagus spears 4 – 6 minutes | |
| Bell peppers, assorted colors cut into 12 -inch rings 5 – 7 minutes | |
| Mushrooms, thickly sliced 4 – 5 minutes | |
| Onion slices, 12 -inch 5 – 7 minutes | |
| Potato slices, 12 -inch 15 – 18 minutes | |
| Portabella mushrooms, 3-inch diameter 4 – 6 minutes | |
| Zucchini slices, 12 -inch 3 – 4 minutes | |
| Fresh pineapple slices, 12 -inch 2 – 4 minutes |
GRILLING TIPS:
- To prevent heat loss and promote even cooking, do not open the grill cover frequently while cooking.
• This grill generally accommodates 5 servings; do not overload - When first cooking a particular food, check for doneness several minutes before suggested time; if necessary, adjust timer using control button.
- If cooking more than one piece of food, try to have them similar in size and thickness.
- Remember that since grill is cooking from both sides, cooking time will typically be shorter than expected. Watch carefully to avoid overcooking.
- For added flavor, add dry seasonings before grilling or marinate foods before cooking.
CARE AND CLEANING
CLEANING
Caution: To avoid accidental burns, allow grill to cool thoroughly before cleaning.
- Before cleaning, unplug grill from wall outlet and allow to cool.
Caution: To avoid sparks at outlet while disconnecting plug, make sure unit is powered off before disconnecting the plug from the outlet.
Important: Heating elements will continue to be ON until grill is powered off.
- With drip tray in place, use plastic spatula to scrape any excess fat and food particles into the drip tray. Wipe plates dry with a paper towel or sponge.
- Remove plates as instructed in HOW TO USE (see illustrations B and C). To clean grill plates, wash in warm, soapy water; dry thoroughly with a paper towel.
- Empty drip tray and wash in warm, soapy water; dry thoroughly with a paper towel.
- Reinstall grill plates (see illustrations B and C), making sure they are securely attached to grill body.
Note: Removable grill plates are also dishwasher-safe. If washing grill plates in a dishwasher, wipe uncoated side with a dry towel to prevent discoloration. Dishwasher detergent may cause oxidation on uncoated side of grill plate. This is not harmful and can be wiped off with a damp towel.
- To remove stubborn buildup, use a nonmetallic scrubbing pad to clean the grill plates.
Important: Do not use metallic scrubbing pads, steel wool or any abrasive cleaners to clean any part of your grill; use only nylon or nonmetallic scrubbing pads.
- To clean the grill exterior, wipe with a warm, wet sponge and dry with a soft, dry cloth.
Important: Do not immerse body of grill in water or any other liquid.
- Any servicing requiring disassembly other than the above cleaning must be preformed by a qualified electrician.
Caution: Make sure to hold grill housing by the handle while cleaning to prevent accidental closing and injury.
STORAGE
• Always make sure grill is clean and dry before storing.
TROUBLESHOOTING
| PROBLEM POSSIBLE CAUSE SOLUTION | ||
| Finish on grill plates has cut marks. been used. plastic, nylon or wood utensils to avoid scratching nonstick surface of grill plates. Never use metal skewers, tongs, forks or knives. | Metal utensils have Always use | heatproof |
| Grill marks on food are Gril very light. preheated before cooking any foods. | was not fully Always preheat use. least 5 minutes before | grill at |
| There is food buildup on grill plates. after use. and hot, soapy water to clean grill plates. Do not use steel wool scrubbing pads or abrasive cleaners to clean grill. | Use nylon scrubbing pad | |
| Food is dry and burnt. both sides, food is cooked much faster than in a skillet or under a broiler. Use cooking chart as a guide and check food at lowest time stated on chart. | Food is overcooked. | Because grill is cooking from |
| Grill does not turn on. is plugged into working outlet and POWER is on. | Grill is not plugged in. | Check to be sure appliance |
| SEAR cooks longer than 90-seconds | Unit is not preheated to 500^ (non-flashing) | Select "SEAR" and bring to 500^ temperature (non-flashing) prior to placing food on grill plates |
| Underside of grill plates are discolored | Oxidation caused by dishwasher detergent | Oxidation on uncoated side of plate is not harmful and can be wiped off with a damp towel. |
RECIPES
HARVEST HAM PANINI
2 ounces deli ham
2 slices whole grain bread
12 apple or pear, thinly sliced
14 cup shredded 2% cheddar cheese
(optional) Thinly sliced onion
Directions:
Top one slice of bread with ham, apple/pear, onion, cheese and remaining slice of bread. Preheat your George Foreman grill and grill for 4 to 7 minutes or until golden brown.
Makes 2 servings.
TENDERLOIN STEAKS WITH GRILL MUSHROOMS AND BLUE CHEESE
Ingredients:
4 ounces sliced fresh mushrooms
1 strip bacon cut into 4 pieces
4 beef tenderloin steaks, well-trimmed, 4 ounces each
12 tsp. salt
14 tsp. coarsely ground pepper
4 tsp grumbled blue or Gorgonzola cheese
Directions:
Place the mushrooms on the preheated grill plate and top with the bacon. Cook for 4 minutes or until bacon is crisp and mushrooms are browed around the edges. Remove bacon and mushrooms set aside and keep warm. Season steaks with salt and pepper. Place steaks on grill plates preheated for searing. Sear for 90 seconds, then grill at 375°F 4 minutes or until meat registers 145°F for medium rare or 160° for medium on a meat thermometer. To serve, top each steak with 1-teaspoon of the crumbled cheese and grilled mushrooms.
Serves 4
A1
natural_image
Illustration of three kitchen utensils: a grater, a flat plate with circular cutouts, and a baking pan (no text or symbols)A3
| Placa Incluída(s) Pieza N° | ||
| 1. Placa para asar 1 GRP5842-03 superior | ||
| 2. Placa para asar 1 GRP5842-04 inferior | ||
| 3. Placa para 1 mini-hamburguesas | GRP4-09 (placa); GRP4-10 (asa) |
Como usar:
Placas de cerámica (Consulte la figura A3.)
natural_image
Illustration of hands opening a grater with heat exchanger (no text or symbols)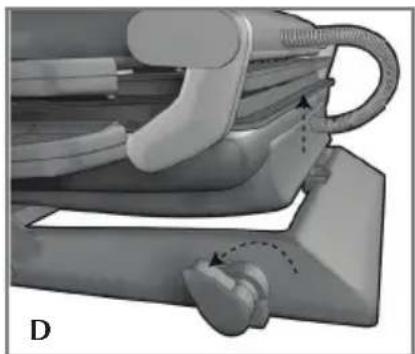
natural_image
Mechanical component diagram showing a curved pipe fitting with a dashed arrow indicating motion (no text or symbols)natural_image
Abstract black-and-white graphic with circular and rectangular shapes, no text or symbols presentFor service, repair or any questions regarding your appliance, call the appropriate 800 number on cover of this book. Please DO NOT return the product to the place of purchase. Also, please DO NOT mail product back to manufacturer, nor bring it to a service center. You may also want to consult the website listed on the cover of this manual.
Two-Year Limited Warranty
(Applies only in the United States and Canada)
What does it cover?
- Any defect in material or workmanship provided; however, Applica's liability will not exceed the purchase price of product.
For how long?
- Two years after the date of original purchase.
What will we do to help you?
- Provide you with a reasonably similar replacement product that is either new or factory refurbished.
How do you get service?
- Save your receipt as proof of date of sale.
- Check our on-line service site at www.prodprotect.com/applica, or call our toll-free number, 1-800-231-9786, for general warranty service.
• If you need parts or accessories, please call 1-800-738-0245.
What does your warranty not cover?
• Damage from commercial use
• Damage from misuse, abuse or neglect
• Products that have been modified in any way
• Products used or serviced outside the country of purchase
• Glass parts and other accessory items that are packed with the unit
• Shipping and handling costs associated with the replacement of the unit
- Consequential or incidental damages (Please note, however, that some states do not allow the exclusion or limitation of consequential or incidental damages, so this limitation may not apply to you.)
How does state law relate to this warranty?
- This warranty gives you specific legal rights, and you may also have other rights that vary from state to state or province to province.
¿NECESITA AYUDA?
© 2014 Spectrum Brands, Inc.
Middleton, WI 53562
Made in People's Republic of China
Printed in People's Republic of China
- SAVE THESE INSTRUCTIONS.
- POLARIZED PLUG (USA/Mexico)
- GROUNDED PLUG (Canada models only)
- TAMPER-RESISTANT SCREW
- ELECTRICAL CORD
- Product may vary slightly from what is illustrated.
- A1
- A2
- How to use:
- GETTING STARTED
- ATTACH GRILL PLATES
- SLIDER PLATE
- Caution: Remove the cool-touch handle from the slider plate when cooking.
- PREHEATING THE GRILL:
- SEARING DIRECTIONS:
- GRILLING MEAT, POULTRY, FISH AND SANDWICHES:
- SUGGESTED GRILLING CHART FOR MEATS, POULTRY, FISH AND SANDWICHES
- GRILLING FRUITS AND VEGETABLES
- GRILLING TIPS:
- CARE AND CLEANING
- CLEANING
- STORAGE
- TROUBLESHOOTING
- RECIPES
- HARVEST HAM PANINI
- Directions:
- TENDERLOIN STEAKS WITH GRILL MUSHROOMS AND BLUE CHEESE
- Ingredients:
- Como usar:
- Two-Year Limited Warranty
- (Applies only in the United States and Canada)
- What does it cover?
- For how long?
- What will we do to help you?
- How do you get service?
- What does your warranty not cover?
- How does state law relate to this warranty?
- ¿NECESITA AYUDA?
Brand : GEORGE FOREMAN
Model : GRP3842
Category : Grill