
GRP3102SBB - Grill GEORGE FOREMAN - Free user manual and instructions
Find the device manual for free GRP3102SBB GEORGE FOREMAN in PDF.


| Product Type | Grill with removable plates |
| Brand | George Foreman |
| Model | GRP3102SBB |
| Capacity | 6 servings |
| Plate Material | Non-stick coating |
| Cooking Surface | Top and bottom removable grill plates |
| Temperature Control | Variable temperature dial |
| Timer | 30-minute timer with auto shut-off |
| Indicator Lights | Power light (red) and ready light (green) |
| Adjustable Angle | Yes, for sloped or level cooking |
| Drip Tray | Removable front drip tray |
| Power Supply | 120V AC, 60Hz |
| Nonstick Surface | Yes |
| Recommended Utensils | Plastic, nylon, or wood only |
| Cleaning Method | Hand wash plates and drip tray with warm soapy water |
| Safety Features | Polarized plug, tamper-resistant screw, auto shut-off |
| Warranty | 3-year limited warranty |
| Customer Service (USA) | 1-800-231-9786 |
| Accessories (USA) | 1-800-738-0245 |
| Part Numbers | Upper grill plate 22881, Lower grill plate 22880, Drip tray 22883 |
Frequently Asked Questions - GRP3102SBB GEORGE FOREMAN
User questions about GRP3102SBB GEORGE FOREMAN
0 question about this device. Answer the ones you know or ask your own.
Ask a new question about this device
Download the instructions for your Grill in PDF format for free! Find your manual GRP3102SBB - GEORGE FOREMAN and take your electronic device back in hand. On this page are published all the documents necessary for the use of your device. GRP3102SBB by GEORGE FOREMAN.
USER MANUAL GRP3102SBB GEORGE FOREMAN
REMOVABLE-PLATE grill for 6 servings
PLACA-REMOVIBLE parrilla para 6 porciones

natural_image
Exterior view of a modern office building (no signage)Customer Care Line:
USA 1-800-231-9786
Accessories/Parts (USA)
1-800-738-0245
For online customer service
and to register your product, go to
www.prodprotect.com/applica
3-Year Limited Warranty
Please Read and Save this Use and Care Book.
IMPORTANT SAFEGUARDS
When using electrical appliances, basic safety precautions should always be followed, including the following:
Read all instructions.
☐ Do not touch hot surfaces. Use handles or knobs.
☐ To protect against electrical shock do not immerse cord, plugs or appliance (except removable plates) in water or other liquid.
☐ Close supervision is necessary when any appliance is used by or near children.
☐ Unplug from outlet when not in use and before cleaning. Allow to cool before putting on or taking off parts.
☐ Do not operate any appliance with a damaged cord or plug, or after the appliance malfunctions or has been damaged in any manner. Return appliance to the nearest authorized service facility for examination, repair or adjustment. Or, call the appropriate toll-free number on the cover of this manual.
☐ The use of accessory attachments not recommended by the appliance manufacturer may cause injuries.
☐ Do not use outdoors.
☐ Do not let cord hang over edge of table or counter, or touch hot surfaces.
☐ Do not place on or near a hot gas or electric burner, or in a heated oven.
☐ Extreme caution must be used when moving an appliance containing hot oil or other hot liquids.
☐ Be sure that removable plates are assembled and fastened properly. (See page 6 "ATTACHING THE GRILL PLATES" for further directions.)
☐ To disconnect, remove plug from wall outlet.
☐ Do not use this appliance for other than intended use.
☐ The appliance is only to be operated in the closed position.
SAVE THESE INSTRUCTIONS.
This product is for household use only.
POLARIZED PLUG (120V Models Only)
This appliance has a polarized plug (one blade is wider than the other). To reduce the risk of electric shock, this plug is intended to fit into a polarized outlet only one way. If the plug does not fit fully into the outlet, reverse the plug. If it still does not fit, contact a qualified electrician. Do not attempt to modify the plug in any way.
TAMPER-RESISTANT SCREW
Warning: This appliance is equipped with a tamper-resistant screw to prevent removal of the outer cover. To reduce the risk of fire or electric shock, do not attempt to remove the outer cover. There are no user-serviceable parts inside. Repair should be done only by authorized service personnel.
ELECTRICAL CORD
a) A short power-supply cord (or detachable power-supply cord) is to be provided to reduce the risk resulting from becoming entangled in or tripping over a longer cord.
b) Longer detachable power-supply cords or extension cords are available and may be used if care is exercised in their use.
c) If a long detachable power-supply cord or extension cord is used,
1) The marked electrical rating of the detachable power-supply cord or extension cord should be at least as great as the electrical rating of the appliance,
2) If the appliance is of the grounded type, the extension cord should be a grounding-type 3-wire cord, and
3) The longer cord should be arranged so that it will not drape over the countertop or tabletop where it can be pulled on by children or tripped over.
Note: If the power supply cord is damaged, it should be replaced by qualified personnel. In Latin America, by an authorized service center.
Product may vary slightly from what is illustrated.
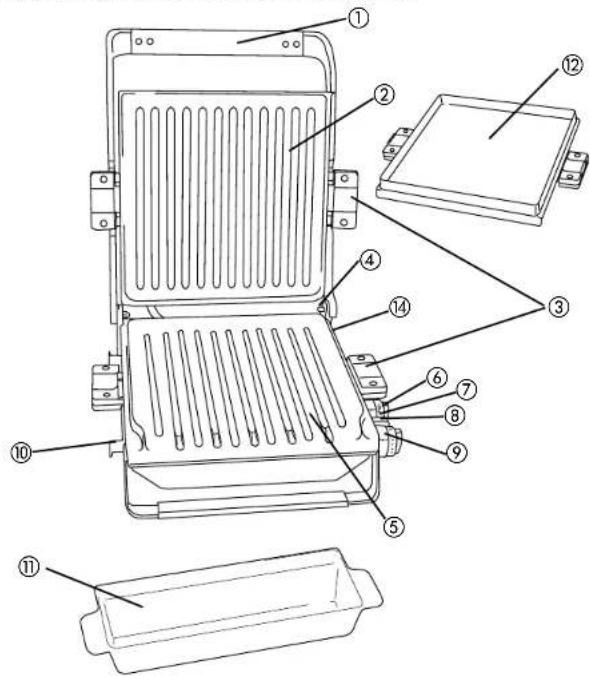
A1
- Extended metal loop handle
† 2. Grill plate (upper) (Part # 22881) - Grill plate release handles (both sides)
- Adjustable grill angle bar (in back)
† 5. Grill plate (lower) (Part # 22880) - Variable temperature control
- Ready indicator light
- Power indicator light
- 30-minute timer
- Cord wrap
† 11. Drip tray (Part # 22883)
† 12 Bake plate (Models GRP100 and GRP100Q (Part # 22882))
13. Power Plug (not shown)
Note: † indicates consumer replaceable/removable parts
Note: Always use the upper grill plate with bake plate.
GETTING INTO GRILLING POSITION
(*As mentioned on page 5, in ATTACHING THE GRILL PLATES Section of this manual.)
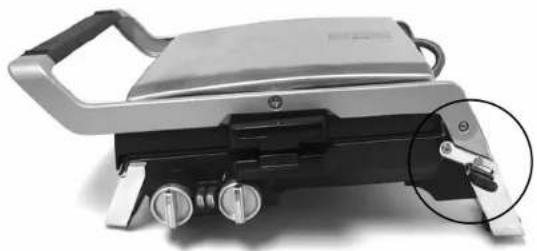
Position A. Adjustable grill angle bar up (locked) for sloped cooking.
natural_image
Close-up of a portable flat-screen electric guitar with control knobs and a handle (no visible text or symbols)Position B. Adjustable grill angle bar down (unlocked) for level cooking.

natural_image
Close-up of a portable electronic device with a handle and control knob, showing no visible text or symbols.How to Use
This product is for household use only.
GETTING STARTED
- Please go to www.prodprotect.com/applica to register your warranty; for additional information go to www.georgeforemancooking.com.
- Wash all removable parts and/or accessories as instructed in CARE AND CLEANING.
- Select a dry, level location where your grill will be used, leaving enough space between the back of grill and wall to allow heat to flow without damage to cabinets and walls.
ATTACHING THE GRILL PLATES
Important: This appliance should always be used with 2 grill plates securely attached. Caution: Attach all grill plates when the appliance is cool.
Basic Grill Plates
Securely attach the top and bottom grill plates of the appliance using the release handles on each side of the plates.
Note: When using these grill plates, use the bar at the rear of the grill to lift the back of the bottom grill plate to have the drippings run into the drip tray (see plate position A on page 5).
Important: This position should only be used when grilling.
Important: When attaching the grill plates, be sure they are securely attached using the release handles on each side of the plates.
Attaching the bake pan
Note: When using this plate, make sure the appliance is in the completely horizontal position (see plate position B on page 5).
- If using the baking pan, securely attach the top grilling plate and baking pan using the release handles on each side of the plates.
DRIP TRAY
Place the drip tray under the front sloped section of the bottom plate on the grill.
PREHEATING THE GRILL
-
Close cover on grill.
-
Unwind cord and plug into standard electrical outlet.
-
Set variable temperature control dial to desired grill setting to begin preheating. See SUGGESTED GRILLING CHART for recommended temperature settings.
-
Set timer between 7 - 10 minutes to preheat at desired temperature.
Note: When setting timer, always turn the dial past 10 and then turn back or forward to desired setting.
- The power light (red) comes on to indicate that the elements are heating. When the appliance is preheated the ready light (green) will turn on.
Note: When set temperature is reach, both the red power light and green ready light will illuminate. When the timer elapses to zero (0), both lights will go out.
GRILLING
- Using a pot holder, carefully open the preheated grill.
- Before first use, lightly oil grill plates, if desired.
Note: Aerosol cooking spray should not be used on nonstick surface. Chemicals that allow spray to come out of can build up on surface of grill plates and reduce their efficiency. - Carefully place foods to be cooked on lower grilling plate. Close lid.
Note: Do not overload grill. - Once food is placed on grill, set timer to desired cooking time.
Note: Use suggested cooking times found in the GRILLING CHART on pages 7 – 8.
Important: Do not leave the appliance unattended during use.
-
After selected time, the food should be done.
-
Using a pot holder, carefully open the grill cover.
-
Remove cooked food using plastic spatula provided.
Note: Always use heatproof plastic, nylon or wood utensils to avoid scratching nonstick surface of grill plates. Never use metal skewers, tongs, forks or knives.
- When finished cooking, turn the dial to the LOW setting and unplug the appliance.
Important: Heat continues to be ON until grill is unplugged.
Warning: Do not remove grill plates while grill is still hot! Allow grill to cool completely before removing or changing plates.
- Allow drip tray to cool before removing it from under grill. Wash and dry drip tray after each use.
Note: Be sure the liquid in drip tray has cooled before attempting to move it.
SUGGESTED GRILLING CHART
The following are meant to be used as a guideline only. The times reflect a full grill of food. Cooking time will depend upon thickness and cut being used. Use a cooking thermometer as a test for doneness. If the food needs longer cooking, check periodically to avoid overcooking the food.
| FOOD SETTING COOKING | TIME NOTES | ||
| MEAT | |||
| Flank steak Mid-High 6 – | 8 minutes 34 -inch thick | ||
| Hamburger (4 oz.) Mid-High 4 – 6 minutes | |||
| Beef kabobs Mid-High 5 – | 7 minutes 1-inch thick | ||
| NY strip steak High 6 – | 8 minutes | ||
| Beef tenderloin High 4 – | 6 minutes | ||
| Lamb loin chops | Med-High | 5 – 6 minutes | |
| Pork loin chops High 7 – | 9 minutes 34 -inch thick | ||
| Bacon High 7 – 8 minutes | Grill plate | ||
| Sausage | Med-High | 5 – 6 minutes | link or patty |
| Hot dogs | Med-High | 4 – 6 minutes | |
| POULTRY | |||
| Chicken breast | Med-High | 7 – 9 minutes | boneless and skinless |
| Turkey tenderloinFISH | Med-High | 12 – 15 minutes | boneless and skinless |
| Fish steak Med-High 7 – | 10 minutes 12 ′′ – 1′′ thick | ||
| Fish fillet Med-High 3 – | 5 minutes | ||
| Shrimp | High | 3 – 4 minutes | |
| Trout | Med-High 3 – 5 minutes |
Please note: To be sure your food is fully cooked, the USDA recommends the following guidelines. Using a meat thermometer cook test for doneness by inserting the meat thermometer into the center of the food being cooked and make sure the thermometer is not touching the bone.
| FOOD TO BE COOKED MEDIUM | WELL DONE OR FULLY COOKED | |
| Chicken breast 170°F 77°C | ||
| Chicken thigh 180°F 82°C | ||
| Beef / Lamb / Veal 160°F | 71°C 170°F 77°C | |
| Pork 160°F 71°C | ||
| Reheated cooked meats and poultry | 165°F 74°C |
Important: Use only silicone, heatproof plastic and wooden utensils when cooking on the grill. Silicone utensils are especially good because they do not discolor or melt with the high temperature.
Care And Cleaning
This appliance contains no user-serviceable parts. Refer service to qualified service personnel. CLEANING
Caution: To avoid accidental burns, allow grill to cool thoroughly before cleaning.
- Before cleaning, unplug grill from wall outlet and allow to cool.
Important: Heat will continue to be ON until the appliance is unplugged.
-
Place drip tray under front of grill. Use plastic spatula to scrape off any excess fat and food particles left on the grill plates; runoff will drip into the drip tray.
-
Use a warm, soapy sponge to wipe plates clean, then rinse sponge and wipe again to remove any soapy residue. Dry thoroughly with an absorbent paper towel.
-
Empty drip tray and wash in warm, soapy water; dry thoroughly with a paper towel or cloth.
-
To remove stubborn buildup, use a nylon or nonmetallic scrubbing pad to clean the grill plates.
Important: Do not use metallic scrubbing pads, steel wool or any abrasive cleaners to clean any part of your grill; use only nylon or nonmetallic scrubbing pads.
- To clean the grill cover, wipe with a warm, damp sponge and dry with a soft, dry cloth.
Important: Do not immerse body of grill in water or any other liquid.
- Any servicing requiring disassembly other than the above cleaning must be preformed by a qualified electrician.
Caution: Make sure to hold grill cover while cleaning to prevent accidental closing and injury.
STORAGE
Always make sure grill is clean and dry before storing.
A1
natural_image
Close-up of a portable electronic device with handle and control buttons, showing internal components (no visible text or symbols)natural_image
Exterior view of a stainless steel robotic device with control knobs and a circular inset detail (no visible text or symbols)Como usar
For service, repair or any questions regarding your appliance, call the appropriate 800 number on cover of this book. Please DO NOT return the product to the place of purchase. Also, please DO NOT mail product back to manufacturer, nor bring it to a service center. You may also want to consult the website listed on the cover of this manual.
Three-Year Limited Warranty
(Applies only in the United States and Canada)
What does it cover?
- Any defect in material or workmanship provided; however, Applica's liability will not exceed the purchase price of product.
For how long?
• Three years from the date of original purchase with proof of such purchase.
What will we do to help you?
- Provide you with a reasonably similar replacement product that is either new or factory refurbished.
How do you get service?
• Save your receipt as proof of date of sale.
- Check our on-line service site at www.prodprotect.com/applica, or call our toll-free number, 1-800-231-9786, for general warranty service.
• If you need parts or accessories, please call 1-800-738-0245.
What does your warranty not cover?
• Damage from commercial use
• Damage from misuse, abuse or neglect
• Products that have been modified in any way
• Products used or serviced outside the country of purchase
• Glass parts and other accessory items that are packed with the unit
• Shipping and handling costs associated with the replacement of the unit
- Consequential or incidental damages (Please note, however, that some states do not allow the exclusion or limitation of consequential or incidental damages, so this limitation may not apply to you.)
How does state law relate to this warranty?
- This warranty gives you specific legal rights, and you may also have other rights that vary from state to state or province to province.
Made and printed in People's Republic of China

Join us on Facebook:
Facebook.com/georgeforemanhealthycooking
¿NECESITA AYUDA?
Facebook.com/georgeforemanhealthycooking


- REMOVABLE-PLATE grill for 6 servings
- PLACA-REMOVIBLE parrilla para 6 porciones
- Please Read and Save this Use and Care Book.
- IMPORTANT SAFEGUARDS
- SAVE THESE INSTRUCTIONS.
- POLARIZED PLUG (120V Models Only)
- TAMPER-RESISTANT SCREW
- ELECTRICAL CORD
- GETTING INTO GRILLING POSITION
- How to Use
- GETTING STARTED
- ATTACHING THE GRILL PLATES
- Basic Grill Plates
- Important: This position should only be used when grilling.
- Attaching the bake pan
- DRIP TRAY
- PREHEATING THE GRILL
- GRILLING
- SUGGESTED GRILLING CHART
- Care And Cleaning
- STORAGE
- Como usar
- Three-Year Limited Warranty
- What does it cover?
- For how long?
- What will we do to help you?
- How do you get service?
- What does your warranty not cover?
- How does state law relate to this warranty?
- ¿NECESITA AYUDA?
Brand : GEORGE FOREMAN
Model : GRP3102SBB
Category : Grill