
NAS-5003 - Loudspeaker Naxa - Free user manual and instructions
Find the device manual for free NAS-5003 Naxa in PDF.


| Product Type | Smart Wi-Fi Speaker with Alexa |
| Brand | Naxa |
| Model | NAS-5003 |
| Power Source | Built-in rechargeable Li-ion battery (3.7V, 2500mAh / 9.2WH) |
| Charging Input | DC 5V via Micro USB port |
| Bluetooth Version | 4.1 |
| Bluetooth Range | Up to 32 feet (open area) |
| Wi-Fi | 2.4 GHz, 802.11 b/g/n |
| Wi-Fi Range | Up to 96 feet (open area) |
| Voice Assistant | Amazon Alexa built-in |
| Audio Input | AUX IN (3.5mm jack) |
| Controls | Power/Mode, Volume +/-, WPS/Mic Mute, Alexa Button |
| Indicators | LED ring, Mode indicator, Charge indicator |
| Microphone | Built-in for Alexa voice control |
| Multi-room Support | Yes (via Naxa Resound app) |
| Supported Streaming Services | Spotify, iHeartRadio, TIDAL, Amazon Music (via Alexa) |
| App | Naxa Resound (iOS and Android) |
| Safety Approvals | FCC Part 15 compliant |
| Warranty | Limited warranty (see manual for details) |
| Package Contents | Speaker, USB charging cable, 3.5mm audio cable, User manual |
| Cleaning Instructions | Wipe with a dry cloth |
Frequently Asked Questions - NAS-5003 Naxa
User questions about NAS-5003 Naxa
0 question about this device. Answer the ones you know or ask your own.
Ask a new question about this device
Download the instructions for your Loudspeaker in PDF format for free! Find your manual NAS-5003 - Naxa and take your electronic device back in hand. On this page are published all the documents necessary for the use of your device. NAS-5003 by Naxa.
USER MANUAL NAS-5003 Naxa
PLEASE READ CAREFULLY BEFORE OPERATING THIS EQUIPMENT KEEP IT IN A SAFE PLACE FOR FUTURE REFERENCE
IMPORTANT SAFETY INSTRUCTIONS

CAUTION
RISK OF ELECTRIC SHOCK DO NOT OPEN

CAUTION: TO REDUCE THE ELECTRIC SHOCK, DO NOT REMOVE THE COVER (OR BACK). NO USER SERVICEABLE PART INSIDE, REFER SERVICING TO QUALIFIED SERVICE PERSONNEL.
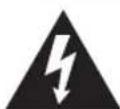
DANGEROUS VOLTAGE: The lighting flash with arrowhead symbol within an equilateral triangle is intended to alert the user to the presence of uninsulated “dangerous voltage” within the product’s enclosure that may be of sufficient magnitude to constitute a risk of electric shock to persons.
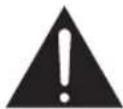
ATTENTION: The exclamation point within an equilateral triangle is intended to alert the user to the presence of important operating and maintenance (servicing) instructions in the literature accompanying the appliance.
WARNING: TO PREVENT FIRE OR SHOCK HAZARD, DO NOT EXPOSE THIS UNIT TO RAIN OR MOISTURE.
WARNING: USE UNDER SUPERVISION OF AN ADULT DUE TO LONG
CORD This unit has a long cord that can be easily tripped on or pulled on, causing injury. Please make sure it is arranged so that it will not drape over tabletop, etc. Where it can be pulled on by children or tripped over accidentally
FCC STATEMENT:
This device complies with part 15 of the FCC Rules. Operation is subject to the following two conditions:
(1) This device may not cause harmful interference, and
(2)This device must accept any interference received, including interference that may cause undesired operation.
FCC NOTICE:
This equipment has been tested and found to comply with the limits for a Class B digital device, pursuant to Part 15 of the FCC Rules. These limits are designed to provide reasonable protection against harmful interference in a residential installation. This equipment generates, uses and can radiate radio frequency energy and, if not installed and used in accordance with the instructions, may cause harmful interference to radio communications.
However, there is no guarantee that interference will not occur in a particular installation. If this equipment does cause harmful interference to radio or television reception, which can be determined by turning the equipment off and on, the user is encouraged to try to correct the interference by one or more of the following measures:
●Reorient or relocate the receiving antenna.
- Increase the separation between the equipment and receiver.
- Connect the equipment into an outlet on a circuit different from that to which the receiver is connected.
- Consult the dealer or an experienced radio/TV technician for help.
FCC WARNING:
To assure continued operation, follow the attached installation instructions and use only shield cables when connecting to other devices. Changes or modifications not expressly approved by the party responsible for compliance could void the user's authority to operate the equipment.
IMPORTANT SAFETY INSTRUCTIONS
Before using the unit, be sure to read all operating instruction carefully, please note that these are general precautions and may not pertain to your unit. For example, this unit may not have the capability to be connected to an outdoor antenna.
1. Read these instructions
All the safety and operating instructions should be read before the appliance is operated.
2. Keep these instructions
The safety and operating instructions should be kept for future reference.
3. Heed all warnings
All warnings on the appliance and in the operating instructions should be adhered to.
4. Follow all instructions
All operation and use instructions should be followed.
5. Do not use this apparatus near water
The appliance should not be used near water; for example, near a bath tub,
washbowl, kitchen sink, laundry tub, in a wet basement, or near a swimming pool.
6. Clean only with dry cloth
The appliance should be cleaned only as recommended by the manufacturer.
7. Do not block any ventilation openings. Install in accordance with the manufacturer's instructions.
Slots and openings in the cabinet and in the back or bottom are provided for ventilation, to ensure reliable operation of the product and to protect it from overheating. These openings must not be blocked or covered. The openings should never be blocked by placing the product on a bed, sofa, rug, or similar surface. This product should never be placed near or over a radiator or heat source. This product should not be placed in a built-in installation, such as a bookcase or rack unless proper ventilation is provided or the manufacturer's instructions have been adhered to.
-
Do not install near any heat sources such as radiators, heat registers, stoves, or other apparatus (including amplifiers) that produce heat.
-
Do not defeat the safety purpose of the polarized or grounding-type plug. A polarized plug has two blades with one wider than the other. A grounding type plug has two blades and a third grounding prong. The wide or the third prong are provided for your safety. If the provided plug does not fit into your outlet, consult an electrician for replacement of the obsolete outlet.
-
Protect the power cord from being walked on or pinched particularly at plugs, convenience receptacles, and the point where they exit from the apparatus.
-
Only use attachments / accessories specified by the manufacturer.
-
Use only with a cart, stand, tripod, bracket, or specified by the manufacturer, or sold with the appa When a cart is used, use caution when moving the cart/apparatus combination to avoid injury from tip-over.

Portable Cart Warning
An appliance and cart combination should be moved with care. Quick stop, excessive fore and uneven surfaces may cause the appliance and cart combination to overturn.
13. Unplug this apparatus during lightning storms or when unused for long periods of time.
To protect your product from a lightning storm, or when it is left unattended an unused for long periods of time, unplug it from the wall outlet and disconnect the antenna or cable system. This will prevent damage to the product due to lightning and power-line surges.
- Refer all servicing to qualified service personnel. Servicing is required when the apparatus has been damaged in any way, such as power-supply cord or plug is damaged, liquid has been spilled or objects have fallen into the apparatus, the apparatus has been exposed to rain or
moisture, does not operate normally, or has been dropped.
15. Power source
This product should be operated only from the type of power source indicated on the marking label. If you are not sure of the type of power supply to your home, consult your appliance dealer or local power company. For products intended to operate from battery power, or other source, refer to the operation instructions.
16. Power lines
An outside antenna system should not be located in the vicinity of overhead power lines or other electric light or power circuits, or where it can fall into su power lines or circuits. When installing an outside antenna system, extreme care should be taken to keep from touching such power lines or circuits as contact with them might be fatal.
17. Overloading
Do not overload wall outlets and extension cords as this can result in a risk of fire or electric shock.
18. Object and liquid entry
Never push objects of any kind into the product through openings as they may touch dangerous voltage points or short out parts that could result in fire or electric shock. Never spill or spray any type of liquid on the product.
19. Outdoor antenna grounding
If an outside antenna is connected to the product, be sure the antenna system is grounded so as to provide some protection against voltage surges and built up static charges. Section 810 of the National Electric Code ANSI/ NFPA 70 provides information with respect to proper grounding of the mast and supporting structure, grounding of the lead- in wire to an antenna discharge product, size of grounding conductors, location of antenna- discharge product, connection to grounding electrodes and requirements for the grounding electrodes.

20. Service
Do not attempt to service this product yourself as opening or removing covers may expose you to dangerous voltage or other hazards. Refer all servicing to qualified service personnel.
21. Replacement parts
When replacement parts are required, be sure the service technician uses replacement parts specified by the manufacturer or those that have the same characteristics as the original parts. Unauthorized substitutions may result in fire or electric shock or other hazards.
22. Safety check
Upon completion of any service or repairs to this product, ask the service technician to perform safety checks to determine that the product is in proper operating condition.
23. Wall or ceiling mounting
The product should be mounted to a wall or ceiling only as recommended by the manufacturer.
24. Damage requiring service
Unplug this product from the wall outlet and refer service to qualified service personnel under the following conditions.
a) When the power-supply cord or plug is damaged.
b) If liquid has been spilled or objects have fallen into the product.
c) If the product has been exposed to rain or water.
d) If the product does not operate normally by following the operating instructions. Adjust only those controls that are covered by the operating instructions, as an adjustment of other controls may result in damage and will require extensive work by a qualified technician to restore the product to its normal operation.
e)If the product has been dropped or the cabinet has been damaged.
f) When the product exhibits a distinct change in performance- this indicates a need for service.
25. Note to CATV system installer
This reminder is provided to call the CATV system installer's attention to Article 820-40 of the NEC that provides guidelines for proper grounding and, in particular, specifies that the cable ground shall be connected to the grounding system of the building, as close to the point of cable entry as practical.
NOTE: Refer all servicing to qualified service personnel. Servicing is required when the unit has been damaged in any way such as the following: the power-supply cord or plug has been damaged, liquid has been spilled into unit, the unit has been exposed to rain or moisture, the unit has been dropped or the unit does not operate normally.
PRODUCT OVERVIEW
TOP VIEW

REAR VIEW
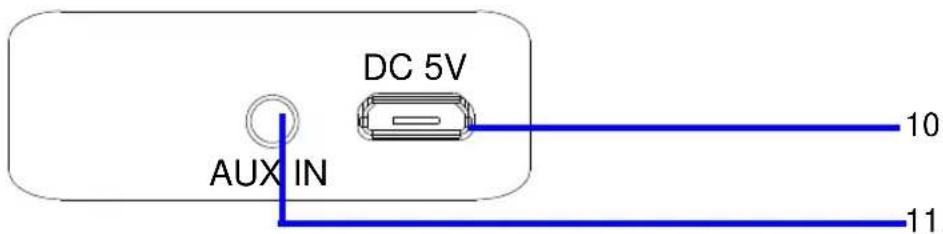
- LED Light Ring
- Power On/Off, MODE Button
- VOL+ Button
- VOL- Button
- Microphone On-Off/WPS Button
-
Alexa Control Button
-
Mode Indicator
- Built-in Microphone
- Charge Indicator
- DC IN Jack
- AUX IN Jack
POWER SOURCE:
There is a built in Li-ion rechargeable battery, recharge it if the battery is low.
- Connect the Micro USB Plug from the supplied USB Connection Cable to the Micro USB Port on the rear of unit.
- Connect the full sized USB Plug from the supplied USB Connection Cable to the USB Port on the USB Charger (During charging, the charge indicator on the top of unit will turn RED, When finished, it will turn off).
NOTES:
Your battery will last longer if you're following these simple guidelines for and storing:
A. Before first time use, charge it approximately 40% until the unit is charged.
B. Recharge and store the unit within the temperature range of 5^ C\~ 35^ C ( 40^ F\~ 95^ F).
C. Do not charge longer than 24 hours. Excessive charging or running the unit until battery fully drains will damage battery. Battery life extended if you keep the battery fully charged.
D. Battery life naturally shortens slowly over time.
E. The rechargeable battery incorporated in this product is replaceable.
AUX IN:
To listen from an external Audio Player such as a MP3 Player, Discman ...etc.
-
Connect one end of the Audio Connection Cable to the AUX Out/Line Out/Phone Jack on the external Audio Player.
-
Connect the other end of the cable to the AUX IN Jack on the rear of the unit. Press and hold the ⏻ MODE button to power on the unit, wait the mode indicator blinks green only, press the ⏻ MODE button repeatedly until the Mode Indicator will turn INDIGO.
-
Play the music on the connected Player as usual.
BLUETOOTH OPERATION:
- Press and hold the ⏻ MODE button to power on the unit, wait the mode indicator blinks green only, press the ⏻ MODE button repeatedly until the Mode Indicator will turn BLUE and blinks.
- Activate the bluetooth menu on the device you wish to connect to the speaker, try to search the speaker, the pairing name "NAXA NAS-5003" will appear on bluetooth device list, select it and make connection.
- After successful connection, the unit will send a tone and the indicator stays lit.
- Play a track on your paired audio player or phone as normal.
During playing:
- Press the VOL+ or VOL- button to adjust volume.
NOTE:
After first time pairing, the unit will be automatically connect with the device last paired when the bluetooth of the device and speaker are activated and in range.
SETUP
APP DOWNLOAD AND INSTALLATION
- Download the Naxa Resound from Apple App store for iOS devies.
- Or, download from Google Play store for Android devices.
- The App icon will appear as the figure on right after successful installation.

Naxa Resound
NOTE:
- The following operation base on iOS system. The operation of Android is similar.
CONNECTION
- Press and hold the ⏻ MODE button to power on the unit, wait the mode indicator blinks green only, now it is WiFi mode.
- Turn on the WiFi on your iOS or Android device(smart phone or tablet with WiFi function), Connect your iOS or Android device to the desired WiFi network (router).


natural_image
Line drawing of a wireless router with WiFi icon (no text or symbols)- Tap the Naxa Resound icon on your iOS or Android device. The following picture will appear. Read the screen instructions and tap the Wi-Fi Setup Wizard to continue.


- Read the instructions on screen and tap
Next
to continue.

- Tap the column to select the desired device NAS-5003. Then tap the
CONNECT SPEAKER
to continue.
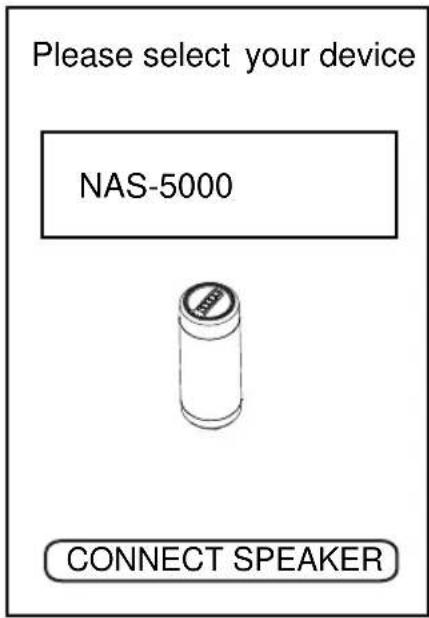
- Tap the Password column to input the password to make the speaker to connect to Wi-Fi network(router), tap Next to continue.

- Press and hold the 📋 WPS button on top of the speaker.
Tap
Next
to continue.

-
There will be voice instructing during the connecting process.
-
When the speaker is connected to the Wi-Fi successfully, and the Mode Indicator on top of the speaker will stay lit.

PLEASE WAIT

Wait for device to be connected to Wi-Fi...
Don't operate device during Wi-Fi setup. Please wait for completion of setup patiently. It's usually finished in 60 seconds.
Cancel
If you hear voice prompt for erro message. please go back and retry
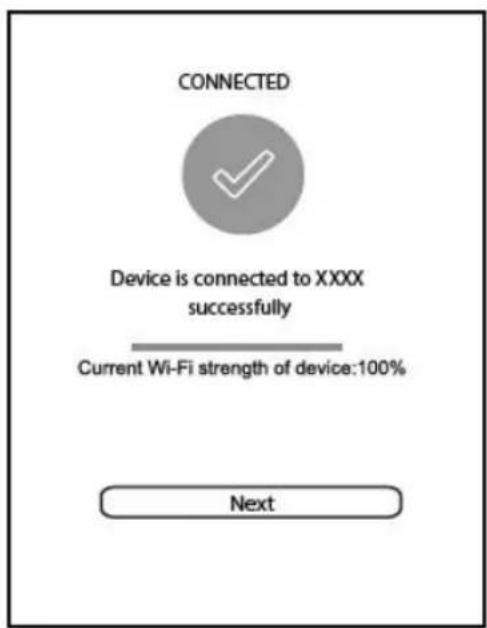
CONNECTED

Device is connected to XXXX successfully
Current Wi-Fi strength of device:100%
Next
Note:
If the connection fails, the following page will appear.
WI-FI SETUP TIMEOUT
UH OH!
Unable to connect your NAXA s...
Alternate Way to Setup
Cancel
Then tap the "Cancel" Button to reconnect as the on screen instructions.
- After connected, the following screen will appear, tap Custom...to set a new desired location name, or tap one in the name list as the selected location.

- The following page will appear, input the account and password and tap the "Sign in" Button on the screen to log on.
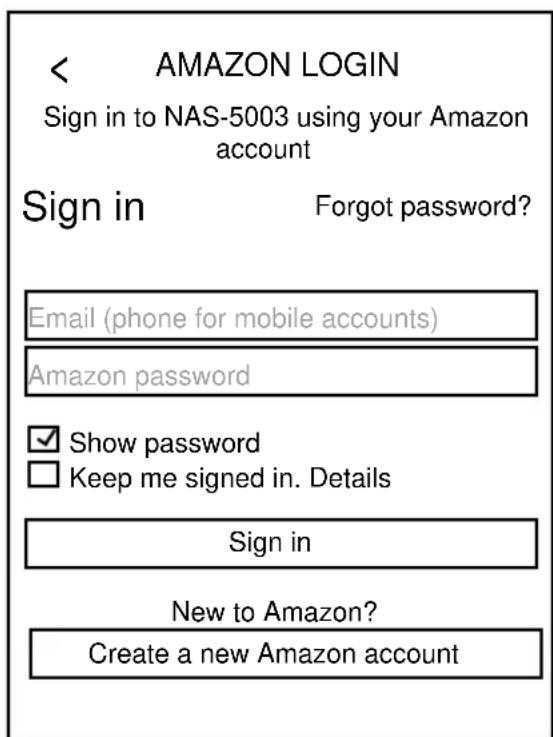
- The following page will appear. If you already have an account, then tap "Sign in with Amazon" Button on the following screen.

- If you do not have an Amazon account, then tap "Create a new Amazon account" to start registration and create a new Amazon account as the on screen instructions.

- When the following page appears, tap the "I agree" Button to log in Amazon.
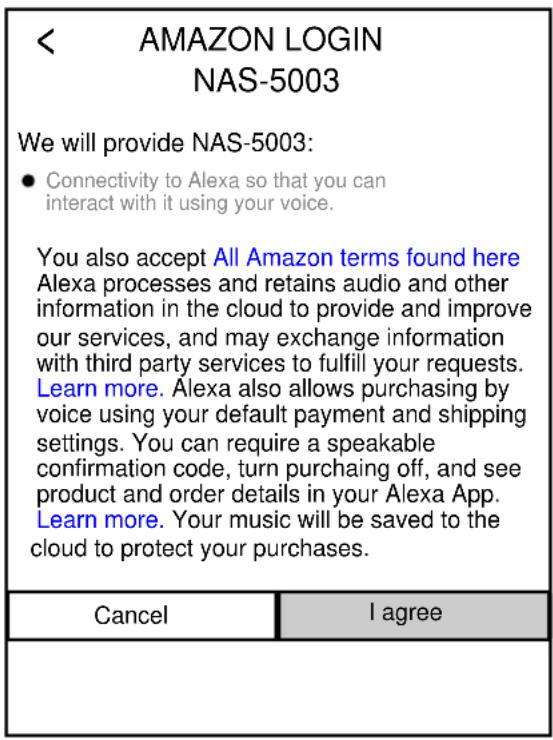
- After log in, the following page will appear, tap the language to set the desired language.

- The following page will appear, tap the "Next" Button on the screen.

- The following page will appear. Then you can mute the microphone function following the on screen instructions or tap the "Next" button to continue.

- Tap "I got it!" to continue. Then the DEVICE LIST will appear.
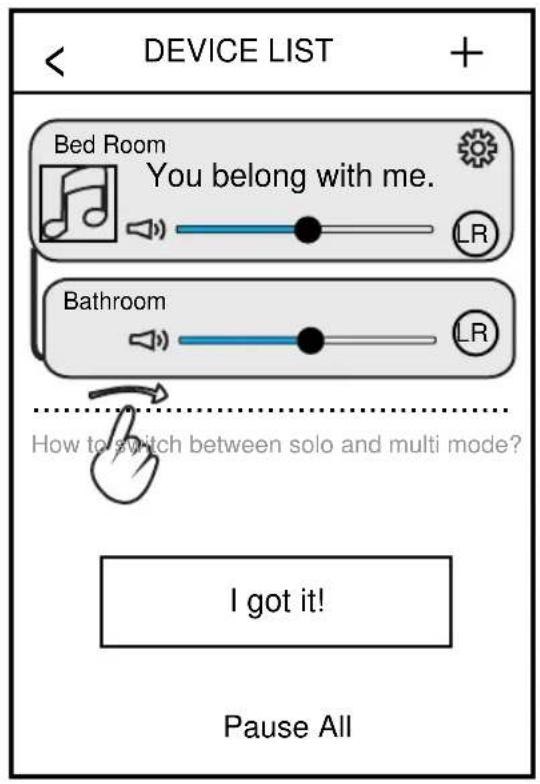

On DEVICE LIST:
- Tap the "+" to add more units to the network, repeat the procedure above and make connection as the on screen instructions.
- Tap the "💡" to rename the unit, check the unit info or reset to the factory setting, check the preset content, and set or reset the Alexa settings.
-
Tap the "LR" to change the audio mode to L (left channel), R (right channel) and LR (stereo).
-
If more than one unit has been added into the DEVICE LIST, you can tap the instruction "How to switch between solo and multi mode?" to learn how to switch solo and multi mode as below:


- When finished, shut off the unit by pressing and holding the ⏻ /MODE button on top of the unit.
Notes: To disconnect the unit from the current Wi-Fi network, press and hold the 🎨 /WPS Button until audible prompt “Connecting to your network, this may take one to three minutes” is heard then power off the unit. Power on the unit again then reconnect to desired Wi-Fi network as the previously instructed.
Operation after being added to the Wi-Fi network:
- Connect your Mobile Device to the 2.4G Wi-Fi Network.
- Power on the unit by pressing and holding the ⏻/MODE Button on the top of the unit until the Blue and Green Indicators on the top of unit illuminates and blinks.
- Wait until the Green Indicator illuminates and blinks.
- Wait a few seconds, the unit will automatically connect to the same Wi-Fi network. The Green Indicator will stop blinking and audible prompt "Connected" will be heard.
- Tap the "Naxa Resound" on your Mobile Device. The following image will appear on the Mobile Device's screen:

- Wait a few seconds, the following page will appear:

- Tap the mobile device's screen and slide to right repeatedly until the following screen appears. Tap the corresponding button to enter to the desired function:

flowchart
graph TD
    A["Search"] --> B["Touch to search online songs"]
    C["Favorites"] --> D["Touch to listen the collected favorite songs"]
    E["My music"] --> F["Touch to listen the music in your connected mobile devices"]
    G["iHeartRadio"] --> H["Touch to log on professional online radio platform"]
    I["Spotify"] --> J["Touch to log on professional music platform"]
    K["TIDAL"] --> L["Touch to log on professional music platform"]
    M["Amazon Alexa"] --> N["Touch to log in/Sign out Amazon Alexa"]
    O["Add More Services"] --> P["Touch to add more service"]
    Q["AUX"] --> R["Touch to switch to Aux In mode"]
    S["Bluetooth"] --> T["Touch to switch to Bluetooth mode"]
    U["Settings"] --> V["Touch to check the version and/or feedback"]
SPOTIFY OPERATION
Before use, you have to create an spotify premium account for log in.
- Tap "Spotify" on the home screen.
- Input your account and password to log in.
- Open the Spotify on your phone, tablet or PC, and play any song.
- Tap the connect icon
- Pick your device from the list.
Licenses
The Spotify Software is subject to third party licenses found here: www.spotify.com/connect/third-party-licenses.
Before use, you have to create an iHeartradio account for log in.
- Tap "iHeartradio" on the home screen.
- Input your account and password to log in.
- Select the desired song and play.
TIDAL OPERATION
Before use, you have to create a TIDAL account for log in.
- Tap "TIDAL" on the home screen.
- Input your account and password to log in.
- Select the desired song and play.
AMAZON ALEXA VOICE CONTROL
Voice Control of Amazon Alexa:
- Speak "Alexa" to the built-in microphone. The color of the Decorative Ring will turn to Blue. Then you can ask your question through the built-in microphone. The unit will answer you by audible reply. The typical question and answer will be:
Q: Alexa --- what's the time now?
A: It's XX (XX=Current time) o'clock now.
Q: Alexa --- what's the weather like?
A: The weather is not so cold.
Q: Alexa --- what day is today?
A: Today is XXXXX (XXXXX=Current day).
Q: Alexa --- what's the news today?
A: Here is the flash briefing.
Q: Alexa --- who is the president in USA?
A: The USA president is XX (XX=Name of USA president).
Q: Alexa --- what's the capital in USA?
A: The United States' capital is Washington D.C.
- Or, press the ⏻Button on the top of unit, the color of the Decorative Ring will turn to Blue. Then you can ask your question through the built-in microphone. The unit will answer you by audible reply. The typical question and answer will be:
Q: What's the time now?
A: It's XX (XX=Current time) o'clock now.
Q: What's the weather like?
A: The weather is not so cold.
Q: What day is today?
A: Today is XXXXX (XXXXX=Current day).
Q: What's the news today?
A: Here is the flash briefing.
Q: Who is the president in USA?
A: The USA president is XX (XX=Name of USA president).
Q: What's the capital in USA?
A: The United States' capital is Washington D.C.
- During Amazon Alexa operation, you can use the following voice command to control the unit:
- Voice command: (Alexa)---play the song
- Voice command: (Alexa) --- pause/stop the song!
Action: The song will be paused or stopped.
● Voice command: (Alexa) --- continue to play! Action: The song will continue to play.
- Voice command: (Alexa) --- volume up!
Action: The volume will increase.
- Voice command: (Alexa) --- volume down!
Action: The volume will decrease.
- Voice command: (Alexa) --- fastforward!
Action: The track will be fastwarded.
- Voice command: (Alexa) --- rewind!
Action: The track will rewind.
- Voice command: (Alexa) --- previous! Action: The track will skip to previous track.
- Voice command: (Alexa) --- next! Action: The track will skip to next track.
- To turn off the microphone. Press the 📋/WPS Button, the color of the Decorative Ring will turn to Red. To turn on again, press the button again. The color of the Decorative Ring will turn to White.
TROUBLESHOOTING
Check the following before requesting service:
| SYMPTOM | POSSIBLE CAUSE POSSIBLE | SOLUTION |
| Can't power on | Built in battery drained Recharge the battery | |
| No sound or sound weak | Volume level in minimum position | Rise the volume level by press the VOL + Button on the top of unit |
| Volume level of paired/connected device is in low level | Rise the volume level of the paired/connected device | |
| Sound distortion | Volume level too high | Reduce the volume level by press the VOL - Button on the top of unit |
| Volume level of the connected/paired device too high | Reduce the volume level of the connected/paired device | |
| BT not functioning | The external BT device had NOT paired to the unit | Fair the external BT device to the unit |
| The external BT device too far from unit | Place the external BT device close to the unit | |
| Wi-Fi not functioning | The unit had NOT add the Wi-Fi network | Add the unit into the Wi-Fi network |
| The unit not in Wi-Fi mode | Power on the unit and enter to the Wi-Fi mode | |
| The unit and the mobile device is not in the same 2.4G Wi-Fi network | Set the unit and the mobile device in the same 2.4G Wi-Fi network | |
| The router wasn Power of my mode Wi-Fi | router | |
| Amazon Alexa not functioning | The unit is not in the Amazon Alexa operation mode | Power on the unit and enter to Amazon Alexa operate mode |
SPECIFICATIONS
Power source: Built-in DC=3.7V, 2500mAh(9.2WH rechargeable Li-ion) Battery,
Recharge by DC-5V through MicroUSB Port
BT Version: 4.1
BT Operation Distance: 32 Feet in open area about
Wifi Operation Distance:
Feet in open area96about
PACKAGE INCLUDES
1 x Les 's Manual
1 x USB Connection Cable (For Charging Only)
1 x Audio Connection Cables with 3.5mm Plugs
SPECIFICATIONS AND ACCESSORIES ARE SUBJECT TO CHANGE WITHOUT NOTICE
naxa®
Parte Posterior


Nota:


NAXA LIMITED WARRANTY ("Warranty") — For Product Categories Listed in Chart Below (as applicable, "Product").
Before returning your Product for service under this Warranty, please read the instruction manual carefully and visit our website at www.naxa.com for product updates and extended support documentation (e.g., Frequently Asked Questions, Common Troubleshooting Guides, etc ...). If you are still having trouble with your Product, please contact Naxa Customer Support.
Warning: Some Products may contain components that are small enough to be swallowed. Please keep out of reach of children.
Subject to the terms and conditions herein, Naxa Electronics, Inc. (herein after called "Naxa") warrants to the original purchaser of the Product ("Customer") that the Product will be free from defects in material or workmanship under normal, non-commercial use ("Defects") for the applicable Warranty Period listed below.
Warranty Period encompasses separate “Coverage Periods” for Parts and Labor as listed in the table below. Each Coverage Period begins from the original date of Customer purchase. If Customer returns a defective Product (or any component thereof) during the applicable Coverage Period, Naxa will, at its option: (1) repair the Product (or any component thereof) or; (2) replace the Product (or any component thereof) with a new or refurbished Product (or any component thereof), in either case free of charge to Customer for Parts and/or Labor during the specified Coverage Period only, and excluding the applicable shipping charges noted below for which the Customer is responsible. The foregoing states the Customer’s exclusive remedy and Naxa’s sole liability for breach of the limited warranty contained herein.
This warranty specifically excludes any product that has been subject to or has defects resulting from:(a)any neglect or misuse by a Customer; (b) an accident, improper application, violation of operating instructions for the Product, or any other Customer-induced damage; (c) the alteration or removal of any Product serial number; (d) any modification or repair to Product (or any component thereof) by any party other than Naxa or a party authorized in writing by Naxa; (e) any damage to Product due to power surges, incorrect electrical voltage, misconnection to any device, or malfunction of any device used with the Product (or, as applicable, any component thereof); (f) cosmetic damage to the Product caused by normal wear and tear; (g) shipping damage that occurs while the Product is in transit; (h) damage caused by heat sources, sunlight, electromagnetic conditions, or other climatic conditions; or (i) any acts of God. Refurbished products are not covered by this Warranty.
Product is sold to Customer for personal, non-commercial use only. Product is not warranted for commercial or rental use. In addition, Product is not warranted against failure, and should not be used by Customer for any application where there is a risk that any data stored on Product will be breached or otherwise compromised, or the data stored on Product is relied upon for medical or lifesaving applications. Naxa disclaims any Warranty for any of the foregoing uses to the fullest extent permitted by law. Customer assumes any and all risks associated with such uses of Product, and agrees to indemnify Naxa for any damages claimed for such uses.
EXCEPT FOR THE EXPRESS WARRANTIES STATED ABOVE AND TO THE MAXIMUM EXTENT PERMITTED BY LAW, ALL PRODUCTS ARE PROVIDED "AS IS", AND NAXA DISCLAIMS ALL OTHER WARRANTIES, INCLUDING WITHOUT LIMITATION ANY IMPLIED WARRANTY OF (I) MERCHANTABILITY; (II) FITNESS FOR A PARTICULAR PURPOSE, OR; (III) NON-INFRINGEMENT OF THIRD PARTY RIGHTS. TO THE MAXIMUM EXTENT PERMITTED BY APPLICABLE LAW, IN NO EVENT WILL NAXA BE LIABLE TO CUSTOMER OR ANY THIRD PARTY FOR ANY INDIRECT, SPECIAL, INCIDENTAL, CONSEQUENTIAL, EXEMPLARY OR PUNITIVE DAMAGES, INCLUDING, WITHOUT LIMITATION, ANY LOST PROFITS OR REVENUES, LOSS OR INACCURACY OF ANY DATA, OR COST OF SUBSTITUTE GOODS, REGARDLESS OF THE THEORY OF LIABILITY (INCLUDING NEGLIGENCE) AND EVEN IF NAXA HAS BEEN ADVISED OF THE POSSIBILITY OF SUCH DAMAGES, NAXA'S AGGREGATE LIABILITY TO CUSTOMER FOR ACTUAL DIRECT DAMAGES FOR ANY CAUSE WHATSOEVER SHALL BE LIMITED TO THE CUMULATIVE PRODUCT FEES PAID BY THAT CUSTOMER FOR THE PRODUCTS CAUSING THE DAMAGES, IF ANY.
This Warranty gives Customer specific rights, and Customer may also have other rights that vary from jurisdiction to jurisdiction.
All warranty returns must have an RMA number provided by Naxa Customer Support. An RMA number can be obtained by contacting Naxa Customer Support by phone, email, or online by using the RMA ticketing system at www.naxa.com.
Naxa Electronics, Inc.
RMA Processing / Customer Support
2320 E. 49th St., Vernon, CA 90058
Email: support@naxa.com
Phone: (866) 411-6292
Web: www.naxa.com
Hours of Operation:
Monday – Friday
10:00 AM to 5:00 PM PST
- IMPORTANT SAFETY INSTRUCTIONS
- CAUTION
- RISK OF ELECTRIC SHOCK DO NOT OPEN
- WARNING: TO PREVENT FIRE OR SHOCK HAZARD, DO NOT EXPOSE THIS UNIT TO RAIN OR MOISTURE.
- WARNING: USE UNDER SUPERVISION OF AN ADULT DUE TO LONG
- FCC STATEMENT:
- FCC NOTICE:
- FCC WARNING:
- Read these instructions
- Keep these instructions
- Heed all warnings
- Follow all instructions
- Do not use this apparatus near water
- Clean only with dry cloth
- Do not block any ventilation openings. Install in accordance with the manufacturer's instructions.
- Unplug this apparatus during lightning storms or when unused for long periods of time.
- Power source
- Power lines
- Overloading
- Object and liquid entry
- Outdoor antenna grounding
- Service
- Replacement parts
- Safety check
- Wall or ceiling mounting
- Damage requiring service
- Note to CATV system installer
- PRODUCT OVERVIEW
- POWER SOURCE:
- NOTES:
- AUX IN:
- BLUETOOTH OPERATION:
- NOTE:
- SETUP
- APP DOWNLOAD AND INSTALLATION
- CONNECTION
- PLEASE WAIT
- Cancel
- Operation after being added to the Wi-Fi network:
- SPOTIFY OPERATION
- TIDAL OPERATION
- AMAZON ALEXA VOICE CONTROL
- Voice Control of Amazon Alexa:
- TROUBLESHOOTING
- SPECIFICATIONS
- PACKAGE INCLUDES
- naxa®
Brand : Naxa
Model : NAS-5003
Category : Loudspeaker