MiTab Line - Tablet Wolder - Free user manual and instructions
Find the device manual for free MiTab Line Wolder in PDF.


| Product Type | Tablet |
| Brand | Wolder |
| Model | MiTab Line |
| Display | 10.1 inch IPS LCD, 1280 x 800 pixels |
| Processor | Quad-core Cortex-A7 @ 1.3 GHz |
| RAM | 2 GB |
| Internal Storage | 32 GB, expandable via microSD |
| Operating System | Android 9.0 Pie |
| Battery | 5000 mAh Li-Ion |
| Connectivity | Wi-Fi 802.11 b/g/n, Bluetooth 4.0 |
| Camera | Front 2 MP, Rear 5 MP |
| Dimensions | 240 x 170 x 8.5 mm |
| Weight | 500 g |
| Power Input | 5V / 2A via micro USB |
| Main Functions | Wi-Fi browsing, media playback, e-reading, light gaming, video calls |
| Maintenance & Cleaning | Wipe with a soft dry cloth; do not use liquids or abrasives |
| Safety Precautions | Keep away from heat and moisture; do not disassemble; use only certified chargers |
| Spare Parts & Reparability | Replacement parts available from authorized service centers; battery and screen replaceable by professionals |
| General Information | User manual available in PDF format for download |
Frequently Asked Questions - MiTab Line Wolder
User questions about MiTab Line Wolder
0 question about this device. Answer the ones you know or ask your own.
Ask a new question about this device
Download the instructions for your Tablet in PDF format for free! Find your manual MiTab Line - Wolder and take your electronic device back in hand. On this page are published all the documents necessary for the use of your device. MiTab Line by Wolder.
USER MANUAL MiTab Line Wolder
Almacenamiento
Fecha y hora

natural_image
Two-panel image collage: top shows a beach scene with duck, waves, grassland, and sunset; bottom shows a blue dandelion against a sky background.natural_image
Digital camera interface showing a white dandelion on a blue background, with control buttons and playback time (no text or symbols on the main image area)f) Navegador
V. 1.0 Página 33

Abrir el navegador
Caution: General Safety Instructions 3
Overview....4
Basic features .... 4
Accessories....4
Key 4
Tablet Applications 5
Status Icons.... 5
a) Getting started. 7
System Configuration.... 7
ON/OFF/Standby....7
Reset....7
PC Connection and Data Transfer 7
Charging....10
Micro SD card Use....10
b) Basic features....10
Main screen.... 10
Main menu 11
c) Settings....13
Wi-Fi 13
Data Usage Information.... 16
Additional settings.... 17
Sound.... 18
Display 19
Storage....20
V. 1.0 Page 1
Battery 21
Applications 21
Location services 22
Security 23
Language and input 24
Backup and reset....25
Add accounts....25
Date and time.... 26
Accessibility 27
Developer options....28
About tablet 29
d) Music....29
e) Video and Picture....31
f) Internet Browser. 33
g) Email 34
h) Calendar....35
i) Clock. 36
Declaration
- The copying, transmission, distribution or storage of information in this manual are prohibited except with prior written license agreement of The Company.
- Although efforts have been made for correctness and completeness during the preparation of the manual, there is no guarantee that this manual is free from any error or omission. The Company does not assume any liability regarding errors or omissions that might exist in the manual.
- For sustainable development, The Company reserves the right to modify and improve any product described in this manual without prior notice.
- Under no circumstance shall The Company assume any liability, directly or indirectly for loss of data or income or any special, accidental, incidental or indirect losses.
Caution: General Safety Instructions
For the correct use of the player and good performance of the tablet, the user must fully understand the manual as well as strictly follow the instructions provided.
- Avoid high temperatures (over 35°C) or low temperatures (below -5°C).
- Do not hit the tablet violently.
- Do not allow the tablet to get in contact with chemicals such as thinners, benzene, etc.
- Do not expose the product to strong magnetic or electrical fields.
- Keep the tablet out of direct sunlight or other sources of heat.
- Do not attempt to disassemble, repair, or modify the player.
- Using the player and headphones while riding a bicycle or driving an automobile or motorbike may lead to dangerous situations.
- Do not use high volume level, it may damage your hearing ability.
- We recommend separation and proper disposal of packaging, batteries and old electronic products.
Overview
Basic features
- Music player: supporting • ape / flac / m4a / mp3 / ogg / wav / wma / dts formats.
- Video player: supporting • avi / mp4 / wmv / mov / mkv • MPEG-1 / MPEG-2 / MPEG-4 ASP / H.264 AVC / wmv / 3gp / rmvb / vob / divx / ts / flv formats.
- Picture gallery: supporting JPEG, BMP, GIF y PNG formats.
- Instant messaging: supports MSN, SKYPE, etc.
- Games: Supports JAVA games, G-sensor games and 3D games.
- TV Out: Supports HDMI synchronous display.
- Setting function: allows showing and setting all properties.
- File system: supports FAT/FAT32/ NTFS and exFAT.
- USB: supports OTG.
- Supports peripherals like USB, mouse, keyboard, etc.
Accessories
The following accessories are included:
| Accessories Functions | |
| Adaptor Device charger | |
| USB connection cable Connects the tablet to the PC for data transfer | |
Key
- Key
| No. | Name Function Definition | |
| 1 | Turning the tablet on | (1) Press and hold to turn on/off the device (power off interface prompt appears).(2) Press and hold player for over 8s to restart tablet.(3) Press to turn on/off the screen (standby mode interface prompt appears with the screen locked). |
- Touch operation
| No. | Name Function Definition | |
| 1 | Press | It indicates that key needs to be pressed for less than 1.2s, it is mainly used in selecting a menu option, confirm etc. |
| 2 | Press and hold It ind | Indicates that key needs to be pressed for more than 1.2s. |
| 3 | Slide/Drag | It allows identifying touch trace direction on the screen. It is mainly used to turn picture/page, drag items etc. |
| 4 | Handwriting recognition | It is mainly used to insert characters/symbol. |
| 5 | Virtual key It belongs to virtual keyboard. | |
| 6 | Vol+/ Vol- | Key to increase/decrease volume, press to increase or decrease volume point by point, press and hold to increase or decrease volume continuously. |
| 7 | Home Returns to main screen. | |
Tablet Applications
Some apps can be customised according to users need. The following list shows the most common basic apps:

Status Icons
Status bar menu is shown below:

natural_image
Desktop screenshot showing a white dandelion against a blue sky, with app icons below (no readable text or symbols on the main image)At the bottom of screen status bar, there are six operation icons on the left side:
| Icons Functions | |
Back soft key  | Opens the previous screen, its function is similar to BACK key. |
Home soft key  | Opens the home screen, its function is similar to HOME key. |
Shortcut key  | List of most common apps, to open an app touch it. |
Screenshot key  | Full screenshot |
Vol key (-)  | Decreases the volume. |
Vol key (+)  | Increases the volume. |
The icons on the right side display the current status of the tablet:
| Icons Functions | |
USB connection status | Displays the USB connection status. |
USB debugging status | Displays whether the USB debugger is active. |
SD card connectionstatus  | Displays if SD card has been removed. |
| Time [CTWS] | Displays current time. |
V. 1.0 Page 6
Wi-Fi  | The device is connected to the Internet through a Wi-Fi connection. The more number of signal bars in the icon, the stronger the signal. |
Battery  | Shows the battery level or charging status. |
a) Getting started
System Configuration
Operating system: Windows 7/Vista/XP/2K/ME/98 (need to install driver)/ubuntu 9.0 and above/Mac OS 10
CPU: Pentium 133MHz and above.
RAM: Minimum 32 MB.
Hard disk free space: Minimum 100 MB.
Video card: 640x480 or above with minimum 16 bit colour.
ON/OFF/Standby
ON: Pressing Power key, the player displays start-up picture and then enters home screen.
OFF: Press and hold Power key for 5s on the home screen, the system will prompt whether to power off device, then press 'YES', the device will power off normally.
Power saving and standby mode: With the device switched on, press power key to enter power saving and standby mode, to exit power saving mode press power key again to lighten the screen, then follow instructions to unlock the screen.
Reset
Press RESET key over 8s to restart the tablet if it has crashed.
PC Connection and Data Transfer
The tablet is connected to a PC using a USB cable. Once the cable is connected, the USB
icon will appear on the lower right side of the status bar indicating that the tablet is now connected through USB. As follows:
V. 1.0 Page 7

When the USB connection menu appears, press 'USB connected'.

Press 'Turn on USB storage' on prompted window:
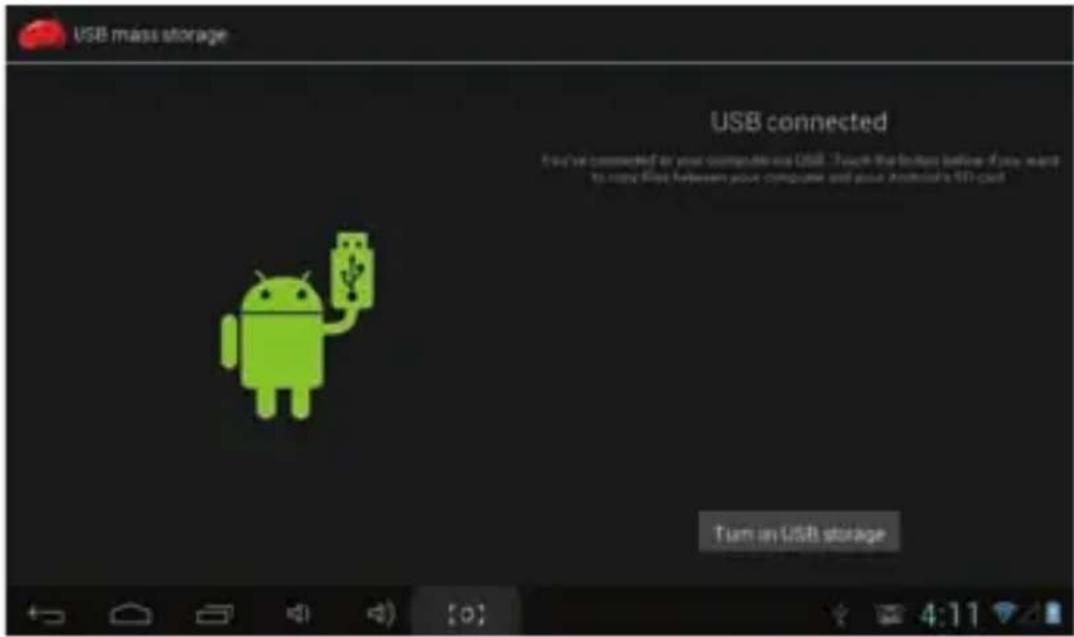
Then data transfer mode is activated.
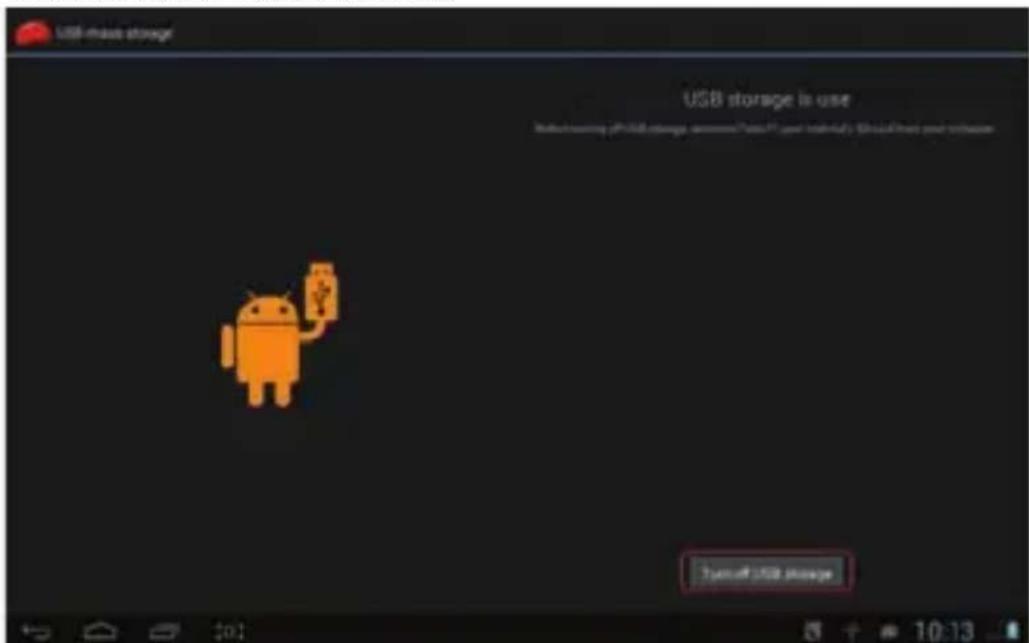
Now the icons of device storage, built-in-memory disk and SD card (if the card is inserted) will appear in my computer list.
To quit data transfer mode, press 'Turn off USB storage'.
【Note】: before quitting data transfer mode, disk unit system or NTFS card, to safely disconnect from PC, click 'Close USB storage device' (Safely remove USB), otherwise you may risk losing data.
V. 1.0 Page 9
Charging
The tablet includes a high capacity Li-Ion battery. To charge the tablet, use the power adaptor included along with the product.
When the battery is low, a window is prompted on the tablet screen to warn you that the device needs to be charged.
It is important to charge it for at least 6 hours when charging for the first time.
Micro SD card Use
After connecting the tablet to the PC, you will find two removable disks, the first one is the built-in-memory disk, and the other one is Micro SD card disk. If no card is inserted, the second disk cannot be opened. The Tablet supports up to 32 GB Micro SD card expansion.
Plug-in: Place the front side (Printed side) Micro SD card upwards in the direction in which the machine's display screen faces and insert it into the card slot by pushing with a slight force. Now the machine can also play the files stored on the card.
Plug-out: Push Micro SD card inwards slightly, it will spring back for certain length, and then take it out.
b) Basic features
Main screen
The tablet is locked by default; drag the lock icon as per appearing instructions to unlock.
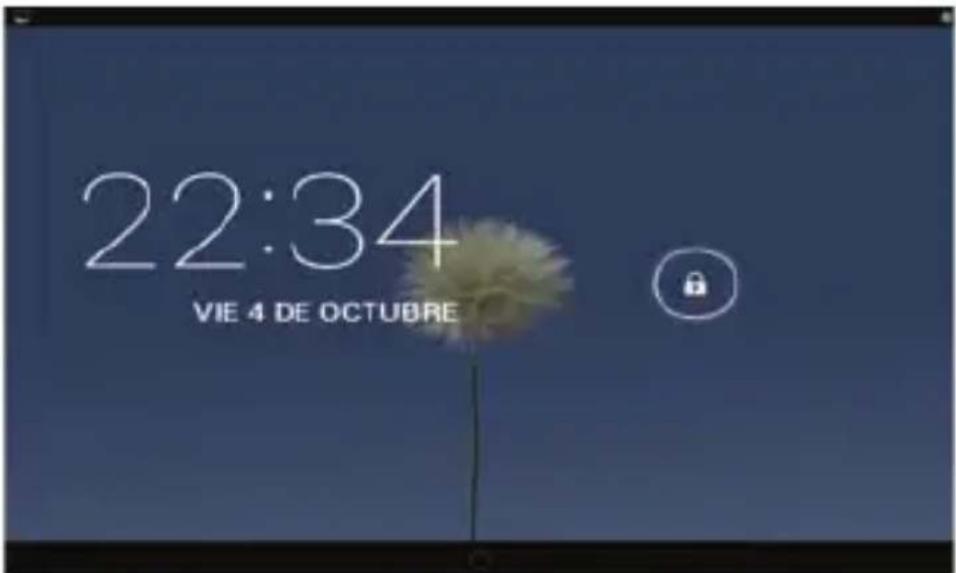
Another screen will appear: Touch the screen leftward and rightward to browse through screens, it supports up to five screens altogether.
Switch to main screen: Press the HOME icon on the status bar or HOME key on the tablet.
Main menu
Press the icon 📄 the upper right side of main screen and the main menu will pop up. To see all the apps listed on the main menu, drag the screen leftward or rightward.

Open or switch applications:
Select a program and press its icon to open the application. Press the HOME icon or HOME key to return to the main screen.
Screen customization (main screen settings)
Press and hold a certain application icon to add a short cut of the application to the main screen.
Zoom in or zoom out
When you view pictures, websites, emails or maps zoom in or zoom out with a gesture of the fingers.
Horizontal or vertical view
This device supports to watch the screen in horizontal or vertical view when you turn it. When you turn the screen, the contents will adapt to the new outlay of the screen.
Text Input
When you need to input, the virtual keyboard will pop up. Also on the lower right side
of the screen a virtual keyboard will appear. When you press it, the selecting menu of input will appear. As following figure:
c) Settings
Set applications, date and time, network connection options, etc.

Wi-Fi
It allows the tablet to connect to the Internet through Wi-Fi.

Introduction to Wi-Fi:
(1) To join a Wi-Fi network: Press 'ON', the device detects the networks that are in its range and allows you to select a network you wish to join and if required prompts you to enter a password.
(2) Once the device connects to a Wi-Fi network, on the right side of the status bar an
icon 📄 appear which displays signal strength (the more number of bars it has more stronger is the signal).
(3) After the device is connected to a wireless network manually the device automatically joins this network.
(4) If there are multiple networks used before are within range of the device, it will join the last used network.
(5) Press 'OFF' to turn off Wi-Fi.
Wi-Fi Advanced settings:
Press the icon 📄 on the upper right side of main screen and and select option 'Advanced' from the popup menu:
![Settings WIRELESS & NETRORES Wi-Fi Ethernet Data usage More... Never Sound Display Storage Battery WOLDER 2 Excluded with WPSI2 (WPSI2 available) Smartphone Excluded with WPSI2 (WPSI2 available) WOLDER INVITADOS Scan WPSPIN Entry Advanced [0] 9:28](/content/2026/05/946585/images/799389e77f65acfebe9e2d445d5adee8e3b5991000ea53a050480b61a406dcae.jpg)
The following screen will open:
![Settings MINESELE & NETWORKS Ethernet Data usage More. navit Sound Display Storage Inventory Network notification: classify one when an peer network is available Keep Wi-Fi on during sleep faster Avoid peer connections Save 5 user a MAC network access in hard a good time-net connection MAC address: 90.64.168.167.168.312 IP address: 100.168.911X [0] 9:29](/content/2026/05/946585/images/ea2dd11cd764fc77a050497dcfa9090f53cbb3835e36982930704d451a8a55d6.jpg)
Keep the Wi-Fi connected in standby mode:
1) Always: it means Wi-Fi is still on in standby mode.
2) Only when plugged in: it means Wi-Fi is still on when the device is connected to a power source in standby mode; otherwise Wi-Fi will be turned off.
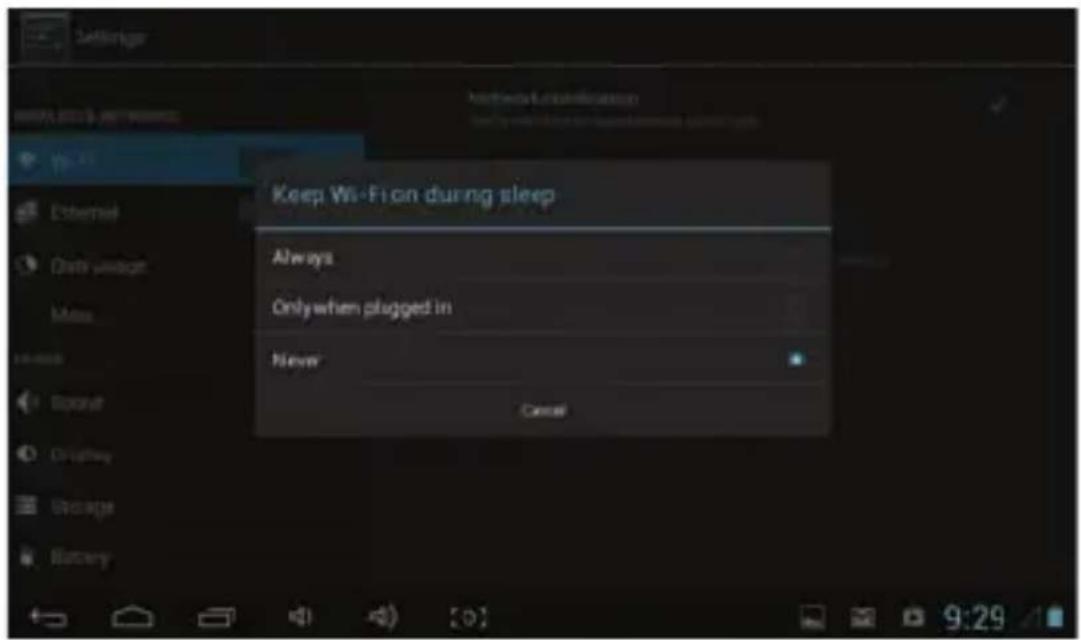
3) Never: it means that when the device is in standby mode, Wi-Fi is always on, it will not turn off automatically.
【Note】: If you need the Wi-Fi to keep working when the device is in standby mode, select 'Never', as shown below:
V. 1.0 Page 15
Data Usage Information
Displays data usage information.

V. 1.0 Page 16
Additional settings
Set 'Airplane mode', 'VPN', 'Mobile networks', etc.
![Settings WIRELESS & NETWORKS Wi-Fi Ethernet Data usage Wire... Device Sound Display Storage Battery Aeroplane mode VPN Mobile networks 3G support list [0] 9:58](/content/2026/05/946585/images/fede7fc8958a06cc1af844c6f7f4f43971aef85962bc9975d6361d2e219a8811.jpg)
If you need to surf the Internet on 3G, first you need to turn off Wi-Fi and Ethernet (if it is on), then plug in the 3G dongle with SIM card to the USB port of the tablet. The device will join the network automatically and once connected the 3G logo will appear on system menu. The complete connection process may last up to 1 minute.
Sound

Volumes: set the volume level of music, video, games and other multimedia content as well as set the volume level for notifications and alarm clock.
Ringtone and notifications: choose the ringtone and notifications warning tone (send notifications, dial operations, plugging in or out of SD card, etc.).
【Note】: the different tones for notifications, option selection, SD card notifications, etc., are used in mobile phones but are set by default in the tablet.
Touch sounds: Indicates presence of tone when you touch the screen.
Screen lock sound: The device emits a sound when the screen is locked.
Display
![Settings WIRELESS & NETWORKS Wireless Wi-Fi Ethernet Data usage Mise Device Sound Display Storage Battery Brightness Wallpaper Sleep After 1 minute of saturation Font size bottom Accelerometer calibration: Input HDMI Output screen reset [0] 9:58](/content/2026/05/946585/images/88454b7abbad3b43020493b17c69c066208d3c8a61c576ac6ec93ffae0874682.jpg)
Brightness: set the brightness of the screen.
Wallpaper: You can choose the wallpaper of your choice from the animated, picture and normal wallpaper galleries.
Sleep: If no operation is carried out during a specific amount of time (15s/30s/1min/2min/5min/10min/30min), the tablet will enter standby mode automatically and the display backlight will auto off to save battery.
Font size: set the font size: (small, normal, large, very large)
Accelerometer calibration: if the accelerometer has any deviation, it can calibrate it from here.
【Note】: some games use the accelerometer, if you find that the accelerometer is not working, search for the icon on the left lower side of the screen. Press it and you will get two options 'Stretch to fill in the screen' and 'Zoom to fill in the screen'. Then you can select the mode that best adapts to the game.

Storage
Provides information on MID storage space.

V. 1.0 Page 20
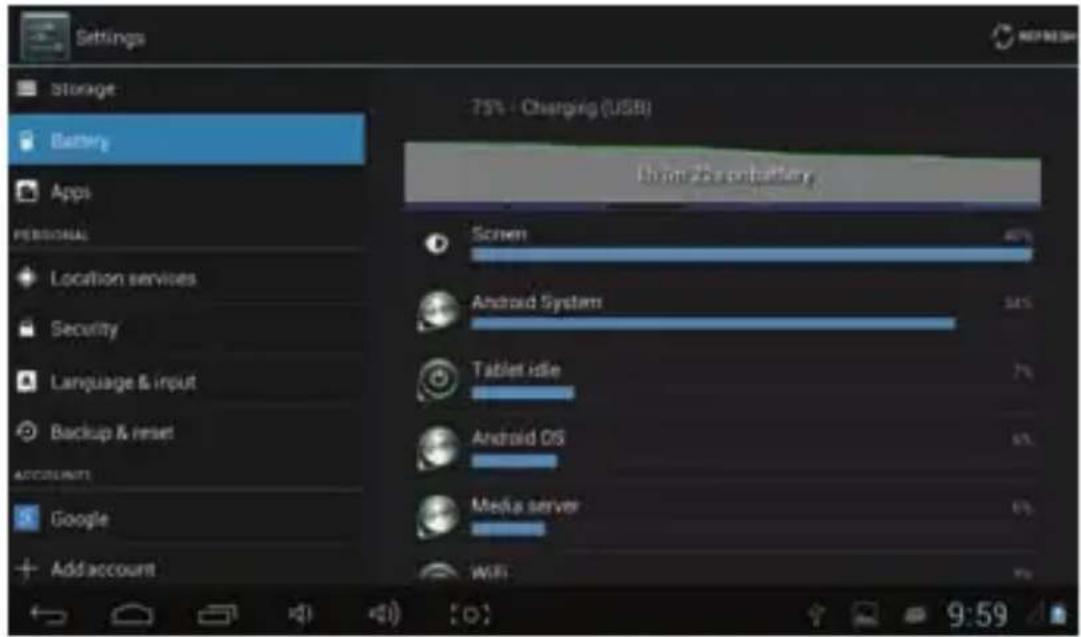
Battery
Displays information on battery charge level.
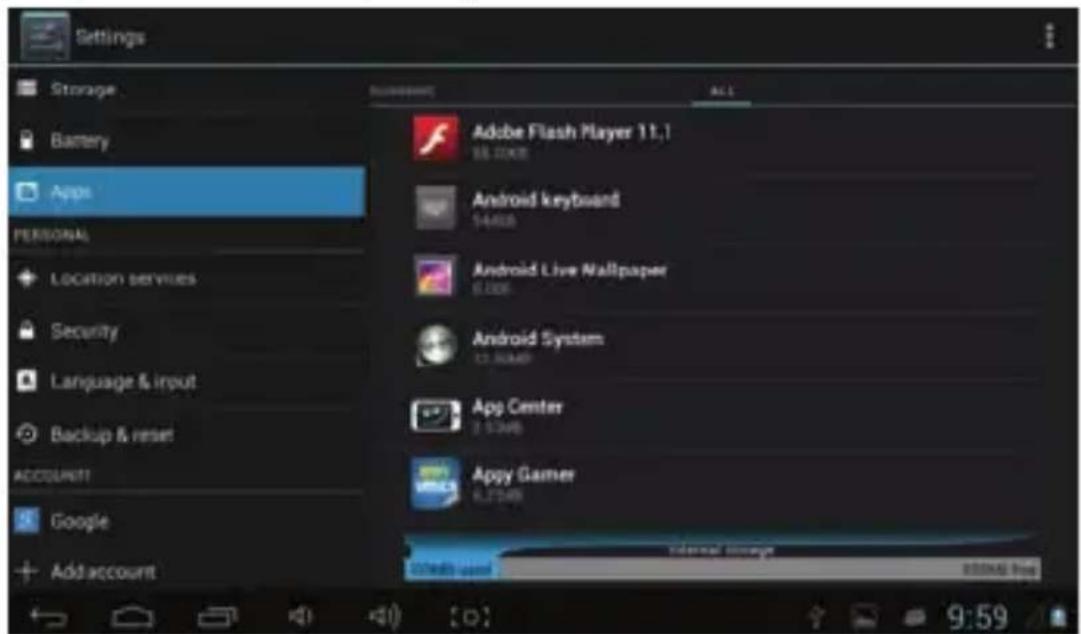
Applications
Here you can check and set system applications.
V. 1.0 Page 21
Downloads: It shows information on the list of downloaded applications.
On SD card: It shows information on the list of application storage on SD card.
Running: It shows information on the list of running applications. Press a running program to see its processes and services.
All: It shows information of all Android system applications. Press any program to check information on its version number, storage space, cache size, access rights etc.
Location services

Google's location service: Allows apps to use data from Sources such as Wi-Fi and mobile networks to determine your approximate location.
Location & Google search: Let Google use your location to improve search results and other services.
Security
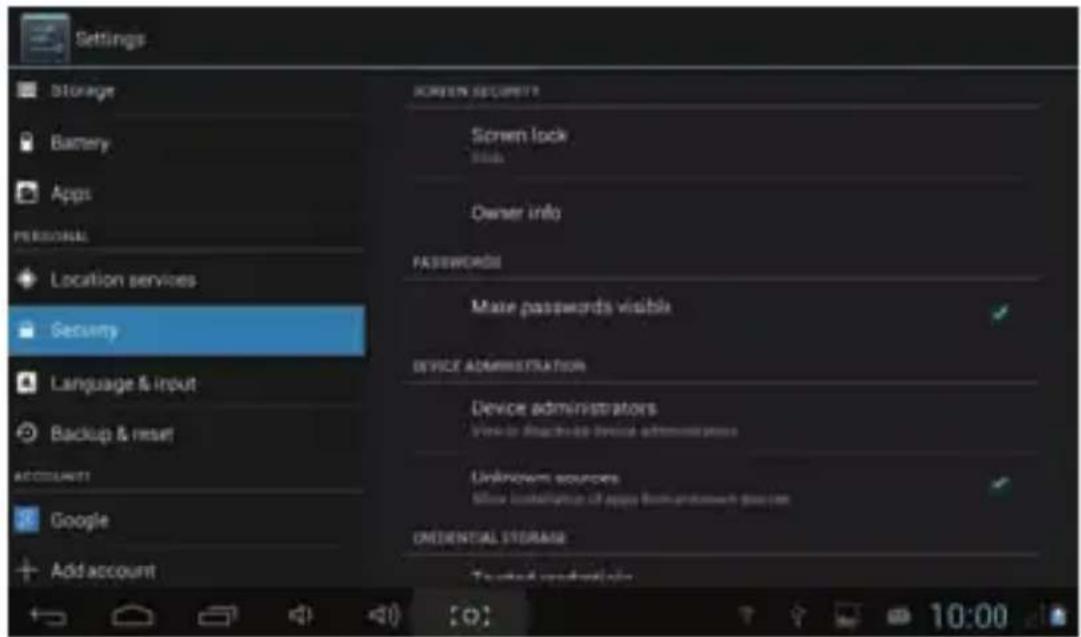
Screen security:
(1) Screen lock: Choose the unlock mode when screen is locked.
(2) Owner info: to set owner information which is displayed when the screen is locked.
(3) Passwords: to choose characters are displayed when inputting a password.
Device administration:
(1) Device administrators: View or deactivate device administrators.
(2) Unknown sources: This option enables to install apps purchased outside Play Store.
Credential storage:
(1) Trusted credentials: Displays confidential CA certification.
(2) Install from SD card: Install certificate from SD card.
(3) Delete credentials: This option enables to delete all credentials.
Language and input
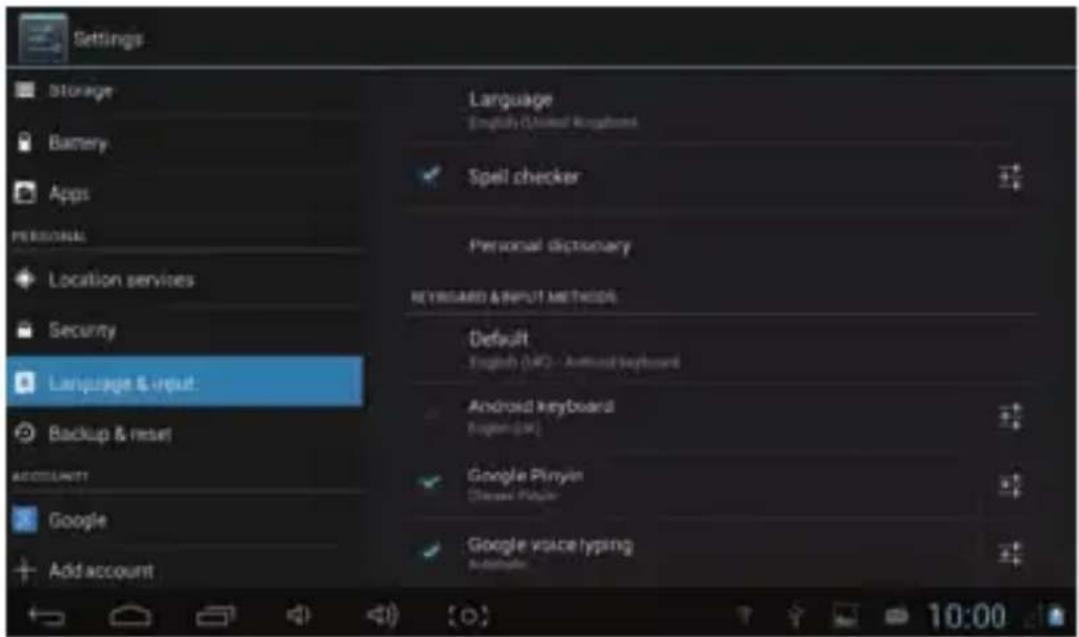
Language: Choose a language to be displayed for all screen items.
Spell checker: It serves to spell check input characters.
Personal dictionary: Press the 'ADD' key on the upper right side of screen and add vocabularies to create your own dictionary.
Keyboard & input methods: This option opens a list of input methods installed in MID which can be configured.
Backup and reset
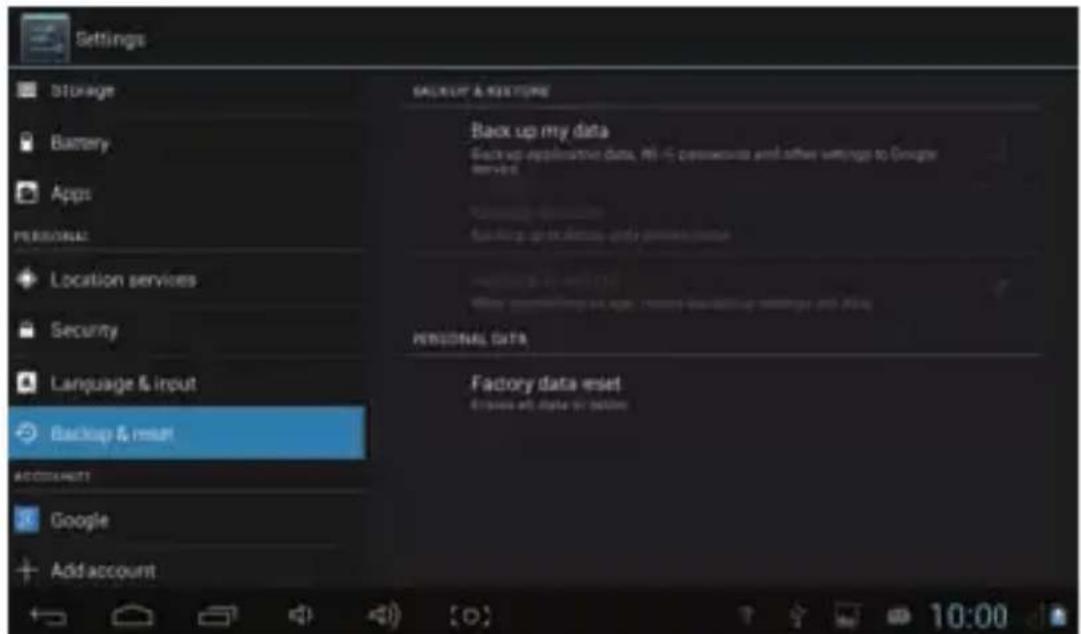
Backup & reset:
(1) Backup my data: Allows you to back up data, Wi-Fi passwords, and other settings to Google servers.
(2) Backup account: Back up to debug-only private cache.
(3) Automatic restore: When reinstalling an app, restore backed up settings and data saved in backup copy.
Personal data:
Factory data reset: Erase all data partition; clear all user data in tablet.
Add accounts
Manage accounts and synchronize information. Press ' Add an account' on the upper right side of screen to add a Google account, company account, or email account.

Date and time

Automatic date & time: Time is set through information synchronised from the network.
Set date.
Set time.
Select time zone.
Use 24-hour format.
Choose date format.
Accessibility
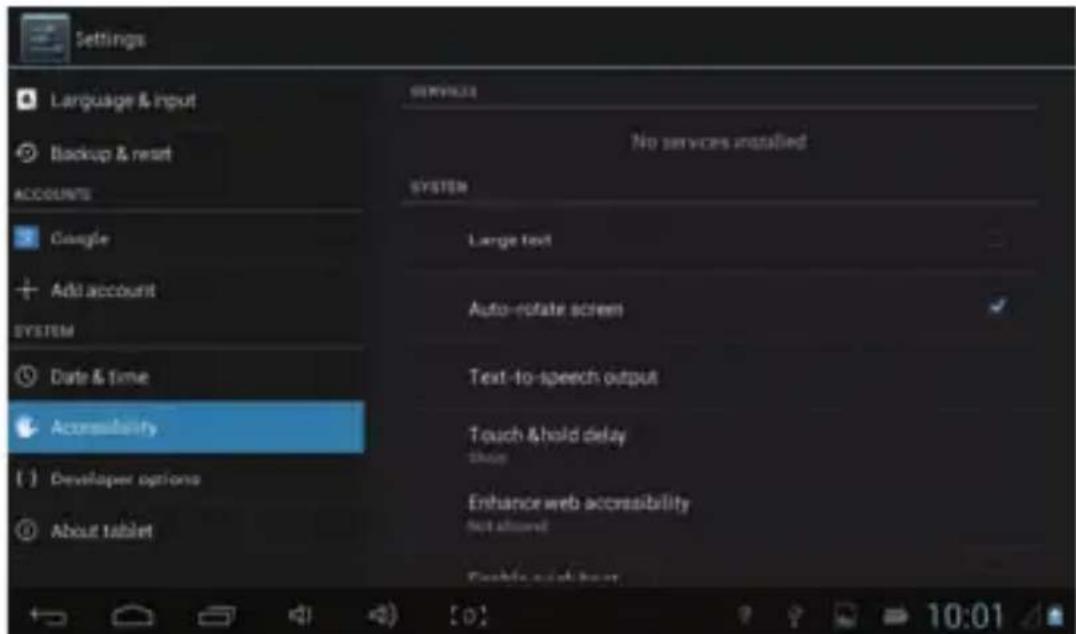
Large text: Select if you need to enlarge font.
Auto-rotate screen: Enables to set if the device is rotated, the image also automatically rotates and adapts itself to the new layout.
Running mode: There are three options, 'Performance balanced', 'Power saving prior' and 'Performance prior'.
1) Performance balanced: MID will adjust power consumption and performance to strike a balance. We suggest you to use this option.
2) Power saving prior: The power consumption of MID is relatively small, but in some cases it may increase. We do not suggest you to use this option.
3) Performance prior: If you choose this option, the performance of MID will be the best, but battery will drain out faster.

【Note】: When running some applications or games, in order to display effectively, screen rotating may be disabled.
Developer options

This option must only be used by program developers, such as auto-open debug mode after connecting through USB.
V. 1.0 Page 28
About tablet

In this option, you can check MID status, legal information, MID model number, Android version, kernel version and build number.
d) Music
Press to enter music library where all music files are listed separately arranged by 'Artists', 'Albums', 'Songs', 'Play list' and 'Now playing'. Press any item to enter the list.
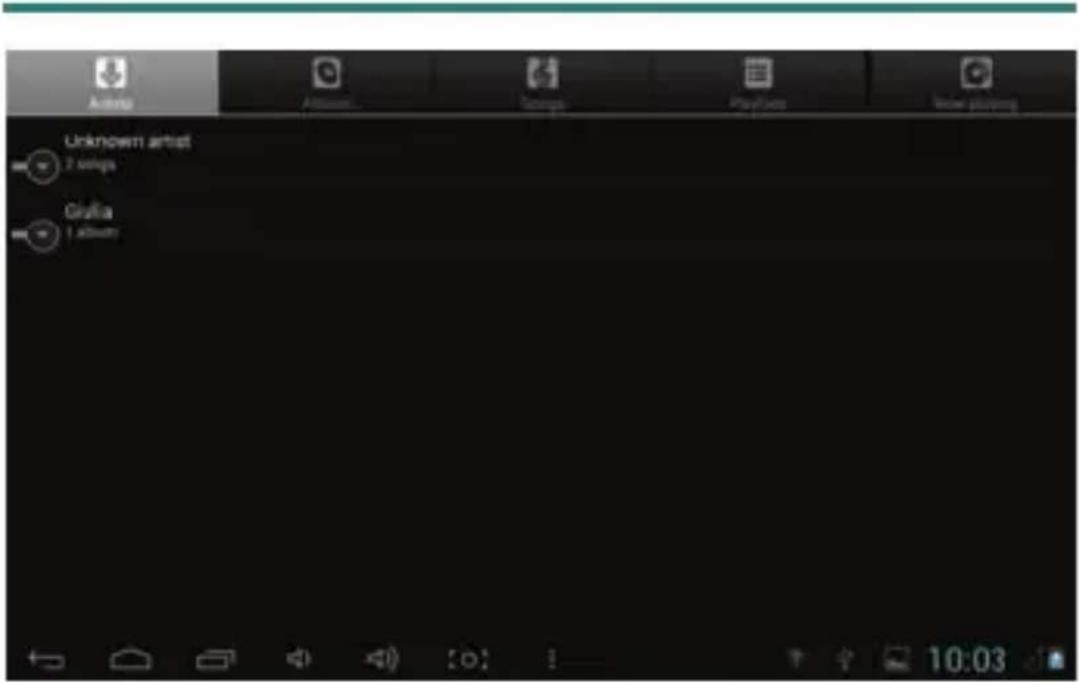
If you press and hold any song or folder name, you may add it to play list, delete and search as shown below:

You can play music as well as use other applications simultaneously. For example, while: browsing pictures, read text or surf the Internet. While playing music in the background,
the upper left side of the status bar displays ▶, if you press and drag downwards, the screen displays as follows, to return to play list screen press icon.
V. 1.0 Page 30

e) Video and Picture
Press 'Gallery' to enter browser directly where you will find the list of all your pictures and video files.
Video player
Press the folder where the video is located. After analysing, press to start playing the video accordingly.
Picture viewer
Choose the pictures from the folder:

natural_image
Collage of nature photos including a duck, beach, island, and wooden pier under different sky and beach lighting (no text or symbols)Press the icon , located on the upper right side and choose an action: Slideshow, edit, rotate left, rotate right, crop and etc.

The option 'Crop' allows you to cut the picture. After selecting the crop region, press the 'OK' button on the upper right side of the screen:

natural_image
Digital photo frame showing a white dandelion flower centered on a blue background, displayed in an image viewer interface (no text or symbols on the flower itself)f) Internet Browser

Open the
browser and enter a website. Before surfing the Internet, ensuring
that Wi-Fi, 3G or Ethernet on your device is turned on.
Website browser screen will open as follows:

g) Email
You can send and receive emails from your device.
Press the email icon and login with your account and password to send and receive emails.

h) Calendar

V. 1.0 Page 35
You can set calendar reminder tone and other related settings in (Settings>Advanced settings).
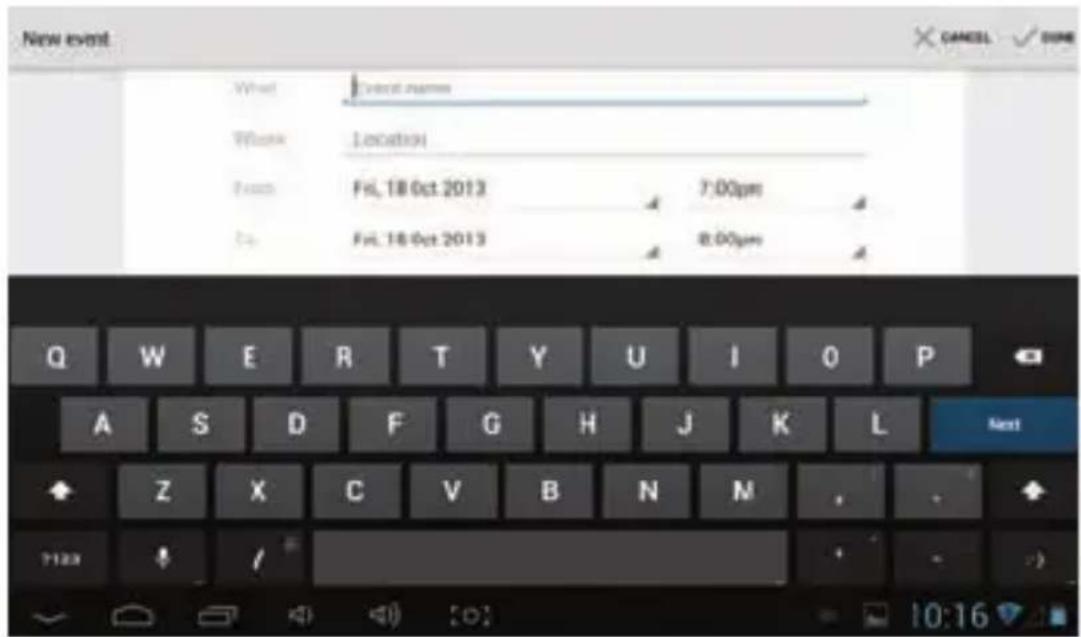
New event: to add an event to the calendar use the option (Settings>New event), which enables you to set the following items: event name, time, place, description, repeat and remind. Now the screen will display the following:
i) Clock
Press the icon

to enter clock screen:
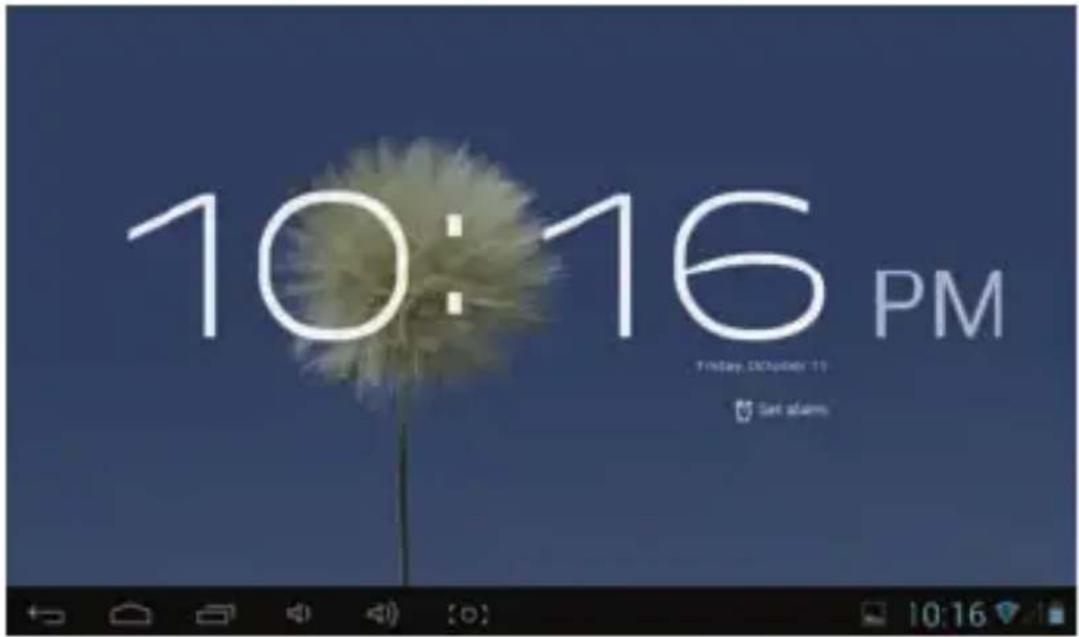
Press to set clock:

DECLARATION OF CONFORMITY
GLOBAL WOLDER GROUP S.L., Polígono Industrial de Barros no 29, 39408 Barros, Cantabria. Spain, certifies that this product, miTab LINE model, complies with the provisions of Directive 99/05/CE on Radio & Telecommunications Terminal Equipment (R&TTE), and Directive 2004/108/CEE on Electromagnetic Compatibility in accordance to harmonised standards.
CE
Manual do Utilizador
Índice
Índice 1
Declaração....3
Precauções....3
Vista geral....4

c) Definição
Armazenamento
natural_image
Two-panel image collage: top shows a beach scene with duck, waves, grassland, and sunset; bottom shows a blue dandelion flower on a clear sky.natural_image
Digital photo editing interface showing a white dandelion flower centered on a blue background, with no visible text or symbols in the main image area.f) Navegador
V. 1.0 Página 33

Abre o navegador
g) E-mail
i) Relógio
Prime o ícone

www.wolderelectronics.com
- Almacenamiento
- f) Navegador
- Caution: General Safety Instructions 3
- Overview....4
- a) Getting started. 7
- b) Basic features....10
- c) Settings....13
- 1.0 Page 1
- Declaration
- Caution: General Safety Instructions
- Overview
- Basic features
- Accessories
- Key
- Tablet Applications
- Status Icons
- 1.0 Page 6
- a) Getting started
- System Configuration
- ON/OFF/Standby
- Reset
- PC Connection and Data Transfer
- 1.0 Page 7
- 1.0 Page 9
- Charging
- Micro SD card Use
- b) Basic features
- Main screen
- Main menu
- Open or switch applications:
- Screen customization (main screen settings)
- Zoom in or zoom out
- Horizontal or vertical view
- Text Input
- c) Settings
- Wi-Fi
- Introduction to Wi-Fi:
- Wi-Fi Advanced settings:
- Keep the Wi-Fi connected in standby mode:
- 1.0 Page 15
- Data Usage Information
- Additional settings
- Sound
- Display
- Storage
- Battery
- Applications
- Location services
- Security
- Screen security:
- Device administration:
- Credential storage:
- Language and input
- Backup and reset
- Backup & reset:
- Personal data:
- Add accounts
- Accessibility
- Developer options
- 1.0 Page 28
- About tablet
- d) Music
- 1.0 Page 30
- e) Video and Picture
- Video player
- Picture viewer
- f) Internet Browser
- g) Email
- h) Calendar
- i) Clock
- DECLARATION OF CONFORMITY
- Manual do Utilizador
- Índice
- c) Definição
- Armazenamento
- g) E-mail
- i) Relógio
Brand : Wolder
Model : MiTab Line
Category : Tablet