20SC2 - Microwaves IFB - Free user manual and instructions
Find the device manual for free 20SC2 IFB in PDF.


User questions about 20SC2 IFB
0 question about this device. Answer the ones you know or ask your own.
Ask a new question about this device
Download the instructions for your Microwaves in PDF format for free! Find your manual 20SC2 - IFB and take your electronic device back in hand. On this page are published all the documents necessary for the use of your device. 20SC2 by IFB.
USER MANUAL 20SC2 IFB
PLEASE READ THESE OWNERS'S
MANUAL INSTRUCTION CAREFULLY
BEFORE OPERATION AND KEEP
IT FOR FUTURE REFERENCE
Please record the details of your microwave oven below for future reference Model number
Serial number
Purchase
WELCOME AND CONGRATULATIONS
Congratulations on your purchase of a new IFB microwave oven! At IFB Industries Ltd, we are very proud of our product and are completely committed to providing you with the best service possible.
Your satisfaction is our number one priority.
CONTENTS
SPECIFICATIONS 3
PRECAUTIONS TO AVOID POSSIBLE EXPOSURE TO EXCESSIVE MICROWAVE ENERGY.... 3
PART NAMES....4
INSTALLATION INSTRUCTIONS.... 5
GROUNDING INSTRUCTIONS.... 5
RADIO INTERFERENCE.... 5
SAFETY INSTRUCTIONS ABOUT YOUR MICROWAVE OVEN 6
SAFETY INSTRUCTIONS ABOUT FOOD 7
MICROWAVE COOKING PRINCIPLES....8
INSTRUCTION WHILE MICROWAVE COOKING.... 8
MICROWAVE COOKING TECHNIQUES....9
FOOD DONENESS SIGN....9
DEFROSTING TIPS....9
GRILLING TIPS.... 10
CONVECTION TIPS.... 10
COOKWARE SELECTION GUIDE.... 10
CONTROL PANEL GUIDE.... 11
OPERTING INSTRUCTIONS.... 12
CLEANING AND CARE 20
SERVICE CALL CHECK.... 27
SPECIFICATIONS*
| Power Consumption: | 230V, 50Hz, 1200W (Microwave) |
| 2200W (Convection) | |
| 1200W (Grill) | |
| Rated Microwave Output: | 800W |
| Operation Frequency: | 2450MHz |
| Outside Dimensions: | 262mm(H)×452mm(W)×390mm(D) |
| Oven Capacity: | 20Litres(0.7cu.ft) |
| Cooking Uniformity: | Turntable System{Φ245mm} |
| Net Weight: | Approx. 15.13kg |
PRECAUTIONS TO AVOID POSSIBLE EXPOSURE TO EXCESSIVE MICROWAVE ENERGY
a. Do not attempt to operate this oven with the door open since open door operation can result in harmful exposure to microwave energy. It is important not to defeat or tamper with the safety interlocks.
b. Do not place any object between the oven front face and the door or allow soil or cleaner residue to accumulate on sealing surfaces.
c. Do not operate the oven if it is damaged. It is particularly important that the oven door close properly and that there is no damage to the
d. Door (bent).
e. Hinges and latches (broken or loosened),
f. Door seals and sealing surfaces.
The oven should not be adjusted or repaired by anyone except properly qualified service personnel.
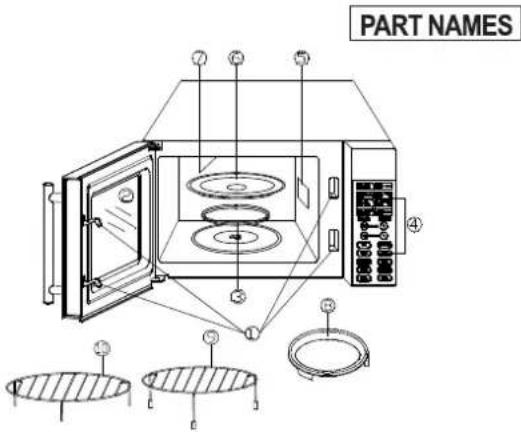
INSTALLATION INSTRUCTIONS
- Door Safety Lock System
- Oven Window
- Roller Ring
- Control Panel
- Oven AirVent
- Glass Tray
- Grill Heater
- Baking plate
- Metal Rack
- Metal Rack
| STEPS | INSTRUCTIONS | |
| 1 | This microwave oven must be placed on a flat surface to hold its weight and the heaviest food likely to be cooked in the oven | 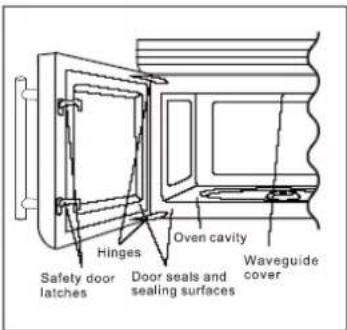 figure 1 figure 1 |
| 2 | Do not place the oven where heat, moisture or high humidity are generated or near combustable materials | |
| 3 | Remove all the packaging material from the microwave oven | |
| 4 | WARNING:Check the oven for any damages, such as misaligned or bent door, damaged door seals and sealing surface,broken or loose door hinges and latches and dents inside the cavity or on the door. If there is any damage,do not operate the oven and contact qualified personnel.Refer figure 1 | |
| 5 | Install shaft, roller support and glass turntable in their proper position.Refer figure 2 | 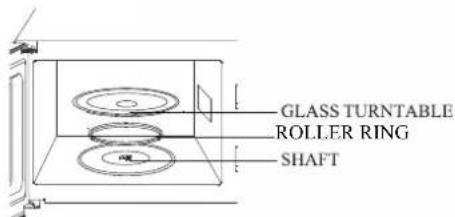 figure 2 figure 2 |
| 6 | Plug power cord into a dedicated 15 Amps Electrical outlet. | 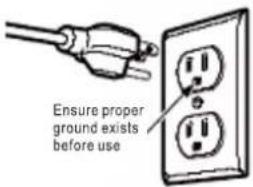 figure 3 figure 3 |
| 7 | Make sure that the power supply cord is undamaged and does not run under the oven or over any hot or sharp surface. | 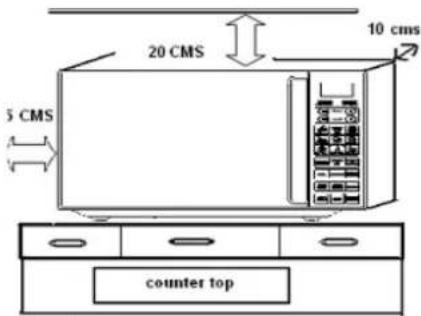 figure 4 figure 4 |
| 8 | The socket must be easily accessible so that it can be easily unplugged in an emergency. | |
| 9 | For correct operation oven must have sufficient airflow. Allow 20cm of space above the oven, 10cm at back and 5cm at both sides (figure 4).Do not cover or block any openings on the appliance.Do not remove feet. | |
| 10 | Do not use the oven outdoors. |
GROUNDING INSTRUCTIONS
This appliance must be grounded. This oven is equipped with a cord having a grounding wire with a grounding plug. It must be plugged into a wall receptacle that is properly installed and grounded. In the event of an electrical short circuit, grounding reduces risk of electric shock by providing an escape wire for the electric current. It is recommended that a separate circuit serving only the oven be provided. Using a high voltage is dangerous and may result in a fire or other accident causing oven damage.
WARNING Improper use of the grounding plug can result in a risk of electric shock.
NOTE:
If you have any questions about the grounding or electrical instructions, con ult a qualified electrician or service person.
Neither the manufacturer nor the dealer can accept any liability for damage to the oven or personal injury resulting from failure to observe the electrical connection procedures. The wires in this cable main are colored in accordance with the following code:
Green and Yellow = EARTH
Blue = NEUTRAL
Brown = LIVE
RADIO INTERFERENCE
Operation of the microwave oven can cause interference to your radio, TV, or similar equipment.
When there is interference, it may be reduced or eliminated by taking the following measures:
1) Clean door and sealing surface of the oven.
2) Reorient the receiving antenna of radio or television.
3) Relocate the microwave oven with respect to the receiver.
4) Move the microwave oven away from the receiver.
5) Plug the microwave oven into a different outlet so that microwave oven and receiver are on different branch circuits.
SAFETY INSTRUCTIONS ABOUT YOUR MICROWAVE OVEN
When using electrical appliance basic safety precautions should be followed to reduce the risk of burns, electric shock, and fire, injury to persons or exposure to excessive microwave.
1) Read all instructions before using the appliance.
2) Use this appliance only for its intended use as described in this manual. Do not use corrosive chemicals or vapors in this appliance. This type of oven is specifically designed to heat, cook or dry food. It is not designed for industrial or laboratory use. drying of food or clothing and heating warming pads, slippers, sponges, damp cloth and similar may lead to risk of injury, ignition or fire.
The microwave oven is intended for defrosting, cooking and steaming of food only.
3) Do not operate the oven when empty (except during preheating the oven in convection mode).
4) Do not rinse the turntable by placing it in water just after cooking.
5) Do not operate this appliance if it has a damaged cord or plug, if it is not working properly or if it has been damaged or dropped. If the supply cord is damaged, it must be replaced by the manufacturer or its service agent or a similarly qualified person in order to avoid a hazard.
6) Do not use the cavity for storage purposes. Do not leave paper products, cooking utensils or food in the cavity when not in use.
7) When using the microwave oven at power levels below 100%, you may hear the magnetron cycling on and off.
8) SAFETY PRECAUTIONS TO REDUCE THE RISK OF FIRE IN MICROWAVE OVEN
a. When heating food in plastic or paper container, keep an eye on the oven due to the possibility of ignition;
b. Remove wire twist-ties from paper or plastic bags before placing bag in oven.
c. If smoke is observed, switch off or unplug the appliance and keep the door closed in order to stifle any flames.
ARCING
If you see arcing, press Stop/Clear pad and correct the problem. Arcing is the microwave term for sparks in the oven.
Arcing is caused by :
a) Metal or foil touching the side of the oven.
b) Foil not molded to food (upturned edges act like antennas).
c) Metal such as twist-ties, poultry pins, or gold rimmed dishes in the microwave.
d) Recycled paper towels containing small metal pieces being used in the microwave.
WARNING
9) Only allow children to use the oven without supervision when adequate instructions have been given so that the child is able to use the oven in a safe way and understands the hazards of improper use.
10) When the appliance is operated in the combination mode, children should only use the oven under adult supervision due to the temperatures generated.
11) It is hazardous for anyone other than a trained person to carry out any service or repair operation which involves the removal of any cover which gives protection against exposure to microwave energy.
12) This appliance is not intended for use by person (including children) with reduced physical, sensory or mental capabilities, or lack of experience and knowledge, unless they have been given supervision or instruction concerning use of the appliance by a
person responsible for their safety.
13) Children should be supervised to ensure that they do not play with the appliance.
SAFETY INSTRUCTIONS ABOUT FOOD
It is normal for the exterior of the microwave oven to be warm to touch when
Cooking or reheating.
Condensation is a normal part of microwave cooking. Room Humidity and the moisture in food will influence the amount of moisture that condenses in the microwave oven.
Generally, covered food will not cause as much condensation as uncovered ones.
Ventilation openings must not be blocked.
LIQUIDS
1) Liquid or other food must not be heated in sealed containers since they are liable to explode.
2) Microwave heating of beverage can result in delayed eruptive boiling, therefore care has to be taken when handling the container.
To reduce the risk of injury to persons:
• Do not overheat the liquid.
• Stir the liquid both before and halfway through heating it.
- Do not use straight-sided containers with narrow necks. Use a wide-mouthed container.
- After heating, allow the container to stand in the microwave oven at least for 20 seconds before removing the container.
• Use extreme care when inserting a spoon or other utensil into the container.
FATS AND OIL
3) Do not deep fry food in the oven. Hot oil can damage oven parts and utensils and even result in skin burns.
EGGS
4) Eggs in their shell and whole hard-boiled eggs should not be heated in microwave ovens since they may explode even after microwave heating has ended.
BABY FOODS
5) The contents of feeding bottles and baby jars should be stirred or shaken and the temperature should be checked before serving in order to avoid burns.
COOKWARES
6) Cooking utensils may become hot because of heat transferred from the heated food. Potholders may be needed to handle the utensil.
7) Utensils should be checked to ensure that they are suitable for use in microwave oven.
POPCORN
Do not pop popcorn in your microwave oven unless in a special Microwave popcorn accessory or unless you use popcorn labeled for use in microwave ovens.
8) This product is a Group 2 Class B ISM equipment. The definition of Group 2 which contains all ISM (Industrial, Scientific and Medical) equipment in which radio-frequency energy is intentionally generated and/or used in the form of electromagnetic radiation for the treatment of material, and spark erosion equipment. For Class B equipment is equipment suitable for use in domestic establishments and
in establishments directly connected to a low voltage power supply network which supplies buildings used for domestic purpose.
MICROWAVE COOKING PRINCIPLES
• More volume = more cooking time
• Colder temperature = more cooking time
• More moisture in food = more cooking time
• More dense foods= more cooking time
• More sugar, fat = less cooking time
• Higher wattage microwave = less cooking time
| INSTRUCTIONS WHILE MICROWAVE COOKING | |
| Because a microwave works like this .... | ....Do this while cooking in a microwave |
| 1.Microwave causes molecules in food to vibrate.This creates heat that cooks the food.Heat from the food warms the container that the food is in | Use potholders to avoid burns. |
| 2. Microwaves cannot pass through metal, but they do pass through glass, ceramic, plastic, or paper. | Hence do not use metal cookwares in microwave mode of cooking. |
| 3. Energy in a microwave oven can be uneven.Some parts of the oven may have more energy and will cook faster than other parts. | Rearrange food while they are cooking.Turn dishes several times during the cooking period. |
| 4. Microwave penetrate food only 3/4 to 1 1/2 inches. Food cook from the outside of the dish toward the center. | Stir food while cooking. Bring food in the center toward the edge and food at the edge toward the center. |
| 5. Microwave bounce off the sides of the oven. | Arrange foods so the thickest parts are toward the side of the oven. |
| 6. A microwave oven has no heating element .This allows you to use paper and plastic products safely in a microwave oven. | Plastic wrap, paper towels,and wax paper can be used to cover food and help reduce spatters. |
| 7. Heat is inside the food,so food does not stop cooking when you turn off the oven. | Remove food from the oven before it is totally cooked .Allow food some standing time to finish cooking. |
| 8. The more food you are cooking ,the less energy there is for each item to absorb. | Larger amounts of food will need a longer time to cook |
| 9. Steam can build up inside confined areas and cause food to explode. | Pierce food with skin (such as egg yolks, potatoes, or sausage) to let steam escape. |
| 10. Many ovens can operate at several different power levels.At lower than 100 percent power levels,the oven turns on and off,allowing times for the heat level to equalize. | The high fat content of cheese attracts microwave .When heating large quantities of cheese, use less than 100 percent power so that outside edges will not get too hot before the inside is heated. |
| 11.Foods cooks quickly ,and most do not have time to brown | Use sauces,herbs ,or toppings to make pale food look better. |
| 12. It is not quicker to cook foods like rice or | Use both microwave and convection mode |
| noodles in a microwave oven..Some foods such as bread,do not cook well in a microwave oven. | for the quickest and most efficient meal preparation. |
MICROWAVE COOKING TECHNIQUES
Stirring
Stir food such as casseroles and vegetables while cooking to distribute heat evenly.
Arrangement
Arrange unevenly shaped foods, such as chicken pieces or chops, with the thicker, meatier parts toward the outside of the turntable where they receive more microwave energy.
Shielding
Shield food with narrow strips of aluminum foil to prevent overcooking (poultry wing-tips, the ends of poultry legs, and corners of square baking dishes). Use only small amounts of aluminum foil. Larger amounts can damage your oven.
Turning
Turn food over midway through cooking to expose all parts to microwave energy. This is especially important with large items such as roasts.
Standing
Food cooked in the microwave build up internal heat and continue to cook for a few minutes after the oven stops. Let food stand to complete cooking, especially food such as roasts and whole vegetables. Roasts need this time to complete cooking in the center without overcooking the outer areas.
All liquids, such as soup or hot chocolate, should be shaken or stirred when cooking is Complete. Let liquids stand a moment before serving.
FOOD DONENESS SIGNS INCLUDE:
o Food steams throughout, not just at edge.
- Center bottom of dish is very hot to touch.
o Poultry thigh joints move easily.
o Meat and poultry show no pinkness.
o Fish is opaque and flakes easily with a fork.
DEFROSTING TIPS
Defrosting in a microwave is speedy and hygienic. It prevents the growth of bacteria & retains the natural texture & flavor of the food, offers quick and complete defrosting.
- Foods must be weighed correctly.
- Remove food to be defrosted from the packaging material.
- Allow the food to stand for few minutes to thaw food completely.
- Spacing of the food to be thawed should be in circular pattern.
- Place though or bigger pieces on the outer edge of the dish.
- When defrosting stir or turn halfway for even defrosting.
o Separate the pieces as they thaw.
- Remove the small pieces which have been thawed to prevent them from cooking
GRILLING TIPS
o Marinate foods only in the refrigerator. Reserve a portion of the marinade, before raw meat is placed in it, for using it later in basting or as a dip for cooked food.
- To avoid flare-ups and charred food, remove visible fat from meat.
- Don't partially cook, unless food will go immediately onto the grill.
- If cooking ahead, cook completely, then cool down first for reheating later.
- Serve food from the grill on clean platter, not one that has raw possibly contaminated juices on it.
CONVECTION TIPS
- ALWAYS PREHEAT OVEN BEFORE PUTTING FOOD IN OVEN (unless your recipe directs otherwise).
As with any recipe, check the food about 5-10 minutes before the expected finish time, due to variables such as the temperature of the food when first placed in the oven, quantity of food in the oven, your preferred level of "doneness", etc. - The more food in the oven at one time, the longer the cooking time.
COOKWARE SELECTION GUIDE
The ideal material for a microwave utensil is transparent to microwave, it allows energy to pass through the container and heat the food.
- Do not use recycled paper products when microwave cooking, as they may contain small metal fragments which may cause sparks and/or fires.
- Round /oval dishes rather than square/oblong ones are recommend, as food in corners tends to overcook.
- Narrow strips of aluminum foil may be used to prevent overcooking of exposed areas. But be careful don't use too much and keep a distance of 1 inch (2.54cm) between foil and cavity.
The list below is a general guide to help you select the correct utensils.
| COOKWARE | MICROWAVE | GRILL/CONVECTION | COMBINATION |
| Heat-Resistant Glass | Yes | Yes | Yes |
| Non Heat-Resistant Glass | No | No | No |
| Heat-Resistant Ceramics | Yes | Yes | Yes |
| Microwave-Safe Plastic Dish | Yes | No | No |
| Kitchen Paper | Yes | No | No |
| Metal Tray | No | Yes | No |
| Metal Rack | No | Yes | Yes |
| Aluminum Foil & Foil Containers | No | Yes | No |
CONTROL PANEL
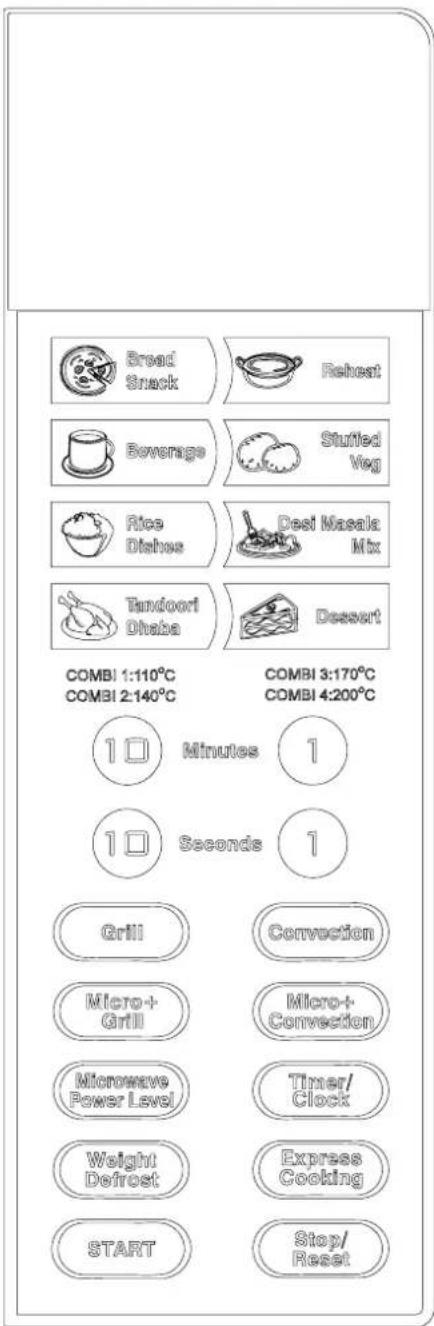
DISPLAY WINDOW
Used to indicate clock, cooking time, etc.
NUMBER PADS
Used to enter clock, cooking time, temperature, etc.
Press to select microwave power level.
GRILL
Press to set a grill-cooking program.
CONVECTION
Press to program convection cooking.
MICRO + GRILL
Press to select one of two combination cooking settings.
MICRO + CONVECTION
Press to select one of four combination cooking settings.
WEIGHT DEFROST
Touch to defrost food by weight.
TIMER/CLOCK
Use to set the clock and the oven timer.
QUICK COOK BUTTONS:
Touch for easy access to cooking popular foods.
START
Press to start cooking program.
EXPRESS COOKING
Touch to start the oven quickly at full power
STOP/RESET
Touch to stop cooking program or clear all previous settings before cooking starts.
HOW TO SET THE OVEN CONTROLS
BEEPS DURING OVEN SETTINGS
ONE BEEP: Oven accepts the entry.
TWO BEEPS: Oven does not accept the entry. Please check and try again.
SETTING THE CLOCK
When the oven is first plugged in, you can set the clock time.
To set the clock time later:
-
Press and hold down TIMER/CLOCK for 3 sec.
-
Use the number pads to enter the correct time.
-
Press TIMER/CLOCK to confirm.
MICROWAVE COOKING
Microwave cooking allows you to customize cooking power and time. First, you select a power level by pressing the MICROWAVE POWER LEVEL pad a number of times (see the table below). Then you set the cooking time using the numeric pads, before pressing the START pad.
| Number of times press POWER | POWER LEVEL | DESCRIPTION |
| Once | 100% (P-HI) | HIGHBoil water, Boil milk, Cook cereals & cereal products (rice, idlis ,poha etc),Cook vegetables,Roast groundnuts, Roast papads, Prepare soups, curries etc. |
| Twice | 90% (P-90) | |
| Thrice | 80% (P-80) | |
| 4 times | 70% (P-70) | MEDIUM HIGHReheat food, Cook food containing cheese or eggs, Cook shell fish /mushrooms etc. |
| 5 times | 60% (P-60) | |
| 6 times | 50% (P-50) | MEDIUMBake cakes, Cook custard etc. |
| 7 times | 40% (P-40) | |
| 8 times | 30% (P-30) | MED.LOWMelt butter, Melt chocolate etc |
| 9 times | 20% (P-20) | |
| 10 times | 10% (P-10) | LOWSoften butter /cheese, Soften ice cream etc |
| 11 times | 0% (P-00) |
Suppose you want to cook for 5 minutes at 60 % power level.
-
Press power pad a number of times to set power.
-
Press number pads to enter cooking time (5:00), is displayed.
-
Press START pad.
NOTE:
-
If you want to temporarily stop a cooking session, press the STOP/RESET pad once and then you can start the cooking again by pressing START; or press the STOP/RESET twice to cancel the cooking program altogether.
-
After the cooking time ends, the system will beep four times and END is displayed. Before starting another cooking session, press STOP/RESET pad to clear the display and reset the system.
GRILL
Grill cooking is particularly useful for thin slices of meat,steaks,chops,kebabs,sausages and pieces of chicken.It is also suitable for hot sandwiches and au gratin dishes.
Suppose you want to program grill cooking for 12 minutes.
- If required, press the STOP/RESET pad once to reset the system.
- Press GRILL button.
- Use the number pads to enter cooking time.
- Press START button.
NOTE:
Grill cooking power is set at full power level by the system.
CONVECTION
During convection cooking, hot air is circulated throughout the oven cavity to brown and make food crisp quickly and evenly. This oven can be programmed for ten different cooking temperatures.
TO COOK WITH CONVECTION
Press convection repeatedly for temperature setting.
Suppose you want to cook at 160 °C for 40 minutes
- Press CONVECTION pad a number of times to select the temperature.
- Use the number pads to enter cooking time.
- Press START pad.
NOTE: After the time has elapsed four beeps sound and END appears in display.
Press STOP/RESET button or open door to clear END before starting another cooking programme.
TO PREHEAT AND COOK WITH CONVECTION
Your oven can be programmed to combine preheating and convection cooking operation.
Suppose you want to preheat to 170 °C and then cook for 35 minutes.
-
Press CONVECTION pad a number of times until the temperature appears on screen.
-
Press START button .PREH will flicker in the display until it reaches the designated temperature.
- Open the door and place container of food at the center of the turntable.
- Use the number pads to enter cooking time.
- Press START button.
MICROWAVE +GRILL
This feature allows you to combine grill and microwave cooking on two different settings. First, press this button once or twice to choose a proper combination setting, then ,at the screen prompt, enter the desired cooking time. After you have pressed the START pad ,the system begins to count down.
COMBINATION 1
30% time for microwave cooking, 70% for grill cooking. Use for fish ,potatoes or au gratin .
Suppose you want to set combination 1 cooking for 25 minutes.
- Press MICRO+GRILL button once.
- Use the number pads to enter 25:00.
- Press START button.
COMBINATION 2
55% time for microwave cooking, 45% for grill cooking. Use for pudding, omlets, baked potatoes and poultry.
Suppose you want to set combination 2 cooking for 12 minutes.
- Press MICRO+GRILL button twice.
- Use the number pads to enter 12:00.
- Press START button.
MICROWAVE + CONVECTION
This oven has four pre-programmed settings that makes it easy to cook with both convection heat and microwave automatically.
Press MICRO+CONVECTION button repeatedly to program convection temperature.
| MICRO+CONVECTION | Number of times pressMICRO+CONVECTION | TEMPERATURE°C |
| COMB1 | Once | 110 |
| COMB2 | Twice | 140 |
| COMB3 | Thrice | 170 |
| COMB4 | 4 times | 200 |
Suppose you want to bake a cake for 24 minutes on COMB3
-
Press MICRO+CONVECTION button 3 times.
-
Use the number pads to enter cooking time as desired.
- Press START button to start.
NOTE:
After time has elapsed four beeps sound and END appears in display. Press STOP/RESET button or open door to clear END before starting another cooking function. You can check the convection temperature while cooking is in progress by pressing the MICRO + CONVECTION button.
WEIGHT DEFROST
The oven can be used to defrost meat, poultry, and seafood.
Suppose you want to defrost frozen meat.
- Press WEIGH DEFROST once or repeatedly to select weight (100gms-1800gms).
- Press START
NOTE:
During defrosting, user is required to turn food over at beeping and then press start to continue.
MULTISTAGE COOKING
Your oven can be programmed for up to 3 automatic cooking sequences.
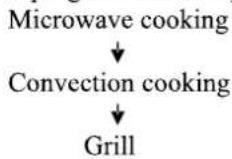
Suppose you want to set the following cooking program.
- Press MICROWAVE POWER LEVEL button to set power level.
- Use the number pads to enter cooking time.
- Press CONVECTION pad a number of times to set convection temperature.
- Use the number pads to enter convection cooking time.
- Press GRILL pad
- Use the number pads to enter grill cooking time.
- Press START button.
QUICK RECIPES FOR THE BEGINERS
INSTRUCTIONS BEFORE COOKING RECIPE FROM A RECIPE BOOK
- Read the recipe carefully before cooking.
- Note down the mode of cooking

flowchart
graph TD
    A["MODE OF COOKING"] --> B["MICROWAVE"]
    A --> C["GRILL"]
    A --> D["CONVECTION"]
    A --> E["COMBINATION"]
-
Check the power level, temperature or type of combination in the required mode of cooking.
-
Select the container to be used based on the mode of cooking.
-
Check the cooking time.
-
Then set the cooking programme.
Example -1
| MICROWAVE RECIPE | GUIDELINES FOR MICROWAVE COOKING |
| RECIPE :Tomato SoupIngredients:2 grated carrots,1 kg tomatoes,2 finely chopped onions,a pinch of sugar, 14 teaspoon of tulsi,1 tbsp fresh cream,1 celery stick,salt and pepper to taste.METHOD OF PREPARATION:In the microwave, cook the tomatoes in a bowl for 5 minutes and then place in cold water.Remove the skin, puree it and drain the seeds.In another bowl take butter, carrots, onion and celery and cook for 3 minutes in the microwave.Puree the carrot mixture and mix with the tomato puree and the seasoning.Continue to cook for 6 minutes.Stirr both the liquid mixtures, cook well in the microwave for 4 minutes and serve with croutons and cream swirled on top.Serves:2-3 | PRECOOKING INSTRUCTIONSKeep all the ingredients required for the recipe in a tray as instructed.COOKING INSTRUCTIONSTAGE 1In the microwave, cook the tomatoes in a bowl for 5 minutes and then place in cold water.1.MODE OF COOKING is MICROWAVE2. POWER LEVEL –not given in the recipe hence you need to select HIGH POWER LEVEL.3.COOKWARE-Microwave safe plastic or borosil since the mode of cooking is microwave.4.COOKING TIME-5minutesSTAGE 2In another bowl take butter, carrots, onion and celery and cook for 3 minutes in the microwave.1.MODE OF COOKING is MICROWAVE2. POWER LEVEL –not given in the recipe hence you need to select HIGH POWER LEVEL.3.COOKWARE-Microwave safe plastic or borosil since the mode of cooking is microwave.4.COOKING TIME-3minutesSTAGE 3Continue to cook for 6 minutes.Cook at high power for 6 minutesStirr both the liquid mixtures, cook well in the microwave for 4 minutesCook at high power for 4 minutes. |
Example -2
| CONVECTION RECIPE | GUIDELINES FOR MICROWAVE COOKING |
| RECIPE :Cheese ballsIngredients:600 ml water,150 gms butter,300 gms plain white flour,5 eggs,200 gms cheese(grated),2 egg yolks.METHOD OF PREPARATION:Put water, salt and butter in a pot on a hot flame.When it boils, add flour and whisk the mixture well until it becomes a smooth ball.When the mixture is cold, add whole eggs and the cheese.Stir it until it becomes smooth.Form small balls.Place on a flat tray and brush them with egg yolk before putting in the center of a 200 degree C oven for 35-40 minutes. | PRECOOKING INSTRUCTIONSKeep all the ingredients required for the recipe in a tray as instructed.COOKING INSTRUCTIONSPlace on a flat tray and brush them with egg yolk before putting in the center of a 200 degree C oven for 35-40 minutes1.MODE OF COOKING is CONVECTION2.TEMPERATURE - 200°CPreheat the microwave oven at 200°C.3.COOKWARE-baking tray (metal).4.COOKING TIME-35-40 minutesRefer instructions on page number 13 topic TO PREHEAT AND COOK IN CONVECTION for setting the programme. |
Example -3
| GRILL RECIPE | GUIDELINES FOR MICROWAVE COOKING |
| RECIPE :Chicken grillIngredients:500 g - bone less chicken,1 cup - curds, 112 cup - onion( chopped),2 tbsp - lime juice,6 - green chillies,3 cm - ginger,10 to 12 flakes -garlic,3 tbsp - mint leaves,3 tbsp - corriander leaves, 112 tsp - chilli powder 112 tsp - turmeric powder,1 tsp - coriander powder,1 tsp -garam masalapowder,salt to taste,oil to grill.METHOD OF PREPARATIONCut the chicken into 2 cm wide, 5 cm long strips. Beatthe curds till smooth. Add lime juice and salt and pourover chicken. Grind all the ingredients from greenchilies to garam masala together to a paste and mixwith the chicken. Leave to marinate for 2 hours.Thead the chicken pieces on bamboo skewers takinga stich through each piece. (Pierce the piece 1 cmabove one end of the strip and bring it up 1 cm fromthe other end.) Heat a thick griddle and place theskewers on it. Pour some oil all round and grill till thechicken is cooked, turning over the skewers half waythrough cooking. Serve hot as a snack or starter withmint chutney. | PRECOOKING INSTRUCTIONSKeep all the ingredients required for the recipe in a trayas instructed.COOKING INSTRUCTIONSHeat a thick griddle and place the skewers on it. Poursome oil all round and grill till the chicken is cooked,turning over the skewers half way through cooking.1.MODE OF COOKING is GRILLPreheat the microwave oven along with the rack in grillmode until the cavity is hot.3. COOKWARE-Grill rack4.COOKING TIME- until cooked (initially grill for 8minutes and add cooking time as required)Once the chicken is grilled on one side turn and grill theother side of the chicken.Brush oil halfway during the grilling process.NOTESoak bamboo skewers in water for 30 minutes toprevent then from burning. |
AUTO COOK MENUS - INSTRUCTION S
For food of the following cooking mode, it is not necessary to program the duration and the cooking power. It is sufficient to indicate the type of food that you wish to cook as well as the weight of this food.
- Press the individual icon pads once or repeatedly to select the weight of the food to be cooked.
- Press START
NOTE: Cooking timings of the cook menu are approximate, factors that may affect cooking are-starting temperature, altitude, volume, size and shape of the food, utensils used. As you become familiar with the oven, you will be able to adjust for these factors.
RECIPE GUIDE FOR AUTO COOK MENUS
| BEVERAGE | COOKWARE | INGREDIENTS | METHOD |
| 1.CHAIServes : 1 cup | Microwave proof tea cup/microwave safe tea kettle | Water- 34 cupSkimmed Milk- 14 cupTea leaves- 1 tspHoney (optional)Optional ingredients-Fresh ginger (grated) or cinnamom stick or cardamom seeds or star anise or whole cloves or peppercorns | Mix all the ingredients in the cup and keep it in the microwave and then select the BEVERAGE option for selecting the number of servings and press start.NOTE: Amount of ingredients may differ as per individual preferences but the volume of liquid will remain the same. |
| 2. COFFEEServe: 1 cup | Microwave proof tea cup/microwave safe tea kettle | Water- 14 cupSkimmed Milk- 14 cupCoffee-1 tsp | |
| 3. JEERA WATERServe: 1 glassConsuming this water frequently relieves indigestion and flatulence. | Microwave proof glass | Water - 34 cupJeera - 1 tsp | |
| 4.SOLE KADHI /COCUM SAARServe: 1 glass | Microwave proof cookware | Water-200mlCocum-5Salt- To tasteGinger (grated)- 14 tspGreen chillies (slit)- 2Coriander (chopped fine )- 1 tbsp | Mix water and cocum in a microwave proof cookware, keep it in the microwave and then select the beverage option for selecting the serving size and press start. Strain and add ginger and chillies and allow it to cool. Add coriander and refrigerate until serving time.NOTE: Amount of ingredients may differ as per individual preferences but the volume of water will remain the same.It is an excellent appetizer. |
| DESI MASALA MIX | COOKWARENOTE:Do not use plastic cookware | INGREDIENTS | METHODNOTE: |
| NOTE:Cool and store the prepared masalas in air tight container.The number of spices and the amount of each spice varies from region to regionIt also comes down to a personal taste. Some of the recipes are handed down in a family from generation to generation. | |||
| 5.MAHARASHTRAN GODA MASALA | Borosil plate | Coriander seeds-1 cupCumin seeds- 14 cupTil (white sesame seeds)- 1/3 cupLavang (cloves) -2 tbspBadi elaichi (big cardamom)- 2 tbspDalchini (cinnamon sticks)- 2 tbspKaale mire(black peppercorns)- 2 tbspDagalphool (lichen)- 2 tbspTamalpatra (Bay leaf)- 1/2 cupOil to roast the spices-1-2 tsp | Roast all the ingredients using the programme except amchur powder, garam masala, salt and stirr constantly.Roast till they turn aromatic and brown.Cool and grind the roasted ingredients in an electric blender. |
| 6.PANCH PHORON Bengali spice mix | Borosil plate | Aniseed- 14 cupCumin- 14 cupFenugreek seeds- 14 cupMustard seeds- 14 cupNigella (fennel & kalonji) - 14 cup | Roast all the ingredients using the programme, cool and grind in an electric grinder. |
| 7.CHAT MASALA POWDER | Borosil plate | Coriander seeds- 2 tbspCumin seeds- 1 tbspAjwain seeds- 12 tspRed chillies- 2Amchur powder - 12 tspSalt -2 tbsp or to tasteGaram masala1- tspPepper corns- 12 tsp | Roast all the ingredients using the programme except amchur powder, garam masala, salt and stirr constantly.Roast till they turn aromatic.Cool and grind the roasted ingredients along with remaining powders in an electric blender. |
| 8.CURRY LEAVES POWDER | Borosil plate | Curry leaves-washed and dried2 cupsCumin seeds1- tbspCoriander seeds-2 tbspRed chillies-6 or to tasteFenugreek- 12 tspSalt- to tastePepper corns-1 tspGarlic flakes-6 (optional) | Roast all the ingredients together stir in between .Cool and grind to make a powder. |
| 9. GARAM MASALA POWDER | Borosil plate | Coriander-2 tspCumin -2 tspPeppercorns- 15Cardamom- 8Cinnamon-8Cloves -8Mace flower- 1 Bay leaf-2 | Roast all the ingredients using the programme, stirr constantly.Roast till they turn aromatic.Cool and grind the roasted ingredients in an electric blender. |
| NOTE: Cool and store the prepared masalas in air tight container.The amount of each spice may vary from region to region as these recipes are handed down in a family from generation to generation. It also depends on the family taste. | |||
| 10.PAPPULA PODI | Borosil plate | Split chick peas- 12 cupCumin seeds- 12 tspGarlic flakes-2Red chillies-4 or to tasteDry coconut powder-2 tsp (optional)Salt- To taste | Roast Split chick peas using the programme, stirring constantly. Cool and grind them along with the other ingredients in an electric blender.Serve with plain white rice and ghee. |
| 11.RASAM POWDER | Borosil plate | Red chillies8Coriander seeds1 cupToor dal 14 cupFenugreek (methi seeds) 12 tspPeppercorns 14 cupCumin seeds 14 cupMustard seeds 12 tbspTumeric powder 12 tbsp | Roast all the ingredients using the programme except turmeric powder and stirrind constantly.Roast till they turn aromatic.Cool and grind the roasted ingredients along with turmeric powders in an electric blender. |
| 12. SAMBAR POWDER | Borosil plate | Red chillies 2 cupsCoriander seeds 34 cupChana dal 12 tbspUrad dal (black gram dal) 12 tbspPeppercorns 12 tspCumin seeds 14 tbspMethi seeds 12 tspAsafoetida 12 tspMustard seeds 12 tspCurry leaves (washed and dried) 14 cup | Roast all the ingredients using this programme, stirring constantly.Roast till they turn aromatic.Cool and grind the roasted ingredients in an electric blender.Cool and store in air tight container. |
| 13. TANDOORI MASALA POWDER | Borosil plate | Coriander seeds- 12 cupCumin seeds- 12 cupAmchur powder- 2 tspDried mint leaves-1 tspDeep red colour- 3 tspChilli powder1- tsp | Place all the ingredients on the turntable except amchur powder, deep red colour, chilli powder and stirring constantly.Roast till they turn aromatic.Cool and grind the roasted ingredients along with the other ingredients in an electric blender.Cool and store in air tight container. |
| STUFFED VEG | COOKWARE | INGREDIENTS | METHOD |
| 14. BHARAWAN ALOO | Borosil plate | Potatoes- Amount as per the programme selected.Ingredients for preparing the stuffing-Onion ,Capsicum,Peas, Green chillies,Tomato,Garlic cloves,Oil, Salt as per taste. | Prepare filling as per individual preference for taste, additional ingredients could be added or deleted while preparing the filling.Slice off the top of the aloo and use it later as a lid.Carefully scoop the inside.Fill the potato with precooked stuffing prepared from the above mentioned ingredients and cover the potato with the potato slice securing it with a toothpick.Bake the potato using BHARAWAN SUBZI programme by selecting appropriate weight. |
| 15. BHARAWAN TOMATO | Borosil plate | Tomatoes- Amount as per the programme selected.Ingredients for preparing the stuffing- Onion, Coriander, Crumbly cottage cheese, Grated cheese, Bread crumbs Salt as per taste | Prepare filling as per individual preference for taste, additional ingredients could be added or deleted while preparing the filling.Cut the head of the tomatoes and scoop out the pulp inside. Mix the pulp with chopped onion, coriander, grated cheese, bread crumbs and fill in the tomatoes.Top the tomatoes with a bit of cheese and cook the stuffed tomato by using BHARAWAN SUBZI programme by selecting appropriate weight |
| BREAD SNACKS | COOKWARE | INGREDIENTS | METHOD |
| 16. PIZZA | Borosil plate | Pizza base (apply butter on the base and grill it for 3 minutes on a grill rack), Pizza sauce, Precooked toppings-veg or non veg, Pizza cheese . | Apply pizza sauce on the base, put the toppings, cover with grated cheese and use the programme BREAD SNACKS to obtain your favorite PIZZA. |
| 17. CHEESE TOAST | Borosil plate | Sandwich bread-grilled on both the sides, Grated cheese, Finely chopped capsicum, Finely chopped green chillies (optional) | 1. Mix cheese, capsicum ,chillies together. 2. Spread the cheese mixture on the bread and cook using the programme BREAD SNACKS. |
| INDIAN STYLE RICE DISHES | |||
| Microwave Oven: Rice cooks easily in the microwave oven and saves energy and clean-up time. | |||
| MENU | COOKWARE | INGREDIENTS | METHOD |
| 18. NAMKIN CHAWAL-Plain savoury rice (north Indian) | Borosil cookware or microwave proof plastic container. | Serves: 1100gms long grain rice200 ml hot water 12 teaspoons ghee1/2 teaspoons salt. | Wash and soak rice I hour in cold water.Drain in colander, add ghee and salt , rice, stir and cover and cook, without lifting lid or stirring using rice programme.Lift lid to allow steam to escape for about 5 minutes, then lightly fluff up rice with fork, Serve with curries or other spiced dishes. |
| 19. RICE IN COCONUT MILK-Nariyal Bhath -(South India) | Borosil cookware or microwave proof plastic container | Serves: 1100 gms long grain rice2 tsp ghee1 medium onions- finely sliced - Spices -4 curry leaves2-3 whole black peppercorns1 small stick cinnamon2 cardamom pods, bruised2 whole clovesfew cashew nuts1/4 teaspoon ground turmeric200ml coconut milk1/2 tsp saltGarnish:1/2 cup fried cashew nuts | Wash rice and drain for at least 30 minutes.Heat the ghee in a heavy saucepan and fry the onions, curry leaves and whole spices, cashew nuts, stirring frequently.. Add the turmeric and the rice and fryAdd the coconut milk and salt, stir and cook covered using rice programme.Serve the rice hot, garnished with fried cashews and accompanied by curries and sambar. |
| TANDOORI DHABA | |||
| NOTE: Wooden skewers can be used while preparing chicken tikka ,soak the skewers for 20 minutes in cold water to prevent them from burning.Check and turn the food halfway during the programme.Cooking time will vary based on the size of the meat pieces hence check in-between and discontinue the Cooking programme if the food is cooked. | |||
| MENU | COOKWARE | INGREDIENTS | METHOD |
| 20. CHICKEN TANDOORI | Borosil cookware | Chicken- Make slits in the flesh of the chicken pieces Tandoori masala As per taste.,Salt -As per taste | Marinate the chicken and then use this programme to prepare the tandoor |
| 21. CHICKEN TIKKA | Skewers and borosil plate | Chicken cubesCrushed Ginger-1 tspCrushed garlic-2 clovesLemon juice,Turmeric -1/2 tspChilli powder-1 tspCurry powder-1/4 tspHung curd-2/3rd cupGaram masala -1/4 tspCoriander -1/4 tspCorn starch-1/4 tspOil ,Salt-as per taste | Mix all the ingredients together and let the chicken marinate for 3-4 hours.Put the chicken onto the skewers and use the programme to cook. |
| 22. MINCED MEAT KEBAB | Skewers and borosil plate | Minced meatOnion chopped very fineGarlic pasteGinger pasteFresh chopped corianderLemon JuiceYogurt (not sour)Garam masala (see link below for recipe to make your own)Green chillies very finely chopped (optional)Salt to tasteVegetable/ canola/ sunflower cookign oil for basting kebabs while cooking1 large onion cut into thin rings (to serve the kebabs on) | Mix all the ingredients till all the ingredients are well blended. Cover the bowl with cling film and put into the refrigerator for an hour. Soak bamboo skewers in water to prep for the kebabs. Remove from fridge and divide the mix into equal portions.Take each portion and form it into a long kebab while pressing on to a skewer. Do this till the mix has firmly adhered to the skewer. Put some oil on your hands to prevent meat from sticking. Cook the kebab Basting with cooking oil as required, till the meat is done. Turn as often as required. Serve piping hot on a bed of onion rings, with Mint-Coriander Chutney |
| DESSERT | ||
| MENU | COOKWARE | INGREDIENTS & METHOD |
| 23. CAKE | Aluminium cake tin | Refer Nita Mehta's IFB MICROWAVE COOKBOOK page number 151 for the recipe (vanilla cake/chocolate cake). |
| 24. CRÈME CARAMEL | Pudding mould | Refer Nita Mehta's IFB MICROWAVE COOKBOOK page number 154 for the recipe (crème caramel). |
OTHER CONVENIENT FEATURES
MINUTE TIMER
To use the timer feature, as when you need to be reminded of the cooking or some other things.
- Press TIMER/CLOCK
- Use the number pads to enter the time to be counted down.
- Press START
NOTE:
When the countdown ends, the system buzzer will beep.
Time countdown can be seen in display for 5 seconds before clock or cooking time is returned to exhibit.
CHILD PROOF LOCK
The child proof lock prevents unsupervised operation by little children.
To set the child proof lock:
Press STOP/RESET button for 3 seconds, then a beep will sound and the indicator light will come on .In lock state, all buttons are disabled.
To cancel the child proof lock:
Press STOP/RESET button for 3 seconds, then a beep will sound and the indicator light will come off.
EXPRESS COOKING
Use this feature to program the oven to microwave food at 100% power conveniently. Press EXPRESS COOKING button in quick succession to set the cooking time.
The oven will auto-start immediately. After time has gone beeps sound and END appears in display.
Press STOP/RESET button or open door to clear END before starting another cooking function.
- Press STOP/RESET button. You can restart the oven by pressing START pad. Touch STOP/RESET to erase all instructions.
- Open the door-You can restart the oven by closing the door and pressing START pad.
NOTE:
Oven stops operating when door is opened.
AUTOMATIC PROTECTION MECHANISM
Anytime in the operation of the oven, when the oven cavity temperature reaches a phenomenon of 250^ C, the oven automatically enters into self protection mode. The display shows E 01, with one beeping every 1.5 sec until the said phenomenon disappears, and STOP/RESET is pressed to make the oven back to normal.
During grill or combination cooking, when the temperature of the oven cavity is lower than 40^ C after cooking already takes place for 5 minutes, the oven will automatically enter into protection mode with the screen displaying error code E 02. This error may disappear after you press STOP/RESET pad.
If the sensor is short circuited, the system enters protection mode with display E 03 which, when cleared, press STOP/RESET to back into normal.
COOLING FEATURE----The controlling system of the microwave oven has the feature of cooling. As for any cooking Mode which cooking time above 2 minutes, after finishing cooking, the oven fan will work about 3 minutes automatically to cool the oven for prolonging the life of the oven.
CLEANING AND CARE
| Disconnect the power cord before cleaning or leave the door open to inactivate the oven during cleaning. | ||
| Cleaning surface | INSTRUCTIONS | 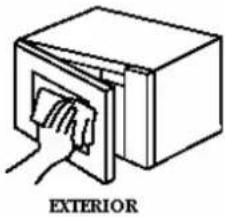 |
| EXTERIOR | Clean the outside with mild soap and water; rinse and dry with a soft cloth.Do not use any type of household or abrasive cleaner. | |
| DOOR | Wipe the window on both sides with a damp cloth to remove any spills or spatters. Metal parts will be easier to maintain if wiped frequently with a damp cloth. Avoid the use of spray and other harsh cleaners as they may stain, streak or dull the door surface. | |
| TOUCH CONTROL PANEL | Care should be taken in cleaning the touch control panel. If the control panel becomes soiled, open the microwave oven door before cleaning. Wipe the panel with a cloth dampened slightly with water only. Dry with a soft cloth. Do not scrub or use any sort of chemical cleaners. | 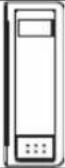 |
| INTERIOR | Cleaning is easy because little heat is generated to the interior surfaces; therefore, there is no baking and setting of spills or spattering. To clean the interior surfaces, wipe with a soft cloth and warm water.DO NOT USE ABRASIVE OR HARSH CLEANERS OR SCOURING PADS. For heavier soil, use baking soda or a mild soap; rinse thoroughly with hot water. The rack can be cleaned with hot soapy water, rinsed and dried. | 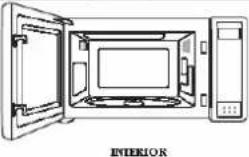 |
| WAVEGUIDE COVER | The waveguide cover is located on the ceiling in the microwave oven cavity. It is made from mica so requires special care. Keep the waveguide cover clean to assure good microwave oven performance. Carefully wipe with a damp cloth any food spatters from the surface of the cover immediately after they occur. Built-up splashes may overheat and cause smoke or possibly catch fire. DO NOT REMOVE THE WAVEGUIDE COVER. | 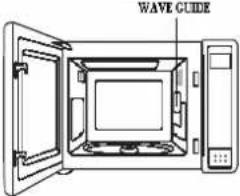 |
| ODOR REMOVAL | Occasionally, a cooking odor may remain in the microwave oven. To remove, combine 1 cup water, grated peel and juice of 1 lemon and several whole cloves in a 2-cup glass measuring cup. Boil for several minutes using 100% power. Allow to set in microwave oven until cool. Wipe interior with a soft cloth. | |
| TURNTABLE/ TURNTABLE SUPPORT | The turntable and turntable support can be removed for easy cleaning. Wash them in mild, sudsy water; for stubborn stains use a mild cleanser and non-abrasive scouring sponge. They are also dishwasher-proof. Use upper rack of dishwasher. The turntable motor shaft is not sealed, so excess water or spills should be wiped up immediately. | 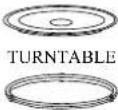 ROLLER RING ROLLER RING |
SERVICE CALL CHECK
Please check the following before calling for service:
- Check that the power cord is securely plugged in.
- Check that the door is firmly closed.
- Check that the cooking time is set.
- Check for a blown circuit fuse or tripped main circuit breaker in your house.
Place one cup of water in a glass measuring cup in the microwave oven and close the door securely.
Operate the microwave oven for one minute at HIGH 100%.
1) Does the microwave oven light come on? YES ____ NO ____
2) Does the cooling fan work? (Put your hand on the louver above the Interactive Display.) YES ____ NO ____
3) Does the turntable rotate? (It is normal for the turntable to turn in either direction.)
YES ____ NO
4) Is the water in the microwave oven warm? YES ____ NO ____
If "NO" is the answer to any of the above questions and electrical outlet, fuse and/or circuit breaker are functioning properly, then
CONTACT IFB SERVICE CENTER.
DO NOT ATTEMPT TO SERVICE THE OVEN YOURSELF!
WARRANTY
IFB Industries Limited. ("The Company") warrants to the original domestic purchase of this microwave oven ("Appliances") that it is free from defects in workmanship & materials. During 12 months from the date of purchase of the new microwave oven model, all the parts of the microwave oven and 36 months on Magnetron & Cavity, shall be replaced or repaired free of charge, on intimation to the Company / Company's authorized service centre nearest to the place where the appliance is installed This warranty is subject to Limitations of Warranty.
LIMITATIONS OF WARRANTY
- This warranty is not valid in case of the following events.
a) If the warranty card is not fully and properly filled in and signed at the time of purchase / installation by the company's authorised dealer / service engineer.
b) If the completed warranty card is not presented to the authorised personnel at the time of service / repair.
c) If the appliance is not used in accordance with manufacturer's instructions given in the Operating Manual.
d) If the appliance has been serviced, repaired, opened or tampered by any unauthorized personnel.
e) If defects arise / caused by accidents, alteration, misuse, neglect, abuse, substitution of original components with spurious / non-genuine components, attack by household pests / rodents, fire, flood, earth-quake, lightning and / or any other acts of God / natural calamities.
f) If damages occur by improper electrical, circuit outside the appliance or by any defective electrical supply thereof.
g) If the machine serial number on the appliance is defaced, missing or altered.
h) If the appliance is taken out of India.
- This warranty does not cover any type of painting, plating including rusting etc or defects thereof.
- This warranty does not cover normal wear and tear of parts.
- Liability for consequential damages is neither accepted nor implied.
- Parts replaced or repaired under this warranty are warranted throughout the remaining of the original warranty period.
- Company is not liable for any delay in servicing due to reasons beyond the control of the company or any of its authorised service center.
- This warranty is not applicable, if the microwave oven is used for commercial purpose of at places like Institutions, Hotels, Hostels, Hospitals, Community Halls and other similar applications.
- For any service under this warranty beyond city / town / municipal limits from the Company / authorized service centre, a fixed charge of Rs. 250 /- will be collected from the customer in addition to the actual to and fro charges by the shortest route. Alternatively the customer can bring the appliance to the nearest service centre for carrying out the neccassary repairs, at customer's own cost.
- During the warranty period whenever the appliance is shifted from the original city of purchase to another city / town where service is provided by the company's authorized service agent, a warranty transfer charge of Rs. 300 /- will be collected from the customer by the company's authorized service agent. The above charges also include the reinstallation of the appliance. However in case of transfer to a city where the company provides direct service, a nominal charge of Rs. 250 /- only will be collected from the customer towards reinstallation. The Company, however, shall not undertake the responsibility of shifting / transferring the appliance from the location where the appliance was originally installed.
- This warranty is issued subject to the jurisdiction of Kolkata courts, and / or other judicial / quasi judicial forums having jurisdiction over the registered office of the Company.
Note: For all types of repairs / maintenance under warranty, the appliance shall be brought to the nearest Company service centre or its authorised service agent.
CUSTOMER COPY
Mr./Mrs./Ms.
Address.
Telephone No.:
Model Name:
Serial No.:
Date of Purchase:
Cash Memo No.:
Dealer Name and:
Address Stamp:
Service Station Copy
Mr./Mrs./Ms
First Name
Middle Name
Last Name
Address:
Pin Code:
Telephone No.:
(R)
(0)
E-mail Address:
Model Name:
Serial No.:
Date of Purchase:
Cash Memo No.:
Products Owned by the customer:(Please tick in the appropriate box.)
□ Washing Machine
Refrigerator
□ Color TV
100% Clothes Dryer
□Dishwasher
Music System
□Oven Toaster Grill
□ 2 Wheeler
Car
Air Conditioner
IFB Industrial Limited
Regd.off.: 14 Taratolla Road
Kolkata - 700088
- WELCOME AND CONGRATULATIONS
- Your satisfaction is our number one priority.
- CONTENTS
- PRECAUTIONS TO AVOID POSSIBLE EXPOSURE TO EXCESSIVE MICROWAVE ENERGY
- GROUNDING INSTRUCTIONS
- NOTE:
- RADIO INTERFERENCE
- SAFETY INSTRUCTIONS ABOUT YOUR MICROWAVE OVEN
- ARCING
- WARNING
- SAFETY INSTRUCTIONS ABOUT FOOD
- LIQUIDS
- FATS AND OIL
- EGGS
- BABY FOODS
- COOKWARES
- POPCORN
- MICROWAVE COOKING PRINCIPLES
- MICROWAVE COOKING TECHNIQUES
- Stirring
- Arrangement
- Shielding
- Turning
- Standing
- FOOD DONENESS SIGNS INCLUDE:
- DEFROSTING TIPS
- GRILLING TIPS
- CONVECTION TIPS
- COOKWARE SELECTION GUIDE
- CONTROL PANEL
- DISPLAY WINDOW
- NUMBER PADS
- GRILL
- CONVECTION
- MICRO + GRILL
- MICRO + CONVECTION
- WEIGHT DEFROST
- TIMER/CLOCK
- QUICK COOK BUTTONS:
- START
- EXPRESS COOKING
- STOP/RESET
- HOW TO SET THE OVEN CONTROLS
- BEEPS DURING OVEN SETTINGS
- SETTING THE CLOCK
- MICROWAVE COOKING
- TO COOK WITH CONVECTION
- TO PREHEAT AND COOK WITH CONVECTION
- MICROWAVE +GRILL
- COMBINATION 1
- COMBINATION 2
- MICROWAVE + CONVECTION
- MULTISTAGE COOKING
- QUICK RECIPES FOR THE BEGINERS
- INSTRUCTIONS BEFORE COOKING RECIPE FROM A RECIPE BOOK
- AUTO COOK MENUS - INSTRUCTION S
- OTHER CONVENIENT FEATURES
- MINUTE TIMER
- CHILD PROOF LOCK
- AUTOMATIC PROTECTION MECHANISM
- SERVICE CALL CHECK
- Please check the following before calling for service:
- WARRANTY
- LIMITATIONS OF WARRANTY
- CUSTOMER COPY
- Service Station Copy
Brand : IFB
Model : 20SC2
Category : Microwaves