
CT-W450R - Cassette player PIONEER - Free user manual and instructions
Find the device manual for free CT-W450R PIONEER in PDF.

User questions about CT-W450R PIONEER
0 question about this device. Answer the ones you know or ask your own.
Ask a new question about this device
Download the instructions for your Cassette player in PDF format for free! Find your manual CT-W450R - PIONEER and take your electronic device back in hand. On this page are published all the documents necessary for the use of your device. CT-W450R by PIONEER.
USER MANUAL CT-W450R PIONEER
Operating Instructions
STEREO DOUBLE CASSETTE DECK
CT-W45OR CT-W355R
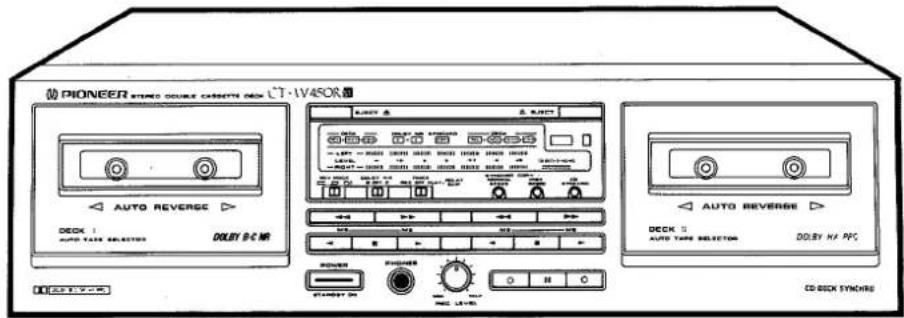
● The above illustration shows the CT-W450R.
Thank you for buying this PIONEER product.
Please read through these operating instructions so you will know how to operate your unit properly. After you have finished reading the instructions, keep the manual in a safe place for future reference.
In some countries or regions, the shape of the power plug and power outlet may sometimes differ from that shown in the explanatory drawings. However, the method of connecting and operating the unit is the same.
WARNING: TO PREVENT FIRE OR SHOCK HAZARD, DO NOT EXPOSE THIS APPLIANCE TO RAIN OR MOISTURE.
IMPORTANT NOTICE
The serial number for this equipment is located on the rear panel. Please write this serial number on your enclosed warranty card and keep it in a secure area. This is for your security.
[For Canadian model]
This digital apparatus does not exceed the Class B limits for radio noise emissions from digital apparatus set out in the Radio Interference Regulations of the Canadian Department of Communications.
These operating instructions are based on the CT-W450R model, but they are also applicable to the CT-W355R model.
Differences between models:
| CT-W450R | CT-W355R | |
| Deck I ( playback only) | Two-way Auto reverse (FWD/REV) | One-way (FWD) |
| Deck II (recording/playback) | Two-way Auto reverse (FWD/REV) | Two-way Auto reverse (FWD/REV) |
| Headphones jack | Provide | Not provide |
IMPORTANT

The lightning flash with arrowhead, within an equilateral triangle, is intended to alert the user to the presence of uninsulated "dangerous voltage" within the product's enclosure that may be of sufficient magnitude to constitute a risk of electric shock to persons.
CAUTION
RISK OF ELECTRIC SHOCK DO NOT OPEN
CAUTION:
TO PREVENT THE RISK OF ELECTRIC SHOCK, DO NOT REMOVE COVER (OR BACK). NO USER-SERVICEABLE PARTS INSIDE. REFER SERVICING TO QUALIFIED SERVICE PERSONNEL.

The exclamation point within an equilateral triangle is intended to alert the user to the presence of important operating and maintenance (servicing) instructions in the literature accompanying the appliance.
SAFETY INSTRUCTIONS
READ INSTRUCTIONS — All the safety and operating instructions should be read before the appliance is operated.
RETAIN INSTRUCTIONS — The operating instructions should be retained for future reference.
HEED WARNING – All warnings on the appliance and in the operating instructions should be adhered to.
FOLLOW INSTRUCTIONS — All operating and use instructions should be followed.
WATER AND MOISTURE — The appliance should not be used near water — for example, near a bathtub, washbowl, kitchen sink, laundry tub, in a wet basement, or near a swimming pool, etc.
LOCATION — The appliance should be installed in a stable location.
WALL OR CEILING MOUNTING — The appliance should not be mounted to a wall or ceiling.
VENTILATION - The appliance should be situated so that its location or position does not interfere with its proper ventilation. For example, the appliance should not be situated on a bed, sofa, rug, or similar surface that may block the ventilation openings; or, placed in a built-in installation, such as a bookcase or cabinet that may impede the flow of air through the ventilation openings.
HEAT - The appliance should be situated away from heat sources such as radiators, heat registers, stoves, or other appliances (including amplifiers) that produce heat.
POWER SOURCES - The appliance should be connected to a power supply only of the type described in the operating instructions or as marked on the appliance.
POWER-CORD PROTECTION - Power-supply cords should be routed so that they are not likely to be walked on or pinched by items placed upon or against them. Pay particular attention to cords at plugs, convenience receptacles, and the point where they exit from the appliance.
POLARIZATION - If your purchased product is provided with a polarized power plug, please read the following instructions. This product is equipped with a polarized alternating current line plug (a plug having one blade wider than the other). This plug will fit into the power outlet only one way. This is a safety feature. If you are unable to insert the plug fully into the outlet, try reversing the plug. If the plug should still fail to fit, contact your electrician to replace your obsolete outlet. Do not defeat the safety purpose of the polarized plug.
CLEANING - The appliance should be cleaned only with a polishing cloth or a soft dry cloth. Never clean with furniture wax, benzine, insecticides or other volatile liquids since they may corrode the cabinet.
POWER LINES — An outdoor antenna should be located away from power lines.
NONUSE PERIODS — The power cord of the appliance should be unplugged from the outlet when left unused for a long period of time.
OBJECT AND LIQUID ENTRY — Care should be taken so that objects do not fall and liquids are not spilled into the enclosure through openings.
DAMAGE REQUIRING, SERVICE — The appliance should be serviced by a Pioneer authorized service center or qualified service personnel when:
● The power-supply cord or the plug has been damaged.
- Objects have fallen, or liquid has been spilled into the appliance.
● The appliance has been exposed to rain.
● The appliance does not appear to operate normally or exhibits a marked change in performance.
● The appliance has been dropped or the enclosure damaged.
SERVICING – The user should not attempt to service the appliance beyond that described in the operating instructions. For all other servicing, contact the nearest Pioneer authorized service center.
OUTDOOR ANTENNA GROUNDING - If an outside antenna is connected to the antenna terminal, be sure the antenna system is grounded so as to provide some protection against voltage surges and built up static charges.
In the U.S.A. section 810 of the National Electrical Code, ANSI/NFPA No. 70-1984, provides information with respect to proper grounding of the mast and supporting structure, grounding of the lead-in wire to an antenna discharge unit, size of grounding conductors, location of antenna discharge unit, connection to grounding electrodes, and requirements for the grounding electrode. See Fig. A.
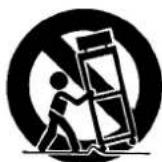
CART — An appliance and cart combination should be moved with care. Quick stops, excessive force, and uneven surfaces may cause the appliance and cart combination to overturn.
NEC - NATIONAL ELECTRIC CODE
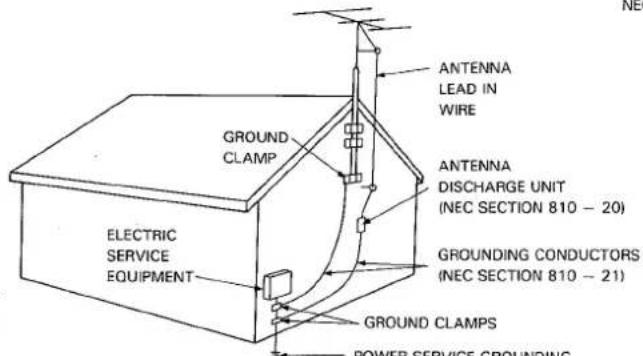
FIG. A
ANTENNA LEAD IN WIRE
ANTENNA
DISCHARGE UNIT
(NEC SECTION 810 - 20)
GROUNDING CONDUCTORS (NEC SECTION 810 - 21)
- GROUND CLAMPS
POWER SERVICE GROUNDING ELECTRODE SYSTEM (NEC ART 250, PART H)
INFORMATION TO USER [FOR U.S. MODEL]
This equipment generates and uses radio frequency energy and if not installed and used properly, that is, in strict accordance with the manufacturer's instructions, may cause interference to radio and television reception. It has been type tested and found to comply with the limits for a Class B computing device in accordance with the specifications in Subpart J of Part 15 of FCC Rules, which are designed to provide reasonable protection against such interference in a residential installation. However, there is no guarantee that interference will not occur in a particular installation.
If this equipment does cause interference to radio or television reception, which can be determined by turning the equipment off and on, the user is encouraged to try to correct the interference by one or more of the following measures:
● reorient the receiving antenna
● relocate this equipment with respect to the receiver
- move this equipment away from the receiver
- plug this equipment into a different outlet so that equipment and receiver are on different branch circuits.
If necessary, the user should consult the dealer or an experienced radio/television technician for additional suggestions. The user may find the following booklet prepared by the Federal Communications Commission helpful:
"How to Identify and Resolve Radio-TV Interference Problems".
This booklet is available from the US Government Printing Office, Washington, D.C., 20402, Stock No. 004-000-00345-4.
The above instructions apply only to units which will be operated in the United States.
CONTENTS
INSTALLATION.... 3
MAINTENANCE.... 3
HANDLING CASSETTE TAPES 4
CONNECTIONS.... 5
FRONT PANEL FACILITIES 6
PLAYBACK 8
SINGLE PLAYBACK....8
BLANK SKIP 8
RELAY PLAYBACK 8
MUSIC SEARCH....9
RECORDING....10
RECORDING MUTE....10
TAPE COPYING 10
RECORDING AND PLAYBACK USING AN AUDIO TIMER.... 11
CD·DECK SYNCHRO RECORDING 12
TROUBLESHOOTING 13
SPECIFICATIONS 15
INSTALLATION
When installing the deck, avoid locations with high temperatures or humidity, and make sure that the deck receives adequate ventilation.
Do not install the deck in locations subject to direct sunlight, or near a space heater or other heating device, as this may cause damage to the finish or the internal parts.
■ Malfunctions may also result if the deck is installed in an excessively humid or dusty location. Avoid installing the deck next to kitchen counters or other locations subject to oily smoke or humidity.
If the deck is placed directly on top of an amplifier, it may pick up humming or other noise. Also, if the amplifier generates a large amount of heat, the deck may malfunction.
If the deck is located near a television set, it may pick up interference noise, which will be recorded as a whistling sound on the tape. In such cases, move the deck further away from the television set or turn the television set off when operating the deck.
Do not place a cloth over the deck, or block the ventilation slots in any other way. The ventilation slots on this deck are necessary to keep internal parts cool. If they are blocked, the deck may malfunction.
CONDENSATION (DEW)
When the deck is moved from a cold location to a 'warm location, or when the temperature of the room changes suddenly, condensation (a phenomenon in which moisture forms on the surface of the mechanical parts) may occur. This can adversely affect the performance of the deck. In such cases, wait for about one hour to allow the deck to adjust to the room temperature. To prevent condensation when heating a room, raise the temperature slowly.
POWER-CORD CAUTION
Handle the power cord by the plug. Do not pull out the plug by tugging the cord and never touch the power cord when your hands are wet as this could cause a short circuit or electric shock. Do not place the unit, a piece of furniture, etc., on the power cord, or pinch the cord. Never make a knot in the cord or tie it with other cords. The power cords should be routed such that they are not likely to be stepped on. A damaged power cord can cause fire or give you an electrical shock. Check the power cord once in a while. When you find it damaged, ask your nearest PIONEER authorized service center or your dealer for a replacement.
MAINTENANCE

CLEANING THE HEADS, PINCH ROLLERS AND CAPSTANS
The heads, pinch rollers and capstans are likely to get dirty quite easily. If these parts; particularly the heads; get dirty, the high frequency components of a recording will not be reproduced and the stereo balance will be impaired, resulting in a deterioration of the playback sound. It is therefore recommended that the head section be cleaned regularly.
- Set the POWER switch to STANDBY.
- Press the EJECT button to open the cassette door.
- Dip a cleaning swab in cleaning fluid and use it to wipe the heads, capstans and pinch rollers.
NOTE:
After cleaning the head section, do not load a tape until the cleaning fluid has dried completely (about 2 or 3 minutes).
DEMAGNETIZING THE HEADS
After using the cassette deck for a period of time, the heads will become magnetized. The same effect will occur if a magnetized screwdriver, magnet, or other magnetized object is brought too close to the heads. When the heads become magnetized, high frequency sounds will be lost during recording or playback, and interference noise may also occur. The heads should be regularly demagnetized with a head demagnetizer, which can be purchased at most audio stores.
When demagnetizing the heads, make sure that the POWER switch of the cassette deck is set to STANDBY. For detailed instructions, refer to the operating instructions of the head demagnetizer.
CLEANING THE FRONT PANEL
Clean the deck regularly with a soft cloth. If the front panel gets dirty or greasy, clean it with a damp cloth and mild soap, then wipe it dry with a soft cloth. Never use volatile cleaners like thinners, benzine or alcohol because they will damage the panel finish.
HANDLING CASSETTE TAPES
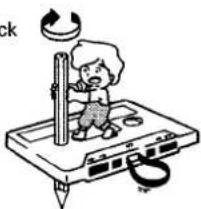
A
Turn pencil to remove tape slack
natural_image
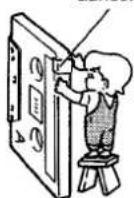
Illustration of a child using a vertical scale on a device with a lightning bolt, no text or symbols presentB
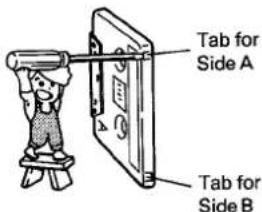
For erasure prevention remove
C
Cover with adhesive tape
D
Erasure prevention tabs
E
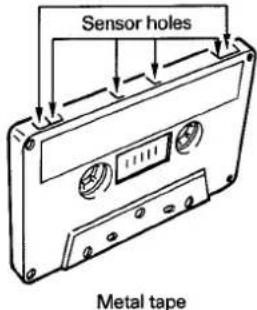
Sensor holes
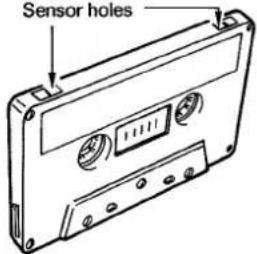
Chrome (CrO2) tape
CHECK CASSETTE BEFORE USE
Check the following items before loading a cassette tape:
Is the tape loose, or is some of the tape outside the cassette?
If some of the tape is loose or projecting outside the cassette shell, the tape may not properly enter between the capstan and pinch roller. This will prevent the tape from being supplied properly, and may even damage the tape itself. In such cases, insert a pencil into the reel hole and take up the slack (Fig. A).
Some cassette tapes come with a plastic or thick paper stopper to prevent the tape from becoming slack. Remove this stopper when loading the cassette and replace it after using the cassette.
Are the accidental erasure prevention tabs intact?
These tabs allow you to prevent important recordings from being erased accidentally. When the tab on the cassette shell is removed (Fig. B), it is not possible to activate the recording function, so valuable recordings will not be erased by mistake.
To re-record on a cassette whose tab has been removed, simply stick a piece of doubled adhesive tape over the hole (Fig. C).
When using metal or chrome tapes, be careful not to block the detection holes with the tape (Fig. D, Fig. E). If the holes are blocked, the automatic tape selector mechanism will not operate correctly.
NOTES:
- The accidental erasure tab for each side is the one located on the top left when the side that you want to protect is facing you.
- When removing the tab, do not use a magnetized screwdriver.
AUTOMATIC TAPE SELECTOR FUNCTION
This cassette deck is equipped with an automatic tape selector function which utilizes the sensor holes on the tape cassette to determine the type of tape being used.
The deck is then set to match the tape recording bias and equalization.
NOTES:
- When using metal tapes, make sure that the tapes have sensor holes.
● Make sure that the sensor holes on the cassette are not blocked; otherwise the tape selector mechanism will not function properly. - Do not use FeCr tapes.
TIPS ON CASSETTE TAPES
- Leader tape (which cannot be recorded on) is provided at the beginning of a cassette tape. Let the tape run for about 5 seconds before starting to record, to allow the leader tape to clear the recording head.
- Do not leave a cassette tape exposed to the environment. Store the cassette in its case after use so that dust and dirt do not adhere to the tape, and so the tape will not get slack. Store tapes in a location free from magnetism, dust, dirt, oil, heat and humidity.
- Because C-120 tapes are very thin, they can easily jam in the pinch rollers and capstan, and they often are subject to other problems such as irregular winding. It is best not to use them with this deck.
- If cassette tapes are irregularly wound, the tape may get jammed in the rollers. This can cause damage to both the tape and the deck itself. If you are not certain whether the tape is wound evenly, fast forward or rewind the tape from beginning to end, to make sure that the tape is properly wound.
CONNECTIONS
flowchart
graph TD
    A["Compact Disc Player"] --> B["CD-ROM jack"]
    B --> C["CD-DECK SYNCHRO control jack"]
    C --> D["Remote control cord"]
    D --> E["Power cord"]
    E --> F["Recording connection cord"]
    F --> G["TAPE REC/PLAY jacks"]
    G --> H["TAPE RECP PLAY"]
    H --> I["Stereo Amplifier"]
    I --> J["CONTROL OUT jack"]
    J --> K["Controller OUT jack"]
    K --> L["CD-ROM jack"]
    L --> M["Power cord"]
    M --> N["Remote control cord"]
    N --> O["Power cord"]
    O --> P["Recording connection cord"]
    P --> Q["TAPE REC/PLAY jacks"]
    Q --> R["TAPE RECP PLAY"]
    R --> S["Stereo Amplifier"]
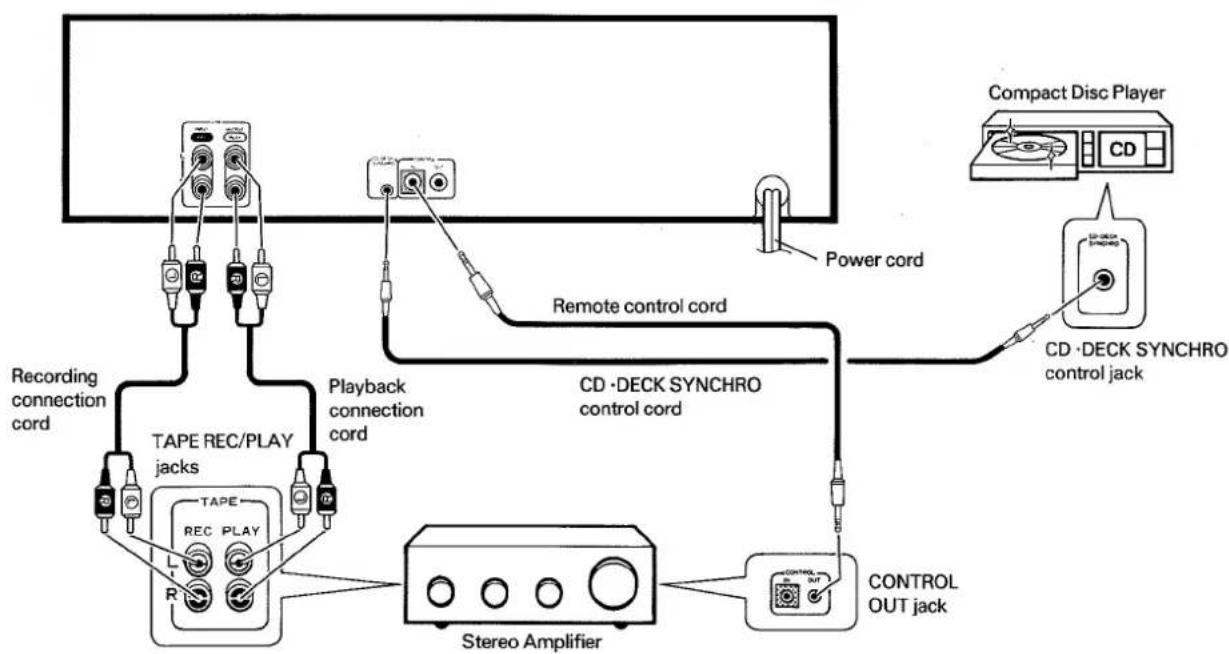
- Read through the operating instructions of the stereo components which you intend to connect to this deck.
■ Turn the power on only after making all the connections.
■ Make sure that all of the connection plugs are inserted securely, as improper connections may generate noise.
Connect the TAPE jacks of your amplifier to the LINE jacks of the cassette deck. Be sure to connect the REC (INPUT) jacks of the deck to the recording (output) jacks of the amplifier, and the PLAY (OUTPUT) jacks of the deck to the play (input) jacks of the amplifier.
- Connect the plugs properly. Left channel — White plug Right channel — Red plug
Insert the power cord of the cassette deck into the accessory AC outlet of your amplifier, or into a normal household outlet.
- When performing unattended recording or wake-up playback, consult the operating instructions of your audio timer for details on power cord connections.
PIONEER SYSTEM REMOTE CONTROL
CONTROL IN jack
Use the enclosed Remote Control Cord to connect this jack to the CONTROL OUT jack of another component which bears the SR mark to indicate that it is equipped with PIONEER System Remote Control. You will then be able to operate this deck using the other component's PIONEER system remote control unit. If the remote control unit does not have separate buttons for Deck I and Deck II, or a selection button to choose Deck I or Deck II; the buttons will only operate Deck II. To operate Deck I with a remote control unit which was not designed for double deck cassette decks; see page 7.
CONTROL OUT jack
Intermediary jack which outputs signals from the CONTROL IN jack of this deck to the input jack of another component. Connect this jack to the CONTROL IN jack of another component compatible with PIONEER System Remote Control.
CD·DECK SYNCHRO RECORDING
- CD·DECK SYNCHRO recording can be carried out when this deck is connected to a PIONEER CD player equipped with a CD·DECK SYNCHRO control jack.
Connection
Connect the CD-DECK SYNCHRO control jack of the deck to the CD-DECK SYNCHRO control jack of the CD player using the enclosed CD-DECK SYNCHRO control cord.
NOTES:
- Keep the input and output jacks connected between the amplifier and the deck. Otherwise, CD·DECK SYNCHRO recording cannot be carried out.
- Even when the CD player is connected to the amplifier with an optical fiber cable, connect the CD player to either the amplifier or this deck with pin plug input and output cords.
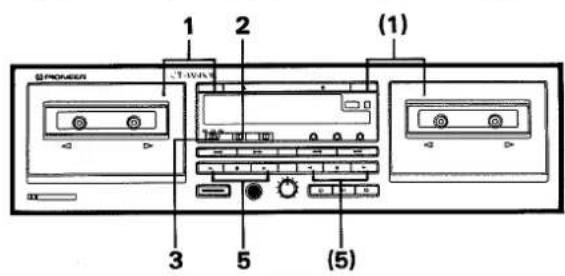
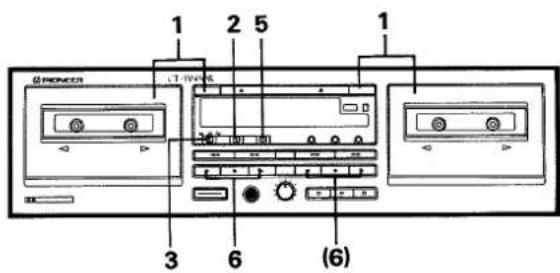
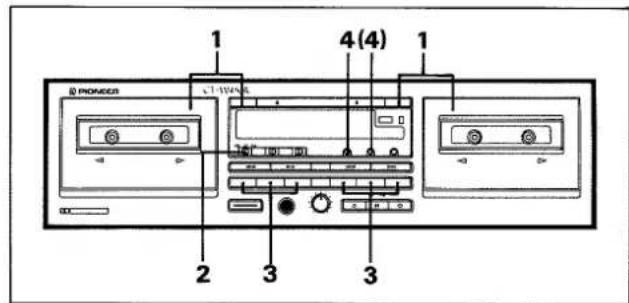
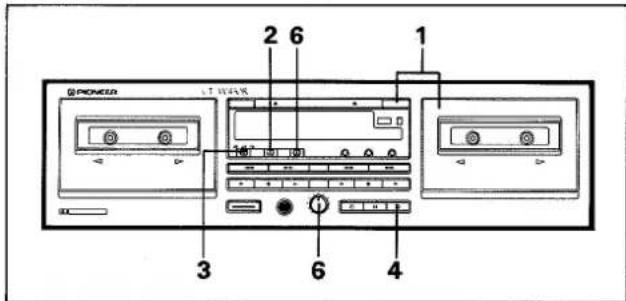
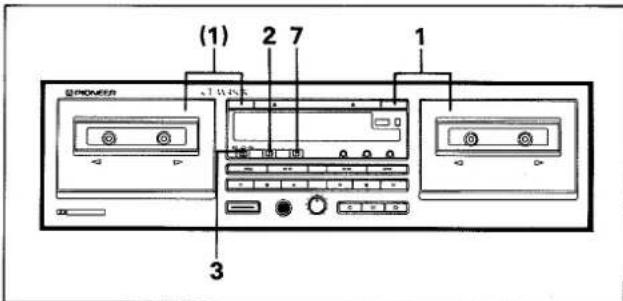
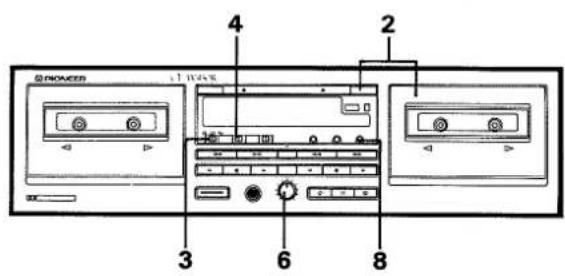
FRONT PANEL FACILITIES
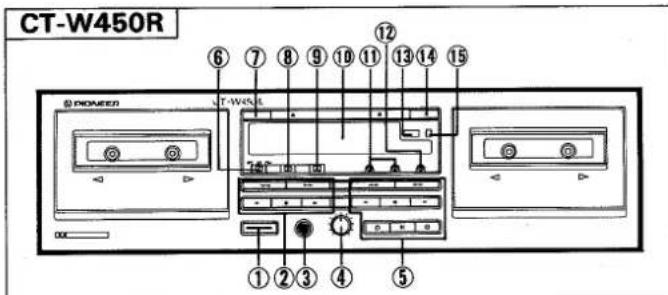

The POWER switch activates the secondary transformer only. Even when the switch is in the STANDBY position, there will be a power flow to the deck's circuits as long as the power cord is connected to a power outlet.
② Deck I operation buttons
Fast reverse/Music search
▶ Fast forward/Music search
Forward playback
■ Stop
◀ Reverse playback (CT-W450R only)
③ Headphones (PHONES) jack (CT-W450R only)
④ Recording level control (REC LEVEL)
⑤ Deck II operation buttons
◀ Fast reverse/Music search
▶ Fast forward/Music search
Forward playback
■ Stop
Reverse playback
○ Recording mute
Pause
- Recording
⑥ Reverse mode switch (REV MODE)
- CT-W450R: For both Decks I and II.
- CT-W355R: For Deck II only (see page 7).
⑦ Deck I eject button (EJECT)
- If the tape is moving (recording, playback, tape winding, etc.), press the stop (■) button before pressing this button.
⑧ Dolby\* NR switch (B/OFF/C)
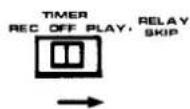
⑨ Timer mode — Relay/Skip play switch (TIMER REC/OFF/PLAY — RELAY/SKIP)
⑩ Function display
⑪ Synchro copy buttons (SYNCHRO COPY I ▷ II)
● NORMAL SPEED: Copying at normal speed.
● HIGH SPEED: Copying at twice normal speed.
⑫ CD·DECK SYNCHRO recording button (CD SYNCHRO)
⑬ Deck II tape counter (DECK II COUNTER)
⑭ Deck II eject button (EJECT)
- If the tape is moving (recording, playback, tape winding, etc.), press the stop (■) button before pressing this button.
⑮ Tape counter reset button (RESET)
Function display
②1 Deck I tape transport mode indicators
• See page 7.
②2 Dolby NR indicators (B/C)
②3 Synchro copy indicator (COPY)
● NORMAL SPEED: lights
- HIGH SPEED: flashes
⑳ Level meter
- The ☐☐ beside the +3 mark indicates the reference level for the Dolby NR system.
⑲ Deck II tape transport mode indicators
• See page 7.
②6 CD·DECK SYNCHRO recording indicator (CD·DECK SYNCHRO)
*
- Dolby noise reduction and HX Pro headroom extension manufactured under license from Dolby Laboratories Licensing Corporation. HX Pro originated by Bang & Olufsen.
- "DOLBY", the double-D symbol and "HX PRO" are trademarks of Dolby Laboratories Licensing Corporation.
TAPE TRANSPORT MODE INDICATORS


The indicators shown below indicate the current tape transport status of Deck I or Deck II. With the CT-W355R model, Deck I has a PLAY indicator only.
For both Decks I and II
Flashing rapidly
| Forward mode | Reverse mode | |
| Stop |  |  · · |
| Playback |  |  |
| Fast forward |  |  · · |
| Fast reverse |  |  |
| Forward music search |  |  |
| Reverse music search |  | 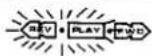 |
For Deck I of the CT-W355R
Flashing rapidly
| StopFast forwardFast reverse | (off) | |
| Playback | ||
| Music search |  |
For Deck II only
Flashing slowly
| Forward mode | Reverse mode | |
| Playback pause | •  | 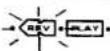 |
| Recording |  • •  |  • • |
| Recording standby |  • •  | 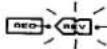 • • |
| Recording mute |  • •  | 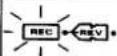 • • |
REVERSE MODE SWITCH (REV MODE)
With the CT-W355R model, this switch affects Deck II only. With the CT-W450R model, this switch affects both decks.
There are three settings:
One way mode = position
When the switch is set to this position, playback or recording (Deck II only) is performed on one side of the tape only. When the tape reaches the end of the side, it stops automatically (auto stop function).
Two way mode position
When the switch is set to this position, playback or recording (Deck II only) can be performed on both sides of the tape. When the tape reaches the end of the first (forward) side, its direction is automatically reversed, and playback or recording continues or the other (reverse) side. When it reaches the end of the reverse side, the tape stops automatically (auto stop function). If playback or recording is started from the reverse side, the tape will stop when it reaches the end of the side.
Repeat mode position
When the switch is set to this position for playback, both sides of the tape are played back repeatedly until the stop (■) button is pressed, or until the tape has been played completely 8 times (16 sides). If any of the operation buttons are pressed during playback, the repeat mode will be reset, and the tape will be played 8 times (16 sides) when playback is restarted.
When the switch is set to this position for recording (Deck II only), both sides are recorded and then the tape stops, as described above for two way mode.
OPERATION OF DECK I WITH A REMOTE CONTROL UNIT NOT DESIGNED FOR DOUBLE DECKS (System Remote Control)
Selecting Deck I
In order to operate Deck I with the remote control unit, adjust the deck as follows: With the power off, press and hold the stop (■) button of Deck I, and turn the power on. Continue to hold the stop (■) button for approximately 5 seconds. Deck I can now be operated using the remote control unit, but Deck II cannot.
Switching to Deck II
To restore remote control operation to Deck II, press the stop (■) button of Deck II while Deck II is in stop mode. Deck II can now be operated using the remote control unit. Remote control operation can be switched back and forth between Deck I and Deck II by pressing the stop (■) button of the desired deck while it is in stop mode.
NOTE:
If the power is turned off, or if a power failure or a sudden change in the power supply (caused by lightning, etc.) occurs, the deck is reset to its original state. Only Deck II can be operated by remote control. To restore operation to either deck, repeat the above procedure from the beginning.
PLAYBACK
SINGLE PLAYBACK (Either Deck I or Deck II)
- Load a prerecorded tape in Deck I or II.
- Set the DOLBY NR switch.
● Always set the switch to the same position that was used for recording.
- Set the REV MODE switch (see page 7).
- Not necessary for playback on Deck I of the CT-W355R model.
- Set the stereo amplifier for tape playback.
- Press the playback (▶ or ◀) button of either Deck I or II.
To stop playback temporarily (Deck II only)
Press the pause (■) button.
- To resume playback, either press the pause (■) button again, or press the playback (▶ or ◀) button.
To stop playback
Press the stop (■) button.
BLANK SKIP
This function allows you to skip unrecorded portions of the tape during playback.
Set the TIMER switch to the PLAY-RELAY/SKIP position.
- When this mode is selected, if the deck encounters an unrecorded portion of tape more than 15 seconds in length, it will fast forward the tape until it encounters another recorded portion, and resume playback from that point.
RELAY PLAYBACK
When relay playback mode is selected, continuous playback can be performed. When the tape in one deck reaches the end and stops, the other deck will automatically begin playback.
- Load prerecorded tapes in Deck I and Deck II.
- Make sure that both tapes have been recorded using the same Dolby NR setting.
- Set the DOLBY NR switch.
● Always set the switch to the same position that was used for recording. - Set the REV MODE switch (see page 9).
- Set the stereo amplifier for tape playback.
- Set the TIMER switch to the PLAY-RELAY/SKIP position.
- Press the playback (▶ or ◀) button of the deck that will start to play first.
- When the tape in one deck ends, the other deck automatically begins playback.
- To cancel relay playback, set the TIMER switch to the OFF position.
NOTES:
- Relay playback can begin from either Deck I or Deck II.
- When the tape in one deck reaches the end, it automatically stops, and the tape in the other deck begins playback.
- The tape in the idle deck can be replaced during relay playback mode, allowing many tapes to be played back continuously. This is a convenient feature for parties, background music, etc.
- When this mode is selected, if the deck encounters an unrecorded portion of tape more than 15 seconds in length, it will fast forward the tape until it encounters another recorded portion, and resume playback from that point.
To stop playback temporarily (Deck II only)
Press the pause ( ■ ) button.
- To resume playback, either press the pause (■) button again, or press the playback (▶ or ◀) button.
To stop playback
Press the stop (■) button of the deck which is currently playing.
SWITCH SETTINGS FOR REVERSE PLAYBACK
The playback sequence depends on the setting of the REV MODE switch and on which playback button is pressed first. The playback sequence for each of the possible selections is shown below.
I ▷ : Deck I forward playback
II ▷ : Deck II forward playback
∞ : Auto-reverse function
I △ : Deck I reverse playback
II △ : Deck II reverse playback
→ : Relay
For CT-W450R:
| REV MODE switch | Playback button | Playback sequence |
| | ▶ | | ▶ → || ▶ | |
| | ◀ | | ◀ → || ▶ | |
| || ▶ | || ▶ → | ▶ | |
| || ◀ | || ◀ → | ▶ | |
| D | | ▶ | | ▶ ∞ | ◀ → || ▶ ∞ || ◀ |
| D | | ◀ | | ◀ → || ▶ ∞ || ◀ |
| D | || ▶ | || ▶ ∞ || ◀ → | ▶ ∞ | ◀ |
| D | || ◀ | || ◀ → | ▶ ∞ | ◀ |
| C2 | | ▶ | | ▶ ∞ | ◀ → || ▶ ∞ || ◀ → | ▶ ...until both tapes are played 8 times (32 sides) |
| C2 | | ◀ | | ◀ → || ▶ ∞ || ◀ → | ▶ ∞ → | ◀ ...until both tapes are played 8 times (31 sides) |
| C2 | || ▶ | || ▶ ∞ || ◀ → | ▶ ∞ | ◀ → || ▶ ...until both tapes are played 8 times (32 sides) |
| C2 | || ◀ | || ◀ → | ▶ ∞ | ◀ → || ▶ ∞ || ◀ ...until both tapes are played 8 times (31 sides) |
For CT-W355R:
- During relay playback in the or mode, the cassette tape(s) of one deck can be changed while the other deck is playing back and relay playback will continue.
| REV MODE switch | Playback button | Playback sequence |
| I▶ | | ▷ → || ▷ | |
| II▶ | || ▷ → | ▷ | |
| II◀ | || ◀ → | ▷ | |
| I▶ | | ▷ → || ▷ ∞ || ◀ | |
| II▶ | || ▷ ∞ || ◀ → | ▷ | |
| II◀ | || ◀ → | ▷ | |
| I▶ | | ▷ → || ▷ ∞ || ◀ → * | ▷ → || ▷ ...until both tapes are played 8 times (24 sides) | |
| II▶ | || ▷ ∞ || ◀ → | ▷ → || ◀ ∞ || ▷ → * | ▷ ...until both tapes are played 8 times (24 sides) | |
| II◀ | || ◀ → | ▷ → || ▷ ∞ || ◀ → * | ▷ ...until both tapes are played 8 times (24 sides) |
* Deck I is rewound automatically while Deck II is playing in order for relay playback to continue.
NOTE:
During relay playback, when a tape begins playing automatically, it always starts from the forward (▷) playback side. Make sure that the tapes are rewound properly before beginning relay playback.
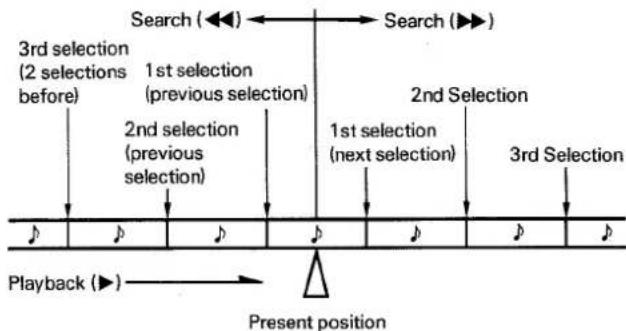
MUSIC SEARCH
(Skipping forward or backward to play back a desired selection)
The music search function detects blanks (longer than 4 seconds) between selections, advances the tape in the forward or reverse direction to find the beginning of the desired selection, and automatically starts playback.
It can find a selection located up to 15 selections before or after the current position.
During Forward Playback
When you wish to locate the next selection or a later one, press the fast forward (▶▶) button as many times as the number of selections to be skipped. When you wish to listen to the current selection from the beginning, press the fast reverse (◀◀) button once. To return to the previous selection or an earlier one, press the fast reverse (◀◀) button as many times as the number of selections to be skipped, plus one.
During Reverse Playback
When you wish to locate the next selection or a later one, press the fast reverse (◀◀) button as many times as the number of selections to be skipped. When you wish to listen to the current selection from the beginning, press the fast forward (▶▶) button once. To return to the previous selection or an earlier one, press the fast forward (▶▶) button as many times as the number of selections to be skipped, plus one.
From the Stop Mode
Press the playback (▶ or ◀) button to select the tape transport direction, then press the fast forward or fast reverse (▶▶ or ◀◀) button to perform music search as described above.
If the button is pressed more times than the number of selections on the side, music search can continue on the other side; but ONLY if the auto reverse function operates.
NOTES:
In the following cases, the music search function may be unable to properly detect blanks between selections, thus operating incorrectly. This is not, however, a sign of unit malfunction.
- When using a tape with blanks between selections less than 4 seconds long.
- When listening to tapes with long low-level intervals; like classical music tapes; or tapes with sound breaks several seconds long within selections.
- When listening to tapes of recorded conferences or talk shows, where the sound is discontinuous.
- When using tapes with noise in the blanks between selections.
How Selections are Counted
When the music search function is performed in the middle of a selection and "1st previous selection" is specified (the button is pressed once), the deck will return to the beginning of the present selection. To return to earlier selections, count the number of selections to be skipped, plus one.
flowchart
graph TD
    A["Search (◀◀)"] --> B["Search (▶▶)"]
    C["3rd selection (2 selections before)"] --> D["1st selection (previous selection)"]
    E["2nd selection (previous selection)"] --> F["1st selection (next selection)"]
    G["2nd Selection"] --> H["3rd Selection"]
    I["Playback (▶)"] --> J["Present position"]
RECORDING
(Deck II only)

- Load a tape for recording in Deck II.
- Set the DOLBY NR switch.
- Set the REV MODE switch.
- To record on one side only, set the switch to the z position. To record on both sides, set the switch to either the z or the z position.
- Press the recording (●) button.
- Prepare the audio source from which you wish to record. Turn on the stereo amplifier and prepare it for playback of the desired audio source.
- Adjust the recording level. For details, see "ADJUSTING THE RECORDING LEVEL" below.
- Press the playback (▶ or ◀) button or the pause (■) button to begin recording.
- When recording on both sides, press the ▶ button. If the ◀ button is pressed, recording will stop after only one side is recorded. The deck cannot switch from the reverse direction to the forward direction during recording.
To Stop Recording Temporarily
Press the pause ( ■ ) button.
- To resume recording, either press the pause (■) button again, or press the playback (▶ or ◀) button.
To Stop Recording
Press the stop (■) button.
The adjustment of the recording level is the most important factor in achieving good recording results. A high level provides a good signal-to-noise ratio and dynamic range, but an excessively high level distorts the sound. If the level is set too low for fear of sound distortion, irritating tape hiss will mar the recording. The characteristics of tapes differ depending on the manufacturer and the type of tape. Set the REC LEVEL control so that the level meter's "+3 dB" indicator remains lit most of the time. No harm will be done if the "+6 dB" indicator lights momentarily at peaks. When recording without Dolby NR, set the REC LEVEL control so that the "0 dB" indicator lights, and the "+3 dB" indicator lights occasionally at peaks.
NOTES:
- The optimal recording level may differ somewhat, depending on the audio source and type of tape used. In order to obtain the best possible results, set the recording level after actual testing. Listen to your recordings, and adjust the level as necessary.
- The level meter may react differently during recording and playback of the same tape. This is due to differences in tape sensitivity, and creates no problem.
Erasure Prevention Tabs
The recording (●) button will not function when the erasure prevention tabs of the loaded cassette tape have been removed (See page 4). Do not press the recording (●) button with unreasonable force. When recording on both sides, make sure that both tabs are intact.
RECORDING MUTE
Use this function to create the 4.5-second blanks needed for proper operation of the music search function.
- Press the recording mute (O) button during recording and the deck will create a blank space by recording a section which contains no signal for approximately 4.5 seconds. The deck will then enter recording standby mode.
- To create a blank which is more than 4.5 seconds long, hold the button down for the desired length of time. When the button is released, the deck will enter recording standby mode.
- To resume recording, press the standby (■) button or the playback (▶ or ◀) button.
Erasing a Tape
To erase the recorded contents of a tape, load the tape in Deck II and follow the procedure below.
- Set the REC LEVEL control to the MIN position.
- Press the recording (●) button.
- Press the playback (▶ or ◀) button or the pause (■) button.
TAPE COPYING (From Deck I to Deck II)
- The tape copying function lets you copy the contents of a tape from Deck I to Deck II.
-
The SYNCHRO COPY buttons are used to select either normal speed copying, or high speed copying (copying at twice the normal playback speed).
-
Load a tape for playback into Deck I and a blank tape into Deck II.
- Set the REV MODE switch.
- Set the tape transport direction.
- Tape copying is always performed in the direction indicated by the tape transport indicator (▶ or ◀). To change this direction, press the desired playback (▶ or ◀) button, then immediately press the stop (■) button.
- Press one of the SYNCHRO COPY buttons to select either NORMAL or HIGH SPEED.
NORMAL Tape copying at normal speed, allowing you to SPEED: listen to playback (COPY indicator lights).
HIGH SPEED: Tape copying at twice the normal speed (COPY indicator flashes). Playback will still audible.
For CT-W355R only
After the forward side of the tape in Deck I ends, both decks will stop. To continue tape copying;
1 Turn the tape in Deck I over.
2 Press the SYNCHRO COPY button again to resume tape copying.
To Stop Copying
Press the stop (■) button of either deck. Both decks will stop.
NOTES:
- If a nearby television set is on while high speed copying is being performed, a high pitched interference sound may be heard on the tape. In this case, either use the normal speed copying function, or turn off the television.
- The tape in Deck II will be recorded with the same Dolby NR characteristics as the tape in Deck I, regardless of the setting of the DOLBY NR switch. For example, if the original tape was recorded with Dolby C-type NR, the copy will also have Dolby C-type NR.
- During high speed copying, none of the operation buttons will function except for the stop (■) button.
- During normal speed copying, the recording mute (O) and pause (■) buttons of Deck II also function.
- Tape copying stops when either of the two tapes reach the end. Therefore it is advisable to use tapes of the same length.
- The sound quality of the copied tape will be somewhat less than that of the original. Therefore when making more than one copy, always record from the original tape (do not make a copy of a copy).
- When making tape copies, the recording level does not have to be adjusted.
RECORDING AND PLAYBACK USING AN AUDIO TIMER
UNATTENDED RECORDING (Deck II only)
1. Load a tape for recording in Deck II.
- Timer recording always begins in the forward direction. Make sure that the tape is properly rewound.
2. Set the DOLBY NR switch.
3. Set the REV MODE switch.
4. Press the recording (●) button.
5. Prepare the audio source.
- Set the amplifier input selector to tuner, then tune in the desired station.
6. Adjust the recording level.
7. Set the audio timer.
- When the timer is set, it will turn off the power of all connected components.
8. Set the TIMER switch to the REC position.
- At the preset time, the power will be turned on, and recording will begin automatically.
NOTES:
- Timer recording will not work if the erasure prevention tabs of the tape loaded in Deck II have been removed.
● Operations depend on the type of audio timer used: Be sure to consult the operating instructions of the audio timer you actually use. - When not performing timer operations, set the TIMER switch to the OFF position. Otherwise, recording might begin unexpectedly when the power is turned on.
- Turn down the volume of the amplifier if you do not wish to listen to the program while it is being recorded.
WAKE-UP PLAYBACK (Deck I or Deck II)
1. Load the tape(s) for playback.
- Timer playback always begins in the forward direction. Make sure that the tape(s) are properly rewound.
2. Set the DOLBY NR switch.
3. Set the REV MODE switch.
- Not necessary for deck I of the CT-W355R model.
4. Set the stereo amplifier for tape playback.
- Adjust the volume level by playing back a portion the tape.
5. Rewind the tape to the position where playback is to start.
6. Set the audio timer.
- When the timer is set, it will turn off the power of all connected components.
7. Set the TIMER switch to the PLAY position.
- At the time set on the audio timer, the power will be turned on and playback will begin automatically.
NOTES:
● Operations depend on the type of audio timer used: Be sure to consult the operating instructions of the audio timer you actually use.
- When tapes are inserted into both Deck I and Deck II, relay playback from Deck I to Deck II will be performed when the power comes on.
- The blank skip function will operate during timer playback (see page 8).
- When not performing timer operations, set the TIMER switch to the OFF position. Otherwise, playback might begin unexpectedly when the power is turned on.
CD·DECK SYNCHRO RECORDING
If the CD player has a program function to determine the order of play-back, program the CD player before beginning this operation.
-
Load a compact disc in the CD player.
-
Load the cassette for recording.
- Rewind the tape to the desired starting position.
- Set the REV MODE switch.
- To record on one side only, set the switch to the ☐ position. To record on both sides, set the switch to either the ☐ or the ☐ position.
-
Set the DOLBY NR switch.
-
Press the play button of the CD player.
-
Adjust the recording level.
• See page 10.
- Press the stop (■) buttons of both the cassette deck and the CD player.
- Unless both this deck and the CD player are in stop mode, synchro recording cannot be performed.
- Press the CD SYNCHRO button.
- The cassette deck begins recording, and the CD player begins playback.
When the compact disc finishes playing:
The CD player enters stop mode and the cassette deck enters recording standby mode. Change the disc and press the play button of the CD player to resume recording. If the CD player does not resume play within 1 minute, the cassette deck enters stop mode.
When the CD player changes discs (twin tray or multi-play disc CD players):
The cassette deck enters recording standby mode, and resumes recording when the CD player begins playing the next disc. A 4.5 second blank space is automatically created between selections.
If the end of the tape is reached while the CD player is still playing:
The CD player returns to the beginning of the currently-playing selection and then enters pause mode. To resume recording, load another tape and check the tape running indicator to ensure that the tape is moving in the desired direction. If not, press the playback (▶ or ◀) button to change the tape direction, then immediately press the stop (■) button. The tape running indicator will change direction. Synchro recording can be resumed by pressing the CD SYNCHRO button again. (The CD SYNCHRO button should be pressed within 1 minute. If more than 1 minute elapses, the CD player will enter stop mode.)
If the auto-reverse function operates while the CD is still playing:
The CD player returns to the beginning of the current selection and enters pause mode.
A 4.5 second blank space is automatically created on the reverse side, then the CD player resumes playback and the deck resumes recording.
NOTES:
- Even when the CD player is connected to the amplifier with an optical fiber cable, connect the CD player to either the amplifier or this deck with pin plug input and output cords.
- Be sure to connect the deck and the CD player with the CD·DECK SYNCHRO control cord.
- Although recording begins when the CD SYNCHRO button is pressed, the CD player does not start playback until the button is released. This function can be used to advance the tape past the leader section, or to create a blank section on the tape.
- Only PIONEER CD players equipped with a CD·SYNCHRO control jack can be used for CD·DECK SYNCHRO recording. Any type of CD player which meets these requirements, including twin-tray or multi-play models, can be used.
■ Dolby NR Systems
Dolby NR systems are designed to reduce the amount of tape hiss, mainly in the treble components. During recording, the high-pitched pianissimo sounds which are most characteristic of audible noise are boosted, and during playback, only these boosted sections are attenuated, so that the sound is returned to normal. As a result, the noise is attenuated by an amount equal to the boosting in the treble range. The Dolby B-type NR system reduces noise in the treble range, cutting tape hiss and expanding the dynamic range. The Dolby C-type NR system is even more effective in reducing noise, as it reduces noise from the mid-range on.
NOTE:
When a tape has been recorded using the Dolby B-type or C-type NR system, make sure that the DOLBY NR switch is set to the same position during playback.
■ Dolby HX PRO Headroom Extension System
The Dolby HX PRO system controls the bias current during recording and maintains it at the optimal level based on the amount of high frequency components in the music signal. It therefore provides excellent recording quality even when recording signals from digital sources, which contain a large amount of high-frequency components, are recorded. To guarantee optimal results, the Dolby HX PRO system is activated automatically when recording begins, regardless of the setting of the Dolby NR System switch. Furthermore, since this system controls the quality of the recording itself, the clarity of the sound will be maintained even when the tapes are played back on another tape deck which does not contain the HX PRO Headroom Extension System.
TROUBLESHOOTING
Incorrect operations are sometimes mistaken for malfunctions. If you think that there is something wrong with this deck, check the table below to see if you can correct the problem yourself. Sometimes, the trouble may be caused by another piece of equipment, or by faulty connections. If the trouble cannot be rectified even after all of the checks below have been performed, contact your nearest PIONEER authorized dealer, or the place of purchase.
| SYMPTOM | CAUSE | REMEDY |
| POWER | ||
| The power does not go on. | ● The power cord is unplugged.● The component (amplifier, timer, etc.) to which the cord is attached is off. | ● Insert the power cord correctly.● Turn the stereo amplifier or audio timer on. |
| CASSETTE DOOR | ||
| The door does not open. | ● The deck is not in stop mode.● Power was turned off with the tape moving. | ● Press the stop (■) button.● Turn power on. |
| The door does not close. | ● The cassette is not properly loaded. | ● Reinsert the cassette. |
| PLAYBACK | ||
| The tape stops immediately. | ● The tape is completely wound.● The tape is slack. | ● Playback in opposite direction.● Rewind the tape.● Take up slack (see page 4). |
| The level meter does not work. | ● The tape is not recorded.● The tape heads are dirty. | ● Replace the tape with a recorded one.● Clean the heads (see page 3). |
| There is no sound. | ● The amplifier input selector is not set properly.● The amplifier volume is too low.● There are connection problems (wrong connection, poor contact, broken wire.) | ● Set the input selector to select the deck.● Turn up the volume.● Check all connections (see page 5). |
| RECORDING | ||
| The recording indicator does not light. | ● The erasure prevention tabs are broken off. | ● Replace the cassette with one whose tabs are intact, or cover the hole with a piece of tape (see page 4). |
| The level meter does not work. | ● The REC LEVEL control is set too low.● The amplifier is not delivering a signal to the deck.● There are connection problems (wrong connection, poor contact, broken wire). | ● Turn the REC LEVEL up (see page 10).● Set the amplifier to select the recorded signal.● Check all connections (see page 5). |
| The tape stops immediately. | ● The tape is completely wound.● The tape is slack. | ● Recording in opposite direction.● Rewind the tape.● Take up slack (see page 4). |
| The tape cannot be recorded. | ● The tape heads are dirty. | ● Clean the heads (see page 3). |
| POOR SOUND QUALITY | ||
| The sound is unstable or interrupted. | ● The heads, pinch rollers and capstans are dirty.● The tape is not uniformly wound. | ● Clean the heads, etc. (see page 3).● Fast forward or rewind the tape completely. |
| There are no high frequencies. | ● A tape recorded without Dolby NR is being played back with the DOLBY NR switch set to B or C position.● The heads are dirty. | ● Set the DOLBY NR switch to OFF.● Clean the heads (see page 3). |
| High frequencies are emphasized. | ● A Dolby NR tape is being played back with the DOLBY NR switch set to OFF. | ● Set the DOLBY NR switch to the same positions used for recording. |
| The sound from previous recordings remains when the tape is re-recorded. | ● The heads are dirty. | ● Clean the heads (see page 3). |
| The sound is distorted. | ● The recording level is too high.● The recorded signal itself is distorted.● The heads are dirty. | ● Turn the REC LEVEL control down (see page 10).● Replace the cassette tape.● Clean the heads (see page 3). |
| There is too much noise. | A noisy tape is being used.There is a faulty connection.Recording level is too low.The heads are dirty.The heads are magnetized. | Replace the cassette tape.Check all connections (see page 5).Turn the REC LEVEL control up (see page 10).Clean the heads (see page 3).Demagnetize the head with a demagnetizer (see page 3). |
| OTHER | ||
| The music search function does not operate properly. | Blanks between selections are less than 4 seconds long. | Use a tape with blanks between selection of at least 4 seconds. |
| Recording or playback starts suddenly when the power is turned on. | TIMER switch is set to PLAY or REC. | Set TIMER switch to OFF. |
| System remote control does not operate. | Control cord is not connected. | Connect control cord properly (see page 5). |
| CD·DECK SYNCHRO recording cannot be carried out. | CD·DECK SYNCHRO control cord and Input/Output cords are not connected.The cassette tape accidental erasure prevention tabs are broken. | Connect correctly (see page 5).Replace the cassette with one whose tabs are intact (see page 4). |
| The CD SYNCHRO indicator is off during CD·DECK SYNCHRO recording. | The tape ran out during the CD·DECK SYNCHRO mode.After the deck entered recording standby mode, more than 1 minute elapsed before the CD player resumed playback. | Replace the tape with a longer one.Change the disc and press the CD SYNCHRO button again. |
SPECIFICATIONS
System....4-track, 2-channel stereo
Heads...."Hard permalloy" recording/playback head × 1
"Hard permalloy" playback head × 1
"Ferrite" erasing head × 1
Motors DC servo motor × 2
Wow and Flutter. No more than 0.10% (WRMS, JIS)
Fast Winding Time ....Approx. 120 seconds (C-60 tape)
Frequency Response (at -20 dB recording level)
Metal Tape 30 to 16,500 Hz
Chrome Tape.... 30 to 16,000 Hz
Normal Tape. 30 to 16,000 Hz
Signal-to-Noise Ratio
Dolby NR off.... More than 56 dB
Noise Reduction Effect
Dolby B-type NR ON. More than 10 dB (at 5 kHz)
Dolby C-type NR ON More than 19 dB (at 5 kHz)
Harmonic Distortion No more than 0.8% (at 0 dB)
Input (Sensitivity)
LINE (INPUT).... 63 mV (Input impedance 56 kΩ)
Output (Reference level)
LINE (OUTPUT) 316 mV (Output impedance 4.5 kΩ)
Headphones
(CT-W450R only).... 0.25 mW (Output impedance 8 Ω)
Miscellaneous
Power requirements AC 120V, 60 Hz
Power consumption 16W
Dimensions 420 (W) ×120 (H) ×265 (D) mm
16-9/16 (W) ×4-3/4 (H) ×10-7/16 (D) in.
Weight 3.9 kg (8 lbs. 10 oz.)
Accessories
Operating instructions 1
Connection cord with pin plugs 2
Remote control cord 1
CD-DECK SYNCHRO control cord....1
Features
● DOLBY HX PRO recording function
• DOLBY B/C types NR
● Music search over ±15 selections
- Synchronized copy start
● High-speed and normal-speed copy (Deck I → Deck II)
- Relay playback/blank skip
- 6-segment LED level meter
● 3-digit mechanical tape counter (for Deck II)
● Automatic recording mute
• Automatic tape selectors
• System remote control available
- Timer recording
- Timer playback (Automatic relay on)
- CD·DECK SYNCHRO function
● Headphones jack (CT-W450R only)
● Automatic reverse (except Deck I of the CT-W355R)
NOTE
Specifications and design subject to possible modifications without notice due to improvements.
Published by Pioneer Electronic Corporation. Copyright © 1991 Pioneer Electronic Corporation. All rights reserved.
PIONEER ELECTRONIC CORPORATION
4-1, Meguro 1-Chome, Meguro-ku, Tokyo 153, Japan
PIONEER ELECTRONICS [USA] INC.
2265 East 220th Street, Long Beach, California 90810, U.S.A.
P.O.:BOX 1720, Long Beach, California 90801, U.S.A
PIONEER ELECTRONICS OF CANADA, INC.
505 Cochrane Drive, Markham, Ontario L3R 8E3, Canada
PIONEER ELECTRONIC [EUROPE] N.V.
Keetberglaan 1, 2740 Beveren, Belgium, TEL: 03/750.05.11
PIONEER ELECTRONICS AUSTRALIA PTY. LTD.
178-184 Boundary Road, Braeside, Victoria 3195, Australia, TEL: [03] 580-9911
- Operating Instructions
- STEREO DOUBLE CASSETTE DECK
- CT-W45OR CT-W355R
- WARNING: TO PREVENT FIRE OR SHOCK HAZARD, DO NOT EXPOSE THIS APPLIANCE TO RAIN OR MOISTURE.
- IMPORTANT NOTICE
- [For Canadian model]
- IMPORTANT
- CAUTION
- RISK OF ELECTRIC SHOCK DO NOT OPEN
- SAFETY INSTRUCTIONS
- INFORMATION TO USER [FOR U.S. MODEL]
- CONTENTS
- INSTALLATION
- When installing the deck, avoid locations with high temperatures or humidity, and make sure that the deck receives adequate ventilation.
- CONDENSATION (DEW)
- POWER-CORD CAUTION
- MAINTENANCE
- CLEANING THE HEADS, PINCH ROLLERS AND CAPSTANS
- NOTE:
- DEMAGNETIZING THE HEADS
- CLEANING THE FRONT PANEL
- HANDLING CASSETTE TAPES
- A
- B
- C
- D
- E
- CHECK CASSETTE BEFORE USE
- Is the tape loose, or is some of the tape outside the cassette?
- Are the accidental erasure prevention tabs intact?
- NOTES:
- AUTOMATIC TAPE SELECTOR FUNCTION
- TIPS ON CASSETTE TAPES
- CONNECTIONS
- PIONEER SYSTEM REMOTE CONTROL
- CONTROL IN jack
- CONTROL OUT jack
- CD·DECK SYNCHRO RECORDING
- Connection
- FRONT PANEL FACILITIES
- ② Deck I operation buttons
- ③ Headphones (PHONES) jack (CT-W450R only)
- ④ Recording level control (REC LEVEL)
- ⑤ Deck II operation buttons
- ⑥ Reverse mode switch (REV MODE)
- ⑦ Deck I eject button (EJECT)
- ⑧ Dolby\* NR switch (B/OFF/C)
- ⑨ Timer mode — Relay/Skip play switch (TIMER REC/OFF/PLAY — RELAY/SKIP)
- ⑩ Function display
- ⑪ Synchro copy buttons (SYNCHRO COPY I ▷ II)
- ⑫ CD·DECK SYNCHRO recording button (CD SYNCHRO)
- ⑬ Deck II tape counter (DECK II COUNTER)
- ⑭ Deck II eject button (EJECT)
- ⑮ Tape counter reset button (RESET)
- Function display
- ②1 Deck I tape transport mode indicators
- ②2 Dolby NR indicators (B/C)
- ②3 Synchro copy indicator (COPY)
- ⑳ Level meter
- ⑲ Deck II tape transport mode indicators
- ②6 CD·DECK SYNCHRO recording indicator (CD·DECK SYNCHRO)
- TAPE TRANSPORT MODE INDICATORS
- REVERSE MODE SWITCH (REV MODE)
- One way mode = position
- Two way mode position
- Repeat mode position
- OPERATION OF DECK I WITH A REMOTE CONTROL UNIT NOT DESIGNED FOR DOUBLE DECKS (System Remote Control)
- Selecting Deck I
- Switching to Deck II
- PLAYBACK
- SINGLE PLAYBACK (Either Deck I or Deck II)
- To stop playback temporarily (Deck II only)
- To stop playback
- BLANK SKIP
- RELAY PLAYBACK
- Press the pause ( ■ ) button.
- SWITCH SETTINGS FOR REVERSE PLAYBACK
- For CT-W355R:
- MUSIC SEARCH
- During Forward Playback
- During Reverse Playback
- From the Stop Mode
- How Selections are Counted
- RECORDING
- (Deck II only)
- To Stop Recording Temporarily
- To Stop Recording
- Erasure Prevention Tabs
- RECORDING MUTE
- Erasing a Tape
- For CT-W355R only
- To Stop Copying
- RECORDING AND PLAYBACK USING AN AUDIO TIMER
- UNATTENDED RECORDING (Deck II only)
- Load a tape for recording in Deck II.
- Set the DOLBY NR switch.
- Set the REV MODE switch.
- Press the recording (●) button.
- Prepare the audio source.
- Adjust the recording level.
- Set the audio timer.
- Set the TIMER switch to the REC position.
- WAKE-UP PLAYBACK (Deck I or Deck II)
- Load the tape(s) for playback.
- Set the stereo amplifier for tape playback.
- Rewind the tape to the position where playback is to start.
- Set the audio timer.
- Set the TIMER switch to the PLAY position.
- When the compact disc finishes playing:
- When the CD player changes discs (twin tray or multi-play disc CD players):
- If the end of the tape is reached while the CD player is still playing:
- If the auto-reverse function operates while the CD is still playing:
- ■ Dolby NR Systems
- ■ Dolby HX PRO Headroom Extension System
- TROUBLESHOOTING
- SPECIFICATIONS
- Miscellaneous
- Accessories
- Features
- NOTE
Brand : PIONEER
Model : CT-W450R
Category : Cassette player