
CT-S55OS - Cassette player PIONEER - Free user manual and instructions
Find the device manual for free CT-S55OS PIONEER in PDF.

| Product Type | Cassette deck (4-track, 2-channel stereo) |
| Brand | Pioneer |
| Model | CT-S55OS |
| Recording/Playback Head | Combined hard permalloy recording/hard permalloy playback head x1 |
| Erasing Head | Ferrite head x1 |
| Motor | DC servo capstan motor x1, DC reel motor x1, DC assist motor x1 |
| Wow and Flutter | ≤0.05% (WRMS, JIS); ≤±0.14% (DIN) |
| Fast Winding Time (C-60 tape) | Approx. 90 seconds |
| Frequency Response (Type IV) | 20 – 25,000 Hz (±6 dB) |
| Frequency Response (Type II) | 20 – 19,000 Hz (±6 dB) |
| Frequency Response (Type I) | 20 – 19,000 Hz (±6 dB) |
| Signal-to-Noise Ratio (Dolby NR OFF) | >59 dB |
| Harmonic Distortion | ≤0.6% (at -4 dB, 160 nWb/m) |
| Input Sensitivity (LINE) | 100 mV (23 kΩ) |
| Output Level (LINE) | 0.5 V (1.9 kΩ) |
| Power Requirements (UK) | AC 230–240 V, 50/60 Hz |
| Power Consumption | 22 W (CT-S550S) |
| Dimensions (W x H x D) | 420 x 125 x 280 mm |
| Weight (European model) | 4.1 kg |
| Noise Reduction Systems | Dolby B, C, S (effects at 5 kHz: B >10 dB, C >19 dB, S >22 dB) |
| Automatic Tape Selector | Yes (Type I, II, IV) |
| Music Search | ±15 selections |
| Super Auto BLE XD Tuning | Automatic bias, level, equalization adjustment with extended dynamic range |
| FLEX (1/f) System | Automatic high frequency compensation during playback |
| Timer Recording/Playback | Yes (with compatible audio timer) |
| CD-DECK SYNCHRO Recording | Yes (with Pioneer CD players equipped with SYNCHRO jack) |
| Remote Control | Pioneer SR system remote (optional) |
| Maintenance: Head Cleaning | Use cleaning swab and fluid; do not load tape until dry |
| Maintenance: Demagnetizing | Use head demagnetizer; power on, amplifier volume minimum |
| Safety | Do not expose to rain/moisture; no user-serviceable parts inside |
Frequently Asked Questions - CT-S55OS PIONEER
User questions about CT-S55OS PIONEER
0 question about this device. Answer the ones you know or ask your own.
Ask a new question about this device
Download the instructions for your Cassette player in PDF format for free! Find your manual CT-S55OS - PIONEER and take your electronic device back in hand. On this page are published all the documents necessary for the use of your device. CT-S55OS by PIONEER.
USER MANUAL CT-S55OS PIONEER
WARNING: TO PREVENT FIRE OR SHOCK HAZARD, DO NOT EXPOSE THIS APPLIANCE TO RAIN OR MOISTURE.
English
Deutsch
The lightning flash with arrowhead, within an equilateral triangle, is intended to alert the user to the presence of uninsulated "dangerous voltage" within the product's enclosure that may be of sufficient magnitude to constitute a risk of electric shock to persons.
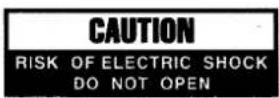
CAUTION:
TO PREVENT THE RISK OF ELECTRIC SHOCK, DO NOT REMOVE COVER (OR BACK). NO USER-SERVICEABLE PARTS INSIDE. REFER SERVICING TO QUALIFIED SERVICE PERSONNEL.

The exclamation point within an equilateral triangle is intended to alert the user to the presence of important operating and maintenance (servicing) instructions in the literature accompanying the appliance.
IMPORTANT 2
FOR USE IN THE UNITED KINGDOM
The wires in this mains lead are coloured in accordance with the following code:
blue neutral brown live
If the plug provided is unsuitable for your socket outlets, the plug must be cut off and a suitable plug fitted.
The cut-off plug should be disposed of and must not be inserted into any 13 amp socket as this can result in electric shock. The plug or adaptor or the distribution panel should be provided with 5 amp fuse. As the colours of the wires in the mains lead of this appliance may not correspond with colourd markings identifying the terminals in your plug, proceed as follows:
The wire which is coloured blue must be connected to the terminal which is marked with the letter N or coloured black.
The wire which is coloured brown must be connected to the terminal which is marked with the letter L or coloured red.
Do not connect either wire to the earth terminal of a three pin plug.
NOTE
After replacing or changing a fuse, the fuse cover in the plug must be replaced with a fuse cover which corresponds to the colour of the insert in the base of the plug or the word that is embossed on the base of the plug, and the appliance must not be used without a fuse cover. If lost, replacement fuse covers can be obtained from your dealer.
Only 5 A fuses approved by B.S.I. or A.S.T.A. to B.S. 1362 should be used.
This product complies with the Low Voltage Directive (73/23/EEC), EMC Directives (89/336/EEC, 92/31/EEC) and CE Marking Directive (93/68/EEC).
THE POWER SWITCH IS SECONDARY CONNECTED AND THEREFORE DOES NOT SEPARATE THE UNIT FROM MAINS IN POWER STANDBY POSITION.
Thank you for buying this Pioneer product.
Please read through these operating instructions so you will know how to operate your unit properly. After you have finished reading the instructions, keep the manual in a safe place for future reference.
In some countries or regions, the shape of the power plug and power outlet may sometimes differ from that shown in the explanatory drawings. However, the method of connecting and operating the unit is the same.
CONDENSATION
When the deck is moved from a cold location to a warm location, or when the temperature of the room changes suddenly, condensation may form on the mechanical parts. This can adversely affect the performance of the deck. If this occurs, wait for about one hour to allow the deck to adjust to the room temperature. To prevent condensation when heating a room, raise the temperature slowly.
CONTENTS
MAINTENANCE 3
HANDLING CASSETTE TAPES 4
INSTALLATION 5
CONNECTIONS 6
FRONT PANEL FACILITIES 9
FUNCTION DISPLAY 13
COUNTER MODES 14
PLAYBACK 16
REPEAT PLAYBACK 16
TAPE RETURN/RETURN PLAY 17
MUSIC SEARCH....17
RECORDING 19
RECORDING MUTE 20
SUPER AUTO BLE XD TUNING (BLE XD) 21
RECORDING AND PLAYBACK USING AN AUDIO TIMER ..... 23
CD-DECK SYNCHRO RECORDING 24
TROUBLESHOOTING 26
SPECIFICATIONS 30
The heads, pinch rollers and capstans are likely to get dirty quite easily. If these parts, particularly the heads, get dirty, the high frequency components of a recording will not be reproduced and the stereo balance will be impaired, resulting in a deterioration of the playback sound. It is therefore recommended that the head section be cleaned regularly.
- Press the ▲ (OPEN/CLOSE) button to open the cassette door.
- Dip a cleaning swab in cleaning fluid and use it to wipe the heads, capstans and pinch rollers.
NOTE:
After cleaning the head section, do not load a tape until the cleaning fluid has dried completely (about two or three minutes).
DEMAGNETIZING THE HEADS
After using the cassette deck for a period of time, the heads will become magnetized. The same effect will occur if a magnetized screwdriver, magnet or other magnetized object is brought too close to the heads. When the heads become magnetized, high-frequency sounds will be lost during recording or playback, and interference noise may also occur. The heads should be regularly demagnetized with a head demagnetizer, which can be purchased at most audio stores.
When demagnetizing the heads, make sure that the POWER switch of the cassette deck is set to ON. However, be sure to turn down the amplifier's volume control to its lowest position, and disconnect any headphones from their headphones jack. For detailed instructions, refer to the operating instructions of the head demagnetizer.
CLEANING THE FRONT PANEL
Clean the deck regularly with a soft cloth. If the front panel becomes soiled, moisten a soft cloth with a weak solution of neutral detergent (diluted in five to six parts of water), wring the cloth well, and wipe the panel clean. Never use volatile cleaners like thinners, benzine or alcohol because they will damage the panel finish.
HANDLING CASSETTE TAPES
Do not use tapes longer then 90 minutes in length
Because over the C-90 tapes are very thin, they can easily jam in the pinch rollers and capstan, and they often are subject to other problems such as irregular winding.
CHECK CASSETTE BEFORE USE
Check the following items before loading a cassette tape:
Is the tape loose, or is some of the tape outside the cassette?
If some of the tape is loose or projecting outside the cassette shell, the tape may not load properly between the capstan and pinch roller. This will prevent the tape from operating properly, and may even damage the tape itself. To prevent this insert a pencil into the reel hole and take up the slack (Fig. A).
Some cassette tapes come with a plastic or thick paper stopper to prevent the tape from becoming slack. Remove this stopper when loading the cassette and replace it after using the cassette.
Are the accidental erasure prevention tabs intact?
These tabs allow you to prevent important recordings from being erased accidentally. When the tab on the cassette shell is broken off (Fig. B), it is not possible to activate the recording function, so valuable recordings will not be erased by mistake. To re-record on a cassette whose tab has been broken off, simply stick a piece of doubled adhesive tape over the hole (Fig. C). When using TYPE IV (Metal) or TYPE II (High/CrO₂) tapes, be careful not to block the sensor holes with the tape (Fig. D, Fig. E). If the holes are blocked, the automatic tape selector mechanism will not operate correctly.
NOTES:
- The accidental erasure prevention tab for each side is the one located on the top left when the side that you want to protect is facing you.
- When breaking off the tab, do not use a magnetized screw-driver.
4
En/Ge
HANDLING CASSETTE TAPES
AUTOMATIC TAPE SELECTOR FUNCTION
This cassette deck is equipped with an automatic tape selector function which utilizes the sensor holes on the tape cassette to determine the type of tape being used. The deck is then set to match the tape recording bias and equalization.
NOTES:
- When using TYPE IV (Metal) tapes, make sure that the tapes have sensor holes.
- Make sure that the sensor holes on the cassette are not blocked; otherwise the tape selector mechanism will not function properly.
- Do not use TYPE III (FeCr) tapes.
TIPS ON CASSETTE TAPES
- Leader tape (which cannot be recorded on) is provided at the beginning of a cassette tape. Let the tape run for about 5 seconds before starting to record, to allow the leader tape to clear the recording head.
- Do not leave a cassette tape exposed to the environment. Store the cassette in its case after use so that dust and dirt do not adhere to the tape, and so the tape will not get slack. Store tapes in a location free from magnetism, dust, dirt, oil, heat and humidity.
- If cassette tapes are irregularly wound, the tape may get jammed in the rollers. This can cause damage to both the tape and the deck. If you are not certain whether the tape is wound evenly, fast forward or rewind the tape from beginning to end, to make sure that the tape is properly wound.
INSTALLATION
When installing the deck, avoid locations with high temperatures or humidity, and make sure that the deck receives adequate ventilation.
■ Do not install the deck in locations subject to direct sunlight, or near a space heater or other heating device, as this may cause damage to the finish or internal parts.
■ Malfunctions may also result if the deck is installed in an excessively humid or dusty location. Avoid installing the deck next to kitchen counters or other locations subject to oily smoke or humidity.
If the deck is placed directly on top of an amplifier, it may pick up humming or other noise. Also, if the amplifier generates a large amount of heat, the deck may malfunction.
If the deck is located near a television set, it may pick up interference noise, which will be recorded as a whistling sound on the tape. If this happens, move the deck further away from the television set or turn the television set off when operating the deck.
Do not place a cloth over the deck, or block the ventilation slots in any way. The ventilation slots on this deck are necessary to keep internal parts cool. If they are blocked, the deck may malfunction.
① Recording connection cord
② TAPE REC/PLAY jacks
③ Playback connection cord
④ CD·DECK SYNCHRO control cord
⑤ Remote control cord
⑥ Power cord
⑦ Stereo Amplifier
⑧ CONTROL OUT jack
⑨ Compact Disc Player
⑩ CD · DECK SYNCHRO jack
ANSCHLÜSSE
- Read through the operating instructions of the stereo components which you intend to connect to this unit.
■ Turn the power on only after making all of the connections.
■ Make sure that all of the connection plugs are inserted securely, as improper connections may generate noise.
Connect the TAPE jacks of your amplifier to the LINE jacks of the cassette deck. Be sure to connect the REC (INPUT) jacks of the deck to the recording (output) jacks of the amplifier, and the PLAY (OUTPUT) jacks of the deck to the play (INPUT) jacks of the amplifier.
- Connect the plugs properly: Left channel — White plug Right channel — Red plug
- CD · DECK SYNCHRO recording can be carried out when this unit is connected to a Pioneer CD player equipped with a CD · DECK SYNCHRO jack.
Connection
Connect the CD · DECK SYNCHRO jack of this unit to the CD · DECK SYNCHRO jack of the CD player using the supplied CD · DECK SYNCHRO control cord.
NOTES:
- Keep the input and output jacks connected between the amplifier and the unit, otherwise, CD·DECK SYNCHRO recording cannot be carried out.
- Even when the CD player is connected to the amplifier with an optical fiber cable, connect the CD player to the amplifier or this unit with the input and output cords with pin plugs.
PIONEER SYSTEM REMOTE CONTROL (⑤, ⑧)
CONTROL IN jack
Use the enclosed Remote Control Cord to connect this jack to the CONTROL OUT jack of another component which bears the SR mark (indicating that it is equipped with a PIONEER System Remote Control). You will then be able to operate this unit using the Pioneer system remote control unit.
CONTROL OUT jack
The intermediary jack outputs signals from the CONTROL IN jack of this unit to the input jack of another unit. Connect this jack to the CONTROL IN jack of another component compatible with Pioneer System Remote Control.
NOTES:
- Be sure to connect both of the control cord's plugs securely to the CONTROL IN and CONTROL OUT jacks. Do not connect only one end of the cord.
- When connecting to the amplifier bearing the SR mark with the System Remote Control cord ⑤, the recording connection cord ① or playback connection cord ③ must be connected to the unit. If connections are incomplete, the System Remote Control cannot function.
- When connecting to a CD player bearing the SR mark with the System Remote Control cord, the CD player's audio outputs must be connected to the amplifier with a connection cord.
CD-SYNCHRONAUFNAHME (④, ⑩)
Insert the power cord of the cassette deck into the accessory AC outlet of your amplifier, or into a normal household outlet.
- When performing unattended recording or wake-up playback, consult the operating instructions of your audio timer for details on power cord connections.
POWER-CORD CAUTION
Handle the power cord by the plug. Do not pull out the plug by tugging the cord and never touch the power cord when your hands are wet as this could cause a short circuit or electric shock. Do not place the unit, a piece of furniture, etc., on the power cord, or pinch the cord. Never make a knot in the cord or tie it with other cords. The power cords should be routed in such a way that they are not likely to be stepped on. A damaged power cord can cause a fire or give you an electrical shock. Check the power cord regularly. When you find it damaged, ask your nearest PIONEER authorized service center or your dealer for a replacement.
LAST MEMORY FEATURE
This unit uses non-erasable non-volatile semiconductor memory to provide semi-permanent (about 10 years) storage of the most recent BLE XD data in addition to the on/off positions of other switches and buttons.
As a result, the most recent settings are stored in the memory even when the power cord is disconnected.
- BLE XD data
• FLEX (1/f) System mode (On or off)
● Meter range (WIDE or EXPAND)
• Dolby NR system (Off, B, C or S)
• STANDBY ON/OFF
• MPX filter mode (On or Off) - Tape counter number data
- Display mode (On or off)
The following data is erased when the power cord is disconnected from the power supply.
- Counter mode
• Time counter data
- Remaining time data
To clear all of the memorized data and set the unit to its original data settings
With the power turned on, press the MUTE button and the COUNTER MODE button simultaneously.
ANSCHLÜSSE
ANSCHLUSS DES NETZKABELS (⑥)
The POWER switch activates the secondary transformer only. Even when the switch is in the STANDBY position, there will be a power flow to the deck's circuits as long as the power cord is connected to a power outlet.
② Display off button (DISP OFF)
Press to select the function display on or off.
③ Level meter range selector button (METER RANGE)
Press to select wide or expanded range on the level meter.
④ Tape counter mode button (COUNTER MODE)
⑤ Counter reset button (COUNTER RESET)
The tape capacity can be selected with this button while the REMAIN counter is displayed.
⑥ Function display
⑦ MPX FILTER button
⑧ Dolby* NR button (DOLBY NR OFF/B/C/S)
*
- Dolby noise reduction and HX Pro headroom extension manufactured under license from Dolby Laboratories Licensing Corporation. HX Pro originated by Bang & Olufsen.
- "DOLBY", the double-D symbol and "HX PRO" are trademarks of Dolby Laboratories Licensing Corporation.
⑨ Return button (RETURN)
This button is used to fast forward or rewind the tape to a point near the counter reading "0000".
⑩ Monitor selector button (MONITOR)
Used to monitor the source sound or the actual recorded sound during recording. (CT-S550S)
When the monitor function is used during a recording being made with Dolby S-type noise reduction, the recorded signals from the tape are played back via a Dolby B-type NR. This allows the economical use of a single S-type circuit by taking advantage of the audible compatibility of Dolby S-type circuit by normal non-simultaneous playback, the S-type decoder is used to decode the tape with full accuracy.
- When the unit is set to record or playback mode, the TAPE indicator lights up and the monitor mode is automatically selected.
⑪ Operation buttons
◀: Rewind/music search
■ : Stop
▶ : When pressed during stop, begins playback.
▶▶ : Fast forward/music search
● : Recording
: When pressed during playback or recording, pauses playback or recording. When pressed during pause, resumes play or starts recording.
○ : Recording mute
- If the tape is moving (recording, playback, tape winding, etc.), press the stop (■) button before pressing this button.
⑭ BLE XD button
⑮ Headphones jack (PHONES)
⑯ CD · DECK SYNCHRO recording button (CD SYNCHRO)
⑰ Recording balance control (REC BALANCE)
⑱ FLEX button
⑲ Recording level control (REC LEVEL)
REPEAT PLAYBACK
When the TIMER mode switch is set to the PLAY-REPEAT position for playback, the forward side of the tape is played back repeatedly until the stop (■) button is pressed, or until sixteen side of the tape have been played back. When the tape reaches its end, it is rewound and starts automatically from the beginning.
- If any operation button is pressed, repeat playback is reset.
SUPER AUTO BLE XD
SUPER AUTO BLE
With commercially available cassette tapes, sensitivity and frequency characteristics might differ slightly from one another, even though the same sound adjustment is set for them.
To utilize tape characteristics to the maximum possible and realize an ideal recording which reproduces the source exactly, optimum recording level (sensitivity) and equalizer values must be set accordingly for each tape. In many conventional tape decks, standard values are fixed for standard tapes, thus nullifying the subtle differences between individual tapes. Perfect tuning by ear through use of fine adjustment controllers for bias and sensitivity is difficult and requires a lot of effort. It is especially difficult with a 2-head deck where the recording sound cannot be monitored. The AUTO BLE on this unit automatically adjusts bias, level and equalizer by using a microprocessor to set the optimum recording characteristics accordingly for each tape.
BEDIENELEMENTE AN DER FRONTPLATTE
This function enables recording with expanded dynamic range in the high range by combining our unique bias control technology with conventional AUTO BLE.
After adjusting the above bias, level, and equalization (BLE), this system checks the tape's recording capability by using relatively high level high-range test signals. During recording SUPER AUTO BLE XD controls the bias to maximize the tape's recording capability.
This makes possible a more faithful recording of sources having a wide dynamic range in the high range.
- Since this system controls the quality of recording itself, the clarity of the sound will be maintained even when the tapes are played back on another cassette deck.
- You can switch between AUTO BLE and AUTO BLE XD. Refer to page 21 for the switching procedure.
FLEX (1/f) SYSTEM
● FLEX System: Frequency Level Expander System
- This system automatically compensates high and low frequency level balance above 1 kHz according to the 1/f curve during playback. Generally, the envelope line of sound energy distribution of Hi-Fi sounds corresponds statistically with the 1/f curve.
The 1/f curve indicates that if the frequency doubles, the level decreases by approx. half of the original frequency level.
- During playback, the FLEX system automatically compensates tapes with poor sound quality at high frequency levels of 1 kHz and over, based on the appropriate audio characteristics. The FLEX system is designed to improve high frequency reproduction in the 10 kHz range be up to 12 dB, particularly on tapes with poor sound clarity and sound presence at high frequency levels. If the playback tape sound matches the 1/f curve, the FLEX system defeats compensation adjustment automatically.
- When you press the FLEX button to turn the FLEX system on and start playback the FLEX indicator flashes and compensation adjustment begins.
Compensation adjustment takes approximately 3 seconds to complete, depending on the music source. The indicator changes from a flashing to a steadily lit condition.
- When the FLEX system is engaged, each music selection is automatically adjusted during playback. System operation status is indicated by the FLEX indicator tlashing or steadily it.
- Even when the FLEX system is turned on, the FLEX indicator is nullified automatically during all recording functions including AUTO BLE tuning and CD · DECK synchro recording.
NOTE:
When a tape has been recorded at a high frequency level above the compensation level, FLEX system operation is automatically defeated during playback.
BEDIENELEMENTE AN DER FRONTPLATTE
SUPER AUTO BLE XD (XD: eXtended Dynamic range)
Dolby NR systems are designed to reduce the amount of tape hiss, mainly in the treble components. During recording, the high-pitched pianissimo sounds which are most characteristic of audible noise are boosted, and during playback, only these boosted sections are attenuated, so that tape sound is returned to normal. As a result, the noise is attenuated by an amount equal to the boosting in the treble range. The Dolby B-type NR system reduces noise in the treble range, cutting tape hiss and expanding the dynamic range. The Dolby C-type NR system is even more effective in reducing noise, as it cuts the noise from the mid-range on.
■ Dolby S-type NR System
The Dolby S-type noise reduction system is effective at reducing noise not only in the treble and mid-range frequencies, but in the bass frequencies as well. In addition, maximum noise-reducing effect is demonstrated not only in non-recorded parts of the tape but in the recorded signal portions as well. The broad reduction of noise modulation (ridging noise), freedom from dynamic side-effects in the audible spectrum (signal modulation) and reduction of decoding errors results in vastly improved sound quality.
NOTE:
When a tape has been recorded using the Dolby B-type, C-type or S-type NR system, the same Dolby NR system selected for recording must be selected for playback.
■ Dolby HX PRO Headroom Extension System
The Dolby HX PRO system controls the bias current during recording and always keeps it at an optimal level according to the level of the high frequency components of the music signal. It therefore provides excellent recording quality even when recording signals from digital sources which contain a large amount of high-frequency components. To guarantee optimal recording results, the HX PRO system is activated automatically when recording begins. The Dolby HX PRO system operates regardless of the setting of the Dolby NR System. Furthermore, since this system affects the recording quality itself, the clarity and high quality of the sound will be maintained even when the tapes are played back on another tape deck which does not contain the HX PRO Headroom Extension System.
MPX FILTER BUTTON
Press the MPX FILTER button, located on the front panel, to ON when recording an FM stereo broadcast using the Dolby NR system. Press it to OFF at other times.
Explanation of the MPX FILTER
The FM stereo signals contain the 19-kHz pilot and 38-kHz subcarrier signals. Depending on tuners, these may cause a malfunction of the Dolby noise reduction circuit, disabling the reproduction of high-frequency sound. Press this button to ON to prevent a malfunction.
Press the button to OFF when recording non-FM stereo broadcasting. The button does not affect playback and recording with Dolby NR off. That is, if the MPX FILTER button is pressed to ON, the signal bypasses the MPX filter while recording with Dolby NR off.
BEDIENELEMENTE AN DER FRONTPLATTE
① BLE XD indicator
See page 22.
② Tape type indicators (TYPE I/II/IV)
Indicate the tape type in accordance with the loaded cassette.
③ FLEX indicator
This indicator lights when the FLEX button is pressed.
④ Counter indicator
Normally the tape, time or remaining time counter is displayed (see "COUNTER MODES").
WAIT: Flashes for four seconds when the power is connected to the power supply. The unit will not operate during this time.
OPEN: Will be displayed when the cassette door is open.
STRT/BIAS/LEVL/H-EQ/M-EQ/TUNE/Err:
Will be displayed during the SUPER AUTO BLE XD tuning.
P+XX/P-XX:
Will be displayed during music search.
A plus sign (+) appears in the second digit during forward direction search.
A minus sign (−) appears in the second digit during reverse direction search.
The last two digits show the number of selections to be skipped.
C60/C46L/C90/C80L:
Will be displayed when the COUNTER RESET button is pressed in the tape remaining time mode (see page 15).
⑤ TIME counter indicator
Lights up in the time counter mode.
⑥ REMAIN counter indicator
Lights up in the remaining time counter mode.
⑦ RETURN indicator
Lights when the tape is returning to counter reading "0000" by pressing the RETURN button.
⑧ Monitor source indicators
TAPE: Recorded sound
The sound differs in the CT-S550S as the Dolby S-type NR used during recording is played back in Dolby B-type NR.
SOURCE: Original source sound
⑨ CD SYNC indicator
Lights when synchro recording from a CD player is being carried out.
⑩ Display off indicator (DISP OFF)
Lights when the display off function is selected.
⑪MPX indicator
This indicator lights when the MPX filter button is set to ON (only when DOLBY NR is also set to ON).
BEDIENELEMENTE AN DER FRONTPLATTE
DISPLAY
when recording starts, the B and S indicators as well as the counter indicator ④ appear as follows.
Start recording
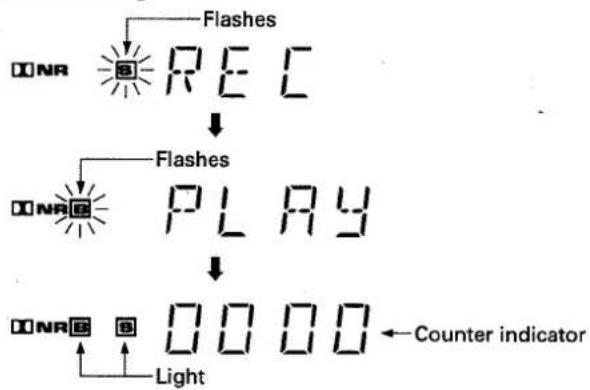
flowchart
graph TD
    A["ONR"] --> B["RE C"]
    B --> C["↓"]
    C --> D["ONR E"]
    D --> E["PLAY"]
    E --> F["↓"]
    F --> G["ONR E"]
    G --> H["Light"]
    H --> I["Counter indicator"]
⑬ Level meter with peak hold function
The ● between the -2 and 0 marks indicates the Dolby NR system's reference level.
Meter range:
Wide mode: -20 dB to +6 dB
Expand mode: -5 dB to +6 dB
⑭ PLAY indicator
Lights during playback.
⑮ REC indicator
Lights during recording.
⑯ Pause indicator (II)
COUNTER MODES
The counter can be set to one of the three following modes: normal tape counter, time counter for displaying the elapsed recording or playback time, or remaining time counter for displaying the remaining tape time.
COUNTER MODE button
By pressing this button repeatedly, the following three modes are called in succession:
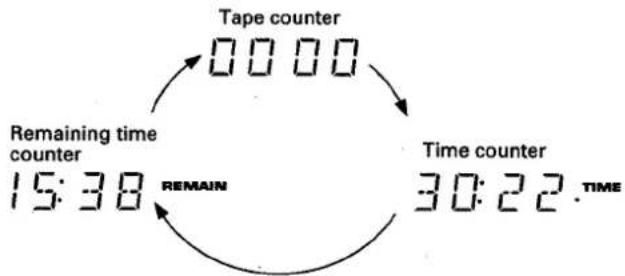
flowchart
graph TD
    A["Tape counter"] --> B["Time counter"]
    B --> C["Remaining time counter"]
    C --> D["15:38"]
    D --> E["Time counter"]
    E --> F["30:22. TIME"]
TAPE COUNTER
The counter reading will change as the tape runs. By taking a note of the counter readings and the contents during recording or playback, desired selections or unrecorded portions on the tape can be easily located at a later date.
TIME COUNTER
- Displays the elapsed time during recording or playback. The time counter is automatically activated when the unit is set to recording or playback.
- The time counter displays only the recording or playback duration. It disappears when fast forward, rewind or music search is performed, and is replaced by the tape counter.
14
En/Ge
BEDIENELEMENTE AN DER FRONTPLATTE
- Set to remaining time counter mode by pressing the COUNTER MODE button.
- Press the COUNTER RESET button.
The counter display changes to the tape capacity display. By pressing the selector repeatedly, the following settings are called in sequence.
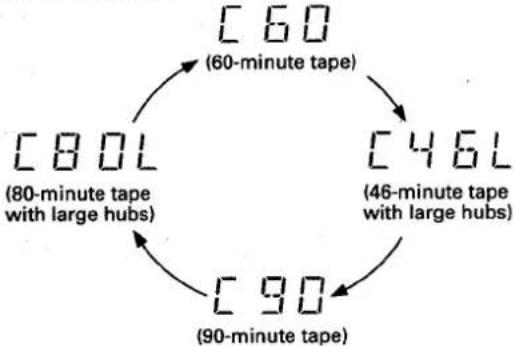
flowchart
graph TD
    A["60 (60-minute tape)"] --> B["46 (46-minute tape with large hubs)"]
    B --> C["90 (90-minute tape)"]
    C --> D["80 (80-minute tape with large hubs)"]
    D --> A
Set the tape capacity according to the length of the tape in use.
- Set to playback or recording mode.
Five to seven seconds after the tape starts running, the remaining time for the tape is displayed.
NOTES:
- The remaining time can be indicated only for the four types of cassettes that can be selected with the COUNTER RESET button. When using tapes of different lengths, set the selector as follows to obtain a close enough estimation of the remaining time.
Up to C-60, standard hub tapes ....C 60 position
Up to C-60, large hub tapes ....C 46L position
Up to C-90, standard hub tapes ....C 90 position
Up to C-90, large hub tapes ....C 80L position - For commonly sold pre-recorded tapes, the remaining time may not be displayed correctly.
- The actual remaining time may differ from the remaining time indication depending on the tape used. The remaining counter information is not a clock. It should be used just as a reference.
- Once the remaining counter has been displayed, even if the counter mode is changed, the remaining time can be checked again by simply selecting the remaining counter mode.
NOTE:
46-minute and 80-minute tapes can be purchased with two different hub sizes: standard hub and large hub. Tapes with large hubs are marked with an "L", such as C46L and C80L. Tapes with a hub diameter of 27 mm are referred to as large hub tapes.
Please note that with hub diameters of more than 27 mm, the tape remaining time indication will not be correct.
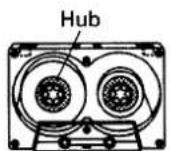
Standard hub
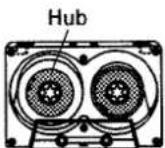
Large hub
BEDIENELEMENTE AN DER FRONTPLATTE
1. Load a prerecorded tape.
① Press the OPEN/CLOSE (▲) button.
② Insert a prerecorded tape.
③ Press the OPEN/CLOSE (▲) button.
• The cassette door closes.
- While the cassette door is open, pressing the playback (▶) button, fast forward (▶▶) button, rewind (◀◀) button or recording (●) button will close the cassette door auto matically, and the operation corresponding to the button pressed begins.
2. Press the DOLBY NR button to select the Dolby B-type, C-type or S-type NR system.
● Always select the same Dolby NR system that was used for recording.
- Dolby NR system is set to the previous position automatically when the power is turned on.
3. Set the stereo amplifier for tape playback.
4. Press the playback (▶) button.
• The TAPE indicator light up.
To improve high frequency sound during playback in tapes with poor recordings
Press the FLEX button and playback the tape.
To stop playback temporarily
Press the pause (Ⅲ) button.
- To resume playback, press the pause (III) button or playback (▶) button.
To stop playback
Press the stop (■) button.
REPEAT PLAYBACK
1. Set the TIMER mode switch to the PLAY-REPEAT position.
2. The rest of the procedure is the same as above steps 1 through 4.
- Playback will stop after the tape is repeated 16 times.
- If one of the operation buttons is pressed during the repeat playback, a new repeat cycle will start from that point.
WIEDERGABE 1
- Press the COUNTER RESET button at the position to be memorized.
- The indicator is reset to "0000".
-
Press the playback (▶) button to start playback.
-
Press the RETURN button.
By simply pressing one button, the tape can then be fast forwarded or rewound from any position and will stop near the counter reading "0000". If the playback (▶) button is pressed during tape return operation, playback will start automatically when "0000" is reached.
MUSIC SEARCH
(Skipping forward or backward to playback a desired selection)
The music search function detects blanks (longer than 4 seconds) between selections, advances the tape in the forward or reverse direction to find the beginning of the desired selection and automatically starts playback.
It can find a selection located up to 15 selections before or after the present position.
During playback
When you wish to locate the next song or beyond, press the ▶ button as many times as the number of songs to be skipped. When you wish to listen to the song being currently played from the beginning, press the ◀ button once. To return to the previous song or beyond, press the ◀ button as many times as the number of songs to be skipped, plus one.
From the stop mode
Press the playback (▶) button to set the playback mode, then press the ◀◀ or ▶▶ button to perform music search as mentioned above.
NOTES:
In the following circumstances, the music search function may be unable to properly detect blanks between selections; this is not, however, a sign of unit malfunction.
- When using a tape with blanks between selections less than 4 seconds long.
- When listening to tapes with long low-level intervals, like classical music, or with sound breaks several seconds long within selections.
- When listening to recorded conferences or talk shows, where sound is intermittent.
- When using tapes with noise in the blanks between selections.
NULLRÜCKLAUF/AUTOMATISCHER WIEDERGABESTART
How selections are counted
When starting the music search operation from the middle of a selection and specifying "1st previous selection," playback will return to the beginning of the present selection. To return to selections further back, count one extra selection.
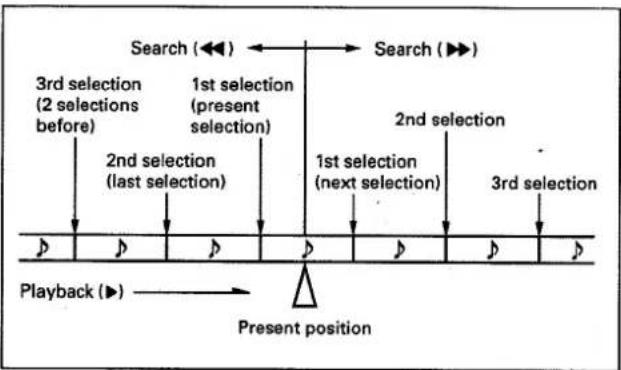
flowchart
graph TD
    A["Search (◀◀)"] --> B["Search (▶▶)"]
    C["3rd selection (2 selections before)"] --> D["1st selection (present selection)"]
    E["2nd selection (last selection)"] --> F["1st selection (next selection)"]
    G["2nd selection"] --> H["1st selection (next selection)"]
    I["3rd selection"] --> J["1st selection (next selection)"]
    K["Playback (▶)"] --> L["Present position"]
    M["Start"] --> N["End"]
NOTE:
Refer to the "COUNTER MODE" section on page 14 for more information about the counter display.
Counter indication during music search

- A plus sign (+) appears during music search in the forward direction
- A minus sign (−) appears during music search in the reverse direction.
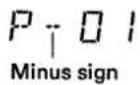
The last two digits of the counter display show the number of selections to be skipped. If three selections are to be skipped, for example, it shows "P+03" first, after which the number decreases by 1 each time a selection is skipped ("P+02"→ "P+01" etc.) When the unit switches back to playback, the normal tape counter appears again.
WIEDERGABE
Zählweise der Titel
Erasure prevention tabs
The recording (●) button does not work when the erasure prevention tabs of the loaded cassette tape have been broken off (See page 4). Do not press the recording (●) button with unreasonable force. When recording on both sides, make sure that both tabs are intact.
1. Load a tape for recording.
For loading a cassette tape, refer to "PLAYBACK" on page 16.
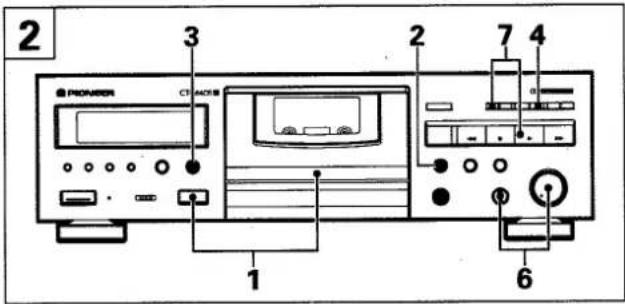
2. If you use AUTO BLE XD tuning, press the BLE XD button.
Refer to "SUPER AUTO BLE XD TUNING (BLE XD)" on page 21 for more details.
- Wait approximately 15\~25 seconds until "TUNE" is displayed in the counter indicator.
3. Press the DOLBY NR button to select the Dolby NR system.
4. Press the recording (●) button.
- The unit is set to the recording standby mode, called one touch recording pause. The monitor is set to source when the SOURCE indicator is lit.
5. Prepare the audio source from which you wish to record. Turn on the stereo amplifier and prepare it for playback of the desired audio source.
6. Adjust the recording level. For details, see "SETTING THE RECORDING LEVEL".
7. Press the pause (II) button or the playback (▶) button to begin recording.
- The TAPE indicator lights up. For the displays at the beginning of and during recording in Dolby-S-type NR on the CT-S550S, refer to the DOLBY NR B/C/S indicator ⑫ on page 14.
To stop recording temporarily
Press the pause (Ⅲ) button.
- To resume recording, press the playback (▶) button.
To stop recording
Press the stop (■) button.
When adjusting the recording level, observe the reading on the level meter and adjust the REC LEVEL control appropriately. When turned clockwise, the recording level is increased and the level meter reading increases accordingly. When turned counterclockwise, the level is reduced. If the recording level is too high, the distortion in the recording increases, and if the level is too low, tape noise increases and the sound level is low.
AUFNAHME 2
Löschschutzzungen
Using normal tapes (TYPE I) or high position and chrome tapes (TYPE II):
Adjust the control so that "0 dB" lights up from time to time with peak input signals.
Using metal tapes (TYPE IV):
Adjust the controls so that "+2 dB" lights up from time to time with peak input signals.
NOTES:
- The optimal recording level may differ somewhat depending on the audio source and type of tape used. In order to obtain the best possible results, set the recording level after actual testing. Listen to your recordings, and adjust the level as necessary.
- The level meter may react differently during recording and playback of the same tape. This is due to differences in tape sensitivity, and creates no problem.
[Balancing the recording level between left (L) and right (R) channels]
Due to the source to be recorded or the equipment used for playback, the sound volume balance between left and right may be shifted to one side. In this case perform fine adjustment using the REC BALANCE control.
Turning the control clockwise will lower the left channel level, and turning it counterclockwise will lower the level of the right channel.
RECORDING MUTE
Use this function to create the approximate 4.5-second blank needed for proper operation of the music selection.
- Press the record mute (O) button during recording and the deck will create a blank space by recording a section which contains no signal for approximately four seconds. The deck will then enter recording standby mode.
- To create a blank which is more than four seconds long, hold the button down for the desired length of time. When the button is released, the deck will enter recording pause mode.
- To resume recording, press the pause (Ⅲ) button or the play-back (▶) button.
ERASING A TAPE
To erase the recorded contents of a tape, load the tape and follow the procedure below.
- Set the REC LEVEL control to the MIN position.
- Press the recording (●) button.
- Press the pause (II) button or the playback (▶) button.
AUFNAHME
- Insert a tape for recording. (Note that a recording cannot be made if the tab is removed.)
- Press the BLE XD button.
Wait approximately 15\~25 seconds until "TUNE" is displayed in the counter indicator.
The tape will be forwarded after pressing the BLE XD button so that recording will start from the recordable portion of the tape. The operation is completed when STRT is displayed in the counter indicator.
The following illustrates the operation;
(Operation completed within approximately 15 seconds)
| Display | |
| Counter indicator | |
| START → REC | 0000→5TRT |
| 1•Adjusting recording bias | BIAS |
| 2•Adjusting recording level | LEVEL |
| 3•Adjusting recording equalizer | H-EQ |
| 4•Adjusting recording equalizer | M-EQ |
| 5•Adjusting recording bias for high level signal (for XD) | BIAS |
| 6Fast reverse → STOP END | TUNE |
To Switch only XD on and off:
(How to switch between AUTO BLE and AUTO BLE XD).
The XD function can be switched on or off independently after AUTO BLE XD tuning.
Put the deck in REC/PAUSE mode and then press the BLE XD button to switch off XD. To switch XD on again, press the BLE XD button while in the REC/PAUSE mode.
(The XD mark on the indicator lights and goes out accordingly.) HX PRO does not function when the XD is on.
AUFNAHME MIT AUTOMATISCHER BANDABSTIMMUNG (BLE XD)
- During SUPER AUTO BLE tuning, signals are recorded on the tape, so be sure to wait until SUPER AUTO BLE tuning is completed before beginning to record.
- After AUTO BLE XD tuning, if you load a different type tape and begin recording, AUTO BLE XD will be cancelled. (The FL display will also go out.)
Display section indicator
| BLE XD operation | AUTO BLE XD indicator |
| Tuning | 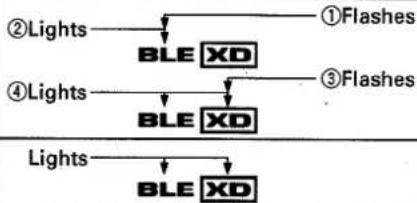 |
| Tuned |
To stop AUTO BLE XD tuning (BLE and XD)
To cancel AUTO BLE XD tuning (e.g. must record urgently), press the stop (■) button.
To reset a tuned condition
Press the BLE XD button again.
Error display
- If the old tape, the tape end or the leader (white portion) immediately prior to the tape end is reached during AUTO BLE XD operation, tuning becomes impossible. That means recording will stop immediately and the counter indicator will display the following (flashing) message: "Err".
In this case, press the BLE XD button again to reset, and record without AUTO BLE XD tuning.
NOTES:
- Make sure to readjust AUTO BLE when using different types of tapes.
- During AUTO BLE tuning, the Dolby NR circuit will not work. Therefore, the DOLBY NR system may be selected to B, C or S.
AUFNAHME MIT AUTOMATISCHER BANDABSTIMMUNG (BLE XD)
ANMERKUNGEN:
- Load the tape for recording.
- Press the DOLBY NR button to select the Dolby NR system.
- Press the recording (●) button.
- Prepare the audio source.
- Set the amplifier input selector to tuner, then tune in the desired station.
-
Adjust the recording level.
-
Set the audio timer.
- When the timer is set, it will turn off the power of all connected components.
- Set the TIMER mode switch to the REC position.
- At the preset time, the power will be turned on, and recording will begin automatically.
NOTES:
- Timer recording will not work if the erasure prevention tabs of the tape loaded have been removed.
- Operations depend on the type of audio timer used; be sure to consult the operating instructions of the audio timer you actually use.
- When not performing timer operations, set the TIMER mode switch to the OFF position. Otherwise, recording might begin unexpectedly when the power is turned on.
- Turn down the volume of the amplifier if you do not wish to listen to the program while it is being recorded.
- When TIMER REC has been set, recording begins after operation of the SUPER AUTO BLE XD function.
WAKE-UP PLAYBACK 4

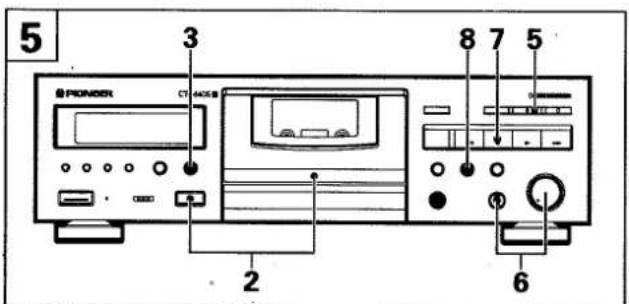
- Load a prerecorded tape.
AUFNAHME UND WIEDERGABE MIT EINEM AUDIO-TIMER
- Adjust the volume level by playing back a portion of the tape.
- Rewind the tape to the position where playback is to start
- Set the audio timer.
- When the timer is set, it will turn off the power of all connected components.
- Set the TIMER mode switch to the PLAY-REPEAT position.
- At the time set on the audio timer, the power will be turned on and playback will begin automatically.
NOTES:
- If the FLEX (1/f) system is left on during wake-up playback, the FLEX (1/f) system is performed before playback starts, when the power is turned on.
If compensation adjustment is completed and the adjustment data is memorized before wake-up playback is set, playback starts immediately when the power is turned on. - When the TIMER mode switch is set to the PLAY-REPEAT position for the wake-up playback, set the unit to the repeat playback mode (see page 16).
- Operations depend on the type of audio timer used; be sure to consult the operating instructions of the audio timer you actually use.
- When not performing timer operations, set the TIMER mode switch to the OFF position. Otherwise, playback might begin unexpectedly when the power is turned on.
CD · DECK SYNCHRO RECORDING 5
If the CD player has a program function to determine the order of playback, program the CD player before beginning this operation.
- Load a compact disc in the CD player.
- Load the cassette for recording.
- Rewind the tape to the desired starting position.
- Press the DOLBY NR button to select the Dolby NR system.
AUFNAHME UND WIEDERGABE MIT EINEM AUDIO-TIMER
-
Press the play button of the CD player.
-
Press the recording (●) button.
-
Adjust the recording level.
• See page 19.
- Press the stop (■) button of both the cassette deck and the CD player.
● Unless both this deck and the CD player are in stop mode, synchro recording cannot be performed.
- Press the CD SYNCHRO button.
- The cassette deck begins recording, and the CD player begins playback.
When the compact disc finishes playing:
The CD player enters stop mode and the cassette deck enters recording standby mode. Change the disc and press the play button of the CD player to resume recording. If the CD player does not resume play within one minute, the cassette deck enters stop mode.
When the CD player changes discs (twin tray or multi CD players):
The cassette deck enters recording standby mode, and resumes recording when the CD player begins playing the next disc. A four second blank space is automatically created between tracks.
When the end of the tape is reached while the CD player is still playing:
The CD player returns to the beginning of the currently-playing selection and then enters pause mode. To resume recording, turn the tape over or load another tape. Synchro recording can be resumed by pressing the CD SYNCHRO button again. (The CD SYNCHRO button should be pressed within 1 minute. If more than 1 minute elapses, the CD player will enter stop mode.)
NOTES:
- Even when the CD player is connected to the amplifier with an optical fiber cable, connect the CD player to the amplifier or this unit with the input and output cords with pin plug.
- The CD·DECK SYNCHRO function only works with PIONEER CD players equipped with the CD·DECK SYNCHRO function.
- Be sure to connect the deck and the CD player with the CD DECK SYNCHRO control cord.
- Although recording begins when the CD SYNCHRO button is pressed, the CD player does not start playback until the button is released. This function can be used to advance the tape past the leader section, or to create a blank section on the tape.
- Only PIONEER CD players equipped with a CD · DECK SYNCHRO jack can be used for CD · DECK SYNCHRO recording. Any type of CD player which meets these requirements, including twin-tray or multi-play models, can be used.
CD-SYNCHRONAUFNAHME
Incorrect operations are often mistaken for trouble and malfunctions. If you think that there is something wrong with this component, check the points below. Sometimes, the trouble may lie in another component. Investigate the other components and electrical appliances being used. If the trouble cannot be rectified even after exercising the checks listed below, ask your nearest PIONEER authorized service center or your dealer to carry out repair work.
| Symptom | Cause | Remedy |
| Cassette door does not open. | The deck is in recording mode.Power was turned off. | Press the stop (■) button.Turn power on. |
| Cassette door does not close. | Cassette tape has not been loaded properly. | Load the tape again. |
| No power when POWER switch is set to ON. | Disconnected power cord.Power cord is connected to switched auxiliary outlet on a stereo component which is turned OFF. | Connect properly to a power outlet.Turn on the power of that component. |
| Tape does not run. | Tape is wound to its end.Cassette tape not loaded properly.Slack tape.The deck is in the pause mode. | Rewind tape or turn tape over.Turn the tape over (play or record on opposite side).Reload tape.Take up slack using pencil (see page 4).Press the playback or pause (▶ or ▶) button. |
| No sound. | Stereo amplifier function switch is not set to TAPE.Stereo amplifier volume control is at minimum position.Unrecorded tape has been loaded.Improper stereo amplifier connection.Dirty the heads.Connection problems (wheng connection, cord removed, poor contact, broken wire). | Set it to TAPE.Turn up the volume.Use a recorded tape.Check all connections (see page 6).Clean the heads (see page 3).Check to see if the Playback connection cord is properly connected (see page 6). |
| No recording. | Cassette tape accidental erasure prevention tab broken off.Improper stereo amplifier connection.Dirty the heads.REC LEVEL control set too low (no indication of the level meter during recording).Connection problems (wrong connection, cord removed, poor contact, broken wire). | Replace tape or cover tab hole with adhesive tape (see page 4).Check all connections (see page 6).Clean the heads (see page 3).Adjust the REC LEVEL control as indicated on page 19 and record.Check to see if the Recording connection cord is properly connected (see page 6). |
| Previous sound remains when recording anew. | Dirty the heads. | Clean the heads (see page 3). |
| Low treble sound. | A tape which was not recorded with the Dolby NR System is being played back with DOLBY NR B, C or S.Dirty the heads. | Set DOLBY NR to off.Clean heads (see page 3). |
| Boosted treble. | A tape which was recorded with a Dolby NR System is being played back with DOLBY NR off. | Set DOLBY NR to B, C or S. |
| Distorted sound. | Distortion in recorded tape itself.Recording level is too high.Dirty the heads. | Try a different tape.Turn down recording level and record again (See page 19).Clean the heads (see page 3). |
| Unstable or intermittent sound. | Dirty heads, pinch roller and capstan.Cassette tape is not wound up uniformly. | Clean (see page 3).Fast forward or rewind tape to wind up tape again. |
TROUBLESHOOTING
| Symptom | Cause | Remedy |
| High noise level. | Tape itself has high noise level.Connecting cord has been connected improperly.Unit has been placed near a TV set.Recording level is too low.Dirty the heads.Heads are magnetized. | Replace cassette tape.Inspect input and output connections; connect cords properly (see page 6).Move the deck away from the TV set or turn the TV power off.Turn up recording level and record (see page 19).Clean the heads (see page 3).Demagnetize them with head eraser (see page 3). |
| Recording or playback starts suddenly when turning power on. | TIMER mode switch is set to the PLAY-REPEAT or REC position. | Set TIMER mode switch to OFF. |
| Cannot use the remote control system. | The connection cords and control cord are not connected. | Connect connection cords and control cord properly (see page 6). |
| CD · DECK SYNCHRO recording cannot be carried out. | CD · DECK SYNCHRO control cord and Input/Output cords are not connected.The cassette tape accidental erasure prevention tabs are broken.The tape ran out while in the CD · DECK SYNCHRO mode. | Connect correctly (see page 6).Replace the cassette with one whose tabs are intact (see page 4).Replace the tape with a longer one. |
| The CD SYNC indicator is off during CD · DECK SYNCHRO recording. | After the deck entered recording standby mode, more than 1 minute elapsed before the CD player resumed playback. | Change the disc and press the CD SYNCHRO button again. |
When troubles occur:
When certain troubles occur during use of the cassette deck, the following display (service number) appears on the function display of the cassette deck. If this occurs, follow the "Remedy" below.
Function display of the cassette deck
L1
| Service number | Cassette deck status | Remedy |
| L1 | Error occurs during opening or closing of the cassette door. | Reload tape correctly.If the same service number appears when the cassette door is opened or closed again, a malfunction has occurred. When servicing your cassette deck, inform them of the displayed service number. |
| M1 | Tape is jammed. | Unload the tape after fast forwarding or rewinding the tape. Then, clean the heads and capstans.If the same service number appears again during recording and playback, a malfunction has occurred. When servicing your cassette deck, inform them of the displayed service number. |
FEHLERSUCHE
System 4-track, 2-channel stereo
Heads
Recording/Playback head:
Combined Hard permalloy recording/Hard permalloy
playback head x 1
Erasing head: Ferrite head x 1
Motor.... DC servo capstan motor x 1
DC reel motor x 1
DC assist motor x 1
Wow and Flutter...... No more than 0.05% (WRMS, JIS)
No more than ± 0.14% (DIN)
Fast Winding Time ....Approx. 90 seconds (C-60 tape)
Frequency Response (at -20 dB recording level)
TYPE IV (Metal) tape 20 to 25,000 Hz (±6 dB)
TYPE II (High/CrO2) Tape 20 to 19,000 Hz (±6 dB)
TYPE I (Normal) Tape 20 to 19,000 Hz (±6 dB)
Signal-to-Noise Ratio (Dolby NR OFF) ...... More than 59 dB
Noise Reduction Effect
Dolby B-type NR ON .... More than 10 dB (at 5 kHz)
Dolby C-type NR ON...... More than 19 dB (at 5 kHz)
Dolby S-type NR ON .... More than 22 dB (at 5 kHz)
Harmonic Distortion No more than 0.6%
(at -4 dB: 160 nwb/m)
Input (Sensitivity)
LINE (INPUT) 100 mV (Input impedance 23 kΩ)
Output (Reference level)
LINE (OUTPUT) 0.5 V (Output impedance 1.9 kΩ)
Headphones (PHONES)...... 1.4 mW (Load impedance 32 Ω)
Miscellaneous
Power requirements
U.K., model ...... AC 230—240 Volts\~, 50/60 Hz
European model ...... AC 220—230 Volts\~, 50/60 Hz
Power consumption
CT-S640S 23 W
CT-S550S 22 W
Dimensions....420 (W) x 125 (H) x 280 (D) mm
Weight (without packages)
European model 4.1 kg
U.K. model 4.3 kg
Subfunctions
● DOLBY B-type, C-type and S-type NR Systems
CT-S550S only:
When the monitoring function is used during a recording being made with Dolby S-type noise reduction, the recorded signals from the tape are played back via a Dolby B-type noise reduction.
● 4-digit electronic tape/time/remain counter
● Music search up to ±15 selections
● Automatic space recording mute
• SUPER AUTO BLE XD tuning system
- FL level meter 12 +1 segments (with peak hold)
- SR System remote control available
- CD · DECK SYNCHRO function
- Timer Recording/Playback (Automatic repeat playback ON)
• Auto tape selector
- FLEX system
- Last memory
- Tape return/return play
● Auto monitor selection (Tape/Source)
- Display off
● Power eject (Open/Close)
Accessories
Operating instructions....1
Connection cord with pin plugs 2
SR Remote control cord .... 1
CD · DECK SYNCHRO control cord .... 1
NOTE:
Specifications and design subject to possible modifications without notice, due to improvements.
TECHNISCHE DATEN
About the Demo mode
Press the COUNTER MODE button and the COUNTER RESET button simultaneously to set the demonstration mode. To cancel the demonstration mode, press any one of the buttons inclosed in dotted lines above. (The demonstration mode can also be cancelled by loading or removing a tape cassette).
Published by Pioneer Electronic Corporation. Copyright © 1996 Pioneer Electronic Corporation. All rights reserved.
PIONEER ELECTRONIC CORPORATION 4-1, Meguro 1-Chome, Meguro-ku, Tokyo 153, Japan
PIONEER ELECTRONICS [USA] INC. P.O. BOX 1540, Long Beach, California 90801-1540
PIONEER ELECTRONICS OF CANADA, INC. 300 Allstate Parkway, Markham, Ontario L3R 0P2, Canada
PIONEER ELECTRONIC [EUROPE] N.V. Haven 1087, Keetberglaan 1, 9120 Melsele, Belgium TEL: 03/570.05.11
PIONEER ELECTRONICS AUSTRALIA PTY. LTD. 178-184 Boundary Road, Braeside, Victoria 3195, Australia, TEL: [03] 580-9911
PIONEER ELECTRONICS DE MEXICO S.A. DE C.V. Augusto Rodin No.128 PB Col. San Juan Mixcoac Mexico D.F. CP.03730 TEL: 52-5-598-3950