
APMP101F - Media player Aluratek - Free user manual and instructions
Find the device manual for free APMP101F Aluratek in PDF.


| Type de produit | Lecteur multimédia personnel |
| Marque | Aluratek |
| Modèle | APMP101F (Cinepal) |
| Taille d'écran | 8 pouces LCD |
| Résolution d'écran | Non spécifiée (estimation 800x600) |
| Mémoire interne | Non spécifiée (estimation 4 Go ou 8 Go) |
| Mémoire externe | Carte SD/SDHC jusqu'à 32 Go, clé USB, disque dur USB externe (alimentation propre) |
| Formats photo pris en charge | Non spécifiés (JPEG probable) |
| Formats vidéo pris en charge | Non spécifiés |
| Formats audio pris en charge | Non spécifiés (MP3 probable) |
| Formats e-book | TXT |
| Sortie TV | Composante YPbPr jusqu'à 1080i (720p/1080i) |
| Connectivité | USB 2.0 Mini-B, sortie audio 3,5 mm, port adaptateur secteur |
| Autres fonctionnalités | Haut-parleur intégré, support de lecteur, télécommande (avec pile) |
| Alimentation | Adaptateur secteur inclus (tension non spécifiée) |
| Dimensions | Non spécifiées (estimation 200 x 150 x 20 mm) |
| Poids | Non spécifié (estimation 400 g) |
| Contenu de la boîte | Lecteur Cinepal, câble USB 2.0, câble mini-USB, câble vidéo composante, câble audio, adaptateur secteur, manuel, carte de garantie |
| Nettoyage | Essuyer avec un chiffon doux et sec. Ne pas utiliser de produits chimiques. |
| Sécurité | Éviter les chocs, l'humidité et les températures extrêmes. Suivre les instructions FCC. |
| Entretien | Retirer le film protecteur avant utilisation. Maintenir les ports propres. |
| Réparabilité | Pièces détachées non disponibles. Contacter le support Aluratek pour toute réparation. |
| Garantie | 120 jours à compter de la date d'achat. |
Frequently Asked Questions - APMP101F Aluratek
User questions about APMP101F Aluratek
0 question about this device. Answer the ones you know or ask your own.
Ask a new question about this device
Download the instructions for your Media player in PDF format for free! Find your manual APMP101F - Aluratek and take your electronic device back in hand. On this page are published all the documents necessary for the use of your device. APMP101F by Aluratek.
USER MANUAL APMP101F Aluratek
8" HD Personal Media Player Instructional Manual
CINEPAL by Aluratok
aluratek.com
APMP101F
mnl M10089 Copyright © 2011 Aluratek, Inc. All Rights Reserved.
Table of Contents
PMP Close-up 04
Package Contents 05
Getting Started 05
Operating Instructions
Turning your Cinepal On / Off 06
Supported Memory Media 06
Managing files from your PC / Mac to your Cinepal 07
Main Menu 08
Setup Options 10
Explorer 11
Photo Mode 13
Video Mode 14
Music Mode 15
eBook Mode 16
Connecting your Cinepal to your HDTV 17
Connection Illustration 18
Technical Support 20
Radio and TV Interference Statement 21
Warranty 22
PMP Close-Up

1 - Speaker
2 - Power ⏻
3 - Return / Exit Directional Keypad
4 - ▶ || Play / Pause
5 - (M) HDTV OUT
6 - Sensor
7 - 8" LCD Screen
8 - Power ON / OFF Switch
9 - Media Player Stand
10 - USB 2.0 Mini-B Port
11 - SD / SDHC Card Slot
12 - HDTV OUT Port
13 - AUDIO OUT Port
14 - Power Adapter Port
Package Contents
Your order has been carefully packaged and inspected. The following should be included in your package. Please inspect the contents of the package to ensure that you have received all items and that nothing has been damaged. If you discover a problem, please contact us immediately for assistance.
• Cinepal HD Media Player
- USB 2.0 Cable
- Mini USB - USB 2.0 Cable
• Video cable & Audio cable
- Power Adapter
- Instructional Manual
• Warranty / Registration Card
Getting Started
- Remove the protective film covering the LCD.
- Remove the plastic insulator from the battery on the remote control.
Operating Instructions
Turning your Cinepal On / Off
Power On - Slide the HOLD switch to the ON position or if the HOLD switch is already to the ON position, press and hold the POWER button on the Cinepal for 2 seconds, the Aluratek startup screen will appear briefly on the Cinepal's display followed by the Main Menu.
Power Off - Press and hold the POWER button until the Cinepal display shows "Shutting Down".
Supported Memory Media
Your Cinepal supports the following memory media:
• SD or SDHC cards up to 32GB.
- USB flash drives
- External USB hard drives that have their own power supplies.
Operating Instructions
Managing files from your PC / Mac to your Cinepal
- A USB cable is included with your Cinepal to connect it to your PC / Mac. Connect the small connector to your Cinepal and the larger connector to your PC / Mac.
- Once connected, the Cinepal will display “Connecting with PC!”. On a PC, the Cinepal’s internal memory will appear as a removable drive when viewed in “My Computer”.
- On a Mac, the Cinepal will appear as a drive icon on the Mac's desktop.
- Copy your photo, video and music files or the folders containing them from your PC / Mac into the icon representing the Cinepal's internal memory. When finished disconnect the USB cable from the PC/Mac. (Note: For a Mac, eject the drive icon before disconnecting the USB cable.)
- You can also delete files and folders from your Cinepal by opening the icon representing the Cinepal's internal memory and selecting the files or folder to be deleted on a PC.
- The Cinepal's will return to normal operation once it is disconnected from your PC / Mac.
Operating Instructions
Main Menu
Menu Options - The On-Screen Display (OSD) will show the Main Menu. Each icon represents the various functions available on your Cinepal: My Favorite, Explorer, Photo, Movie, Music, eBook and Setup.
Navigating the Main Menu - Browse the different functions using the Up and Down buttons and select a function by pressing the ▶∥ button.
My Favorite - A user can quickly access their favorite photos and music by saving those files to a folder titled “Favorite” in the Cinepal’s internal memory using the Explorer option.

Operating Instructions
Setup Options
Under the Setup menu, a user can:
• View the User Manual for the Cinepal,
- Configure the settings for playing movies, viewing photos, listening to music or reading an ebook.
- Select the Cinepal's Display/ TV Output options and HD resolutions.
- Configure power savings options and the Cinepal's backlight.
- Configure the default language, backgrounds, update the Cinepal's firmware, restore default settings and select the Cinepal's boot mode.
Operating Instructions
Explorer
- A user can use Explorer to transfer files from an SD card or USB flash drive to the Cinepal. Files can also be deleted using Explorer.
- Please insert your SD card and / or USB flash drive into your Cinepal.
- From the Main Menu, use Up and Down buttons to navigate to the Explorer icon.
- When the Explorer icon is highlighted, you will see the option of selecting USB Device, SD or Memory. To transfer files from your SD card or USB flash drive, highlight either USB Device or SD using the Up and Down buttons and then press the ▶ || button.
- A list of the files or folders contained on the SD card or USB flash drive will be displayed. Browse the files using the Up and Down buttons and highlight the file you wish to transfer. If photos are contained in a folder, press the ▶|| button to open the folder.
- To copy a file or folders to the internal memory, press and hold the ▶∥ arrow button until you see an Option menu.
- From the Option Menu, select "Copy" using the Up and Down buttons press the button. A window will open saying "Copy to local memory". Use Left or Right buttons select
Operating Instructions
Explorer
"Yes" and press the ▶ || button. The file will be saved to your Cinepal's internal memory.
- To delete a file or folder, simply browse to it and press and hold the ▶|| button to view the Option menu. Use the Down buttons to select “Delete”. Use the Left button to select “Yes” when the “Delete?” dialog box appears.
- To delete a file or folder, simply browse to it and press and hold the ▶ || button to view the Option menu. Use the Down buttons to select “Delete”. Use the Left button to select “Yes” when the “Delete?” dialog box appears.
- To save photos and music files to My Favorite, select the file, press and hold the ▶ || button to view the Option menu, use the Down button to select “To Favorite”, press the ▶ || button, use the Left button to select “Yes” and then press the ▶ || button. This process will create a new folder titled “Favorite” on your Cinepal’s internal memory where favorites will be stored.
Operating Instructions
Photo Mode
- To setup a photo slideshow, navigate to the Photo icon using the Left or Right arrow buttons and then select USB Device, SD or Memory and then press the ▶|| button.
- A list of the photo files or folders contained on the memory source selected will be displayed. Browse the files using the Up and Down buttons, highlight the photo file you wish start the slideshow with and then press the ▶|| button.
- If photos are contained in a folder, press the ▶ || button to open the folder and then following the above directions.
- To view the slideshow options, press the ▶ || button to pause the slideshow and then press and hold the button until you see an Option menu. The Option menu allows a user to turn on set the source of the photo files, enable background music, configure screen brightness, the order of photos, timing and a photo's scale.
- Use the ▼ or ▲ arrow buttons to select the option that you would like to configure and then pressing the Up and Down buttons or the ▶ || button to configure each option.
- Press the Return / Exit button to exit the Option menu. To resume the slideshow, press the ▶ || button.
Operating Instructions
Video Mode
- To play a video, navigate to the Movie icon using the Left or Right buttons, select USB Device, SD or Memory and then press the ▶|| button.
- A list of the video files or folders contained on the memory source selected will be displayed. Browse the files using the Up and Down buttons, highlight the video file you wish to play and then press the ▶ || button.
- If video files are contained in a folder, press the ▶ || button to open the folder and then following the above directions.
- To view the Movie options, press and hold the ▶ || button until you see an Option menu. The Option menu allows the user to configure a movie's features, such as the display ratio, sub-titles, sound and brightness. Use the Left or Right buttons to highlight the option that you wish to configure and press the ▶ || button to cycle through each setting for the various options. Press the Return / Exit button to exit the Option menu.
Operating Instructions
Music Mode
- To play a song, navigate to the Music icon using the Left or Right buttons, select USB Device, SD or Memory and then press the button.
- A list of the music files or folders contained on the memory source selected will be displayed. Browse the files using the Up and Down buttons, highlight the song you wish to play and then press the button.
- If music files are contained in a folder, press the ▶ || button to open the folder and then following the above directions.
- To pause a song, press the ▶∥ button. To resume playing a song, press the button again.
- To view the Music options, press and hold the button until you see an Option menu. The Option Menu allows a user to set the source of the music files, playback sequence, set the background, configure the equalizer and backlight settings.
- Use the Up, Down, Left or Right buttons to highlight the option that you wish to configure and press the ▶ || button to cycle through the settings for each option.
- Press the Return / Exit button to exit the Option menu.
Operating Instructions
eBook Mode
- Your Cinepal supports reading TXT-format ebooks.
- To read an ebook, navigate to the Ebook icon using the Left or Right buttons, select USB Device, SD or Memory and then press the ▶|| button.
- A list of the TXT files contained on the memory source selected will be displayed. Browse the files using the Up and Down buttons, highlight the ebook you wish to read and then press the ▶ || button.
- If ebooks are contained in a folder, press the ▶ || button to open the folder and then following the above directions.
- To read an ebook, press the ▶ || button.
- To view the Ebook options, press and hold the button until you see an Option menu. The Option Menu allows a user to enable background music, auto-scroll, configure font color, font size and the page background. Use the Up and Down buttons to highlight the option that you wish to configure and press the ▶ || button or the Left or Right buttons to cycle through the settings for each option.
- Press the Return/Exit button to exit the Option menu and resume reading your ebook.
Operating Instructions
Connecting your Cinepal to your HDTV
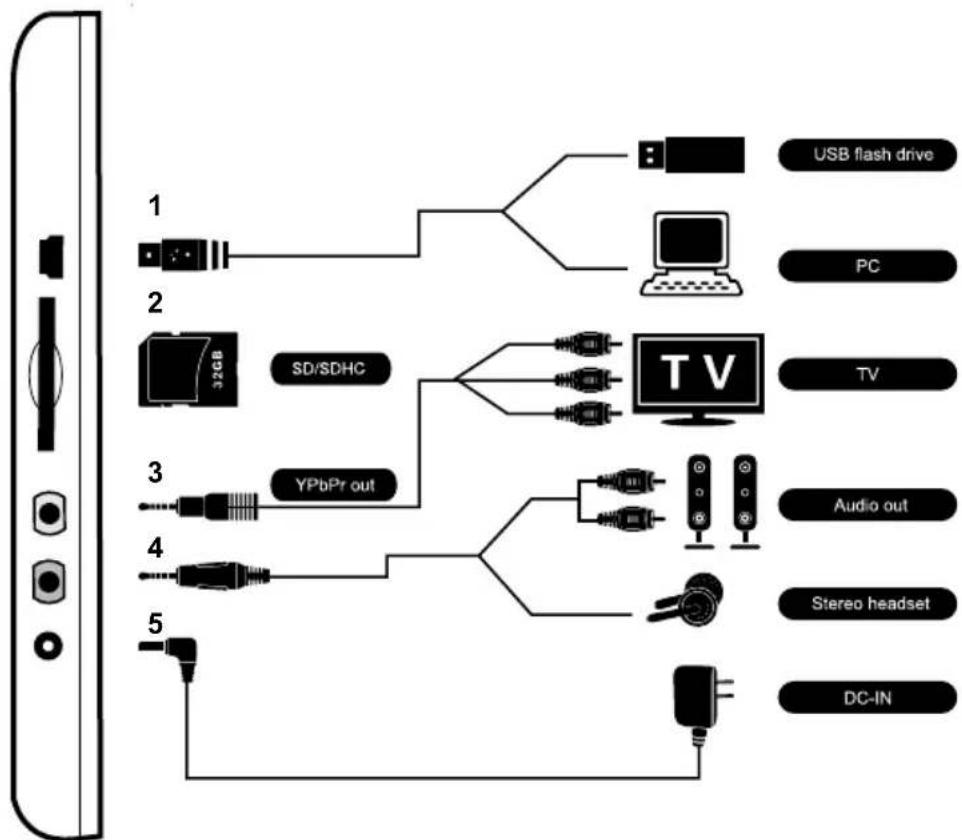
- Please connect the red, blue and green component video cable that came with your Cinepal to your HDTV and connect the other end to the HDTV Out jack on your Cinepal.
- Then connect the red and white audio cable to your HDTV's sound input and connect the other end to the Headphone jack on your Cinepal.
- Please configure your HDTV to view the component video input you connected your Cinepal component cable to.
- A user can configure the Cinepal video output mode to either 720p or 1080i, which ever is appropriate for the video file that is being viewed. Under the Setup menu, go to TV Output, then select Output format and then use the Left or Right buttons to select 1080i or 720p. Press the Return / Exit button to return to the Main Menu.
- To enable the TV output to your HDTV, press and hold the “M” button on your Cinepal until you see a window showing that TV OUT is highlighted.
- The Cinepal display turn off and the Main Menu will be displayed on your HDTV.
- To switch back to the Cinepal's display, press and hold the "M" button on your Cinepal for approximately three (3) seconds and the Main Menu will be displayed on your Cinepal.
Connection Illustration
1 - USB 2.0 Port
2 - Memory Card Slot
3 - HDTV OUT
4 - AUDIO OUT
5 - DC-IN
flowchart
graph TD
    A["USB flash drive"] --> B["PC"]
    C["32GB"] --> D["SD/SDHC"]
    D --> E["TV"]
    F["YPbPr out"] --> G["Audio out"]
    H[" "] --> I["Stereo headset"]
    J[" "] --> K["DC-IN"]
Technical Support
If you need further assistance, please contact Aluratek support department prior to returning this device.
E-mail: support@aluratek.com
Web: www.aluratek.com/support
Local (Tustin, CA): 714-586-8730
Toll free: 1-866-580-1978
Radio and TV Interference Statement
WARNING!!! This equipment has been tested and found to comply with the limits of a Class B digital device, pursuant to part 15 of the FCC rules. These limits are designed to provide reasonable protection against harmful interference in a residential installation
This equipment generates, uses and can radiate radio frequency energy and, if not installed and used in accordance with the instruction, may cause harmful interference to radio communications. However, there is no guarantee that interference will not occur in a particular installation. If this equipment does cause harmful interference to radio or television reception, which can be determined by turning the equipment off and on, the user is encouraged to try to correct the interference by whatever measures may be required to correct the interference.
Warranty
Aluratek warrants this product against defect in material or workmanship for 120 Days from the date of purchase.
This warranty becomes invalid if the factory-supplied serial number or “warranty void” sticker has been removed or altered on the product.
This warranty does not cover:
A) Cosmetic damage or damage due to acts of God
B) Accident, misuse, abuse, negligence or modification of any part of the product.
C) Damage due to improper operation or maintenance, connection to improper equipment, or attempted repair by anyone other than Aluratek.
D) Products sold AS IS or WITH FAULTS.
IN NO EVENT SHALL ALURATEK'S LIABILITY EXCEED THE PRICE PAID FOR THE PRODUCT FROM DIRECT, INDIRECT, SPECIAL, INCIDENTAL, OR CONSEQUENTIAL DAMAGES RESULTING FROM THE USE OF THE PRODUCT, IT'S ACCOMPANYING SOFTWARE, OR IT'S DOCUMENTATION.
Aluratek makes no warranty or representation, expressed, implied, or statutory, with respect to it's products, contents or use of this documentation and all accompanying software, and specifically disclaims it's quality, performance, merchantability, or fitness for any particular purpose. Aluratek reserves the right to revise or update it's product, software or documentation without obligation to notify any individual or entity.
Aluratek
aluratek.com
Aluratek, Inc. 14831 Myford Rd. Tustin, CA 92780 sales@aluratek.com 714.586.8730 • office 714.586.8789 • fax

- 8" HD Personal Media Player Instructional Manual
- CINEPAL by Aluratok
- Table of Contents
- PMP Close-Up
- Package Contents
- Getting Started
- Operating Instructions
- Turning your Cinepal On / Off
- Supported Memory Media
- Managing files from your PC / Mac to your Cinepal
- Main Menu
- Setup Options
- Explorer
- Photo Mode
- Video Mode
- Music Mode
- eBook Mode
- Connecting your Cinepal to your HDTV
- Connection Illustration
- Technical Support
- Radio and TV Interference Statement
- Warranty
- Aluratek
Brand : Aluratek
Model : APMP101F
Category : Media player