
1525 - Weather Station Taylor - Free user manual and instructions
Find the device manual for free 1525 Taylor in PDF.


| Type | Wireless Weather Station |
| Brand | Taylor |
| Model | 1525 |
| Power Supply | Base unit: 2 AAA batteries (not included); Remote sensor: 2 AAA batteries (not included) |
| Indoor Temperature Range | 14°F to 158°F (-10°C to 70°C) |
| Outdoor Temperature Range | -40°F to 158°F (-40°C to 70°C) |
| Indoor Humidity Range | 20% - 99% RH |
| Resolution | Temperature: 0.1°; Humidity: 1% |
| Transmission Range | Up to 100 ft (30 m) open area |
| Number of Remote Sensors | Supports up to 3 (1 included) |
| Clock | 12-hour or 24-hour display, manual setting |
| Memory | Daily min/max temperature and humidity |
| Trend Indicators | Rising, steady, falling for temperature and indoor humidity |
| Backlight | Yes, 3-second duration via button |
| Temperature Unit | Switchable between °F and °C |
| Low Battery Indicator | Yes, separate icons for base and remote |
| Remote Sensor | Weather-resistant, probe cord optional |
| Placement | Base: indoors; Remote: shaded, dry area |
| Care Instructions | Clean with soft, lint-free cloth; do not immerse in water |
| Warranty | 1 year from date of purchase |
| Model for Additional Sensors | Taylor Model 1534 (sold separately) |
Frequently Asked Questions - 1525 Taylor
User questions about 1525 Taylor
0 question about this device. Answer the ones you know or ask your own.
Ask a new question about this device
Download the instructions for your Weather Station in PDF format for free! Find your manual 1525 - Taylor and take your electronic device back in hand. On this page are published all the documents necessary for the use of your device. 1525 by Taylor.
USER MANUAL 1525 Taylor
Welcome to the Taylor®WeatherGuide System. Simple, reliable, accurate...it allows you to monitor indoor or outdoor locations from one room.The base unit reads indoor conditions, while the remote sensor wirelessly reports outdoor weather conditions back to the ba unit for an all-in-one weather display.
Plan your work day, play day, every day. Now that's smart
Table of Contents
Powering the WeatherGuide™ 3
How to Set Up the WeatherGuide™ 3
How to Display the WeatherGuide™ 5
Clock Setting 6
How to Read the WeatherGuide™ 7
Temperature/Indoor Humidity Displays 8
Minimum/Maximum Records....9
Temperature/Indoor Humidity Trends .....10
Backlight....I
°F/°C Switch ......II
Low Battery Display ....II
TroubleShooting
Disconnected Signals....12
Transmission Collision 13
Problem Solving ......13
Precautions ......14
Your WeatherGuide ^TM base unit is powered by 2 AAA batteries (no included).
Remove the battery compartment cover on the back of the unit Install 2 AAA batteries. Replace the battery compartment cover. Important: Power the base unit before installing batteries in the remote sensor, or the units' transmissions may not properly conn
Remote Sensors
Unscrew the 4 screws securing the remote sensor's battery compartment cover located on the back of the unit. Install 2 AAA batteries. (Tip: Lithium batteries are recommended in extremely cold or hot locations.)
How to Set up Your WeatherGuiSystem
First, power up the base unit, using 2 AAA batteries. Next, install 2 A batteries into the remote sensor. Place the base unit as close as possible to the remote unit.

Move channel switch to Channel I
There is a Channel switch in the remote sensor battery compartment. Move the switch to Channel I.

Press the Tx button to send transmission signal to base unit
Press the “TX” button located inside the remote sensor battery compartment. This will send a transmission signal to the base unit. The red LED Indicator light will flash when a signal is transmitted.

Transmission successful
If the transmission is successful, the remote sensor readings and aicon will appear on the base unit. If dashes are still displayed on the receiver unit, press the Tx button again.
Replace the remote's battery compartment cover.
The remote will automatically transmit readings to the base unit.
- The first remote registered will transmit every 53 seconds.
- If a second remote is registered, it will transmit every 56 seconds.
- If a third remote is registered, it will transmit every 59 seconds.
Note: A maximum of 3 remote sensor units can be registered. Should you purchase one or two additional remote units (Model 153 sold separately) to expand your thermometer monitoring capabilities to multiple locations, slide the CH switch to Channel 2 to register the second sensor and select Channel 3 to register the third sensor. The Channel number assigned will appear on the base unit's LCD screen.
How to Display your WeatherGuide™
Table top – use the Table Stand on the back of the base and rem sensor units
Wall – use the keyhole on the back of the base and remote sensor

Table Stand
Base unit location -
Place the unit indoors in a well-ventilated location away from direct sunl
Remote sensor location –
The transmission range of the remote sensor is 100 feet. The effective transmission range is vastly affected by obstacles such as walls, sheds trees, etc. Try various set ups for the best results. Shorten the distance between receiver and remote units when necessary. Place indoor in well ventilated location away from direct sunlight. Place the sensor in a dry, shaded area. Direct sunlight will heat the casing and inflate temperatures readings.
Important: Though the remote unit is weather proof, it should be placed away from direct sunlight, rain, snow and should never be submerged in water.
A maximum of 3 remote sensor units can be registered. One remote sensor is included. To purchase additional Remote Sensors (Taylor model 1534), please visit www.partshelf.com.

Press and hold SET to start clock setting.
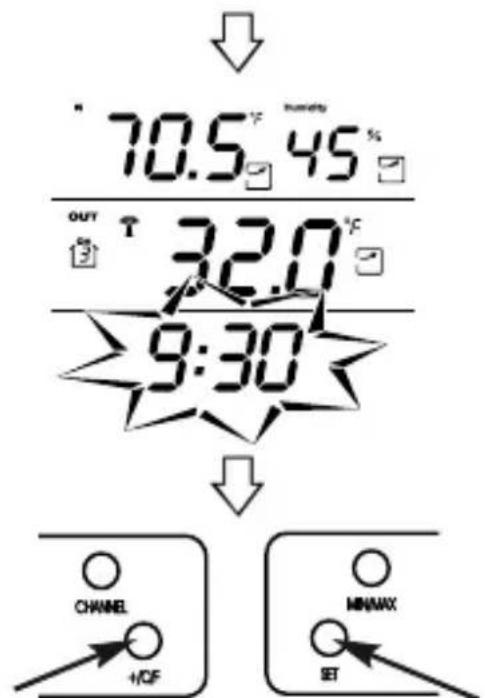
Press +C/F to change time digits and then SET to enter. Repeat for all settings.

Press SET after setting year. The clock is set.
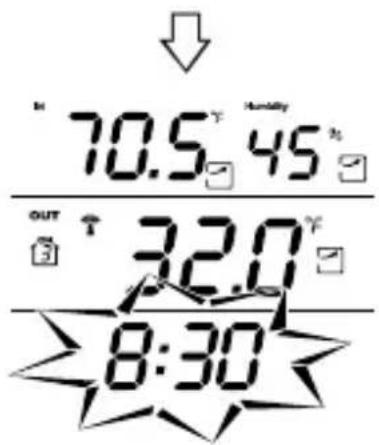
How to Set the Clock Manually
To manually set the clock:
Your WeatherGuide™ has a 12 hour clock function. To set the clock:
I. Press and hold the "Set" button located on the back of the base unit. The hour digits will flash.
2. Press “+C/F” to change the hours.
Press “SET” to enter.
3. Press “+C/F” to change the minutes.
Press “SET” to enter.
4. Press “+C/F” to change the month.
Press “SET” to enter.
5. Press“+C/F” to change the day. Press “SET” to enter.
6. Press “+C/F” to change the year.
Press “SET” to enter.
7. The clock is now set.
Tip: Hold down the "C/F" button to advance the digits quickly.
How to Read Your WeatherGuide™
The base unit displays indoor conditions from its location.
The remote unit will transmit weather readings from its location back to the base unit.
Alternately, the remote sensor's probe cord may be used. Plug the probe cord into the rubber plug on the remote sensor.Allow the en to hang where you wish to measure temperatures (out of a window aquariums, swimming pools, etc.)


Base unit – Indoor and Outdoor readings Remote unit – outdoor readings

Press Channel to see different remote sensor readings
If more than one remote sensor is in use, press the “CHANNEL” button on the back of the base unit to toggle between sensor displays.

Channel icon indicates which channel is displayed.
A Channel icon on the base unit indicates which remote sensor readings are displayed.

Auto scroll will toggle between different remote sensor readings
Auto Scroll feature – the base unit can be set to automatically scroll through readings. To activate Auto Scroll, press the “Channel” button on the back of the base unit until the auto scroll symbol appears on the LCD. The base unit will automatically display base and remote readings for 10 seconds each.
Temperature/Indoor Humidity Readings
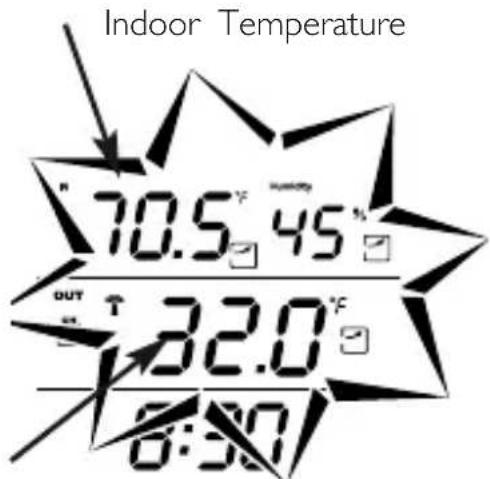
Outdoor Temperature
Indoor temperature readings – these are temperatures at the base unit's location.
Outdoor temperature readings – these are temperatures that are measured by the remote sensor.
Indoor humidity readings – these are temperatures at the base unit's location.
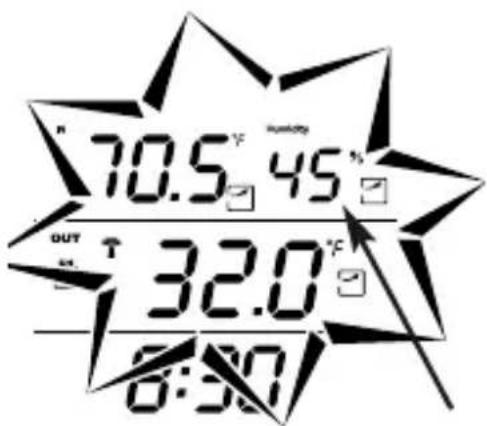
Humidity display
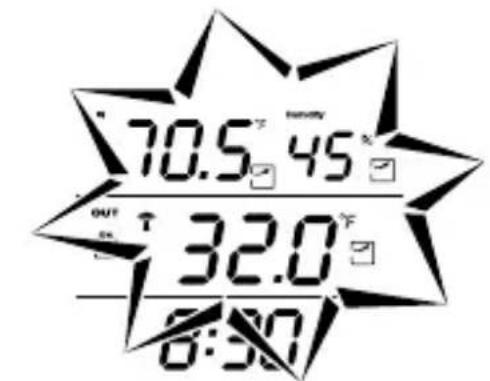
Current reading

Press MIN/MAX to see high and low daily temperature & humidity
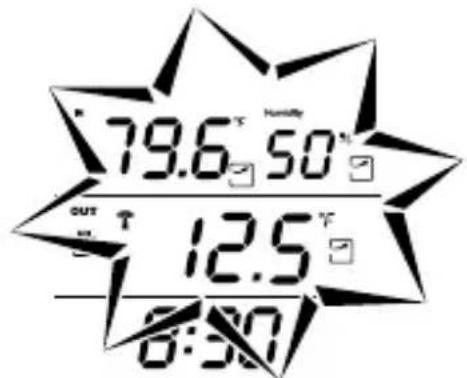
Minimum or Maximum readings

Back to current readings

Minimum or Maximum readings on screen
To View Minimum/Maximum temperature / indoor humidity readings
Your WeatherGuide™ will store the last recorded high and low temperatures and indoor humidity over a 24 hour period. The 24 hour period starts when the batteries are installed.
I. Press the “Min/Max” button once to see the highest temperature/indoor humidity of the day.
-
Press the “Min/Max” button again to see the lowest temperature/indoor humidity of the day.
-
Press the "Min/Max" button a third time to see current temperature/indoor humidity again.
To Clear the minimum or maximum readings, press and hold the "Min/Max" button while those readings are on the screen. The reading will reset to the current temperature and indoor hu- midity.

Press and hold Min/Max to reset high/low temperature & indoor humidity when they are on the screen

Min/Max readings are cleared.
Temperature Trend Indicators
Your WeatherGuide ^™ will indicate if temperatures are rising, falling, or steady.
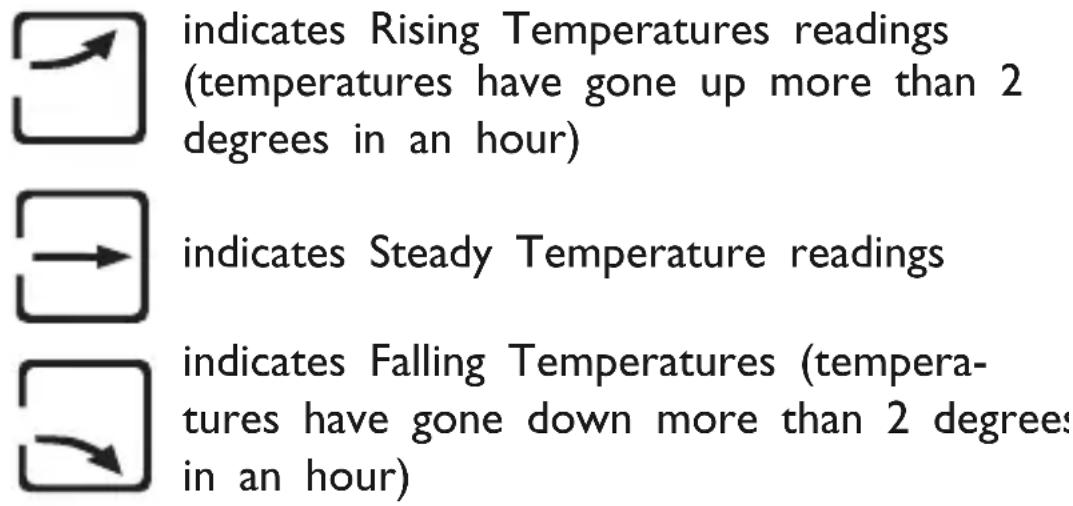
indicates Rising Temperatures readings (temperatures have gone up more than 2 degrees in an hour)
indicates Steady Temperature readings
indicates Falling Temperatures (temperatures have gone down more than 2 degrees in an hour)
Indoor Humidity Trend Indicators
Your WeatherGuide ^™ will indicate if indoor humidity levels are rising falling, or steady.

indicates Rising Indoor Humidity readings (humidity has gone up more than 2 degrees in an hour)

indicates Steady Indoor Humidity readings

indicates Falling Indoor Humidity (humidity has gone down more than 2 degrees in an hour)
Backlight Feature
The base unit has a backlight for easy viewing of the screen. Press t "Light" button to turn the backlight on for 3 seconds.
Press LIGHT for a 3 second backlight
To Switch Between °F and °C
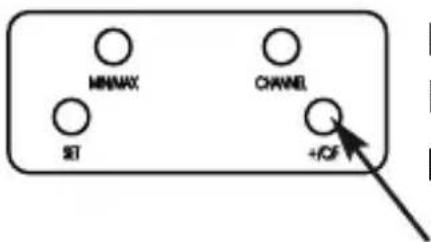
Press the“+C/F” button to switch between Fahrenheit and Celsius temperature displays.
Low Battery Indicator
A on the LCD indicates the batteries are running low and should soon be replaced.
- A by the indoor temperature display indicates the base unit batteries are low.
- A by the outdoor temperature display indicates the remote batteries are low.

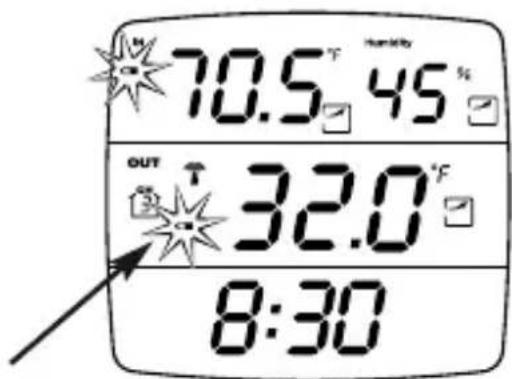
Base unit batteries low Remote sensor batteries low
Disconnected Signals
If the receiver unit does not receive a transmission from a remote cnel for 1 hour, the display will show dashes. To correct this problem
I. Check that the remote is properly positioned, within the appropriate transmission range. Transmissions are vastly affected by building materials and where the receiver and remote units are positioned. Try various set ups for the best results. Shorten the distance between receiver and remote units when necessary.
-
Check to make sure the transmission path is clear of obstacles and interference.
-
If new batteries are faulty on the initial installation, install fresh batteries. If you did not notice the Low Battery icon warning and the product performed correctly after initial set up, the batteries have lost their charge. Replace batteries (see the Power Sources section of this manual.)
-
Press the “Tx” button in the battery compartment of the remote to send a transmission signal to the base unit.
-
Press and hold the “Channel” button on the back of the base uni This will clear the channel setting and the base unit will begin searching for remote sensor transmissions. Press the “Tx” butto in the battery compartment of the remote to send a transmission signal to the base unit.
-
Press the “RESET” button in the remote sensor’s battery compartment to reset all sensor settings.
Transmission Collision
Signals from other household devices, such as doorbells, home security systems and entry controls, may interfere. This is normal and does not affect the general performance of this product. The transmission will resume once the interference recedes.
Note: This equipment has been tested and found to comply with the limits for a Class B digital device, pursuant to Part 15 of the FCC R. These limits are designed to provide reasonable protection against harmful interference in a residential installation. This equipment generates, uses and can radiate radio frequency energy and, if not install and used in accordance with the instructions, may cause harmful interference to radio communications. However, there is no guarantee that interference will not occur in a particular installation. If this equipment does cause harmful interference to radio or television reception which can be determined by turning the equipment off and on, the U is encouraged to try to correct the interference by one or more of following measures:
--Reorient or relocate the receiving antenna.
--Increase the separation between the equipment and receiver.
Modifications not authorized by the manufacturer may void users authority to operate this device.
Problem Solving
I. If the LCD readout is faint, replace the batteries.
2. If outdoor temperature does not display on the base unit:
a) Remove and reinstall all batteries;
b) Use fresh batteries ;
c) Place the remote sensor closer to the base unit;
d) Position the base and remote so that the transmission path is free of any obstacles, such as buildings, trees, etc. Try to have no more than 2 or 3 walls between the units.
- The temperature sensors are manufactured to the accurate within plus or minus one degree, so 2 units placed next to each other may report different readings. This is a normal occurrence with digital sensors and should not be considered a defect.
Precautions
I. The receiver is intended for indoor use only. It is not sealed against moisture and could be damaged if used outdoors.
2. Do not immerse the unit in water. If you spill liquid on it, dry in mediately with a soft, lint-free cloth.
3. Do not clean the unit with abrasive or corrosive materials. This may scratch plastic parts and corrode electronic circuits.
4. Do not subject unit to excessive force, shock, dust, temperature or humidity. This may result in malfunction, shorter electronic life span, damaged battery or distorted parts.
5. Do not tamper with the unit's internal components. Doing so will invalidate the warranty on this product and may cause damage. The unit contains no user-serviceable parts.
6. Do not mix old and new batteries. Do not mix Alkaline, carbon-zinc (standard) or Nickel-Cadmium (rechargeable) batteries. Do not dispose of batteries in fire. Batteries may explode or leak. Remove the batteries if the units will not be used for a long period of time.
7. Always read the instruction manual before operating this product.
8. Due to continuous product improvements, the displays shown in this manual may differ from the actual display.
Important: Though the remote unit is weather proof, it should be placed away from direct sunlight, rain, snow and should never be submerged in water.
Specifications
Range of temperature measurement:
Receiver unit (indoor only): 14°F to 158°F (-10°C to 70°C)
Remote unit: -40^ to 158^ ( -40^ to 70^ )
Indoor Humidity: 20% - 99% RH
Resolution: 0.1 degree for temperature, 1% for humidity
Temperature/Indoor Humidity trends – rising, falling or steady
Minimum/Maximum daily temperature/humidity records
12/24 Hour Clock
Low Battery Indicator
Channels: maximum of 3 remote sensors
Transmission: Max. 100 ft (30m) open area
Power: 2 AAA alkaline batteries (not
included) for receiver unit and 2 AAA alkaline batteries for remote sensor (not included)
One Year Warranty
This product is warranted against defects in materials or workmanship for one (I) year from date of original purchase. It does not cover damages or wear resulting from accident, misuse, abuse, commercial use, or unauthorized adjustment and/or repair. Should this product require service (or replacement at our option) while under warranty, do not return to retailer. Please pack the item carefully and return it paid, along with store receipt showing date of purchase and a note explaining reason for return to:
Taylor Precision Products 2220 Entrada Del Sol, Suite A Las Cruces, New Mexico 88001 www.taylorusa.com
There are no express warranties except as listed above. This warranty gives you specific legal rights, and you may have other rights which vary from state to state.
For additional product information, or warranty information in Canada or elsewhere outside the USA, please contact us through www.taylorusa.com.
Made to our exact specifications in China.
© 2008Taylor Precision Products and its affiliated companies, all rights reserved. Taylor® and Leading the Way in Accuracy® are registered trademarks of Taylor Precision Products and its affiliated companies. WeatherGuide™ is a trademark of Taylor Precision Products and its affiliated companies. All rights reserved.
- Table of Contents
- Remote Sensors
- How to Set up Your WeatherGuiSystem
- How to Display your WeatherGuide™
- Base unit location -
- Remote sensor location –
- How to Set the Clock Manually
- To manually set the clock:
- How to Read Your WeatherGuide™
- Temperature/Indoor Humidity Readings
- To View Minimum/Maximum temperature / indoor humidity readings
- Temperature Trend Indicators
- Indoor Humidity Trend Indicators
- Backlight Feature
- To Switch Between °F and °C
- Low Battery Indicator
- Disconnected Signals
- Transmission Collision
- Problem Solving
- Precautions
- Specifications
- One Year Warranty
Brand : Taylor
Model : 1525
Category : Weather Station