
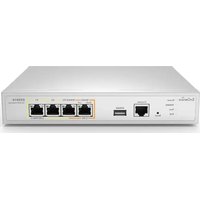
ESR1221N2 - Router ENGENIUS - Free user manual and instructions
Find the device manual for free ESR1221N2 ENGENIUS in PDF.


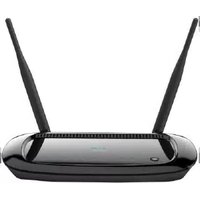
| Brand | EnGenius |
| Model | ESR1221N2 |
| Product Type | 300N Wireless Broadband Router |
| Wireless Standard | 802.11b/g/n |
| Frequency Band | 2.4 GHz |
| Wireless Speed | Up to 300 Mbps |
| WAN Ports | 1 x 10/100 Mbps RJ-45 |
| LAN Ports | 4 x 10/100 Mbps RJ-45 |
| Number of SSIDs | Up to 4 |
| WPS Support | Yes (Push Button and PIN) |
| Wireless Security | WEP, WPA, WPA2 (PSK and RADIUS) |
| Firewall Features | SPI, DoS protection, MAC/IP/URL Filter, DMZ |
| QoS | Priority Queue and Bandwidth Allocation |
| VPN Pass-Through | PPTP, IPSec |
| Dynamic DNS | Yes (supports DynDNS) |
| Scheduling | Supports Firewall and Power Saving schedules |
| Power Supply | AC Adapter (5V DC, 1A typical) |
| LED Indicators | Power, LAN, Internet, WLAN (blue) |
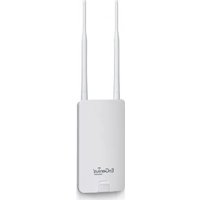
| Antenna | 2 external fixed antennas |
| Firmware Upgrade | Via web interface |
Frequently Asked Questions - ESR1221N2 ENGENIUS
User questions about ESR1221N2 ENGENIUS
0 question about this device. Answer the ones you know or ask your own.
Ask a new question about this device
Download the instructions for your Router in PDF format for free! Find your manual ESR1221N2 - ENGENIUS and take your electronic device back in hand. On this page are published all the documents necessary for the use of your device. ESR1221N2 by ENGENIUS.
USER MANUAL ESR1221N2 ENGENIUS
300N Wireless Router V1.0

natural_image
White wireless router with two antennas and a small orange key (no text or symbols visible)1
- Introduction......7
1.1. Package Contents....7
1.2. System Requirements....7
1.3. Introduction 8
1.4. LED Overview 9
1.5. Before you Begin....10
1.6. Considerations for Wireless Installation....10
- Configure PC/Laptop Network Interface 11
2.1. Windows XP/Vista 11
2.2. Windows 7....14
2.3. Apple MacOS....16
-
Setup your Router....17
-
Manually enter Setup Wizard....20
-
System 32
5.1. Status 32
5.2. LAN 36
5.3. DHCP 40
5.4. Schedule 43
5.5. Log....45
EnGenius®
2
5.6. Monitor 46
5.7. Language 47
6. Internet....48
6.1. Status....48
6.2. Dynamic IP Address 49
6.3. Static IP Address 51
6.4. PPP over Ethernet....52
6.5. Point-to-Point Tunneling Protocol (PPTP) 54
7. Wireless 57
7.1. Status....57
7.2. Advanced 60
7.3. Security 62
7.4. Filter....68
7.5. Wi-Fi Protected Setup (WPS)....70
7.6. Client List 73
7.7. Policy 74
8. Firewall....75
8.1. Enable 75
8.2. Advanced 76
8.3. DMZ....77
EnGenius®
3
8.4. Denial of Service (DoS)....78
8.5. MAC Filter 79
8.6. IP Filter....80
8.7. URL Filter....81
9. Advanced....82
9.1. Network Address Translation (NAT) 82
9.2. Port Mapping....83
9.3. Port Forwarding 84
9.4. Port Trigger 85
9.5. Application Layer Gateway (ALG) 86
9.6. Universal Plug and Play (UPnP) 87
9.7. Quality of Service (QoS) 88
9.8. Routing 91
10. Tools....93
10.1. Admin....93
10.2. Time 94
10.3. Dynamic DNS (DDNS)....95
10.4. DDNS Services work as follows: 95
10.5. Power 96
10.6. Diagnosis....97
EnGenius®
4
10.7. Firmware....98
10.8. Back-up 99
10.9. Reset....100
Appendix A – FCC Interference Statement....101
Appendix B – IC Interference Statement....103
Revision History
| Version Date Notes | |
| 1.0 2010/12/09 First Release |
1. Introduction
1.1. Package Contents
• EnGenius 11N WIRELESS ROUTER
- AC Adapter
• RJ-45 Ethernet LAN Cable
• CD-ROM with User Manual and Setup Utility
- Quick Guide
1.2. System Requirements
• RJ-45 Ethernet Based Internet (ADSL or Cable Modem)
• Computer with Wireless Network function
- Windows, Mac OS or Linux based operating systems
- Internet Explorer or Firefox or Safari Web-Browser Software
1.3. Introduction
ESR1221N2 is a palm size 11N WIRELESS ROUTER. It allows users to create a wireless network and share the Internet among multiple users.
The ESR1221N2 can be connected to the Internet through a DSL/Cable modem at any available location. It can even share the connection in your hotel's room if a RJ-45 network cable is used.
ESR1221N2 ensures data transmission security by encrypting data. It supports Wi-Fi Protected Setup (WPS) for simple and easy setup of WPA2 encryption of the wireless signal. It supports legacy encryption such as WEP and WPA.
1.4. LED Overview
| LED Lights Icon Description | ||
| Wireless LAN | Color – BlueLights when Wireless signal is activated.Blinks when Wireless data transfer. | |
| Internet | Color – BlueBlinks when WPS handshake is initialized. | |
| LAN | Color – BlueLights when wired network device is connected to RJ-45 port.Blinks when data transfer occurs on RJ-45 port. | |
| Power | Color – BlueLights when device is powered ON.Blinks device is Reset. | |
1.5. Before you Begin
This section will guide you through the installation process. Placement of the ESR1221N2 is very important to avoid poor signal reception and performance. Avoid placing the device in enclosed spaces such as a closet, cabinet or wardrobe.
1.6. Considerations for Wireless Installation
The operating distance of all wireless devices cannot be pre-determined due to a number of unknown obstacles in the environment that the device is deployed. These could be the number, thickness and location of walls, ceilings or other objects that the wireless signals must pass through. Here are some key guidelines to ensure that you have the optimal wireless range.
- Keep the number of walls and ceilings between the EnGenius access point and other network devices to a minimum. Each wall or ceiling can reduce the signal strength; the degradation depends on the building's material.
● Building materials makes a difference. A solid metal door or aluminum stubs may have a significant negative effect on range. Locate your wireless devices carefully so the signal can pass through a drywall or open doorways. Materials such as glass, steel, metal, concrete, water (fish tanks), mirrors, file cabinets and brick will also degrade your wireless signal. - Interferences can also come from your other electrical devices or appliances that generate RF noise. The most usual types are microwaves, or cordless phones.
2. Configure PC/Laptop Network Interface
2.1. Windows XP/Vista
- Click Start button and open Control Panel.
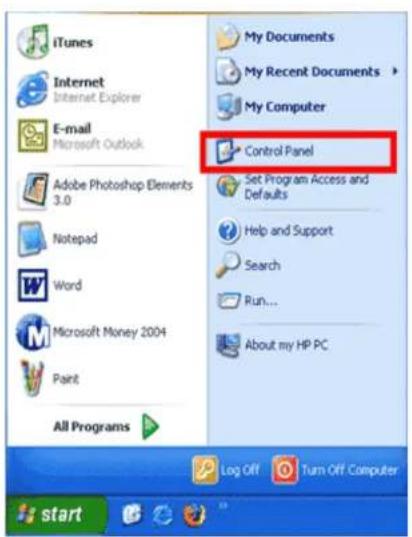
Windows XP

Windows Vista
EnGenius®
● Windows XP, click [Network Connection]
- Windows Vista, click [View Network Status and Tasks] then [Manage Network Connections]
● Right click on [Local Area Connection] and select [Properties].

Network Connections

Network and Internet Connect to the Internet View network status and tasks Set up file sharing

Local Area Connection

Tasks
View computers and devices
Connect to a network
Set up a connection or network
Manage network connections
Diagnose and repair
EnGenius®
13
- Check "Client for Microsoft Networks", "File and Printer Sharing", and Internet Protocol (TCP/IP) is ticked. If not, please install them.
- Select "Internet Protocol (TCP/IP)" and click [Properties]
- Select Obtain an IP Address automatically and Obtain DNS server address automatically
- Click OK when done


EnGenius®
2.2. Windows 7
- In the Start menu search box, type: ncpa.cpl

● The Network Connections List appears.

● Right-click the Local Area Connection icon and click Properties.
EnGenius®
- In the Networking tab of the Local Area Connection Properties dialog box, click either Internet Protocol Version 4 (TCP/IPv4) or Internet Protocol Version 6 (TCP/IPv6), and then click Properties.
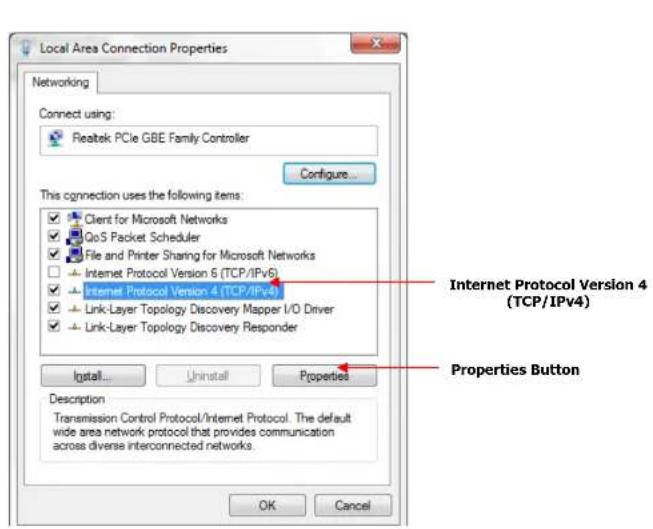

- Select Obtain an IP Address automatically and Obtain DNS server address automatically
- Click OK when done
EnGenius®
2.3. Apple MacOS
- Go to System Preferences > Network

● Under Network setting, select Using DHCP.
- Click Apply when done.

EnGenius®
3. Setup your Router

natural_image
Line drawing of a EnGenius wireless router with two antennas and a power outlet (no text or symbols on the device itself)- Plug in the adapter
- Please wait until Wireless LED is on
Click [Next] to proceed
EnGenius®

- Connect modem and router with an Ethernet cable as shown above
Click [Next] to proceed

- Please configure your network interface to DHCP (obtain an IP address automatically)
- Connect PC/Laptop and the router with an Ethernet cable as shown above (cable 2)
Click [Next] to proceed
EnGenius®

- Please check your Ethernet cable setting again and make sure it is the same as shown above.
- When confirmed, please click [Next] to enter Wizard setup
EnGenius®
4. Manually enter Setup Wizard
- Open a web browser (Internet Explorer/Firefox/Safari) and enter the IP Address http://192.168.0.1
Note: If you have changed the default LAN IP Address of the WIRELESS ROUTER, ensure you enter the correct IP Address.

- The default username and password are admin. Once you have entered the correct username and password, click the OK button to open the web-base configuration page.

EnGenius®
- You will see the following webpage if login successful.

Wireless Network Broadband Router
Status
LAN
DHCP
Schedule
Log
Monitor
Language
You can use the Status page to monitor the connection status for the WAN/LAN interface firmware and hardware version numbers, any illegal attempts to access your network or information on all DHCP client PCs currently connected to your network.
System
Model
Wireless Network Broadband Router
Mode
AP Router
Uptime
13 min 11 sec
Current Date/Time
2009/01/01 00:28:21
Hardware version
1.2.3
Serial Numbe
123456789
Application version
0.1.0
WAN Settings
Attain IP Protocol
Dynamic IP Address
IP address
...
Subnet Mask
...
EnGenius®
- Click Wizard to enter the Setup Wizard.
Then click Next to begin the wizard.

EnGenius®
5. Select the Operation Mode.
Please ensure you have the proper cables connected as described in the Hardware Installation section.


EnGenius®
AP Router Mode
a) The device will now automatically search for the correct Internet settings.
WAN Configuration
Automatically detecting the Services on WAN port. Please wait 7 seconds
b) The most appropriate WAN type will be determined and selected automatically. If it is incorrect, please select Others to set up the WAN settings manually.
WAN Configuration
Please choose your service type or select Others to setup WAN configurations manually.
| No. | Service | Description |
| 1. | DHCP | DHCP is used when your Modem is controlling your internet connection the Username & Password is stored on the Modem. |
| 2. | PPPoE | PPPoE is used when your modem is set in Bridge Mode and your Router is used to control the internet connection. IE: router houses ISP's Username & Password. |
| 3. | Others |
Rescan Skip Next
EnGenius®
c) There are many WAN service types available. Please obtain the correct settings from your Internet Service Provider (ISP).

Static IP Address
If your ISP Provider has assigned you a fixed IP address, enter the assigned IP address, Subnet mask, Default Gateway IP address, and Primary DNS and Secondary DNS (if available) of your ISP provider.

EnGenius®
Dynamic IP Address
The IP Address is allocated automatically. However some ISP's will also recognize the MAC address and will reject connections if the MAC address does not match.
If your ISP has recorded the MAC address of your computer's Ethernet LAN card, please connect only the computer with the authorized MAC address, and click the Clone MAC Address button.
This will replace the AP Router MAC address to the computer MAC address. The correct MAC address is used to initiate the connection to the ISP.
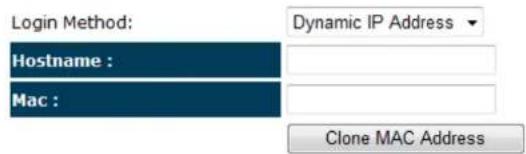
Dynamic IP Address
Hostname: This is optional. Only required if specified by ISP
MAC: The MAC Address that is used to connect to the ISP.
EnGenius®
PPP over Ethernet
ISP requires an account username and password.
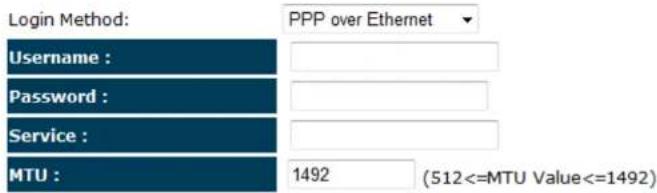
PPP over Ethernet
| Username: | Username assigned to you by the ISP |
| Password: | Password for this username. |
| Service: | You can assign a name for this service. (Optional) |
| MTU: | The maximum size of packets.Do not change unless mentioned by the ISP. |
Point-to-Point Tunneling Protocol (PPTP)
PPTP is used by some ISPs.

PPTP Settings :

PPTP WAN Interface Settings
| WAN Interface Type: | Select whether the ISP is set to Static IP or Dynamic IP addresses. |
| Hostname: This is optional. Only required if specified by ISP | |
| MAC: The MAC Address that is used to connect to the ISP. | |
PPTP Settings
| Login: | Username assigned to you by the ISP |
| Password: | Password for this username. |
| Service IP Address: | The IP Address of the PPTP server. |
| Connection ID: | This is optional. Only required if specified by ISP |
| MTU: | The maximum size of packets.Do not change unless mentioned by the ISP. |
d) Setup the level of wireless security to be used.
EnGenius recommends the Highest level of security to be used.
Note: 802.11n wireless speeds may not be achievable if the security is setup to Lowest and Low level.
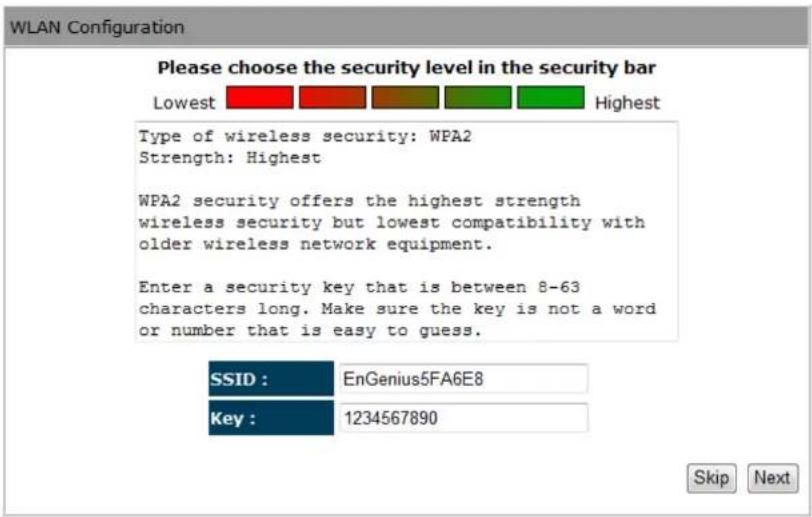
SSID: Enter the name of your wireless network.
Key: Enter the security key for your wireless network.
EnGenius®
e) Check the settings are correct, and then click Reboot to apply the settings.

EnGenius®
5. System
5.1. Status
This page allows you to monitor the status of the device.
System
| Model | Wireless Network Broadband Router |
| Mode | AP Router |
| Uptime | 28 sec |
| Current Date/Time | 2009/01/01 00:05:30 |
| Hardware version | 1.2.3 |
| Serial Number | 123456789 |
| Application version | 0.1.0 |
| Status | |
| Model: Description of this device. | |
| Mode: The device is currently in which mode. | |
| Uptime: The duration about the device has been operating without powering down or reboot. | |
| Current Date/Time: The device's system time.If this is incorrect, please set the time in the Tools / Time page. | |
| Hardware version and Serial Number: | Hardware information for this device. |
| Kernel and Application version: | Firmware information for this device. |
EnGenius®
WAN Settings
Attain IP Protocol Dynamic IP Address
IP address ---
Subnet Mask ---
Default Gateway ---
MAC address 00:99:88:77:66:55
Primary DNS ---
Secondary DNS ---
WAN Settings
Attain IP Protocol: Method used to connect to the Internet
IP address: The WAN IP Address of the device.
Subnet Mask The WAN Subnet Mask of the device.
MAC address The MAC address of the device's WAN Interface.
Primary and Secondary DNS: Primary and Secondary DNS servers assigned to the WAN connection.
LAN Settings
IP address 192.168.0.1
Subnet Mask 255.255.255.0
DHCP Server Enabled
LAN Settings
IP address: The LAN IP Address of the device.
Subnet Mask The LAN Subnet Mask of the device.
DHCP Server Whether the DHCP server is Enabled or Disabled.
WLAN Settings
Channel 11
SSID_1
ESSID EnGenius5FA6E8
Security Disable
BSSID 00:02:6F:5F:A6:E8
Associated Clients 1
SSID_2
ESSID EnGenius5FA6E8_2
Security Disable
BSSID 00:02:6F:5F:A6:E9
Associated Clients 0
WLAN Settings
| Channel: The wireless channel in use. | |
| ESSID: The SSID (Network Name) of the wireless network.(up to 4 SSID's are supported) | |
| Security: Wireless encryption is enabled for this SSID. | |
| BSSID: The MAC address of this SSID. | |
| Associated Clients: The number of wireless clients connected to this SSID. |
5.2. LAN
This page allows you to modify the device's LAN settings.
| Status | LAN | DHCP | Schedule | Log | Monitor | Language |
You can enable the Broadband routers DHCP server to dynamically allocate IP Addresses to your LAN client PCs. The broadband router must have an IP Address for the Local Area Network.
LAN IP
| IP address : | 192.168.0.1 |
| IP Subnet Mask : | 255.255.255.0 |
| 802.1d Spanning Tree : | Disabled ▼ |
DHCP Server
| DHCP Server : | Enabled |
| Lease time : | Forever |
| Start IP : | 192.168.0.100 |
| End IP : | 192.168.0.200 |
| Domain name : | esr1221N |
DNS Sérvers
| DNS Servers Assigned by DHCP Server | ||
| First DNS Server | DNS Relay | 192.168.0.1 |
| Second DNS Server | None | 0.0.0.0 |
Apply Cancel
EnGenius®
LAN IP
IP address : 192.168.0.1
IP Subnet Mask : 255.255.255.0
802.1d Spanning Tree : Disabled ▼
LAN IP
IP address: The LAN IP Address of this device.
IP Subnet Mask: The LAN Subnet Mask of this device.
802.1d Spanning Tree: When Enabled, the Spanning Tree protocol will prevent network loops in your LAN network.
DHCP Server
| DHCP Server : | Enabled |
| Lease time : | Forever |
| Start IP : | 192.168.0.100 |
| End IP : | 192.168.0.200 |
| Domain name : | esr1221N |
| DHCP Server | |
| DHCP Server: The DHCP | Server automatically allocates IP addresses to your LAN devices. |
| Lease Time: The duration | of the DHCP server allocates each IP address to a LAN device. |
| Start / End IP: The range | of IP addresses of the DHCP server will allocate to LAN devices. |
| Domain name: The domain name for this LAN network. | |
DNS Servers
DNS Servers Assigned by DHCP Server
First DNS Server
Second DNS Server
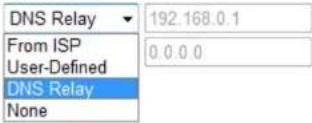
Two DNS servers can be assigned for use by your LAN devices.
There are four modes available.
DNS Servers
From ISP: The DNS server IP address is assigned from your ISP.
User-Defined: The DNS server IP address is assigned manually.
DNS Relay: LAN clients are assigned the device's IP address as the DNS server. DNS requests are relayed to the ISP's DNS server.
EnGenius®
5.3. DHCP
This page shows the status of the DHCP server and also allows you to control how the IP addresses are allocated.
| Status | LAN | DHCP | Schedule | Log | Monitor | Language |
DHCP Client Table
This DHCP Client Table shows client IP address assigned by the DHCP Server
| IP address | MAC address | Expiration Time |
| 192.168.0.100 | 00:1A:4D:49:1E:3A | Forever |
| 192.168.0.101 | 00:0C:F6:5C:06:14 | Forever |
Refresh
You can assign an IP address to the specific MAC address
Enable Static DHCP IP
| IP address | MAC address |
Add Reset
Current Static DHCP Table :
| NO. | IP address | MAC address | Select |
EnGenius®
The DHCP Client Table shows the LAN clients that have been allocated an IP address from the DHCP Server
DHCP Client Table
This DHCP Client Table shows client IP address assigned by the DHCP Server
| IP address | MAC address | Expiration Time |
| 192.168.0.100 | 00:1A:4D:49:1E:3A | Forever |
| 192.168.0.101 | 00:0C:F6:5C:06:14 | Forever |
Refresh
DHCP Client Table
| IP address: The LAN IP address of the client. |
| MAC address: The MAC address of the client's LAN interface. |
| Expiration Time: The time that the allocated IP address will expire. |
| Refresh: Click this button to update the DHCP Client Table. |
√ Enable Static DHCP IP
| IP address | MAC address | |
| 192.168.0.155 | 000AF43C1516 | |
| Add | Reset | |
Current Static DHCP Table :
| NO. | IP address | MAC address | Select |
| 1 | 192.168.0.150 | 00:0C:C6:3C:06:17 |
You can also manually specify the IP address that will be allocated to a LAN client by associating the IP address with its MAC address.
Type the IP address you would like to manually assign to a specific MAC address and click Add to add the condition to the Static DHCP Table.
EnGenius®
5.4. Schedule
This page allows you to schedule times that the Firewall and Power Saving features will be activated / deactivated.
Click Add to create a Schedule entry.
| Status | LAN | DHCP | Schedule | Log | Monitor | Language |
You can use the Schedule page to Start/Stop the Services regularly. The Schedule will start to run, when it get GMT Time from Time Server. Please set up the Time Server correctly in Toolbox. The services will start at the time in the following Schedule Table or it will stop.
√ Enabled Schedule Table (up to 8)
| NO. | Description | Service | Schedule | Select |
| 1 | schedule 01 | Firewall | From 08:00 to 20:00---Mon, Wed, Fri | |
| 2 | schedule 02 | Power Saving | From 21:00 to 23:30---Mon, Tue, Wed, Thu, Fri, Sat, Sun | |
| Add Edit Delete Selected Delete All | ||||

EnGenius®

| Schedule | |
| Schedule Description: Assign a name to the schedule. | |
| Service: The service provides for the schedule. | |
| Days: Define the Days to activate or deactivate the schedule. | |
| Time of day: Define the Time of day to activate or deactivated the schedule.Please use 24-hour clock format. |
5.5. Log
This page displays the system log of the device. When powered down or rebooted, the log will be cleared.
| Status | LAN | DHCP | Schedule | Log | Monitor | Language |
View the system operation information.
| day | 1 02:01:25 | [SYSTEM]: WLAN, start LLTD |
| day | 1 02:01:25 | [SYSTEM]: WLAN, LLTD Stopping |
| day | 1 02:01:25 | [SYSTEM]: UPnP, Stopping |
| day | 1 02:01:24 | [SYSTEM]: NET, start Firewall |
| day | 1 02:01:24 | [SYSTEM]: NET, start NAT |
| day | 1 02:01:24 | [SYSTEM]: NET, stop Firewall |
| day | 1 02:01:24 | [SYSTEM]: NET, stop NAT |
| day | 1 02:01:24 | [SYSTEM]: SCHEDULE, stop Power Save |
| day | 1 02:01:24 | [SYSTEM]: SCHEDULE, Schedule Stopping |
Save Clear Refresh
Log
| Save: Save the log to a file. | |
| Clear: Clears the log. | |
| Refresh: Updates the log. | |
EnGenius®
5.6. Monitor
This page shows a histogram of the WAN and Wireless LAN traffic.
The information is automatically updated every five seconds.
| Status | LAN | DHCP | Schedule | Log | Monitor | Language |
You can monitor the bandwidth in different interface. This page will refresh in every five seconds.

EnGenius®
5.7. Language
This page allows you to change the Language of the User Interface.
| Status | LAN | DHCP | Schedule | Log | Monitor | Language |
You can select other language in this page.
| Multiple Language : | Choose your language |
| Choose your language | |
| English | |
| Traditional Chinese | |
| Simplified Chinese |
EnGenius®
6. Internet
The Internet section allows you to manually set the WAN type connection and its related settings.
6.1. Status
This page shows the current status of the device's WAN connection.
Status Dynamic IP Static IP PPPoE PPTP
View the current internet connection status and related information.
WAN Settings
Attain IP Protocol Dynamic IP Address
IP address 10.0.174.29
Subnet Mask 255.255.254.0
Default Gateway 10.0.175.254
MAC address 00:02:6F:5F:A9:1E
Primary DNS 10.0.200.101
Secondary DNS 10.0.200.102
Renew
EnGenius®
6.2. Dynamic IP Address
The IP Address is allocated automatically. However some ISP's will also recognize the MAC address and will reject connections if the MAC address does not match.
If your ISP has recorded the MAC address of your computer's Ethernet LAN card, please connect only the computer with the authorized MAC address, and click the Clone MAC Address button.
This will replace the AP Router MAC address to the computer MAC address. The correct MAC address is used to initiate the connection to the ISP.

You can select the type of the account you have with your ISP provider.


EnGenius®
Dynamic IP Address
Hostname: This is optional. Only required if specified by ISP
MAC address: The MAC Address that is used to connect to the ISP.
DNS Servers
Two DNS servers can be assigned for use by your LAN devices.
There are two modes available.
From ISP: LAN devices are assigned the DNS server IP address of your ISP.
User-Defined: Set the DNS server IP address manually.
6.3. Static IP Address
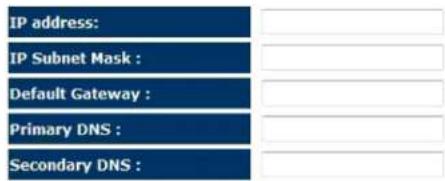
If your ISP Provider has assigned you a fixed IP address, enter the assigned IP address, Subnet mask, Default Gateway IP address, and Primary DNS and Secondary DNS (if available) of your ISP provider.
Status Dynamic IP Static IP PPPoE PPTP
You can select the type of the account you have with your ISP provider.
Apply Cancel
Static IP Address
IP address: Assign an IP address Manually.
IP Subnet Mask: Specify an IP address's subnet mask.
Default Gateway: Specify the gateway of your network.
User-Defined: Set the DNS server IP address manually.
Primary DNS Specify the primary DNS server's IP address.
Secondary DNS Specify the second DNS server's IP address.
EnGenius®
6.4. PPP over Ethernet
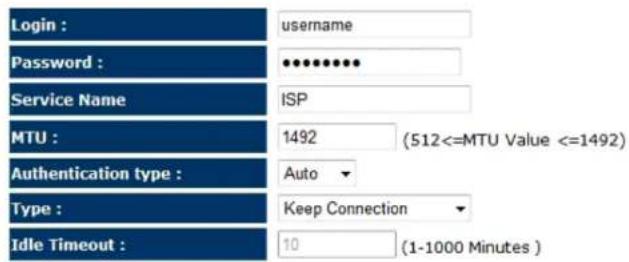
ISP requires an account username and password.

You can select the type of the account you have with your ISP provider.

EnGenius®
| PPP over Ethernet (PPPoE) | |
| Username: | Username assigned to you by the ISP |
| Password: | Password for this username. |
| Service: | You can assign a name for this service. (Optional) |
| MTU: | The maximum size of packets.Do not change unless mentioned by the ISP. |
| Authentication type | Select whether the ISP uses PAP or CHAP methods for authentication. Select Auto if unsure. |
| Type: | You can choose the method that the router maintains connection with the ISP.Keep Connection:The device will maintain a constant connection with the ISP.Automatic Connection:The device will only initiate connection to the ISP when there is an Internet connection request made from a LAN device.Manual Connection:The user will need to manually connect to the ISP by clicking the Connect button. |
| Idle Timeout: | When the connection type is Automatic Connection, when Internet traffic is idle, then the device will automatically disconnect from the ISP.Please specify the Idle time in minutes. |
6.5. Point-to-Point Tunneling Protocol (PPTP)
PPTP is used by some ISPs.
| Status | Dynamic IP | Static IP | PPPoE | PPTP |
You can select the type of the account you have with your ISP provider.
WAN Interface Settings :

PPTP Settings :


EnGenius®
| Point-to-Point Tunneling Protocol (PPTP) | |
| WAN Interface Type: | Select whether the ISP is set to Static IP or will allocate Dynamic IP addresses. |
| Hostname: This is optional. Only required if specified by ISP | |
| MAC address: The MAC Address that is used to connect to the ISP. | |
| Login: Username assigned to you by the ISP | |
| Password: Password for this username. | |
| Service IP Address: The IP Address of the PPTP server. | |
| Connection ID: This is optional. Only required if specified by ISP | |
| MTU: The maximum size of packets.Do not change unless mentioned by the ISP. | |
| Type: You can choose the method that the router maintains connection with the ISP.Keep Connection: The device will maintain a constant connection with the ISP.Automatic Connection: The device will only initiate connection to the ISP when there is an Internet connection request made from a LAN device.Manual Connection: The user will need to manually connect to the ISP by clicking the Connect button. | |
| Idle Timeout: | When the connection type is Automatic Connection, when Internet traffic is idle, then the device will automatically disconnect from the ISP.Please specify the Idle time in minutes. |
7. Wireless
The Wireless section allows you to configure the Wireless settings.
7.1. Status
This page shows the current status of the device's Wireless settings.
| Basic | Advanced | Security | Filter | WPS | Client List | Policy |
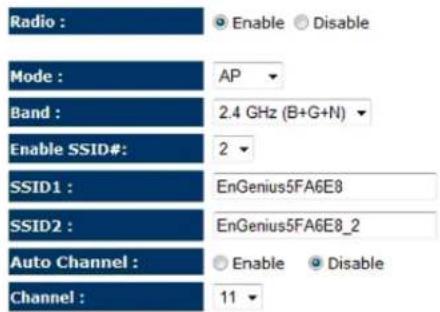
This page allows you to define SSID, and Channel for the wireless connection. These parameters are used for the wireless stations to connect to the Access Point.
Apply Cancel
EnGenius®
| Basic | |
| Radio: Enable or Disable the device's wireless signal. | |
| Mode: Select between Access Point or Wireless Distribution System (WDS) modes. | |
| Band: Select the types of wireless clients that the device will accept.eg: 2.4 GHz (B+G+N)Only 802.11b and 11g clients will be allowed. | |
| Enable SSID#: Select the number of SSID's (Wireless Network names) you would like.You can create up to 4 separate wireless networks. | |
| SSID# Enter the name of your wireless network. You can use up to 32 characters. | |
| Auto Channel: When enabled, the device will scan the wireless signals around your area and select the channel with the least interference. | |
| Channel: Manually select which channel the wireless signal will use. | |
| Check Channel Time: When Auto Channel is Enabled, you can specify the period of the device will scan the wireless signals around your area. |
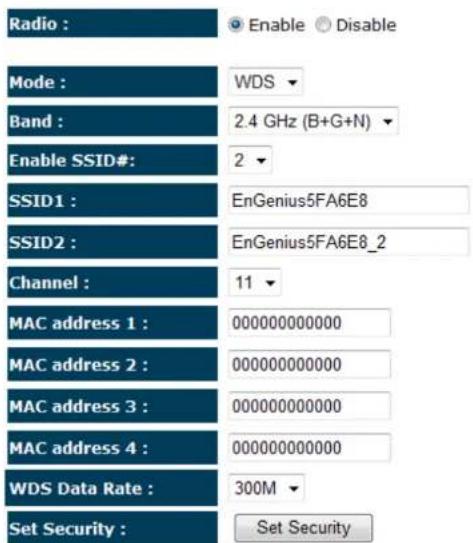
Wireless Distribution System (WDS)
Using WDS to connect Access Point wirelessly, and in doing so extend a wired infrastructure to locations where cabling is not possible or inefficient to implement.
Note that compatibility between different brands and models is not guaranteed. It is recommended that the WDS network be created using the same models for maximum compatibility.
Also note that all Access Points in the WDS network needs to use the same Channel and Security settings.
To create a WDS network, please enter the MAC addresses of the Access Points that you want included in the WDS. There can be a maximum of four access points.
7.2. Advanced
This page allows you to configure wireless advance settings. It is recommended the default settings are used unless the user has experience with these functions.
| Basic | Advanced | Security | Filter | WPS | Client List | Policy |
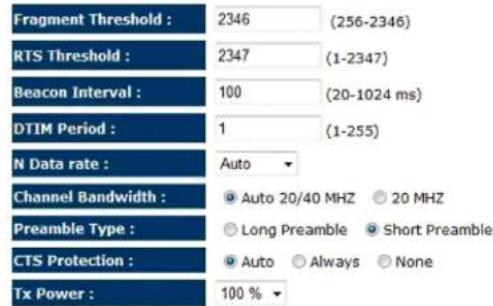
These settings are only for more technically advanced users who have a sufficient knowledge about wireless LAN. These settings should not be changed unless you know what effect the changes will have on your Broadband router.

EnGenius®
| Advanced | |
| Fragment Threshold: | Specifies the size of the packet per fragment. This function can reduce the chance of packet collision.However when this value is set too low, there will be increased overheads resulting in poor performance. |
| RTS Threshold: When the packet size is smaller than the RTS Threshold, then the packet will be sent without RTS/CTS handshake which may result in incorrect transmission. | |
| Beacon Interval: The time interval that the device broadcasts a beacon. This beacon is used to synchronize all wireless clients on the network. | |
| DTIM Period: A Delivery Traffic Indication Message informs all wireless clients that the access point will be sending Multi-casted data. | |
| N Data Rate: You can limit the transfer rates between the device and wireless clients.Each Modulation Coding Scheme (MCS) refers to a specific transfer speed. | |
| Channel Bandwidth: | Set whether each channel uses 20 or 40Mhz.To achieve 11n speeds, 40Mhz channels must be used. |
| Preamble Type: A preamble is a message that helps access points synchronize with the client.Long Preamble is standard based so increases compatibility.Short Preamble is non-standard, so it decreases compatibility but increases performance. | |
| CTS Protection: When Enabled, the performance is slightly lower however the chances of packet collision is greatly reduced. | |
| Tx Power: Set the power output of the wireless signal. | |
7.3. Security
This page allows you to set the wireless security settings.
| Basic | Advanced | Security | Filter | WPS | Client List | Policy |
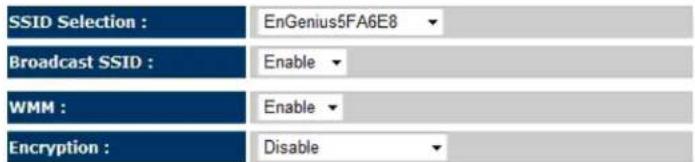
This page allows you setup the wireless security. Turn on WEP or WPA by using Encryption Keys could prevent any unauthorized access to your wireless network.

Enable 802.1x Authentication
Apply
Cancel
| Security | |
| SSID Selection: Select the SSID that the security settings will apply to. | |
| Broadcast SSID: | If Disabled, then the device will not be broadcasting the SSID. Therefore it will be invisible to wireless clients. |
| WMM: | Wi-Fi Multi-Media is a Quality of Service protocol which prioritizes traffic in the order according to voice, video, best effort, and background. |
EnGenius®
| Note that in certain situations, WMM needs to be enabled to achieve 11n transfer speeds. | |
| Encryption: The encryption method to be applied.You can choose from WEP, WPA pre-shared key or WPA RADIUS.·Disabled - no data encryption is used.·WEP - data is encrypted using the WEP standard.·WPA-PSK - data is encrypted using the WPA-PSK standard. This is a later standard than WEP, and provides much better security than WEP. If all your Wireless stations support WPA-PSK, you should use WPA-PSK rather than WEP.·WPA2-PSK - This is a further development of WPA-PSK, and offers even greater security, using the AES (Advanced Encryption Standard) method of encryption.·WPA-RADIUS - This version of WPA requires a Radius Server on your LAN to provide the client authentication according to the 802.1x standard. Data transmissions are encrypted using the WPA standard.If this option is selected:·This Access Point must have a "client login" on the Radius Server.·Each user must have a "user login" on the Radius Server.·Each user's wireless client must support 802.1x and provide the login data when required.·All data transmission is encrypted using the WPA standard. Keys are automatically generated, so no key input is required. | |
IEEE 802.1x is an authentication protocol. Every user must use a valid account to login to this Access Point before accessing the wireless LAN. The authentication is processed by a RADIUS server. This mode only authenticates users by IEEE 802.1x, but it does not encrypt the data during communication.

Enable 802.1x Authentication
| RADIUS Server IP address : | |
| RADIUS Server port : | 1812 |
| RADIUS Server password : |
| 802.1x Authentication | |
| RADIUS Server IP Address: | The IP Address of the RADIUS Server |
| RADIUS Server port: | The port number of the RADIUS Server. |
| RADIUS Server password: | The RADIUS Server's password. |
WEP Encryption:
| Encryption : | WEP | ||
| Authentication type : | Open System Shared Key Auto | ||
| Key Length : | 128-bit | ||
| Key type : | ASCII (13 characters) | ||
| Default key : | Key 1 | ||
| Encryption Key 1 : | 1234567890123 | ||
| Encryption Key 2 : | ********** | ||
| Encryption Key 3 : | ********** | ||
| Encryption Key 4 : | ********** | ||
| WEP Encryption | |
| Authentication Type: | Please ensure that your wireless clients use the same authentication type. |
| Key type ASCII: regular text (recommended)HEX: for advanced users | |
| Key Length: | Select the desired option, and ensure the wireless clients use the same setting.64 Bit - data is encrypted, using the default key, before being transmitted.You must enter at least the default key. For 64 Bit Encryption, the key size is 10 chars in HEX (0~9 and A~F).128 Bit - data is encrypted, using the default key, before being transmitted.You must enter at least the default key. For 128 Bit Encryption, the key size is 26 chars in HEX (0~9 and A~F). |
| Default Key: | Select the key you wish to be the default. Transmitted data is ALWAYS encrypted using the Default Key; the other Keys are for decryption only.You must enter a Key Value for the Default Key. |
| Encryption Key #: | Enter the key value or values you wish to use. Only the Key selected as Default is required. The others are optional. |
WPA Pre-Shared Key Encryption:
| Encryption : | WPA pre-shared key ▼ | ||
| WPA type : | ○ WPA(TKIP) ○ WPA2(AES) ○ WPA2 Mixed | ||
| Pre-shared Key type : | Passphrase ▼ | ||
| Pre-shared Key : | 1234567890 | ||
| WPA Pre-Shared Key Encryption | |
| Authentication Type: | Please ensure that your wireless clients use the same authentication type. |
| WPA type: | Select the WPA encryption you would like.Please ensure that your wireless clients use the same settings. |
| Pre-shared Key Type: | Select whether you would like to enter the Key in HEX or Passphrase format. |
| Pre-shared Key: | Wireless clients must use the same key to associate the device.If using passphrase format, the Key must be from 8 to 63 characters in length. |
WPA RADIUS Encryption:
| Encryption : | WPA RADIUS | ||
| WPA type : | ○ WPA(TKIP) ○ WPA2(AES) ○ WPA2 Mixed | ||
| RADIUS Server IP address : | |||
| RADIUS Server port : | 1812 | ||
| RADIUS Server password : | |||
| WPA RADIUS Encryption | |
| WPA type: | Select the WPA encryption you would like.Please ensure that your wireless clients use the same settings. |
| RADIUS Server IP address: | Enter the IP address of the RADIUS Server |
| RADIUS Server Port: | Enter the port number used for connections to the RADIUS server. |
| RADIUS Server password: | Enter the password required to connect to the RADIUS server. |
7.4. Filter
This page allows you to create filters to control which wireless clients can connect to this device by only allowing the MAC addresses entered into the Filtering Table.
| Basic | Advanced | Security | Filter | WPS | Client List | Policy |
For security reason, the Access Point features MAC Address Filtering which only allows authorized MAC Addresses to associate with the Access Point
√ Enable Wireless Access Control
| Description | MAC address |
| Notebook2 | 00ABC710722 |
| Add Reset |
MAC Address Filtering Table :
| NO. | Description | MAC address | Select |
| 1 | Notebook1 | 00:0C:C6:3C:06:17 |
| Apply | Cancel |
EnGenius®
| Wireless Filter | |
| Enable Wireless Access Control: | Tick the box to Enable Wireless Access Control.When Enabled, only wireless clients on the Filtering Table will be allowed. |
| Description: Enter a name or description for this entry. | |
| MAC address: Enter the MAC address of the wireless client that you wish to allow connection. | |
| Add: Click this button to add the entry. | |
| Reset: Click this button if you have made a mistake and want to reset the MAC address and Description fields. | |
| MAC Address Filtering Table | |
| Only clients listed in this table will be allowed access to the wireless network. | |
| Delete Selected: Delete the selected entries. | |
| Delete All: Delete all entries | |
| Reset: Un-tick all selected entries. | |
7.5. Wi-Fi Protected Setup (WPS)
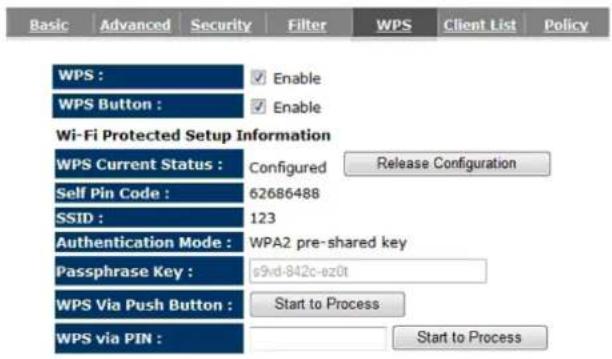
WPS feature is following the Wi-Fi Alliance WPS standard and it eases the set up of security-enabled Wi-Fi networks in the home and small office environment.
It reduces the user steps required to configure a network and supports two methods that are familiar to most consumers to configure a network and enable security.
EnGenius®
| Wi-Fi Protected Setup (WPS) | |
| WPS: | Tick to Enable the WPS feature. |
| WPS Button: Tick to Enable the WPS push button. | |
| Wi-Fi Protected Setup Information | |
| WPS Current Status: | Shows whether the WPS function is Configured or Un-configured.Configured means that WPS has been used to authorize connection between the device and wireless clients. |
| SSID: The SSID (wireless network name) used when connecting using WPS. | |
| Authentication Mode: | Shows the encryption method used by the WPS process. |
| Passphrase Key: This is the passphrase key that is randomly generated during the WPS process. It is required if wireless clients that do not support WPS attempts to connect to the wireless network. | |
| WPS Via Push Button: | Click this button to initialize WPS feature using the push button method. |
There are two methods to initialize the WPS feature. They are the Push Button and Pin code methods.
EnGenius®
1. Pin Code Method
Note the Pin code of your WIRELESS ROUTER device.

Please use this Pin code to initialize the WPS process from the wireless client configuration utility.
This process will be different for each brand or model. Please consult the user manual of the wireless client for more information.
EnGenius®
7.6. Client List
This page shows the wireless clients that are connected to the WIRELESS ROUTER device.
| Basic | Advanced | Security | Filter | WPS | Client List | Policy |
WLAN Client Table :
This WLAN Client Table shows client MAC address associate to this Broadband Router
| Interface | MAC Address | Signal (%) | Idle Time |
| EnGenius5FA6E8_2 | 00:19:7D:9E:D4:9C | 68 | 20 secs |
Refresh
EnGenius®
7.7. Policy
This page allows you to configure the access policies for each SSID (wireless network).

SSID 1 Connection Control Policy

SSID 2 Connection Control Policy

Apply Cancel
| Policy | |
| WAN Connection: | Allow wireless clients on this SSID to access the WAN port which typically is an Internet connection. |
| Communication between Wireless clients: | Whether each wireless client can communicate with each other in this SSID. When Disabled, the wireless clients will be isolated from each other. |
| Communication between Wireless clients and Wired clients. | Whether wireless clients on this SSID can communicate with computers attached to the wired LAN port. |
8. Firewall
The Internet section allows you to set the access control and Firewall settings.
8.1. Enable
This page allows you to Enable / Disable the Firewall features.
When Enabled, Denial of Service (DoS) and SPI (Stateful Packet Inspection) features are also be enabled.
| Enable | Advanced | DMZ | DoS | MAC Filter | IP Filter | URL Filter |
Firewall automatically detects and blocks Denial of Service (DoS) attacks. URL blocking, packet filtering and SPI (Stateful Packet Inspection) are also supported. The hackers attack will be recorded associated with timestamp in the security logging area.
Firewall : ☑ Enable ☑ Disable
Apply
EnGenius®
8.2. Advanced
You can choose whether to allow VPN (Virtual Private Network) packets to pass through the Firewall.
| Enable | Advanced | DMZ | DoS | MAC Filter | IP Filter | URL Filter |
| Description | Select | |||||
| VPN PPTP Pass-Through | ✓ | |||||
| VPN IPSec Pass-Through | ✓ | |||||
Apply Cancel
EnGenius®
8.3. DMZ
If enabled this feature, allows the DMZ computer on your LAN to be exposed to all users on the Internet.
- This allows almost any application to be used on the server.
- The "DMZ PC" will receive all Unknown connections and data.
- If the DMZ feature is enabled, please enter the IP address of the PC to be used as the "DMZ PC"
Note: The "DMZ PC" is effectively outside the Firewall, making it more vulnerable to attacks. For this reason, you should only enable the DMZ feature when required.

If you have a local client PC that cannot run an Internet application properly from behind the NAT firewall, you can open unrestricted two-way Internet access for this client by defining a Virtual DMZ Host.
√ Enable DMZ
Local IP Address : 192.168.0.100 < 192.168.0.100
Apply Cancel
EnGenius®
8.4. Denial of Service (DoS)
Denial of Service (Denial of Service) is a type of Internet attack that sends a high amount of data to you with the intent to overload your Internet connection.
Enable the DoS firewall feature to automatically detect and block these DoS attacks.
| Enable | Advanced | DMZ | DoS | MAC Filter | IP Filter | URL Filter |
The Firewall can detect and block DOS attacks, DOS (Denial of Service) attacks can flood your Internet Connection with invalid packets and connection requests, using so much bandwidth and so many resources that Internet access becomes unavailable.
Block DoS : ☑ Enable ☑ Disable
Apply Cancel
EnGenius®
8.5. MAC Filter
You can choose whether to Deny or only Allow those computers listed in the MAC Filtering table to access the Internet.

MAC Filters are used to deny or allow LAN computers from accessing the Internet.
√ Enable MAC filtering
Deny all clients with MAC address listed below to access the network

MAC Filtering table :
| NO. | Description | LAI MAC Address | Select |
| 1 | Notebook1 | 00:0C:C6:3C:06:17 |
Apply Cancel
MAC Filter
| Enable MAC filtering: | Tick this box to Enable the MAC filtering feature. |
| Deny all clients with MAC addresses listed below to access the network: | When selected, the computers listed in the MAC Filtering table will be Denied access to the Internet. |
| Allow all clients with MAC addresses listed below to access the network: | When selected, only the computers listed in the MAC Filtering table will be Allowed access to the Internet. |
EnGenius®
8.6. IP Filter
You can choose whether to Deny or only Allow, computer with those IP Addresses from accessing certain Ports.
This can be used to control which Internet applications the computers can access.
You may need to have certain knowledge of what Internet ports the applications use.

| IP Filter | |
| Enable IP filtering: | Tick this box to Enable the IP filtering feature. |
| Deny all clients with IP addresses listed below to access the network: | When selected, the computers with IP addresses specified will be Denied access to the indicated Internet ports. |
| Allow all clients with IP addresses listed below to access the network: | When selected, the computers with IP addresses specified will be Allowed access only to the indicated Internet ports. |
EnGenius®
8.7. URL Filter
You can deny access to certain websites by blocking keywords in the URL web address.
For example, "abc123" has been added to the URL Blocking Table. Any web address that includes "abc123" will be blocked.

You can block access to certain Web sites for a particular PC by entering either a full URL address or just a keyword of the Web site

Current URL Blocking Table :
| NO. | URL/keyword | Select |
| 1 | abc123 |
Apply Cancel
EnGenius®
9. Advanced
The Internet section allows you to configure the Advanced settings of the router.
9.1. Network Address Translation (NAT)
This page allows you to Enable / Disable the Network Address Translation (NAT) feature. The NAT is required to share one Internet account with multiple LAN users.
It also is required for certain Firewall features to work properly.
| NAT | Port map. | Port fw. | Port tri. | ALG | UPnP | QoS | Routing |
NAT(Network Address Translation) involves re-writing the source and/or destination addresses of IP packets as they pass though a Router or firewall, NAT enable multiple hosts on a private network to access the Internet using a single public IP address.
NAT: ☐ Enable ☐ Disable
Apply
EnGenius®
9.2. Port Mapping
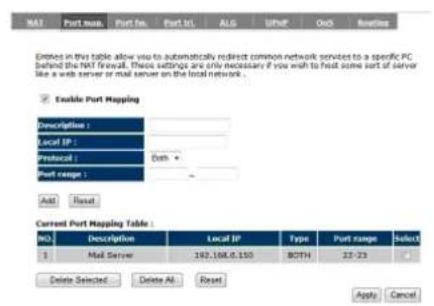
Port Mapping allows you to redirect a particular range of ports to a computer on your LAN network. This helps you host servers behind the NAT and Firewall.
In the example below, there is a Mail Server that requires ports 22 to 23.
When there is a connection from the Internet on those ports, it will be redirected to the Mail Server at IP address 192.168.0.150.
| Port Mapping | |
| Enable Port Mapping | Tick this box to Enable the Port Mapping feature. |
| Description: Enter a name or description to help you identify this entry. | |
| Local IP: The local IP address of the computer the server is hosted on. | |
| Protocol: | Select to apply the feature to either TCP, UDP or Both types of packet transmissions. |
| Port range: The range of ports that this feature will be applied to. | |
EnGenius®
9.3. Port Forwarding
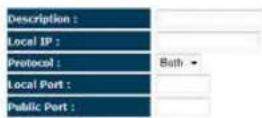
Port Forwarding allows you to redirect a particular public port to a computer on your LAN network. This helps you host servers behind the NAT and Firewall.
In the example below, there is a FTP Server running on port 21 on the LAN.
For security reasons, the Administrator would like to provide this server to Internet connection on port 30.
Therefore then there is a connection from the Internet on port 30, it will be forwarded to the computer with the IP address 192.168.0.100 and changed to port 21.

You can configure the router as a Virtual Server allowing remote users to access services such as Web or FTP at your local PC. Depending on the requested service (TCP/UDP) port number, the router will redirect the external service request to the appropriate internal server (located at one of your local PCs).
2 Enable Port Forwarding

Current Port Forwarding Table

| Port Forwarding | |
| Enable Port Forwarding | Tick this box to Enable the Port Forwarding feature. |
| Description: Enter a name or description to help you identify this entry. | |
| Local IP: The local IP address of the computer the server is hosted on. | |
| Protocol: Select to apply the feature to either TCP, UDP or Both types of packet transmissions. | |
| Local Port: The port that the server is running on the local computer. | |
| Public Port: When a connection from the Internet is on this port, then it will be forwarded to the indicated local IP address. | |
9.4. Port Trigger
If you use Internet applications which use non-standard connections or port numbers, you may find that they do not function correctly because they are blocked by the Wireless Router's firewall. Port Trigger will be required for these applications to work.

| Port Trigger | |
| Enable Port Forwarding | Tick this box to Enable the Port Trigger feature. |
| Popular applications: | This is a list of some common applications with preset settings.Select the application and click Add to automatically enter the settings. |
| Trigger port: This is the outgoing (outbound) port numbers for this application. | |
| Trigger type | Select whether the application uses TCP, UDP or Both types of protocols for outbound transmissions. |
| Public Port These are the inbound (incoming) ports for this application. | |
| Public type: | Select whether the application uses TCP, UDP or Both types of protocols for inbound transmissions. |
9.5. Application Layer Gateway (ALG)
Certain applications may require the use of ALG feature to function correctly. If you use any of the applications listed, please tick and select it to enable this feature.
| NAT | Port.map. | Port.fw. | Port.tri. | ALG | UPnP | QoS | Routing |
The ALG (Application Layer Gateway) serves the purpose of a window between correspondent application processes so that they may exchange information on the open environment.
| Description | Select |
| H323 | |
| MMS | |
| TFTP | |
| Egg | |
| IRC | |
| Amanda | |
| Quake3 | |
| Talk | |
| IPsec | |
| FTP | |
| SIP |
EnGenius®
9.6. Universal Plug and Play (UPnP)
The UPnP function allows automatic discovery and configuration of UPnP enabled devices on your network. It also provides automatic port forwarding for supported applications to seamlessly bypass the Firewall.
| NAT | Port map. | Port fw. | Port tri. | ALG | UPnP | QoS | Routing |
Universal Plug and Play is designed to support zero-configuration, "invisible" networking, and automatic discovery for a range of device from a wide range of vendors. With UPnP, a device can dynamically join a network, obtain an IP address and learn about the presence and capabilities of other devices all automatically. Devices can subsequently communicate with each other directly
Enable the Universal Plug and Play (UPnP) Feature
☐ Allow users to make port forwarding changes through UPnP
Apply
| Universal Plug and Play (UPnP) | |
| Enable the UPnP Feature: | Tick this box to Enable the UPnP feature to allow supported devices to be visible on the network. |
| Allow users to make port forwarding changes through UPnP: | Tick this box to allow applications to automatically set their port forwarding rules to bypass the firewall without any user set up. |
EnGenius®
9.7. Quality of Service (QoS)
QoS allows you to control the priority that the data is transmitted over the Internet, or to reserve a specific amount of Internet bandwidth. This is to ensure that applications get enough Internet bandwidth for a pleasant user experience.
If not, then the performance and user experience of time sensitive transmissions such as voice and video could be very poor.
In order for this feature to function properly, the user should first set the Uplink and Downlink bandwidth provided by your Internet Service Provider.

Quality of Service (QoS) refers to the capability of a network to provide better service to selected network traffic. The primary goal of QoS is to provide priority including dedicated bandwidth, controlled jitter and latency (required by some real-time and interactive traffic), and improved loss characteristics. Also important is making sure that providing priority for one or more flows does not make other flows fail.
Total Bandwidth Settings
| Uplink | Full |
| Downlink | Full |
QoS : ○ Priority Queue ○ Bandwidth Allocation ● Disabled
Apply Cancel
| Total Bandwidth Settings | |
| Uplink: | Set the Uplink bandwidth provided by your Internet Service Provider. |
| Downlink: Set the Downlink bandwidth provided by your Internet Service Provider. | |
| Priority Queue Sets the QoS method to Priority Queue. | |
| Bandwidth Allocation: | Sets the QoS method to Bandwidth Allocation. |
| Disabled Disables the QoS feature. | |
EnGenius®
Priority Queue Method
Bandwidth priority is set to either High or Low. The transmissions in the High queue will be processed first.
QoS :
Priority Queue Bandwidth Allocation Disabled
Unlimited Priority Queue
| Local IP Address | Description |
| The IP address will not be bounded in the QoS limitation |
High/Low Priority Queue
| Protocol | High Priority | Low Priority | Specific Port | |||
| FTP | 20,21 | |||||
| HTTP | 80 | |||||
| TELNET | 23 | |||||
| SMTP | 25 | |||||
| POP3 | 110 | |||||
| Name: | Both ▼ | ~ | ||||
| Name: | Both ▼ | ~ | ||||
| Name: | Both ▼ | ~ | ||||
| Unlimited Priority Queue | |
| Local IP Address: | The computer with this IP Address will not be bound by the QoS rules. |
| High / Low Priority Queue | |
| Protocol: The type of network protocol. | |
| High / Low Priority Sets the protocol to High or Low priority. | |
| Specific Port Each protocol uses a specific port range.Please specify the ports used by this protocol. | |
EnGenius®
Bandwidth Allocation Method
You can set the maximum amount of bandwidth a certain protocol will use at one time. Or you can set a minimum amount of bandwidth that will be guaranteed to a certain protocol.

Current QoS Table:
| NO. | Type | Local IP range | Protocol | Port range | Policy | Rate (bps) | Select |
| 1 | Both | 192.168.0.100 ~ 192.168.0.103 | TCP | 80 ~ 90 | Min | 2M | |
| Delete Selected | Delete All | Reset | |||||
| Bandwidth Allocation | |
| Type: | Set whether the QoS rules apply to transmission that are Download, Upload or Both directions. |
| Local IP range: | Enter the IP address range of the computers that you would like the QoS rules to apply to. |
| Protocol: Select | from this list of protocols to automatic set the related port numbers. |
| Port range: Each | protocol uses a specific port range.Please specify the ports used by this protocol.. |
| Policy: | Choose whether this rule is to set a limit on the Maximum amount of bandwidth allocated to this protocol, or to set the guaranteed Minimum amount of bandwidth for this protocol. |
EnGenius®
9.8. Routing
If your WIRELESS ROUTER device is connected a network with different subnets, then this feature will allow the different subnets to communicate with each other.
Note: NAT function needs to be disabled for the Routing feature to be enabled.

You can enable Static Routing to turn off the NAT function of the router and let the router forward packets by your routing policy,
To take Static Route effect, please disable NAT function.


| Static Routing | |
| Enable Static Routing: Tick this box to Enable the Static Router feature. | |
| Destination LAN IP: Enter the IP address of the destination LAN. | |
| Subnet Mask: Enter the Subnet Mask of the destination LAN IP address | |
| Default Gateway: | Enter the IP address of the Default Gateway for this destination IP and Subnet. |
| Hops: Specify the maximum number of Hops in the static routing rule. | |
| Interface: Select whether the routing applies to LAN or WAN interfaces. | |
EnGenius®

flowchart
graph TD
    A["Client1\n192.168.1.11"] --> B["Router1\n192.168.123.216"]
    B --> C["Submask\n192.168.123.210"]
    C --> D["Router2\n192.168.123.103"]
    D --> E["Client2\n192.168.0.2"]
    C --> F["Client3\n192.168.12.22"]
    B --> G["Client3\n192.168.12.22"]
| Destination Subnet Mask Gateway Hop Interface | ||
| 192.168.1.0 255.255.255.0 192.168.123.216 | 1 LAN | |
| 192.168.0.0 255.255.255.0 192.168.123.103 | 1 LAN |
So if, for example, Client3 wants to send an IP data packet to 192.168.0.2 (Client 2), it would use the above table to determine that it had to go via 192.168.123.103 (Router 2)
And if it sends Packets to 192.168.1.11 (Client 1) will go via 192.168.123.216 (Router 1).
EnGenius®
10. Tools
This section allows you to configure some device system settings.
10.1. Admin
This page allows you to change the system password and to configure remote management.

You can change the password that you use to access the router, this is not your ISP account password.

Remote management allows the router to be configured from the Internet by a web browser. A username and password is still required to access the Web-Management interface.

Apply Cancel
| Change Password | |
| Old Password: Enter the current password. | |
| New Password: Enter your new password. | |
| Repeat New Password: Enter your new password again for verification. | |
| Remote Management | |
| Host Address: | You can only perform remote management from the specified IP address. Leave blank to allow any host to perform remote management. |
| Port: Enter the port number you want to accept remote management connections. | |
| Enable: Tick to Enable the remote management feature. | |
EnGenius®
10.2. Time
This page allows you to set the system time.
| Admin | Time | DDNS | Power | Diagnosis | Firmware | Back-up | Reset |
The Router reads the correct time from NTP servers on the Internet and sets its system clock accordingly. The Daylight Savings option merely advances the system clock by one hour. The time zone setting is used by the system clock when displaying the correct time in schedule and the log files.
| Time Setup: | Synchronize with the NTP Server |
| Time Zone : | (GMT)Greenwich Mean Time: Dublin, Edinburgh, Lisbon, London |
| NTP Time Server : | |
| Daylight Saving : | EnableFrom January 1 To January 1 |

| Time | |
| Time Setup: Select the | method you want to set the time. |
| Time Zone: Select the | time zone for your current location. |
| NTP Time Server: Enter | the address of the Network Time Protocol (NTP) Server to automatically synchronize with a server on the Internet. |
| Daylight Savings: Check | whether daylight savings applies to your area. |
EnGenius®
10.3. Dynamic DNS (DDNS)
This free service is very useful when combined with the Virtual Server feature. It allows Internet users to connect to your Virtual Servers using a URL, rather than an IP Address.
This also solves the problem of having a dynamic IP address. With a dynamic IP address, your IP address may change whenever you connect, which makes it difficult to connect to you.

10.4. DDNS Services work as follows:
- You must register for the service at one of the listed DDNS Service providers.
- After registration, use the Service provider's normal procedure to obtain your desired Domain name.
- Enter your DDNS data on the ETR-9305's DDNS screen, and enable the DDNS feature.
- The Wireless Router will then automatically ensure that your current IP Address is recorded at the DDNS service provider's Domain Name Server.
- From the Internet, users will be able to connect to your Virtual Servers (or DMZ PC) using your Domain name, as shown on this screen.
| Dynamic DNS | |
| Dynamic DNS Tick this box to Enable the DDNS feature. | |
| Server Address: Select the list of | Dynamic DNS homes you would like to use from this list. |
| Username / Password: Enter the | Username and Password of your DDNS account. |
EnGenius®
10.5. Power
This page allows you to Enable or Disable the wireless LAN power saving features.
| Admin | Time | DDNS | Power | Diagnosis | Firmware | Back-up | Reset |
You can use the power page to save energy for WLAN interfaces.
Power Saving Mode :


EnGenius®
10.6. Diagnosis
This page allows you determine if the WIRELESS ROUTER device has an active Internet connection.
| Admin | Time | DDNS | Power | Diagnosis | Firmware | Back-up | Reset |
This page can diagnose the current network status
| Address to Ping : | Start | |
| Ping Result : |
| Diagnosis | |
| Address to Ping: Enter | the IP address you like to see if a successful connection can be made. |
| Ping Result: The results of the Ping test. | |
10.7. Firmware
The firmware (software) in the WIRELESS ROUTER device can be upgraded using your Web Browser.
| Admin | Time | DDNS | Power | Diagnosis | Firmware | Back-up | Reset |
You can upgrade the firmware of the router in this page. Ensure, the firmware you want to use is on the local hard drive of your computer. Click on Browse to browse and locate the firmware to be used for your update.


To perform the Firmware Upgrade:
- Click the Browse button and navigate to the location of the upgrade file.
- Select the upgrade file. Its name will appear in the Upgrade File field.
- Click the Apply button to commence the firmware upgrade.
Note: The Wireless Router is unavailable during the upgrade process, and must restart when the upgrade is completed. Any connections to or through the Wireless Router will be lost.
EnGenius®
10.8. Back-up

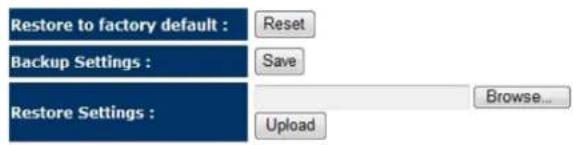
Use BACKUP to save the routers current configuration to a file named config.dlf. You can use RESTORE to restore the saved configuration. Alternatively, you can use RESTORE TO FACTORY DEFAULT to force the router to restore the factory default settings.
| Back-up | |
| Restore to factory default: | Restores the device to factory default settings. |
| Backup Settings: Save | the current configuration settings to a file. |
| Restore Settings: Restores a previously saved configuration file.ClickBrowseto select the file. ThenUploadto load the settings. | |
EnGenius®
10.9. Reset
In some circumstances it may be required to force the device to reboot.

In the event the system stops responding correctly or stops functioning, you can perform a reset. Your settings will not be changed. To perform the reset, click on the APPLY button.
Apply Cancel
EnGenius®
Appendix A – FCC Interference Statement
Federal Communication Commission Interference Statement
This equipment has been tested and found to comply with the limits for a Class B digital device, pursuant to Part 15 of the FCC Rules. These limits are designed to provide reasonable protection against harmful interference in a residential installation. This equipment generates, uses and can radiate radio frequency energy and, if not installed and used in accordance with the instructions, may cause harmful interference to radio communications. However, there is no guarantee that interference will not occur in a particular installation. If this equipment does cause harmful interference to radio or television reception, which can be determined by turning the equipment off and on, the user is encouraged to try to correct the interference by one of the following measures:
● Reorient or relocate the receiving antenna.
- Increase the separation between the equipment and receiver.
- Connect the equipment into an outlet on a circuit different from that to which the receiver is connected.
- Consult the dealer or an experienced radio/TV technician for help.
This device complies with Part 15 of the FCC Rules. Operation is subject to the following two conditions: (1) This device may not cause harmful interference, and (2) this device must accept any interference received, including interference that may cause undesired operation.
EnGenius®
FCC Caution: Any changes or modifications not expressly approved by the party responsible for compliance could void the user's authority to operate this equipment.
IMPORTANT NOTE:
FCC Radiation Exposure Statement:
This equipment complies with FCC radiation exposure limits set forth for an uncontrolled environment. This equipment should be installed and operated with minimum distance 20cm between the radiator & your body.
We declare that the product is limited in CH1–CH11 by specified firmware controlled in the USA.
This transmitter must not be co-located or operating in conjunction with any other antenna or transmitter.
Appendix B - IC Interference Statement
Industry Canada statement:
This device complies with RSS-210 of the Industry Canada Rules. Operation is subject to the following two conditions:
(1) This device may not cause harmful interference, and (2) this device must accept any interference received, including interference that may cause undesired operation.
IMPORTANT NOTE:
Radiation Exposure Statement:
This equipment complies with IC radiation exposure limits set forth for an uncontrolled environment. This equipment should be installed and operated with minimum distance 20cm between the radiator & your body.
This device has been designed to operate with an antenna having a maximum gain of 2 dBi. Antenna having a higher gain is strictly prohibited per regulations of Industry Canada. The required antenna impedance is 50 ohms.
EnGenius®
- 2
- Internet....48
- Wireless 57
- Firewall....75
- 3
- Advanced....82
- Tools....93
- Introduction
- Package Contents
- System Requirements
- Introduction
- LED Overview
- Before you Begin
- Considerations for Wireless Installation
- Configure PC/Laptop Network Interface
- Windows XP/Vista
- Tasks
- Windows 7
- Apple MacOS
- Setup your Router
- Manually enter Setup Wizard
- Wireless Network Broadband Router
- System
- WAN Settings
- Select the Operation Mode.
- AP Router Mode
- Static IP Address
- Dynamic IP Address
- PPP over Ethernet
- Point-to-Point Tunneling Protocol (PPTP)
- PPTP Settings :
- System
- Status
- LAN Settings
- LAN
- LAN IP
- DNS Servers
- DHCP
- Refresh
- Add Reset
- Schedule
- Log
- Monitor
- Language
- Internet
- Status
- Dynamic IP Address
- Static IP Address
- PPP over Ethernet
- Point-to-Point Tunneling Protocol (PPTP)
- Wireless
- Status
- Wireless Distribution System (WDS)
- Advanced
- Security
- Filter
- Wi-Fi Protected Setup (WPS)
- Pin Code Method
- Client List
- Policy
- Firewall
- Enable
- Advanced
- DMZ
- Denial of Service (DoS)
- MAC Filter
- IP Filter
- URL Filter
- Advanced
- Network Address Translation (NAT)
- Port Mapping
- Port Forwarding
- Port Trigger
- Application Layer Gateway (ALG)
- Universal Plug and Play (UPnP)
- Quality of Service (QoS)
- Priority Queue Method
- Bandwidth Allocation Method
- Routing
- Tools
- Admin
- Time
- Dynamic DNS (DDNS)
- DDNS Services work as follows:
- Power
- Diagnosis
- Firmware
- To perform the Firmware Upgrade:
- Back-up
- Reset
- Appendix A – FCC Interference Statement
- Federal Communication Commission Interference Statement
- IMPORTANT NOTE:
- FCC Radiation Exposure Statement:
- Appendix B - IC Interference Statement
- Industry Canada statement:
- Radiation Exposure Statement:
Brand : ENGENIUS
Model : ESR1221N2
Category : Router