
MXWall-UHD 8×8 - Audiovisual Equipment Smart-AVI - Free user manual and instructions
Find the device manual for free MXWall-UHD 8×8 Smart-AVI in PDF.


| Product Type | Seamless UHD Matrix Switcher |
| Model | MXWall-UHD 8x8 |
| Video Inputs | 8x HDMI (HDMI 2.0, HDCP 2.2) |
| Video Outputs | 8x HDMI |
| Max Resolution | 3840x2160@60Hz |
| Bandwidth | 18 Gbps |
| Control Interfaces | Front panel, RS-232, TCP/IP (LAN 10/100), Web GUI, Windows software |
| Video Wall Support | Up to 8 displays, presets: 2x4, 1x8, 2x2 |
| Audio Features | HDMI audio extract, external LR audio insert |
| IR Matrix | IR routing follows video routing |
| EDID Management | Programmable per input |
| Dimensions (W x D x H) | 430 x 300 x 44 mm |
| Weight | 5 kg |
| Power Supply | 100-240VAC, 50/60Hz, 100W max |
| Operating Temperature | 0 to 40°C |
| Storage Temperature | -20 to 70°C |
| Humidity | 10% to 50% |
| Package Contents | MXWall-UHD unit, user manual, AC power cord |
| Seamless Switching | Yes, with HDMI 2.0 |
| Scene Saving | Up to 8 scenes via front panel or software |
| RS-232 Baud Rate | 9600 bps, 8 data bits, 1 stop bit, no parity |
| Compatible Browsers | IE10.0+, HTML5 |
| Safety | Use only with provided power cord; operate within specified temperature range |
| Cleaning | Disconnect power before cleaning; use dry cloth |
| Repairability | Contact SmartAVI for service; no user-serviceable parts |
Frequently Asked Questions - MXWall-UHD 8×8 Smart-AVI
User questions about MXWall-UHD 8×8 Smart-AVI
0 question about this device. Answer the ones you know or ask your own.
Ask a new question about this device
Download the instructions for your Audiovisual Equipment in PDF format for free! Find your manual MXWall-UHD 8×8 - Smart-AVI and take your electronic device back in hand. On this page are published all the documents necessary for the use of your device. MXWall-UHD 8×8 by Smart-AVI.
USER MANUAL MXWall-UHD 8×8 Smart-AVI
Customize 8 inputs and 8 outputs through IP Control,
RS-232 command capabilities, and a Windows GUI
INSTALLATION
MANUAL
CONTENT
1 Introduction.... 2
2 Front Panel Control.... 2
3 Rear Panel.... 3
4 RS232 Control.... 4
4.1 RS232 Connector.... 4
5 MXWALL-UHD User Guide 5
5.1 Connecting with the Web Page.... 5
5.1.1 Connecting with the Web Page: Video Matrix.... 6
5.1.2 Connecting with the Web Page: TV Wall.... 6
5.1.3 Connecting with the Web Page: Configuration...... 7
5.2 Connecting with the Software.... 8
5.2.1 Connecting with the Software: Account Creation and Modification.... 8
5.2.2 Connecting with the Software: Ethernet Connection.. 8
5.2.3 Connecting with the Software: RS232 Connection..... 9
5.3 Using MXWALL-UHD....9
5.4 Navigating MXWALL-UHD.... 10
6 Electrical parameters.... 13
7 Package Contents.... 14
1 INTRODUCTION
MXWALL-UHD is a high-performance seamless UHD matrix switcher with 8x HDMI inputs and 8x HDMI outputs. Audio extract or insert can also be enabled on this device. IR matrix routing on this video matrix is followed with video routing. MXWALL-UHD support one or more video wall with RS232 command
MXWALL-UHD key features support:
- HDMI 2.0/HDCP 2.2
- Seamless switching
• Video Wall Configurations - IR matrix
- HDMI audio extract
• EDID management
- External LR audio insert on HDMI stream
• HDMI video output resolution up to 3840x2160@60
- Front panel, RS232, and TCP/IP (LAN 10M/100M) control
2 FRONT PANEL CONTROL

- Press buttons OUTPUT n + INPUT m + TAKE in this order to switch matrix input n and output m.
- Press button POWER and hold for 5 seconds, this will put the matrix into standby mode.
Press button POWER and hold for 1 second to power on the matrix
- Press button LOCK to lock or unlock front buttons. When locked, the LOCK LED will light up.
- Press buttons ALL + INPUT m + TAKE in this order to switch all of the outputs to the specified input m.
- Press button SAVE + OUTPUT n + TAKE in this order to save the current “scene” as scene n. The matrix can save up to 8 total scenes.
- Press button RECALL + OUTPUT n + TAKE to load saved scene n.
- Press button RES + OUTPUT n + NEXT + TAKE, to change output resolution of OUTPUT n Resolution options:
AUTO:
3840x2160@60, 3840x2160@50, 3840x2160@30, 3840x2160@25,
1920x1200@60,1920x1080@60, 1920x1080@50, 1600x1200@60,
1400x1050@60, 1366x768@60, 1360x768@60, 1280x1024@60,
1280x768@60,1280x720@60, 1280x720@50, 1024x768@60
When select AUTO resolution, the output port will set the output resolution according to the displayer prefer timing/resolution;
- Press buttons EDID + INPUT m + NEXT + TAKE, change the EDID mode of port INPUT m EDID option:
3840x2160@60, 3840x2160@30, 1920x1200@60, 1920x1080@60, 1280x1024@60,
1280x720@60, 1024x768@60
3 REAR PANEL

• LAN(10M/100M), RS232 are for the MXWALL-UHD software.

- IR IN and IR OUT
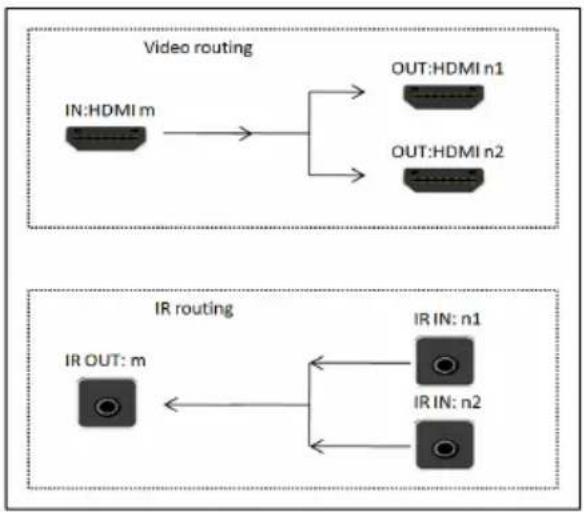
IR IN/OUT is for remote control routing, and follow the video routing.
For example, if input HDMI m is routed to output HDMI n1 and n2 ports, then IR IN n1 and n2 ports will be routed to IR OUT m port. Please refer bellow illustration.
Relationship between video and IR routing
flowchart
graph TD
    A["IN:HDMI m"] --> B["OUT:HDMI n1"]
    A --> C["OUT:HDMI n2"]
    D["IR OUT: m"] <--> E["IR IN: n1"]
    D <--> F["IR IN: n2"]
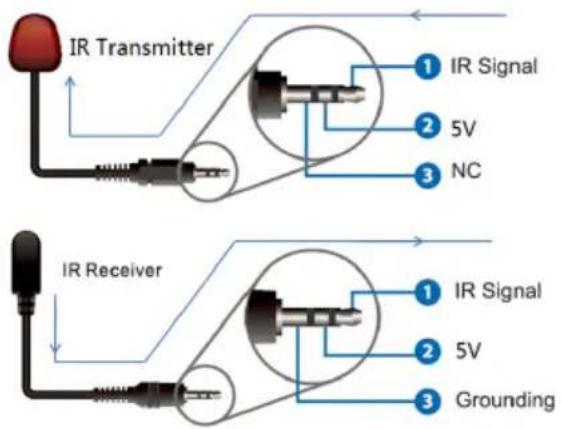
IR extender connectors (not as accessories)
4.1 RS232 CONNECTOR
• RS-232 control, baud rate 9600, DB9 connector
- Port RS232-1 uses a DB9 female connector. The user will need to use the corresponding direct/straight RS232 cable. The pin layout is shown as follows:

| Index | Pin |
| 1 | N/A |
| 2 TX (Matrix → PC) PC ) | |
| 3 RX (Matrix → PC) | |
| 4 | N/A |
| 5 | Ground |
| 6 | N/A |
| 7 | N/A |
| 8 | N/A |
| 9 | N/A |

flowchart
graph LR
    A["Router"] -->|Baud rate 9600| B["Computer"]
    B --> C["RS232 communication"]
• RS232-2 and IR-EXT ports are reserved for future development
5 MXWALL-UHD USER GUIDE
The MXWALL-UHD can be connected through either the web or our provided software. The web connection will require the device to be on the same network as the PC that will control it. With our provided software, the user has the option to also connect to the device through either the network or via RS232.
5.1 CONNECTING WITH THE WEB PAGE
The IP address of the device can be found our provided application SmartFinderPro. Simply open the application and click Find. It will provide a list of all the devices with their IP address and MAC address. The user can also double click the IP address to quickly open a web browser to go directly into using the web page.

By using the web page, the user is provided with two different options on how to configure their video settings.
-
Video Matrix: This is the home page that the user starts in. Video Matrix allows the user to quickly select each individual input and output.
-
TV Wall: This page allows the user to create "stitches" of their inputs, creating an intuitive experience for video walls.
5.1.1 CONNECTING WITH THE WEB PAGE: VIDEO MATRIX

5.1.2 CONNECTING WITH THE WEB PAGE: TV WALL
To use the TV Wall mode, click on the "TV Wall" link on the top right of the page.
-
Save Selection: To create a stitching, simply click on the desired input first and "drag and drop" within the given matrix as seen below. Once the panel is highlighted in blue to how the user would like to stitch, click save selection. This will change the panel to show what input is currently being stitched.
-
Clear Selection: To remove any stitches, simply click clear selection. This button will be grayed out unless there is an existing stitching.

5.1.3 CONNECTING WITH THE WEB PAGE: CONFIGURATION
On the top left of the page there is a purple button with three lines, clicking this will open up the Configuration page. Please note that the Matrix Switch page only displays the "Open Settings" option. For the TV Wall, the user is provided with the option to change matrix presets and can also set the resolution.
Presets:
- 2x4
- 1x8
- 2x2
Resolutions:
• 1920 x 1080 @ 60 Hz (1080p60)
• 3840 x 2160 @ 30 Hz (4k30)
• 3840 x 2160 @ 60 Hz (4k60)

5.2 CONNECTING WITH THE SOFTWARE
Upon launching the MXWALL-UHD software, the user will be prompted to sign in. On first boot up, the Administrator username and password will already be provided. The user may add additional users with or without administrative privileges within the Users tab.
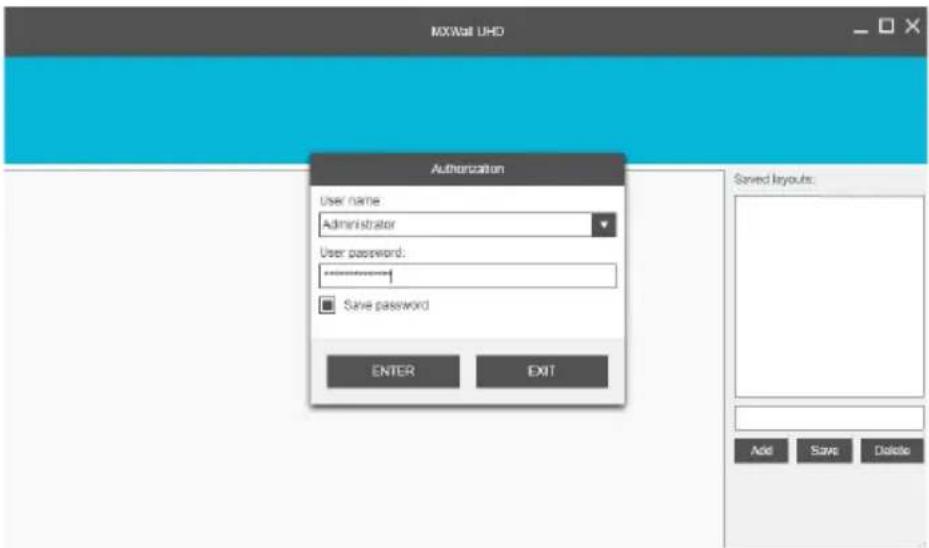
Default password of Administrator (access to all features) : 12345
5.2.1 CONNECTING WITH THE SOFTWARE: ACCOUNT CREATION AND MODIFICATION
- Select an existing using on the list to edit credentials or fill in the User name and User password field to create a new account.
- If editing an existing account, click save. Otherwise click add once you have filled in the required fields to create an account.

5.2.2 CONNECTING WITH THE SOFTWARE: ETHERNET CONNECTION
The user can search for the MXWALL-UHD using the Connect tab in the MXWALL-UHD software as long as the device and PC are within the same network. After opening Connect, select "Use network connection" and click on "Start" next to Search devices. Select the connected Matrix to add to the main page and then click OK.
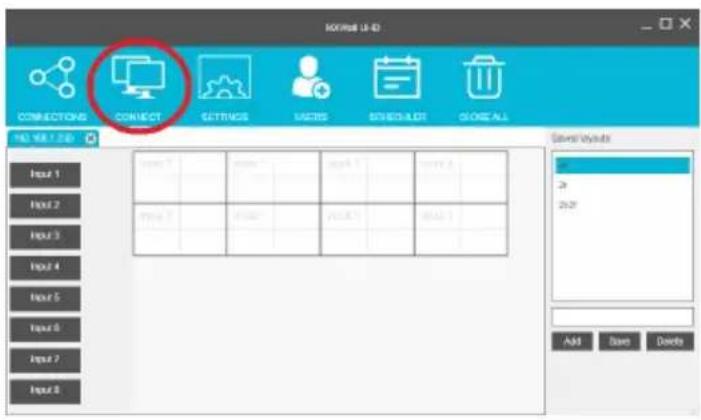

5.2.3 CONNECTING WITH THE SOFTWARE: RS232 CONNECTION
This setup is similar to using the network on the software to connect. Select "Use serial port connection" in the Connect tab and change the Serial port name to the appropriate COM port connection and set the Baud rate to 9600. Once all of these settings are selected, click OK and the software will search for the matrix using RS232.

5.3 USING MXWALL-UHD
Regardless of how the software connects to the device, controlling it will all be the same. Once the connection has been established, the user can begin stitching together the monitors and changing inputs.
a) Under the word tab section, the connection to the matrix will show as either an IP address or COM port depending on how the user connects to the device. Within the green box shown below, there are three MXWALL-UHD devices connected. The blue highlighted tab (192.168.1.113) will show which device is currently being controlled for interaction.
b) On the left side in the PURPLE BOX where Input 1 – 8 is shown, the user can drag these input boxes to the desired output. The user is also able to drag these inputs into stitched sets already to seamlessly change. When creating new stitches, the lowest input within the stitching range will always take priority when the stitch is created. For example, if the user were to stitch the two panels in the BLUE BOX together, Input 1 has precedence over Input 5, therefore would create a 1x2 stitching with Input 1. The user however can simply make this Input 5 by dragging the box labeled Input 5 from the left side.
c) On the right side in the RED BOX, users are able to register and reload layouts to quickly set up the matrix to their liking. To register a layout, simply draw out the monitor stitching and type in the name of the layout. Press the "Add" button to register it. Multiple layouts may be registered. It is also possible to edit currently saved layouts by simply pressing "Save" while highlighting an existing layout.
d) The Close All tab in the PINK BOX is an easy way to quickly close out all existing stitches.

5.4 NAVIGATING MXWALL-UHD
There are several main tabs within the MXWALL-UHD software.
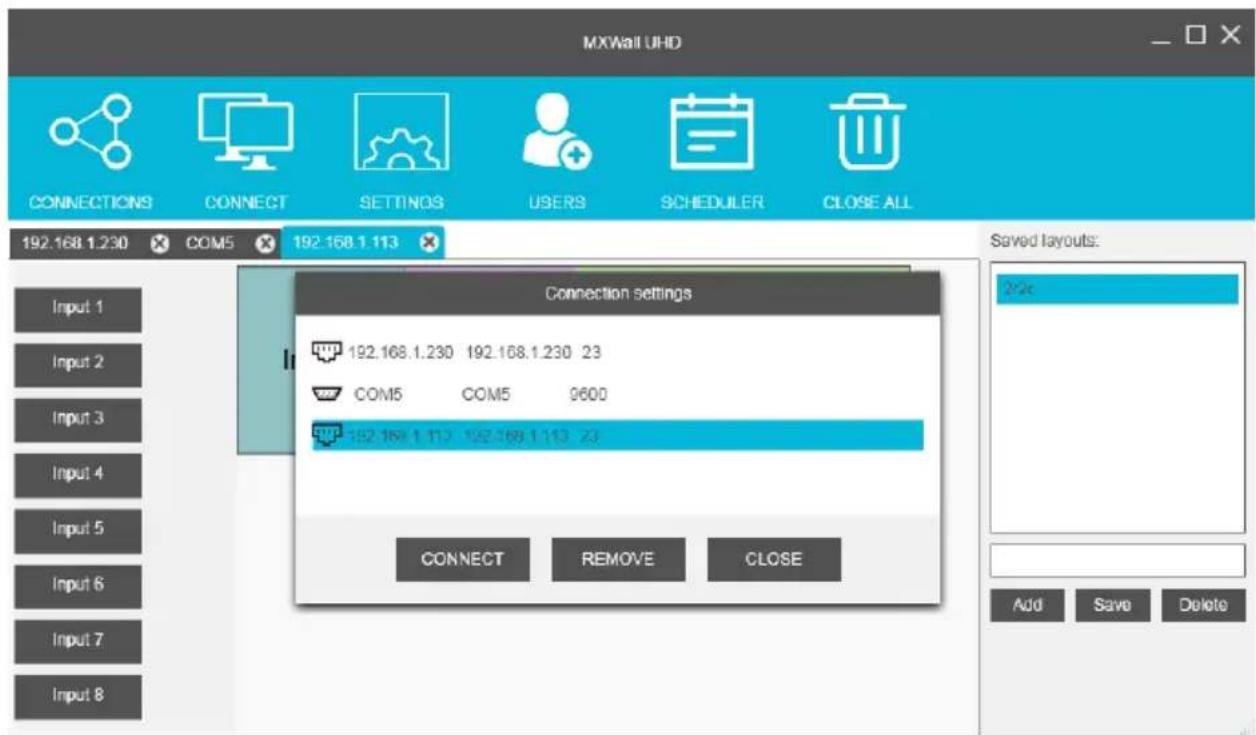
- Connections – Opening this menu will bring up a window that shows all currently connected devices, showing their connection type. Here the user can easily remove a connected device by highlighting the connection and clicking REMOVE. The user can also use the CONNECT button in this window to switch to the highlighted device as well.
- Connect - Please refer to Section 5.2.2 and 5.2.3
- Settings – Opening this menu will bring up a window that provides the user with the option to change the matrix layout as well as the resolution. To change the matrix layout simply add or remove the number of rows or columns. The resolution can be changed by using the drop down menu and selecting any of the following:
a. 1920 x 1080 @ 60 Hz (1080p60)
b. 3840 x 2160 @ 30 Hz (4k30)
c. 3840 x 2160 @ 60 Hz (4k60)


- Users – Please refer to Section 5.2 and 5.2.1
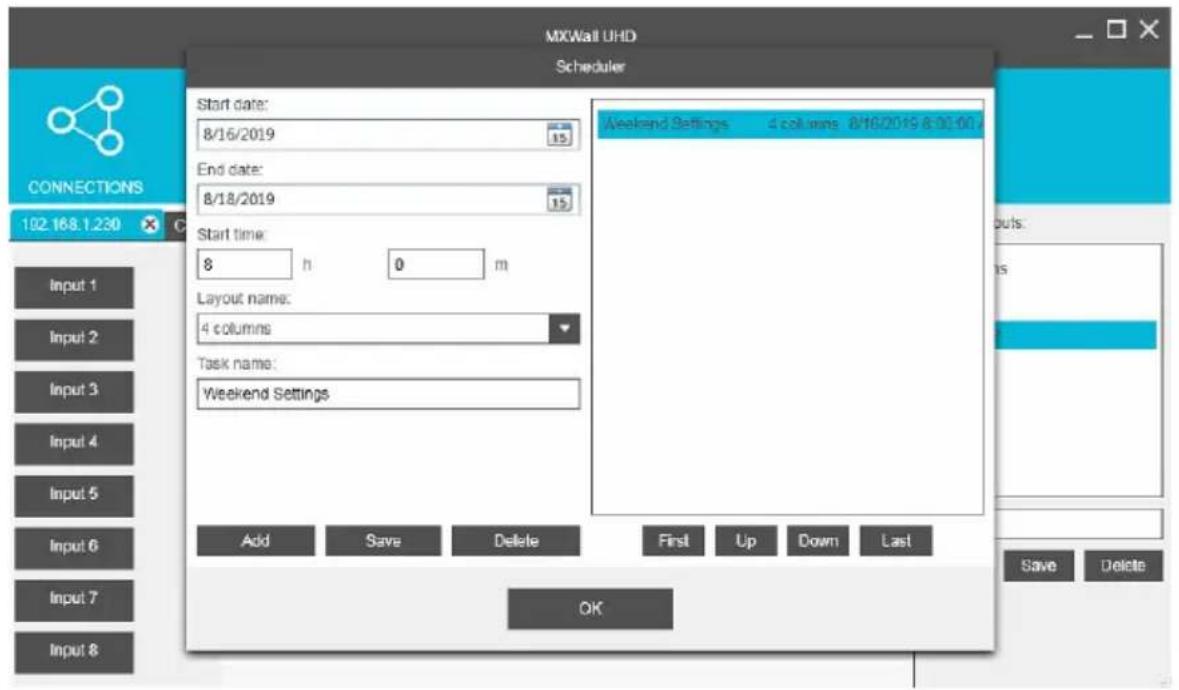
- Scheduler – Opening this menu will bring up the Scheduler window that allows the user to set date specific schedules for saved layouts to automatically set up. Please note that because of this, the user is required to register layouts in the general page of the software first before the scheduler can be used.
- Close All – This will close all current stitching in the matrix.
6 ELECTRICAL PARAMETERS
ELECTRICAL PARAMETER
| Interface | HDMI-A |
| HDMI /DP /VGA Version | HDMI2.0,HDCP2.2 |
| Bandwidth | 18Gbps |
| Input | 800x600@60Hz,1024x768@60Hz, 1280x768@60Hz,1280x800@60Hz,1280x1024@60Hz,1360x768@60Hz,1366x768@60Hz,1400x1050@60Hz,1440x900@60Hz,1600x1200@60Hz,1680x1050@60Hz, 1920x1200@60Hz,480p,576p,720p,1920x1080i,1920x1080p,3840x2160@24Hz/25Hz/30Hz/50Hz/60Hz,4096x2160@24Hz/25Hz/30Hz/50Hz/60Hz. |
| Output | 3840x2160@60Hz, 3840x2160@50Hz,3840x2160@30Hz, 3840x2160@25Hz,1920x1200@60Hz,1920x1080@60Hz,1920x1080@50Hz,1600x1200@60Hz,1400x1050@60Hz,1366x768@60Hz,1360x768@60Hz, 1280x1024@60Hz,1280x768@60Hz, 1280x720@60Hz,1280x720@50Hz, 1024x768@60Hz |
| HDMI Amplitude | T.M.D.S +/- 0.4Vpp |
| Differential impedance | 100±15ohm |
| RS232/ETHERNET CONTROL | |
| Baud rate and protocol | Baud rate:9600, data bit:8, stop bit:1,no parity checking |
| Ethernet | IE10.0+,HTML5 |
| POWER | |
| Max Consumption | 100W, 110-240VAC |
| MATRIX MECHANICAL DIMENSIONS | |
| Size(mm) | 430(L)X300(W)X44 (H) |
| Weight | 5Kg |
| Operating temperature | 0 to 40°C |
| Storage temperature | -20 to 70°C |
| Permissible humidity | 10%-50% |
7 PACKAGE CONTENTS
| ITEM | QUANTITY |
| MXWALL-UHD unit | 1 |
| MXWALL-UHD User Manual | 1 |
| AC Power Cord | 1 |
Smart-AM
SMART AUDIO VIDEO INNOVATION
NOTICE
The information contained in this document is subject to change without notice. SmartAVI makes no warranty of any kind with regard to this material, including but not limited to, implied warranties of merchantability and fitness for any particular purpose. SmartAVI will not be liable for errors contained herein or for incidental or consequential damages in connection with the furnishing, performance or use of this material. No part of this document may be photocopied, reproduced or translated into another language without prior written consent from SmartAVI.


- CONTENT
- INTRODUCTION
- FRONT PANEL CONTROL
- REAR PANEL
- RS232 CONNECTOR
- MXWALL-UHD USER GUIDE
- CONNECTING WITH THE WEB PAGE
- CONNECTING WITH THE WEB PAGE: VIDEO MATRIX
- CONNECTING WITH THE WEB PAGE: TV WALL
- CONNECTING WITH THE WEB PAGE: CONFIGURATION
- CONNECTING WITH THE SOFTWARE
- CONNECTING WITH THE SOFTWARE: ACCOUNT CREATION AND MODIFICATION
- CONNECTING WITH THE SOFTWARE: ETHERNET CONNECTION
- CONNECTING WITH THE SOFTWARE: RS232 CONNECTION
- USING MXWALL-UHD
- NAVIGATING MXWALL-UHD
- ELECTRICAL PARAMETERS
- Smart-AM
- SMART AUDIO VIDEO INNOVATION
- NOTICE
Brand : Smart-AVI
Model : MXWall-UHD 8×8
Category : Audiovisual Equipment