
VW-04XVDS - Audiovisual Equipment Smart-AVI - Free user manual and instructions
Find the device manual for free VW-04XVDS Smart-AVI in PDF.


| Product Type | Video Wall Controller Kit (Hardware + Software) |
| Brand | Smart-AVI |
| Model | VW-04XVDS |
| Graphics Engine | RADEON HD4670 x 2 |
| Video Memory | 2GB DDR3 |
| Engine Clock | 725MHz |
| Memory Clock | 800MHz |
| Memory Interface | 128-bit |
| DirectX Support | 10.1 |
| Bus Standard | PCI Express 2.0 |
| Display Outputs | 4 x Dual-Link DVI on-board |
| HDTV Output | Yes |
| External Power Input | 6-pin connector |
| Cooling | Dual Slot FAN Cooler |
| Form Factor | ATX |
| Software Included | PresenterWall Server, Client, and HTML Editor (KompoZer 0.7.10) |
| Maximum Supported Displays | 64 (per single computer via expansion) |
| Warranty | 1 year limited warranty |
| Package Contents | PresenterWall software, PCI-E 4-port DVI video card, USB protection key, DVI-to-VGA adapters (4) |
Frequently Asked Questions - VW-04XVDS Smart-AVI
User questions about VW-04XVDS Smart-AVI
0 question about this device. Answer the ones you know or ask your own.
Ask a new question about this device
Download the instructions for your Audiovisual Equipment in PDF format for free! Find your manual VW-04XVDS - Smart-AVI and take your electronic device back in hand. On this page are published all the documents necessary for the use of your device. VW-04XVDS by Smart-AVI.
USER MANUAL VW-04XVDS Smart-AVI
What's in the Box? 5
Limited Warranty Statement 6
Secon 1 –Installing the PresenterWall Hardware
- Hardware Installaon 7
Secon 2 -Seng up the PresenterWall Soware
- Installing PresenterWall Soware 9
2.1 User Manager 11
2.2 Firewall 13
Secon 3 - Using the PresenterWall Server Soware
-
Using PresenterWall Soware 14
-
Seng up Staon Views 18
-
PresenterWall Task Manager 20
-
Creang and working with schedules 22
-
Creang a Super Schedule 25
-
Template Creator 28
-
Creeping Line Editor 34
-
Registraon 40
Specicaons 42
Introducon
Congratulaons on your purchase of the PresenterWall informaon display network. Please read the instrucons carefully before using.
When you need to make a presentaon that will really grab their aenon, PresenterWall with the Xpander card is your best choice. PresenterWall with Xpander is a unique combinaon of soware and hardware that enables a single computer to drive and control up to 64 remote monitors simultaneously and independently from a single locaon. Each monitor has its own Windows desktop and can be programmed to work independently from the others - as though there were 64 separate computers.
PresenterWall reduces unnecessary costs and eliminates the need for mulple PCs to run applicaons concurrently. Each screen is capable of running unique applicaons, as though they were on separate computers.
PresenterWall is the ulmate soluon for the display and management of your digital content. It is highly cost eecve and easy to use. It is perfect for both small-scale and large-scale projects.
There are dozens of applicaons for PresenterWall; here are just a few:
- Dynamic Digital Adversing such as malls, airports, hotels, convenon centers, and Sports arenas.
- Educaon and Entertainment such as informaon walls, booths, program informaon and updates.
- Special Events and Demonstrations such as Vendor booths, product presentaons, and special speaker events.
Disclaimer Noce
The informaon contained in this document is subject to change without noce. SmartAVI makes no warranty of any kind with regard to this material, including but not limited to, implied warranes of merchantability and tness for parcular purpose.
SmartAVI will not be liable for errors contained herein or for incidental or consequential damages in conneccon with the furnishing, performance or use of this material.
No part of this document may be photocopied, reproduced, or translated into another language without prior written consent from SmartAVI, Inc.
What's in the Box?
| PART NO. | QTY | DESCRIPTION |
| AP-PRWL-W | 1 | PresenterWall Soware - Figure A |
| APU4-X-HD* | 1 | PCI-E 4-port DVI Video Card* -Figure B |
| ASUSBKEY | 1 | Unique USB Key - Figure C |
| CCDVI2VGA* | 4 | Adapter, DVI to VGA* -Figure D |

Figure A

natural_image
Electronic hardware component with a black CPU fan and red card, showing ports and connectors (no visible text or symbols)Figure B

Figure C

natural_image
White DVI D-sub connector with metallic pins and a small screw head (no visible text or symbols)Figure D
*These items can change based on your conguraon.
Limited Warranty Statement
A. Extent of Limited Warranty
-
SmartAVI, Inc. warrants to the end-user customers that the SmartAVI product specied above will be free from defects in materials and workmanship for the duraon of 1 year, which duraon begins on the date of purchase by the customer. Customer is responsible for maintaining proof of date of purchase.
-
SmartAVI's limited warranty covers only those defects which arise as a result of normal use of the product, and do not apply to any:
a. Improper or inadequate maintenance or modicaons.
b. Operaons outside product specicaons.
c. Mechanical abuse and exposure to severe conditions.
-
If SmartAVI receives, during Applicable warranty period, a noce of defect, SmartAVI, Inc. will, at its discretion, replace or repair the defective product. If SmartAVI is unable to replace or repair the defective product covered by the SmartAVI warranty within a reasonable period of me, SmartAVI shall refund the cost of the product.
-
SmartAVI shall have no obligaon to repair, replace or refund unit until customer returns defective product to SmartAVI.
-
Any replacement product could be new or like new, provided that it has funconality at least equal to that of the product being replaced.
-
SmartAVI limited warranty is valid in any country where the covered product is distributed by SmartAVI.
Secon 1 Installing the PresenterWall Hardware
1. Hardware Installaon (PCI-E 4-port DVI Video Card)
- Turn o your computer
- Remove the outer case from your computer.
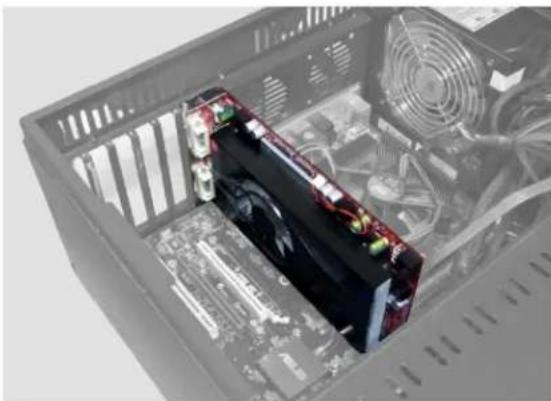
- Firmly insert the Video Card adapter into a free PCI-E slot. (Figure 1.1)
- Screw the Video Card adapter into the case.
- Restore the outer case to your computer.
natural_image
Interior view of a computer tower case showing internal components like CPU socket and fan (no text or symbols visible)Figure 1.1

natural_image
Close-up of a computer rack with multiple Ethernet ports and ventilation grilles (no visible text or labels)gure 1.2
Note: If you are installing mulple PCI adapter cards, be sure the previously installed card is fully operational by reassembling your PC and boong Windows before installing additional PCI adapter cards.
- Connect each of the four DVI to VGA adapters to the four available DVI ports on the Video Card. (Figure 1.2) Connect each of your monitors to the VGA end of the adapters that are connected to the Video Card.
(Note: If you have DVI cables for your monitors, this is not required. You may connect to your monitors directly to the DVI ports.)
- Turn on your computer.
- You will see a 'New Hardware' bubble pop up from the system tray.
- Windows will automatically nd the correct drivers for the Video Card.
- To ensure proper installaon of the hardware, please click 'Start' / 'Control Panel' / 'System' and select the 'Hardware' Tab / 'Device Manager' buon. (Figure 1.3)
- Under Display Adapters you should see your two video adapters, two ATI Radeon 4600 series. (Figure 1.4) Any other adapters you see should be other cards you already have installed.
-
Reboot your computer once more.
-
Once rebooted, check the 'Display Properes' by clicking on your Windows Desktop with your right mouse buon.
- Click the 'Sengs' Tab. You should see mulple monitors. Right-click each faded monitor and click "Aached." Then click apply. - Click "Idenfy" to see which monitor corresponds to which number. Pick the monitor you will use as your default and check "Use this device as the primary monitor." The desktop should be extended to the rest of your monitors.
-
You may arrange the display icons in the manner you plan to display your Video Wall. This can also be congured later with PresenterWall Client's "Monitor Cong" opon.
-
Once they have been extended correctly, you will see your desktop wallpaper displayed on each monitor.
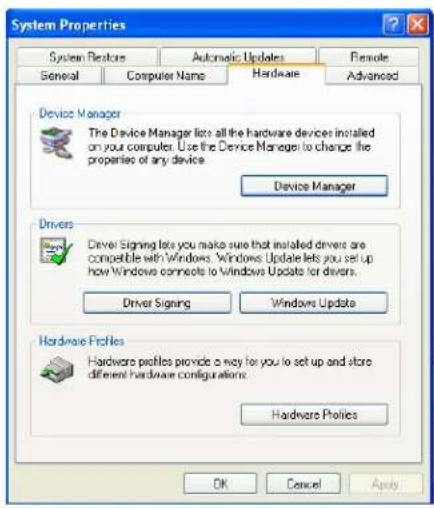
Figure 1.3

Figure 1.4

Figure 1.5
Secon 2 Seng up the PresenterWall Soware
2. Installing PresenterWall Soware
PresenterWall Soware requires a unique CD key to be installed. You will nd your key on the back of the PresenterWall Soware CD sleeve. In addition, you must complete the online registraon for your copy of PresenterWall. If you do not register in the thirty-day window, your PresenterWall soware will become disabled. A registraon window will open automatically. If you wish to register at a later date, simply select Help/Registraon.
Note: For proper installaon of the PresenterWall soware, you must insert the USB protecon key provided into any available USB port on your PC before you install the PresenterWall soware. Once inserted, Windows will ask for the drivers; you may cancel that request; drivers will be installed during installaon of the soware.
- Double click on the PresenterWall_Setup executable on your CD. The setup will have a name similar to "PresenterWALL_Setup v.4.3 2011-05-12_HASP" depending on the version and date. Read the License Agreement then click 'I Agree'
- Enter in your name and organizaon and enter the unique Serial Number provided to you.
Important: When entering the Serial Number, please make sure it is typed with ALL CAPS, or registraon will not give you a 30 day grace period. (Figure 2.1) - The next window will be to choose components. Select "Full" installaon and make sure that 'PresenterWall Server,' 'PresenterWall Client' and 'HTML Editor (KompoZer 0.7.10)' is checked. (Figure 2.2)
- Choose the installaon locaon where you would like to install PresenterWall. Click 'Install' and installaon will begin. (Figure 2.3)
- A 'New Hardware' nocaon bubble will appear from the system tray for the USB protecon key. Windows will automatically install the drivers needed for this.
- Before the installaon completes, you will be asked to create a password for the Administrator account. (Figure 5.4) You must sign in as the Administrator for the rst me you load the PresenterWall Client and Manager. You may set a user name and password now or leave the default user name "Administrator" and blank password and edit this later. (For more informaon on the User Manager, go to secon 2.1 of the manual.)
- When installaon is nished, you will rst be asked to log on to the PresenterWall Client. (Figure 2.5) Use the default (or the name and password you set up) in step 6. Leave the computer IP address as 127.0.0.1 (This is your local IP). Click OK and your client will be up and running.
- Finally, click next and you will be asked to reboot your computer. Be sure to save any other work you may have been doing, highlight "Reboot now," and click "Finished" to restart your computer. (Figure 2.6) This will complete the installaon process.

Figure 2.1

Figure 2.2

Figure 2.3

Figure 2.4
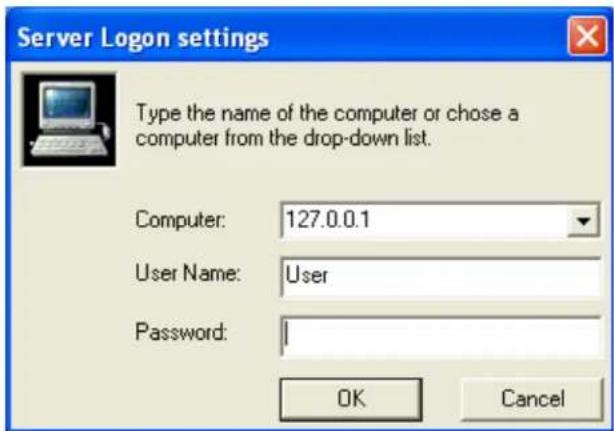
Figure 2.5 Figure 2.6

2.1 User Manager
Our user manager now allows PresenterWall users to manage and control their own user database. Each user created is allowed a set of permissions.
The user rights are described as followed:
- Administrator: Full access to everything, only user that is able to create and manage users.
- Task Manager: Allowed to access and control the task manager and selectable clients assigned by the administrator.
• Staon Manager: Allowed to access and control the staon manager. - Client: Used for the PresenterWall clients to connect to the PresenterWall server only.
During the installaon, you will be asked to create the administrator password. You can leave it blank; the default user name will be 'Administrator' (Figure 5.1.1)
To have dierent users log in, always click on 'Conguraon' then 'Login server.' (Figure 2.1.2)

Figure 2.1.1

Figure 2.1.2
Aer you log into the PresenterWall manager, you can create new users by clicking 'Run,' then clicking on 'User Manager' (Figure 2.1.3)
To create a new user, right click or click on 'User' then 'New User.' The user properes window will open. Here is where you enter in your new user informaon (Figure 2.1.4):
- User name: The name of the new user.
• Full name: The real name of the user. - Descripon: The descripon of the user.
- Password: The password for that user.
- User rights: Select the rights you want this user to have.

Figure 2.1.3

Figure 2.1.4
Click 'Save'. You will then see the new user in the list. (Figure 2.1.3)
2.2 Firewall
PresenterWall uses the TCP/IP suite to communicate between the server and client, proper sengs of your rewall and routers will be needed.
Aer the installaon of PresenterWall Manager, and the initial start of the soware, you will be asked to by the windows rewall to unblock, or keep blocking PresenterWall Manager. You want to make sure you unblock it.
The port used for communicaon is '13325' UDP and TCP. This will be used when forwarding ports in your router, when using PresenterWall via WAN.

Figure 2.2.1
Secon 3 Using the PresenterWall Soware
3. Using PresenterWall Soware
-
To begin using the PresenterWall applicaon;
-
Open the applicaon by selecng Start / All Programs / PresenterWall / PresenterWall Manager
-
Or by clicking the Presenter Manager icon on your desktop.
-
When using PresenterWall for the rst me
-
A dialog box will appear with a default IP address of 127.0.0.1
- In the Username/Password elds use the Administrator user you created during the installaon. Click 'OK'
PresenterWall Manager
-
Once in the PresenterWall Manager window, you will see the following: (Figure 3.1)
-
Clients: This is the user you created during installaon.
-
Connected mangers: This is the staon manager window you are currently looking at.
-
You must have a Client running. If you do not see a Client running in this dialog (bright green screen next to client), open the client from your start menu. (Start / Programs / PresenterWall / PresenterWall Client)
-
You will see a blue "P" icon when the client is loaded and a red "P" icon when the manager is loaded. You will also see an icon for the Cursor Finder as well. (Figure 3.2)
Cursor Finder
Note: Occasionally while using PresenterWall soware, your mouse cursor might get lost on one of the other displays. Typing 'Alt' + 'F1' will center the cursor on your primary display.
To congregate the 'Cursor Finder' hot-keys;
- Right click on the 'Cursor Finder' icon located on your task bar.
- This brings up the 'Cursor Finder' dialog. (Figure 3.3)
- Once you have congured the hot-keys select ok to 'OK' to keep the sengs or 'Cancel' to cancel.
![PresenterWALL Manager Run Station Configuration Help Clients: Default PWALL-082CA2B6A Connected managers: Manager User name Station Mngr (PWALL-082CA2B6A) Administrator Logs: Time From Description 2011.06.07 09:09:34.140 Server Login user: Station Manager PWALL-082CA2B6A [12] 2011.06.07 10:09:20.953 Server Login user: User Manager PWALL-082CA2B6A [127] 2011.06.07 10:19:50.579 Server Logoff user: User Manager PWALL-082CA2B6A [127] 2011.06.07 10:19:55.187 Server Login user: Station Manager PWALL-082CA2B6A [12] 2011.06.07 10:19:58.046 Server Logoff user: Station Manager PWALL-082CA2B6A [12] Task Manager Hide User Administrator logged in successfully](/content/2026/05/838477/images/f412059aa6f98091c18eae605e4b5bb8d46c47cee28c98e73e745f1572bb220f.jpg)
Figure 3.1

Figure 3.2

Figure 3.3
Conguring Wall View Monitors
The wall conguraon sengs are designed much the same way as Windows display properes. Windows display properes only allow a user to conjure up to 10 monitors, with our soware you can conjure as many as you want. From this menu you can also select the wall dimensions, resoluon, color quality and refresh rate.
Geng started
- From the Windows Desktop, locate the blue PresenterWall client icon located in the system tray. (Figure 3.2)
- Double click the icon to bring up the Client Interface.
- Select "Monitor Cong" to open the Mul Monitor Conguraon window. (Figure 3.4)
To congure your screen layout
- Under "Wall dimension" use the dropdown numbers to select the number of screens in your video wall. (gure 3.5)
Example: For a four screen video wall, select 2 for Columns and 2 for Rows. This will create a 2x2 video wall layout.
- Once you set your wall dimensions, the monitor conguraon will show you grey boxes split into the layout you have chosen. Our example shows four monitors set 2x2.
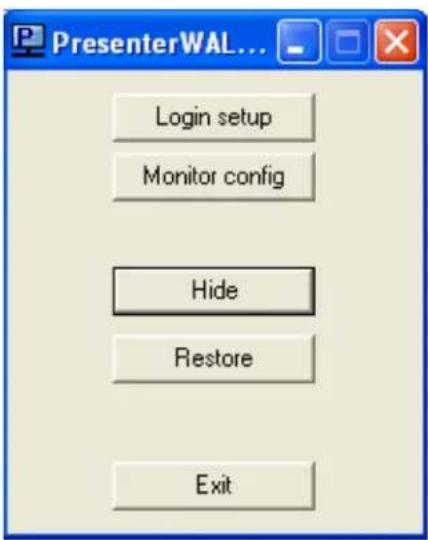
Figure 3.4

Figure 3.5
Assigning monitors
- To assign your monitors, rst click "Ideny" to see which monitors are assigned to which number.
- Right click on one of the grey boxes and select "Set Monitor." (Figure 3.6)
- Aer you set each monitor, click "Apply" to save your sengs.
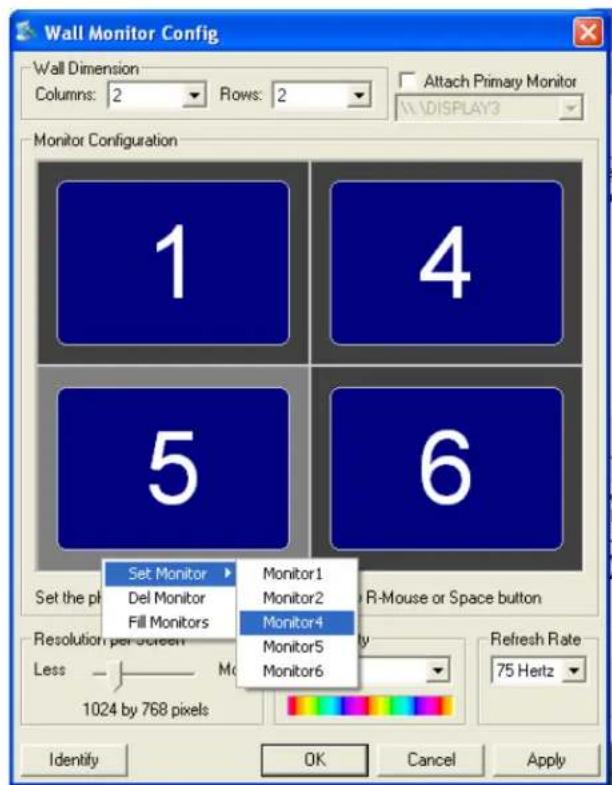
Figure 3.6
Seng resoluon
Seng "Resoluon per Screen," "Color quality," and "Refresh Rate" from the Wall Monitor Cong window will aect all of the monitors in the Wall View.
4. Seng up Staon Views
'Staon Views' is one of the most significant features of the PresenterWall soware. This is where you control how your content will be displayed across the various displays you've set up. You can make several applicaons run simultaneously on separate windows, or have one applicaon displayed across several screens, or variaons of the two. (Figures 4.1 and 4.2)

natural_image
Four-panel image showing a close-up of a large ocean wave, with visible waves crashing against the sea (no text or symbols)Figure 4.1

heatmap
| | 1 | 2 | 3 | 4 | 5 | 6 | |---|---|---|---|---|---|---| | Blue | | | | | | 6 | | Yellow | | | | | 5 | | | Orange | | | | | | | | Red | | | | | 4 | |Figure 4.2
To open 'Wall Views'
- From the 'Presenter Wall Manager' use your mouse to highlight your local client.
- Once highlighted select 'Staon' and click 'Congure Staon Views' from the drop down menu.
- This will open the 'Staon Views' Manager. (Figure 4.3)
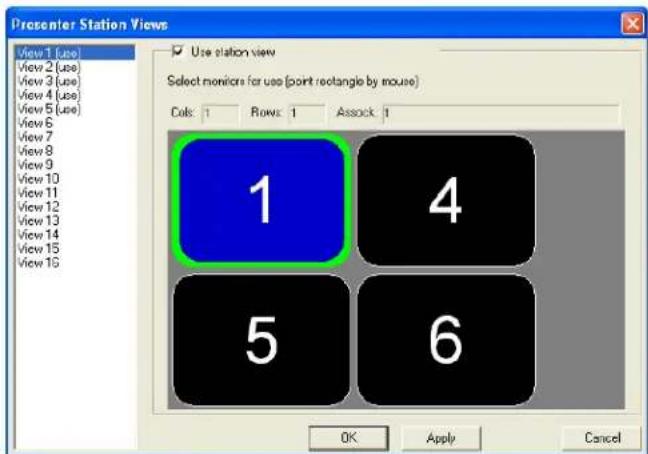
Figure 4.3

Figure 4.4
The Staon View manager's main window shows a representaon of the displays connected to the video card.
- To create a view, select 'View 1' from the le and select 'Use staon view'.
- Drag your cursor across the displays to select some or all of them. (Figures 4.3 and 4.4)
- The selected displays will appear blue.
- Once you have the desired displays selected, click 'ok'
- To create additional views, repeat steps 1 thru 4.
5. PresenterWall Task Manager
The PresenterWall Task Manager allows you to create schedules for the applicaons to be displayed on your Video Wall. You can dene the date, me, and duraon for all of your projects. Schedules can also be saved to the hard drive for later use.
Tasks: are individual les such as movies, PowerPoint presentaons or Flash les; in order to run a Task it must be placed into a schedule.
Seng up Tasks: In the Task menu opon, you can create, delete, and view the properes of all the applicaons you wish to run on PresenterWall.
To open the Task Manager: From PresenterWall Manager select 'Run' then click on 'Task Manager'. (Figure 5.1) Then your task manager should appear. (Figure 5.2)
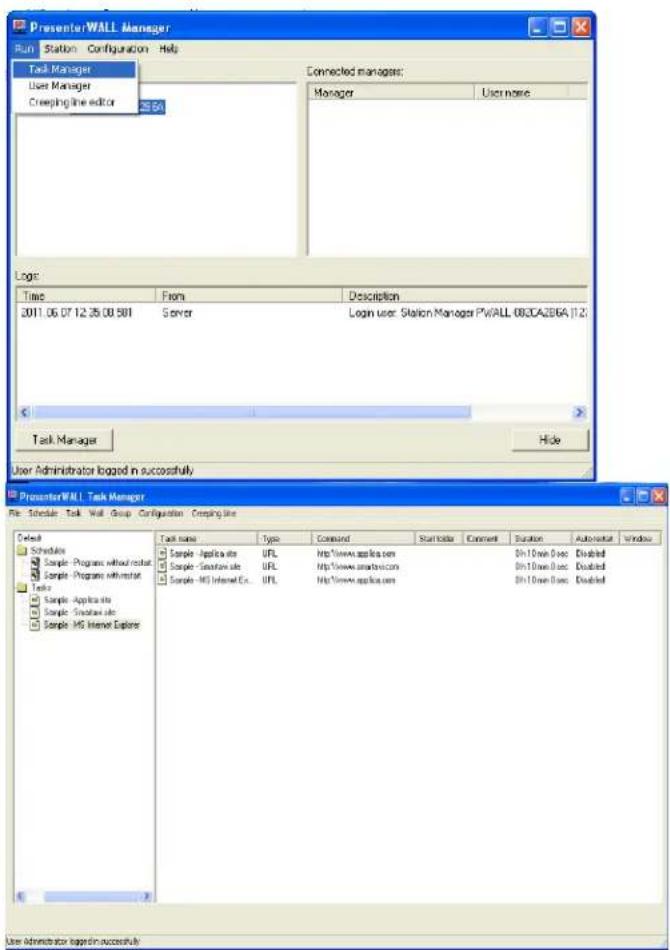
Figure 5.1 Figure 5.2
Once you are in the Task Manager you can begin seng up your presentaon.
To create a new task:
- Select Task then click on 'New Task'.
- Select the type of le you are going to use. (Figure 5.3)
You can select from a wide variety of le types such as Creeping lines (marquis text), Web Pages, PowerPoint, Video, PDF, Images and more)
- Select the le located on your hard drive. (Figure 5.4)
Once the task has been added you can congregate the following properes;
a. The duraon of the task (seng the duraon to 0:0:0 will cause the program to run indenitely.
b. Operaon on End of Task
Here you can set what will happen upon compleon of the Task if it is included in a schedule.
- Run Next Task in schedule will open up the next task in the schedule upon compleon.
- Restart Current Task will cause the task to repeat itself without going to the next task.
- Wait for end of task period and then start next task in schedule will wait for the duraon period to end before running the next task even if the current task is complete.
c. Additional les: Some presentaons require speci font or external les. Use this buon to each those les.
Note: You can override these conguraons in the 'Schedule' menu. (Secon 6)
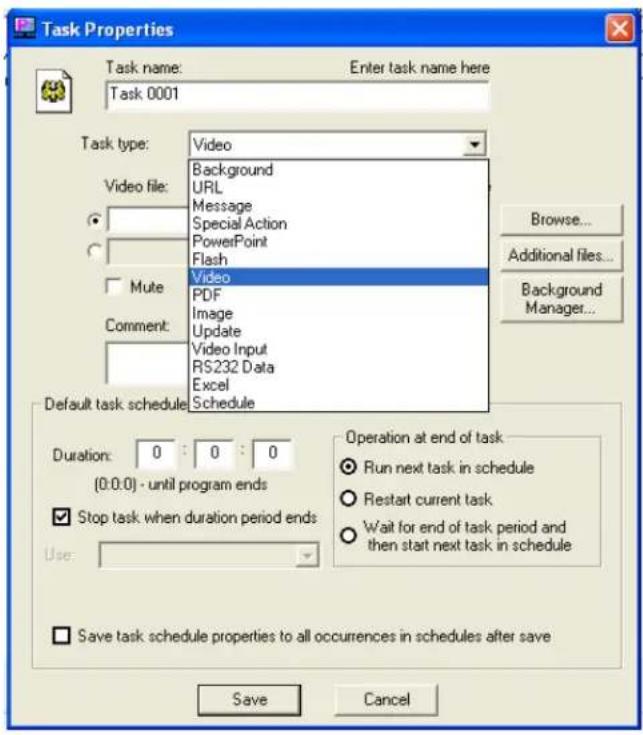
Figure 5.3

Figure 5.4
6. Creang and working with schedules
Schedules can be as complex or as simple as you like. You can control hundreds of tasks to run at specific mes or simply have one or two tasks set to loop connuously
- In the Task Manager select 'Schedule' and click 'New Schedule.' The Client Conguraon Properes Dialog will appear. (Figure 6.1)
- In the 'General' tab give your schedule a name. (optional)
- Begin populang the schedule with various tasks. These tasks can be videos, images, web pages, PowerPoint Presentaons, etc.
a. To do this you must use your mouse to highlight one of the tasks you created in step 5.
b. With the task highlighted click the down arrow just to move the task into your schedule.
c. The task within the schedule will run in order starting from the task at the top of the list. You can arrange tasks by selecting them and using the up and down buons.
d. You also have the opon of deleng the task from the schedule or clearing the schedule enrely.

Figure 6.1

Figure 6.2
Once you have added your tasks to the schedule, you are ready to modify the tasks properes. (Figure 6.2)
Modifying Tasks within the schedule
- Double-click the task you wish to modify from the 'Scheduled Tasks' secon. This brings up the 'Schedule Task Properes' Dialog. From here you are given several opons:
a. Operaon on end of task
- Run next task in schedule: This opon will run the next task that you've added to the schedule once the task has ended.
- Restart current task: This will restart the current task once it has nished. Use this selecon to loop your task indenitely.
- Wait for end of task period and then start next task in schedule: Use this Selecon if you've set a specic duraon for the task.
b. Duraon: Lets you congregate how long you would like the task to be displayed on your screen. Seng this to 0:0:0 will automatically stop the task once it has ended. This is primarily used for video and ash movies.
Use View: If you are using templates*, this control lets you select which view to display your task. (More about templates in secon 8.)
c. Click 'OK' to save your sengs.
- Day and Time: Use the 'Day and Time' tab to control when and for how long the schedule will play. The Day and Time dialog controls the following:
a. Schedule start type: This feature selects how the schedule will operate. (Figure 6.3)
- Run once: Select a specific me and date for the schedule to run.
- Run periodically: Set a schedule of mes and dates for your schedules to play. This opon allows you to alternately schedule a variety of schedules.
- Run on player start: Schedule starts when the player starts
b. The following scheduling features let you control when your schedules will play up to the minute. (Figures 6.3 and 6.4)
Days of week, Month, Day(s) of month, Years, Start me, End me, Duraon, and Intervals.

Figure 6.3

Figure 6.4
7. Creang a Super Schedule
Super Schedules were designed for those who want to get the most from their video wall. Super Schedules allow the user to create a variety of alternang screen layouts.
Virtual View
Seng Virtual Views creates various layouts for your video wall. This should be congured the same way as your physical video wall layout. These views can be used for any Super Schedule you create. For this example we created a 2x2 video wall.
- In your task manager, at the top, click "Wall," then "Setup Virtual Views."
- On the Wall View tab, assign the number of rows and columns that is the same as your staon views setup
- Click "Add" on the boom le to add a view, which you may name whatever you like. Drag your mouse across whichever screen or screens you would like to assign to this view. You may use individual or mulple screens. (Figure 7.1)
- Repeat step 3 unl you have the views you need.
- Click the "Wall View Set" tab to start creang different sets using the views you have just created.
- Click "Add" to add sets, which you may name whatever you like. Now you may add dierent views to your set by clicking the check boxes for each view you would like to add. Make sure you do not use views that overlap. (Figure 7.2) You may also add additional sets for dierent view conguraons. (Figure 7.3)
- Once your sets are complete, you will be ready to congure your Super Schedule

Figure 7.1
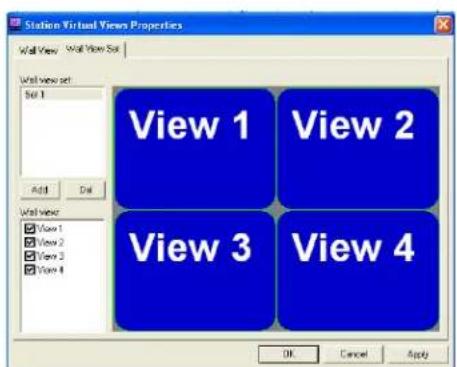
Figure 7.2

Figure 7.3
Create a new Super Schedule
- From the task manager select 'Schedule' / 'New Super Schedule'.
- Click "Add" at the boom le to create a Schedule. (Figure 7.4)
- Create a name for your Schedule.
- Set the duraon of your schedule. (Note: Seng the duraon to 00:00:00 sets the duraon to loop connuously.)
- Select one of the Wall View Sets that you previously created.
- Repeat steps 2-5 to create more schedules and sets to play consecuively. (Note: Be sure to set duraons to these schedules so that a schedule doesn't loop connuously.)
- Once you have completed a schedule you can begin adding media les. Drag the media le icons onto the screen representaon. (Figure 7.5)
- Once you drag an icon onto a screen, a Task Property window will appear similar to Figure 5.3. Create this task as you would a task in secon 5.
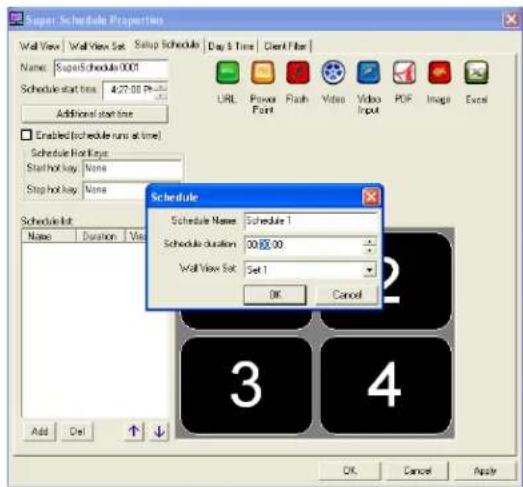
Figure 7.4

Figure 7.5
- Repeat step 7-8 unl you have the desired media in each set and schedule.
Day and Time
The Day and Time tab allows you to set the play schedule for your super schedule. From this tab you can set most of the same conguraons as you would a normal schedule. Refer back to the Day and Time conguraon for regular schedules in secon 6.
Note: If at any me you would like to manually start a schedule or super schedule, you may do so from the task manager by right clicking the schedule you would like to play and click "Start." You may also manually stop your schedules here.
8. Template Creator
A powerful feature of PresenterWall is the Template Creator. Templates allow users to create and assign regions. This gives you the ability to run several tasks at the same me on one screen. The result is the simultaneous integraon of high-resolution graphics with dynamic video and scrolling text messages and news feeds.
To create a template and assign tasks:
- Double click schedule you wish to use for your template.
- Click "New Template" on the right.
- Choose the resoluon you would like to use for your template.
- Once the Template creator window is open you can now create regions.
- To create your rst region click on the 'Add View' icon and drag your mouse across the white display editor. (Figures 8.1 and 8.2)
- Repeat step 5 unl you've added all the view regions you want.
- You may move and edit your regions any way you want. An example of a 3-region template is shown in Figure 8.3.

Figure 8.1

Figure 8.2
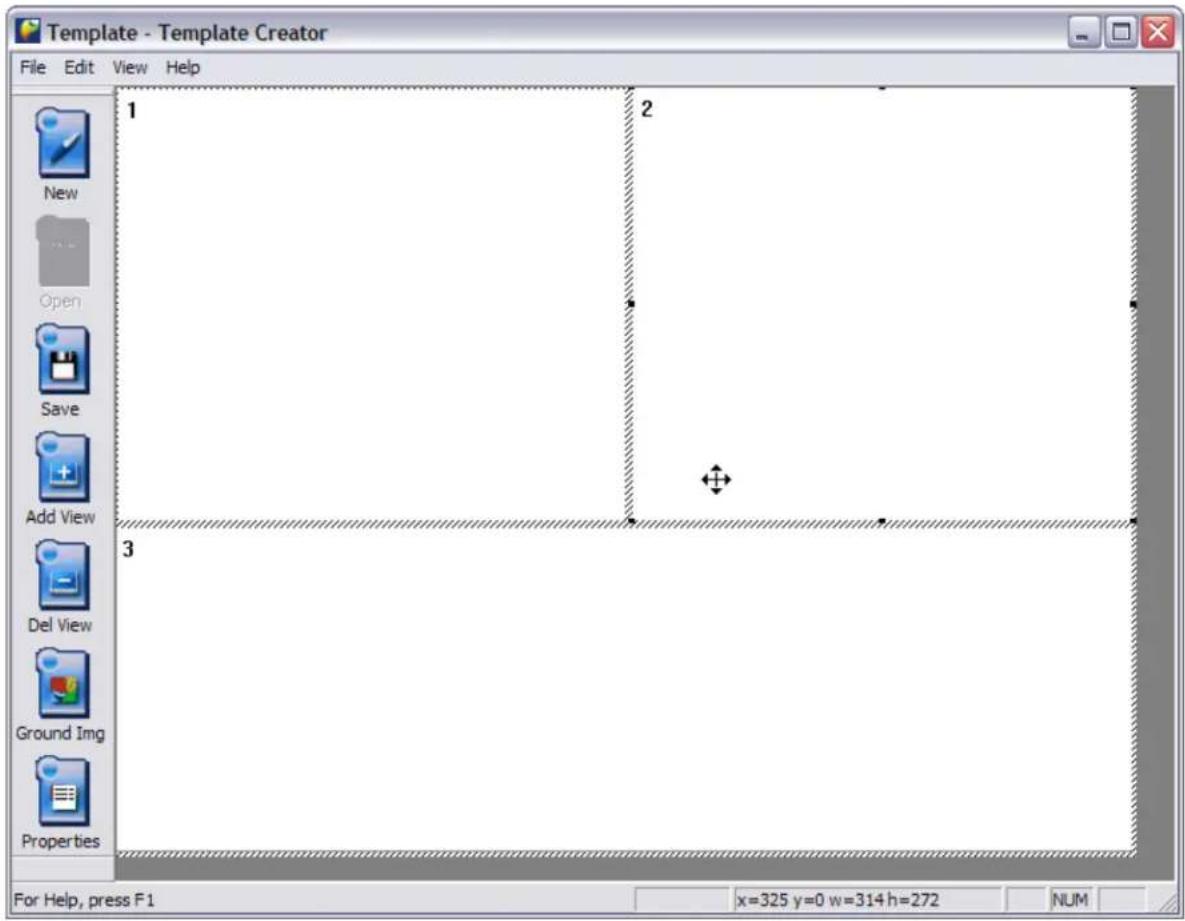
Figure 8.3
You can also assign a background image to your layout by clicking the 'Properes' icon and selecng an image from your hard drive. (Figure 8.4)

Figure 8.4
Once you are sased with your layout, save the template le on your computer hard drive. (Figure 8.5)

Figure 8.5
Now you are ready to assign views. This is where you select which task will be displayed into the dierent regions you've just created.
Assigning Views for Templates:
- If you're schedule properes isn't showing from before, from the 'Schedule Properes' dialog double click the schedule you want use the template for.
- Click the check box for "Use Template." Then click "Browse" to load the template you created. (Figure 8.6)
- Double-click the task name to bring up the task properes.
- Select a view from the dropdown menu you where you would like the task displayed. Then click 'Ok' (Figure 8.7)

Figure 8.6

Figure 8.7
Figure 8.8 shows an example of a typical layout using SmartAVI's template creator.

Figure 8.8
9. Creeping Line Editor
PresenterWall's Creeping Line Editor enables you to create a scrolling marquis anywhere on your screen(s). You can use RSS feeds, text from a le, or simply type text directly into the editor.
-
Open the Creeping Line Editor. From the PresenterWall Manager select 'Run' and click "Creeping Line Editor."
-
Add content to your Creeping Line.
a. To create and edit scrolling text, select "Opons" and click 'Creeping Line Opons' (Figure 9.1)

Figure 9.1
b. In the 'General' tab Creeping Line Property Sheet you are given several opons;
- Input text: Type your text directly into the editor. (Figure 9.2)
• Use RSS: Input the URL of the RSS feed of your choice. (Figure 9.3)
• Control the speed of your scrolling text. - Preview the text directly on your desktop
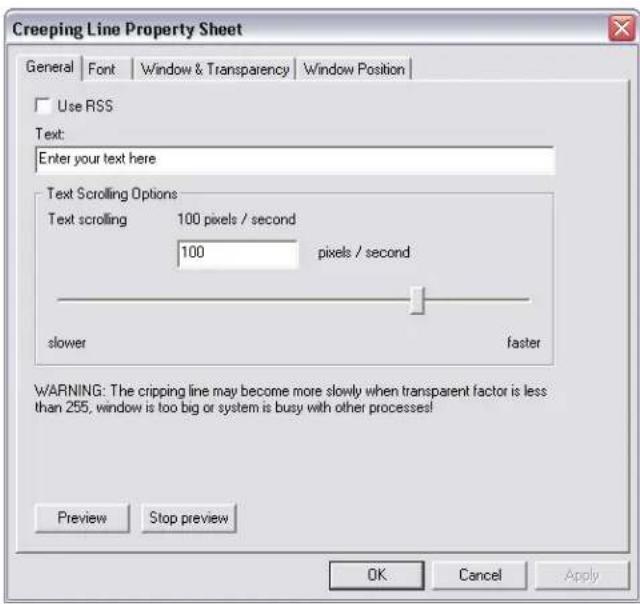
Figure 9.2

Figure 9.3
3. Customizing fonts
a. Select the 'Font' tab and click "Choose Font" to adjust the size, style and color of your font. (Figure 9.4)

Figure 9.4
- Adjust window text and transparency.
a. In the Text Window and Transparency dialog box you are given several adjustment opons. (Figure 9.5)
- Background Color
- Window Border
- Transparency
- Transparent Color

Figure 9.5
Below are some examples of dierent transparency sengs (Figure 9.6)

Example A

Example B

Example C

Example D
Figure 9.6
- Set the posion of your Creeping Text.
The Window Posion dialog lets you decide where you would like the scrolling text to appear on your screen.
You have the opon of either docking your window to the top or boom of your screen, or posioning it exactly where you want it. (Figure 9.7)
You also have the ability to adjust the height and width of your textbox as well. (Figure 9.8)
- Save your changes.

Figure 9.7

Figure 9.8
Note: You can preview your changes anymore by clicking the 'Preview' buon.
a. To accept your changes click the 'OK' buon on your Creeping Line Property Sheet.
b. To save your work select 'File' and click either 'Save' or 'Save As' from the secon menu or click the disk save icon. (Figure 9.9)
c. Name your le and save to your hard drive.

Figure 9.9
The Background Manager allows PresenterWall users to add mulple Creeping Lines in Tasks rather than in a Schedule. You can now add mulple Creeping Lines into specic Tasks.
To add Creeping Lines into a Task:
- Click on the Task Properes of the Task you want to add the Creeping Line into.
- Click on the buon that is labeled "Background Manager"
- In the Background Manager, you can add exisng Creeping Lines or create new ones. To create a new one, click on 'Edit.' To add exisng Creeping Lines, click on 'Add' and browse for your le. (Figure 9.10)
- You can add more than one Creeping Line in each task. To stop a previous Creeping Line in a dierent Task that is running in one Schedule, click on 'Stop previous Background.'
- 'Enable Background documents below:' must be checked for the Creeping Lines to play.
- You can change the Creeping Lines in Tasks that are already placed in Schedules by going to your Task properes via the Schedule Properes.

Figure 9.10
10. Registraon
Soware Registraon
PresenterWall soware requires registraon and acvaon for successful use of the PresenterWall Manager soware aer 30 days.
To register, open up the PresenterWall Manager, and then click on 'Help' and then 'Registraon'
Important: Serial numbers must be typed in ALL CAPS, or registraon will fail.
The next step you want to do is click the link that says 'Get key from WWW'. (Figure 10.1)
Next you want to ll out the form completely, and make sure the Product at the top says PresenterWALL. (Figure 10.2)
Aer you have completed the form, click the 'Register Now' buon.
A new window will pop up, this contains your acvaon code, copy it, close that window, and paste it in the Register Product window in the 'Acvaon key:' eld.
Last click the buon that says 'Save Changed Registraon Informaon'.
The Product Registraon Status will say 'Product acvated successfully!'
Click 'Ok' to close the window.
Note: Make sure you save your acvaon code in a safe place; it will be needed for product upgrades.
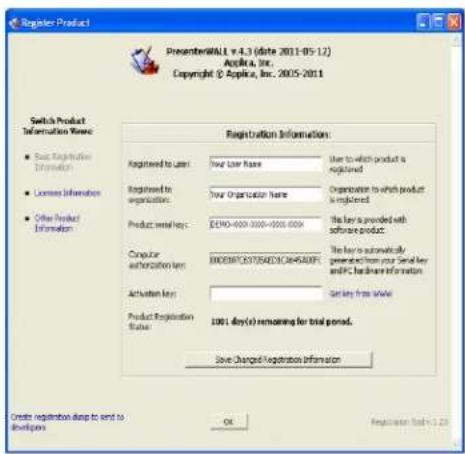
Figure 10.1

Figure 10.2

Figure 10.3
Specicaons
PCI-E 4-port DVI Video Card Technical Speciaons
| Graphics Engine | RADEON HD4670 x 2 |
| Video Memory | 2GB DDR3 |
| Engine Clock | 725MHz |
| Memory Clock | 800MHz |
| Memory Interface | 128bit |
| DirectX Support | 10.1 |
| Bus Standard | PCIE 2.0 |
| Display output | 4 x DL DVIs on-board |
| HDTV Output | Yes |
| External Power input (6 pin) | Yes |
| FAN sink | Dual Slot FAN Cooler |
| Dual-link DVI | Yes (4 Ports) |
| HDMI/HDCP Support | Yes (adapter is required) |
| Form Factor | ATX size |
Supported conguraons
- Single DVI-D
- Dual DVI-D
- Quad DVI-D
• HDMI video and audio (via adapter) - Single VGA (adapter required)
• Dual VGA (adapter required)
• Quad VGA (adapter required)
• S-Video (adapter required)
• Composite RCA video (adapter required) - Component HDTV (adapter required)
Notes
Notes
Notes
Notes
© Copyright 2011 Smart-AVI, All Rights Reserved
NOTICE
The informaon contained in this document is subject to change without noce. Smart-AVI makes no warranty of any kind with regard to this material, including but not limited to, implied warranes of merchantability and tness for any particular purpose.
Smart-AVI will not be liable for errors contained herein or for incidental or consequential damages in conneccon with the furnishing, performance or use of this material.
No part of this document may be photocopied, reproduced or translated into another language without prior written consent from Smart-AVI.
For more informaon, visit www.smartavi.com.
Smart-AM
SMART AUDIO VIDEO INNOVATION


- Secon 1 –Installing the PresenterWall Hardware
- Secon 2 -Seng up the PresenterWall Soware
- Secon 3 - Using the PresenterWall Server Soware
- Introducon
- Disclaimer Noce
- What's in the Box?
- Limited Warranty Statement
- Secon 1 Installing the PresenterWall Hardware
- Hardware Installaon (PCI-E 4-port DVI Video Card)
- Secon 2 Seng up the PresenterWall Soware
- Installing PresenterWall Soware
- User Manager
- Firewall
- Secon 3 Using the PresenterWall Soware
- Using PresenterWall Soware
- PresenterWall Manager
- Cursor Finder
- Conguring Wall View Monitors
- Geng started
- To congure your screen layout
- Assigning monitors
- Seng resoluon
- Seng up Staon Views
- The Staon View manager's main window shows a representaon of the displays connected to the video card.
- PresenterWall Task Manager
- To create a new task:
- Creang and working with schedules
- Modifying Tasks within the schedule
- Creang a Super Schedule
- Virtual View
- Create a new Super Schedule
- Day and Time
- Template Creator
- To create a template and assign tasks:
- Assigning Views for Templates:
- Creeping Line Editor
- Customizing fonts
- Registraon
- Specicaons
- Supported conguraons
- Notes
- © Copyright 2011 Smart-AVI, All Rights Reserved
- NOTICE
- Smart-AM
- SMART AUDIO VIDEO INNOVATION
Brand : Smart-AVI
Model : VW-04XVDS
Category : Audiovisual Equipment