The Precise Chopper - Food processor Baccarat - Free user manual and instructions
Find the device manual for free The Precise Chopper Baccarat in PDF.


| Product Type | Food Processor |
| Brand | Baccarat |
| Model | The Precise Chopper |
| Power | 500W |
| Voltage | 220-240V ~ 50/60Hz |
| Bowl Capacity | 1.5 liters |
| Bowl Material | Plastic (BPA-free) |
| Blade Material | Stainless steel |
| Speed Settings | 2 speeds + pulse |
| Functions | Chopping, mixing, pureeing, emulsifying |
| Dimensions (LxWxH) | 25 x 20 x 30 cm |
| Weight | 2.5 kg |
| Cord Length | 1.2 m |
| Safety Features | Non-slip feet, safety lock lid, overload protection |
| Cleaning | Detachable parts dishwasher safe; bowl and blades hand wash recommended |
| Warranty | 2 years |
| Included Accessories | Chopping blade, mixing blade, spatula, recipe book |
| Repairability | Spare parts available from Baccarat service centers |
Frequently Asked Questions - The Precise Chopper Baccarat
User questions about The Precise Chopper Baccarat
0 question about this device. Answer the ones you know or ask your own.
Ask a new question about this device
Download the instructions for your Food processor in PDF format for free! Find your manual The Precise Chopper - Baccarat and take your electronic device back in hand. On this page are published all the documents necessary for the use of your device. The Precise Chopper by Baccarat.
USER MANUAL The Precise Chopper Baccarat
earning. Whisk, Dough,
Chopping Auto-Clean

Accessories

Convenient
Accessories Case

Manual Speed
Control

Recipe Book
Included

Feed Chules
To Suit Various Sized
Ingredients


natural_image
Close-up of a colorful salad in a bowl, featuring diced tomatoes, red peppers, and green herbs (no text or symbols visible)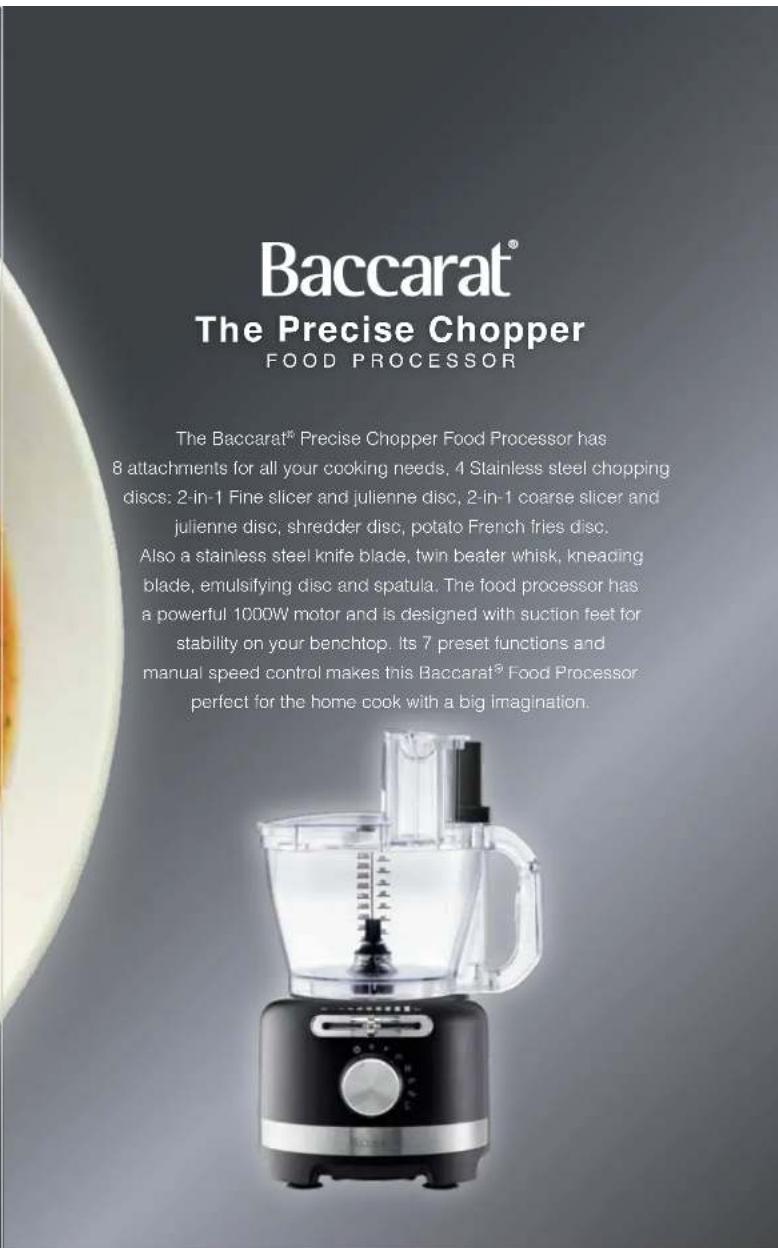
Baccarat®
The Precise Chopper
FOOD PROCESSOR
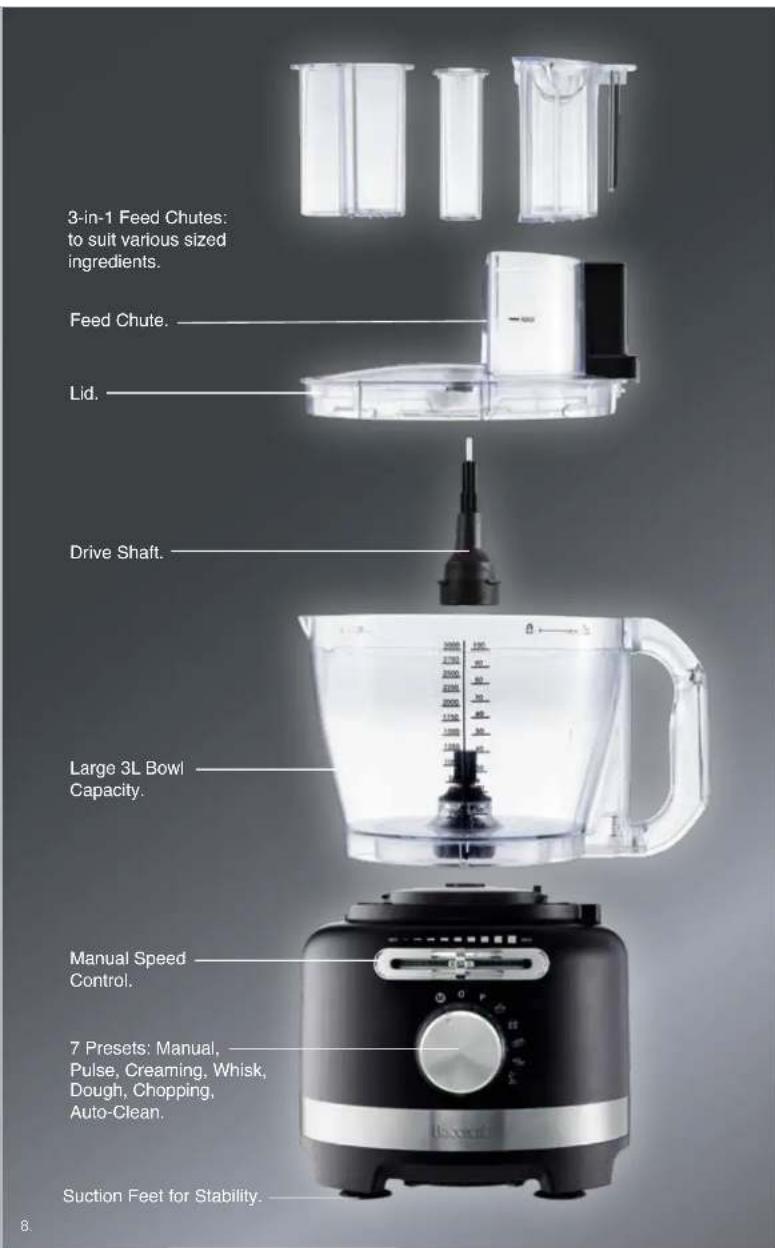
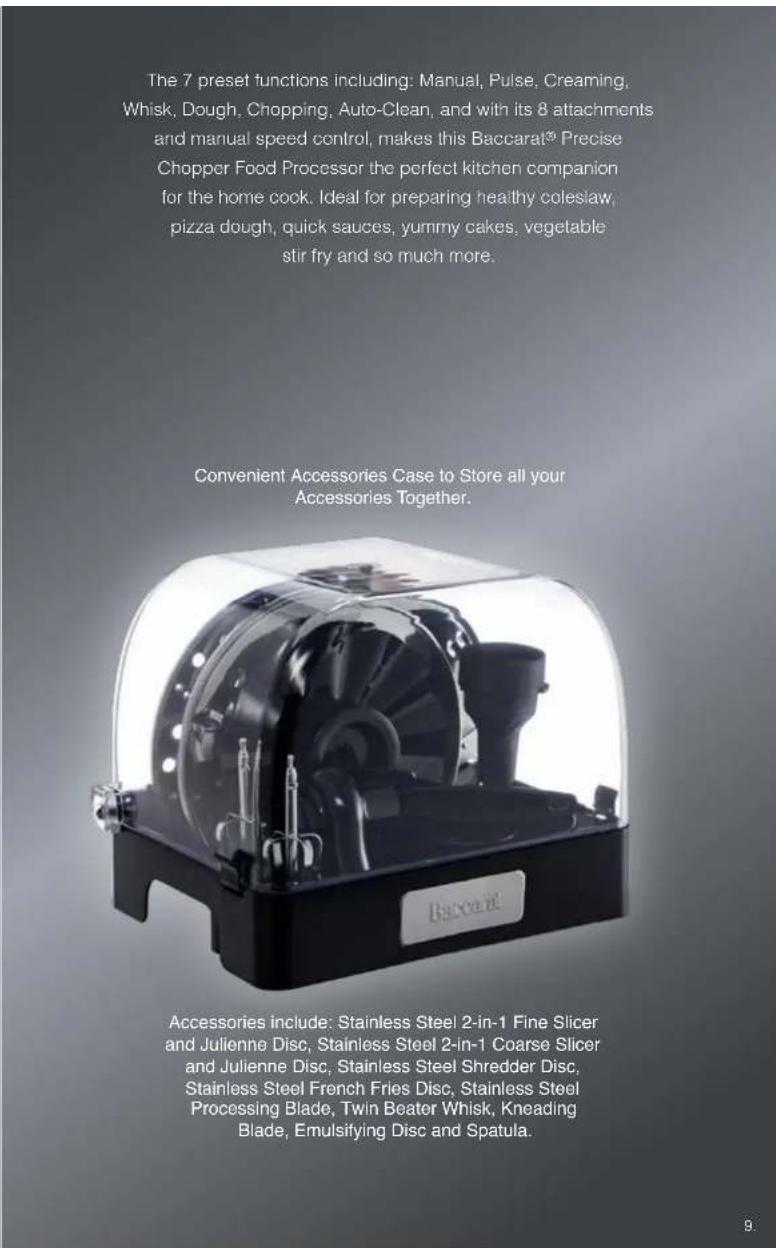
The Baccarat® Precise Chopper Food Processor has 8 attachments for all your cooking needs, 4 Stainless steel chopping discs: 2-in-1 Fine slicer and julienne disc, 2-in-1 coarse slicer and julienne disc, shredder disc, potato French fries disc. Also a stainless steel knife blade, twin beater whisk, kneading blade, emulsifying disc and spatula. The food processor has a powerful 1000W motor and is designed with suction feet for stability on your benchtop. Its 7 preset functions and manual speed control makes this Baccarat® Food Processor perfect for the home cook with a big imagination.
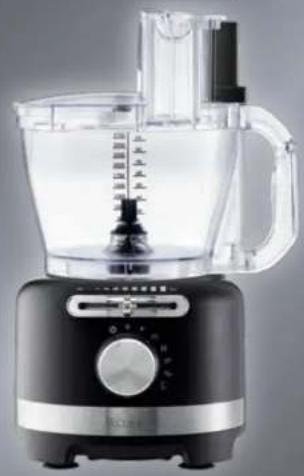
natural_image
Exterior view of a kitchen blender with clear glass and black casing (no visible text or symbols)| Contents | Pages |
| Safety Precautions | 5-6 |
| Operating Instructions / Before First Use | 6 |
| Cooking Use | 7-14 |
| Accessories Guide | 14-18 |
| Product Features | 8-9 |
| Care Guide | 18 |
| Storage Case | 19 |
| Troubleshooting | 20 |
| Recipes | 22-32 |
| Warranty | 34-35 |
Baccarat® The Precise Chopper
BACCARAT® IMPORTANT SAFETY INSTRUCTIONS FOR ALL ELECTRICAL APPLIANCES. PLEASE READ CAREFULLY BEFORE FIRST USE & RETAIN FOR FUTURE REFERENCE.
Safety is at the forefront of design and manufacturing throughout the process of all Baccarat® products. It is essential that the product user exercise care when using a Baccarat® electrical appliance. Please adhere to the following precautions which are essential for the safe use of an electrical appliance:
Safety precautions for the Baccarat® Precise Chopper.
- Do not plug the appliance into a power outlet until it is fully assembled.
- Never remove the lid while the appliance is operating. Always turn the appliance off, switch the power off at the power outlet and unplug before removing the lid.
- Do not fill processing bowl above marked levels.
• Always add drier or thicker ingredients to the processing bowl prior to adding wet ingredients. - Do not move the appliance during operation.
- Keep hands, hair, knives and other kitchen utensils away from moving accessories when the appliance is under operation to reduce the risk of injury to persons or damage to the appliance.
-
Ensure the appliance motor is off and come to a complete stop; the appliance is switched off and unplugged at the power outlet before disassembling. Unlock the processing bowl from the motor body before and carefully remove appliance attachments and internal contents from the bowl.
-
Caution: SHARP Blades and Discs! Handle the sharp blades and attachments with care when cleaning the appliance or when assembling or disassembling the appliance.
- Do not guide food down the feed chule with your fingers or other utensils. Always use the food pushers provided.
- Do not process hot or boiling liquids into the processing bowl. Allow hot or boiling liquids to cool down first before placing into the processing bowl.
- Please do not crush ice in the appliance. This will cause damage to the Stainless Steel Processing Blade or Kneading Blade.
- Do not handle the appliance with wet hands. If the appliance becomes humid or wet, turn the appliance off and switch off at the power outlet and unplug.
- Do not place any part of the appliance in the microwave.
Baccarat®
Safety Precautions for all Baccarat® Electrical Appliances
- This appliance is not intended for use by persons (including children) with reduced physical, sensory, or mental capabilities, or lack of experience and knowledge, unless they have been given supervision or instruction concerning use of the appliance by a person responsible for their safety.
• Children should always be supervised to ensure that they do not play with the appliance.
• To eliminate a choking hazard for young children, remove and safely discard the protective cover fitted to the power plug of this appliance. - Always turn the power off at the power outlet before you insert or remove a plug. Remove by grasping the plug - do not pull on the cord.
- Turn the power off and remove the plug when the appliance is not in use and before cleaning.
- Do not use the appliance with an extension cord unless this cord has been checked and tested by a qualified electrician.
• Always use the appliance from a power outlet of the voltage (A.C. only) marked on the appliance. - Do not pull or carry the appliance by its power cord. Do not bend the cord around sharp edges or corners. Do not bend the cord and never force the plug into the outlet.
- The temperature of accessible surfaces may be high when the appliance is operating.
- Never leave the appliance unattended while in use.
-
Do not use the appliance for any purpose other than its intended use.
-
Do not place the appliance on or near a hot gas flame, electric element, on or in a heated oven.
- Do not place on top of any other appliance.
- Do not let the power cord of the appliance hang over the edge of a table or bench top or touch any hot surface.
- Do not operate any electrical the appliance with a damaged plug, cord or after the appliance has been damaged in any manner. If damage is suspected, return to place of purchase, or see how to claim under warranty.
- Do not immerse the appliance in water or any other liquid unless recommended.
- The appliances are not intended to be operated by means of an external timer or separate remote-control system.
- Do not use unauthorised accessory attachments as they may cause injuries.
- This appliance is for household use only. Do not use this appliance for anything other than its intended use. Do not use in moving vehicles or boats. Do not use outdoors. Misuse may cause injury.
- The appliance should always be used on a smooth, hard, flat, stable, dry and heat-resistant surface, such as a benchtop or table.
- Allow to cool before storing.
• Refer to 'Care Guide' for cleaning.
Operating Instructions
Before First Use
- Remove all the packaging and safely discard.
- Wash the processing bowl, processing lid and all attachments. Rinse and dry thoroughly. Refer to 'Care Guide' for cleaning.
Cooking Use
-
Ensure the rotary dial indicator is in (OFF) position.
-
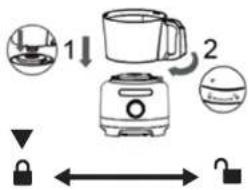
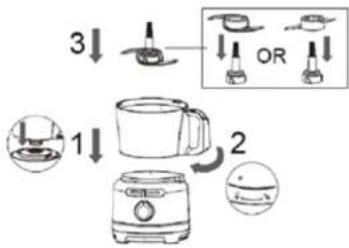
Position the processing bowl onto the motor base.
- Align the arrow on the processing bowl base with the 'Open Lock' symbol on the motor base.
- Holding the processing bowl by the handle, firmly turn the bowl clockwise direction towards the 'Closed Lock' symbol on the motor base to securely lock the processing bowl onto the motor base.
- Note: The appliance will not operate unless the processing bowl is locked into position correctly.
flowchart
graph TD
    A["1"] --> B["2"]
    B --> C["3"]
    C --> D["4"]
    D --> E["5"]
    E --> F["6"]
    F --> G["7"]
    G --> H["8"]
    H --> I["9"]
    I --> J["10"]
    J --> K["11"]
    K --> L["12"]
    L --> M["13"]
    M --> N["14"]
    N --> O["15"]
    O --> P["16"]
    P --> Q["17"]
    Q --> R["18"]
    R --> S["19"]
    S --> T["20"]
5 Place the drive shaft vertically onto the centre rotor inside the processing bowl.
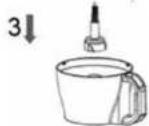
- Note: The drive shaft is required when using ALL attachments. Failing to use the drive shaft will damage the attachments.
- Position the desired accessory over the drive shaft. See 'Accessories Guide' for instructions on attaching the desired accessory to the drive shaft and suggested usage.
-
Note: The Processing Blade accessories will drop lower on the drive shaft than the discs.
-
Note: Only one accessory can be used at any one time.
-
CAUTION: Blades and Discs are sharp! Please handle with care!
-
Place the lid on the food processing bowl. See 'Lid Guide' for instructions and 3-in-1 Feed chute usage.
- Insert the plug into a power outlet.
- Turn the rotary dial indicator towards your desired function and once ready, push in the rotary dial to start the function to operate. See Functions Guide for use of functions or 'Accessories Guide' for suggested Function for the accessory in use.
- Once food processing task is complete to your preference, push the rotary dial to stop the current function and turn the rotary dial indicator to OFF position. Wait for the appliance to come to a complete stop.
- Switch the power off and unplug at the power outlet.
- Unlock the processing bowl from the motor body by firmly holding the handle and turning anti-clockwise direction towards the 'Open Lock' symbol.
- Remove processing bowl from the motor body.
- Remove lid from the processing bowl. See 'Lid Guide' for instructions.
- Carefully remove accessory from the drive shall. Use provided spatula, if required, to remove the internal contents from the processing bowl. Enjoy. Caution: Blades and Discs are sharp! Please handle with care!
natural_image
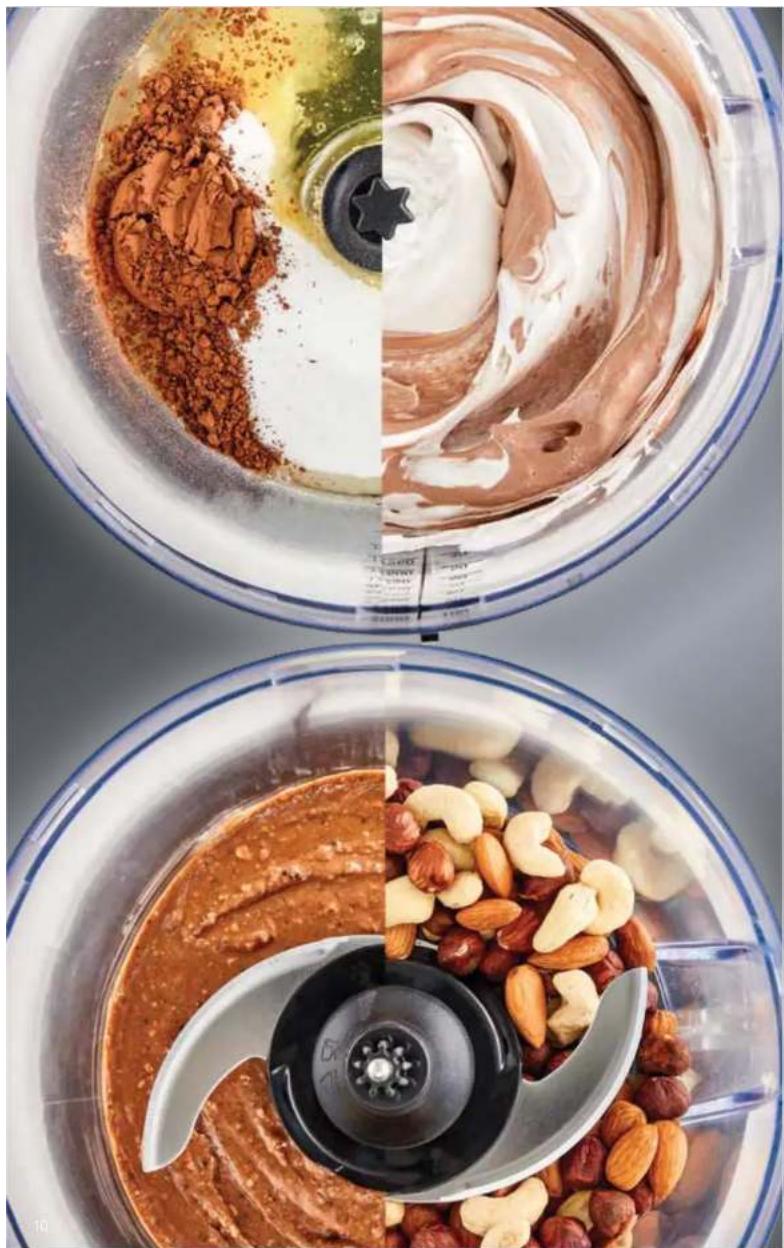
Top-down view of a kitchen mixer with three views: one showing powdered sugar, one with chocolate and cream, and one blending nuts with cash (no text or symbols visible)Baccarat®
natural_image
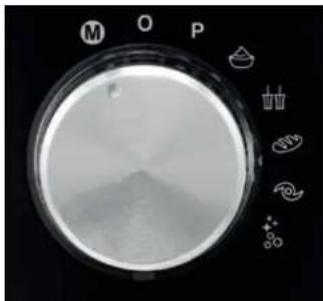
Close-up of a circular mechanical component with control buttons (M, O, P) and icons, no readable text or symbols beyond labels.Off O
This is the O (OFF) indicator. The appliance will not operate under this function.
- Ensure the rotary dial indicator is always positioned in OFF) when first plugged in to a power outlet.
-
Note: This is to avoid the appliance working immediately when plugged in and bringing an unexpected accident.
-
Once ready to operate the appliance, turn the rotary dial indicator to your desired function position and push in the rotary dial to start function.
- Push in rotary dial to stop function and turn rotary dial indicator back to OFF position to stop operation.
Manual Control M
This function can be used for all accessory attachments and allows for manual control over the speed.
- Assemble the desired accessory attachment into the food processing bowl. See 'Accessories Guide' for assembling instructions.
-
Insert the plug into a power outlet. Ensure rotary dial indicator is positioned in OFF when first plugged in to a power outlet.
-
Turn the rotary dial indicator towards position.
- Push in the rotary dial to start the function once ready to operate.
- Slide the speed control to adjust to the desired speed.
- Push in the rotary dial to stop the function
- Turn rotary dial indicator back to O (OFF) position once completed with the function.
Pulse P
This function is designed for momentary bursts of power and can be used with all accessory attachments.
1. Assemble the desired accessory attachment into the food processing bowl.
See 'Accessories Guide' for assembling instructions.
2. Insert the plug into a power outlet. Ensure rotary dial indicator is positioned in OFF when first plugged in to a power outlet.
3. Turn the rotary dial indicator towards P (PULSE) position.
4. Push in the rotary dial to start the (Pulse) P function.
a. Hold the rotary dial in if slightly longer pulse function is required.
5. Release the rotary dial to stop the 'Pulse' function.
6. Continue to push and release the rotary dial for bursts of power.
7. Once complete with the function, release the rotary dial, and turn the rotary dial indicator back to OFF position.
Baccarat®
Creaming
This function is designed for creaming eggs and other ingredients with the EMULSIFYING DISC accessory attachment.

- Assemble the EMULSIFYING DISC accessory into the food processing bowl. See 'Accessories Guide' for assembling instructions.
- Turn the rotary dial indicator towards (CREAMING) position.
- Push in the rotary dial to start the 'Creaming function.
- Push in the rotary dial to stop the function.
- Turn rotary dial indicator back to O (OFF) position once completed with the function.
Whisk
This function is designed for whisking eggs and other types of light mixtures with the Twin Beater Geared Whisk accessory attachment.

- Assemble the TWIN BEATER GEARED WHISK accessory into the food processing bowl. See 'Accessories Guide' for assembling instructions.
- Turn the rotary dial indicator towards (WHISK) position.
- Push in the rotary dial to start the 'Whisk' function.
- Push in the rotary dial to stop the function.
- Turn rotary dial indicator back to O (OFF) position once completed with the function.
Dough Mixing

This function is designed for all types of dough mixing with the Kneacing Blade attachment.

- Assemble the Kneading Blade into the food processing bowl. See 'Accessories Guide' for assembling instructions.
- Turn the rotary dial indicator towards (DOUGH MIXING) position.
- Push in the rotary dial to start the Dough Mixing function.
- Push in the rotary dial to stop the function.
- Turn rotary dial indicator back to O (OFF) position once completed with the function.
Chopping

This function is designed for all types of chopping of ingredients with the Stainless Steel Processing Blade attachment.

- Assemble the Processing Blade into the food processing bowl. See 'Accessories Guide' for assembling instructions.
- Tum the rotary dial indicator towards (CHOPPING) position.
- Push in the rotary dial to start the 'Chopping' function.
- Push in the rotary dial to stop the function.
- Turn rotary dial indicator back to O (OFF) position once completed with the function.
Auto Clean
Use this function for cleaning the Stainless Steel Processing Blade or Kneading Blade accessory attachments with case.


- Assemble either the Processing Blade or Kneading Blade accessory into the food processing bowl. See 'Accessories Guide' for assembling instructions.
- Add 3-4 drops of a neutral dishwashing detergent and add water (no more than 800ml of water).
- Turn the rotary dial indicator towards (AUTO CLEAN) position.
- Push in the rotary dial to start the 'Auto Clean' function.
- Push in the rotary dial to stop the function.
- Turn rotary dial indicator back to O (OFF) position once completed with the function.
Lid Guide
- Place the lid on top of the processing bowl ensuring the arrow symbol on the lid aligns with the 'open lock' symbol at the top of the processing bowl.

- Firmly turn the lid in clockwise direction towards the 'closed lock' symbol until the arrow symbol on the lid aligns with the locked symbol. Ensure the lid clicks into place and is securely locked onto the food processing bowl.
- After use, unlock the lid from the processing bowl by firmly turning the lid anti-clockwise direction until the arrow on the lid aligns with the 'open lock' symbol on the processing bowl.
- Note: Only open the lid when the accessories have come to a complete stop.
Using 3-In-1 Feed Chute and Pushers
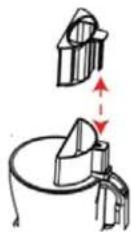
3-in-1 Feed Chutes to suit various sized ingredients.
- Before operating the appliance, ensure the processing bowl, desired accessory attachment and the lid are properly assembled and secured.
- Ensure the pin of Pusher C is inserted to start operation. If Pusher C is not inserted, the appliance will not work.
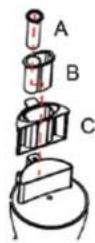
Pusher A
This pusher and food chute is ideal for small and thin ingredients.
- Firstly, insert Pusher B and C into the food chute.
- Insert ingredients into the food chute opening of Pusher B.
- Press the ingredients down with Pusher A.
Pusher B
This pusher and food chute is ideal for medium sized ingredients.
- Firstly, insert Pusher A into Pusher B.
- Pusher B and Pusher A need to be used together.
- Insert Pusher C into the food chute opening.
- Insert ingredients into the food chute opening of Pusher C.
- Press the ingredients down with Pusher B.
Baccarat®
Pusher C
This pusher is ideal for generous sized ingredients.
- Use Pusher C together with Pusher B and Pusher A.
- Insert ingredients into the food chute opening of the lid.
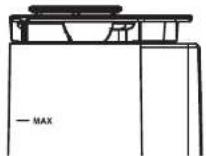
- Ensure ingredients do not exceed the 'MAX' mark on the feed tube. If ingredients are higher than the 'MAX' mark, the Pusher C pin may not be able to connect, resulting in the appliance not operating.
- Press the ingredients down with Pusher C.
Accessories Guide
Kneading Blade
Mix all your dough ingredients with little effort
Suggested Function: Dough mixing

- Do not exceed the volume of 500g of flour with 300g of water at a time.
- Do not operate for more than 2 minutes at a time. Let the appliance rest for 30 minutes before your next use.
- For Coarser ingredients use 'Manual Control'. Refer to 'Functions Guide'.
| Ingredient | Suggested Volume | Function | |
| Flour / Water | Flour | 200g | Dough Mixing (Auto Program) |
| Water | 120g | ||
| Cake Balter | Eggs | 1 egg | Dough Mixing (Auto Program) |
| Margarine | 50g | ||
| Sugar | 50g | ||
| Flour | 50g | ||
| Baking Powder | 1g | ||
Stainless Steel Processing Blade
Perfect for chopping a variety of ingredients with precision and ease.
Suggested Function: Chopping

- Before processing, cut the ingredients into food chute sized pieces to ensure the ingredients fit through the food chute.
- The Stainless Steel Processing Blade will come with a protective plastic cover to protect from the sharp blade. Ensure to remove the protective plastic cover before placing on the drive shaft for use.
| Ingredient | Processing Size | Volume | Working Time | Function |
| Onion | Into 4 pieces (without skin) | 250g | Approx. 30-60 seconds | Chopping or Pulse |
| Garlic Clove | Remove skin | 250g | Approx. 30-60 seconds | Chopping or Pulse |
| Carrot | 2x2cm or smaller | 250g | Approx. 30-60 seconds | Chopping or Pulse |
| Meat | 2x2cm or smaller (without bone) | 250g | Approx. 30-60 seconds | Chopping or Pulse |
Attaching the Blades
Directions on how to attach the Stainless Steel
Processing Blade or Kneading Blade for use.
- Note: Only one accessory can be used at any one time.
- Follow Steps 1 – 5 in 'Cooking Use'
- Position the desired Blade over the drive shaft. Ensure it is fixed well on the drive shaft.
Ensure to store the Stainless Steel Processing Blade back in the protective plastic cover after use and once cleaned.
- CAUTION: 'Blade' is sharp! Handle with care!
- Do not operate for more than 3 minutes at a time. Let the appliance rest for 30 minutes before your next use.
- For Coarser ingredients use the 'Pulse' function or 'Manual Control'. Refer to 'Functions Guide'.
flowchart
graph TD
    A["3"] --> B["OR"]
    B --> C["1"]
    C --> D["2"]
    D --> E["Shaker with lid"]
Baccarat®
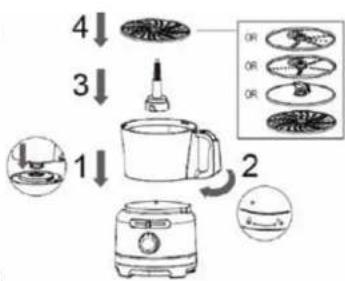
Stainless Steel Blade Discs
Save time on tedious kitchen tasks of slicing and shredding with the Stainless Steel Blade discs. Suggested Function: 📂 Manual
- In 'Manual' Function, Slide the speed control to desired speed.


Julienne Fries (French Fries) Disc
Perfect Shoestring Fries every time with this easy to use Julienne Fries Disc.

2-in-1: Coarse Slicer & Julienne Disc
Save time in the kitchen with this convenient 2-in-1 disc for all your coarse slicing and julienne cuts for luss-free food preparation.
Use the Coarse Slicer side for all your desired thicker slicing and flip the disc to the other side for your coarse Julienne cuts.

2-in-1: Fine Slicer & Julienne Disc
Save time in the kitchen with this convenient 2-in-1 disc for all your fine slicing and julienne cuts for fuss-free food preparation.
Use the Fine Slicer side for all your desired thinner slicing and flip the disc to the other side for your thin Julienne cuts.

Shredder Disc
Quick and easy shredded cheese, lettuce, carrots and all your shredding needs with the shredder disc accessory to reduce your food prep time.
- Do not exceed the max capacity indicated on the processing bowl. Once contents approach the max line, please stop operation, and pour out some of the contents to not exceed the max capacity.
| Ingredient | Suggested Volume | Working Time | Speed | |||
| Jullenne Disc | Fine/ Coarse Slicer Disc | Shredder Disc | Jullenne Fries Disc | |||
| Carrot | 500g | Approx. 1 Minute | Min. Speed | Min. Speed | Min. Speed | N/A |
| Potato | 500g | Approx. 1 Minute | Min. Speed | Min. Speed | Min. Speed | Min. to Macium speed |
| Zucchini | 500g | Approx. 1 Minute | Min. Speed | Min. Speed | Min. Speed | N/A |
| Lack | 500g | Approx. 1 Minute | Min. Speed | Min. Speed | Min. Speed | N/A |
| Beetroot (skin removed) | 500g | Approx. 1 Minute | Min. Speed | Min. Speed | Min. Speed | N/A |
- Only use the provided pushers to guide ingredients down the food chute evenly. Never use or put your fingers in the food chute.
- Do not operate for more than 3 minutes at a time. Let the appliance rest for 30 minutes before your next use.
Attaching the Stainless Steel Blade Discs
Directions on how to attach one of Stainless Steel blade discs for use.
- Note: Only one Stainless Steel blade disc can be used at any one time.
• Follow Steps 1 – 5 in 'Cooking Use'. - Position the desired Stainless Steel blade disc over the drive shaft. Ensure it is fixed well on the drive shaft.
• CAUTION: Blades are sharp! Handle with care!
Emulsifying Disc
Convenient attachment to use for whipping cream, making mayonnaise, aioli and other mixtures. Suggested Function: 🙏 Creaming

- For egg white whisking, use room temperature eggs. Please ensure the processing bowl and emulsifying disc is dry and free from grease.
- For whipping cream, allow cream to cool in the fridge at least 24 hours before use. Use the cream straight from the fridge whilst still cool.
- Do not exceed the volume of 500g of flour with 300g of water at a time.
- Do not operate for more than 2 minutes at a time. Let the appliance rest for 30 minutes before your next use.
flowchart
graph TD
    A["Raw Material"] --> B["Add 1: Dish with lid"]
    B --> C["Add 2: Oven with fan blade"]
    C --> D["Add 3: Dish with bulb"]
    D --> E["Add 4: Dish with fan blade"]
    E --> F["Final Product with fan blade and tray"]
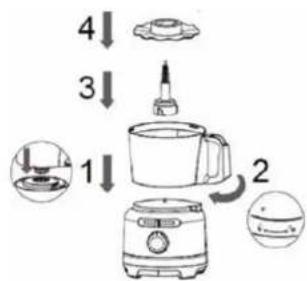
Attaching the Emulsifying Disc
Directions on how to attach the emulsifying disc for use.
- Note: Only one accessory can be used at any one time.
• Follow Stops 1–5 in 'Cooking Use'. - Position the emulsifying disc over the drive shaft. Ensure it is fixed well on the drive shaft.
flowchart
graph TD
    A["1: Dish-shaped bowl"] --> B["2: Cooker with brush, no text or symbols"]
    B --> C["3: Cooker with pencil, no text or symbols"]
    C --> D["4: Cooker with lid, no text or symbols"]
    D --> E["5: Cooker with blender, no text or symbols"]
Baccarat®
Twin Beater Geared Whisk
Convenient attachment to use for light whisking of egg whites, cream, evaporated milk and other mixtures.
Suggested Function: Whisk
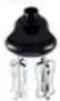
- Do not use this attachment for heavy mixtures.
- Do not add more than 6 eggs at a time.
- Do not operate for more than 10 minutes at a time. Let the appliance rest for 30 minutes before your next use.
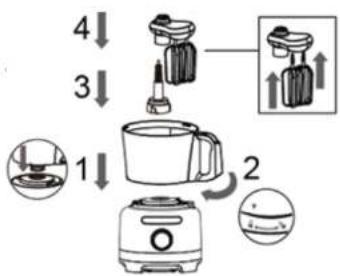
Attaching the Twin Beater Geared Whisk
Directions on how to attach the Twin Beater
Geared Whisk for use.
- Note: Only one accessory can be used at any one time.
Care Guide
• Always switch off, unplug, and dismantle before cleaning.
- Never put the appliance, plug, or cord in water or allow the cord or plug get wet.
- Do not wash parts in the dishwasher.
- Do not clean with scouring powders, steel wool pads or other abrasive materials.
To Clean
Cleaning the Motor Body
- Before cleaning, switch off the power at the power socket and unplug The Precise Chopper and let cool down.
- Wipe outer surfaces of the motor body with a damp cloth and dry.
-
Do not submerge the motor body in water.
-
Follow Steps 1 – 5 in 'Cooking Use'.
- Attach the Twin Bealer Whisks to the Bealer Body in their designated sockets.
- Insert the whisk body. Ensure it is fixed well on the drive shaft, failure to do so will result in the lid not locking onto the processing bowl.
flowchart
graph TD
    A["1: Cooker"] --> B["2: Oven"]
    B --> C["3: Washer"]
    C --> D["4: Cooker with lid"]
    D --> E["5: Washer with tray"]
    style A fill:#f9f,stroke:#333
    style B fill:#ccf,stroke:#333
    style C fill:#cfc,stroke:#333
    style D fill:#fcc,stroke:#333
    style E fill:#cff,stroke:#333
Cleaning the Processing Bowl and Accessory Attachments
- Wash in warm soapy water. Handle the sharp accessory attachments with care.
- Allow parts to dry thoroughly before storing away.
Auto Clean Function
- Add 3-4 drops of neutral detergent into the processing bowl, add no more than 800ml of water into the processing bowl.
- Place the accessory Stainless Steel Processing Blade or Kneading Blade over the drive shaft.
- Place and lock the lid into place. Refer to 'Lid Guide'
-
Turn the rotary dial indicator to (AUTO CLEAN) position.
-
Press down the rotary dial to start the 'Auto Clean' function.
- Once clean, press the rotary dial down again for the function to stop.
Storage
Storage Case
Store away the accessory attachments and spatula in the provided storage case to protect accessory attachments from chips, cracks and scratches.
Food Processor
Once motor body, processing bowl, lid and food pushers are clean, dry and reassembled, store away in a dry cupboard.
Disposal
Dispose of the appliance in accordance with the local environmental laws and guidelines.
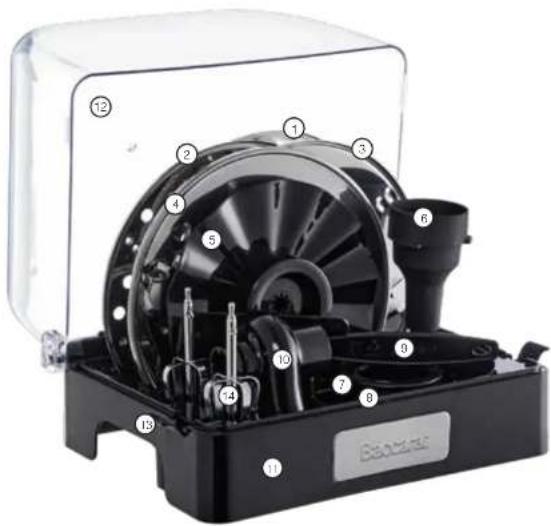
1, 2, 3, 4: Stainless Steel Blade Discs 5: Emulsifying Disc 6: Drive Shaft
7: Knoading Blade (sits on top of the Stainless Steel Processing Blade) 8: Stainless Steel Processing Blade 9: Spatula (place diagonal on top of the Stainless steel Processing Blade and beside the emulsifying disc)
10: Twin Beater Whisk Body 11: Storage Case housing 12: Storage Case cover
13: Lock tabs for storage case housing and cover 14: Twin Bealer Whisk
Baccarat®
Troubleshooting
| Problem | Easy Solution |
| Appliance does not work | There is a safety interlock switch on the processing bowl. Please ensure processing bowl is locked into position correctly onto the motor body and correct assembly.Ensure power plug is plugged in correctly.Check if the mains have tripped or if there is a power outage. |
| Jullionne Frios (French Frios)Disc is not moving | Always clear any blocked potato from the disc before processing more potatoes. |
| Motor slows down when mixing dough | Ensure the amount of dough has not exceeded the maximum capacity. Remove half of the dough and process in two batches.Do not add more than 250g dough. |
| Dough is too dry | Add water through the food chute whilst appliance is operation, 1 tablespoon at a time until dough cleans the inside of the processing bowl and desired consistency is met. |
| Dough is too wet | Add flour through the food chute whilst appliance is operating, 1 tablespoon at a time until dough cleans the inside of the processing bowl and desired consistency is met. |
| Motor is slowing down when chopping | The amount of internal contents may be too much and/or exceeded capacity. Remove half and process in two batches.For the best result with meat, trim the fat off the meat before processing. |
| Appliance vibrates/moves during use | Clean and dry the suction foot at the bottom of the unit. Ensure maximum load capacity of the internal contents has not been exceeded. |
natural_image
Top-down view of a colorful salad in a glass bowl, featuring sliced vegetables, tomatoes, and sauce (no text or symbols visible)Baccarat®
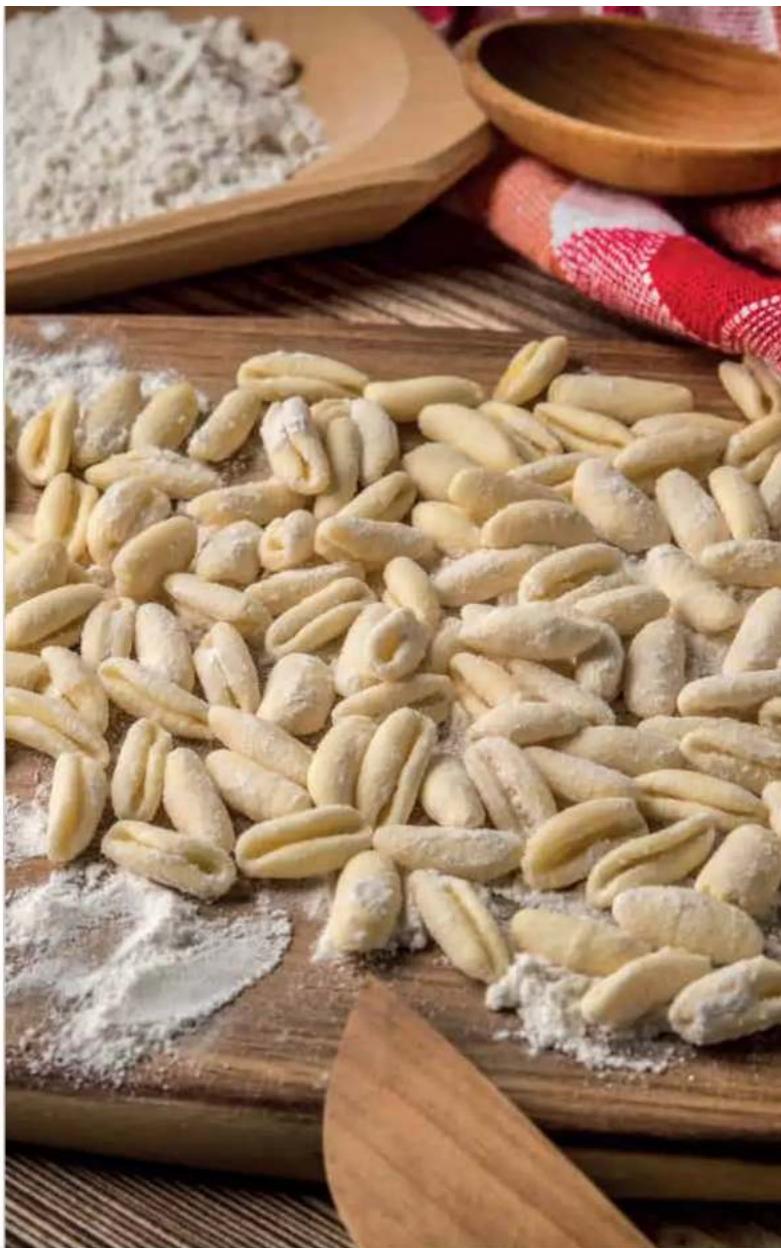
No Fall Pasta Dough (Cavatelli Pasta)
Dough Mixing Function
Kneading Blade Accessory
Serves: 4
Prep: 60 minutes
Cook: 5 minutes

Ingredients
- 400g Double Milled Durum Semolina Flour (Semola Rimacinata Flour) plus more aside for dusting
- 200ml Lukowarm water (40°C)
Method
- Assemble the Kneading Blade into the food processing bowl.
- Add the Semola Rimacinata Flour into the food processing bowl and securely place and lock the lid onto the food processing bowl.
- Turn the rotary dial towards the 0% (Dough Mixing Function) position and push in to start the 'Dough Mixing' function.
- Slowly pour in the lukewarm water through the chute opening. Continue the 'Dough Mixing' function until the dough comes together into a ball.
- Stop the function and unplug at the power outlet. Remove the lid and tip the dough onto a lightly floured surface.
-
Knead the dough for 5 minutes or until the dough is smooth and springs back with a finger.
-
Cover and rest the dough at room temperature for 30 minutes.
- To make cavatelli pasta, divide the dough into 8 equal portions. Roll each portion into a 2cm thick log. Work with one portion at a time and keep the remaining portions covered to avoid drying out.
- Cut the log into 0.5cm pieces. Using a gnocchi board and a dough cutter or the back of a butter knife, roll the pasta pieces into cavatelli shapes.
- Transfer to a tray dusted with more semola rimacinata flour.
- Cook the pasta in boiling salted water until they float to the surface, 2-3 minutes.
- Serve with the "Basil Posto" sauce recipe or your favourite pasta sauce. Enjoy!
natural_image
Close-up of pasta pasta with flaky pastries and dough, placed on a wooden cutting board with a wooden spoon and cloth in the background (no text or symbols visible)Baccarat®
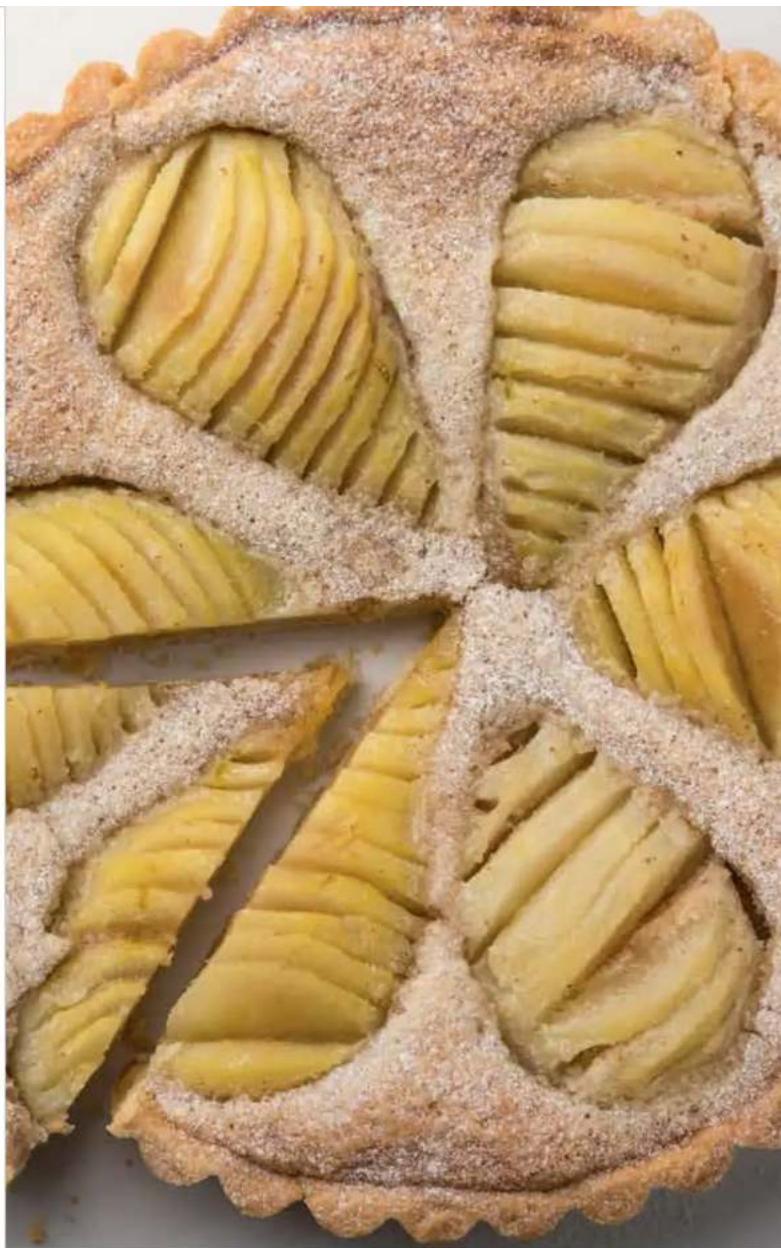
Pear and Frangipane Tart with Sweet Pastry
Dough Mixing Function
Kneading Blade Accessory
Serves: 12
Prep: 20 minutes (+ 2.5 hours resting)
Cook: 40 minutes

Ingredients
- 150 unsalted butter, softened
- 90g icing sugar, sifted
- 30g almond meal
- 1 large egg
- 250g plain flour
Frangipane Tart Filling
- 150g unsalted butter, softened
- 150g caster sugar
- 150g almond meal
- 3 large eggs
40g plain flour
- 800g poached pear halves
Method
- Assemble the Kneading Blade into the food processing bowl.
- Add the butter, icing sugar and almond meal into the food processing bowl and securely place and lock the lid.
- Turn the rotary dial towards the (Dough Mixing Function) position and push in to start the function. Continue the function until all ingredients are combined.
- Add the eggs one at a time through the chute opening of 'Pusher C' until incorporated into the mixture.
-
Stop the function by pushing in the rotary dial and turning it to OFF). Remove the lid and scrape the sides with the provided spatula. Add the flour into the mixture and securely place and lock the lid. Start the Dough Mixing Function again until the flour is fully incorporated.
-
Stop the function and turn the dial to (OFF). Remove the lid and unlock the processing bowl. Tip the dough onto a sheet of baking paper. Press the dough into a flat disc then rest in the fridge covered, for two hours.
- Return to room temperature and roll into a 3mm thick circle. Line the pastry into a 23cm X 3cm pastry tin. Place into the freezer for 30 minutes or until firm.
- Preheat oven to 170°C, fan forced.
- To make the trangpane, clean the food processor bowl and re-assemble the clean Kneading Blade. Add the butter, sugar and almond meal into the food processing bowl. Place and securely lock the lid. Turn on appliance and turn the rotary dial towards the Dough Mixing Function position and push in to start the function until ingredients are combined.
- Stop the function, remove the lid and scrape the sides with the provided spatula. Place and securely lock the lid and start the Dough Mixing Function again. Add the eggs one at a time and the flour through the chute opening of 'Pusher C' until combined into the mixture.
- Stop the function and turn appliance off at the power outlet. Remove the lid and unlock the processing bowl. Spread the frangipane evenly into the cooled tart shell, then press the fruit into the frangipane.
- Bake until the frangipane is firm to the touch and golden, approx. 40 minutes. Enjoy!
natural_image
Close-up of a tart with sliced apple slices and powdered sugar, no text or symbols visibleBaccarat®
Muhammara
(Roasted Red Pepper and Walnut Dip)
Chopping Function
Stainless Steel Processing
Blade Accessory
Serves: 6-8
Prep: 10 minutes

Ingredients
- 50g grilled eggplant slices, drained
- 200g tinned roasted red peppers, drained
- 60g walnuts, toasted
- 1 clove garlic
- 25g / 1 tbsp pomegranate molasses
- ¼ tsp ground cumin
- ¼ tsp chilli powder
- 1 lsp caster sugar
- 1 tsp salt
- 15g extra virgin olive oil plus more to garnish
- Flatbreads or pita, to serve
Method
- Assemble the Stainless Steel Processing Blade into the food processing bowl.
- Place all the ingredients except for the oil into the food processing bowl and securely place and lock the lid.
- Turn the rotary dial to the 📂 (Chopping Function) position and push in to start the function. Process the ingredients until a smooth paste is formed.
- Slowly stream in the olive oil through the chute opening of 'Pusher B' until emulsified.
- Stop the function and turn appliance off at the power outlet. Remove the lid and unlock the processing bowl.
- Transfer dip to a serving bowl, gamish with an extra drizzle of olive oil and serve alongside pita or flatbreads. Enjoy!

natural_image
Close-up of a glass jar filled with green, textured green vegetable paste, tied with a rope ribbon, surrounded by fresh spinach leaves and a woven basket in the background (no text or symbols visible).Basil Pesto
Pulse P and Chopping Function
Stainless Steel Processing
Blade Accessory
Makos: 200g / 1 cup
Prep. 5 minutes

Ingredients
- 75g (2 bunches) basil leaves
- 1 garlic clove, crushed
- 30g (2 tbsp) pine nuts
- 15g (1/3 tightly packed cup) grated
partesan cheese - 1/2 tsp sea salt
- 10 turns black pepper
- 100ml extra virgin olive oil
Method
-
Assemble the Stainless Steel Processing Blade into the food processing bowl.
-
Place all the ingredients except for the oil into the food processing bowl and securely place and lock the lid.
-
Turn the rotary dial to the P (Pulse Function) and pulse until the ingredients are finely chopped.
- Stop the function by releasing the rotary dial and turn the dial to OFF). Remove the lid and scrape the sides with the provided spatula.
- Turn the rotary dial to (Chopping Function) position and push in the dial to start the function.
- Slowly stream in the olive oil through the chute opening of 'Pushor B' until emulsified. Process the ingredients until a smooth sauce is achieved.
- Stop the function and turn appliance off at the power outlet.
- Remove the lid and unlock the processing bowl.
- Serve the Basil Pesto with the "No Fail Pasta Dough (Cavatelli Pasta)" recipe or your favourite pasta. Enjoy!

natural_image
Close-up of a red bowl containing a creamy sauce with walnuts and herbs, placed on a green wooden surface (no text or symbols visible)Baccarat®
Coleslaw Salad
Manual Function M
2-In-1: Fine Slicer & Julienne Disc
Serves: 4-6
Prep: 15 minutes

Ingredients
- 1/4 green cabbage (approx. 700g)
- 1 large carrot
- 7g (1½ tsp) caster sugar
- 7g (1½ tsp) sea salt
- 2 tbsp fresh parsley, chopped
For the Dressing
- 40g (2 tbsp) mayonnaise
- 1 tbsp apple cider vinegar
- 1 tsp dijon mustard
- 5g (1 tsp) caster sugar
- ¼ tsp celery seed
- % tsp cracked pepper

natural_image
Close-up of a wooden bowl filled with shredded cabbage and lettuce, placed on a green textured surface (no text or symbols visible)Method
- Assemble the Fine Slicer disc from the 2-in-1 Fine Slicer & Julienne blade disc into the food processing bowl. Place the Fine Slicer side facing up on the drive shaft.
- Cut the cabbage to fit through the chute opening of Pusher C.
- Place and securely lock the lid. Turn the rotary dial to Manual Function) position and slide the speed control to the next speed level bar (-). Push in dial to start the Manual function.
- Feed the cabbage pieces through the chute opening of Pusher C. Use Pusher B & A to push down the cabbage pieces to the disc to shred.
- Stop the function by pushing in the dial and turn the dial towards OFF). Turn appliance off at the power outlet. Remove the lid and unlock the processing bowl. Transfer the shredded cabbage to a large bowl.
- Peel the carrot and cut into thirds.
- Flip the blade disc for the Fine Julienne blade side to face up on the drive shaft. Place and securely lock the lid. Turn the dial to (Manual Function) position and slide the speed control to the next speed level bar (-).
- Push in the dial to start the Manual function. Feed the carrot pieces through the chute opening.
- Stop the function and turn off the appliance at the power outlet. Remove the lid and unlock the processing bowl.
- Mix the salt and sugar into the cabbage, then stand for 10 minutes to soften. Drain any excess juices from the bowl after 10 minutes.
- Whisk together the dressing ingredients then mix with the cabbage. Mix in the carrot and parsley just before serving. Enjoy!

natural_image
Plate of Hong Kong-style bunsen with cream topping and herbs, served on a white dish with garlic and cherry tomatoes in background (no text or symbols)Flawless Hollandaise Sauce
Creaming Function
Emulsifying Disc Accessory
Makes: 500ml
Prep. 5 minutes

Ingredients
- 4 egg yolks
- 3/4 tsp fine salt
- 2 tsp white wine vinegar
- 250ml clarified button
- ½ lemon, juiced
- 1 tbsp warm water
- Pinch cayenne pepper (optional)
Method
- Assemble the Emulsifying Disc into the food processing bowl and securely place and lock the lid.
- Heat the butter in a saucepan (approx. at 90°C)
-
Feed the egg yolks, vinegar, salt and warm water through the chute opening of Pusher C
-
Turn the dial to (CREAMING) position and push in the dial to start the function.
- Slowly feed through the heated butter through the chule opening into the yolk mixture until fluffy and emulsified.
- Add the lemon juice and cayenne pepper, if using. If the hollandaise sauce is slightly too thick, add another tbsp of water.
- Stop the function by pushing in the dial and turn the dial indicator towards OFF). Turn off the appliance at the power outlet. Remove the lid and unlock the processing bowl.
- Serve the hollandaise sauce immediately or keep covered in a warm place. Serve on your eggs beredict or pair with vegetables. Enjoy!
Baccarat®
Blueberry Muffins
Creaming Function Emulsifying Disc Accessory Makos: 12 muffins Prep: 5 minutes Cook: 25 minutes

Ingredients
- 300g / 2½ cups plain flour
- 5g / 1 tsp baking soda
- 5g / 1 tsp baking powder
- 2g / > tsp cinnamon powder
- 2g / % tsp fine salt
- 200g ^3/4 cup caster sugar
- 100g / ½ cup canola oil
- 120g / ½ cup buttermilk
- 2 eggs
- 1 lemon, zested
- 125g blueberries
Method
- Preheat oven to 180^ C fan forced. Line a 12-cup muffin tray with muffin papers or cooking spray.
-
Assemble the Emulsifying Disc into the food processing bowl. Add the dry ingredients into the food processing bowl and securely place and lock the lid.
-
Turn the rotary dial to (CREAMING) position and push in the dial to start the function. Continue the function until the dry ingredients are combined.
- Combine the oil, buttermilk, eggs and lemon zest in a separate bowl.
- Feed through the wet ingredients through the chute opening of 'Pusher C'.
- Once a smooth batter is developed, stop the function by pushing in the dial and turn the dial to OFF. Remove the lid and unlock the processing bowl.
- Divide the mixture evenly among the twelve muffin cups, then press the blueberries into the surface of the batter.
- Bake for 24 minutes, rotating halfway, or until the muffins are golden brown and a toothpick comes out clean.
- Cool in the muffin pan for at least five minutes before serving. Enjoy!

natural_image
Close-up of blueberry muffins on a white plate with mint leaves (no text or symbols visible)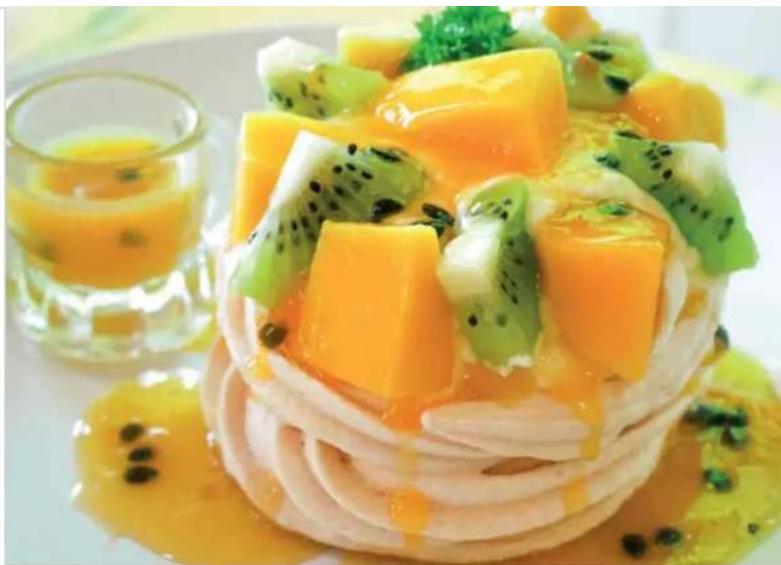
natural_image
Stacked dessert with kiwifruit slices and mango, served on a plate with a glass of orange juice in the background (no text or symbols visible)Baked Meringues
Whisk Function
Beater Geared Whisk accessory Serves: 6
Prep: 10 minutes
Cook: 75 minutes

Ingredients
- 4 extra large egg whites, at room temperature
- 200g (¾ cup) caster sugar
- Cooking spray
- Passionfruit pulp, to garnish
- Mango slices, to garnish
- Kiwi fruit slices, to garnish
Method
-
Proheat oven to 100^ C fan forced. Line a flat baking tray with non-slick baking paper.
-
Assemble the Bealer Geared Whisk into the food processing bowl. Add in the egg whites to the food processing bowl and securely place and lock the lid.
-
Turn the dial to the (WHISK) position and push in the dial to start the function. Whisk until egg whites reach medium peaks, approx, one minute.
-
Whilst function is still operating, feed in the sugar, one spoonful at a time, through the chute opening of 'Pusher C'. Once all the sugar is added, continue the whisking function for another five minutes until all the sugar is dissolved, the meringue mixture is glossy and holds firm peaks on the tip of the whisk when slowly lifted.
- Stop the function by pushing in the dial and turn the dial to OFF). Remove the lid and unlock the processing bowl.
- Spread a small amount of meringue under each corner of baking paper to prevent the meringue from lifting from the tray. Spray the paper with cooking spray.
- Use a large kitchen spoon to make six dollops of meringue on the tray.
- Place in the oven for 1hr 15 minutes or until the bottom of the meringues feel hollow when tapped.
- Serve with passionfruit pulp, mango slices, kiwi fruit slices (or your fruit garnishes of choice). Enjoy!
Baccarat®
Buckwheat Pancake Stack
Whisk Function 📋 Beater Geared Whisk accessory Makes: 12 large pancake Prep: 10 minutes Cook: 30 minutes

Ingredients
- 320g (2 ½ cups) plain flour
- 80g (2/3 cup) buckwheat flour
- 24g (1tbsp + 2lsp) baking powder
- 60g (¼ cup) caster sugar
- 12g (2 tsp) fine salt
- 4 extra large eggs
- 500g (2 cups) full cream milk
- 100g unsalted butter, melted.
plus more to serve - Maple syrup, to serve
Method
- Sift together the dry ingredients and set aside.
- Assemble the Beater Geared Whisk into the food processing bowl. Add in the eggs, milk and butter into the food processing bowl and securely place and lock the lid.
- Turn the dial to ☐ (Whisk Function) position and push in the dial to start the function. Whisk until mixture is fully combined.
- Stop the function by pushing in the dial and turn the clai to ☐OFF). Remove the lid and scrape the sides of the food processor with the provided spatula and add in the dry mixture into the food processing bowl. Securely place and lock the lid.
-
Turn the dial to (Whisk Function) position and push in the dial to start the function again. Continue the whisk function until the mixture is fully combined.
-
To cook the pancakes, heat a non-stick pan over medium-low heat, add ½ cup (100g) of better to the pan and cook until bubbles begin to rise (approx. 2 minutes), then flip and cook for another 1 minute. Continue with the remaining pancake batter.
- Serve with maple syrup and butter. Enjoy!

natural_image
Stack of golden pancakes topped with caramel and butter, served on a patterned plate (no text or symbols visible)Baccarat®
Warranty
Baccarat® 12 Month Guarantee
Baccarat® is covered by a "12 Month Guarantee" which is provided during the Warranty Period (defined below) by the following importers in the country in which you bought this product:
Australia; Playcorp Pty Ltd. www.globalretailbrandsAU.com Level 3, 425 St Kilda Road Melbourne Victoria 3004 1300 136 936
The Terms and Conditions of the 12 Month Guarantee are as set out below.
What it covers:
The "12 Month Guarantee" constitutes a warranty that the product is free from defects in workmanship, manufacture and materials, or abnormal deterioration when used in accordance with our "Care and Use Instructions" as contained in this Manual and normal domestic use during the Warranty Period.
What it does not Cover:
To the extent permitted by applicable laws, the 12 Month Guarantee does not cover defects or faults caused to the product by:
- Misuse or a failure to use in accordance with our "Care and Use Instructions", such as improper use and cleaning, neglect, modification, fire or flood, theft or commercial use, or normal wear and tear;
- Defects or damages caused by accessories, replacement parts or repair services other than those that have been authorised by Baccarat ^® or the importer; or
- Cosmetic damages that do not impair the function of the product (examples include but are not limited to scratches, water marks, cracks, dents, stains or discolouration to surfaces).
Warranty Period
The "12 Month Guarantee" starts from the date of purchase by the original end user and continues for twelve (12) months from this date (Warranty Period).
Replacement of the product or a part of the product does not extend or restart the Warranty Period.
How to Claim:
To make a claim under the 12 Month Guarantee for a defective product, please cease using the product and contact the importers customer service team for assessment (see contact details at the end of this warranty). You may also present the item at the place of purchase with proof of purchase for an assessment but your claim may be deferred to the importer for further assessment. In order to make a claim under this Warranty, you will need your original proof of purchase and to provide an explanation as to the nature of the defect. You will need to provide your product model number and batch code. This can be found on a sticker and is typically located underneath or on the back of the product. Once we have this information and the details of the problem with your product, we will be able to advise you of next steps required to process your Warranty claim.
You must not Dispose of any Defective Product:
We may need you to send it back to us. If so, we will give you full details of how to prepare it for shopping and how to return it to us free of charge (see under heading 'The costs of claiming' below). You must make a claim or present the item with proof of purchase (as applicable) during the Warranty Period.

What Happens if you make a Claim:
If your claim is assessed to be valid, the product will be repaired or replaced by an alternative product. Any decision as to whether to repair or replace a product is to be made by the importer in its absolute discretion.
If an identical replacement product is not available, the retailer or the importer may replace your product with a new product with equivalent features and specifications as determined by the retailer or the importer where the retail price of the replacement does not exceed the original purchase price paid for the product. Once any product or part has been replaced, the original product or part becomes our property.
The Costs of Claiming:
There is no cost to you for making a claim for a defective product and receiving a replacement or repaired product.
We will be responsible for all shipping costs for the claims under this Warranty which are assessed by the importer as valid. However, we may arrange with you to pick up the replacement or repaired product directly from our business address in certain circumstances. The product will be at your risk whilst in transit between you and the relevant retailer.
Your Statutory Rights:
The purchaser who is a consumer has statutory rights in relation to this product and this Warranty does not affect those statutory rights. Nothing in this Warranty restricts or affects any of the guarantees, rights or remedies given to you under any other relevant law.
New Zealand - Our goods come with guarantees that cannot be excluded under the New Zealand consumer law. You are entitled to your available rights and remedies under the Consumer Guarantees Act 1993.
Australia - Our goods come with guarantees that cannot be excluded under the Australian Consumer Law. You are entitled to a replacement or refund for a major failure and compensation for any other reasonably foreseeable loss or damage. You are also entitled to have the goods repaired or replaced if the goods fail to be of acceptable quality and the failure does not amount to a major failure.
Further Enquiries and Contact Details for Claims:
Visit your relevant and local importer website to obtain additional options for submitting a further enquiry through customer service.
Australia; Playcorp Pty Ltd. www.globalretailbrandsAU.com 1300 136 936.
- Baccarat®
- The Precise Chopper
- Baccarat® The Precise Chopper
- BACCARAT® IMPORTANT SAFETY INSTRUCTIONS FOR ALL ELECTRICAL APPLIANCES. PLEASE READ CAREFULLY BEFORE FIRST USE & RETAIN FOR FUTURE REFERENCE.
- Safety precautions for the Baccarat® Precise Chopper.
- Safety Precautions for all Baccarat® Electrical Appliances
- Operating Instructions
- Before First Use
- Cooking Use
- Off O
- Manual Control M
- Pulse P
- Creaming
- Whisk
- Dough Mixing
- Chopping
- Auto Clean
- Lid Guide
- Using 3-In-1 Feed Chute and Pushers
- Pusher A
- Pusher B
- Pusher C
- Accessories Guide
- Kneading Blade
- Stainless Steel Processing Blade
- Attaching the Blades
- Stainless Steel Blade Discs
- Julienne Fries (French Fries) Disc
- 2-in-1: Coarse Slicer & Julienne Disc
- 2-in-1: Fine Slicer & Julienne Disc
- Shredder Disc
- Attaching the Stainless Steel Blade Discs
- Emulsifying Disc
- Attaching the Emulsifying Disc
- Twin Beater Geared Whisk
- Attaching the Twin Beater Geared Whisk
- Care Guide
- To Clean
- Cleaning the Motor Body
- Cleaning the Processing Bowl and Accessory Attachments
- Auto Clean Function
- Storage
- Storage Case
- Food Processor
- Disposal
- No Fall Pasta Dough (Cavatelli Pasta)
- Ingredients
- Method
- Pear and Frangipane Tart with Sweet Pastry
- Frangipane Tart Filling
- Muhammara
- Basil Pesto
- Coleslaw Salad
- For the Dressing
- Flawless Hollandaise Sauce
- Blueberry Muffins
- Baked Meringues
- Buckwheat Pancake Stack
- Warranty
- Baccarat® 12 Month Guarantee
- The Terms and Conditions of the 12 Month Guarantee are as set out below.
- What it covers:
- What it does not Cover:
- Warranty Period
- How to Claim:
- You must not Dispose of any Defective Product:
- What Happens if you make a Claim:
- The Costs of Claiming:
- Your Statutory Rights:
- Further Enquiries and Contact Details for Claims:
Brand : Baccarat
Model : The Precise Chopper
Category : Food processor