
SV1631HD - Network switch StarTech.com - Free user manual and instructions
Find the device manual for free SV1631HD StarTech.com in PDF.


| Product Type | KVM Switch |
| Brand | StarTech.com |
| Model | SV1631HD |
| Dimensions | 1.7 x 17.2 x 7.0 in (44 x 436 x 180 mm) |
| Power Supply | 9V DC, 600mA |
| Computer Ports | 16 |
| User Ports | 1 |
| Console Connectors | 1x PS/2 Keyboard, 1x PS/2 Mouse, 1x HD-15 Monitor |
| Maximum VGA Resolution | 1920x1440 (DDC2B) |
| Hot Plug Support | Yes |
| Hot Key Control | Yes |
| On-Screen Display (OSD) | Yes |
| Cascading | Supports up to 136 computers |
| Rack Mountable | 19-inch standard |
| Auto Scan Interval | 3, 8, 15, 30 seconds |
| Security | 4-character password per computer |
| Computer Name Entry | Up to 14 characters |
| Console Cable Length | 100 ft (30m) |
| PC USB Cable Length | 16 ft (5m) |
| Cable Type | 2-in-1 USB KVM or 3-in-1 PS/2 KVM |
| OS Compatibility | PC, Mac, Sun |
| Plug and Play | Yes |
| Front Panel LEDs | Yes |
| Warranty | 3 years |
Frequently Asked Questions - SV1631HD StarTech.com
User questions about SV1631HD StarTech.com
0 question about this device. Answer the ones you know or ask your own.
Ask a new question about this device
Download the instructions for your Network switch in PDF format for free! Find your manual SV1631HD - StarTech.com and take your electronic device back in hand. On this page are published all the documents necessary for the use of your device. SV1631HD by StarTech.com.
USER MANUAL SV1631HD StarTech.com
natural_image
Pixelated black-and-white cursor arrow icon pointing right (no text or symbols)SV831HD
SV1631HD
SV1631D1U
Instruction Guide
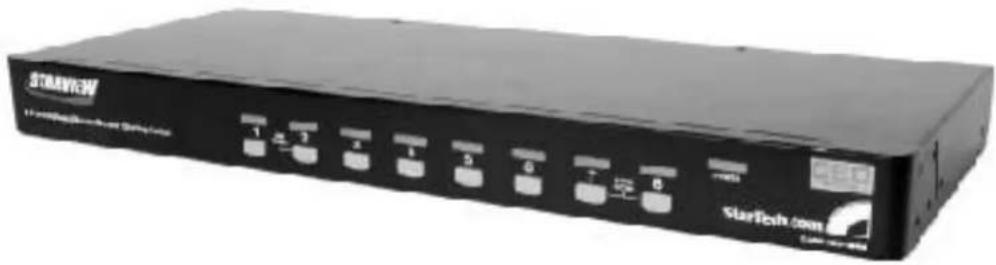
* SV831HD shown
* Actual product may vary from photo
StarTech.com

The Professionalsí Source For Hard-to-Find Computer Parts
Table of Contents
Introduction ......2
System Requirements....2
Installation ....3
Operating Your KVM Switch....4
Pushbuttons ....4
OSD Operations....4
OSD Function Keys....5
Hot Key Commands 8
Changing Your Configuration 9
Keyboard Mapping ....10
Troubleshooting 11
Technical Specifications....12
Technical Support 13
Warranty Information....13
Introduction
Thank you for purchasing a StarTech.com 1U KVM switch. Our universal KVM switches let you control either 8 (SV831HD) or 16 (SV1631HD) USB or PS/2 computers using only one PS/2 keyboard, mouse, and monitor. Our slim 16-port PS/2 switch (SV1631D1U) lets you connect 16 PS/2 computers using only one PS/2 keyboard, mouse, and monitor. Switching between your PCs is easy thanks to pushbutton or hot-key commands. These slim KVM switches take up only 1U of space in your cabinet and use rear cable connections for maximum space efficiency. Each KVM can be cascaded to support 64 (SV831HD) or 136 (SV1631HD, SV1631D1U) computers and support both Manual and Auto scan modes for easy monitoring of your PCs.
Features
• SV831HD, SV1631HD: Supports PCs with both USB and PS/2 keyboard/mouse connections
• SV1631D1U: Supports PCs with PS/2 keyboard/mouse connections
- Saves valuable rack space with thin 1U height form factor
- Supports hot-plugging: allows computers to be added or removed without having to reboot the other connected systems
• SV831HD, SV1631HD: Works with PC, Mac, and Sun systems
- Fast switch-buttons for each port provide quick access to any connected system
• Uses On-Screen Display (OSD) menu for easy PC selection and switch configuration
• Can be cascaded to control up to 64 (SV831HD) or 136 (SV1631HD, SV1631D1U) PCs
- Visible front panel LEDs show status for each connected device
- Allows effortless monitoring of devices through configurable Auto and Manual scan modes
- Acts independent of operating system: no software or drivers required
- Complies with Plug and Play specifications
- Backed by StarTech.com's 3-year warranty
Before You Begin
To ensure a quick and easy console installation, please read through this section carefully before attempting to install the device.
Contents
This package should contain:
• 1 x StarView KVM Switch (SV831HD, SV1631HD, SV1631D1U)
• 1 x power adapter (9V 600mA DC)
System Requirements
- 1 x PS/2 mouse (6-pin mini-DIN male connector)
- 1 x PS/2 keyboard (6-pin mini-DIN male connector)
• 1 x HD-15 monitor (Male connector) - SV831HD, SV1631HD: StarTech.com's 2-in-1 USB KVM cables or 3-in-1 PS/2 KVM cables
• SV1631D1U: StarTech.com's 3-in-1 PS/2 KVM cables
Installation
This section will guide you through the hardware installation of your KVM switch. Please read through this section carefully and complete each step in the order listed.
- Make sure all computers and devices are powered off.
- Plug a PS/2 keyboard, PS/2 mouse, and monitor into the labelled keyboard, mouse, and monitor Console ports on the back of the KVM.
- Attach each of your managed computers to your StarView KVM switch's PC ports using ultra-thin KVM cables. The SV831HD and SV1631HD are capable of using either 2-in-1 USB or 3-in-1 PS/2 cables. The SV1631D1U uses 3-in-1 PS/2 cables. Use the cables to connect one of the PC ports on the back of the switch to the computer's keyboard, mouse, and video ports. Note: These instructions are for a single KVM switch only. For information on cascading multiple KVMs, see Cascade Configuration below.
- Plug the 9V DC power adapter into the power port on the KVM.
- Turn on your computers.
Note: After the initial power up, you can hot-plug additional computers or slave KVM switches without having to power down your KVM.
Cascade Configuration
You can connect a second level of KVMs to one or more of your Master KVM switch's PC ports. The KVM switches connected to the Master switch are known as Slaves. Once connected, the KVM switches will automatically configure themselves as either Masters or Slaves. You can only connect an equal or "smaller" KVM to the Master KVM. For example, a 16-port Master KVM switch can have both 16-port and 8-port slaves. An 8-port Master KVM switch can only have 8-port KVM slaves or lower.
The 8-port KVM can support 64 PCs, with 8 8-port Slave KVMs, each connected to 8 PCs. The 16-port KVM can support 136 computers, with 8 16-port Slave KVMs, each connected to 16 computers. The Slave KVM's must be connected to the 1\~8 ports, not the A\~H ports.
To cascade your KVMs, use a 3-in-1 PS/2 KVM cable to connect one of your Master switch's PC ports to the Slave switch's PC 1\~8 ports. When turning on your cascaded switches, turn on the Master switch before turning on any of the others.
Operating Your KVM Switch
To toggle between computers, you can use the hot-key commands, OSD (On-Screen Display) menu or by using the pushbuttons.
Push Buttons
The LEDs on the KVM switch indicate which computers are turned on (solid green) and which computer is selected (solid red). The indicator flashes red when in Auto or Manual Scan mode. You can press any of the corresponding pushbuttons to select the active computer. On the 16 port models, Port 1 and Port A share the same pushbutton, as do Port 2 and Port B, etc. To select Ports 1 through 8, press the pushbutton once. To select Ports A through H, press and hold the pushbutton for two seconds. Alternatively, if Port 1 is currently selected and you want to select Port A, you can press the pushbutton once to switch to Port A.
The K/M Reset function reconfigures your system without powering down your computers or your KVM switch. To reset the switch, press and hold the front-panel 1 and 2 buttons simultaneously.
The Auto-Scan function automatically scrolls through your connected computers. Press and hold the front-panel 7 and 8 buttons simultaneously to enter Auto Scan mode.
OSD Operations
By hitting the left
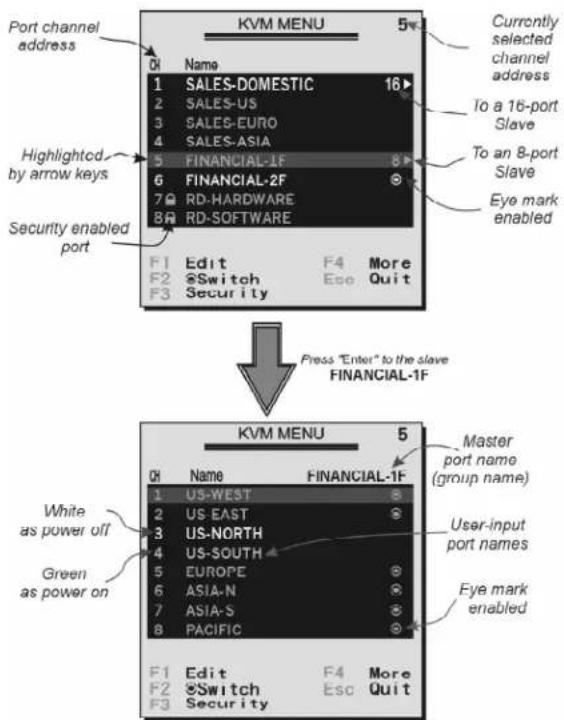
- The port number (or channel address) of the currently selected computer is displayed in red in the top right of the screen.
- The device name is green if the device has power and is ready for selection or white if it has no power. The OSD menu automatically updates the color when it is activated. On the 16-port models, use the
and keys to view the other 8 computers.
• Use the, , 1\~8, or A\~H keys to highlight a computer and to select it. - Press
to exit the OSD menu and remove the OSD menu from the screen. - A triangle mark on the right side of the screen indicates the port is cascaded to a Slave KVM; the number at the left of the triangle mark shows the number of ports the Slave has. With that port highlighted, press
to bring up a screen listing the computers connected to that Slave. The name of the Slave KVM will be shown at the upper right corner of the OSD menu. - An eye mark on the right side of the screen indicates that the computer has been selected to be monitored in Scan mode. You can switch this mark on and off using function key
. - Press
to exit the OSD and to return to using the selected computer. The computer name is shown on the screen.
OSD Function Keys
You can use the function keys when the OSD menu is active.
Function key
Edits the name of a computer or a Slave KVM. First, use the
Function key
Marks a computer to be scanned by switching the eye mark on or off. First, use the
Function key
Locks a device (a computer or a Slave) from unauthorized access. To lock a device, use the
If you want to access the locked device temporarily, simply highlight it and press
If you forget the password, the only way to permanently erase all passwords is to press and hold pushbuttons 1 and 2, then press and hold pushbuttons 7 and 8. Release 7 and 8 then release 1 and 2.
Function key
More functions are available by hitting
Auto Scan
In this mode, the KVM automatically switches from one power-on computer to the next sequentially in a fixed interval. During Auto Scan mode, the OSD displays the name of the selected computer. When Auto Scan detects any keyboard or mouse activity, it suspends the scanning until activity stops; it then resumes with the next computer in sequence. To abort Auto Scan mode, press the left
Manual Scan
Scans through power-on computers using keyboard control. Scan Type (
Audio Stick
An optional multimedia module can be LINKed to the back of each StarView for selecting microphone and stereo speaker signals. There are two options for Audio Stick: On and Off. When set to On, audio selection follows computer selection. When set to Off, audio selection stops following computer selection. Off mode is useful if you want to listen to a particular computer's audio signal while operating other computers. The non-volatile memory stores the Audio Stick setting.
Scan Type
Ready PC + Eye: In Scan mode, scans through only power-on and eye-marked selected computers.
Ready PC: In Scan mode, scans through all power-on computers.
Eye only: In Scan mode, scans through any Eye-selected computer regardless of power status.
The non-volatile memory stores the Scan Type setting.
Scan Rate
Sets the duration of a computer displayed in Auto Scan mode. The options are 3 seconds, 8 seconds, 15 seconds and 30 seconds. The non-volatile memory stores the Scan Rate setting.
Keyboard Speed
StarView offers a keyboard typematic setting that overrides the typematic settings in the BIOS and Windows operating system. Available speed options are Low, Middle, Fast and Faster as 10, 15, 20 and 30 characters/sec respectively. The non-volatile memory stores the Keyboard Speed setting.
Hotkey Menu
When you hit the left
CH Display
Auto Off: After you select a computer, the channel address and name of the computer will appear on the screen for 3 seconds then disappear automatically. Always On: The channel address and name of a selected computer and/or OSD status displayed on the screen all the time. The non-volatile memory stores the CH Display setting.
Position
You can choose where the selected computer name and/or OSD status is displayed on your screen during operation. The actual display position shifts due to different VGA resolution, the higher the resolution the higher the display position. The non-volatile memory stores the Position setting.
UL as Upper Left UR as Upper Right
LL as Lower Left LR as Lower Right
MI as Middle
Country Code for Sun (SV831HD, SV1631HD only)
Sun keyboards of different languages have different layouts. This KVM switch can emulate a Sun keyboard for a specific language type (or country). Select the proper country code that matches all your Sun computers.
Function Key (SV831HD, SV1631HD only)
Switches the Sun mark on or off. The Sun mark indicates that the port is connected to a Sun server. First, use the
ESC: To exit the OSD, press the
Hot Key Commands
A hot key command is a short keyboard sequence to select a computer, activate a computer scan, etc. A hot-key sequence starts with two Left Control keystrokes followed by one or two more keystrokes. A built-in buzzer generates a high-pitched beep for correct hot-key sequences and a low-pitched beep for errors or bad key combinations that will not be carried out.
The short form hot-key menu can be turned on as an OSD function (
- Left Ctrl refers to the
key located at the left side of the keyboard. - 1\~8/A\~H refer to the number keys 1 to 8 at the upper row of the keyboard (Do not use the keypad at the right of the keyboard) and character keys A to H (case insensitive).
Selecting a Computer
To select a computer by hot-key command you need to know the device's channel address, which is determined by the StarView connection.
- For a computer connected to a Master KVM, the address is represented by the PC port number (1\~8 or A\~H). For example, to access the PC plugged into port 7 of the Master KVM switch, type:
$$ \text { left } C t r l + \text { left } C t r l + 7 $$
- For a computer connected to a Slave KVM, you need to know the channel address of the Slave unit (1\~8) and then the channel address of the device (1\~8 or A\~H). (Please note that only Master's PC 1 to PC 8 ports can be connected to a Slave.) For example, to access the computer plugged into port C of the Slave KVM Switch that is plugged into Port 6 of the Master KVM, type:
$$ \text { left } C t r l + \text { left } C t r l + 6 + C $$
Auto Scan
Auto Scan automatically scans through power-on computers at a fixed interval:
$$ \text { left } C t r l + \text { left } C t r l + F 1 $$
When Auto Scan detects any keyboard or mouse activity, it suspends the scanning until activity stops; it then resumes with the next computer in sequence. The length of the Auto Scan interval (Scan Rate) is adjustable (see Scan Rate on the following page). To abort the Auto Scan mode, press the left Ctrl key twice.
Note: Scan Type (See “OSD Function Keys: F4”) determines whether eye mark is necessary during Auto Scan.
Manual Scan
Manual Scan enables you to manually switch back and forth between power-on computers:
$$ \text { left } C t r l + \text { left } C t r l + F 2 $$
Press the up or down arrow to select the previous or next computer in sequence. Press any other key to abort the Manual Scan.
Note: Scan Type (See “OSD Function Keys: F4”) determines whether eye mark is necessary during Manual Scan.
Scan Rate
Scan Rate sets the duration between switching to the next computer in Auto Scan mode:
$$ \text { left } C t r l + \text { left } C t r l + F 3 $$
The StarView gives off one to four beeps indicating scan interval of 3, 8, 15 and 30 seconds respectively.
Keyboard Typematic Rate
You can adjust the keyboard typematic rate (given in characters/sec). This setting over-rides the keyboard typematic rate of your BIOS and any operating system.
$$ \text { left } C t r l + \text { left } C t r l + F 4 $$
The StarView gives off 1 to 4 beeps indicating 10, 15, 20 and 30 characters/sec respectively.
Audio Stick
An optional multimedia module can be LINKed to the back of each StarView for selecting microphone and stereo speaker signals. There are two options for Audio Stick: On and Off. When set to On, audio selection follows computer selection. When set to Off, audio selection stops following computer selection. It is useful if you want to listen to a particular computer's audio signal while operating other computers.
$$ \text { left } C t r l + \text { left } C t r l + F 5 $$
The StarView gives off 1 or 2 beeps corresponding to On and Off respectively.
Changing Your Configuration
After the initial power up, any device (either a KVM or a PC) can be added or removed from any PC x port on the KVM without having to power down the Master KVM Switch. Make sure that devices are turned off before connecting them to the Master KVM switch.
Note: After changing your configuration, the OSD will automatically update to reflect the new configuration.
Keyboard Mapping (SV831HD, SV1631HD only)
These KVMs are able to emulate a Sun keyboard and mouse when a computer is marked with a Sun in OSD menu by Function key
| FromPS/2 keyboard | Map toSun keyboard | Map toMac keyboard |
| right- Ctrl 1 | ||
| right- Ctrl 2 | ||
| right- Ctrl 3 | ||
| right- Ctrl 4 | Power | |
| right- Ctrl F1 | Stop | |
| right- Ctrl F2 | Again | |
| right- Ctrl F3 | Props | |
| right- Ctrl F4 | Undo | |
| right- Ctrl F5 | Front | |
| right- Ctrl F6 | Copy | |
| right- Ctrl F7 | Open | |
| right- Ctrl F8 | Paste | |
| right- Ctrl F9 | Find | |
| right- Ctrl F10 | Cut | |
| Print Screen | F13 | |
| Scroll Lock | F14 | |
| Pause Break | F15 | |
| right- Ctrl H | Help | |
| right- | right - | right - |
| left - | left - | left - |
| Context key | Compose | |
| right- Alt | Alt Graph | right- Option |
| left- Alt | Alt | left- Option |
Note: For Sun: The switch does not support LowPower option under Power Off Select after the command right - Ctrl 4.
* For Japanese keyboard: The leading key for the Combo Key is replaced by 半角/全角
Troubleshooting
If you are experiencing trouble with your devices, first make sure that all cables are connected to their proper ports and are firmly seated. You may also want to try resetting the devices by pressing and holding the front-panel 1 and 2 pushbuttons.
Mouse does not work.
• Make sure there is only one mouse driver installed in each computer.
Monitor works, but keyboard and mouse do not.
- Make sure you haven't swapped the keyboard and mouse cables
VGA image is not clear.
- You may be using poor quality VGA cables. Make sure you are using UL-2919 rated, double-shielded VGA cables.
No OSD screen or screen image.
- You may have selected a power-off computer. Use the pushbuttons or to select a computer that is turned on.
There is a keyboard error on boot.
• You may have a loose keyboard connection. Make sure your keyboard cables are well-seated.
The letters on the TFT LCD display are blurry or have shadows.
- You may have improper resolution settings. Under the Control Panel, set the VGA output of your computers to match the highest resolution of the LCD monitor with “Large Font” selected.
Master/Slave does not work or there is a double OSD.
Make sure that the slave's Console port is connected to one of the Master's PC ports.
• Perform a KVM Reset.
- Make sure that you have removed all power sources from the Slave unit before connecting it to the Master KVM switch.
The Up and Down arrows don't work in manual scan mode.
• Make sure more than one computer is turned on. Manual Scan only works with power-on computers.
- Check the Scan Type (from the OSD menu) and make sure you have selected the proper computers.
Auto Scan does not work, the StarView beeps and the indicators flash red.
• Make sure more than one computer is turned on. Auto Scan only works with powered on computers.
- Check the Scan Type (from the OSD menu) and make sure you have selected the proper computers.
- Press the Left Control key twice or press any front pushbutton to abort the Auto Scan.
OSD menu is not in the proper position.
- The OSD menu has a fixed resolution and its size varies depending on the monitor. Use
Cannot select a computer connected to a Slave.
- Make sure that the Slave's Console port is connected to one of the Master's PC ports.
- Only ports PC1 to PC8 can be connected to Slaves, even if the Master KVM has 16 PC ports.
- Only one level of Slave KVMs is allowed.
Keyboard strokes are shifted.
- Press both Shift keys.
Technical Specifications
SV831HD SV1631HD SV1631D1U
User ports 1 1 1
Computer ports 8 16 16
Cascade control PC number Up to 64 Up to 136 Up to 136
Cable Type 2-in-1 USB KVM 2-in-1 USB KVM 3-in-1 PS/2 KVM
3-in-1 PS/2 KVM 3-in-1 PS/2 KVM
Front panel control 8 16 16
| Hot plug and play Yes | Yes | ||
| Hot key control | Yes | Yes | Yes |
| Rack mountable | 19" industry standard | 19" industry standard | 19" industry standard |
| Auto scan interval | 3, 8, 15, 30 seconds | 3, 8, 15, 30 seconds | 3, 8, 15, 30 seconds |
| Programmable scan pattern Yes | Yes | Yes | |
| Computer name entry | Up to 14 characters | Up to 14 characters | Up to 14 characters |
| Security control | 4 characters per computer | 4 characters per computer | 4 characters per computer |
| Cable length (max.) | 100 ft (30m) at Console PS/2: 100 ft (30m) at PC USB: 16 ft (5m) at PC | 100 ft (30m) at Console PS/2: 100 ft (30m) at PC USB: 16 ft (5m) at PC | 100 ft (30m) at Console PS/2: 100 ft (30m) at PC |
| VGA | 1920x1440, DDC2B | 1920x1440, DDC2B | 1920x1440, DDC2B |
| Computer Connector | 8 x HD-DB-15 female | 16 x HD-DB-15 female | 16 x HD-DB-15 female |
| Console Connectors: | |||
| Mouse | 1 x PS/2 female | 1 x PS/2 female | 1 x PS/2 female |
| Keyboard | 1 x PS/2 female | 1 x PS/2 female | 1 x PS/2 female |
| Monitor | 1 x HD-DB-15 female | 1 x HD-DB-15 female | 1 x HD-DB-15 female |
| Dimensions (H x W x D) | 1.7 x 17.2 x 7.0 in.(44 x 436 x 180 mm) | 1.7 x 17.2 x 7.0 in.(44 x 436 x 180 mm) | 1.7 x 17.2 x 7.0 in.(44 x 436 x 180 mm) |
| Power Supply (min.) | 9V DC 600mA | 9V DC 600mA | 9V DC 600mA |
Technical Support
The following technical resources are available for this StarTech.com product:
On-line help:
We are constantly adding new information to the Tech Support section of our web site. To access this page, click the Tech Support link on our homepage, www.startech.com. In the tech support section there are a number of options that can provide assistance with this card.
Knowledge Base - This tool allows you to search for answers to common issues using key words that describe the product and your issue.
FAQ - This tool provides quick answers to the top questions asked by our customers.
Downloads - This selection takes you to our driver download page where you can find the latest drivers for this product.
Call StarTech.com tech support for help:
USA/Canada: 1-519-455-4931
UK/Ireland/Europe: 00-800-7827-8324
Support hours: Monday to Friday 9:00AM to 5:00PM EST (except holidays)
Warranty Information
This product is backed by a three-year warranty. In addition StarTech.com warrants its products against defects in materials and workmanship for the periods noted below, following the initial date of purchase. During this period, the products may be returned for repair, or replacement with equivalent products at our discretion. The warranty covers parts and labor costs only. StarTech.com does not warrant its products from defects or damages arising from misuse, abuse, alteration, or normal wear and tear.
Limitation of Liability
In no event shall the liability to StarTech.com Ltd. (or its officers, directors, employees or agents) for any damages (whether direct or indirect, special, punitive incidental, consequential, or otherwise), loss of profits, loss of business, or any pecuniary loss, arising out of related to the use of the product exceed the actual price paid for the product. Some states do not allow the exclusion or limitation of incidental or consequential damages. If such laws apply, the limitations or exclusions contained in this statement may not apply to you.
FCC Compliance
This device complies with part 15 of the FCC Rules. Operation is subject to the following conditions: (1) this device may not cause harmful interference; and (2) this device must accept any interference received, including interference that may cause undesired operation.
- Instruction Guide
- Table of Contents
- Introduction
- Features
- Before You Begin
- Contents
- System Requirements
- Installation
- Cascade Configuration
- Operating Your KVM Switch
- Push Buttons
- OSD Operations
- OSD Function Keys
- Function key
- Auto Scan
- Manual Scan
- Audio Stick
- Scan Type
- Scan Rate
- Keyboard Speed
- Hotkey Menu
- CH Display
- Position
- Function Key (SV831HD, SV1631HD only)
- Hot Key Commands
- Selecting a Computer
- Keyboard Typematic Rate
- Changing Your Configuration
- Keyboard Mapping (SV831HD, SV1631HD only)
- Troubleshooting
- Mouse does not work.
- Monitor works, but keyboard and mouse do not.
- VGA image is not clear.
- No OSD screen or screen image.
- There is a keyboard error on boot.
- The letters on the TFT LCD display are blurry or have shadows.
- Master/Slave does not work or there is a double OSD.
- The Up and Down arrows don't work in manual scan mode.
- Auto Scan does not work, the StarView beeps and the indicators flash red.
- OSD menu is not in the proper position.
- Cannot select a computer connected to a Slave.
- Keyboard strokes are shifted.
- Technical Specifications
- SV831HD SV1631HD SV1631D1U
- Technical Support
- On-line help:
- Warranty Information
- Limitation of Liability
- FCC Compliance
Brand : StarTech.com
Model : SV1631HD
Category : Network switch