
AXHN-2 - Car kit Axxess - Free user manual and instructions
Find the device manual for free AXHN-2 Axxess in PDF.


| Product Type | Car Kit / Hands-Free Bluetooth Kit |
| Model | AXHN-2 |
| Brand | AXESS |
| Dimensions (approx.) | 100 x 60 x 20 mm |
| Weight (approx.) | 50 g |
| Power Source | 12V car cigarette lighter socket |
| Bluetooth Version | 5.0 |
| Bluetooth Range | Up to 10 meters |
| Supported Profiles | HFP, A2DP, AVRCP |
| Main Functions | Hands-free calling, music streaming, FM transmitter, USB charging (up to 2.1A) |
| FM Transmitter Frequency | 87.5 - 108.0 MHz |
| USB Output | 5V / 2.1A |
| Display | LED or LCD (depends on variant) |
| Microphone | Built-in noise cancellation |
| Operating Temperature | -10°C to 50°C |
| Storage Temperature | -20°C to 60°C |
| Maintenance | Wipe with dry cloth; avoid liquids |
| Safety Features | Overcharge protection, short circuit protection |
| Spare Parts & Repairability | USB cable, user manual; not user-serviceable |
| General Information | Compatible with most smartphones and devices with Bluetooth |
Frequently Asked Questions - AXHN-2 Axxess
User questions about AXHN-2 Axxess
0 question about this device. Answer the ones you know or ask your own.
Ask a new question about this device
Download the instructions for your Car kit in PDF format for free! Find your manual AXHN-2 - Axxess and take your electronic device back in hand. On this page are published all the documents necessary for the use of your device. AXHN-2 by Axxess.
USER MANUAL AXHN-2 Axxess
natural_image
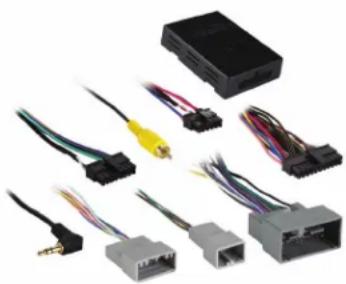
Collection of various automotive electrical connectors and wiring, including a black box, gray connector, and various colored wires (no text or symbols visible)INTERFACE FEATURES
- AXHN-2 interface
- AXHN-2 harness
APPLICATIONS
Honda
Civic....2014-2015
CR-V 2015
FIT 2015-2017
Honda LaneWatch Camera Retention 2014-2017
Visit MetraOnline.com for more detailed information about the product and up-to-date vehicle specific applications
INTERFACE FEATURES
- Provides accessory power (10-amp)
- Provides NAV outputs (parking brake, reverse, speed sense)
- Pre-wired AXSWC harness (AXSWC sold separately)
- Retains the factory backup camera
- Retains the LaneWatch camera
- Retains ability to change factory clock and date*
- Retains the factory AUX-IN jack
- Can be used in non-amplified, or amplified models
- Retains balance and fade
- Micro-B USB updatable
* Excluding LX and NAV models
TABLE OF CONTENTS
Connections
- For models without a factory amp....2
- For models with a factory amp ....3
Installation 4
Programming......4
Extra settings....5
Visit AxxessInterfaces.com
for up-to-date vehicle specific applications.
TOOLS & INSTALLATION ACCESSORIES REQUIRED
- Crimping tool and connectors, or solder gun solder, and heat shrink • Tape • Wire cutter
- Zip ties
Product Info

CONNECTIONS
For models without a factory amp:
From the AXHN-2 harness to the aftermarket radio
Main harness:
- Connect the Black wire to the ground wire.
- Connect the Yellow wire to the battery wire.
- Connect the Red wire to the accessory wire.
For the following (8) connections, cut off the RCA jacks to expose the speaker wire inside.
- Connect the White wire to the left front positive speaker output.
- Connect the White/Black wire to the left front negative speaker output.
- Connect the Gray wire to the right front positive speaker output.
- Connect the Gray/Black wire to the right front negative speaker output.
- Connect the Green wire to the left rear positive speaker output.
- Connect the Green/Black wire to the left rear negative speaker output.
- Connect the Purple wire to the right rear positive speaker output.
- Connect the Purple/Black wire to the right rear negative speaker output.
16-pin harness:
- Connect the Orange/White wire to the illumination wire.
The following (3) wires are for aftermarket multimedia/navigation radios that require these wires:
- Connect the Light Green wire to the parking brake wire (if applicable).
- Connect the Blue/Pink wire to the speed sense wire (if applicable).
- Connect the Green/Purple wire to the reverse wire (if applicable).
- Connect the Yellow RCA jack to the backup camera input.
Note: This RCA jack is used to retain the backup camera as well as the LaneWatch camera.
- Connect the White and Red RCA jacks to the audio AUX-IN jacks (if applicable).
8-pin harness:
- Disregard the White RCA jack, it will not be used in this application.
12-pin pre-wired AXSWC harness & 3.5mm jack:
- This harness and 3.5mm jack is to be used along with the optional AXSWC (sold separately) to retain steering wheel audio controls. If the AXSWC is not being used, disregard this harness. If it will be used, refer to the vehicle specific AXSWC instruction from Axxess Interfaces for radio connections and programming. Disregard the harness that comes with the AXSWC.
- The Gray/Blue wire will only be used in vehicles equipped with Bluetooth. Connect this wire to the Yellow wire in pin-15 from the 32-pin harness in the factory Bluetooth module.
Bluetooth module location:
Civic - Behind glovebox
CR-V - In dash, under radio
Continue to Installation
CONNECTIONS
For models with a factory amp:
From the AXHN-2 harness to the aftermarket radio
Main harness:
- Connect the Black wire to the ground wire.
- Connect the Yellow wire to the battery wire.
- Connect the Red wire to the accessory wire.
- Connect the Blue/White wire to the amp turn-on wire.
- Connect the White RCA jack to the front left RCA output.
- Connect the Gray RCA jack to the front right RCA output.
- Connect the Green RCA jack to the rear left RCA output.
- Connect the Purple RCA jack to the rear right RCA output.
16-pin harness:
- Connect the Orange/White wire to the illumination wire.
The following (3) wires are for aftermarket multimedia/navigation radios that require these wires:
- Connect the Light Green wire to the parking brake wire (if applicable).
- Connect the Blue/Pink wire to the speed sense wire (if applicable).
- Connect the Green/Purple wire to the reverse wire (if applicable).
- Connect the Yellow RCA jack to the backup camera input.
Note: This RCA jack is used to retain the backup camera as well as the LaneWatch camera.
- Connect the White and Red RCA jacks to the audio AUX-IN jacks (if applicable).
8-pin harness:
- Connect the White RCA jack to the subwoofer output jack.
12-pin pre-wired AXSWC harness & 3.5mm jack:
- This harness and 3.5mm jack is to be used along with the optional AXSWC (not included) to retain steering wheel audio controls. If the AXSWC is not being used, disregard this harness. If it will be used, refer to the vehicle specific AXSWC instruction from Axxess Interfaces for radio connections and programming. Disregard the harness that comes with the AXSWC.
- The Gray/Blue wire will only be used in vehicles equipped with Bluetooth. Connect this wire to the Yellow wire in pin-15 from the 32-pin harness in the factory Bluetooth module.
Bluetooth module location:
Civic - Behind glovebox
CR-V - In dash, under radio
Continue to Installation
INSTALLATION PROGRAMMING
- Connect the AXHN-2 harness to the AXHN-2 interface, and then to the wiring harness in the vehicle.
- Turn the key (or push-to-start button) to the ignition position and wait until the radio comes on.
Note: If the radio doesn't come on within 60 seconds, turn the key to the off position, disconnect the interface, check all connections, reconnect the interface, and then try again.
- Turn the key to the off position, and then to the accessory position. Test all functions of the installation for proper operation, before reassembling the dash.
EXTRA SETTINGS
LaneWatch settings:
Note: The LaneWatch button is located on the left side of the steering wheel, on the stalk.
- Press and hold the LaneWatch button for 15 seconds to toggle right turn signal triggering on or off. If on, press and hold the button again for 15 seconds to toggle it off. Likewise if off. The hi-beam indicator will flash 1 time if off; 2 times if on.
Note: Right turn signal triggering is default on.
CAUTION! The following step should only be performed by an authorized Honda technician. Once this procedure has been started, you cannot back out of it.
- Press and hold the LaneWatch button for 50 seconds to begin the LaneWatch aiming procedure. The hi-beam indicator will flash 3 times. At this point the display will also show an image of the LaneWatch camera feed, with instructions on what to do--a Honda authorized technician will know what to do from here.
Note: While accessing LaneWatch aiming the right turn signal triggering will be toggled after 15 seconds has passed, so the hi-beam indicator will flash before the 50 second mark is reached. The technician will have to ignore that and continue holding the button until the 50 second mark is reached to aim the camera.
Clock and date settings:
Note: This section refers to the buttons on the left side of the steering wheel.
Note: If no button is pressed for 15 seconds, this process will end.
- Activate the analog clock on the top screen.
- Press and hold the "Source" button for 15 seconds until the hi-beam indicator blinks twice, and then let go.
- Press and release the "Seek-Up" and "Seek-Down" buttons to toggle between minutes, hours, days, months, and year.
- Once a choice is selected, press and release the "Volume-Up" or "Volume-Down" buttons to adjust the settings.
- While changing the hour, press the "Source" button to toggle between 12 and 24 hour formats.
- Wait 15 seconds for the process to end.
Having difficulties? We're here to help.
Contact our Tech Support line at:
386-357-1187
Or via email at:
techsupport@metra-autosound.com
Tech Support Hours (Eastern Standard Time)
Monday - Friday: 9:00 AM - 7:00 PM
Saturday: 10:00 AM - 5:00 PM
Sunday: 10:00 AM - 4:00 PM

KNOWLEDGE IS POWER
Enhance your installation and fabrication skills by swelling in the most recognized and respected
mobile electronics school in our industry.
Log onto www.installerinstitute.edu or call
386-672-5771 for more information and take steps toward a better tomorrow.

Metra recommends MECP
certified technicians
natural_image
Collection of various automotive electrical connectors and wiring (no visible text or symbols)COMPONENTES DE LA INTERFASE
- Interfase AXHN-2
- Arnés AXHN-2
APLICACIONES
Honda
Civic 2014-2015
CR-V 2015
FIT 2015-2017
Movil (Mobile Electronics
(Certification Program, MECP).



- INTERFACE FEATURES
- APPLICATIONS
- Honda
- Honda LaneWatch Camera Retention 2014-2017
- TABLE OF CONTENTS
- Connections
- TOOLS & INSTALLATION ACCESSORIES REQUIRED
- For models without a factory amp:
- From the AXHN-2 harness to the aftermarket radio
- Main harness:
- 16-pin harness:
- 8-pin harness:
- 12-pin pre-wired AXSWC harness & 3.5mm jack:
- Bluetooth module location:
- For models with a factory amp:
- INSTALLATION PROGRAMMING
- EXTRA SETTINGS
- LaneWatch settings:
- Clock and date settings:
- Tech Support Hours (Eastern Standard Time)
- COMPONENTES DE LA INTERFASE
- APLICACIONES
Brand : Axxess
Model : AXHN-2
Category : Car kit