
AXGM-044 - Car kit Axxess - Free user manual and instructions
Find the device manual for free AXGM-044 Axxess in PDF.


| Product Type | Bluetooth Hands-Free Car Kit |
| Brand | AXESS |
| Model | AXGM-044 |
| Dimensions (approximate) | 4.7 x 2.4 x 0.8 in (12 x 6 x 2 cm) |
| Weight | 1.8 oz (50 g) |
| Power Supply | USB 5V / built-in rechargeable battery (300 mAh) |
| Main Functions | Bluetooth hands-free calling, music streaming, voice control, noise reduction, multi-point connection |
| Bluetooth Version | 5.0 |
| Operating Range | Up to 33 ft (10 m) |
| Compatibility | Most smartphones with Bluetooth |
| Installation | Clip-on sun visor mount or dashboard mount included |
| Controls | Multi-function button, volume up/down, built-in microphone |
| Maintenance & Cleaning | Wipe with a soft, dry cloth; avoid liquids |
| Safety Precautions | Do not expose to extreme temperatures or moisture; use only certified charger |
| Spare Parts | Replacement USB cable and adhesive pads available |
| Repairability | Non-user serviceable; contact support for issues |
| Warranty | 1 year limited |
Frequently Asked Questions - AXGM-044 Axxess
User questions about AXGM-044 Axxess
0 question about this device. Answer the ones you know or ask your own.
Ask a new question about this device
Download the instructions for your Car kit in PDF format for free! Find your manual AXGM-044 - Axxess and take your electronic device back in hand. On this page are published all the documents necessary for the use of your device. AXGM-044 by Axxess.
USER MANUAL AXGM-044 Axxess
natural_image
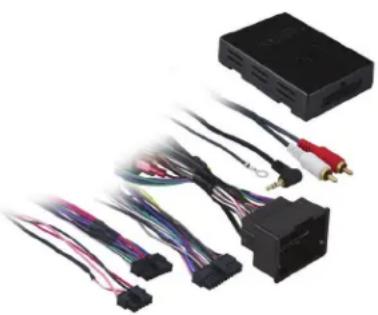
Exterior view of an automotive electrical module with various cables and connectors (no text or symbols visible)Chevrolet Cruze 2011-2015 / Cruze Limited 2016 (with monochrome screen)
INTERFACE FEATURES
- Provides accessory power (12-volt 10-amp)
- Retains R.A.P. (retained accessory power)
• Used in amplified or non-amplified systems - Retains chimes
- Provides NAV outputs (parking brake, reverse, mute, speed sense)
- Prewired AXSWC harness (AXSWC sold separately)
- Retains OnStar/OE Bluetooth
- Adjustable volume for chimes and OnStar
• High level speaker input
• USB CAB cable updatable - Retains balance and fade
TABLE OF CONTENTS
Connections 2-3
Installation 3
Programming 3
Adjustments 4
Personalization Menu 4
No OE Steering Wheel Controls ....5
OPTIONAL ACCESSORIES(sold separately)
AXSWC: Steering wheel control interface ASWCSTALK: Steering wheel control add-on
TOOLS & INSTALLATION ACCESSORIES REQUIRED
- Crimping tool and connectors, or solder gun, solder, and heat shrink • Tape • Wire cutter
- Zip ties • Small flat-blade screwdriver
Product Info

INTERFACE COMPONENTS
- AXGM-044 interface
- AXGM-044 harness
- 16-pin harness with stripped leads
CONNECTIONS
From the 16-pin harness with stripped leads to the aftermarket radio:
- Connect the Red wire to the accessory wire.
- Connect the Orange/White wire to the illumination wire. If the aftermarket radio doesn't have an illumination wire, tape off and disregard.
- If equipped with a factory amplifier, connect the Blue/White wire to the amp turn on wire.
- Connect the White wire to the left front positive speaker output.
- Connect the White/Black wire to the left front negative speaker output.
- Connect the Gray wire to the right front positive speaker output.
- Connect the Gray/Black wire to the right front negative speaker output.
- Connect the Brown wire to the mute wire. If the aftermarket radio doesn't have a mute wire, tape off and disregard.
The following (3) wires are only for multimedia/navigation radios that require these wires.
- Connect the Blue/Pink wire to the VSS/speed sense wire.
- Connect the Green/Purple wire to the reverse wire.
- Connect the Light Green wire to the parking brake wire.
From the AXGM-044 harness to the aftermarket radio:
- Connect the Black wire with a ring terminal to the radio chassis with the ISO screw supplied with radio.
Note: This wire must be connected as instructed otherwise the interface will not function. - The Black/Yellow wire will be discussed later in the Adjustments section.
- If the vehicle doesn't come equipped with steering wheel controls, connect the Green/Orange wire to the Green/Orange wire from the ASWCSTALK (sold separately) to retain the personalization features. Refer to the section titled No OE Steering Wheel Controls for more information and wiring for the ASWCSTALK.
- Connect the Black wire to the ground wire.
- Connect the Yellow wire to the battery wire.
- Connect the Green wire to the left rear positive speaker output.
- Connect the Green/Black wire to the left rear negative speaker output.
- Connect the Purple wire to the right rear positive speaker output.
- Connect the Purple/Black wire to the right rear negative speaker output..
- Connect the RCA jacks to the audio AUX-IN jacks (if applicable).
Note:
(a) This will allow you to retain the 3.5 AUX-IN jack in the console.
(b) The 3.5 jack can only be used if it is a single AUX-IN jack.
(c) If the AUX-IN jack has a USB port, neither can be used.
Continued on the next page
CONNECTIONS (CONT)
12-pin pre-wired AXSWC harness:
- This harness is to be used along with the AXSWC (not included) to retain steering wheel audio controls. If the AXSWC is not being used, disregard this harness. If it will be used, refer to the AXSWC instructions for radio connections and programming. Disregard the harness that comes with the AXSWC.
- Connect the Red wire to the accessory wire.
Note: The relay attached to the AXGM-044 is only for audible turn signal clicks. No extra steps are required to retain this, so leave it as-is.
INSTALLATION
With the key in the off position:
- Connect the AXGM-044 harness into the interface, and then to the wiring harness in the vehicle.
PROGRAMMING
Attention! If the interface loses power for any reason, the following steps will need to be performed again.
- Turn the key (or push-to-start button) to the ignition position and wait until the radio comes on.
Note: If the radio doesn't come on within 60 seconds, turn the key to the off position, disconnect the interface, check all connections, reconnect the interface, and then try again. - Turn the key to the off position, and then to the accessory position. Test all functions of the installation for proper operation, before reassembling the dash.
ADJUSTMENTS PERSONALIZA
Chime level adjustment:
- With the vehicle on, turn it off and leave the keys in ignition. Open the driver's door; chimes will be heard.
- Wait 10 seconds, and then with a small flat-blade screwdriver, turn the potentiometer clockwise to raise the chime level; counterclockwise to lower the chime level.
- When the chime is at a desired level, remove the keys from the ignition. This will lock the chime volume at its current level.
OnStar level adjustment:
- Press the OnStar button to activate it.
- While OnStar is speaking, press the VOLUME UP or VOLUME DOWN buttons on the steering wheel to raise or lower the OnStar level.
- If the vehicle doesn't come equipped with steering wheel controls, find the Black/Yellow wire on the 18-pin harness.
- While OnStar is speaking, tap the Black/Yellow wire to ground. Once OnStar level is set, it will stay at that level until the Black/Yellow wire is tapped to ground again.
ON MENU
The vehicle must be equipped with OE steering wheel controls in order to access and change the personalization features. If the vehicle didn't come equipped with OE steering wheel controls, refer to the section titled No OE Steering Wheel Controls.
Note: The personalization menu can be set before the factory radio is removed. Though, the time and date can't be adjusted in vehicles without the factory steering wheel controls.
Note: The OE Screen can be disconnected in models without factory steering wheel controls.
- Turn off the radio.
- Press and hold the Off Hook button on the steering wheel for 3-seconds. After 3-seconds the personalization menu will show up on the display.
- To scroll through the menu, use the Seek Up and Seek Down buttons on the steering wheel
- To make a selection, use the Source button on the steering wheel, which is the center button between the Seek Up and Seek Down buttons.
- Use the Off Hook button to exit the personalization menu.
NO OE STEERING WHEEL CONTROLS
If the vehicle didn't come equipped with OE steering wheel controls, the ASWCSTALK can be used to retain both the clock setting function, and the ability to change the personalization features. Below are the wiring instructions on wiring and using the ASWCSTALK.
Note: The ASWCSTALK cannot be used to control the aftermarket radio, I.E., volume, seek, mute, etc. The ASWCSTALK can only be used for controlling the personalization menu.
- Connect the two Black wires from the ASWCSTALK to accessory power.
- Connect the Green/Orange wire from the ASWCSTALK to the Green/Orange wire from the AXGM-044 harness.
- Tape off and disregard the Green/Black wire from ASWCSTALK.
- Cycle the key on and test the ASWCSTALK. The following are the buttons that apply to this application. All other buttons will not be used.


ENTER/SELECT EXIT UP DOWN
Having difficulties? We're here to help.

ur Tech Support line at: 386-257-1187
Or via email at:
techsupport@metra-autosound.com
Tech Support Hours (Eastern Standard Time)
Monday - Friday: 9:00 AM - 7:00 PM
Saturday: 10:00 AM - 7:00 PM
Sunday: 10:00 AM - 4:00 PM

KNOWLEDGE IS POWER
Enhance your installation and fabrication skills by enrolling in the most recognized and respected mobile electronics school in our industry. Log onto www.installerinstitute.com or call 800-354-6782 for more information and take steps toward a better tomorrow.

Metra recommends MECP certified technicians
natural_image
Exterior view of a black integrated circuit board with various colored cables and connectors (no text or symbols visible)Móvil (Mobile Electronics
Certification Program, MECP).



- Chevrolet Cruze 2011-2015 / Cruze Limited 2016 (with monochrome screen)
- INTERFACE FEATURES
- TABLE OF CONTENTS
- OPTIONAL ACCESSORIES(sold separately)
- TOOLS & INSTALLATION ACCESSORIES REQUIRED
- INTERFACE COMPONENTS
- CONNECTIONS
- From the 16-pin harness with stripped leads to the aftermarket radio:
- From the AXGM-044 harness to the aftermarket radio:
- Note:
- CONNECTIONS (CONT)
- 12-pin pre-wired AXSWC harness:
- INSTALLATION
- With the key in the off position:
- PROGRAMMING
- ADJUSTMENTS PERSONALIZA
- Chime level adjustment:
- OnStar level adjustment:
- ON MENU
- NO OE STEERING WHEEL CONTROLS
- Tech Support Hours (Eastern Standard Time)
Brand : Axxess
Model : AXGM-044
Category : Car kit