
SCD700 - Heat gun STANLEY - Free user manual and instructions
Find the device manual for free SCD700 STANLEY in PDF.


| Product Type | Cordless Drill Driver |
| Brand | Stanley |
| Model | SCD700 |
| Voltage | 18 V (20 V MAX) |
| Battery Type | Li-Ion |
| Battery Capacity Options | 1.5 Ah, 2.0 Ah, 4.0 Ah, 6.0 Ah |
| No-Load Speed | 0–400 / 0–1500 rpm |
| Max Torque | 50 Nm |
| Chuck Capacity | 13 mm keyless chuck |
| Max Drilling Capacity (Steel/Wood) | 13 mm / 35 mm |
| Torque Settings | 23 positions |
| Gear Selector | Dual range (low speed/high torque, high speed/low torque) |
| Weight | 1.2 kg |
| LED Work Light | Integrated, automatically illuminates work area |
| Forward/Reverse Button | Yes, with lock-off center position |
| Belt Hook | Removable, attachable on either side |
| Charger Models | SC120, SC125, SC200, SC400 |
| Charging Time (1.25A charger) | Approximately 1 hour for 1.5 Ah battery |
| Operating Temperature (Charging) | 10 °C to 40 °C |
| Construction Class | II (Double insulated) |
| Maintenance | Clean ventilation slots with soft brush or dry cloth; clean motor housing with damp cloth |
| Safety Features | Lock-off button, thermal protection, battery state of charge indicator |
| Spare Parts / Repairability | Contact authorized Stanley service centers for genuine replacement parts |
| Warranty | Refer to product documentation or Stanley website |
Frequently Asked Questions - SCD700 STANLEY
User questions about SCD700 STANLEY
0 question about this device. Answer the ones you know or ask your own.
Ask a new question about this device
Download the instructions for your Heat gun in PDF format for free! Find your manual SCD700 - STANLEY and take your electronic device back in hand. On this page are published all the documents necessary for the use of your device. SCD700 by STANLEY.
USER MANUAL SCD700 STANLEY
natural_image
Illustration of a Stanley electric drill with a flathead and base (no text or symbols on the device body)English (original instructions) 20




Uso pretendido
natural_image
Pure electrical circuit symbol for battery, no text or labels presentMontaje en pared
natural_image
Pure electrical circuit symbol for battery, no text or labels presentFixação de parede
Your STANLEY SCD700 and SCD708 drill driver have been designed for screwdriving applications and for drilling in wood, metal and plastics. This appliance is intended for professional and private, non professional users.
Safety instructions
General power tool safety warnings

Warning! Read all safety warnings, instructions, illustrations and specifications provided with this power tool. Failure to follow the warnings and instructions listed below may result in electric shock, fire and/or serious injury..
Save all warnings and instructions for future reference.
The term "power tool" in all of the warnings listed below refers to your mains operated (corded) power tool or battery operated (cordless) power tool.
- Work area safety
a. Keep work area clean and well lit. Cluttered or dark areas invite accidents.
b. Do not operate power tools in explosive atmospheres, such as in the presence of flammable liquids, gases or dust. Power tools create sparks which may ignite the dust or fumes.
c. Keep children and bystanders away while operating a power tool. Distractions can cause you to lose control.
- Electrical safety
a. Power tool plugs must match the outlet. Never modify the plug in any way. Do not use any adapter plugs with earthed (grounded) power tools. Unmodified plugs and matching outlets will reduce risk of electric shock.
b. Avoid body contact with earthed or grounded surfaces such as pipes, radiators, ranges and refrigerators. There is an increased risk of electric shock if your body is earthed or grounded.
c. Do not expose power tools to rain or wet conditions. Water entering a power tool will increase the risk of electric shock.
d. Do not abuse the cord. Never use the cord for carrying, pulling or unplugging the power tool. Keep cord away from heat, oil, sharp edges or moving parts. Damaged or entangled cords increase the risk of electric shock.
e. When operating a power tool outdoors, use an extension cord suitable for outdoor use. Use of a cord suitable for outdoor use reduces the risk of electric shock.
f. If operating a power tool in a damp location is unavoidable, use a residual current device (RCD) protected supply. Use of an RCD reduces the risk of electric shock.
- Personal safety
a. Stay alert, watch what you are doing and use common sense when operating a power tool. Do not use a power tool while you are tired or under the influence of drugs, alcohol or medication. A moment of inattention while operating power tools may result in serious personal injury.
b. Use personal protective equipment. Always wear eye protection. Protective equipment such as dust mask, non-skid safety shoes, hard hat, or hearing protection used for appropriate conditions will reduce personal injuries.
c. Prevent unintentional starting. Ensure the switch is in the off-position before connecting to power source and/or battery pack, picking up or carrying the tool. Carrying power tools with your finger on the switch or energising power tools that have the switch on invites accidents.
d. Remove any adjusting key or wrench before turning the power tool on. A wrench or a key left attached to a rotating part of the power tool may result in personal injury.
e. Do not overreach. Keep proper footing and balance at all times. This enables better control of the power tool in unexpected situations.
f. Dress properly. Do not wear loose clothing or jewellery. Keep your hair and clothing away from moving parts. Loose clothes, jewellery or long hair can be caught in moving parts.
g. If devices are provided for the connection of dust extraction and collection facilities, ensure these are connected and properly used. Use of dust collection can reduce dust-related hazards.
h. Do not let familiarity gained from frequent use of tools allow you to become complacent and ignore tool safety principles. A careless action can cause severe injury within a fraction of a second.
- Power tool use and care
a. Do not force the power tool. Use the correct power tool for your application. The correct power tool will do the job better and safer at the rate for which it was designed.
b. Do not use the power tool if the switch does not turn it on and off. Any power tool that cannot be controlled with the switch is dangerous and must be repaired.
c. Disconnect the plug from the power source and/or remove the battery pack, if detachable, from the power tool before making any adjustments, changing accessories, or storing power tools. Such preventive safety measures reduce the risk of starting the power tool accidentally.
d. Store idle power tools out of the reach of children and do not allow persons unfamiliar with the power tool or these instructions to operate the power tool. Power tools are dangerous in the hands of untrained users.
e. Maintain power tools and accessories. Check for misalignment or binding of moving parts, breakage of parts and any other condition that may affect the power tools operation. If damaged, have the power tool repaired before use. Many accidents are caused by poorly maintained power tools.
f. Keep cutting tools sharp and clean. Properly maintained cutting tools with sharp cutting edges are less likely to bind and are easier to control.
g. Use the power tool, accessories and tool bits etc. in accordance with these instructions, taking into account the working conditions and the work to be performed. Use of the power tool for operations different from those intended could result in a hazardous situation.
h. Keep handles and grasping surfaces dry, clean and free from oil and grease. Slippery handles and grasping surfaces do not allow for safe handling and control of the tool in unexpected situations.
- Battery tool use and care
a. Recharge only with the charger specified by the manufacturer. A charger that is suitable for one type of battery pack may create a risk of fire when used with another battery pack.
b. Use power tools only with specifically designated battery packs. Use of any other battery packs may create a risk of injury and fire.
c. When battery pack is not in use, keep it away from other metal objects, like paper clips, coins, keys, nails, screws, or other small metal objects, that can make a connection from one terminal to another. Shorting the battery terminals together may cause burns or a fire.
d. Under abusive conditions, liquid may be ejected from the battery; avoid contact. If contact accidentally occurs, flush with water. If liquid contacts eyes, additionally seek medical help. Liquid ejected from the battery may cause irritation or burns.
e. Do not use a battery pack or tool that is damaged or modified. Damaged or modified batteries may exhibit unpredictable behaviour resulting in fire, explosion or risk of injury.
f. Do not expose a battery pack or tool to fire or excessive temperature. Exposure to fire or temperature above 130 °C may cause explosion.
g. Follow all charging instructions and do not charge the battery pack or tool outside the temperature range specified in the instructions. Charging improperly or at temperatures outside the specified range may damage the battery and increase the risk of fire.
- Service
a. Have your power tool serviced by a qualified repair person using only identical replacement parts. This will ensure that the safety of the power tool is maintained.
b. Never service damaged battery packs. Service of battery packs should only be performed by the manufacturer or authorized service providers.
Additional safety warnings for screwdrivers
- Wear ear protectors with impact drilling. Exposure to noise can cause hearing loss.
- Use auxiliary handles supplied with the tool. Loss of control can cause personal injury.
- Use clamps or another practical way to secure and support the work piece to a stable platform. Holding the work by hand or against your body leaves it unstable and may lead to loss of control.
- Before driving fasteners into walls, floors or ceilings, check for the location of wiring and pipes.
- The intended use is described in this instruction manual.
- The use of any accessory or attachment or performance of any operation with this tool other than those recommended in this instruction manual may present a risk of personal injury and/or damage to property.
1) Safety instructions for all operations
a. Brace the tool properly before use. This tool produces a high output torque and without properly bracing the tool during operation, loss of control may occur resulting in personal injury.
b. Hold the power tool by insulated gripping surfaces, when performing an operation where the cutting accessory may contact hidden wiring. Cutting accessory contacting a "live" wire may make exposed metal parts of the power tool "live" and could give the operator an electric shock.
2) Safety instructions when using long drill bits
a. Never operate at higher speed than the maximum speed rating of the drill bit. At higher speeds, the bit is likely to bend if allowed to rotate freely without contacting the workpiece, resulting in personal injury.
b. Always start drilling at low speed and with the bit tip in contact with the workpiece. At higher speeds, the bit is likely to bend if allowed to rotate freely without contacting the workpiece, resulting in personal injury.
c. Apply pressure only in direct line with the bit and do not apply excessive pressure. Bits can bend causing breakage or loss of control, resulting in personal injury
Safety of others
- This tool is not intended for use by persons (including children) with reduced physical, sensory or mental capabilities, or lack of experience and knowledge, unless they have been given supervision or instruction concerning use of the appliance by a person responsible for their safety.
- Children should be supervised to ensure that they do not play with the appliance.
Residual risks
Additional residual risks may arise when using the tool which may not be included in the enclosed safety warnings. These risks can arise from misuse, prolonged use etc.
Even with the application of the relevant safety regulations and the implementation of safety devices, certain residual risks can not be avoided. These include:
- Injuries caused by touching any rotating/moving parts.
- Injuries caused when changing any parts, blades or accessories.
- Injuries caused by prolonged use of a tool. When using any tool for prolonged periods ensure you take regular breaks.
- Impairment of hearing.
- Health hazards caused by breathing dust developed when using your tool (example:- working with wood, especially oak, beech and MDF.)
Labels on tool
The label on your tool may include the following symbols:
 | Warning! Do not stare at operating lamp. | ||
 | WARNING! To reduce the risk of injury, the user must read the instruction manual before use. | ||
 | Wear safety glasses or goggles. | ||
 | Wear ear protection. | ||
 | Wear a dust mask. | ||
| V Volts Direct Current | --- | ||
| A Amperes no No-Load | Speed | ||
| Hz Hertz | [823K] | Class II Construction | |
| W Watts Earthing Terminal | [7625] | ||
| min minutes Safety Alert | Syr  | ||
| ~ | Alternating Current | /min. | Revolutions or Reciprocation per minute |
Position of date code
The Date Code, which also includes the year of manufacture, is printed into the housing.
Example:
2023 XX JN
Year of manufacturing
Additional safety instructions for batteries and chargers
Batteries
- Never attempt to open for any reason.
- Do not expose the battery to water.
- Do not store in locations where the temperature may exceed 40 °C.
- Charge only at ambient temperatures between 10 °C and 40 °C.
- Charge only using the charger provided with the tool.
- When disposing of batteries, follow the instructions given in the section "Protecting the environment".
Chargers
- Use your STANLEY charger only to charge the battery in the tool with which it was supplied. Other batteries could burst, causing personal injury and damage.
- Never attempt to charge non-rechargeable batteries.
- Have defective cords replaced immediately.
- Do not expose the charger to water.
- Do not open the charger.
- Do not probe the charger.


The charger is intended for indoor use only.
Read the instruction manual before use.
Do not attempt to charge damaged batteries.
Electrical safety

Your charger is double insulated; therefore no earth wire is required. Always check that the mains voltage corresponds to the voltage on the rating plate. Never attempt to replace the charger unit with a regular mains plug.
- If the supply cord is damaged, it must be replaced by the manufacturer or an authorised STANLEY Service Centre in order to avoid a hazard.

Warning! Never attempt to replace the charger unit with a regular mains plug.
Features
This appliance includes some or all of the following features.
- Trigger Switch
- Forward/Reverse Button
- Torque Adjust Collar
- Dual Range Gear Selector
- Keyless Chuck
- Battery
- Battery Release Button
- LED Work Light
Use

Warning! Let the tool work at its own pace. Do not overload.
Charging the battery (Fig. A)
The battery needs to be charged before first use and whenever it fails to produce sufficient power on jobs that were easily done before.
The battery may become warm while charging; this is normal and does not indicate a problem.

Warning! Do not charge the battery at ambient temperatures below 10 °C or above 40 °C. Recommended charging temperature: approx. 24 °C.
Note: The charger will not charge a battery if the cell temperature is below approximately 10 °C or above 40 °C. The battery should be left in the charger and the charger will begin to charge automatically when the cell temperature warms up or cools down.
Note: To ensure maximum performance and life of lithium-ion battery packs, charge the battery pack fully before first use.
- Plug the charger (9) into an appropriate outlet before inserting battery pack (6).
- The green charging light (9a) will blink continuously indicating that the charging process has started.
- The completion of charge will be indicated by the green charging light (9a) remaining ON continuously. The battery pack (6) is fully charged and may be removed and used at this time or left in the charger.
- Charge discharged batteries within 1 week. Battery life will be greatly diminished if stored in a discharged state.
Charger LED Modes
Indicators for all chargers except SC120

Charging


Fully Charged


Hot/Cold Pack Delay


Only SC120 Charger Indicators


Charging


Fully Charged


Hot/Cold Pack Delay


Note: The compatible charger(s) will not charge a faulty battery pack. The charger will indicate a faulty battery pack by refusing to light.
Note: This could also mean a problem with a charger. If the charger indicates a problem, take the charger and battery pack to be tested at an authorized service centre.
Leaving the battery in the charger
The charger and battery pack can be left connected with the LED glowing indefinitely. The charger will keep the battery pack fresh and fully charged.
Hot/Cold Pack Delay
When the charger detects a battery that is too hot or too cold, it automatically starts a Hot/Cold Pack Delay, the green LED (9a) will flash intermittently, while the red LED (9b) will remain on continuously, suspending charging until the battery has reached an appropriate temperature. The charger then automatically switches to the pack charging mode. This feature ensures maximum battery life.
Battery state of charge indicator (Fig. B)
The battery includes a state of charge indicator to quickly determine the extent of battery life as shown in figure B. By pressing the state of charge button (6a) you can easily view the charge remaining in the battery as illustrated in figure B.

natural_image
Pure electrical circuit symbol for battery, no text or labels presentWall Mounting
Some STANLEY FATMAX chargers are designed to be wall mountable or to sit upright on a table or work surface. If wall mounting, locate the charger within reach of an electrical outlet, and away from a corner or other obstructions which may impede air flow. Use the back of the charger as a template for the location of the mounting
screws on the wall. Mount the charger securely using drywall screws (purchased separately) at least 1"
(25.4 mm) long, with a screw head diameter of 0.28–0.35" (7–9 mm), screwed into wood to an optimal depth leaving approximately 7/32" (5.5 mm) of the screw exposed. Align the slots on the back of the charger with the exposed screws and fully engage them in the slots.
NOTE: Do not attempt to mount SC120 charger under a bench or table.
NOTE: Only mount SC120 charger with the charging lights pointed upward toward the ceiling.
Installing and Removing the Battery Pack from the tool

Warning! Make certain the lock-off button is engaged to prevent switch actuation before removing or installing battery.
To install battery pack (Fig. C)
- Insert battery pack firmly into tool until an audible click is heard as shown in figure C. Ensure battery pack is fully seated and fully latched into position.
To remove battery pack (Fig. D)
- Depress the battery release button (7) as shown in figureD and pull battery pack out of tool.
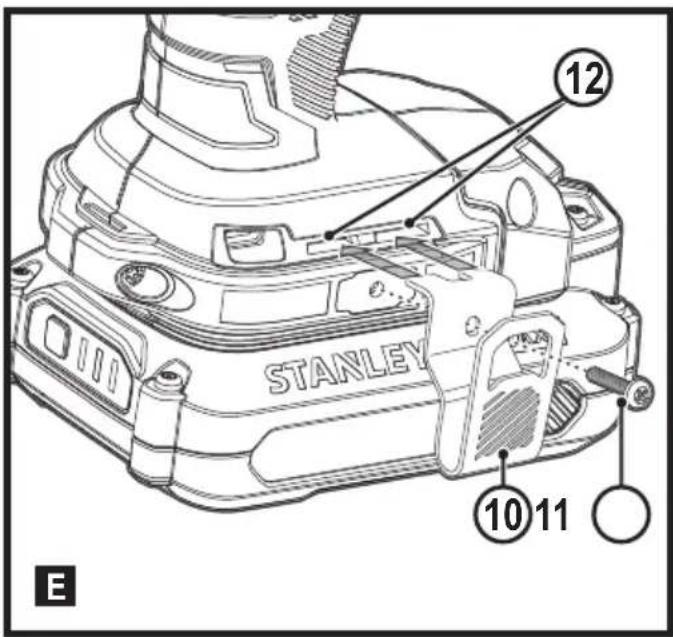
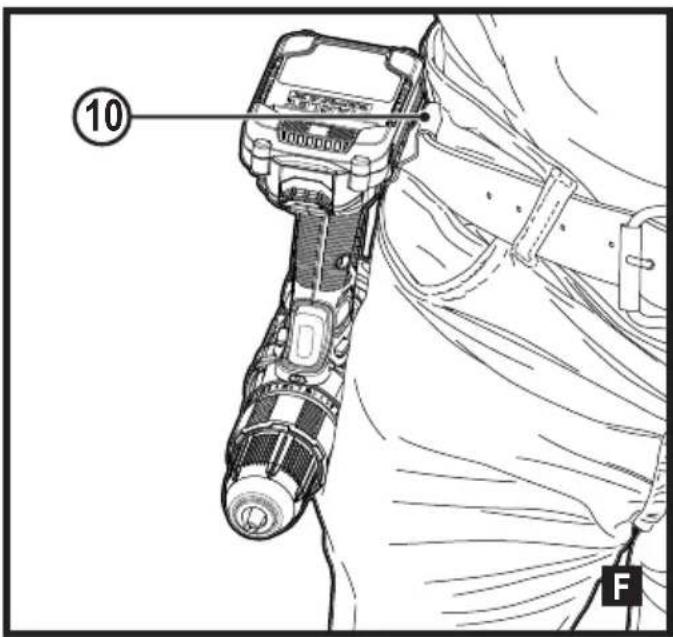
Belt hook (Optional extra) (Fig. E, F)

Warning! To reduce the risk of serious personal injury, place the forward/reverse button in the lock-off position or turn tool off and disconnect battery pack before making any adjustments or removing/installing attachments or accessories. An accidental start-up can cause injury.

Warning! To reduce the risk of serious personal injury, ONLY use the tool's belt hook (10) to hang the tool from a work belt. DO NOT use the belt hook for tethering or securing the tool to a person or object during use. DO NOT suspend tool overhead or suspend objects from the belt hook.

Warning! To reduce the risk of serious personal injury, ensure the screw (11) holding the belt hook is secure.
Note: When attaching or replacing the belt hook (10), use only the screw (11) that is provided. Be sure to securely tighten the screw.
The belt hook (10) can be attached by sliding into the slots (12) on either side of the tool using only the screw (11) provided, to accommodate left- or right-handed users. If the hook is not desired at all, it can be removed from the tool. To move the belt hook, remove the screw (11) that holds the belt hook (10) in place then reassemble on the opposite side. Be sure to securely tighten the screw (11).
Note: Various trackwall hooks and storage configurations are available.
Please visit our website www.stanleytools.eu/3 for further information.
Keyless chuck (Fig. G)

Warning! Make certain the battery pack is removed to prevent tool actuation before installing or removing accessories.
To insert a drill bit or other accessory:
- Grasp the chuck (5) and rotate it in the counterclockwise direction, as viewed from the chuck end.
- Insert the bit or other accessory (13) fully into the chuck, and tighten securely by rotating the chuck in the clockwise direction as viewed from the chuck end.

Warning! Do not attempt to tighten or loosen drill bits (or any other accessory) by gripping the front part of the chuck and turning the tool on.
Damage to the chuck and personal injury may occur when changing accessories.
Trigger switch & forward/reverse button (Fig H)
- The drill is turned ON and OFF by pulling and releasing the trigger switch (1) shown in figure H. The farther the trigger is depressed, the higher the speed of the drill.
- A forward/reverse control button (2) determines the rotational direction of the tool and also serves as a lock off button.
- To select forward rotation, release the trigger switch and depress the forward/reverse control button on the right side of the tool.
- To select reverse, depress the forward/reverse control button on the left side of the tool.
- The center position of the control button locks the tool in the off position. When changing the position of the control button, be sure the trigger is released.
Adjusting torque control (Fig I)
This tool is fitted with a torque adjustment collar (3) to select the operating mode and to set the torque for tightening screws. Large screws and hard workpiece materials require a higher torque setting than small screws and soft workpiece materials.
- For drilling in wood, metal and plastics, set the collar (3) to the drilling position symbol.
- For screwdriving, set the collar to the desired setting. If you do not yet know the appropriate setting, proceed as follows:
◆ Set the collar to the lowest torque setting.
◆ Tighten the first screw.
- If the clutch ratchets before the desired result is achieved, increase the collar setting and continue tightening the screw.
◆ Repeat until you reach the correct setting.
◆ Use this setting for the remaining screws.
Dual range switch (Fig J)
The dual range feature of your drill allows you to shift gears for greater versatility.
- To select low speed, high torque setting (position1), turn tool off and permit to stop. Slide gear shifter button (4) away from the chuck.
- To select the high speed, low torque setting (position 2), turn tool off and permit to stop. Slide gear shifter button back toward the chuck.
Note: Do not change gears when tool is running. If you are having trouble changing gears, make sure that the dual range gear button is either completely pushed forward or completely pushed back.
Screw driving
- For driving fasteners, the forward/reverse button should be pushed to the left.
- Use reverse (button pushed to the right) for removing fasteners.
Note: When moving from forward to reverse, or vice versa, always release the trigger switch first.
Drilling
- Use sharp drill bits only.
- Support and secure work properly, as instructed in the Safety Instructions.
- Use appropriate and required safety equipment, as instructed in the Safety Instructions.
- Secure and maintain work area, as instructed in the Safety Instructions.
- Run the drill very slowly, using light pressure, until the hole is started enough to keep the drill bit from slipping out of it.
- Apply pressure in a straight line with the bit. Use enough pressure to keep the bit biting but not so much as to stall the motor or deflect the bit.
- Hold the drill firmly with two hands, one hand on the handle, and the other gripping the bottom around the battery area or the auxiliary handle if provided.
- DO NOT CLICK THE TRIGGER OF A STALLED DRILL OFF AND ON IN AN ATTEMPT TO START IT. DAMAGE TO THE DRILL CAN RESULT.
- Minimize stalling on breakthrough by reducing pressure and slowly drilling through the last part of the hole.
- Keep the motor running while pulling the bit out of a drilled hole. This will help reduce jamming.
- Make sure switch turns drill on and off.
Drilling in wood
Holes in wood can be made with the same twist drill bits used for metal or with spade bits. These bits should be sharp and should be pulled out frequently when drilling to clear chips from the flutes.
Drilling in metal
Use a cutting lubricant when drilling metals.
The exceptions are cast iron and brass which should be drilled dry. The cutting lubricants that work best are sulphurized cutting oil.
LED work light (Fig H)
When drill is activated by pulling the trigger switch (1), the integrated LED work light (8) will automatically illuminate the work area.
Note: The work light is for lighting the immediate work surface and is not intended to be used as a flashlight.
Troubleshooting
| Problem Possible cause | se Possible solution | |
| Unit will not start. Battery | pack not installed properly. | Check battery pack installation. |
| Battery pack not charged. | Check battery pack charging requirements. | |
| Unit starts immediately upon inserting battery | The switch has been left in the “on” position. | The switch must be moved to “off” to prevent the tool from immediately starting when battery is inserted. |
| Battery pack will not charge. | Battery pack not inserted into charger. | Insert battery pack into charger until LED lights. |
| Charger not plugged in. | Plug charger into a working outlet. | |
| Surrounding air temperature too hot or too cold. | Move charger and battery pack to a surrounding air temperature of above 45°C or below +40.5°C. | |
| Unit shuts off abruptly. | Battery pack has reached its maximum thermal limit. | Allow battery pack to cool down. |
| Out of charge. (To maximize the life of the battery pack it is designed to shutoff abruptly when the charge is depleted. | Place on charger and allow to charge. |
Maintenance
Your STANLEY tool has been designed to operate over a long period of time with a minimum of maintenance. Continuous satisfactory operation depends upon proper tool care and regular cleaning.
Your charger does not require any maintenance apart from regular cleaning.

Warning! Before performing any maintenance on the tool, remove the battery from the tool. Unplug the charger before cleaning it.
- Regularly clean the ventilation slots in your tool and charger using a soft brush or dry cloth.
- Regularly clean the motor housing using a damp cloth.
- Do not use any abrasive or solvent-based cleaner.
Protecting the environment

Separate collection. Products and batteries marked with this symbol must not be disposed of with normal household waste.
Products and batteries contain materials that can be
recovered or recycled reducing the demand for raw materials. Please recycle electrical products and batteries according to local provisions. Further information is available at www.2helpU.com.
Technical data
| SCD700 SCD708 | |||
| Voltage V | DC | 18V(20V MAX) | 18V(20V MAX) |
| No-load speed Min | -1 | 0-400/0-1500 0-400/0-1500 | |
| Max. torque Nm 50 52 | |||
| Chuck capacity mm 13 13 | |||
| Torque setting Position 23 23 | |||
| Max Drilling capacity | |||
| Steel/wood mm 13/35 13/35 | |||
| Weight kg 1.2 1.2 | |||
| Charger | SC125 | SC200 | SC400 | SC120 | |
| Input Voltage | V_AC | AR, B2 220VB3 120VBR BIVOLT(127V | 220V) | AR, B2 220VB3 120VBR 127V | AR, B2 220VB3 120VBR 127V | AR, B2 220VB3 120VBR BIVOLT(127V | 220V) |
| Output Voltage | V_DC | 18V(20V MAX) | 18V(20V MAX) | 18V(20V MAX) | 18V(20V MAX) |
| Current | A | 1.25 | 2 | 4 | 1.25 |
| Battery SB201 | SB202 | SB204 | SB206 | ||
| Voltage V | DC | 18V(20V MAX) | 18V(20V MAX) | 18V(20V MAX) | 18V(20V MAX) |
| Capacity | Ah | 1.5 | 2.0 | 4.0 | 6.0 |
| Type | Li-Ion | Li-Ion | Li-Ion | Li-Ion | |
SERVICE INFORMATION
STANLEY offers a full network of company-owned and authorized service locations. All STANLEY Service Centers are staffed with trained personnel to provide customers with efficient and reliable power tool service. For more information about our authorized service centers and if you need technical advice, repair, or genuine factory replacement parts, contact the STANLEY location nearest you or visit us at www.stanleytools-la.com.
Col. Santa Fé, Alvaro Obregón
- Uso pretendido
- Montaje en pared
- Fixação de parede
- Safety instructions
- General power tool safety warnings
- Save all warnings and instructions for future reference.
- Additional safety warnings for screwdrivers
- Safety of others
- Residual risks
- Labels on tool
- Position of date code
- Additional safety instructions for batteries and chargers
- Batteries
- Chargers
- Electrical safety
- Features
- Use
- Charging the battery (Fig. A)
- Charger LED Modes
- Leaving the battery in the charger
- Hot/Cold Pack Delay
- Battery state of charge indicator (Fig. B)
- Wall Mounting
- Installing and Removing the Battery Pack from the tool
- To install battery pack (Fig. C)
- To remove battery pack (Fig. D)
- Belt hook (Optional extra) (Fig. E, F)
- Keyless chuck (Fig. G)
- Trigger switch & forward/reverse button (Fig H)
- Adjusting torque control (Fig I)
- Dual range switch (Fig J)
- Screw driving
- Drilling
- Drilling in wood
- Drilling in metal
- LED work light (Fig H)
- Maintenance
- Protecting the environment
- SERVICE INFORMATION
Brand : STANLEY
Model : SCD700
Category : Heat gun