
EB60DSXB1 - Coffee maker Fisher & Paykel - Free user manual and instructions
Find the device manual for free EB60DSXB1 Fisher & Paykel in PDF.


| Product Type | Built-in Coffee Maker |
| Brand | Fisher & Paykel |
| Model | EB60DSXB1 |
| Dimensions (L x H x D) | 594 x 460 x 412 mm |
| Weight | 24 kg |
| Power Supply | 220-240 V~, 50/60 Hz, max 10A |
| Power Consumption | 1350 W |
| Pump Pressure | 15 bar |
| Water Tank Capacity | 1.8 L |
| Bean Container Capacity | Approx. 250 g (estimated) |
| Coffee Types | Espresso, Small Cup, Medium Cup, Large Cup, Mug |
| Taste Levels | Extra Mild, Mild, Normal, Strong, Extra Strong, Pre-ground |
| Adjustable Coffee Spout | Yes, height adjustable |
| Cappuccino System | Removable cappuccino maker with steam function |
| Hot Water Function | Yes, programmable quantity |
| Grinder Adjustment | Rotary knob, fine to coarse |
| Water Filter | Optional water softener filter (replace every 2 months) |
| Cleaning | Automatic rinse cycles, removable brewing unit, drip tray, waste container |
| Descaling | Required periodically; menu-guided procedure |
| Safety Features | Auto shut-off, child lock (via supervision), thermal protection, earthing required |
| Installation | Built-in, requires minimum cabinet dimensions (see manual) |
Frequently Asked Questions - EB60DSXB1 Fisher & Paykel
User questions about EB60DSXB1 Fisher & Paykel
0 question about this device. Answer the ones you know or ask your own.
Ask a new question about this device
Download the instructions for your Coffee maker in PDF format for free! Find your manual EB60DSXB1 - Fisher & Paykel and take your electronic device back in hand. On this page are published all the documents necessary for the use of your device. EB60DSXB1 by Fisher & Paykel.
USER MANUAL EB60DSXB1 Fisher & Paykel
Built-in coff ee maker
嵌入式咖啡机
Installation instructions
and User guide
EB60DSXB model
EB60DSXB型
安装说明
和用户指南
NZ AU GB IE CN
Contents
Safety and warnings 2
Electrical connection (GB IE only) 5
Installation instructions 6
Introduction 10
Using the appliance for the first time 14
Turning on and heating up 17
Making coffee using coffee beans 18
Making espresso coffee with pre-ground coffee 20
Making cappuccino (using the steam function) 21
Cleaning 22
Changing and setting menu parameters 25
Displayed messages 30
Troubleshooting 32
Warranty and service 35
Important!
Save these instructions
The models shown in this user guide may not be available in all markets and are subject to change at any time. For current details about model and specification availability in your country, please visit our local website listed on the back cover or contact your local fisher & paykel dealer.
Your safety is important to us. Please read this information before using your coffee maker.
WARNING!

Cut Hazard
Take care – panel edges are sharp.
Failure to use caution could result in injury or cuts.
Important safety instructions!
- This is a household appliance only. It is not intended to be used in:
- staff kitchen areas in shops, offices and other working environments;
- farm houses;
- by clients in hotels, motels and other residential type environments;
- bed and breakfast type environments.
- Never touch the appliance with damp hands.
- Never touch the plug with damp hands.
- Make sure the socket used is freely accessible at all times, enabling the appliance to be unplugged when necessary.
Important safety instructions!
- If the appliance is faulty, do not attempt to repair. Turn it off using the main switch, unplug from the mains socket and contact Customer Care.
- Keep all packaging (plastic bags, polystyrene foam) away from children.
Children of less than 8 years old must be kept away from the appliance unless continuously supervised. This appliance can be used by children aged from 8 years and above, and persons with reduced physical, sensory or mental capabilities or lack of experience and knowledge, if they have been given supervision or instruction concerning the use of the appliance in a safe way and they understand the hazards involved. Cleaning and user maintenance shall not be done by children without supervision. - This appliance produces hot water and steam may form while it is in operation. Avoid contact with splashes of water or hot steam. Use knobs and handles.
- Do not grasp the coffee maker when it is out of the cabinet. Do not rest receptacles containing liquids or inflammable or corrosive materials on top of the appliance. Place the accessories required to make the coffee (the measure for example) in the special holder. Do not rest large objects which could obstruct movement or unstable objects on the appliance.
Important safety instructions!
- Do not use the appliance when extracted. Make sure the appliance is inactive before extracting it. The only exception is adjusting the coffee mill which must be done with the machine out (see the section “Adjusting the coffee mill”).
- Use original or manufacturer recommended accessories and spare parts only.
- This appliance is designed and made to prepare coffee and other hot drinks.
- All other use is considered improper.
- This appliance is not suitable for commercial use.
The manufacturer is not liable for damage deriving from improper use of the appliance. - This appliance can be installed over a built-in oven if the latter is fitted with a cooling fan at the rear (maximum microwave power: 3 kW).
- The appliance has a cooling fan. This comes on whenever coffee, steam or hot water is delivered. After several minutes, the fan goes off automatically.
For Great Britain only
Important!
This appliance must be earthed.
Fuse replacement
The mains lead of this appliance is fitted with a BS 1363A 13 A fused plug. To change a fuse in this type of plug, use an ASTA approved fuse to BS 1362 type and proceed as follows:
1 Remove the fuse cover and fuse.
2 Fit the replacement 13A fuse into the fuse cover.
3 Refit both into plug.
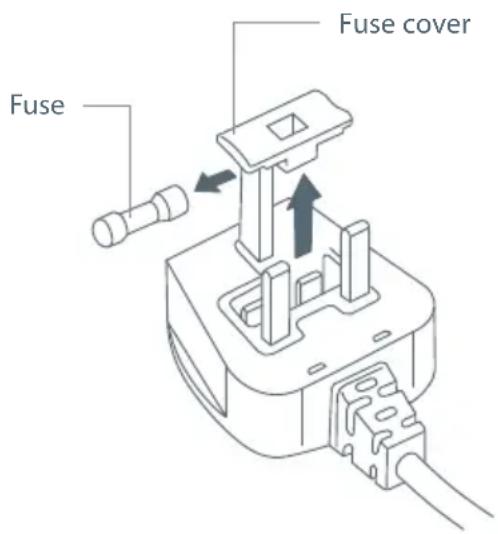
Important!
The fuse cover must be refitted when changing a fuse and if the fuse cover is lost, the plug must not be used until a correct replacement is fitted.
- Correct replacements are identified by the colour insert or the colour embossed in words on the base of the plug.
■ Replacement fuse covers are available from your local electrical store.
For the Republic of Ireland
The information given in respect to Great Britain will frequently apply, but a third type of plug and socket is also used: the 2-pin, side earth type.
Socket outlet / plug (valid for both countries)
If the fitted plug is not suitable for your socket outlet, please contact an Authorised Service Agent. Please do not attempt to change the plug yourself. This procedure must be carried out by a qualified service technician in compliance with the manufacturer's instructions and current standard safety regulations.
Checking for transport damage
After removing the packaging, make sure the product is complete and undamaged and that all accessories are present. Do not use the appliance if it is visibly damaged. Contact Customer Care.
Installing and connecting the appliance
Important!
Installation must be performed by a qualified professional in compliance with legislation in force in the country of installation (see Built-in installation).
This appliance should be connected to a circuit which incorporates an isolation switch providing full disconnection from the power supply.
The packing elements (plastic bags, polystyrene foam, etc.) should be kept out of reach of children.
Do not install the appliance in rooms where the temperature may drop to 0°C or lower.
- Customise the water hardness as soon as possible following the instructions in section 'Changing and setting menu parameters', under "Setting water hardness".
- Check that the mains power supply voltage corresponds to the value indicated on the rating plate on the bottom of the appliance.
- Connect the appliance to an efficiently earthed and correctly installed socket with a minimum current rating of 10A only.
If the power socket does not match the plug on the appliance, have the socket replaced with a suitable type by a qualified professional.
To comply with safety directives, an omnipolar switch with a minimum contact distance of 3 mm must be installed.
- Do not use multiple sockets or extensions.
Safety cutout devices must be included in the mains power supply in compliance with the installation regulations in the country concerned.
Disposal
Electrical appliances must not be disposed of as household waste.
Appliances with this symbol are covered by European Directive 2002/96/EC.
All unused electric and electronic appliances must be disposed of separately from household waste by taking them to state authorised special centres. Disposing of the unused appliance correctly avoids damage to the environment and a risk to health. For more information on disposing of the unused appliance, contact the local administration, the waste disposal department or the shop where the appliance was bought.
Technical specification
Voltage: 220-240 V\~ 50/60 Hz max. 10A Absorbed power: 1350 W
Pressure: 15 bars Water tank capacity: 1.8 litres
Size LxHxD: 594x460x412 mm Weight: 24 kg
Built-in installation
Verify the minimum measurements required for correct installation of the appliance.
The coffee maker must be installed in a column and the column must be firmly fixed to the wall with commercially available brackets.
Important!
All installation or maintenance operations must be performed with the appliance disconnected from the mains electricity supply.
Kitchen furniture in direct contact with the appliance must be heat resistant (65°C min).
To guarantee correct ventilation, leave a gap at the bottom of the cabinet (see measurements in figure).

Note:
If you are installing an appliance directly over another, you have the option of using a black metal shelf cover to conceal the shelf front that would be visible between the two appliances. This can be purchased as a separate accessory and needs to be fitted before the lower grill kit and/or appliance is installed. Refer to the instructions packed with the shelf cover accessory kit.
Installation option A: Coffee maker by itself Installation option B: Coffee maker with
lower grill kit - this is to match the height of adjacent appliances
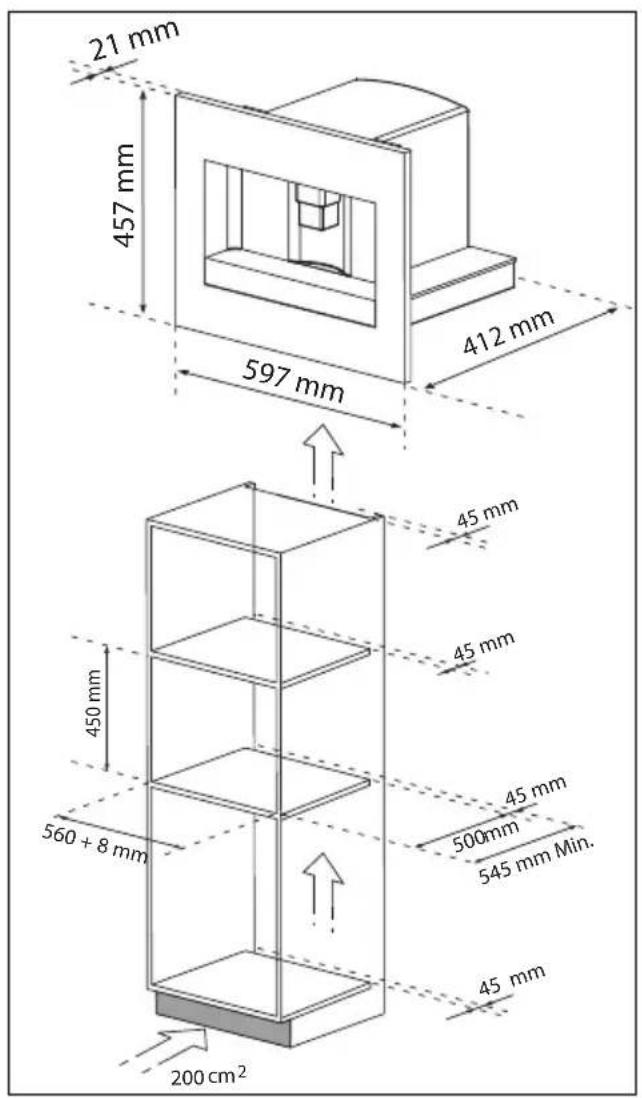

Important!
If you choose Installation option B, you will need to install the lower grill kit BEFORE you install the coffee maker. Refer to the instructions packed with the lower grill kit.

Position the rails on the sides of the cabinet as shown in the figure. Fix with the screws, then extract them completely. If the coffee maker is installed over a warmer drawer, use the top surface of this as a reference to position the rails. In this case, there will be no surface to rest the rails on.

Position the appliance on the rails, making sure the pins are correctly inserted in the housings, then fix it with the screws supplied.
If the height of the appliance requires adjusting, use the spacer disks provided.
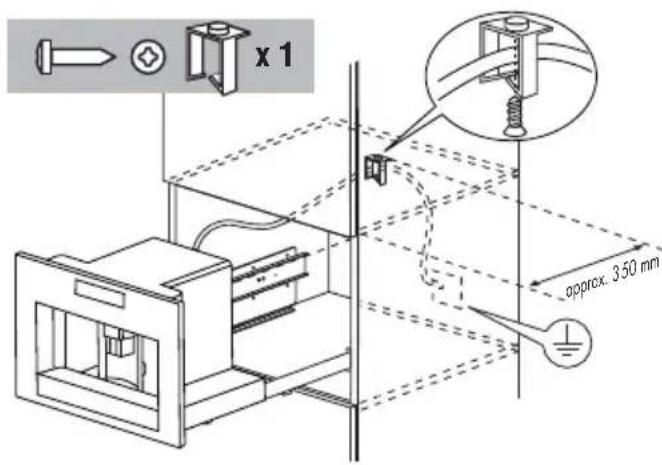
Fix the power cable with the clip. The power cable must be long enough to allow the appliance to be extracted from the cabinet to fill the coffee bean container.
The appliance must be earthed in compliance with legislation.
Electrical connections must be performed by a qualified electrician following the instructions.

If necessary, correct alignment of the appliance by positioning the spacers supplied under or at the sides of the support.
Product overview
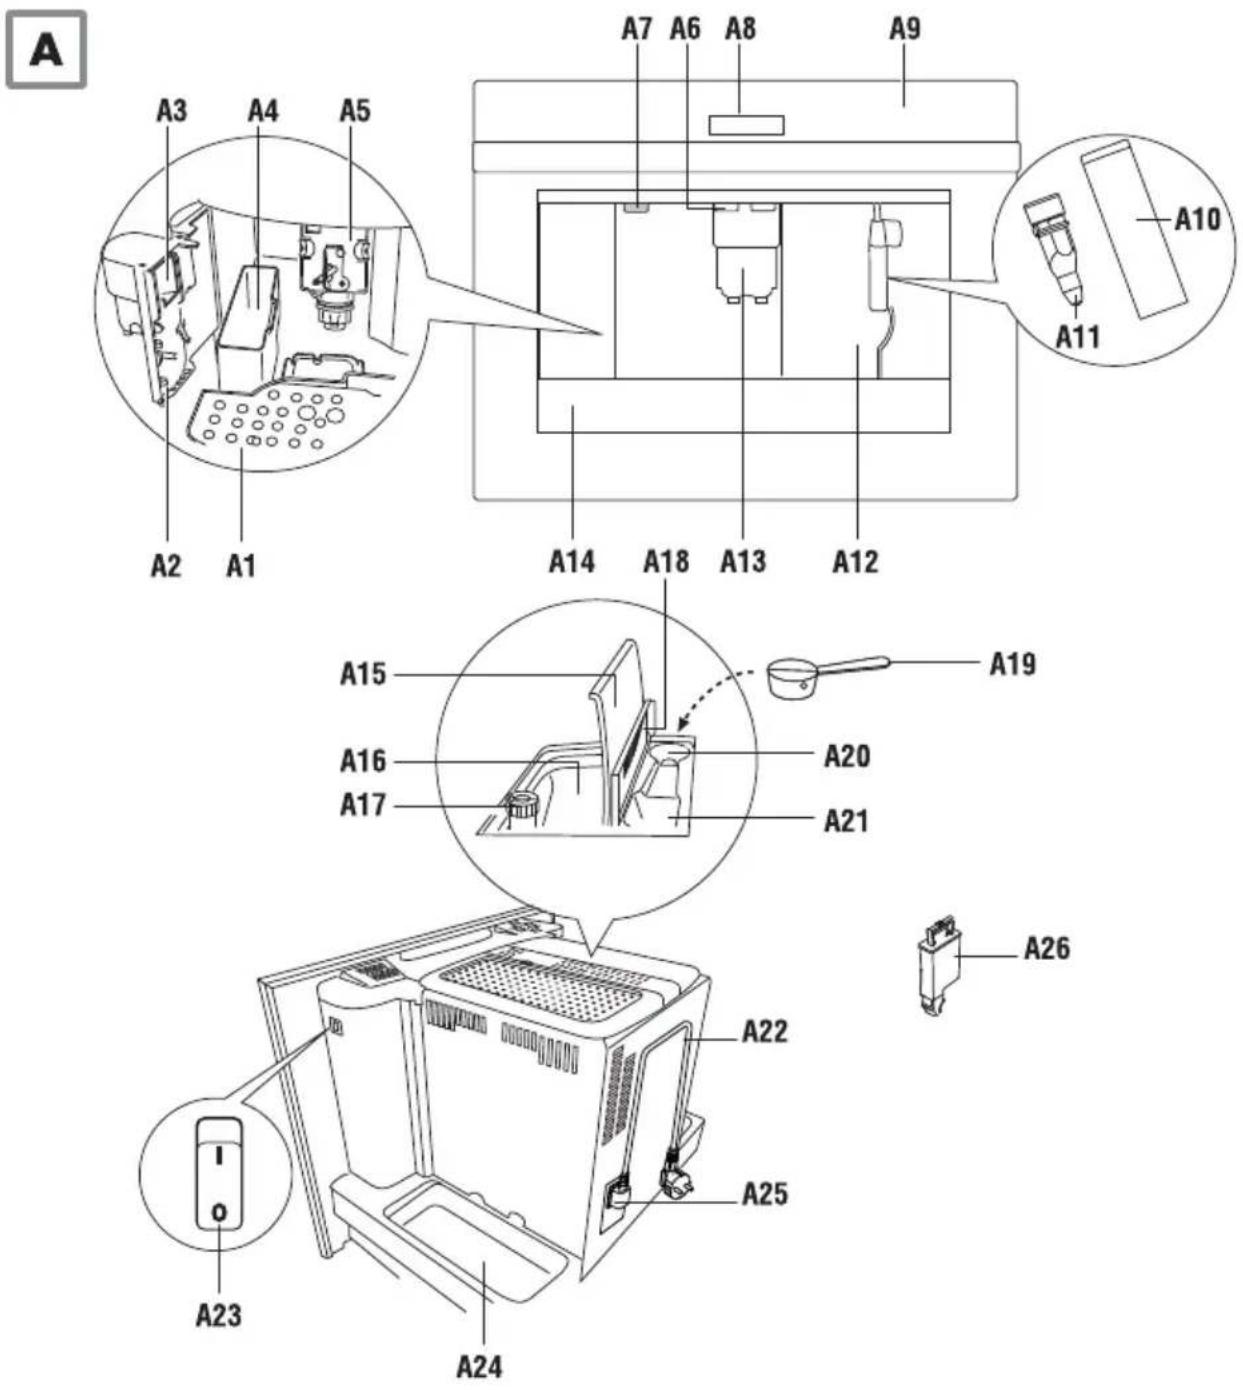
Touch controls overview
Product Overview descriptions
A1. Cup tray
A2. Service door
A3. Coffee guide
A4. Waste coffee container
A5. Brewing unit
A6. Cup tray lights
A7. On/OFF/stand-by button
A8. Display
A9. Control panel
A10. Cappuccino maker (removable)
A11. Cappuccino maker nozzle
A12. Water tank
A13. Coffee spout (adjustable height)
A14. Drip tray
A15. Bean container lid
A16. Bean container
A17. Grinding adjustment knob
A18. Pre-ground coffee funnel door
A19. Measure
A20. Compartment for measure
A21. Pre-ground coffee funnel
A22. Power cable
A23. Main switch
A24. Tray
A25. IEC connector
A26. Water softener filter (optional)
Description of the control panel
Only the icons available in the function currently being used will be lit on the touch screen.
A light touch is enough to activate the icon.
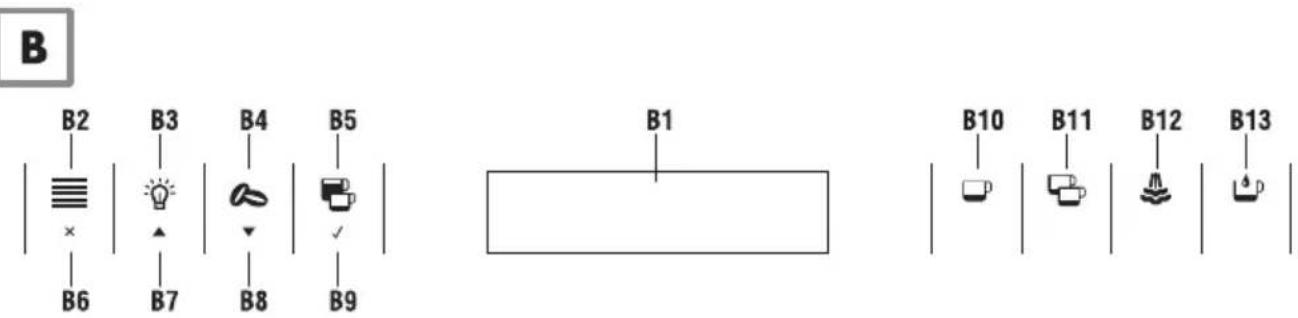
B1. Display: guides the user in using the appliance.
B2. ≡ icon to activate or deactivate menu parameter setting mode
B3. 🙏 icon to turn lights A6 on and off
B4. 🔗 icon to select the coffee taste
B5. 📋, icon to select the type of coffee (espresso, small cup, medium cup, large cup, mug)
B6. ESC icon (x) to exit the selected mode
B7-B8. ▲▼ icons to scroll forwards or backwards through the menu and display the various modes
B9. OK icon ( ) to confirm the selected function
B10. □ icon to deliver a cup of coffee
B11. 📋 icon to deliver two cups of coffee
B12. 🔊 icon to deliver steam
B13. 📁 icon to deliver hot water

Using the appliance for the first time
- Coffee has been used to factory test the appliance and it is therefore completely normal for there to be traces of coffee in the mill.
- Customise water hardness as soon as possible following the instructions in section 'Changing and setting menu parameters', under "Setting water hardness".
1 Connect the appliance to the mains supply. Set the required language.
2 To set the language, use the icons (B7 and B8) to choose the required language (fig. 2). When the message "PRESS OK TO CHOOSE ENGLISH" is displayed, press the OK icon (B9) (fig. 3) for 3 seconds until "ENGLISH INSTALLED" is displayed. If you set the wrong language, follow the instructions in section 'Changing and setting menu parameters', under "Setting the language". If your language is not available, select one from those displayed. The instructions refer to the English version. Then follow the instructions displayed:
3 After 5 seconds, the appliance displays "FILL TANK". Extract the water tank (fig. 4), rinse and fill with fresh water without exceeding the MAX line. Replace and push as far as it will go. A water softener filter can be installed in the tank (fig. 29).
4 Place a cup under the cappuccino maker (fig. 5). The appliance displays: "HOT WATER PRESS OK". Press the OK icon (B9) (fig. 3) and after a few seconds a little water comes out of the cappuccino maker.
5 The machine now displays "TURNING OFF... PLEASE WAIT" and goes off.
6 Extract the appliance by pulling it out using the handles (fig. 6). Open the lid and fill the container with coffee beans, then close the lid and push the appliance in.
The coffee maker is now ready for normal use.
Important!
Never introduce pre-ground coffee, freeze dried coffee, caramelised beans or anything else which could damage the appliance.
When using the appliance for the first time, you need to make 4-5 cups of coffee and 4-5 cappuccinos before the appliance gives satisfactory results.
Each time you turn the coffee maker on by the ON/OFF switch (A23), it performs a SELF-DIAGNOSIS cycle and then goes off. To turn it on again, press the ON/OFF button (A7) (fig. 1)
Installing the filter
Some models are fitted with a water softener filter to improve the quality of the water used and extend the working life of the appliance.
To install, proceed as follows:
1 Remove the filter from the packaging;
2 Slide the date indicator pointer (see fig. 29) until the months of use are displayed.
Note: The filter lasts about two months if the appliance is used normally. If the coffee maker is left unused with the filter installed, it will last a maximum of three weeks.
3 Fill the tank with a little water up to the level shown:
4 Insert the filter in the water tank and press it until it touches the bottom of the tank (see fig. 29);
5 Fill the water tank and insert in the coffee maker;
6 Place a container underneath the cappuccino maker (min. capacity: 100 ml).
7 Press the icon (B2) to enter the menu;
8 Press the ▼ icons (B7) and (B8) until "INSTALL FILTER" is displayed;
9 Press the OK icon (B9);
10 The message "INSTALL FILTER PLEASE CONFIRM" is displayed.
11 Press the OK ICON (B9) to confirm the selection (or ESC (B6) to cancel). "HOT WATER PRESS OK" is displayed.
12 Press the OK icon (B9) again. The appliance begins delivering hot water and the message "PLEASE WAIT..." is displayed. When delivery stops, the appliance automatically displays the basic modes set again.
Note: The appliance may request the operation to be repeated a number of times until the air is completely eliminated from the hydraulic circuit.

natural_image
Simple line drawing of a container with a side outlet and a small screw on the side (no text or symbols)Replacing the filter ("FILTER RESET")
When "REPLACE FILTER" is displayed or after 2 months of use (see date indicator), the filter must be replaced:
1 Remove the exhausted filter;
2 Remove the new filter from the packaging.
3 Slide the pointer of the date indicator (see fig. 29) until the months of use are displayed (the filter lasts about 2 months);
4 Insert the filter in the water tank and press it until it touches the bottom of the tank (see fig. 29);
5 Fill the water tank and insert in the coffee maker;
6 Turn the cappuccino maker outwards and place a container underneath (min. capacity 100 ml).
7 Press the icon (B2) to enter the menu;
8 Press the ▼ icons (B7) and (B8) until "FILTER RESET" is displayed;
9 Press the OK icon (B9);
10 The message "FILTER RESET CONFIRM" is displayed.
11 Press the OK icon (B9) to confirm the selection (or ESC (B6) to cancel). "HOT WATER PRESS OK" is displayed.
12 Press the OK icon (B9) again. The appliance begins delivering hot water and the message "PLEASE WAIT..." is displayed. When delivery stops, the appliance automatically displays the basic modes set again.
Removing the filter
To use the appliance without a filter, you must remove it and notify the appliance of its removal as follows:
1 Press the icon (B2) to enter the menu;
2 Press the icons (B7) and (B8) until "INSTALL FILTER" is displayed;
3 Press the OK icon (B9);
4 The message "INSTALL FILTER* CONFIRM" is displayed.
5 Press the ESC icon (B6).
6 When the asterisk has disappeared from the top right of the display, press ESC (B6) to exit the menu.
Note: Use the filters recommended by the manufacturer only. Use of unsuitable filters could damage the appliance.
Each time the appliance is turned on, it performs an automatic preheat and rinse cycle which cannot be interrupted. The appliance is ready for use only after completion of this cycle.
Important!
Be careful. During rinsing, a little hot water flows from the coffee spouts.
To turn the appliance on, press the ON/OFF/stand-by button (A7) (fig. 1). The message "HEATING UP... PLEASE WAIT" is displayed.
When heating is complete, the message changes to "RINSING"; The appliance is at temperature when the message "MEDIUM CUP NORMAL TASTE" is displayed. If no icon is pressed within about 2 minutes, the time (if set, see the "Setting the clock" section) is displayed.
If the time has not been set, the appliance displays the last functions set. When any icon is pressed, "MEDIUM CUP NORMAL TASTE" is displayed again. The appliance is ready to make coffee again.
1 The appliance is preset to make coffee with a normal taste. You can also choose coffee with an extramild, mild, strong or extra-strong taste. There is also a pre-ground coffee option.
To choose the required taste, press the 🔺 icon (B4) (fig. 7). The required coffee taste is displayed.
2 Place 1 cup under the spouts to make 1 coffee (fig. 8) or 2 cups for 2 coffees (fig. 9). Lower the spouts as near as possible to the cup for a creamier coffee (fig. 10).
3 Press the 📄 icon (B5) (fig. 11) to select the type of coffee: espresso, small cup, medium cup, large cup, mug. Now press the 📄 icon (B10) (fig. 12) if you want to make a coffee and the 📄 icon (B11) (fig. 13) if you want to make 2 coffees. The appliance now grinds the beans and starts delivering the coffee into the cup.
Once the set amount of coffee has been delivered, the machine stops delivery automatically and expels the exhausted waste coffee into the waste coffee container.
4 After a few seconds, the appliance is ready for use again.
5 To turn the appliance off, press the ON/OFF/stand-by button (A7) (fig. 1). (Before going off, the appliance performs an automatic rinse cycle. Take care to avoid scalds).
If the coffee is delivered a drop at a time or not at all, see the "Adjusting the coffee mill" section.
If the coffee is delivered too fast and the cream is not satisfactory, see the "Adjusting the coffee mill" section.
Tips for a hotter coffee
Proceed as described in the section "Changing and setting menu parameters", "Rinse" function.
■ Unless preheated, do not use excessively thick cups as they will absorb too much heat.
■ Preheat the cups by rinsing them with hot water.
- Coffee delivery can be interrupted at any moment by re-pressing the previously selected icon which remains lit during the operation.
As soon as delivery is finished, to increase the quantity of coffee in the cup, just keep pressing the previously selected icon within 3 seconds after delivery has finished.
- When the appliance displays "FILL TANK", fill the tank with water or the appliance will not deliver coffee. (It is normal for there to be a little water left in the tank).
■ After about 14 single (or 7 double) coffees, the appliance displays "EMPTY WASTE COFFEE CONTAINER".
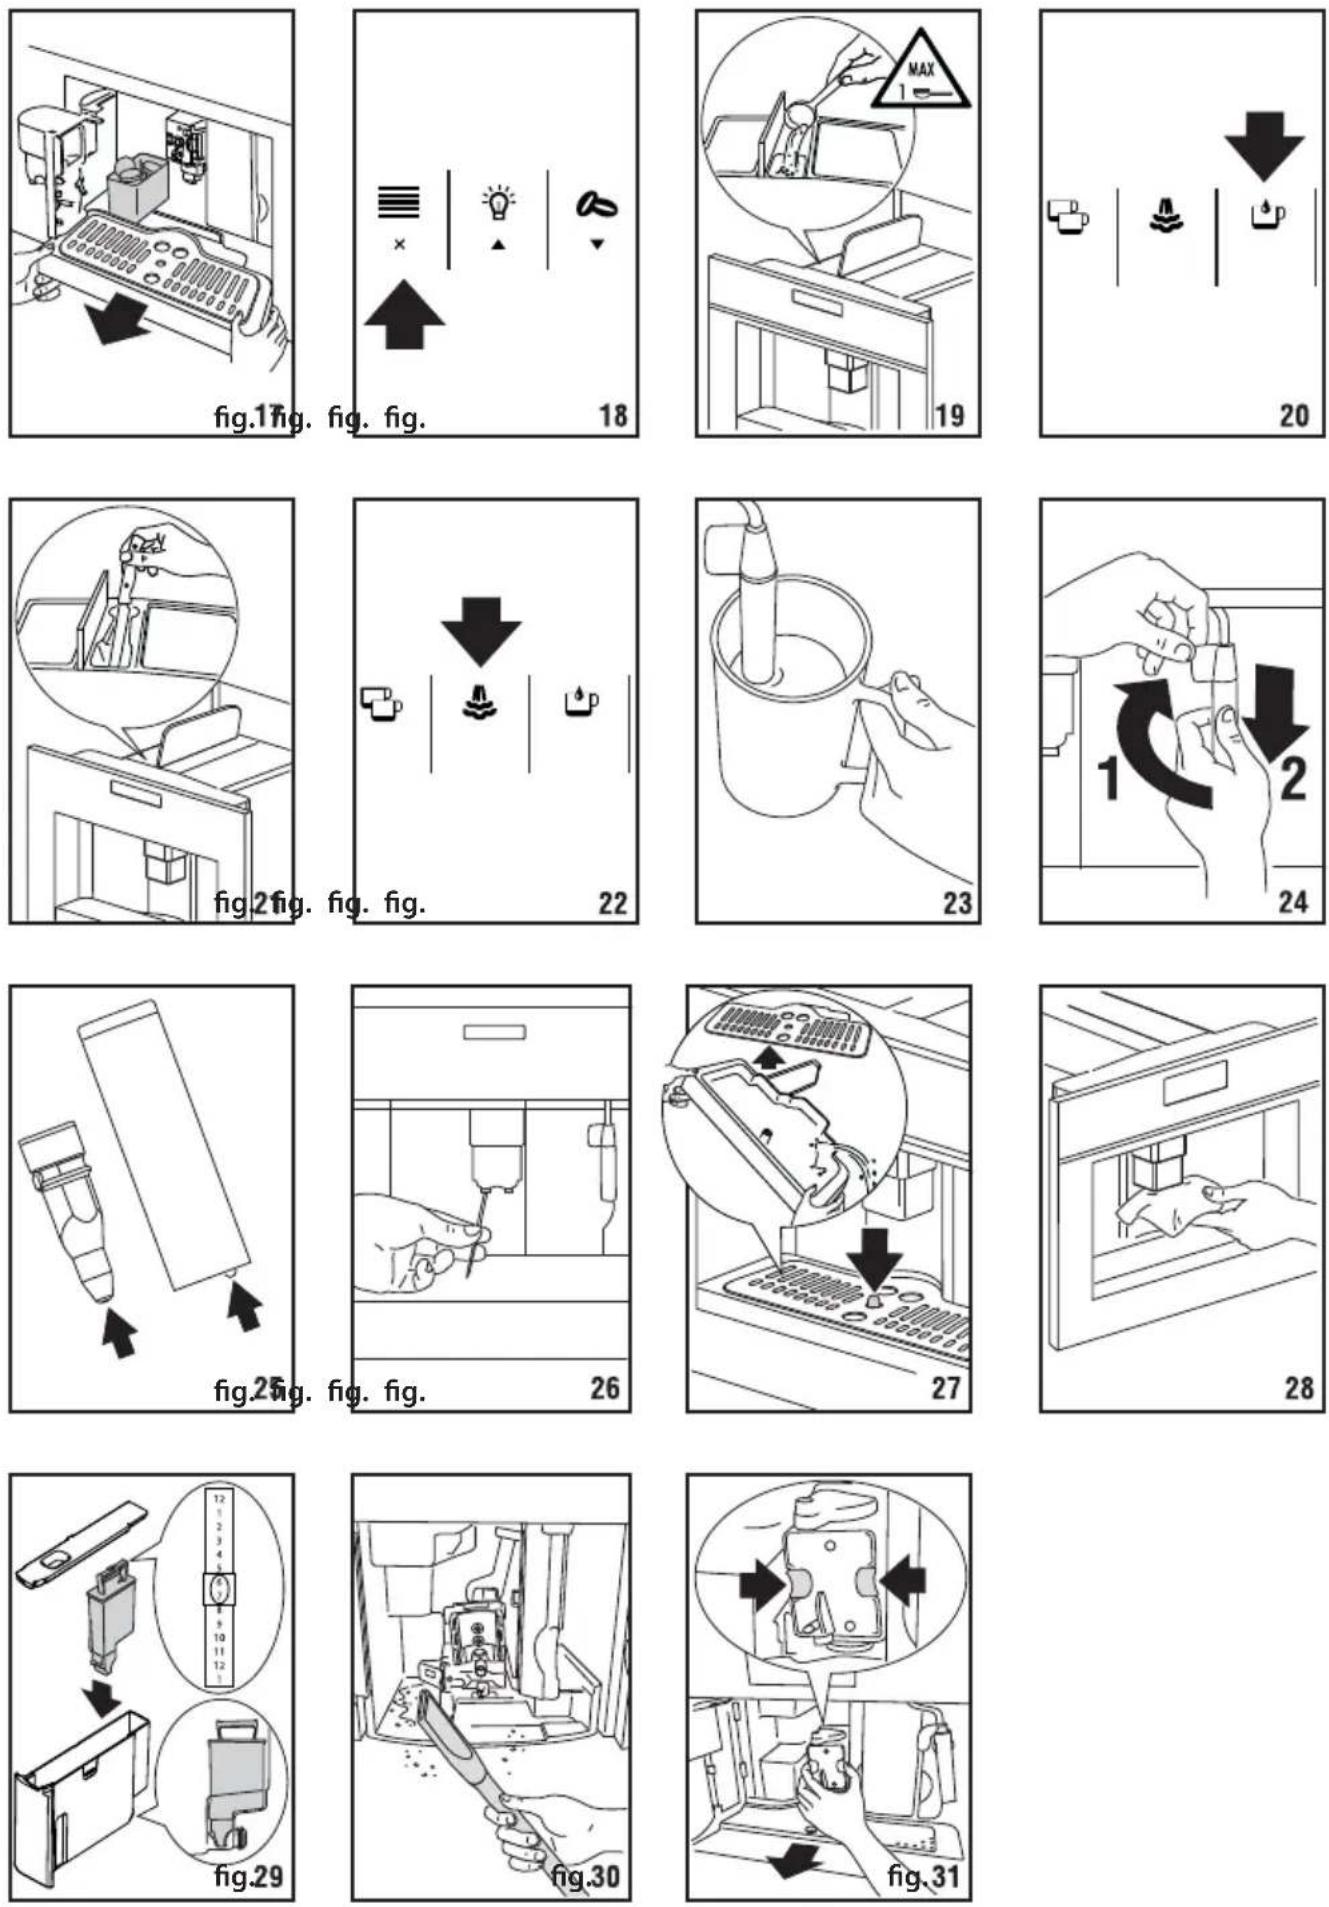
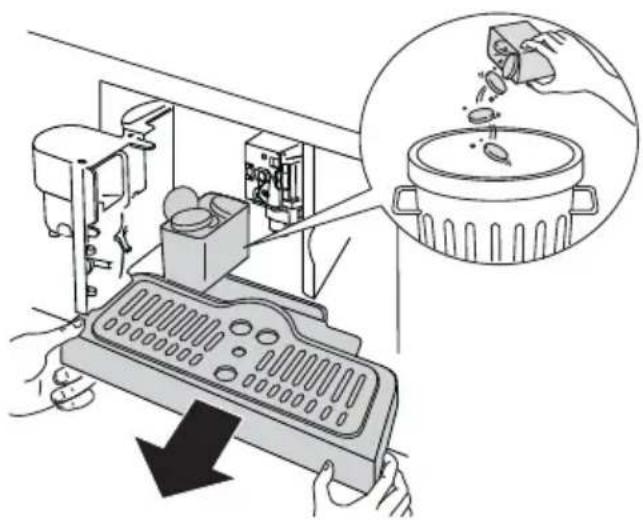
To clean, open the service door on the front of the appliance by pulling the spout (fig. 16), extract the drip tray (fig. 17) and clean. When cleaning, always extract the drip tray completely.
Important!
When extracting the drip tray, the waste coffee container MUST always be emptied. If this is not done, the machine may be clogged.
natural_image
Illustration of a kitchen appliance with a downward arrow indicating a drop, and an inset showing food being added (no text or symbols present)Never extract the water tank while the machine is delivering coffee. If it is removed, it will not be possible to make the coffee and the appliance will display “GROUND TOO FINE ADJUST MILL AND PRESS OK” and then “FILL TANK”. Check the level of water in the tank and replace in the appliance. To turn the machine on again, press the OK icon (B9). “HOT WATER PRESS OK” is displayed. Press the OK icon (B9) within a few seconds and deliver water from the cappuccino maker for about 30 seconds. When delivery stops, the basic modes are displayed again.
Note: The coffee maker may request the operation to be repeated a number of times until the air is completely eliminated from the hydraulic circuit.
Note: if this operation is not performed correctly or if the machine is turned off, the basic modes may be displayed, although the problem is in fact still present.
Changing the quantity of coffee in the cup
The appliance is set by default to automatically make the following types of coffee:
espresso
small cup
medium cup
large cup
mug
To change the quantity, proceed as follows:
1 Press the ≡ icon (B2) to enter the menu (fig. 15). Press the ▲▼icons (B7) and (B8) (fig. 2) until “PROGRAM COFFEE” is displayed.
2 Press the OK icon (B9).
3 Select the type of coffee you want to change by pressing the icons (B7) and (B8).
4 Press the OK icon (B9) to confirm the type of coffee you want to make.
5 Use the ▲▼ icons (B7) and (B8) to change the quantity of coffee. The progress bar shows the quantity of coffee selected.
6 Press the OK icon (B9) again to confirm (or the ESC icon (B6) to cancel the operation).
7 Press the ESC icon (B6) (fig. 18) twice to exit the menu.
The appliance is now reprogrammed with the new settings and is ready.
Adjusting the coffee mill
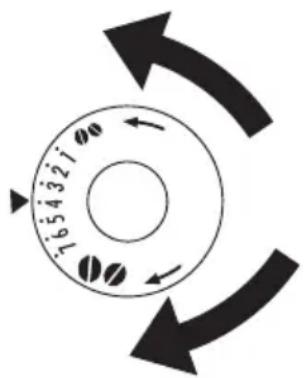
The coffee mill is preset in the factory and should not require adjusting. However, if after making the first few coffees you find that delivery is either too fast or too slow (a drop at a time), this can be corrected by adjusting the grinding adjustment knob (fig. 14).
Important!
The grinding adjustment knob must only be turned when the coffee mill is in operation.
For slower delivery and creamier coffee, turn one click anticlockwise (finer pre-ground coffee).
For faster delivery (not a drop at a time), turn one click clockwise (coarser pre-ground coffee).
1 Press the icon (B4) (fig. 7) and select the pre-ground coffee function.
2 Extract the machine by pulling it outwards using the handles.
3 Lift the central lid, place one measure of preground coffee in the funnel (fig. 19), push the appliance in then proceed as described in the section "Making coffee using coffee beans".
Note: you can make just one coffee at a time by pressing the icon (B10) (fig. 12).
4 After using the machine with pre-ground coffee, to go back to making coffee using beans, deactivate the pre-ground coffee function by pressing the 🔗 icon (B4) (fig. 7).
- Never introduce pre-ground coffee when the machine is off or it could spread through the inside of the appliance.
■ Never add more than 1 measure, otherwise the appliance will not make the coffee.
■ Use the measure provided only.
■ Introduce only pre-ground coffee for espresso coffee machines into the funnel.
If more than one measure of pre-ground coffee is used and the funnel clogs, push the coffee down with a knife (fig. 21) then remove and clean the brewing unit and machine as described in the “Cleaning the brewing unit” section.
Delivering hot water
■ Always make sure the appliance is ready.
■ Turn the cappuccino maker outwards and place a container underneath (fig. 5).
Press the icon (B13) (fig. 20). The appliance displays: "HOT WATER PRESS OK". Press the OK icon (B9) again and hot water is delivered from the cappuccino maker into the container underneath. You should not deliver hot water for more than 2 minutes at a time.
To interrupt, press the 📁 icon (B13) or the ESC icon (B6). The appliance stops delivery once the set quantity is reached.
natural_image
Circular dial with directional arrows indicating clockwise rotation (no text or symbols)Changing the quantity of hot water
The machine is set by default to automatically delivery 200 ml of hot water.
To change these quantities, proceed as follows:
1 Place a container underneath the cappuccino maker (fig. 3).
2 Press the icon (B2) to enter the menu (fig. 15) or press the icons (B7) and (B8) (fig. 2) until "PROGRAM HOT WATER" is displayed.
3 Press the OK icon (B9) to confirm.
4 Select the required quantity of water by pressing the ▲▼ icons (B7) and (B8). The progress bar shows the quantity of water selected.
5 Press the OK icon (B9) to confirm (or the ESC icon (B6) to cancel the operation.
6 Press the ESC icon (B6) (fig. 18) twice to exit the menu.
The appliance is now reprogrammed with the new settings and is ready.
1 Turn the cappuccino maker towards the centre (fig. 5).
2 Take a container, fill it with about 100 g of milk for each cappuccino to be made and place it under the cappuccino maker. In choosing the size of the receptacle, bear in mind that the milk doubles or triples in volume. You are recommended to use partially skimmed milk at refrigerator temperature.
3 Press the 🔊 icon (B12) (fig. 22). "STEAM PRESS OK" is displayed.
4 Press the OK icon (B9).
5 To interrupt steam delivery, press the icon (B12) again or the ESC icon (B6).
6 Immerse the cappuccino maker in the milk container (fig. 23), taking care not to immerse it for more than half its length. Press the 🔊 icon (B12) (take care to avoid scalds) and press the OK icon (B9). Steam comes out of the cappuccino maker. For a creamier froth, immerse the cappuccino maker in the milk and move the container with slow upward movements. You should not deliver steam for more than 2 minutes at a time.
7 When the required temperature is reached, interrupt steam delivery by pressing the icon (B12) again or the ESC icon (B6).
8 Make the coffee as described above using sufficiently large cups, then fill them with the frothed milk prepared previously.
Always clean the cappuccino system immediately after use.
Proceed as follows:
9 Press the icon (B12) and then press the OK button (B9) to discharge a small amount of steam for a few seconds. This empties the steam spout of all traces of milk.
To ensure the hygiene of the appliance, you are recommended to carry out this procedure each time you make cappuccino to avoid stale milk remaining in the circuit.
10 Wait for the cappuccino maker to cool down, then holding the cappuccino maker lever firmly in one hand, unscrew the cappuccino maker itself with the other, turning it anticlockwise and removing it downwards (fig. 24).
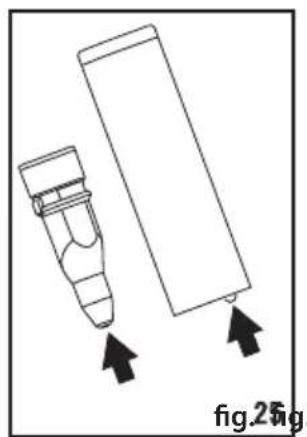
11 Remove the cappuccino maker nozzle by pulling it downwards.
12 Wash the cappuccino maker and nozzle thoroughly in hot water.
13 Make sure the two holes shown in figure 25 are not blocked. If necessary, clean with a pin.
14 Replace the nozzle by inserting it upwards into the cappuccino maker.
15 Replace the cappuccino maker by pushing it upwards and rotating it clockwise.
Important!
Important!
Important!
Before performing any cleaning operations, the machine must be turned off by pressing the main switch (A23) and unplugged from the mains power supply. Never immerse the coffee maker in water.
Cleaning the coffee maker
Do not use solvents or abrasive detergents to clean the coffee maker. A soft damp cloth will suffice. Never wash any of the components of the coffee maker in the dishwasher.
The following parts of the machine must be cleaned regularly:
■ Waste coffee container (A4).
Drip tray (A14).
Water tank (A12).
Coffee (A13), hot water (A11) and cappuccino maker spouts (A10).
■ Pre-ground coffee funnel (A21).
■ Inside of the machine, accessible after opening the service door (A2).
■ Brewing unit (A5).
Cleaning the waste coffee container
When "EMPTY WASTE COFFEE CONTAINER" is displayed, the waste coffee container must be emptied and cleaned. To clean:
1 Open the service door on the front of the appliance (fig. 16), extract the drip tray (fig. 17) and clean.
2 Clean the waste coffee container thoroughly.
Cleaning the drip tray
Important!
- When extracting the drip tray, the waste coffee container must always be emptied.
If the drip tray is not emptied the water might overflow. This could damage the machine. The drip tray is fitted with a level indicator (red) showing the level of water it contains (fig. 27). Before the indicator protrudes from the cup tray, the drip tray must be emptied and cleaned.
To remove the tray:
1 Open the service door (fig. 16).
2 Remove the drip tray and the waste coffee container (fig. 17).
3 Clean the drip tray and waste coffee container (A4).
4 Replace the drip tray and waste coffee container (A4).
5 Close the service door.
Cleaning the water tank
1 Clean the water tank (A12) regularly (about once a month) with a damp cloth and a little mild washing up liquid.
2 Remove all traces of washing up liquid.
Cleaning the spouts
1 Clean the nozzles periodically using a sponge (fig. 28).
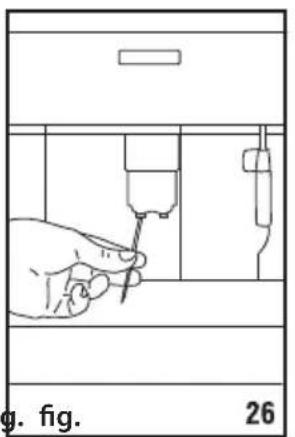
2 Check regularly that the holes in the coffee spout are not blocked. If necessary, remove coffee deposits with a toothpick (fig. 26).
Cleaning the pre-ground coffee funnel
- Check regularly (about once a month) that the pre-ground coffee funnel is not blocked (fig. 21).
Cleaning the inside of the coffee maker
1 Check regularly (about once a week) that the inside of the appliance is not dirty. If necessary, remove coffee deposits with a sponge.
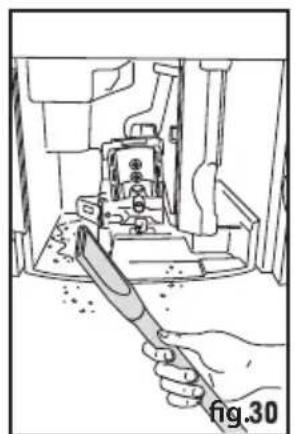
2 Remove the residues with a vacuum cleaner (fig. 30).
Cleaning the brewing unit
The brewing unit must be cleaned at least once a month.
Important!
The brewing unit (A5) must not be removed when the appliance is on. Do not use force to remove the brewing unit.
1 Make sure the machine is correctly turned off (see "Turning the appliance off").
2 Open the service door (fig. 16).
3 Remove the drip tray and waste coffee container (fig. 17);
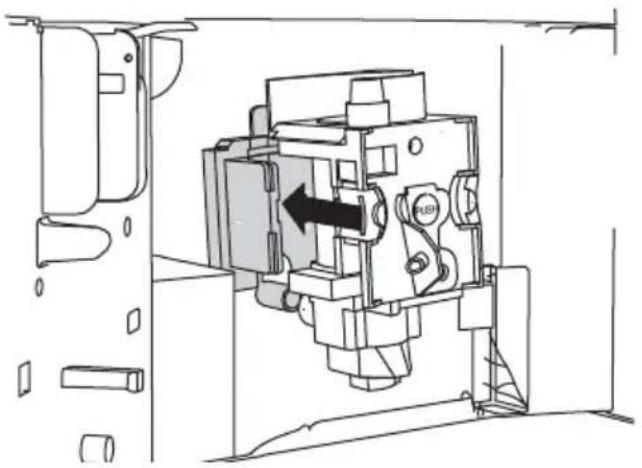
4 Press the two red release buttons inwards and at the same time pull the brewing unit outwards (fig. 31).
Important!
Do not use washing up liquid to clean the brewing unit. It would remove the lubricant applied to the inside of the piston.
5 Soak the brewing unit in water for about 5 minutes, then rinse.
6 After cleaning, replace the brewing unit (A5) by sliding it onto the internal support and pin at the bottom, then push the PUSH symbol fully in until it clicks into place.
Cleaning the brewing unit cont.
If the brewing unit is difficult to insert, you must first adapt it to the right dimensions by pressing it forcefully from the bottom and top as shown in the figure.
natural_image
Technical line drawing of a mechanical assembly with no visible text or symbols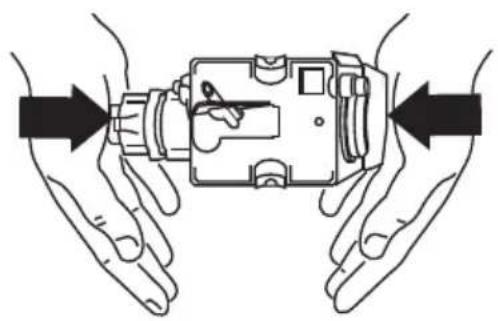
natural_image
Illustration of hands holding a mechanical device with arrows indicating force or movement (no text or symbols)7 Once inserted, make sure the two red buttons have snapped out.
8 Replace the drip tray and waste coffee container.
9 Close the service door.

natural_image
Technical diagram of a mechanical device with directional arrows indicating movement or force (no text or symbols present)When the appliance is ready, you can use the internal menu to modify the following parameters and functions:
- Choose language
Rinsing
Shut-off time
Set clock
Start time
Auto-start
Temperature
Water hardness
Coffee quantity
Water quantity
Descale
Reset to default
Statistics
Install filter
Reset filter
Buzzer
Contrast
Setting the language
To change the language on the display, proceed as follows:
1 Press the icon (B2) to enter the menu. "CHOOSE LANGUAGE" is displayed.
2 Press the OK icon (B9).
3 Press the ▲ icons (B7) and (B8) until the required language is displayed.
4 Press the OK icon (B9) to confirm.
5 Press the ESC icon (B6) to exit the menu.
Note: If you choose the wrong language, you can access the menu directly to modify the parameter.
6 Press the icon button (B2) for at least 7 seconds until the appliance displays the various languages.
7 Choose the required language as described in the section "Using the appliance for the first time".
Rinsing
This function enables you to obtain hotter coffee. Proceed as follows:
- When you turn the appliance on, if you want to make a small cup of coffee (less than 60 cc), preheat the cup by rinsing it with hot water.
If on the other hand more than 2/3 minutes have passed since the last coffee was made, before requesting another coffee, you must preheat the brewing unit by:
1 first pressing the icon (B2) to enter the menu
2 then the ▼ icons (B7) and (B8) to select the "RINSING" function.
3 press the OK icon (B9). "RINSING... PLEASE CONFIRM" is displayed.
4 press the OK icon (B9) again. Deliver the water into the underlying drip tray or alternatively use this water to fill (and then empty) the cup to be used for the coffee to preheat it.
Changing the length of time the appliance remains on
The appliance is set by default to go off automatically 30 minutes after the last coffee has been made. To change this interval (max. 120 min), proceed as follows:
1 Press the ≡ icon (B2) to enter the menu and then the ▲▼ icons (B7) and (B8) until "SHUT-OFF TIME" is displayed.
2 Press the OK icon (B9) to confirm.
3 Press the icons (B7) and (B8) to set the time after which the appliance will go off (after 1/2 hour, 1 hour, 2 hours).
4 Press the OK icon (B9) to confirm.
5 Press the ESC icon (B6) to exit.
Setting the clock
1 Press the icon (B2) to enter the menu and then the icons (B7) and (B8) until "SET CLOCK" is displayed.
2 Press the OK icon (B9).
3 Use the icons (B7) and (B8) to set the hour, then press the OK icon (B9) to confirm.
4 Use the ▲ icons (B7) and (B8) to set the minutes, then press the OK icon (B9) to confirm.
5 Press the ESC icon (B6) to exit the menu.
Setting auto-start time
This function programmes the time the machine will come on automatically.
1 Make sure the clock on the appliance has been set.
2 Press the ≡ icon (B2) to enter the menu and then the ▲▼ icons (B7) and (B8) until "START TIME" is displayed.
3 Press the OK icon (B9).
4 Use the icons (B7) and (B8) to set the auto-start time, then press the OK icon (B9) to confirm.
5 Use the icons (B7) and (B8) to set the minutes, then press the OK icon (B9) to confirm.
6 Press the ▲▼ icons (B7) and (B8) to activate the auto-start function until "AUTO START" is displayed.
7 Press the OK icon (B9) to confirm. The symbol appears on the display.
8 Press the ESC icon (B6) to exit the menu.
9 To deactivate the automatic start-up function, press the ☐ (B2) icon, then press the ▲▼ (B7) and (B8) icons until the appliance displays the message "AUTO START-UP". Press the OK (B9) icon. "CONFIRM" will appear on the display. Press "ESC" to deactivate and the 🔊 symbol will disappear.
Changing coffee temperature
To change coffee temperature, proceed as follows:
1 Press the icon (B2) to enter the menu and then the icons (B7) and (B8) until "TEMPERATURE" is displayed.
2 Press the OK icon (B9).
3 Press the icons (B7) and (B8) to select the required coffee temperature from low, medium and high.
4 Press the OK button (B9) to confirm the temperature selected.
5 Press the ESC icon (B6) to exit the menu.
Setting water hardness
The operating period can be extended if required, making descaling less frequent by programming the machine on the basis of the real lime content in the water used. Proceed as follows:
1 Remove the "Total Hardness Test" strip (attached to this manual) from its packaging then dip it fully in the water for a few seconds, Then remove and wait about 30 seconds (until it changes colour and forms red squares).
2 Turn the appliance on by pressing the ON/OFF/stand-by button (A7).
3 Press the i≡n (B2) to enter the menu and then the icons (B7) and (B8) until "WATER HARDNESS" is displayed.
4 Press the OK icon (B9).
5 Press the icons (B7) and (B8) until the number coincides with the number of red squares on the test strip (for example, if there are 3 red squares on the test strip, select the message "WATER HARDNESS 3".
6 Press the OK icon (B9) to confirm. The coffee maker is now programmed to provide the descale warning when actually necessary.
Changing the quantity of coffee
For instructions on programming coffee, see section 'Making coffee using coffee beans', under
Changing the quantity of hot water
For instructions, see section 'Making coffee using pre-ground coffee'.
Descaling
Important!
- Failure to descale the appliance regularly voids the warranty.
- Descaler contains acids. Respect the safety warnings provided by the manufacturer and given on the descaler pack.
Use the descaler recommended by the manufacturer only. Use of other descalers voids the warranty. Failure to descale the appliance as described also voids the warranty.
Before descaling, make sure the water softener filter has been removed.
When "PLEASE DESCALE!" is displayed, the machine requires descaling. Proceed as follows:
1 Make sure the machine is ready;
2 Press the icon (B2) to enter the menu and then the icons (B7) and (B8) until "DESCALE" is displayed.
3 Press the OK icon (B9) and the appliance displays "DESCALE PLEASE CONFIRM".
4 Press the OK icon (B9). The message "ADD DESCALER PLEASE CONFIRM" is displayed.
5 Empty the tank of water, pour the contents of the descaler bottle into the tank respecting the instructions given on the descaler pack, then add water up to the MAX level marked on the water tank. Position a container with a capacity of about 2 litres under the hot water spout.
6 Press the OK icon (B9). Descaler flows out of the hot water spout into the container below. The appliance displays: "DESCALING".
7 The descale programme automatically performs a series of deliveries and pauses.
8 After about 30 minutes "DESCALE COMPLETE PLEASE CONFIRM" is displayed.
9 Press the OK icon (B9). "RINSING PLEASE CONFIRM" is displayed.
10 Empty the water tank, rinse to eliminate descaler residues, then fill with clean water.
11 Replace the tank full of clean water. "RINSING PLEASE CONFIRM" is displayed again.
12 Press the OK icon (B9) again. Hot water flows out of the spout into the container below and "RINSING" is displayed.
13 Wait until "RINSING COMPLETE PLEASE CONFIRM" is displayed.
14 Press the OK icon (B9). "DESCALE COMPLETE" is displayed, then "FILL TANK". Fill the tank again with clean water.
15 The descale programme is now terminated and the appliance is ready to make coffee again.
Note: If descaling is interrupted before completion, the process must be begun again from the beginning.
Resetting default values (reset)
It is possible to reset all the settings to their default values. Proceed as follows:
1 Press the icon (B2) to enter the menu and then the icons (B7) and (B8) until "RESET TO DEFAULT" is displayed.
2 Press the OK icon (B9) and the appliance displays "RESET TO DEFAULT PLEASE CONFIRM".
3 Press the OK button (B9) to reset the default values.
Statistics
This displays statistics relating to the machine.
To display, proceed as follows:
1 Press the icon (B2) to enter the menu and then the icons (B7) and (B8) until "STATISTICS"
is displayed.
2 Press the OK icon (B9).
3 Press the ▼ icons (B7) and (B8) to verify:
- How many coffees have been made.
- How many times the machine has been descaled.
- The total number of litres of water delivered.
4 Press the ESC icon (B6) once to exit the function or twice to exit the menu.
Buzzer
This activates or deactivates the buzzer emitted by the machine each time an icon is pressed or an accessory is inserted/removed.
Note: The buzzer is active by default.
1 Press the icon (B2) to enter the menu and then the icons (B7) and (B8) until "BUZZER" is displayed.
2 Press the OK icon (B9). "BUZZER PLEASE CONFIRM" is displayed.
3 Press the ESC icon (B6) to disable or the OK icon (B9) to enable the buzzer.
4 Press the ESC icon (B6) to exit the menu.
Adjusting contrast
To increase or reduce the contrast of the display, proceed as follows:
1 Press the icon (B2) to enter the menu and then the icons (B7) and (B8) until "CONTRAST" is displayed.
2 Press the OK icon (B9).
3 Press the ▲▼ icons (B7) and (B8) until the required display contrast is reached. The progressive bar indicates the level of contrast selected.
4 Press the OK icon (B9) to confirm.
5 Press the ESC icon (B6) once to exit the function or twice to exit the menu.
Water filter
For instructions on the water softener filter, see the section "Installing the filter".
Turning the appliance off
Each time the appliance is turned off, it performs an automatic rinse cycle which cannot be interrupted.
Important!
During rinsing, a little hot water flows from the coffee spouts. Avoid contact with splashes of water.
To turn the appliance off, press the ON/OFF button (A7). The appliance performs the rinse cycle then goes off. Note: If the appliance is not used for an extended period, place the main switch on the back of the appliance in the 0 position (A23).
| Displayed message Possible causes What to do | ||
| FILL TANK The water tank is empty or positioned incorrectly. | Fill the tank with water and/or insert it correctly, pushing it as far as it will go. | |
| GROUND TOO FINE ADJUST MILL AND (alternating with) PRESS OK | The grinding is too fine and the coffee is delivered too slowly.The machine cannot make coffee as there is air in the hydraulic circuit. Possible cause: the filter has not been installed correctly. | Turn the grinding adjustment knob one click clockwise towards "7".Make sure the filter (A26) is properly installed and that the installation has been carried out correctly. |
| GROUND TOO FINE ADJUST MILL AND (alternating with) PRESS OK (then) FILL TANK | The tank has been removed during delivery. | Insert the tank and press the OK icon (B9). "HOT WATER PRESS OK" is displayed. |
| EMPTY WASTE COFFEE CONTAINER | The waste coffee container (A4) is too full or more than 3 days have passed since you last made coffee (this guarantees correct hygiene of the machine). | Empty the waste coffee container and clean, then replace.Important!When removing the drip tray, the waste coffee container MUST be emptied, even if it is not completely full. If this is not done, when you make the next coffees, the waste coffee container may fill up more than expected and clog the machine. |
| INSERT WASTE COFFEE CONTAINER | After cleaning, the waste coffee container has not been replaced. | Open the service door and insert the waste coffee container. |
| ADD PRE-GROUND COFFEE | The "pre-ground coffee" function has been selected without placing any pre-ground coffee in the funnel.The funnel (A21) is blocked. | Extract the appliance and place pre-ground coffee in the funnel.Empty the funnel with the help of a knife as described in the section "Cleaning the pre-ground coffee funnel". |
| PLEASE DESCALE! | The machine must be descaled. | The descaling procedure described in the “Descaling” section needs to be performed as soon as possible. |
| LESS COFFEE | Too much coffee has been used. Select a milder taste or reduce the quantity of preground coffee, then make the coffee again. | |
| FILL BEAN CONTAINER The coffee beans have run out. Fill bean container. | ||
| INSERT BREWING UNIT The brewing unit has not been replaced after cleaning. | Insert the brewing unit as described in the section ‘Cleaning’, under “Cleaning the brewing unit”. | |
| CLOSE DOOR The service door is open. Close the service door. | ||
| GENERAL ALARM! | The inside of the appliance is very dirty. | Clean the inside of the appliance thoroughly, as described in the section “Cleaning”. If the message is still displayed after cleaning, contact a Customer Care. |
| REPLACE FILTER! | The water softener filter (A26) must be replaced. | You must immediately replace the filter following the instructions in the section ‘Using the appliance for the first time’, under “Replacing the filter”. |
| Problem Possible causes What to do | ||
| The coffee is not hot. | The cups were not preheated.The brewing unit has cooled down because 2/3 minutes have elapsed since the last coffee was made.The temperature set is too low. | Warm the cups by rinsing them with hot water.Before making coffee, preheat the brewing unit by selecting the RINSING function in the menu.Change the set temperature (see section ‘Changing and setting menu parameters’). |
| The coffee is not creamy enough. | The coffee is ground too coarsely.Wrong type of coffee. | Turn the grinding adjustment knob one click anticlockwise towards “1” while the coffee mill is in operation (fig. 11).Use a type of coffee for espresso coffee makers. |
| The coffee is delivered too slowly or a drop at a time. | The coffee is ground too finely. | Turn the grinding adjustment knob one click clockwise towards “7” while the coffee mill is in operation (fig. 11).Continue one click at a time until coffee delivery is satisfactory. The effect is only visible after delivering two coffees. |
| The coffee is delivered too quickly. | The coffee is ground too coarsely. | Turn the grinding adjustment knob one click anticlockwise towards “1” while the coffee mill is in operation (fig. 11).Avoid turning the grinding adjustment knob excessively otherwise when you select 2 cups, the coffee may be delivered a drop at a time. The effect is only visible after delivering two coffees. |
| Coffee does not come out of one of the spouts. | The spouts are blocked. Clean the spouts with a toothpick (fig. 23). | |
Problem Possible causes What to do
| The coffee does not come out of the spouts, but from around the service door (A2). | The holes in the spouts are clogged with dry coffee dust.The coffee guide (A3) inside the service door is blocked and cannot swing. | If necessary, remove coffee deposits with a toothpick, sponge or stiff bristled kitchen brush (fig. 23).Thoroughly clean the coffee guide (A3), particularly near the hinges. |
| Water comes out of the spouts instead of coffee. | The pre-ground coffee may be blocked in the funnel (A21). | Clean the funnel (A21) with a wooden or plastic fork, clean the inside of the machine. |
| The coffee is delivered too quickly. | The coffee is ground too coarsely. | Turn the grinding adjustment knob one click anticlockwise towards “1” while the coffee mill is in operation (fig. 11).Avoid turning the grinding adjustment knob excessively otherwise when you select 2 cups, the coffee may be delivered a drop at a time. The effect is only visible after delivering two coffees. |
| Coffee does not come out of one of the spouts. | The spouts are blocked. Clean the spouts with a toothpick (fig. 23). | |
Before you call for service or assistance ...
Check the things you can do yourself. Refer to the installation instructions and your user guide and check that:
1 your product is correctly installed
2 you are familiar with its normal operation.
If after checking these points you still need assistance or parts, please refer to the Service & Warranty book for warranty details and your nearest Authorised Service Centre, Customer Care, or contact us through our local website listed on the back cover.
This appliance has been designed and constructed in accordance with the following codes and specifications:
In New Zealand and Australia:
AS/NZS 60335-1 General Requirements for Domestic electrical appliances
AS/NZS 60335-2-14 Particular Requirements for kitchen machines
AS/NZS 60335-2-15 Particular Requirements for appliances for heating liquids
In China:
IEC60335-2-14
IEC60335-2-15
GB4706.19
In Europe:
- EN 60335-1 General Requirements for Domestic electrical appliances
- EN 60335-2-14 Particular Requirements for kitchen machines
- EN 60335-2-15 Particular Requirements for appliances for heating liquids

European directive 2002/96/EC on Waste Electrical and Electronic Equipment (WEEE) (for European Union countries only)
GB This appliance is marked according to the European directive 2002/96/EC on Waste Electrical and Electronic Equipment (WEEE). By ensuring this product is disposed of correctly, you will help prevent potential negative consequences for the environment and human health, which could otherwise be caused by inappropriate waste handling of this product.
The symbol ☒ on the product, or on the documents accompanying the product, indicates that this appliance may not be treated as household waste. Instead it shall be handed over to the applicable collection point for the recycling of electrical and electronic equipment. Disposal must be carried out in accordance with local environmental regulations for waste disposal.
For more detailed information about treatment, recovery and recycling of this product, please contact your local city office, your household waste disposal service or the shop where you purchased the product.
Product details
Fisher & Paykel Ltd
Model Serial No.
Date of Purchase Purchaser
Dealer Suburb
Town Country
目录
安全警告 39
安装说明 40
简介 44
首次使用咖啡机 48
通电加热 51
用咖啡豆煮咖啡 52
用咖啡粉煮浓缩咖啡 54
用蒸汽功能煮卡布奇诺咖啡 55
清洁 56
更改和设置菜单参数 59
显示的消息 64
故障排除 66
保修和服务 68
名称和产品中有害物质的含量 70
重要!
妥善保存这些说明书
natural_image
Diagram of a computer monitor with ports and a control panel, showing an open button (no text or symbols present)fig. fig.


natural_image
Line drawing of a mechanical assembly with a magnified inset showing a hand operating a tool (no text or symbols)fig. fig.


natural_image
Line drawing of a hand holding a cup with a pipette inserted, labeled '23' (no text or symbols on the diagram itself)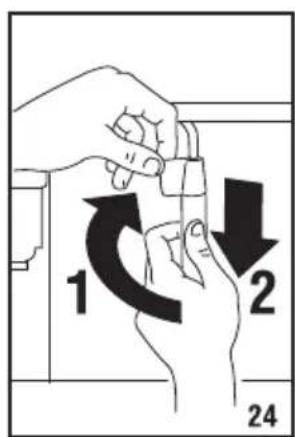
natural_image
Diagram of a device with a funnel and arrow indicator, no readable text or symbols presentfig. fig.


natural_image
Line drawing of a hand inserting a small object into a device inside a storage unit (no text or symbols)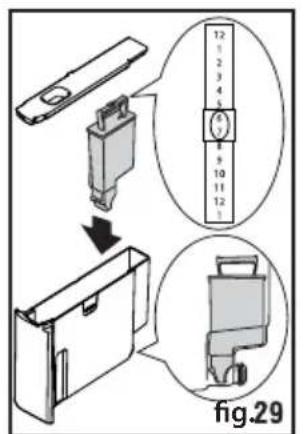
natural_image
Line drawing of a hand using a tool to clean or inspect internal components (no text or symbols visible)
natural_image
Simple line drawing of a mechanical component or bracket (no text or symbols)natural_image
Illustration of a kitchen appliance with a downward arrow indicating a drop, and an inset showing food being added to a pot (no text or symbols present)natural_image
Technical line drawing of a mechanical device with an arrow indicating direction (no text or symbols present)natural_image
Illustration of two hands holding a mechanical device with arrows indicating force or movement (no text or symbols)
natural_image
Technical diagram of a mechanical device with directional arrows indicating movement or force (no text or symbols)Name and content of hazardous substances in products
| 组件名称Components Name | 有害物质Hazardous substances | |||||
| 铅Lead(Pb) | 汞Mercury(Hg) | 镉Cadmium(Cd) | 六价铬HexavalentChromium(Cr(VI)) | 多溴联苯Polybrominatedbiphenyls(PBB) | 多溴二苯醚Polybrominateddiphenyl ethers(PBDE) | |
| 塑料外壳和底盘Plastic enclosure and chassis | ○ | ○ | ○ | ○ | ○ | ○ |
| 印刷电路板Printed Circuit Board Assembly | X | ○ | ○ | ○ | ○ | ○ |
| 电机、阀门Motors, valves | X | ○ | ○ | ○ | ○ | ○ |
| 电缆和电线Cable and wiring | ○ | ○ | ○ | ○ | ○ | ○ |
| 金属零件Metal parts | X | ○ | ○ | ○ | ○ | ○ |
| 本表格依据SJ/T 11364的规定编制。This table is prepared in accordance with the provisions of SJ/T 11364.○:表示该害物质在该部件所有均质材料中的含量均在GB/T 26572规定的限量要求以布。○:The content of such hazardous substance in all homogeneous material of such components is below the limit required by GB/T 26572.X:表示该害物质至少在该部件的某一均质材料中的含量超出GB/T 26572规定的限量要求。X:The content of such hazardous substance in a certain homogeneous material of such components is beyond the limit required by GB/T 26572.上表中打X的部件,由于技术原因目前无法实现替代,今后随着技术进步,将实现替代或改进;For these parts with “X” in the above table, there is no replacement solution due to technique limitation in the industry; however, this may change with the technique improvement. | ||||||
www.fi sherpaykel.com
Fisher&Paykel
Copyright © Fisher & Paykel Appliances 2016. All rights reserved.
The product specifications in this booklet apply to the specific products and models described at the date of issue. Under our policy of continuous product improvement, these specifications may change at any time. You should therefore check with your Dealer to ensure this booklet correctly describes the product currently available.
Copyright © Fisher & Paykel Appliances 2016.版权所有。




- Contents
- Important!
- Save these instructions
- WARNING!
- Cut Hazard
- Important safety instructions!
- For Great Britain only
- Fuse replacement
- For the Republic of Ireland
- Socket outlet / plug (valid for both countries)
- Checking for transport damage
- Installing and connecting the appliance
- Disposal
- Technical specification
- Built-in installation
- Note:
- Product Overview descriptions
- Description of the control panel
- Using the appliance for the first time
- Installing the filter
- Replacing the filter ("FILTER RESET")
- Removing the filter
- Tips for a hotter coffee
- Changing the quantity of coffee in the cup
- Adjusting the coffee mill
- Delivering hot water
- Changing the quantity of hot water
- Cleaning the coffee maker
- Cleaning the waste coffee container
- Cleaning the drip tray
- Cleaning the water tank
- Cleaning the spouts
- Cleaning the pre-ground coffee funnel
- Cleaning the inside of the coffee maker
- Cleaning the brewing unit
- Cleaning the brewing unit cont.
- Setting the language
- Rinsing
- Changing the length of time the appliance remains on
- Setting the clock
- Setting auto-start time
- Changing coffee temperature
- Setting water hardness
- Changing the quantity of coffee
- Descaling
- Resetting default values (reset)
- Statistics
- Buzzer
- Adjusting contrast
- Water filter
- Turning the appliance off
- Before you call for service or assistance ...
- In Europe:
- Product details
- 目录
- 重要!
- 妥善保存这些说明书
- Name and content of hazardous substances in products
Brand : Fisher & Paykel
Model : EB60DSXB1
Category : Coffee maker