
EB60MSB1 - Coffee maker Fisher & Paykel - Free user manual and instructions
Find the device manual for free EB60MSB1 Fisher & Paykel in PDF.


| Product Type | Built-in Automatic Coffee Maker |
| Model | EB60MSB1 (also EB60MSG1, EB60DSX1) |
| Power Source | Mains electricity |
| Control Interface | Touch keypad with display |
| Grinder | Built-in adjustable burr grinder |
| Bean Container Capacity | Sufficient for multiple drinks (no specific capacity given) |
| Ground Coffee Option | Yes, via pre-ground coffee funnel (max 1 measure) |
| Beverages | Espresso, Coffee, Long, Double Espresso, Cappuccino, Latte Macchiato, Hot Milk, Hot Water, Steam |
| Milk Frothing | Automatic with milk container (froth adjustment dial) and manual steam wand |
| Custom Profiles | Up to 6 profiles (MY) for personalized drink settings |
| Auto-Start | Yes, programmable daily time |
| Cup Warmer | Yes, on/off via settings |
| Water Filter Compatible | Yes, optional water softener filter |
| Water Hardness Setting | Yes, 4 levels adjustable |
| Energy Saving Mode | Yes, can be enabled/disabled |
| Descaling | Required periodically (~45 min process with guided prompts) |
| Rinse Cycle | Yes, manual and auto on startup/shutdown |
| Cleaning | Infuser (monthly), milk container (after each use), steam wand (after each use), drip tray/grounds container (regularly) |
| Safety Features | Hot surface warning, auto shut-off (standby), main power switch, child safety (supervision required) |
| Languages | Multiple (e.g., English, Deutsch, Italiano, Français, etc.) |
| Display | LCD screen with settings and alerts |
| Accessories Included | Milk container, steam wand, water filter (if model has), cleaning brush, descaler, ground coffee measure, water hardness test strip |
| Warranty | Refer to Service & Warranty booklet (details not specified) |
Frequently Asked Questions - EB60MSB1 Fisher & Paykel
User questions about EB60MSB1 Fisher & Paykel
0 question about this device. Answer the ones you know or ask your own.
Ask a new question about this device
Download the instructions for your Coffee maker in PDF format for free! Find your manual EB60MSB1 - Fisher & Paykel and take your electronic device back in hand. On this page are published all the documents necessary for the use of your device. EB60MSB1 by Fisher & Paykel.
USER MANUAL EB60MSB1 Fisher & Paykel
EB60MSB1 & EB60MSG1 models
CONTEMPORARY
EB60DSX1 models
USER GUIDE
NZ AU UK IE SG
CONTENTS
Safety and warnings 4
Before you begin 7
Control panel 8
Accessories 9
First use 10
Coffee making guide 17
Steaming milk 22
Hot water 27
Custom drink settings 28
Customising drinks 30
Settings 31
Auto start 33
Care and cleaning 34
Descaling 44
Water filter 47
Alerts 49
Troubleshooting 52
Warranty and service 54
Registration
To register your product visit our website: fisherpaykel.com/register
IMPORTANT SAFETY INSTRUCTIONS
Your safety is important to us. Keep the following instructions in mind when you are using your coffee maker.
Failure to observe the instructions could result in electric shock, serious injury, burns, fire, or damage to the appliance.
Save these instructions.
| ⚠ WARNING! | |
 | Cut HazardTake care - some edges are sharp.Failure to use caution could result in injury or cuts. |
| ⚠ WARNING! | |
 | Electrical shock hazardNever touch the appliance with damp hands.Never touch the plug with damp hands.Make sure the socket used is freely accessible at all times, enabling the appliance to be unplugged when necessary.Unplug directly from the plug only.Never pull the power cable as you could damage it.To disconnect the appliance completely, place the main switch on the side of the appliance in the 0 position.If the appliance is faulty, do not attempt to repair. Turn it off using the main switch, unplug from the mains socket and contact Customer Services. |
| ⚠ WARNING! | |
 | Hot surface hazardAccessible parts may become hot when in use.This appliance produces hot water and steam may form while it is in operation.Avoid contact with splashes of water or hot steam. Use knobs and handles. |
- The appliance is not intended for use by persons (including children) with reduced physical, sensory or mental capabilities, or lack of experience and knowledge, unless they have been given supervision or instruction concerning use of the appliance by a person responsible for their safety.
• Children should be supervised to ensure that they do not play with the appliance. - Designated use: this appliance is designed and made to prepare coffee and milk based beverages and hot water. Any other use is considered improper and thus dangerous. The manufacturer is not liable for damage deriving from improper use of the appliance.
• This appliance is not suitable for commercial use. - This is an household appliance only. It is not intended to be used in: staff kitchen areas in shops, offices and other working environments; farm houses; by clients in hotels, motels and other residential type environments; bed and breakfast type environments.
- The surface of the heating element remains hot after use and the outside of the appliance may retain the heat for several minutes depending on use.
- Clean all the components thoroughly, taking particular care with parts in contact with the coffee and milk.
• Cleaning and user maintenance shall not be made by children without supervision.
• Never immerse the appliance in water. - CAUTION: To prevent damage to the appliance do not use alkaline cleaning agents when cleaning, use a soft cloth and a mild detergent
- If the plug or power cable is damaged, it must be replaced by customer services only to avoid all risk.
- Appliances with removable cord: avoid splashes of water on the power cord connector or socket at the back of the appliance.
- Appliances with removable cord: avoid splashes of water on the power cord connector or socket at the back of the appliance.
- WARNING: Models with glass surfaces: do not use the appliance if the surface is cracked.
- This appliance can be used by children aged from 8 years and above if they have been given supervision or instruction concerning use of the appliance in a safe way and if they understand the hazard involved. Cleaning and user maintenance shall not be made by children unless they are older than 8 and supervised. Keep the appliance and its cord out of the reach of children aged less than 8 years.
- Appliances can be used by persons with reduced physical, sensory or mental capabilities or lack of experience and knowledge if they have been given supervision or instruction concerning use of the appliance in a safe way and understand the hazards involved.
• Children shall not play with the appliance. - When not in use and before cleaning, always unplug the appliance.
- Keep all packaging (plastic bags, polystyrene foam) away from children.
- CHOKING HAZARD. The appliance might contain small parts. Some of those small parts might be required to get disassembled during cleaning and maintenance operations. Handle with care and keep small parts out of reach of children.
- Do not hold on to the coffee machine when it is out of the cabinet.
- Do not rest recipients containing liquids or inflammable or corrosive materials on top of the appliance. Place the accessories required to make the coffee (the measure for example) in the special holder. Do not rest large objects which could obstruct movement or unstable objects on the appliance.
-
Do not use the appliance when pulled out from the cabinet. Make sure the appliance is inactive before pulling it out. The only exception is adjusting the coffee mill which must be done with the machine pulled out (see section “Adjusting the coffee mill”).
-
Use original or manufacturer recommended accessories and spare parts only.
- Never turn off the machine during descaling.
- The first time you use the appliance, or if it is not used for more than 3 or 4 days, rinse all removable accessories which may come into contact with water or milk with hot water.
- If the appliance is not used for more than 3 or 4 days, before making the first beverage, rinse the water circuit as described in this Instruction for Use.
- You should carry out automatic cleaning and guided maintenance scrupulously when proposed by the appliance through the display or the lights described in the manual.
- Do not allow children and animals to stop or linger near the appliance when it is pulled out of the cabinet.
- Do not leave the machine pulled out of the cabinet when it is being used.
- Do not leave the machine pulled out of the cabinet when it is not needed.
- Install the machine according to the instructions in the handbook to guarantee there are no spills when it is pulled out from the cabinet.
• Make sure the installer has completed the 'Final checklist' in the Installation instructions.
- Read this guide, taking special note of the 'Safety and warnings' section.
- Remove all internal and external packaging and dispose of it responsibly. Recycle items that you can.
• After removing the packaging, make sure the product is complete. If the appliance
• is damaged, contact customer support.
- Coffee has been used to factory test the appliance, so there may be traces of coffee in the mill.
- We recommend customising water hardness as soon as possible following the instructions in the section ‘Setting water hardness’.

Coffee machine features
① Beans container/Ground coffee funnel
② Control panel
③ Handle
④ Standby button
⑤ Grounds container
⑥ Coffee dispenser spouts
⑦ Lower door panel
⑧ Drip tray
⑨ Light
⑩ Hot water/steam connection
⑪ Accessories storage
⑫ Water tank (internal)
⑬ Main power switch
⑭ Cup warmer
⑮ Power plug

Control panel features
① My menu
② Customisable profiles
③ Scroll arrows
④ Beverage selection
⑤ Settings menu
⑥ Coffee strength
⑦ Clock
⑧ Coffee size
⑨ Strength selection
⑩ Size selection
Using the touch controls
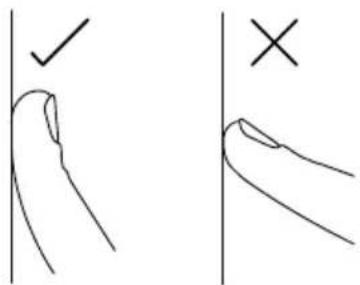
Your coffee machine is operated using a touch keypad and display. To use the keypad to navigate between functions and settings, use the ball of your finger, not its tip. The controls respond to touch, so pressure is not needed.
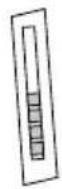
Water hardness indicator paper (included with printed Safety Guide)

Ground coffee measure
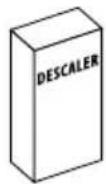
Descaler

Cleaning brush

Water softener filter
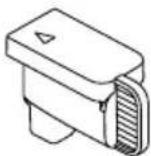
Connection nozzle cover

Steam wand/ Hot water spout

Milk container
Setting a language
You'll need to select a language when your appliance is first turned on, or after a power cut.
①

Connect the appliance to the mains electricity supply.
②
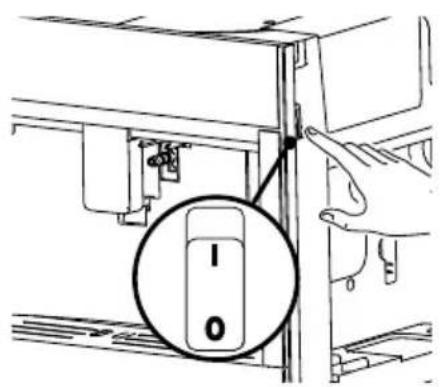
Ensure the main power switch at the side of the appliance is turned on.
③

Press ⬆ to turn on the coffee maker. HEATING UP UNDERWAY PLEASE WAIT will appear on the display.
④
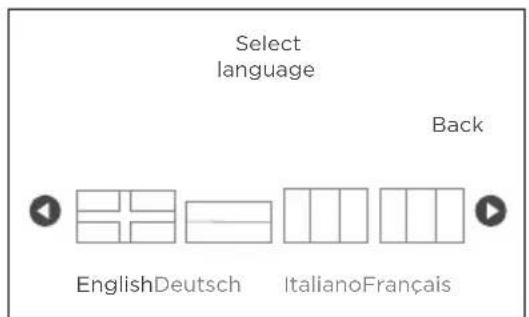
Touch 🔔 or ▶ until the flag corresponding to the required language appears on the display.
Touch the flag to select.
Filling the water tank
Before making any coffee, you'll need to fill the water tank. For best results, we recommend filling the tank with fresh water each day.
①

Pull the coffee dispenser forward to open the door.
Remove the water tank.
②

Remove the lid.
③

Fill with fresh water to the MAX line, then replace the lid.
④

Place the water tank back inside the coffee maker, then close the door.
Preparing the water circuit
The first time you fill the water tank, you'll also need to prepare the water circuit.

Connect the hot water spout to the appliance.
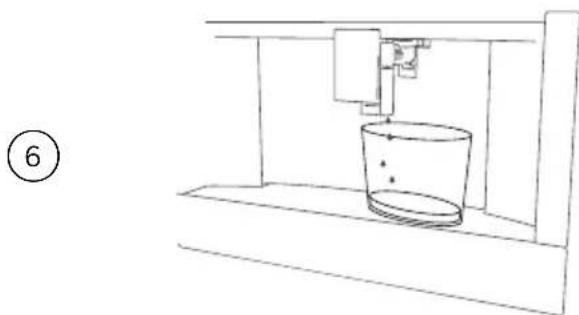
Place a container underneath the steam wand to catch any water.
Press √ to start filling the water circuit. Water will flow through the steam wand until the circuit is filled.
- When using the appliance for the first time, the water circuit is empty and the appliance could be noisy. This level of noise will reduce as the circuit fills.
- To improve the performance of your appliance, we recommend installing a water softener filter. If your model is not provided with a filter, you can request one from Customer Care.
Turning the coffee maker on
When the coffee maker is turned on, it will run an automatic preheat and rinse cycle.
1
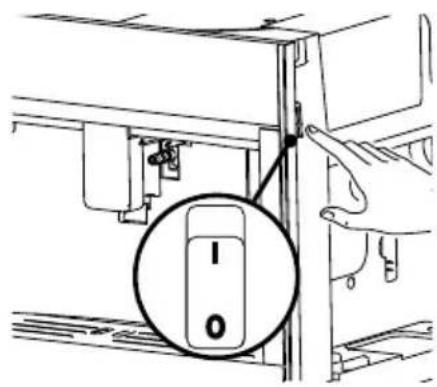
Ensure the main power switch at the side of the appliance is turned on.
②
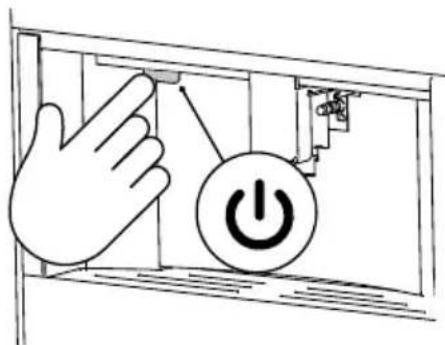
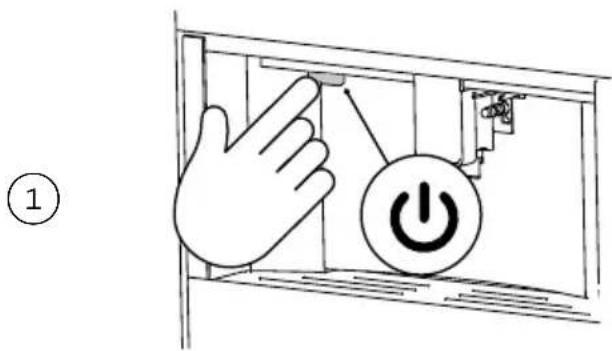
Press 📁 to turn on the coffee maker. HEATING UP UNDERWAY PLEASE WAIT will appear on the display.
③

After preheating and rinsing, the display will return to the home screen. The coffee maker is now ready to use.
During rinsing, some hot water will come out from the coffee spout and collect in the drip tray underneath. Keep hands clear of the spout to avoid contact with the water.
Turning the coffee maker off
When the coffee maker is turned off, it will run an automatic rinse cycle.
To ensure that cleaning message prompts appear on the display as scheduled, we recommend leaving the coffee maker in standby mode.
If you will not be using the coffee maker for an extended period of time, turn the appliance off by pressing the main power switch.
Never press the main power switch while the appliance is running.
Press ⏻ to put the coffee maker into standby mode.
TURNING OFF, PLEASE WAIT will appear on the display.
The appliance will perform a rinse cycle before turning off.
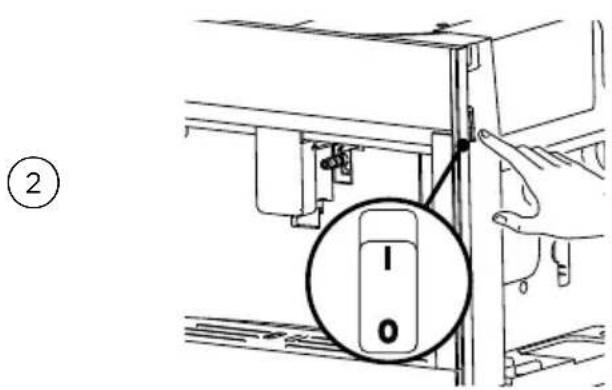
After the rinse cycle is finished, press the main power switch at the side of the appliance.
Measuring and setting water hardness
Your coffee maker comes supplied with a water hardness indicator paper in the front cover of the Safety Guide, to test the water hardness level in your home. The indicator paper can be found with your user guide.
For best results, the water hardness level should be set before making coffee for the first time.
Measuring water hardness
①

Remove the indicator paper from its pack. Immerse completely in glass of water for 1 second.
②

Remove the paper and shake lightly. Wait for 1 minute for the paper to develop.
The number of red squares on the paper indicate the water hardness level.
Water hardness level
| STRENGTH | |
| Level 1 (Soft water) | |
| Level 2 (Slightly hard water) | |
| Level 3 (Hard water) | |
| Level 4 (Very hard water) |
Setting water hardness
Once you have measured the water hardness in your home, you may need to adjust the water hardness level on your coffee maker.
The default setting is Level 4.
①

Touch ≡ to enter the settings menu.
②

Touch 🔔 or 🔒 to scroll to the WATER HARDNESS setting.
③

To change the level selected, touch WATER HARDNESS until the required level is displayed.
Touch BACK to confirm and return to the home screen.
For best results, you'll need to condition your coffee maker before you start using it. To do this, make four to five coffees, until the appliance starts delivering a consistent result. While conditioning the coffee maker, it is normal to hear the sound of boiling water. After making a few coffees this noise should reduce.
You can make coffee using either whole beans or pre-ground coffee. You can make up to two coffees at a time using whole beans, or one cup at a time using pre-ground coffee.
For a creamier coffee, adjust the height of the coffee dispenser as close to the cup as possible.
Tips for a hotter coffee
- Perform a rinse cycle by selecting the RINSING function in the settings menu.
- Warm the cups with hot water (see section 'Hot water').
- Increase the coffee temperature in the settings menu (see section 'Settings').
Coffee strength
Adjust coffee strength according to your preference.
Select the required strength by pressing STRENGTH.
| STRENGTH | |
| Very Light | |
| Light | |
| Medium | |
| Strong | |
| Extra Strong | |
| Customized strength (if programmed) | |
| Pre-ground coffee |
Coffee size
Select the required size of coffee delivered by pressing SIZE.
| SIZE | |
| Small | |
| Medium | |
| Large | |
| Extra Large | |
| Customized size (if programmed) |
Using whole coffee beans
If using whole beans, you'll need to fill the beans container before making your coffee. When the container is empty, FILL BEANS CONTAINER will appear on the display.
Do not use green, caramelised or candied coffee beans as they may stick in the coffee mill and damage it.

Pull the coffee maker out. Open the beans container cover and fill with coffee beans.
Close the cover and push the coffee maker back into place.
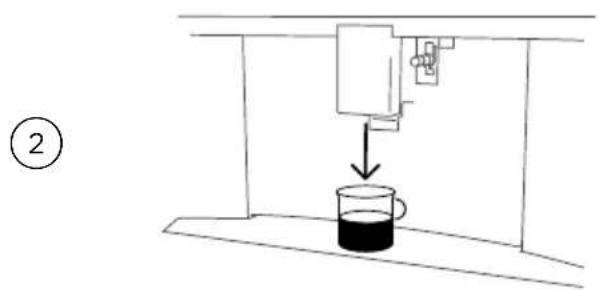
Place a cup under the coffee dispenser and adjust the dispenser height.
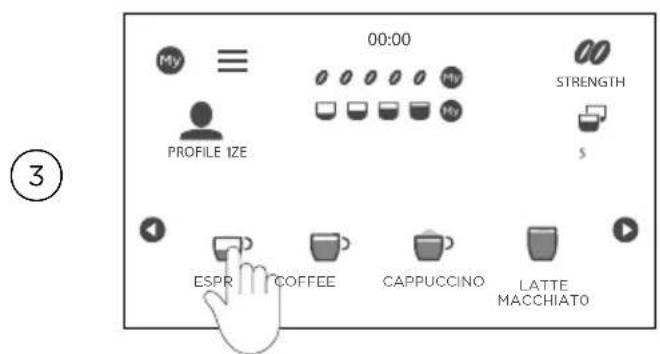
Touch 🔔 or 📄 to scroll through the drink options. Touch the drink option to select.
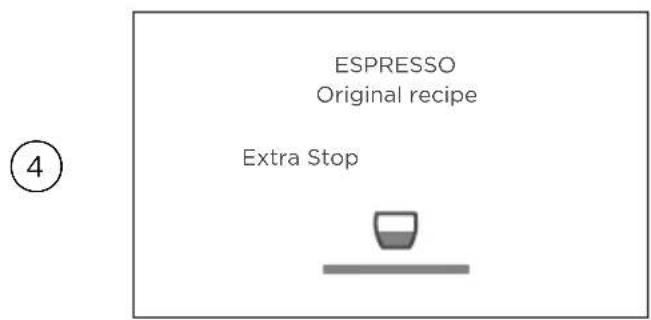
Your coffee is now being made.
When your coffee is ready, the display will revert back to the home screen.
Using pre-ground coffee
If using pre-ground coffee, you'll need to add coffee each time you make a drink. Before adding ground coffee, ensure the funnel isn't blocked.
Never add ground coffee when the machine is off.
Never use more than one level measure as this may block the funnel.

Pull the coffee maker out. Open the container cover and then the funnel cover.
Add one level measure of ground coffee.
Close the cover and push the coffee maker back into place.

Place a cup under the coffee dispenser and adjust the dispenser height.
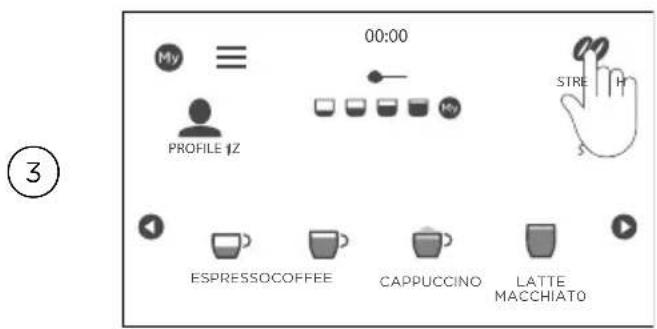
Touch STRENGTH repeatedly until appears on the display.

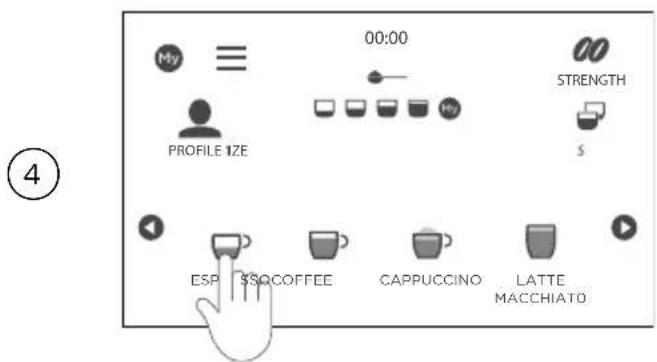
Select your coffee and touch to start.
If using pre-ground coffee to make a long coffee, you may need to add an extra measure of coffee partway through the drink dispensing.
①
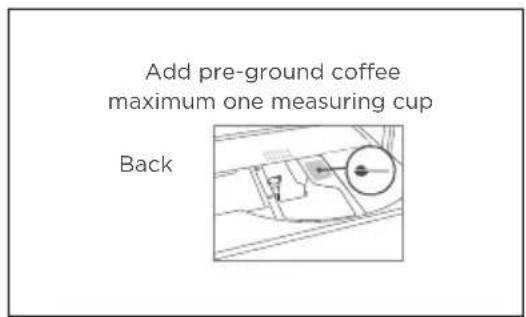
Halfway through dispensing, ADD PRE-GROUND COFFEE, MAXIMUM ONE MEASURE will appear on the display.
②

Pull the coffee maker out and add one level measure of ground coffee.
Close the cover and push the coffee maker back into place.
Coffee dispensing will resume.
To cancel
①
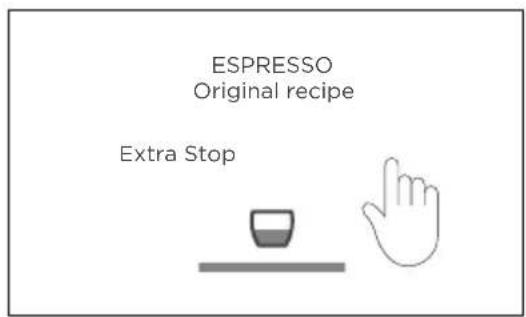
Touch STOP at any point to stop.
To top up
①

At the end of coffee dispensing, touch EXTRA to top up your drink. When the desired size is reached, press CANCEL.
Adjusting the coffee mill
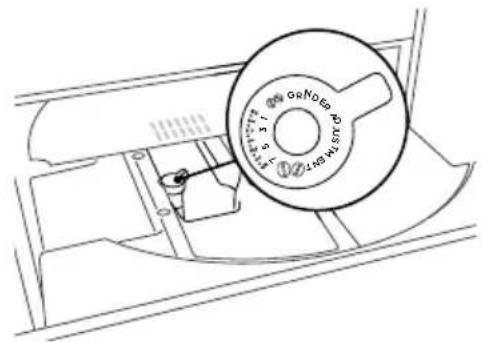
The coffee mill is set by default to prepare coffee correctly and should not require adjusting initially.
If after making the first few drinks you find that the coffee is too weak, not creamy enough or delivery is too slow (a drop at a time), this can be corrected by adjusting the grinding adjustment dial.
- The grinding adjustment dial must only be turned when the coffee mill is in operation during the initial phase of coffee preparation.
• If coffee is dispensed too slowly or not at all, turn one position clockwise towards 7.
• For fuller-bodied, creamier coffee, turn one position counterclockwise towards 1. - When adjusting, do not turn the dial more than one position at a time.
- These adjustments will only be evident until after making at least two cups of coffee. If this adjustment does not obtain the desired result, repeat the process and adjust the dial to the next position.
Steaming milk
To make cappuccinos, lattes and other milk-based drinks, you can steam milk either automatically using the milk container attachment, or manually using the steam wand attachment.
For best results, use refrigerated, skimmed milk at about 5° C temperature. The warmer the milk, the less foam is produced.
Steaming milk automatically
- Use the milk container attachment to automatically make cappucinos, lattes and other milk-based drinks.
- Do not leave the milk container out of the refrigerator for long periods of time.
- To avoid milk with poor foam or large bubbles, always clean the milk container lid and connection nozzle as described in sections ‘Cleaning the milk container’ and ‘Cleaning the steam wand’.
- If ENERGY SAVING mode is enabled, you may have to wait a few seconds before the milk begins heating.
Adjusting the foam level
Turn the froth adjustment dial on the milk container lid to adjust the amount of foam delivered while making milk-based coffees. Follow the recommendations in the table below:
DIAL POSITION FROTH RECOMMENDED FOR
| None Latte / Hot milk | |
| Minimum Latte or Macchiato | |
| Maximum Cappuccino |
Filling the milk container
①

Remove the lid of the milk container.
②

Fill the milk container with a sufficient quantity of milk, not exceeding the MAX level marked on the container. Each mark on the side of the container corresponds to about 100ml of milk.
③

Make sure the milk intake tube is correctly inserted in the bottom of the milk container lid. Replace the lid on the milk container.
④

Remove the steam wand if it is attached.
Attach the milk container to the steam wand connection. Push in until the container clicks into place.
Making milk-based coffees automatically
①

Fill the milk container and attach it.
Position the cup under both the coffee dispenser and the milk spout.
Adjust the length of the milk spout if needed.
②
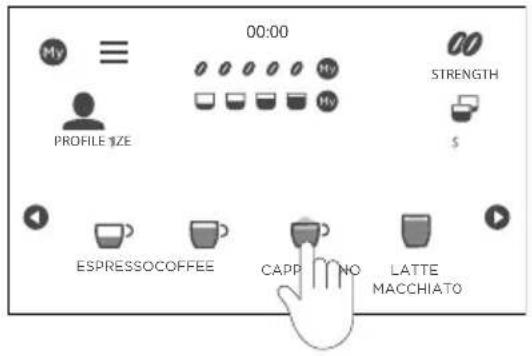
Select the desired drink option.
③

Turn the dial on the milk container lid to the corresponding drink option.
Touch √ to confirm.
To cancel
①
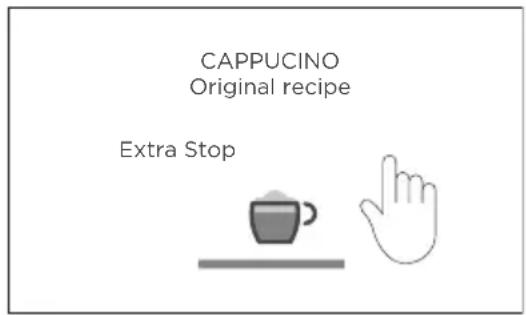
Touch BACK to exit the drink selection. Touch STOP at any point to stop.
To top up
①

At the end of coffee dispensing, touch EXTRA to top up your drink. When the desired size is reached, press STOP.
Steaming milk manually
- Use the steam wand attachment to manually make cappucinos, lattes and other milk-based drinks.
- Choose an appropriately-sized container. The milk will double or triple in volume as it is steamed.
- For best results, use refrigerated, skimmed milk at about 5°C temperature. The warmer the milk, the less foam is produced.
• For a creamier froth, rotate the container with slow movements in an upward direction.
• To avoid milk with poor foam or large bubbles, always clean the spout as directed.
• The steam wand can also be used to heat water.
Do not leave the appliance unattended while steam is being delivered. Always stop steam delivery before extracting the container filled with liquid to avoid burns from splashes.
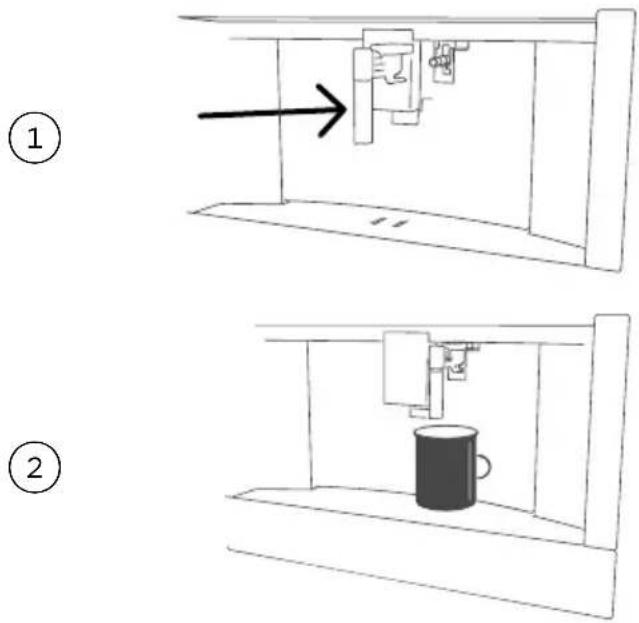
Make sure the steam wand is attached correctly to the coffee maker.
Fill a container with milk or water to be and immerse the spout in the liquid.
3

Select STEAM from the drink options. After a few seconds, steam will start to dispense and heat the liquid.
④

When the desired temperature or level of foam is reached, touch STOP to stop.
Dispensing hot water
Use the steam wand to dispense hot water.
Do not leave the appliance unattended while dispensing hot water.
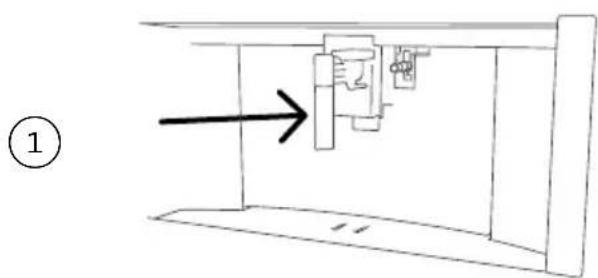
Make sure the steam wand is attached correctly to the coffee maker.
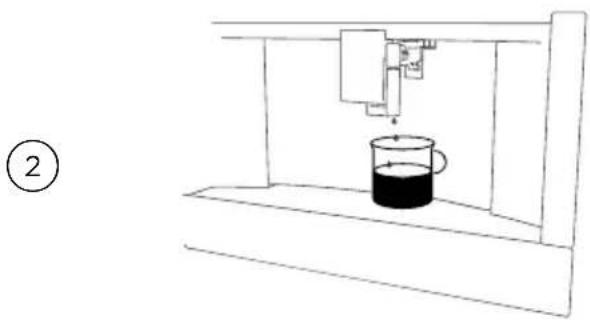
Place a container under the spout. Position it as close as possible to avoid splashes.
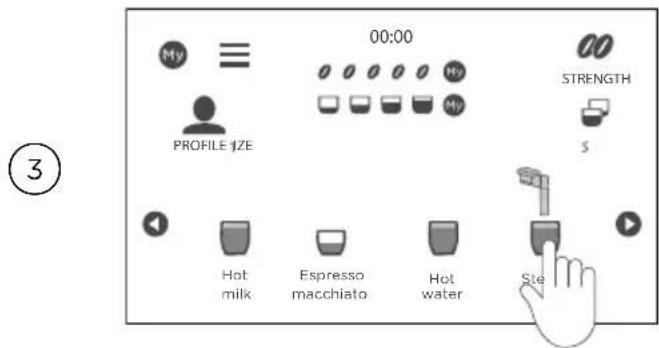
Select HOT WATER from the drink options. Hot water will begin dispensing from the spout and will stop automatically.
To cancel
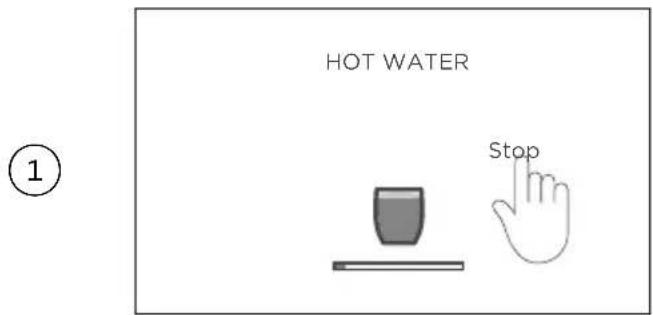
Touch STOP at any point to stop.
Drinks can be customized by altering the strength and size of coffee delivered. You can save custom drink settings for up to six MY profiles.
Select the GUEST profile to make drinks using the default settings.
Selecting a profile
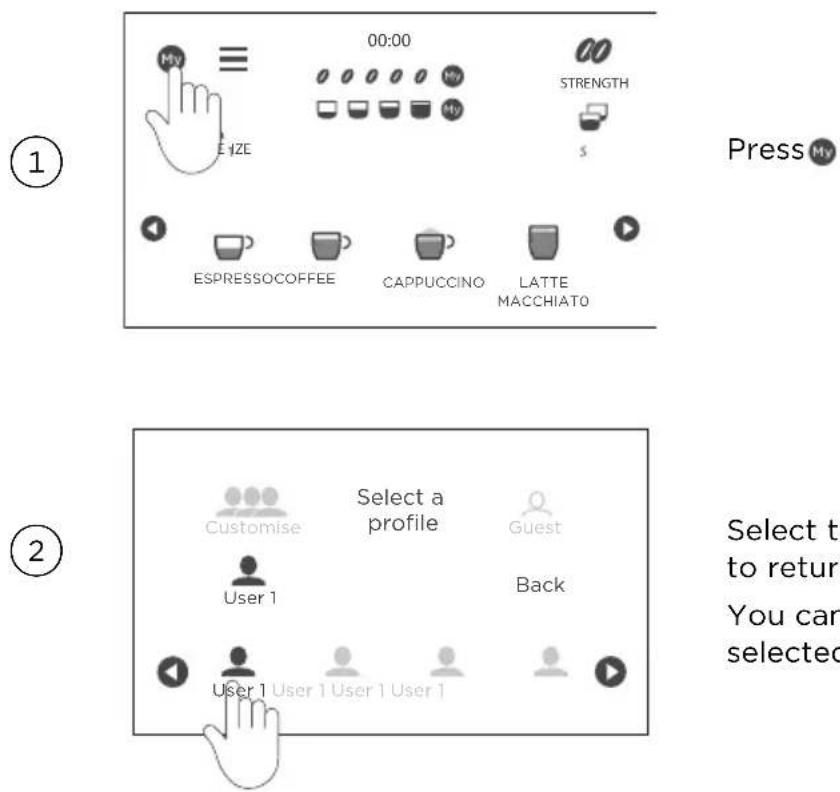
Select the desired profile, then press BACK to return to the home screen.
You can now modify drink options for the selected profile.
Customising a profile
Make sure the profile you want to customize is active. The current profile will be displayed on the home screen.
①

From the home screen, press MY.
②

Select a drink to customize.
The corresponding accessories must be attached.
3

Set the desired coffee strength, then press OK.
④

Set the desired coffee size, and for milk-based drinks the desired amount of milk.
When the desired size is reached, press STOP.
5
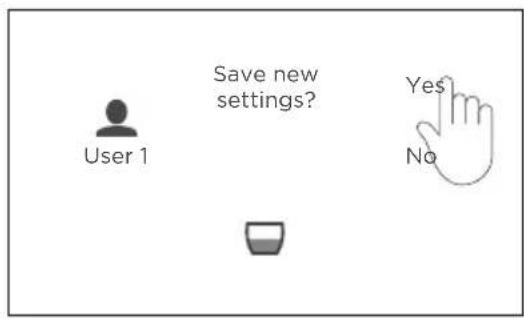
Press YES to save new settings, then OK to return to the home screen.
Custom drink sizes
| BEVERAGE | STANDARD CUSTOM | |
| ml ml | ||
| Espresso 40 20-80 | ||
| Long 160 115-250 | ||
| Coffee 180 100-240 | ||
| Double espresso 120 80-180 | ||
| Hot water 250 20-420 | ||
The settings menu allows you to:
- Rinse the coffee spouts with water
• Descale the coffee maker
• Install or replace the water filter
• View custom drink settings and reset back to default - Change the time
- Set AUTO START to turn the appliance on at a certain time each day
- Adjust AUTO OFF to turn the appliance off after a certain amount of time
• Turn the cup warmer on or off - Enable or disable ENERGY SAVING to reduce energy consumption
- Adjust the temperature of the water used to make coffee
- Adjust the water hardness setting
- Change the language of the display
• Turn audio tones on or off
• Turn coffee lights on or off - Adjust the display background
- Enable or disable DEMO MODE (for servicing only)
- Restore all settings to factory original defaults
• View your appliance statistics
Changing the settings
①
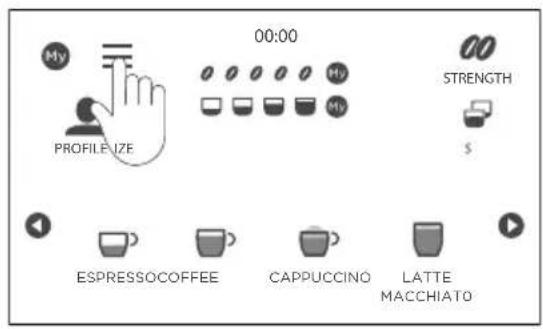
Touch ≡ to enter the settings menu.
②
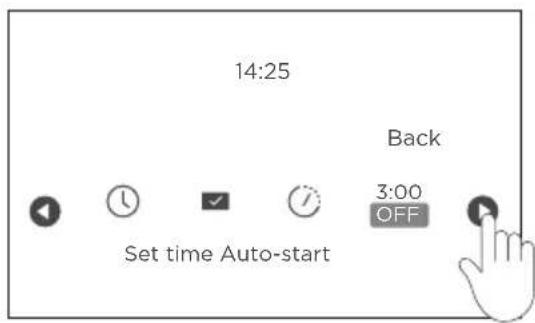
Touch ◀ or 📋 to scroll to the desired setting.
③
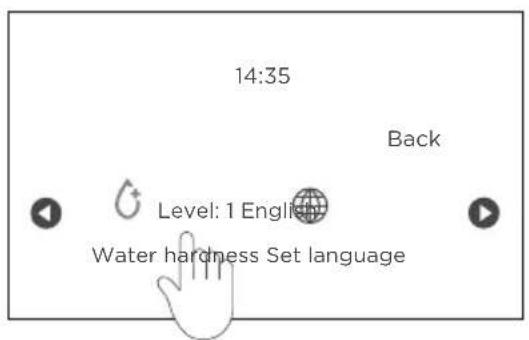
Either touch the setting to adjust or select √ to turn on or off.
④

Touch BACK to exit the menu and return to the home screen.
Auto-start
You can set AUTO START to have the appliance ready at a certain time of day (eg in the morning), so that the appliance is ready to make coffee immediately.
To enable AUTO START, the time must already be set correctly.
If the mains power switch is turned off, AUTO START will be cancelled.
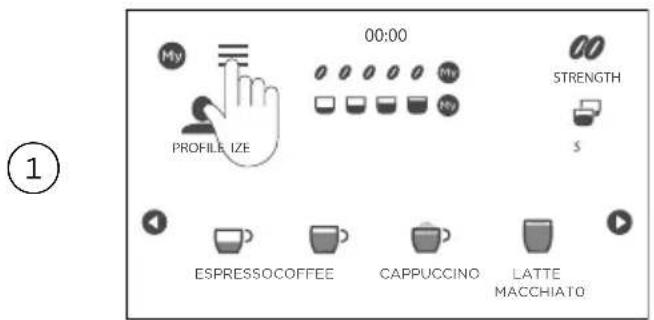
Press ☑ enter the settings menu.

Touch ◀ or ▶ until AUTO START appears on the display.
Select AUTO START.

Touch OFF to enable AUTO START, then set a time of day. The coffee maker will automatically turn on and preheat at the set time.

Touch OK to confirm, then BACK to exit the settings menu.
To cancel
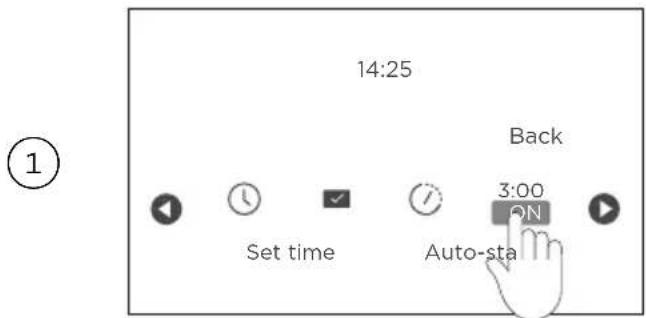
Enter the settings menu and select AUTO START.
Touch ON to turn off AUTO START, then BACK to exit.
- Do not use solvents, abrasive detergents or alcohol to clean the coffee maker. You do not need to use chemical products to clean the machine.
- None of the components of the appliance can be washed in a dishwasher with the exception of the milk container.
- Do not use metal objects to remove coffee deposits as they could scratch metal or plastic surfaces.
Emptying the coffee grounds container and drip tray
When the coffee grounds container is full, you'll need to empty and clean it before you can continue using the appliance. Even if the grounds container isn't full, it will still need to be emptied and cleaned regularly. We recommend doing this every couple of days.
To empty

EMPTY GROUNDS CONTAINER will appear on the display.
Open the door and drop the lower door panel to access the drip tray and grounds container.

Remove the grounds container, empty and clean. Ensure all coffee residue is removed, using the spatula or the brush provided.
Replace the drip tray and coffee grounds container and close the appliance door.
Emptying the drip tray
The drip tray is fitted with a red level indicator. When the indicator protrudes, the drip tray must be emptied and cleaned, otherwise the water may overflow with further use.
①
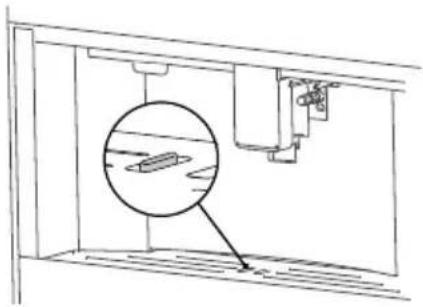
Check the drip tray. If the red indicator is protruding, it will need to be emptied.
②

Open the door and drop the lower door panel to access the drip tray and grounds container.
③

Remove the drip tray and grounds container, empty and clean.
When removing the drip tray, the grounds container must be emptied too, even if it only contains a few grounds. If this is not done, the grounds container may fill up more than expected the next time the appliance is used.
Cleaning the inside of the coffee maker
Before cleaning internal parts, the appliance must be turned off (see section ‘Turning the coffee maker off’) and unplugged from the mains power supply. Never immerse the the appliance in water.
Check regularly (about once a month) that the inside of the appliance is not dirty. To access the inside of the coffee maker, remove the grounds container and drip tray.
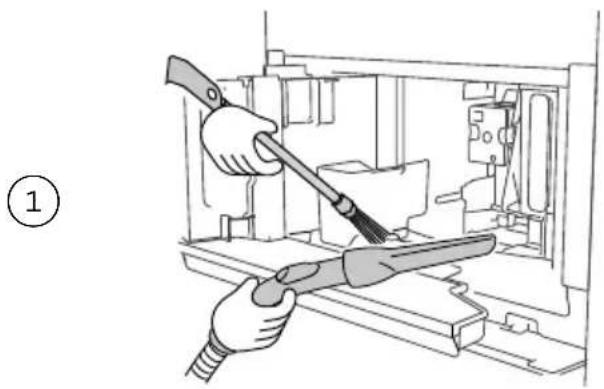
If necessary, remove coffee deposits with the brush supplied and a sponge. Remove remaining residue with a vacuum cleaner.
Cleaning the pre-ground coffee funnel
Check regularly (about once a month) that the pre-ground coffee funnel is not blocked. If necessary, remove coffee deposits with the brush supplied.
Cleaning the water tank
Clean the water tank regularly (about once a month) and whenever you replace the water softener filter (if fitted).
Clean with a damp cloth and dishwashing liquid, then rinse thoroughly before refilling and replacing back in the appliance.
If the water filter is fitted, remove and rinse with fresh running water. After replacing, you'll need to run the machine once to reactivate the filter.
Cleaning the coffee spouts

Clean the coffee spouts regularly with a sponge or cloth.
Check that the holes in the coffee spouts are not blocked. If necessary, remove coffee deposits with a toothpick.
Cleaning the infuser
The infuser must be cleaned at least once a month.
①
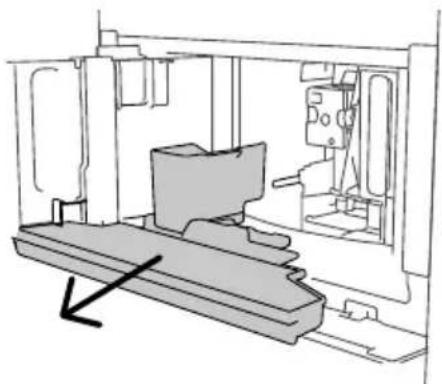
Remove the drip tray and coffee grounds container.
②

Press the two coloured release buttons on the infuser inwards and pull to remove.
Soak the infuser in water for about five minutes, then rinse.
③

After cleaning, replace the infuser by sliding it onto the internal support and pin at the bottom, then push the PUSH symbol fully in until it clicks into place.
Replace the drip tray and coffee grounds container.
④

If you are having difficulty reinserting the infuser, you may need to adjust it slightly by pushing from the top and bottom.
- The infuser must not be removed when the appliance is on. Do not use force to remove the infuser.
- Do not use dishwashing liquid to clean the infuser as it will remove the lubricant inside the piston.
- When reinserting, ensure the two release buttons have snapped back out into place.
Cleaning the milk container
Each time the milk container needs to be refilled, take it apart and clean the components.
Wash all components thoroughly with hot water and dishwashing liquid. All components except for the thermal casing are dishwasher safe.
Each time you refill the milk container, also clean the steam connection nozzle with a sponge to remove any milk residue.
When making a number of cappuccinos or milk based coffees, clean the milk container after you have prepared the last beverage.
The thermal casing must not be filled with or immersed in water. Clean with a damp cloth only.

①
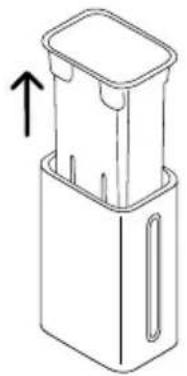
Remove the milk container from the thermal casing, holding it by the two side grips.
②

Remove the milk spout and intake tube. Turn the froth adjustment dial clockwise to the INSERT position and pull off.
③

Ensure there is no milk residue in the hollow and groove under the dial. If needed, scrape with a toothpick to remove. Rinse inside the froth adjustment dial seat and the milk frother connector hole.
④
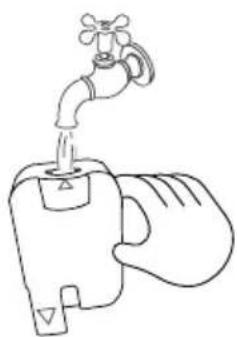
Check that the intake tube and spout are not clogged.
Replace all components. Reposition the dial (lining up the arrow with the INSERT marker), and reinsert the spout and milk intake tube.
Cleaning the milk frother
Each time you use the milk container, you'll need to run a clean cycle afterwards to clean the milk frother components.

Leave the milk container in the machine (you do not need to empty it).
Place a cup or other container under the spout.

Turn the adjustment dial to CLEAN.
CLEANING MILK CONTAINER UNDERWAY will appear on the screen.
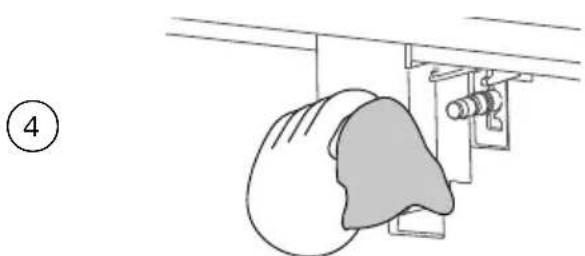
When the clean cycle is finished, remove the milk container and clean the steam connection nozzle with a sponge.
The milk container can be stored in the refrigerator, or if empty taken apart for further cleaning.
- When making a number of cappuccinos or milk based coffees, clean the milk container after you have prepared the last beverage only. To proceed with making the next beverages, when the CLEAN message is displayed, press BACK.
- If you do not clean the milk container, will appear on the screen to remind you that it needs cleaning.
• In some cases, before cleaning you must wait for the appliance to heat up.
When cleaning the internal tubes of the milk container, a little hot water and steam may leak out of the frothed milk spout. Take care to avoid burns from hot splashes of water.
Cleaning the steam wand
Clean the steam wand after every use to avoid the build-up of milk residue and prevent it from clogging.
Wash all parts of the spout thoroughly with a sponge and warm water.

Place a container under the steam wand and dispense a small amount of water.

Wait a few minutes for the spout to cool down, then extract.
Hold the spout with one hand and with the other, turn the end of the spout and pull it downwards.

Remove the steam connection nozzle by pulling it downwards.
Check the hole in the connection nozzle is not blocked. If necessary, clean using a toothpick.
Replace all components. Insert the steam connection nozzle, then the steam wand spout by pushing it upwards and turning it clockwise until firmly in place.
Rinsing the coffee maker
Use the RINSING cycle to dispense hot water from the coffee spouts and steam wand, to clean and heat the appliance's internal circuit.
If the appliance is not used for more than four days, when switched on again, we recommend performing three rinses before use.
After cleaning, it is normal for the grounds container to contain water.
Do not run this cycle without a container placed under the coffee and water spouts.
Do not leave the appliance unattended while dispensing hot water.

Touch ☐o enter the settings menu.

Touch 🔔 or 📄 to scroll to RINSING, then press ✅ to start.
After a few seconds, hot water will be dispensed from the coffee spouts.
When the cycle has finished the display will revert to the home screen.
To cancel
Touch CANCEL at any point to stop the rinsing cycle.
For best results, descale the coffee maker as soon as possible after the descale alert is shown. The descale process takes approximately 45 minutes.
You will need a 2.5L container for the water to empty into. Make sure the water dispensing spout is fitted during this process.
Take care while handling descaling solution and while running the descale cycle. We recommend wearing gloves during this process and to avoid contact with the skin.
Do not leave the appliance unattended while rinsing or emptying.
To descale

DESCALING NEEDED will appear on screen. Press OK to start immediately, or BACK to start later.
To start the cycle later, go to the settings menu.
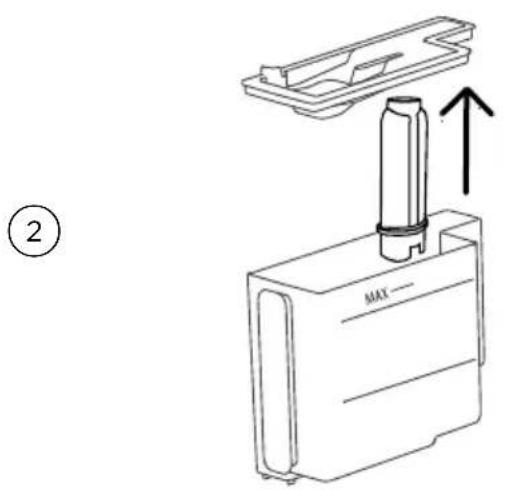
Follow the instructions on the screen.
Remove the water tank and water filter (if fitted) and empty.
Press NEXT.

Add descaling solution to the water tank, following the instructions on the screen. Place water tank back in the appliance.
Press NEXT.
④

Empty the grounds container and drip tray, then replace.
5
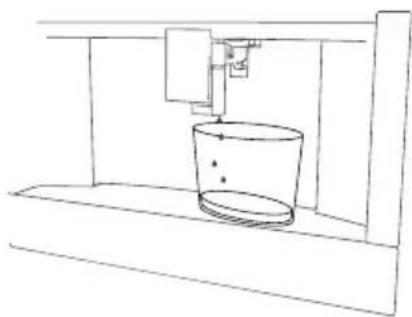
Place a 2.5L container under the coffee and water spouts.
Press OK to start, then √to confirm descaling solution has been added.
The coffee maker will begin descaling.
Rinsing
After descaling, the coffee maker will need to run at least two rinse cycles to ensure the descaling solution has been completely flushed from the internal circuits.
①

After approximately 25 minutes, descaling will stop.
Empty out the container and remove and rinse the water tank.
Fill the tank with fresh clean water up to MAX level and replace.
②

Place the 2.5L container back under the coffee and water spouts.
Press OK to start.
The coffee maker will begin rinsing.
When the water in the tank has run out, empty out the container before running the second rinse cycle.

Remove and rinse the water tank.
Replace the water filter (if using) and fill the tank up to MAX level.
Press NEXT.

Place the 2.5L container back under the coffee and water spouts.
Press OK to start.
The coffee maker will begin rinsing again.

At the end of rinsing, empty the grounds container and drip tray then replace.
Descaling is now complete and the coffee maker is ready to use again.
- If the descaling cycle is not completed correctly, eg due to a power cut, we recommend repeating the cycle.
- If the water tank has not been filled to the MAX level, you may need to do a third rinse to ensure the descaling solution has been completely flushed from the machine's internal circuits. Before starting the rinse cycle, remember to empty the drip tray.
• After descaling, it is normal for the grounds container to contain water. - If you live in an area with very hard water, the descaling alert may appear at very short intervals. This is part of normal operation.
Certain models are fitted with a water softener filter. If this is not the case with your model, we recommend purchasing one from an approved supplier.
The filter lasts approximately two months if the appliance is used regularly. If the coffee maker is left unused with the filter installed, it will last a maximum of three weeks.
Installing the filter
Remove the filter from the packaging.
①

Press ≡.
②

Press 🔒 or Ⓥ until WATER FILTER appears. Press √ to enter.
③
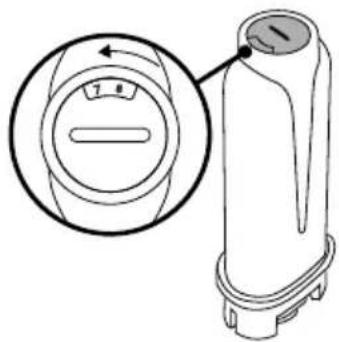
Follow the instructions on the screen. Turn the date indicator disk until the next two months of the year are displayed. Press NEXT.
④

To activate the filter, run tap water through the hole in the filter, until water comes out of the openings at the side for more than a minute.
Press NEXT.
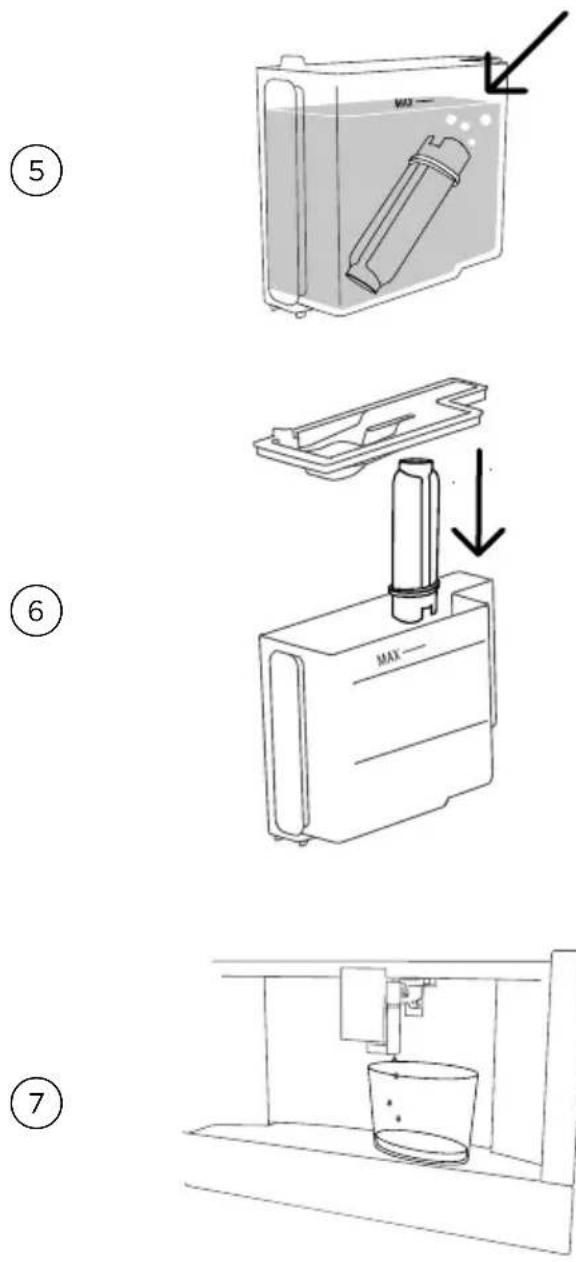
Remove the water tank and fill with fresh water. Place the filter in the tank, immersing completely for about ten seconds.
Allow any air bubbles to escape, then press NEXT.
Insert the filter into the filter housing, pushing in as far as it will go.
Replace the tank lid, then place the tank back in the appliance.
Press NEXT.
Place a 2.5L container under the coffee and water spouts.
Press OK to start.
The coffee maker will begin rinsing. Once rinsing is complete, the coffee maker is ready to use.
Replacing the filter
REPLACE WATER FILTER will appear on the screen when a new filter is needed. Remove the old filter, then follow the instructions above to install a new one.
We recommend replacing the filter every two months or if the appliance has not been used for three weeks, even if REPLACE WATER FILTER hasn't appeared on the screen. To do this, go to the WATER FILTER setting and select REPLACE WATER FILTER, then follow the instructions on the screen.
Removing the filter
To remove the filter, go to the WATER FILTER setting and select REMOVE WATER FILTER. Follow the instructions on the screen to remove.
| DISPLAYED MESSAGE POSSIBLE CAUSE WHAT TO DO | ||
| Fill tank with fresh water | Insufficient water in the tank. | Fill the tank with water and ensure that it is inserted correctly, pushing it as far as it will go until it clicks into place. |
| Insert water tank The tank is not correctly in place. | Insert the tank correctly and press as far as it will go. | |
| Empty grounds container | The grounds container is full. | Empty the grounds container and drip tray, clean and place it back in the appliance. Note: when removing the drip tray, the grounds container must be emptied, even if it contains few grounds. If this is not done, when you make the next drinks, the grounds container may fill up more than expected and clog the machine. |
| Insert grounds container After cleaning, the grounds container has not been re-inserted. | Remove the drip tray and insert the grounds container. | |
| Add pre-ground coffee, coffee max. 1 Measure | The ‘pre-ground coffee’ function has been selected without placing any pre-ground coffee in the funnel. | Place pre-ground coffee in the funnel and repeat delivery. |
| The pre-ground coffee funnel is clogged. | Empty the funnel. See section ‘Cleaning the pre-ground coffee funnel’. | |
| Add coffee, coffee max. 1 Measure | A long coffee with pre-ground coffee has been requested. | Place pre-ground coffee in the funnel and press OK to continue and complete delivery. |
| Fill beans container The coffee beans have run out. | Fill the beans container. | |
| Select a milder taste or reduce pre-ground coffee quantity | Too much coffee has been used. | Select a milder strength by pressing STRENGTH or reduce the quantity of pre-ground coffee (maximum one measure). |
| Ground too fine.Adjust mill 1 clickwhile in operation | The grinding istoo fine and thecoffee is deliveredtoo slowly ornot at all. | Repeat coffee delivery and turn thegrinding adjustment dial one clickclockwise towards7 while the coffeemill is in operation. If after making atleast two coffees, delivery is still tooslow, repeat the correction procedure,turning the grinding adjustment dialanother click until delivery is correct (seesection ‘Adjusting the coffee mill’). If theproblem persists, make sure the watertank is fully inserted. |
| If you’re using awater softener filter,an air bubble mayhave been releasedinside the circuit,obstructing delivery. | Deliver some water through thehot water spout until the flowbecomes regular. | |
| GENERAL ALARM:REFER TOUSER MANUAL | The inside ofthe appliance isvery dirty. | Clean the inside of the appliancethoroughly, as described in section‘Care and cleaning’. If the message isstill displayed after cleaning, contactCustomer Care. |
 | The applianceneeds descaling and/or the filter mustbe replaced. | The descaling procedure describedin the ‘Descaling’ section, needs tobe performed and/or the filter needsreplacing or removing as describedin section ‘Water filter’. |
| [X66T] | The tubes insidethe milk containermust be cleaned. | Turn the froth adjustment dial toCLEAN. |
 | The filter mustbe replaced. | Replace the filter or remove it asdescribed in section ‘Water filter’. |
 | The machine mustbe descaled. | The descaling procedure describedin section ‘Descaling’ needs tobe performed. |
 | The auto-startfunction is enabled. | To disable the function, refer to theinstructions under ‘Auto start’. |
 | Energy savingis enabled. | To disable energy saving, refer toinstructions under ‘Settings’. |
| Insert water spout The hot water spout is not inserted or is not inserted correctly. | Insert the water spout as far as it will go. | |
| Insert milk container The milk container is not inserted correctly. | Insert the milk container as far as it will go. | |
| Insert infuser assembly The infuser has not been replaced after cleaning. | Insert the infuser as described in section ‘Cleaning the infuser’. | |
| Water circuit empty press ok to start filling process | The water circuit is empty. | Press OK to deliver water from the spout until it flows out normally. Delivery stops automatically.If the problem persists, make sure the water tank is fully inserted. |
| Press ok to start cleaning process or turn milk froth adjustment dial | The milk container has been inserted with the froth adjustment dial in the CLEAN position. | To proceed with the CLEAN function, press OK or turn the froth adjustment dial to one of the milk positions. |
| Turn dial to CLEAN position to start cleaning | Milk has been delivered recently and the tubes inside the milk container must be cleaned. | Turn the froth adjustment dial to CLEAN. |
| Turn the milk froth adjustment dial to milk position | The milk container has been inserted with the froth adjustment dial in the CLEAN position. | Turn the dial to the required froth position. |
| Descaling needed press ok to start (~45min) | The machine must be descaled. | Press OK to start descaling or BACK to descale later. The descaling procedure described in section ‘Descaling’ needs to be performed. |
| Replace water filter press OK to start | The water softener filter is exhausted. | Press OK to replace or remove the filter, or BACK to carry out the procedure later. Follow the instructions in section ‘Water filter’. |
| PROBLEM POSSIBLE CAUSE WHAT TO DO | ||
| The coffee is not hot | The cups were not preheated. | Warm the cups by rinsing them with hot water (Note: you can use the hot water function). |
| The infuser has cooled down because two to three minutes have elapsed since the last coffee was made. | Before making the coffee, heat the infuser by rinsing using the rinse function (see section ‘Rinsing the coffee maker’). | |
| A low coffee temperature is set. | Set a hotter coffee temperature in the menu (see section ‘Settings’). | |
| The coffee is weak or not creamy enough | The coffee is ground too coarsely. | Turn the grinding adjustment dial one click counter clockwise towards 1 while the coffee mill is in operation. Continue one click at a time until you reach the desired coffee delivery. The effect is only visible after delivering two coffees (see section ‘Adjusting the coffee mill’). If coffee is still not to your preference, try using a different brand of coffee. |
| The coffee is delivered too slowly or a drop at a time | The coffee is ground too finely. | Turn the grinding adjustment dial one click clockwise towards 7 while the coffee mill is in operation above figure. Continue one click at a time until you reach the desired coffee delivery.The effect is only visible after delivering two coffees (see section ‘Adjusting the coffee mill’). |
| Coffee does not come out of one or both of the spouts | The coffee spouts are blocked. | Clean the spouts with a toothpick. |
| The appliance will not make coffee | The appliance has detected impurities in its internal circuits.CLEANING UNDERWAY is displayed on the screen. | Wait for the appliance to be ready for use again and reselect the required drink. Contact Customer Care if the problem persists. |
| The appliance does not turn on | It is not plugged into the mains socket. Plug into the mains socket. | |
| The main switch on the side of the coffee maker is not turned on. | Press the main switch. | |
| On/Off switch is not turned on. | Press ⏻ | |
| The infuser cannot be extracted | The appliance has not been turned off correctly. | Turn the appliance off by pressing the standby button (see section ‘Turning the coffee maker off’). |
| At the end of descaling, the appliance requests a third rinse | During the two rinse cycles, the water tank has not been filled to the MAX level. | Follow the instructions displayed by the appliance, but first empty the drip tray to avoid the water overflowing. |
| The milk does not come out of the milk spout | The lid of the milk container is dirty. | Clean the milk container lid as described in the ‘Cleaning the milk container’ section. |
| The milk contains large bubbles and squirts out of the milk spout or there is little froth | The milk is not cold enough, or is not light or skimmed milk. | Use light or skimmed milk at refrigerator temperature (about 5°C). If the result is not as you wished, try using a different brand of milk. |
| The froth adjustment dial is incorrectly adjusted. | Adjust following the instructions in the ‘Adjusting the foam level’ section. | |
| The milk container lid or froth adjustment dial is dirty. | Clean the milk container lid and froth adjustment dial as described in the ‘Cleaning the milk container’ section. | |
| The hot water/steam connection nozzle is dirty. | Clean the connection nozzle. See ‘Care and cleaning’. | |
| The machine emits noises or small puffs of steam while not in use | The machine is ready for use, or has recently been turned off, and condensation is dripping into the hot vaporiser. | This is part of normal operation. To limit this occurring, empty the drip tray. |
Before you call for service or assistance...
Check the things you can do yourself. Refer to the installation instructions and your user guide and check that:
① Your product is correctly installed.
② You are familiar with its normal operation.
If after checking these points you still need assistance or parts, please refer to the Service & Warranty book for warranty details and your nearest Authorised Service Centre, Customer Care, or contact us through our website fisherpaykel.com.
Complete and keep for safe reference:
Model
Serial No. ____
Purchase Date ____
Purchaser ____
Dealer
Suburb
Town
Country ____
FISHERPAYKEL.COM
© Fisher & Paykel Appliances 2023. All rights reserved.
The models shown in this guide may not be available in all markets and are subject to change at any time.
The product specifications in this guide apply to the specific products and models described at the date of issue. Under our policy of continuous product improvement, these specifications may change at any time.
For current details about model and specification availability in your country, please go to our website or contact your local Fisher & Paykel dealer.




- CONTENTS
- REGISTRATION
- IMPORTANT SAFETY INSTRUCTIONS
- COFFEE MACHINE FEATURES
- CONTROL PANEL FEATURES
- USING THE TOUCH CONTROLS
- SETTING A LANGUAGE
- FILLING THE WATER TANK
- PREPARING THE WATER CIRCUIT
- TURNING THE COFFEE MAKER ON
- TURNING THE COFFEE MAKER OFF
- MEASURING AND SETTING WATER HARDNESS
- MEASURING WATER HARDNESS
- WATER HARDNESS LEVEL
- SETTING WATER HARDNESS
- TIPS FOR A HOTTER COFFEE
- COFFEE STRENGTH
- COFFEE SIZE
- USING WHOLE COFFEE BEANS
- USING PRE-GROUND COFFEE
- TO CANCEL
- TO TOP UP
- ADJUSTING THE COFFEE MILL
- STEAMING MILK
- STEAMING MILK AUTOMATICALLY
- ADJUSTING THE FOAM LEVEL
- FILLING THE MILK CONTAINER
- MAKING MILK-BASED COFFEES AUTOMATICALLY
- STEAMING MILK MANUALLY
- DISPENSING HOT WATER
- CUSTOMISING A PROFILE
- CHANGING THE SETTINGS
- AUTO-START
- EMPTYING THE COFFEE GROUNDS CONTAINER AND DRIP TRAY
- TO EMPTY
- EMPTYING THE DRIP TRAY
- CLEANING THE INSIDE OF THE COFFEE MAKER
- CLEANING THE PRE-GROUND COFFEE FUNNEL
- CLEANING THE WATER TANK
- CLEANING THE COFFEE SPOUTS
- CLEANING THE INFUSER
- CLEANING THE MILK CONTAINER
- CLEANING THE MILK FROTHER
- CLEANING THE STEAM WAND
- RINSING THE COFFEE MAKER
- TO DESCALE
- RINSING
- INSTALLING THE FILTER
- REPLACING THE FILTER
- REMOVING THE FILTER
- BEFORE YOU CALL FOR SERVICE OR ASSISTANCE
- FISHERPAYKEL.COM
Brand : Fisher & Paykel
Model : EB60MSB1
Category : Coffee maker