
RX-D48 - Radio PANASONIC - Free user manual and instructions
Find the device manual for free RX-D48 PANASONIC in PDF.


| Product Type | Portable AM/FM Radio |
| Brand | Panasonic |
| Model | RX-D48 |
| Dimensions (Approx.) | 200 x 120 x 70 mm (7.9 x 4.7 x 2.8 in) |
| Weight (Approx.) | 500 g (1.1 lb) without batteries |
| Power Source | 3 x AA batteries (1.5V each) or AC adapter (6V DC, center positive) |
| Frequency Range AM | 530 – 1600 kHz |
| Frequency Range FM | 87.5 – 108 MHz |
| Speaker | Built-in mono speaker, 8 cm (3.15 in) diameter |
| Output Power | 0.5 W RMS |
| Headphone Jack | 3.5 mm stereo (mono output) |
| Tuning Method | Analog dial with thumbwheel |
| Antenna | FM: telescopic rod antenna; AM: built-in ferrite bar |
| Controls | On/off volume knob, tuning wheel, band selector (AM/FM) |
| Indicators | Power/battery indicator LED |
| Cleaning Instructions | Wipe with a soft, dry cloth. Do not use solvents or water. |
| Safety Precautions | Keep away from moisture and heat sources. Do not disassemble. |
| Spare Parts Availability | Contact Panasonic service center for replacement antennas or knobs. |
| Battery Life (Approx.) | Up to 80 hours with alkaline batteries (continuous use) |
| Repairability | User-replaceable batteries only. Internal repair by qualified technician. |
Frequently Asked Questions - RX-D48 PANASONIC
User questions about RX-D48 PANASONIC
0 question about this device. Answer the ones you know or ask your own.
Ask a new question about this device
Download the instructions for your Radio in PDF format for free! Find your manual RX-D48 - PANASONIC and take your electronic device back in hand. On this page are published all the documents necessary for the use of your device. RX-D48 by PANASONIC.
USER MANUAL RX-D48 PANASONIC
Operating Instructions
使用说明书
Portable Stereo CD System
携带式立体声 CD 音响系统
Model No./型号
RX-D53
RX-D48
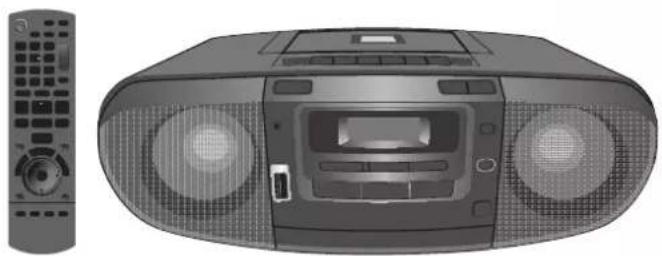
natural_image
Illustration of a portable electronic device with two speakers and a front-mounted control panel (no text or symbols visible)Thank you for purchasing this product.
For optimum performance and safety, please read these instructions carefully.
Please keep this manual for future reference.
感谢您购买本产品。
These operating instructions are applicable for models RX-D53 and RX-D48.
RX-D53 : indicates features applicable to RX-D53 only.
RX-D48 : indicates features applicable to RX-D48 only.
Your unit may not look exactly the same as illustrated. Unless otherwise indicated, illustrations in these operating instructions are of RX-D53.
CLASS 1 LASER PRODUCT
Safety precautions
WARNING!
Unit
• To reduce the risk of fire, electric shock or product damage,
- Do not expose this unit to rain, moisture, dripping or splashing.
- Do not place objects filled with liquids, such as vases, on this unit.
– Use only the recommended accessories.
- Do not remove covers.
- Do not repair this unit by yourself. Refer servicing to qualified service personnel.
| CAUTION | - LASER RADIATION WHEN OPEN, DO NOT SEE INTO BEAM. | PDA 21 CER (March 3) |
| CAUTION | - CLASS IM MURBLE AND INMIBLE LASER RADIATION WHEN OPEN, DO NOT VIEW DIRECTLY WITH OPTICAL INSTRUMENTS. | EROSKEI - AID Max. IV |
| VARNING | - CLASS IM MURBLE, OCH ONLINE LASERSTRAFING MA DIANA DEL AR OPPAR, BETHANAT EN STRAFLIN DIRECT GEROM OPTEXT INSTRUMENT. | |
| FORSITIG | - SYSTEMS OF GRAVING LASERSTRAFING KASS IM NUP LAGET ER ABENT, UNIDAD AT SE LEGE PARED OPTIKE INSTRUMENTS. | |
| VARO! | - ANTARESSA OLUT ACT IBA LOUKEN IM MURABLE, NATAYNATOTA, LASERASTA TOLIE, ALA KATO OF BIGLLA, LAFTELLA SUDHAIN SATISCREIN. | |
| VORSICHT | - SICHTEBANE, LAD LASER THAPPE, LASERTRABILING CLASSE, IM MENA BREADUNG GUSTNET, NICHY DRET NET OPTICOHEN INSTRUMENTS BETACHETEN. | |
| ATTENTION | - RAVONEMENT LASER VIBBLE ET INMIBLE, CLASSE IM EN CAS TOURISMUS, NE PAS REGARDEN DIRECTOMAT LA CHADE ENVIRONMENTAL OPPIQUE. | |
| PRECAUCTION | - PROPRIED LASER VIBBLE ET INMIBLE DE CLASE IM AL ESTAR AMERTO, NO VEACREDITAMENTE CON INSTRUMENTOS OPTICOS. | |
Inside of product
CAUTION!
Unit
• To reduce the risk of fire, electric shock or product damage,
- Do not install or place this unit in a bookcase, built-in cabinet or in another confined space. Ensure this unit is well ventilated.
- Do not obstruct this unit's ventilation openings with newspapers, tablecloths, curtains, and similar items.
- Do not place sources of naked flames, such as lighted candles, on this unit.
• This unit is intended for use in tropical climates.
• Install this unit so that the AC mains lead can be unplugged from the socket outlet immediately if any problem occurs.
- This unit may receive radio interference caused by mobile telephones during use. If such interference occurs, please increase separation between this unit and the mobile telephone.
- This unit utilizes a laser. Use of controls or adjustments or performance of procedures other than those specified herein may result in hazardous radiation exposure.
- Avoid using or placing this unit near sources of heat. Do not leave it in an automobile exposed to direct sunlight for a long time with the doors and windows closed as this may deform the cabinet.
- Avoid cuts, scratches, or poor connections in the AC mains lead, as they may result in possible fire or electric shock hazard. Also, excessive bending, pulling or splicing of the lead should be avoided.
- Do not unplug the AC mains lead by pulling on the lead. To do so may cause premature failure or shock hazard.
- Do not operate this unit in a bathroom, as a potential shock hazard may result.
- When not in use, disconnect the AC mains lead from the household mains socket.
Batteries
- If this unit is not used for a long period of time or is used only from an AC power source, remove all the batteries to prevent potential damage due to possible battery leakage.
- Insert so the poles (+ and -) match those in the unit and the remote control.
- Do not mix old and new batteries.
- Do not use different types of batteries at the same time.
- Do not break open or short-circuit the battery.
- Do not charge the alkaline or manganese battery.
- Do not use the battery if the cover has peeled off.
- Do not heat or expose to flame.
- Do not leave the battery(ies) in a car exposed to direct sunlight for a long period of time with doors and windows closed.
- Remove the battery if you do not use the unit or the remote control for a long period of time. Keep in a cool, dark area.
- Danger of explosion if battery is incorrectly replaced. Replace only with the type recommended by the manufacturer.
- When disposing the batteries, please contact your local authorities or dealer and ask for the correct method of disposal.
- If you see this symbol -
Information on Disposal in other Countries outside the European Union
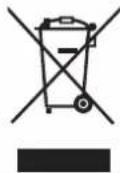
This symbol is only valid in the European Union. If you wish to discard this product, please contact your local authorities or dealer and ask for the correct method of disposal.
Note on AC mains lead (RX-D53 only)
(For Saudi Arabia and Kuwait only)
Before use
Remove the connector cover.
How to replace the fuse
The location of the fuse differs according to the type of AC mains plug (figures A and B). Confirm the AC mains plug fitted and follow the instructions below. Illustrations may differ from actual AC mains plug.
- Open the fuse cover with a screwdriver.
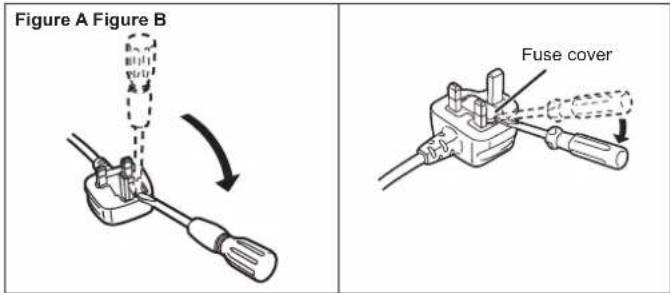
- Replace the fuse and close or attach the fuse cover.
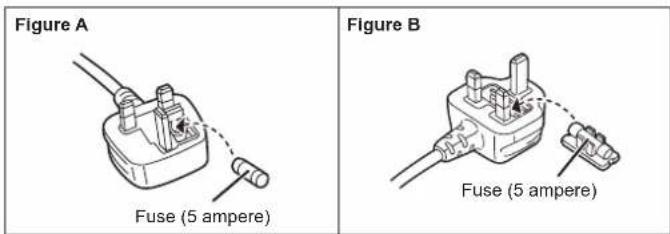
Table of contents
Safety precautions 2
Note on AC mains lead (RX-D53 only)....2
Supplied accessories 3
Power sources .... 3
Remote control 3
Overview of controls 4
Disc....5
Radio 6
USB (RX-D53 only) 6
Cassette tape 7
Clock and timers....7
Sound effects 8
Music port 8
Troubleshooting 8
Specifications 9
Maintenance....9
Supplied accessories
Check and identify the supplied accessories.
□ 1 x AC mains lead

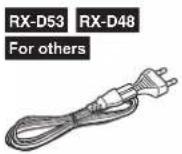
□ 1 x Remote control
RX-D53 (N2QAYA000008)
RX-D48 (N2QAYA000009)
Power sources
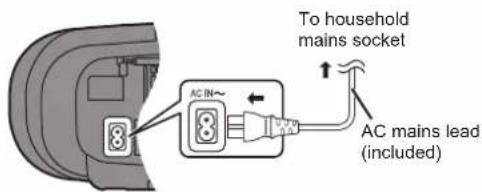
Using the household mains socket
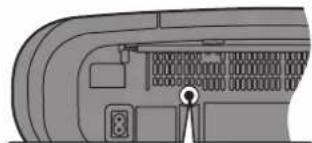
Connect the AC mains lead firmly to the unit and the household mains socket.
Rear view
Note:
- The included AC mains lead is for use with this unit only. Do not use it with other equipment.
- The unit is in the standby condition when the AC power supply cord is connected. The primary circuit is always "live" as long as the power cord is connected to an electrical outlet.
Using batteries (not included)
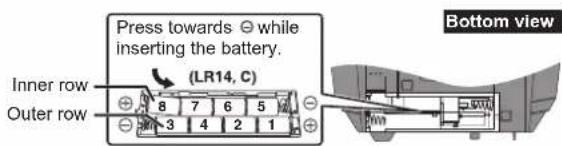
• Use only alkaline batteries.
- The unit cannot be powered by batteries if the AC mains lead is connected. Disconnect the AC mains lead from the unit to operate on battery power.
- The remote control cannot turn the unit on when batteries are used.
When to change the batteries
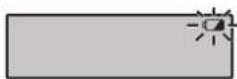
When the battery indicator begins flashing, replace all 8 of the batteries. It is also a good idea to replace all the batteries before recording.
Note:
Before any function starts, the battery indicator may flash although the batteries are not drained. The indicator will display its current status when the unit is powered from the household mains socket by using the AC mains lead.
Memory back-up
When the power supply is interrupted, the current time, timer settings and radio stations you have set are saved if you have inserted back-up batteries (not included).
- Use either alkaline or manganese batteries. - These batteries do not power the unit.
When to change the batteries
Bottom view
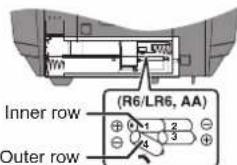
The batteries last about a year.
Connect the unit to AC power before replacing the batteries.
Before connecting or disconnecting the AC mains lead, press [■/▲, STOP/EJECT] to stop the tape and press [TAPE/OFF] to turn the unit off. The back-up batteries wear out faster if the cord is disconnected with the power still on.
Remote control
Insert the batteries (not included) observing the correct polarities (+, -).
Aim at the remote control signal sensor, avoiding obstacles, at a maximum range of 7 m directly in front of the unit.
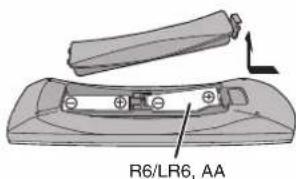
Operations in these instructions are described mainly using the remote control, but you can perform the operations on the main unit if the controls are the same.
RX-D53
RX-D53
natural_image
Hand pointing at a button with a magnified circular detail (no text or symbols visible)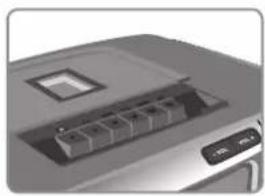
natural_image
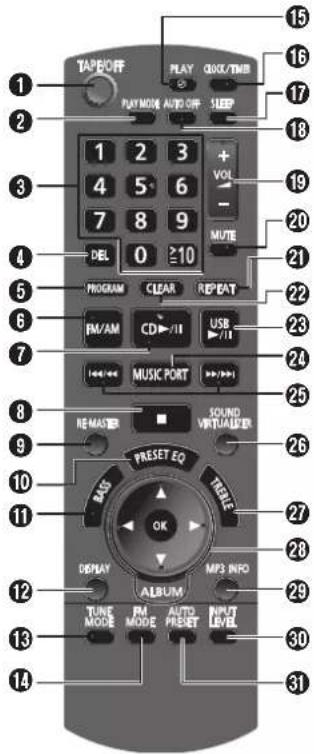
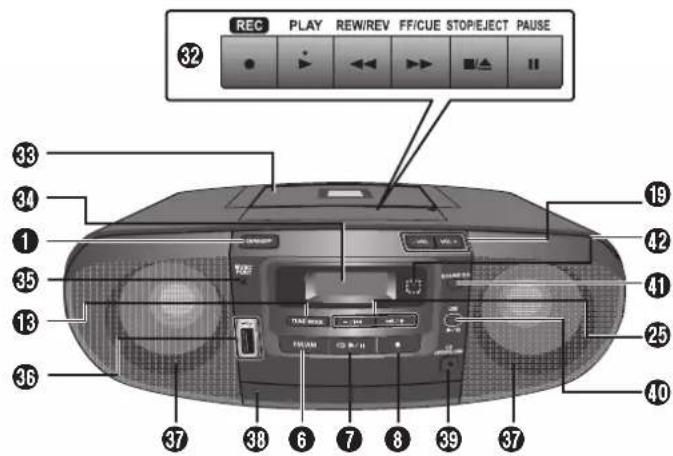
Close-up of a printer's front panel showing internal components (no text or symbols visible)① Tape mode/standby switch
- Press to switch the unit to standby mode.
② Play mode function
3 Numeric buttons
- To select a 2-digit number, press [10] once then the two digits.
• To select a 3-digit number, press [10] twice then the three digits.
Program delete function
5 Program function
6 Tuner (FM/AM) selection
⑦ Disc play or pause
8 Stop disc playback
EQ OFF selection RX-D48 (by remote control only)
9 RE-MASTER selection
⑩ Preset EQ selection
⑪ BASS selection
⑫ Track information display function
⑬ Tuning mode selection
14 MONO selection for FM mode
⑮ Play timer setting
⑯ Clock or timer setting
⑰ Sleep timer setting
18 Auto off function
RX-D53 Select either "ON A.OFF" or "OFF A.OFF".
RX-D48 Select either "ON" or "OFF".
This auto off function allows you to turn off the unit in disc or USB mode only after left unused for 10 minutes.
- Press the button to activate the function.
- Press the button again to cancel.
- The setting is maintained even if the unit is turned off.
19 Volume control
20 Muting function
- Press the button to activate the function.
- Press the button again or adjust the volume to cancel.
21 Repeat function
22 Program clear
②3 USB play or pause RX-D53
Stop disc playback RX-D48
24 Music port selection
natural_image
Diagram of a computer monitor with ports and cables (no text or labels)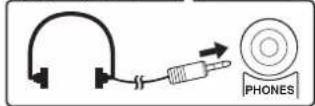
Headphone Jack (PHONES)
Plug type: ∅ 3.5 mm stereo (not included)
- Avoid listening for prolonged periods of
time to prevent hearing damage.
- Excessive sound pressure from earphones and headphones can cause hearing loss.
- Listening at full volume for long periods may damage the user's ears.
25 Track skip or search, check program content, preset channel selection, tuning function, time adjustment, bass or treble adjustment Remote control: [I◄◄/◄◄] or [►►/►►] Main unit: [-/◄◄] or [►►I/+]
26 Sound virtualizer function
27 TREBLE selection
28 [OK]: confirm selection ▲/▼: album selection
[◀/▶] have the exact same functions as those of [◀◀/◀◀] or [▶▶/▶▶]
29 MP3 information display RX-D53
Input level selection RX-D48
30 Input level selection RX-D53
Manual preset selection RX-D48
31 Auto preset selection
32 Cassette play operations
33 Cassette deck
34 Display panel
35 Music port jack
36 USB port RX-D53
37 Speakers
These speakers do not have magnetic shielding. Do not place them near televisions, personal computers or other devices easily influenced by magnetism.
38 Disc tray
39 Disc tray open or close
40 USB play or pause RX-D53
Music port selection RX-D48
⑫ Remote control signal sensor
Basic play
1 Press [▲, CD OPEN/CLOSE] to open the disc tray and then load the disc with the label facing up.
2 Press [▲, CD OPEN/CLOSE] again to close.
3 Press [CD ▶/II] to start play.
| Stop playback | Press [■] during play. |
| Pause play | Press [CD ▶/■] during play.Press again to resume play. |
| Skip tracks | Press [|◀◀/◀◀] or [▶▶/▶▶] (main unit: [-/l◀◀] or [▶▶/+]).During RANDOM or 1-ALBUM RANDOM play, you cannot skip to tracks that have been played. |
| Search through tracks | CDPress and hold [|◀◀/◀◀] or [▶▶/▶▶] (main unit: [-/l◀◀] or [▶▶/+]) during play or pause.During program play (→ see right), or random play (→ see below, "Play Mode function"), you can search only within the track. |
| Skip album | MP3Press [▲/▼, ALBUM] in the play mode.Press [▲/▼, ALBUM] once and then the numeric buttons in the stop mode. |
Play Mode function
CD MP3
Press [PLAY MODE] to select the desired mode.
| 1-TRACK Play one selected track on the disc. | |
| RX-D53 ITR RX-D48 | Press the numeric buttons to select the track. |
| 1-ALBUM RX-D53 IALBUM RX-D48 ALBUM | MP3Play one selected album on the disc.Press [▲/▼, ALBUM] to select the album. |
| RANDOM Play a disc randomly. | |
| RX-D53 RND RX-D48 RND | |
| 1-ALBUM RANDOM RX-D53 IALBUM RND RX-D48 ALBUM RND | MP3Play all tracks in one selected album randomly.Press [▲/▼, ALBUM] to select the album. |
Checking the track information
You can view the information of the current track from the display panel.
Press [DISPLAY] repeatedly during play or pause.

flowchart
graph LR
    CD["CD"] -->|Elapsed play time ↔ Remaining play time| RX-D53["RX-D53 MP3"]
    RX-D53 -->|Elapsed play time ↔ Track name Album name| MP3["MP3"]
RX-D53 MP3
Press [MP3 INFO] repeatedly during play or pause.
ID3 (Album) ID3 (Track) ID3 (Artist) Elapsed play time
Note:
• This unit supports ver. 1.0 and 1.1 ID3 tags.
- ID3 is a tag embedded in MP3 track to provide information about the track.
- Titles containing text data that the unit does not support may be displayed differently.
- RX-D48 Display for MP3 shows only "Elapsed play time".
Note about using a DualDisc
The digital audio content side of a DualDisc does not meet the technical specifications of the Compact Disc Digital Audio (CD-DA) format so playback may not be possible.
Note on CDs
Choose discs with this mark:

- This unit can access up to 99 tracks.
- This unit can play MP3 files and CD-DA format audio CD-R/RW that have been finalised.
- It may not be able to play some CD-R/RW due to the condition of the recording.
- Do not use irregularly shaped disc.
- Do not use disc with labels and stickers that are coming off or with adhesive exuding from under labels and stickers.
- Do not attach extra labels or stickers on the disc.
- Do not write anything on the disc.
Advanced play
Repeat play
CD MP3
You can repeat program play or other selected play mode.
To activate
Press [REPEAT].
RX-D53
"ON REPEAT" and "are displayed.
RX-D48
" is displayed.
To cancel
Press [REPEAT] again.
RX-D53
"OFF REPEAT" is displayed and "is cleared.
RX-D48
" is cleared.
Program play
This function allows you to program up to 24 tracks.
CD
1 Press [CD ▶/II] and then [■].
2 Press [PROGRAM].
"PGM" is displayed.
3 Press the numeric buttons to select your desired track.
Repeat this step to program other tracks.
4 Press [CD ▶/III] to start play.
MP3
1 Press [CD ▶/III] and then [■].
2 Press [PROGRAM].
"PGM" is displayed.
3 Press [▲/▼, ALBUM] to select your desired album.
4 Press [▶▶/▶▶] once and then the numeric buttons to select your desired track.
5 Press [OK].
Repeat steps 3 to 5 to program other tracks.
6 Press [CD ▶/II] to start play.
| Cancel program mode | Press [PROGRAM] in the stop mode. |
| Replay the program | Press [PROGRAM] then [CD ▶/III] in the stop mode. |
| Check program contents | Press [I◄◄/◄◄] or [►►/►►I] (main unit: [-I◄◄] or [►►I/+]) when “PGM” is displayed in the stop mode.To check while programming, press [PROGRAM] twice after “PGM” appears, then press [◄◄/◄◄] or [►►/►►I]. |
| Add to the program | CDRepeat step 3 in the stop mode.MP3Repeat steps 3 to 5 in the stop mode. |
| Clear the last track Press [DEL] in the stop mode. | |
| Clear all programmed tracks | Press [CLEAR] in the stop mode."CLR ALL" RX-D53 ("CLEAR" RX-D48) is displayed. |
Note:
- When you try to program more than 24 tracks, "PGM FULL" RX-D53
("FULL" RX-D48) appears.
- The program memory is cleared when you open the disc tray.
Note on MP3
- Files are treated as tracks and folders are treated as albums.
• This unit can access up to 999 tracks, 255 albums and 20 sessions. - Disc must conform to ISO9660 level 1 or 2 (except for extended formats).
- To play in a certain order, prefix the folder and file names with 3-digits numbers in the order you want to play them.
Limitations on MP3 play
- If you have recorded MP3 on the same disc as CD-DA, only the format recorded in the first session can be played.
- Some MP3s may not be played due to the condition of the disc or recording. - Recordings will not necessarily be played in the order you recorded them.
MPEG Layer-3 audio coding technology licensed from Fraunhofer IIS and Thomson.
Radio
Manual tuning
1 Press [FM/AM] to select "FM" or "AM".
2 Press [TUNE MODE] to select "MANUAL". RX-D53
If "PGM" is displayed, press [TUNE MODE] to clear it. RX-D48
3 Press [|◀◀/◀◀] or [▶▶/▶▶-] (main unit: [-/|◀◀] or [▶▶/-+]) to select the frequency of the required station.
To tune automatically, press and hold [|◀◀/◀◀] or [▶▶/▶▶] until the frequency starts changing rapidly. The unit begins auto tuning, stopping when it finds a station.
• Auto tuning may not function when there is excessive interference.
- To cancel auto tuning, press [I◄◄/◄◄] or [►►/►►] once again.
To improve reception
FM: Extend the whip antenna and adjust its direction.
AM: Adjust the position of the unit.
To improve FM sound quality
When "FM" is selected
Press [FM MODE] to display "MONO".
To cancel
Press [FM MODE] again.
• MONO is also cancelled if the frequency is changed.
- Turn off "MONO" for normal listening.
Memory preset
Up to 16 stations each can be set in the FM and AM bands.
Preparation
Press [FM/AM] to select "FM" or "AM".
Automatic presetting
RX-D53
1 Press [PLAY MODE] repeatedly to select either "CURRENT" or "LOWEST".
CURRENT Tuning begins from the current frequency.
LOWEST Tuning begins from the lowest frequency.
2 Press [AUTO PRESET] to start presetting.
RX-D48
Press [AUTO PRESET] to start presetting.
The tuner presets all the stations it can receive into the channels in ascending order. When finished, the last station memorised is tuned in.
Manual presetting
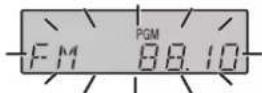
1 Press [PROGRAM] RX-D53 ([MANUAL PRESET] RX-D48). "PGM" is displayed.
2 Within 10 seconds or so
Press [i◄◄/◄◄] or [►►/►►] to tune to the required station.
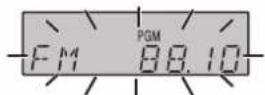
3 Press [PROGRAM] RX-D53 ([MANUAL PRESET] RX-D48).
4 Press the numeric buttons to select a channel.
The station occupying a channel is erased if another station is preset to that channel.
5 Repeat steps 2 to 4 to preset more stations.
Selecting a preset station
Press the numeric buttons to select a channel.
OR
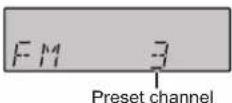
1 Press [TUNE MODE] to select "PRESET". RX-D53
Press [TUNE MODE] to display "PGM". RX-D48
2 Press [|◀◀/◀◀] or [▶▶/▶▶] (main unit: [-/◀◀] or [▶▶/+]) to select the channel.
AM allocation setting (by main unit only)
This system can also receive AM broadcasts allocated in 10 kHz steps.
To change the step from 9 kHz to 10 kHz
1 Press and hold [FM/AM]. After a few seconds the display changes to a flashing display of the current minimum frequency.
2 Continue to hold down [FM/AM].
When the minimum frequency changes, release the button.
• To return to the original step, repeat the above steps.
• After the setting is changed, any previously preset frequency will be cleared.
USB (RX-D53 only)
MP3
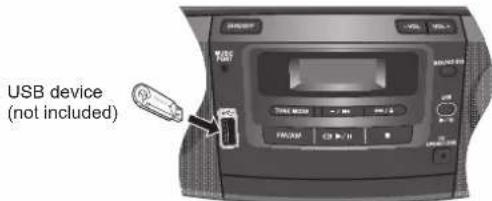
The USB connectivity enables you to connect and play MP3 tracks from USB mass storage class. Typically, USB memory devices (bulk only transfer).
Preparation
Before connecting any USB mass storage device to the unit, ensure that the data stored therein has been backed up.
Note:
- It is not recommended to use a USB extension cable. The device connected via the cable will not be recognised by this unit.
- When you connect your digital audio player to the USB port, it charges all the time except in standby mode.
Basic play
1 Reduce the volume and connect the USB mass storage device to the USB port.
2 Press [USB ▶/III] to start play.
| Stop playback | Press [■] during play. “RESUME” is displayed. The position is memorised. Press [USB ▶/■] to resume play. Press [■] again to clear the position. |
| Pause play | Press [USB ▶/■] during play. Press again to resume play. |
| Skip tracks | Press [◀◀/◀◀] or [▶▶/▶▶] (main unit: [-/i◀◀] or [▶▶/+]). |
| Skip album | Press [▲/▼, ALBUM] in the play mode. Press [▲/▼, ALBUM] once and then the numeric buttons in the stop mode. |
Note on USB
Compatible devices
Devices which are defined as USB mass storage class:
- USB devices that support bulk only transfer.
• USB devices that support USB 2.0 full speed.
Supported format
- Folders are defined as album.
- Files are defined as track.
- Track must have the extension ".mp3" or ".MP3".
- Only FAT12, FAT16 and FAT32 file systems are supported.
• CBI (Control/Bulk/Interrupt) is not supported. - A device using NTFS file system is not supported.
- Depending on the sector size, some files may not work.
• Maximum album: 255 albums
• Maximum track: 2500 tracks
• Maximum track in one album: 999 tracks
Basic play
Use normal position tapes.
High position and metal position tapes can be played, but the unit will not be able to identify the characteristics of these tapes.
1 Press [TAPE/OFF].
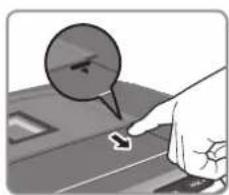
2 Open the cassette operation buttons' lid.
3 Press [■/▲, STOP/EJECT] and insert the cassette.
Insert with the side to be played facing up and the exposed tape facing towards you. Close the deck by hand.
4 Press [▶, PLAY] to start play.
| Stop tape playback | Press [■/▲, STOP/EJECT]. |
| Pause play | Press [III, PAUSE].Press again to resume play. |
| Fast-forward and rewind | Press [◀◀, REW/REV] or [▶▶, FF/CUE] in the stop mode. |
| Search for a specific point | Press [◀◀, REW/REV] (to search backward) or [▶▶, FF/CUE] (to search forward) during playback.Play is resumed when the button is released. |
Recording
Use normal position tapes.
High position and metal position tapes can be used, but the unit will not be able to record or erase them correctly.
Preparation
Wind up the source tape so recording can begin immediately.
1 Press [■/▲, STOP/EJECT] and insert the cassette to be recorded. Insert with the side to be recorded facing up and the exposed tape facing towards you.
2 Select the source to be recorded.
| Disc 1. Insert the disc you want to record.Press [CD ▶/II] and then [■].2. Prepare the desired disc recording mode.Record programmed tracksProgram the tracks you want (→ page 5).Record specific albums or tracksPress [PLAY MODE] to select the desired mode(→ page 5). | |
| Radio | Tune in the station (→ page 6). |
| USB RX-D53 | 1. Prepare the USB mass storage device for recording(→ page 6).2. Press [◀◀/◀◀] or [▶▶/▶▶] (main unit: [-/l◀◀]or [▶▶/+]) to select the desired track for recording. |
| Music port | Select music port (→ page 8). |
3 Press [● FEC] to start recording.
| Stop recording | Press [■/▲, STOP/EJECT]. |
| Record on the other side of the tape | Turn the cassette over and press [● REC]. |
| Erase a recorded sound | 1. Press [TAPE/OFF].2. Insert the recorded cassette.3. Press [● REC]. |
Note:
Changes to volume and sound quality do not affect recording.
Erasure prevention
The illustration shows how to remove the tabs to prevent recording. To record on the tape again, cover as shown.
To prevent recording
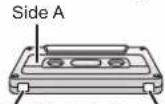
Tab for Side B Tab for Side A
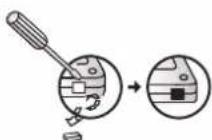
To re-record

Adhesive tape
Note:
- Tapes exceeding 100 minutes are thin and can break or get caught in the mechanism.
- Tape slack can get caught up in the mechanism and should be wound up before the tape is played.
- Endless tapes can get caught up in the deck's moving parts if used incorrectly.
Setting the clock
This is a 24-hour clock.
1 Press [CLOCK/TIMER].
Each time you press the button:
$$ \begin{array}{c} \text { CLOCK } \longrightarrow \oplus \text { PLAY ON } \ \text { Original display } \end{array} $$
2 Within 5 seconds or so
Press [|◀◀/◀◀] or [▶▶/▶▶] to set the time.
Holding down the button will speed up the time selection.
3 Press [CLOCK/TIMER] to finish setting the time.
Displaying the clock
Press [CLOCK/TIMER] to display the clock for few seconds.
Note:
- Reset the clock regularly to maintain accuracy.
- When the unit is in standby mode and it is powered by batteries, clock will not be displayed.
Using the play timer
You can set the timer to come on at a certain time to wake you up.
Preparation
- Turn the unit on and set the clock.
- Prepare the music source you want to listen to; disc, radio, USB (RX-D53 only) or music port source, and set the volume.
1 Press [CLOCK/TIMER] repeatedly to select the play timer.
2 Within 5 seconds or so
Press [|◀◀/◀◀] or [▶▶/▶▶] to set the starting time.
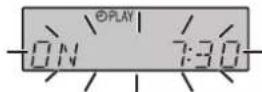
3 Press [CLOCK/TIMER] to confirm.
4 Repeat steps 2 and 3 to set the finishing time.
To activate the timer
5 Press [∅ PLAY] to turn on the timer.
$$ ⓧ P L A Y \leftrightarrow N o d i s p l a y (o f f) $$
6 Press [TAPE/OFF] to turn off the unit.
| Change the settings | Repeat steps 1 to 4 and 6 (→ see above). |
| Change the source or volume | 1. Press [∅ PLAY] to clear the timer indicator from the display.2. Make changes to the source or volume.3. Perform steps 5 and 6 (→ see above). |
| Check the settings (when the unit is on or in standby mode) | Press [CLOCK/TIMER] repeatedly to select "∅ PLAY" (there is no display when the unit is powered by batteries and is in standby mode). |
| Cancel | Press [∅ PLAY] to clear the timer indicator from the display. |
Note:
- The play timer will start at the preset time, with the volume increasing gradually to the preset level.
- The timer comes on at the set time every day if the timer is on.
- The unit must be in the standby mode for the timer to function.
- If you turn the unit off and on again while a timer is functioning, the finish time setting will not be activated.
Using the sleep timer
This function enables you to turn off the unit automatically after the set time except in tape mode.
Press [SLEEP] repeatedly to select your desired time (in minutes).
To cancel
Press [SLEEP] repeatedly to select "OFF".
Changing the remaining time
Press [SLEEP] to show the remaining time, and press [SLEEP] again to select your desired time.
Note:
• The play and sleep timer can be used together.
- The sleep timer always has priority. Be sure not to overlap timer settings.
Sound effects
Changing the sound quality
Preset EQ
Press [PRESET EQ] (main unit: [SOUND EQ]) repeatedly to select your desired setting.
RX-D53
Clarifies higher frequencies
For background music
Adds gloss to vocal
Cancels the EQ selection
BASS or TREBLE
Enables you to enjoy the lower or higher pitch sound.
1 Press [BASS] or [TREBLE] to select your desired setting.
2 Press [◀◀/◀◀] or [▶▶/▶▶] to adjust the level.
Note:
• The level of the pitch is between -4 to +4.
- Select "EQ OFF" to cancel BASS or TREBLE.
RE-MASTER
MP3
This feature reproduces the frequencies lost during recording (original soundtrack) to give you a sound closer to the original.
Press [RE-MASTER] repeatedly to select either "ON RE-MASTER" or "OFF RE-MASTER" RX-D53 ("ON R.M" or "OFF R.M" RX-D48).
Sound virtualizer
Enables you to add natural width and depth to the stereo sound.
Press [SOUND VIRTUALIZER] to display "||||||||". Press the button again to cancel.
Note:
• Recording is not affected by this feature.
• The actual effect depends on the source played.
Music port
You can connect a portable audio equipment and listen to the audio through this system.
Preparation
Switch off the equalizer function (if there is any) of the portable audio equipment before you plug into the MUSIC PORT jack. Otherwise, sound from the speaker may be distorted.
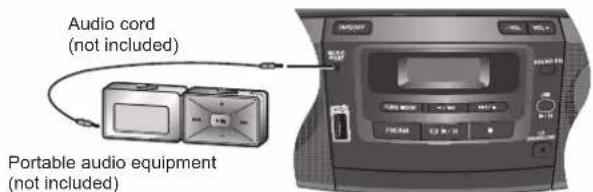
1 Plug the audio cord into the MUSIC PORT jack.
2 Press [MUSIC PORT].
3 Play the portable audio equipment.
Note:
Read the operating instructions of the portable audio equipment for details.
Level adjustment
You can select the sound input level of your portable audio equipment.
Press [INPUT LEVEL] to select your desired setting.
RX-D53
HIGH (high) ← LOW (low)
RX-D48
HI (high) ⊕O (low)
Note:
Select low if the sound is distorted when level high is activated.
Troubleshooting
Before requesting service, make the following checks. If you are in doubt about some of the check points, or if the solutions indicated in the chart do not solve the problem, consult your dealer for instructions.
Common problems
No response when remote control buttons are pressed.
- Check that the batteries are installed correctly (→ page 3).
- Replace the batteries if they are worn (→ page 3).
The unit cannot be turned on from the remote control.
- Turn the unit on from the main unit if you are using batteries to power the unit.
Clock display is not shown when the unit is powered by batteries and is in standby mode.
- Connect to the household AC power in order to view the display (→ page 3, 7).
Distorted sound or no sound.
- Adjust the volume.
A "humming" sound can be heard during play.
- An AC mains lead or fluorescent light is near the unit. Keep other appliances and cords away from the unit.
"F76" is displayed.
- There is a power supply problem. Consult the dealer.
"UO1" is displayed.
- Replace the batteries or use household AC power (→ page 3).
Discs
"ERROR" is displayed.
- Incorrect operation performed. Read the instructions and try again.
Incorrect display or play will not start.
- You have not inserted the disc correctly; insert it correctly.
• Disc may be dirty. Wipe it clean. - Replace the disc if it is scratched, warped, or non-standard.
- Condensation has formed: Wait 1 to 2 hours for it to evaporate.
Radio
A beat sound is heard.
- Turn the television off or move it away from the unit.
A low hum is heard during AM broadcast.
- Keep other appliances and cords away from the unit.
Cassette tape
Poor sound quality.
- Clean the heads (→ page 9).
Recording cannot be performed.
- If the erasure prevention tabs have been removed, cover the holes with adhesive tape (→ page 7).
The cassette cannot be ejected.
- The batteries are flat. Replace the batteries or connect to household AC power (→ page 3).
- Press [▶, PLAY] then [■/▲, STOP/EJECT].
USB (RX-D53 only)
"NO PLAY" is displayed.
- The USB drive format or its contents is/are not compatible with the system.
The USB drive or its contents cannot be read.
- Unplug the USB device and insert it again.
- The USB host function of this product may not work with some USB devices.
- USB devices with storage capacity of more than 8 gigabytes may not work in some instances.
Slow operation of the USB device.
- Large file size or high memory USB flash drive takes longer time to read.
RX-D53
HIGH (high) ← LOW (low)
Note:
Select low if the sound is distorted when level high is activated.
Amplifier section
Output power 4 W x 2 (RMS MAX / DC)
PMPO output power 90 W
FM/AM tuner section
Frequency Modulation (FM)
Frequency range 87.50 MHz to 108.00 MHz (50 kHz step)
Amplitude Modulation (AM)
Frequency range 522 kHz to 1629 kHz (9 kHz step) 520 kHz to 1630 kHz (10 kHz step)
Terminals section
Headphone jack
Terminal Stereo, 3.5 mm jack (32 Ω)
Music port (front) jack
Sensitivity 100 mV, 4.7 k Ω
Terminal Stereo, 3.5 mm jack
Disc section
Disc played (8 cm or 12 cm)
(1) CD-Audio (CD-DA)
(2) CD-R/RW (CD-DA, MP3 *formatted disc)
(3) MP3
MPEG-1 Layer 3, MPEG-2 Layer 3
Bit rate
MP3 32 kbps to 320 kbps
Sampling frequency
CD 44.1 kHz
MP3
32 kHz, 44.1 kHz, 48 kHz
16 bit linear
Decoding
Beam source
Semiconductor laser {wavelength 795 nm (CD)}
40 Hz to 20 kHz
Frequency response
2 channel, stereo
Number of channels
Less than possible measurement data
Cassette deck section
Track system 4 track, 2 channel, stereo
| Monitor system | Variable sound monitor |
| Recording system | AC bias 84 kHz |
| Erase system | Multi Pole magnet |
| Frequency response | |
| NORMAL | 50 Hz to 12 kHz |
USB section (RX-D53 only)
USB port
| Media file format support | MP3 (°.mp3) |
| USB device file system | FAT12, FAT16, FAT32 |
| USB port power | 500 mA (Max) |
Speaker section
| Speakers | Impedance 4 Ω |
| Full range | 2 x 8 cm |
General
| Power supply | |
| AC | 220 V to 240 V, 50/60 Hz |
| Battery | 12 V (8 x LR14, C) |
| Memory back-up | 6 V (4 x R6/LR6, AA) |
| Power consumption 17 W | |
| Battery life (use only alkaline batteries) | |
| Radio broadcast | 9 hours |
| Radio recording | 9 hours |
| CD playback | 6 hours |
| CD recording | 7 hours |
| Tape playback | 8 hours |
| Dimensions (W x H x D) | 408 mm x 148 mm x 271 mm |
| Mass | RX-D53 3.2 kg without batteries (3.8 kg with batteries) |
| RX-D48 3.1 kg without batteries (3.7 kg with batteries) | |
| Operating temperature range | 0°C to +40°C |
| Operating humidity range | 35% to 80% (no condensation) |
| Power consumption in standby mode | 2 W (240 V) (approximate) |
Note:
- Specifications are subject to change without notice.
Mass and dimensions are approximate.
- Total harmonic distortion is measured by the digital spectrum analyzer.
Maintenance
If the surfaces are dirty
To clean this unit, wipe with a soft, dry cloth.
If the surfaces are extremely dirty, use a soft cloth dipped in a soap and water solution or a weak detergent solution.
- Never use alcohol, paint thinner or benzine to clean this unit.
- Before using chemically treated cloth, read the instructions that came with the cloth carefully.
Care of tape deck's heads
Clean the heads regularly to ensure good quality playback and recording. Use a cleaning tape (not included).
| CAUTION | - LASER RACTION WHEN OPEN, DO NOT STRAT IN MEAM. | FDA BY CPR / DOTS |
| CAUTION | - CLASS 70 VIBEL AND INMABLE LASER RACTION WHEN OPEN, DO NOT VIEW DIRECT WITH OPTICAL INSTRUMENTS. | RICHMOND AID CLASS 1M |
| VARNING | - KLASI 50 SYLUS OCH ONLE LEASER STRALING NAY DENNA DEL AN OPINAC, BETIMARJA EL STRALING DIRECT GENON OPTIKAT INSTRUMENT. | |
| FORSIGTIG | - SPC 600 OSVYKID LASERSTRA AG CLASS 50, NAR LAGIT EN ABIND, LUNGAT AT LEONE PARE MED OPTIKE INSTRUMENTAL. | |
| VARO! | - ANTIFERSIA ET AUTOM BUDION 10 MAYVYAR, MAYVYMATONE, LASERASTRONAL, ALA KATOO OPTICULA LAFTELLA SUJANAN SATEGENIL. | |
| VORSICHT | - SCHWARE UND JARDSTRAPE, ASSTRATHURG KLASE 1M, NEVA ANDEKAND GOSTRINE, NOCT DIRECT WTE OPTICOEN INSTRUMENTS RETRADED. | |
| ATTENTION | - RANKMENT LABOR WUBEET IR MINIBLE, CLARSE 1M, EN CAS STUARTURE, NO PAS REGRANER DIRECTMENT ALADE INSTRUMENTS OPTIQUE. | |
| PRECAUCION | - RANKION LASER WUBEET IR MINIBLE DE CLASS 3M, EL STAR ABIRIO, NO VIA DIRECTAMENTE CON INSTRUMENTOS OPTICOS. |
产品内部
目录
natural_image
Illustration of a hand pointing at a device with a magnified circular detail (no text or symbols visible)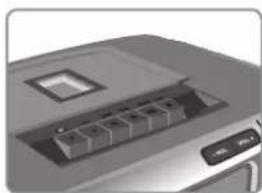
natural_image
Close-up of a printer's front panel showing internal components (no visible text or symbols)①磁带模式/待机开关
· 按此钮使本机进入待机状态。
② 播放模式功能
③ 数字键
natural_image
Close-up of a computer monitor with ports and buttons (no visible text or symbols)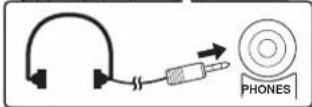
头戴耳机插孔 (PHONES)
插头类型:∅3.5mm立体声。
(非附件)
natural_image
Diagram of a mechanical assembly with a cylindrical component and a base plate (no text or symbols)R6/LR6, AA
基本播放
32 kHz, 44.1 kHz, 48 kHz
解码器
United Arab Emirates
United Arab Emirates (UB)
2 ال Compact الازر [US] ▶/II
(RX-D48 [MANUAL PRESET]) RX-D53 [PROGRAM] 1
"PGM" يتم عرض
(RX-D48 [MANUAL PRESET]) RX-D53 [PROGRAM] 3
[PROGRAM] ا Compact Anxiety 2
"PGM" يتم عرض
natural_image
Diagram of a mechanical component with a lid and base, showing no text or symbolsR6/LR6, AA
natural_image
Close-up of a printer's front panel showing internal components (no visible text or symbols)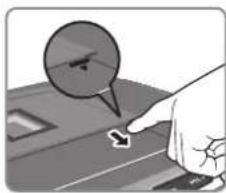
natural_image
Hand pointing at a device with a magnified circular detail (no text or symbols visible)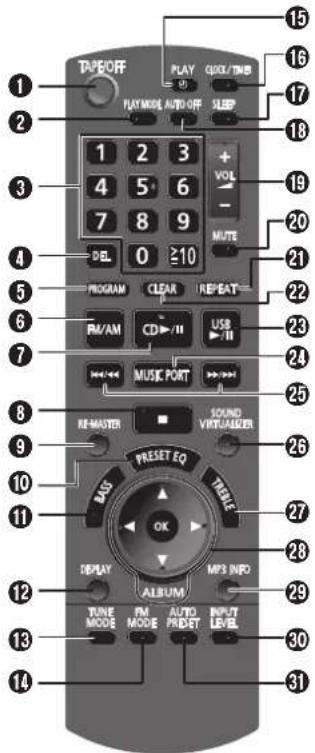
natural_image
Diagram of a computer mouse with internal components and a small button (no text or symbols)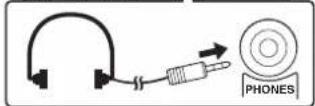
CLASS 1 LASER PRODUCT
CAUTION - LASER RADIATION WHEN OPEN.
DO NOT STARE INTO BEAM,
CAUTION - CLASS IN VISIBLE AND INVISIBLE LASER RADIATION WHEN OPEN, DO NOT VIEW DIRECTLY WITH OPEN. SYSTEMS, FORBORS
VAPRISO - © 485.1M SYN. II.2073 DAVN (I) INSTRATIVA ENO NADORA DE JAC/BRIN
WARNING BETRAKTA EU STRÅLEN DIREKT GENOM OPTISKIT INSTRUMENT
FORSIGTIG - SYN LIS OS UIMYLIS LASERSIPALINGS BLASS 14, NAR LÄGET EN
AGENT, UNIDUAL SERVICE PAREM OFFICE INSTRUMENTER.
VARO! - AINTAESSA OLET ALTINA LIJOKAN TM NAKYVAA JA NAKYMKTORTA, LASERSÄTERLYE. ALKATO OTERELI AS TITREI & SIKRAAN SÄTEESER
natural_image
Illustration of a portable electronic device with two speakers and a control panel, shown from front and side views (no text or symbols visible)- Portable Stereo CD System
- 携带式立体声 CD 音响系统
- CLASS 1 LASER PRODUCT
- Safety precautions
- WARNING!
- Unit
- CAUTION!
- Batteries
- Information on Disposal in other Countries outside the European Union
- Note on AC mains lead (RX-D53 only)
- Before use
- How to replace the fuse
- Table of contents
- Supplied accessories
- Power sources
- Using the household mains socket
- Note:
- Using batteries (not included)
- When to change the batteries
- Memory back-up
- Remote control
- Basic play
- Play Mode function
- Checking the track information
- Note about using a DualDisc
- Note on CDs
- Advanced play
- Repeat play
- To activate
- To cancel
- Program play
- Note on MP3
- Limitations on MP3 play
- Radio
- Manual tuning
- To improve FM sound quality
- Memory preset
- Automatic presetting
- RX-D53
- RX-D48
- Manual presetting
- Selecting a preset station
- AM allocation setting (by main unit only)
- USB (RX-D53 only)
- MP3
- Note on USB
- Recording
- Erasure prevention
- Setting the clock
- Using the play timer
- Using the sleep timer
- Sound effects
- Changing the sound quality
- Preset EQ
- BASS or TREBLE
- RE-MASTER
- Sound virtualizer
- Music port
- Preparation
- Level adjustment
- Troubleshooting
- Common problems
- Discs
- Cassette tape
- Amplifier section
- FM/AM tuner section
- Terminals section
- Disc section
- Cassette deck section
- USB section (RX-D53 only)
- Speaker section
- General
- Maintenance
- If the surfaces are dirty
- Care of tape deck's heads
- 目录
- 基本播放
- 解码器
Brand : PANASONIC
Model : RX-D48
Category : Radio